Sonosax Stelladat II User manual

Stelladat II
User's manual
Software version: 1.32
Last revision: October 24, 2000
This PDF document has been made
exclusively for printing. Thus the links
from the online user manual have not
been transposed as Acrobat links.
SAS S.A.
Ch. de la Naz 38
CH-1052 Le Mont (Switzerland)
www.sonosax.com

2
Table of Contents
1. INTRODUCTION & QuickStart Page 4
2. DESCRIPTION
Top Page 6
Front side Page 8
Left side Page 10
Right side Page 12
Rear side Page 14
3. HARDWARE SETUP Page 16
Battery Page 16
External Power Supply Page 16
Other Power Sources Page 17
Power On / Off Page 17
Lid Page 17
Loading a cassette Page 18
Configuration Page 18
Connecting Audio Sources Page 18
Analog source Page 18
Optimal gain Page 19
Modulation Page 19
Filters Page 19
Limiter Page 19
Overload LED Page 20
Panpots Page 20
Digital source Page 20
Time Code Page 20
WordClock Page 21
RS 422 Page 21
Accessory Socket Page 21
Monitoring Page 22
Headphone Page 22
Control Louspeaker Page 23
Slate Microphone Page 23
1kHz Tone Generator Page 23
Main Keyboard Page 23
Function Keys Page 25
LCD Display Page 25
4. SOFTWARE Page 26
Joystick Page 26
ESC Key Page 26
Stelladat II's Menus Page 26
Status Screens Page 43
JOG Mode Page 45
SHUTTLE Mode Page 45
Locator Page 46
CHASE Mode Page 47
REMOTE Mode Page 47
Audio Routing Page 48

3
5. APPLICATIONS Page 49
Pull-up, pull-down Page 49
Monitoring Page 50
6. SPECIFICATIONS Page 52
7. OPTIONS & ACCESSORIES Page 54
8. MAINTENANCE Page 56
9. TROUBLESHOOTING Page 57
Software Reset Page 57
Powering Software Reset Page 57
Error Messages Page 59
Frequently Asked Questions (FAQ) Page 64
10. PROM REPLACEMENT Page 66
Appendix A Page 73
Menu Tree Page 73
Appendix B Page 80
DRAWINGS & DIAGRAMS Page 80

4
1. Introduction & QuickStart
Your Stelladat II digital recorder has been designed to assure you many years of irreproachable
performances. Stelladat II's reliability is due as much to its solid mechanical engineering as to a
meticulous manual assembling of selected electronic components. The updatable software
management of the device's main elements allows you the use of sophisticated functions,
unthinkable until now on a recorder of that size, and guarantees you always access to the most
recent developments.
Stelladat II, portable DAT recorder, unique on the market offering you the choice of 2 and 4
tracks, features extremely advanced engineering and characteristics.
Stelladat II includes four mic/line inputs, all outfitted with legendary SONOSAX mic preamplifiers,
input gain control, limiters, low pass filters, pan pots and output level controls. These four inputs
can be routed towards two or four tracks, with or without panpot, depending on the application.
Stelladat II has a true 4 channels input mixer. Included is a tone generator, a slate microphone
and a control loudspeaker. To also maintain the reliability under difficult temperature or humidity
conditions, the recorder contains a tape scanner heater switching on automatically when
circumstances require it.
Stelladat II records and plays back at 44.1 kHz and 48 kHz (and at 96 kHz on option). It can also
use pull-up and pull-down sample frequencies (+0.1% and -0.1% ) to meet the requirements of
NTSC video.
While Time Code DAT machines have become notorious for their frequency instability, (Time
Code drift of 20 ppm is typical), Stelladat II is as stable as its Swiss analog predecessors (Time
Code drift < 2 PPM, typically < 1 PPM), and offers an optional High Stability (oven stabilized)
crystal providing frequency stability better that 0.1 PPM.
Unique circuit design allows Stelladat II to achieve unheard of power efficiency in a DAT
recorder. Stelladat II uses only 10 to 15 watts, depending on the configuration. The power saving
software allows you to power off the analog inputs one by one, the optical inputs and outputs and
the analog outputs. Power requirements in stand by are considerably lowered allowing many
hours of typical production from a single NP-1 battery.
Stelladat II has been designed and manufactured to meet the highest standards of reliability to
operate under very rugged conditions. If service should be required, its modular design allows
any module to be removed and replaced with one single 2 mm hex wrench.
Although Stelladat II has been particularly sturdily constructed and all precautions have been
taken to avoid any damage caused by incorrect use, we advise you to invest some of your time to
carefully read this user manual.
That being said, Stelladat II is not a complicated recorder and if you don't find the time to read
this user manual before your first recording, you most certainly will achieve to use it. Its basic
functionalities are very similar to these of other well known analog portable recorders.
Before recording
If you are in a hurry, before you go on to your first recording session with your new recorder, just
read these few fundamental, little restricting rules for an optimal and comfortable use of Stelladat
II's resources:
•Never attempt to carry any hardware modification or to take apart any module before
having studied the manual.
•Never try to touch or clean the tape scanner with any object. The 4 heads inside the
drum are very fragile and can be easily damaged. Operations on these elements can only
be executed by authorized service centers.
•To clean the heads, use a cleaning cassette (Ex.: SONY DT-10 CL or similar) and read
carefully the instructions enclosed with it. We recommend playing back the cleaning

5
cassette a few seconds only. Keep in mind that the tape scanner rotates at 2000
turns/minute.
•Avoid recording programs in different formats on the same tape (e.g 2 tracks 48 kHz
followed by 4 tracks 48 kHz). Although nothing forbids it in isolation, the transition from one
format to another requires a full switching of Stelladat II, needing a certain amount of time
and is likely to cause localization problems on the tape.
•A DAT cassette lifespan is not unlimited. Playback or recording on a worn cassette can
cause errors not only in the PCM parts (audio) but also in the subcode parts which can
lead to tape-locating problems.
•Whenever possible, avoid activating the RS422 port when it is unused.
When you use a battery, make sure that the recorder is correctly set (Power Menu > Battery
select). This precaution allows to select the correct battery manager program controlling the
switching off of Stelladat II whenever the battery is exhausted.
Always turn Stelladat II off when replacing a battery. Preferably take the battery out when you
use the external power supply.
It is normal that the power-on needs few seconds, necessary for the initialisation of the different
functions. Three microprocessors (four with the Time Code Option), two high quality AD/DA
convertors and highly sophisticated power circuits will have to communicate while you are
recording.
If you're working with Time Code, check in the Time Code Menu that the desired frame rate is
selected.
At this point, you are ready for your first recording. If anything is not working the way you
figured - don't shout: start to read this manual.
This user's manual will be updated with each new software release, allowing you to exploit to the
utmost the possibilities of your Stelladat II.

6
2a. Description - Top

7
CASSETTE TRAY
STAND BY POWER SWITCH
EJECT CASSETTE EJECT KEY
ESC ESCAPE KEY
JOYSTICK
REC / F5 RECORD KEY / FUNCTION 5
STOP / F4 STOP KEY / FUNCTION 4
PLAY / F3 PLAYBACK KEY / FUNCTION 3
FF / F2 FAST FORWARD KEY / FUNCTION 2
REW / F1 REWIND KEY / FUNCTION 1
LINK LINK CHANNELS 3 AND 4 KEY
OVD OVERLOAD LED FOR CHANNELS 1- 4
LINK LINK CHANNELS 1 AND 2 KEY
LEVEL CHANNEL LEVEL CONTROLS 1- 4
PAN PANPOTS CHANNELS 1 - 4
80 / LIN /120 HIGH-PASS FILTERS CHANNELS 1, 2, 3, 4
GAIN GAIN SELECTORS
12 / DYN/LIN / 48 LINE / MICROPHONE POWER SELECTOR

8
2b. Description - Front

9
LCD DISPLAY
LEFT / ST / 1-2 MAIN CONTROL CHANNELS 1-2
SLATE MICROPHONE
RIGHT / 3-4 MAIN CONTROL CHANNELS 3-4
MON DIRECT / TAPE KEY
DISP STATUS DISPLAY / *(LEVEL METER SWITCHING) KEY
*(FOR 4 TRACKS MODE)
PRG BLANK SEARCH ON /OFF KEY
REWIND / INDEX SEARCH BACK KEY
FAST FORWARD / INDEX SEARCH FORWARD KEY
RECORDING / POWER ON KEY
PAUSE KEY
STOP / POWER OFF KEY
PLAYBACK KEY

10
2c. Description - Left

11
LEFT / 1 IN ANALOG INPUT LEFT / CHANNEL 1
LEFT / 1 OUT ANALOG OUTPUT LEFT / CHANNEL 1
RIGHT / 2 IN ANALOG INPUT RIGHT / CHANNEL 2
RIGHT / 2 OUT ANALOG OUTPUT RIGHT / CHANNEL 2
3 IN ANALOG INPUT CHANNEL 3
3 OUT ANALOG OUTPUT CHANNEL 3
4 IN ANALOG INPUT CHANNEL 4
4 OUT ANALOG OUTPUT CHANNEL 4
L/1, R/2, 3, 4, ST/1-2, 3-4 MONITORING SELECTOR
PHONES HEADPHONE SOCKET
MS ON / OFF MS MATRIX SWITCH
STEREO / MONO MONITORING MONO / STEREO SELECTOR
HP ON / OFF CONTROL LOUDSPEAKER SWITCH
MON LEVEL MONITORING LEVEL CONTROL
12
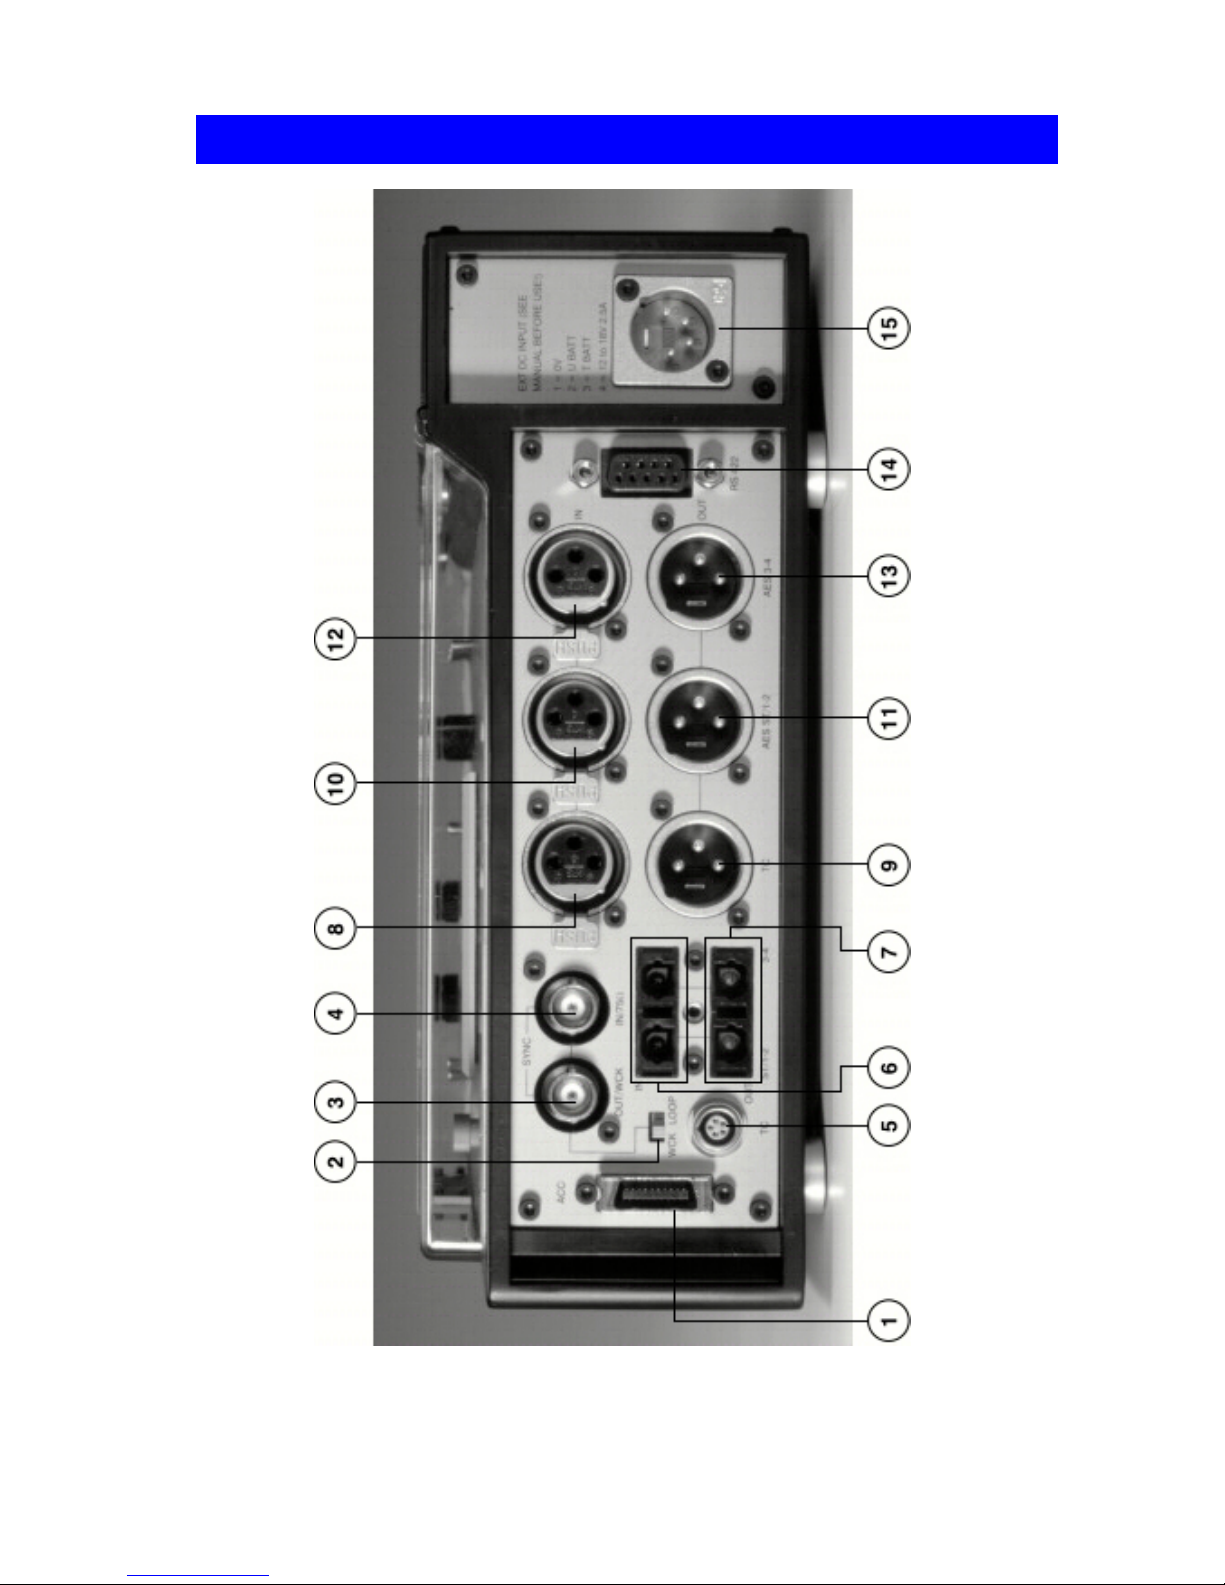
2d. Description - Right

13
ACC ACCESSORY SOCKET
WCK LOOP WORDCLOCK LOOP SWITCH
SYNC OUT /WCK SYNC / WORDCLOCK OUTPUT
SYNC IN / 75 SYNC / WORDCLOCK INPUT
TC SMPTE / AES-EBU TIMECODE INPUT / OUTPUT LEMO
SOCKET
IN ST / 1-2 3-4 DIGITAL OPTICAL SPDIF STEREO INPUTS / TRACKS 1-
2 AND TRACKS 3-4
OUT ST / 1-2 3-4 DIGITAL OPTICAL SPDIF STEREO OUTPUTS / TRACKS
1-2 AND TRACKS 3-4
TC IN SMPTE / AES-EBU TIMECODE XLR INPUT
TC OUT SMPTE / AES-EBU TIMECODE XLR OUTPUT
AES ST / 1-2 IN DIGITAL AES/EBU STEREO INPUT / TRACKS 1-2
AES ST / 1-2 OUT DIGITAL AES/EBU STEREO OUTPUT / TRACKS 1-2
AES 3-4 IN DIGITAL AES/EBU STEREO INPUT / TRACKS 3-4
AES 3-4 OUT DIGITAL AES/EBU STEREO OUTPUT / TRACKS 3-4
RS 422 SONY 9-PIN STANDARD RS 422 SOCKET
EXT DC INPUT EXTERNAL DIRECT CURRENT POWER SOCKET

14
2e. Description - Rear

15
BATTERY (LITHIUM ION 14.4 V RECOMMENDED)
CONTROL LOUDSPEAKER

16
3. Hardware Setup
Inserting A Battery
Stelladat II uses NP-Format batteries. These different types are suitable:
•NP-1B 12 V Ni-Cd and similar
•NPX 13.2 V Ni-Cd and similar
•NP-L40 (see note) or NP-L46 14.4 V Lithium Ion and similar (Recommended)
It's necessary to configure the device for each of these types of batteries (See Software >
Power Menu > Battery Select).
Some batteries don’t respect the NP-Standard in size and are thus too short, too long
or too thick. These batteries cannot be used on Stelladat II.
The battery holder is located on the rear side of the recorder.
Insert the battery into the holder watching over the insertion direction. To do this, first slide the
battery into the left side of the holder, the arrow on top, pointing towards the loudspeaker of the
device. Push lightly on the vertical side of the battery near the arrow and the battery will insert
correctly.
DO NOT CONNECT THE NEGATIVE POLE OF THE BATTERY TO THE
GROUND OF THE DEVICE !
Powered with a 46 Wh Lithium Ion battery, Stelladat II provides e.g. more then 3 hours of
continuous recording.
Note : By wrongly inserting the cable of the external power supply, you may cause a short
circuit between pins 1 and 4 of the external DC power socket. If an IDX NP-L40 battery is in
the holder, this causes an apparent « dead » state of the NP-L40. To correct the problem,
insert the battery once into the charger. The problem has been corrected by IDX for NP-L46.
Removing A Battery
To remove a battery, grab it between your index finger and your thumb through the side
openings of the holder and push lightly back. Then lift the battery to extract it from the holder.
Connecting The External Power Supply
The power supply provided with Stelladat II, to be connected on 100-240V 50/60Hz AC main,
delivers 12V DC. Connect the XLR-4 plug of the supply to the external DC power socket.
If the external power supply is connected while a battery is in the holder, Stelladat II
switches automatically to the external power supply. Preferably take the battery out
when you use the external power supply.
17
Connecting Other Power Sources
Stelladat II can be powered from another DC source. Here is the pin out of the external DC
power socket (XLR-4):
1 0 V TO USE
2 U Batt
3 T Batt DO NOT USE
4 8.8 V* - 18 V DC / 2.5 A TO USE
*)10.8 V with High Precision Oscillator Option
To keep its maximal performances, Stelladat II must use a separate power source
(avoid using one source for several appliances).
Power On
Po
Stelladat is turned on with the STAND BY key (page 6), located on the top of the device.
Depending of the position of its use, it can also be switched on with the REC key (page 8)
located on the front side of the recorder. The power on takes few seconds, necessary to initialize
different functions.
Power Off
Stelladat II is turned off with the STAND BY key (page 6). The STOP key (page 8) can
also be used for powering off. As a safety measure, switching off by this mean needs to hold the
key for at least 3 seconds.
Opening The Lid
To open the lid, pinch the locker between thumb and index finger. Closing the lid works the
same way.
Extracting The Lid
For interior or studio use the transparent lid can be extracted to facilitate access to the elements
located on the device's top side. Open the lid placing it in the upright position and pull up gently :
the hinges release from their slot. Store the lid where it cannot be scratched.
To put the lid back in place, grab one hinge with each hand, holding it upright and insert gently
the hinges into their respective slot. Push down softly until you hear a click.

18
Loading A Cassette
Press the EJECT key (page 6). The cassette tray opens. Insert the cassette into the tray in
the direction of the arrow. Close the drawer pushing down gently until you hear a click. The
cassette is loaded.
Use professional DAT cassettes only. Don't use cassettes longer than 120' (thinner
tape).
A DAT cassette's lifespan is not unlimited. Playback or recording on a worn
cassette can cause errors not only in the PCM parts (audio) but also in the subcode
parts which can lead to tape locating problems.
Configuring Stelladat II
Stelladat II can be configured in 2-tracks or 4-tracks mode, using various sample frequencies
(Configuration Menu > Working Cfg > Working mode). Moreover, each mode offers several
routing configurations of the inputs towards the tracks. Mode and audio routing configuration is
carried out by software (Configuration Menu > Audio Routing).
Connecting Audio Sources
Stelladat II was designed to support all types of analog and digital audio signals. The selection of
audio type source, analog or digital is carried as well by software (Configuration Menu > Working
Cfg > Source select).
Analog inputs and outputs are located on the left side of the recorder. Digital inputs and outputs
are located on the right side.
Connecting an Analog Source
Before connecting a source, set the Line / Microphone Power Selector (page 6) of the
selected input to the position corresponding to the signal to be connected. Set the selector to the
center position (DYN/LIN) for dynamic microphones or line level signals. Place the selector to the
left for microphones requiring T12 V powering. The right position is for microphones with a
phantom +48 V powering.
To avoid overload of the pre-amps, place the gain selector (page 6) in its 0 position.
Insert the XLR-3 plug into the , , or (page 10) selected input.

19
Optimal Gain Setting
The gain selectors (page 6) allow to set the amplification of the analog inputs of the recorder
in a range of 70 dB by steps of 14 dB. The Overload LED's detect too hot signals for each
input. When a LED lights up, the gain has to be decreased until the LED goes out. The fine gain
setting is done with the Channels Level Controls .
Maximal input level: + 18 dBu.
In order to save energy, the analog outputs of Stelladat II are OFF by default. To
switch them on by software, see Power Menu, > Analog Power > Outputs.
The output level of Stelladat II depends on the software selected dB scale (Setup
Menu > Display > dB scale). See Output Levels Table on page 74.
Level Setting
For this setting the Main Controls and (page 8) must be set into their 0 position. Adjust the
channel level control (page 6) until the LED lights up, then turn gently back until the LED
goes out.
Modulation Setting
The modulation setting is carried out by the Main Controls and (page 8) , depending on the
software selected audio routing (Configuration Menu > Audio routing).
In four-tracks configuration the main controls have effect on the input channels 2 by 2 (1-2 and 3-
4). In stereo or double-stereo configuration, or for other applications, the channel level controls
can be linked 2 by 2 with the LINK switches ( and (page 6).
Filters
Each analog input has a two-position High Pass Filter (page 6): 80 Hz and 120 Hz. These
filters have a slope of 12 dB/octave. The LIN position of the selector sets the filters off and leaves
the signal unchanged.
Limiter
Each input module includes a limiter. These limiters can be switched on or off by software (Setup
Menu > Limiter). Their default configuration is ON.
Stelladat II's limiters, designed from the legendary limiter of the SXS portable mixer offer a large
modulation reserve. Their use allow not to hesitate to modulate hot, not for all that to risk an
overload. They're protecting the AD converter from overloads and limit the signal to -2 dBFS.
The limiters can be set OFF whenever the signal level is predictable (rehearsed recordings). For
voice, news, documentary or feature recordings they can stay constantly on. Their acting will be
absolutely inaudible by brief overmodulations.

20
Overload LED's
The Overload LED's (page 6) light up 4 dB under the input's overload level. The input level is
measured at the preamp's output, after the filter.
Panpots
The Panpot's (page 6) function is to distribute the incoming signal towards the tracks. Their
working depend on the selected audio routing configuration (Configuration Menu > Audio
routing). In some configurations, they're ineffective.
Connecting A Digital Source
The digital AES/EBU format is supported at the inputs and outputs of Stelladat II.
The digital inputs are located on the right side of the recorder.
The digital input sockets (page 12) for tracks 1 and 2 and for tracks 3 and 4 are XLR-3, as
are the digital output sockets (tracks 1 and 2) and (tracks 3 and 4).
The optical digital in- and outputs are usually covered by a protective plate main-tained in place
by a knurled-head screw. The sockets are the optical inputs for tracks 1 - 2 and 3 - 4 and the
sockets are the outputs.
In order to save energy the optical digital in- and output's default configuration is OFF. They can
be turned ON by software (Power Menu > Optical).
By simultaneous connecting of signals on both types of digital inputs, optical and
XLR, the signal connected to the optical sockets has priority.
No level setting is necessary on both types of digital inputs, thus the signal is recorded at its
nominal level.
Connecting Time Code
Stelladat II has on option an internal Time Code generator accepting all usual formats at in- or
output:
•30 non-drop
•30 drop
•29.97 non-drop
•29.97 drop
•24
•25
The generator is also designed to regenerate incoming Time Code (JAM SYNC function). So the
user, configuring the recorder in the Time Code Menu, can select a setting perfectly adapted for
his application.
The Time Code can be connected to two types of sockets, at user's choice. In the case of two
Time Code signals connected simultaneously to both types of input sockets, the Lemo socket
Table of contents
Other Sonosax Voice Recorder manuals


 operating instructions")


