Sonuus Voluum User manual

Owner’s Manual
Analogue Volume Effects
Stomp Box for Guitar and Bass
®
Version 1.1.0

2 © Copyright 2014 Sonuus Limited Voluum
Owner’s Manual
Safety — read this first!
Important safety information. Read the following information carefully and keep all instructions for
future reference.
!
Do not open any part of the Voluum case other than the battery compartment. There are no
user-ser iceable parts in the Voluum.
!
Do not expose the Voluum to rain, liquids or moisture of any kind. If this occurs, disconnect the
Voluum from your computer, power supply, and from your musical instrument and remo e any
batteries then allow the unit to dry out completely before using it again. If any liquid has entered the
unit, it may need to be ser iced by a sonuus engineer or authorised repair centre.
!
When the Voluum has been stored in a cold en ironment (
e.g.,
a car) then exposed to a warmer
en ironment (
e.g.,
a warm room), condensation can form on the outside and inside of the Voluum.
In such cases the Voluum should be allowed to warm up to room temperature before use to ensure
any such condensation has e aporated.
!
A oid getting anything,
e.g.,
an instrument cable, trapped under the footpedal—this will cause
damage to the Voluum footpedal sensor.
!
Only use the correct type of power supply (see “Powering the Voluum” on page 10). The Voluum
must ne er be connected directly to mains electricity.
!
Do not drop the Voluum or expose it to excessi e shock or ibration. This may cause damage to
the electronics inside the unit.
!
Do not put excessi e weight onto the footpedal of the Voluum. It is designed to be foot-operated,
but not to bear excessi e loads. Do not allow your foot to press on the control panel area because
this may damage it. The Voluum has protection bars to pre ent your feet from accidentally pressing
this area but this cannot pro ide complete protection—you must still take reasonable care when
using the product.

Voluum © Copyright 2014 Sonuus Limited 3
Owner’s Manual
uick start
This manual is a comprehensi e guide to the Voluum. To start using it as quickly as possible, follow
this short guide. Please refer to the rest of the manual for detailed operating instructions.
Connect your guitar/bass to the
IN
jack of the Voluum.
Connect your amplifier to the
OUT
jack of the Voluum.
Set the
LOCK
switch to the locked position (this lets you select presets without worrying about
editing them by mistake).
Connect a suitable power supply: 9V
DC
,
USB
or batteries (see “Powering the Voluum” on
page 10).
Select the first factory preset by pressing the button until F00 is shown on the numeric display.
Tap the footswitch to enable the effect. The footswitch
LED
will light up.
Rock the footpedal back and forward while you are playing to obtain a classic olume effect. As
you rock the footpedal from the “heel-down” position to the “toe-down” position the output olume
is increased.
Next, start exploring other presets using the and buttons. There are 30 factory presets labelled
F00–F29, then 100 user presets labelled P00–P99. If you press and hold or you can increment
or decrement in steps of 10 so you can quickly select the preset you want.
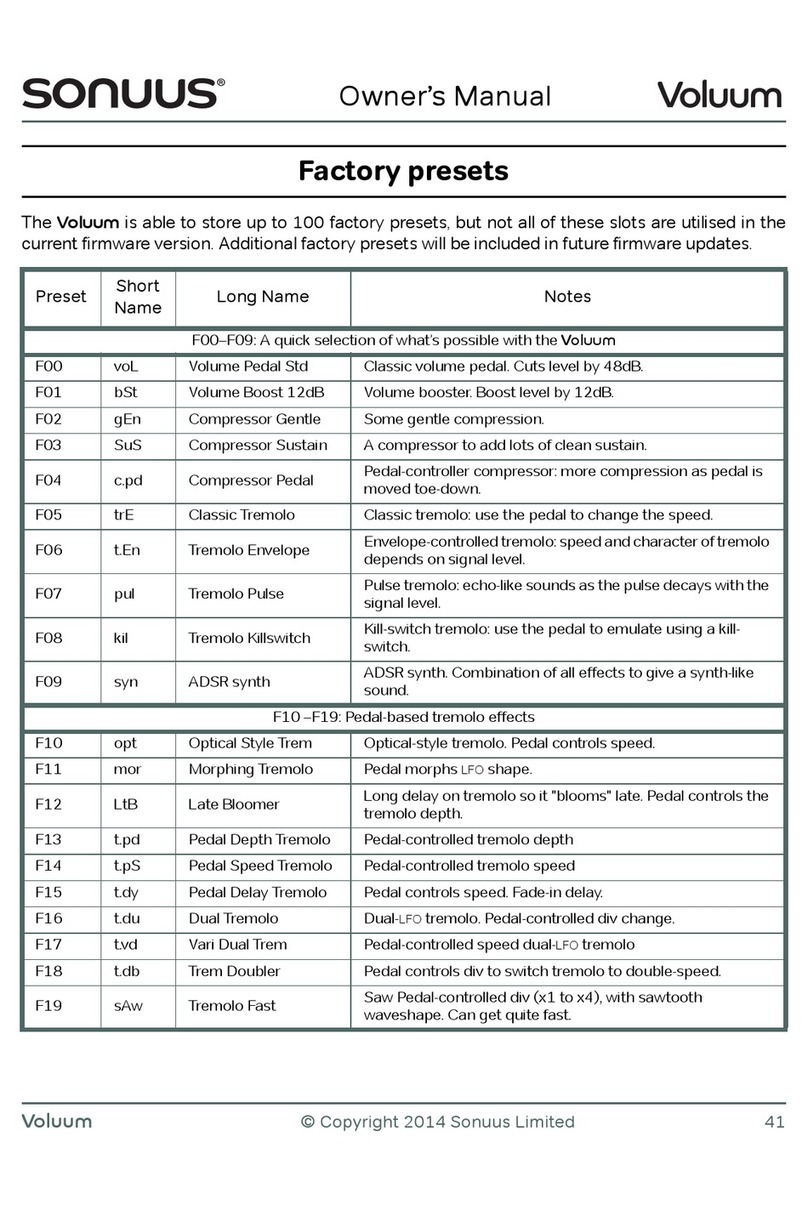
To get started, we suggest you try the first 10 factory presets:
Preset escription
F00 Classic olume pedal.
F01 Volume boost: use the pedal to add up to 12dB of gain to your signal.
F02 Gentle compressor.
F03 Clean sustain compressor.
F04 Pedal-controlled compressor: more compression as pedal is mo ed toe-down.
F05 Classic tremolo: basic tremolo, use the pedal to change the speed.
F06 En elope tremolo: speed and character of tremolo depends on signal le el.
F07 Pulse tremolo: echo-like sounds as the pulse decays with the signal le el.
F08 Kill-switch tremolo: use the pedal to emulate using a kill-switch.
F09
ADSR
synth. Combination of all effects to gi e a synth-like sound.

4 © Copyright 2014 Sonuus Limited Voluum
Owner’s Manual
Welcome
Thank you for purchasing a sonuus Voluum. Like all sonuus products, the Voluum is the culmination
of ground-breaking inno ation and considerable technical expertise. We are delighted that you ha e
chosen to purchase a sonuus Voluum and we anticipate that it will greatly enhance your music
making. This manual is a comprehensi e guide to the Voluum but if you ha e any questions, we offer
attenti e customer support ia our on-line user forum:
www.sonuus.com/forum
The Voluum is an analogue olume effects stomp box. It is packed with inno ations from the sonuus
Research Team.
Analogue signal path with digital control
The Voluum’s fully analogue signal path features a high-performance studio-grade oltage-
controlled-amplifier (
VCA
) with low noise and low distortion characteristics. A constant high- oltage
analogue power supply gi es maximum analogue performance and high headroom to ensure e en
the loudest signals can be processed without artifacts. This high bandwidth, high dynamic range
signal path guarantees the smooth sound of analogue circuitry with no digital artifacts.
Combining the analogue signal path with digital control gi es you precision and configurability.
Flexible effects chain
The effects chain comprises fi e effects (noise gate, compressor,
LFO
(tremolo), olume control and
limiter) which can be used in any combination.
Unique patent-pending pedal sensor
Most olume pedals operate using a potentiometer (a pot) which has two main problems: the pot
sucks the tone from your instrument, and it wears out quickly resulting in the effect becoming
scratchy. Pots also ha e mechanical couplings which limit fine control and let dirt inside the unit, so
compromising reliability.
Some other olume pedals use optical methods to a oid the limitations of pots, but these are
susceptible to dirt and often don't ha e fine control or fast response.
sonuus' patent-pending position sensor allows fast, super-fine precision control that isn't susceptible
to dirt and grease. As a result, the pedal control on the Voluum won’t get scratchy and will ne er
wear out. Combined with ultra-smooth pedal action with user-adjustable tension, in a rock-solid
chassis, the Voluum gi es you unri alled signal le el control.
For guitar and bass
The Voluum is designed from the ground up to be perfect for guitar and bass. We know that many
musicians play both instruments and don’t want to compromise when an effect is designed for the
higher or lower frequencies of specific instrument. Of course, the Voluum can also be used on other
instruments such as keyboards. You don’t need to restrict your creati ity to guitar and bass!

Voluum © Copyright 2014 Sonuus Limited 5
Owner’s Manual
Transparent-true-bypass…
True-bypass means that the effect is completely switched out of your signal chain when bypassed
to preser e the integrity of your guitar/bass signal. This is typically done by mechanical switches but
these cause clicks or pops when switching.
sonuus has designed a silent-switching true-bypass circuit so you get the benefits of true-bypass
without the associated switching noise. What’s more: if the power to the Voluum is interrupted, the
unit will automatically switch back to the bypassed state so you don’t lose your instrument’s signal.
…with the option of buffered-bypass
Howe er, not e eryone wants true-bypass. With the Voluum you ha e control o er whether you
want to use true-bypass, or buffered-bypass. Buffered-bypass keeps the Voluum in the signal path
at all times, but passes the input signal without modification when the effect is bypassed. This can
be useful when using long cables: the buffered output of the Voluum means these long cables won’t
affect your tone, e en when the effect is bypassed.
Stage-ready
The Voluum is designed to be ideal for gigging on stage:
• Hea y-duty cast aluminium case that will stand up to years of hea y use.
• The pedal won’t decide to get scratchy just before a crucial gig!
• Variety of power sources: any polarity 9V for maximum con enience,
USB
and high-capacity AA
batteries.
• Foot-operated preset selection.
•
LOCK
switch to pre ent accidental changes to settings or presets.
Presets
The Voluum comes ready-to-play with factory presets that include traditional olume effects and
pedal-controlled compressor effects. Without making any adjustments, the Voluum is ready to play,
straight out of the box.
The factory presets are just the starting place! By tweaking these presets you can explore different
sounds and create your own effects—there are 100 user presets where you can store your own set-
ups.
www.sonuus.com
We recommend that you isit our web site and register your new Voluum. This is required for direct
warranty support. Once you ha e registered, you ha e access to firmware updates, the Voluum
Desktop Editor Software and you can opt to recei e updates and news from sonuus:
register.sonuus.com
To get assistance or to share your experiences with other Voluum users, register on our user forum:
www.sonuus.com/forum

6 © Copyright 2014 Sonuus Limited Voluum
Owner’s Manual
What can the Voluum do?
Gate/expander
In its simplest form a noise gate cuts the signal when its le el falls below a set threshold. The Voluum
noise gate not only gi es you control o er the threshold, but also enables fine control o er how
quickly it reacts and how much the signal should be reduced in le el. Combined with a smooth
transition from open to closed, the Voluum gi es you ultra-transparent gating that reduces the noise
when you're not playing without introducing any audible artifacts.
Pedal-controlled compressor
Compression is a widely-used effect that compresses the dynamic range of your signal. Essentially,
it is used to keep the le el of your instrument consistent, regardless of how hard or soft you play. It
does this by reducing the le el of loud signals, and applying a make-up gain to ensure the apparent
loudness stays the same.
The compressor in the Voluum features an intelligent make-up gain which means you only need to
think about how much compression you want to apply. This also allows dynamic modulation of the
compressor. For example, by using the foot pedal you can smoothly ary the amount of compression
being applied without affecting your signal le el – another unique sonuus inno ation.
Variable attack and release times let you configure the effect to suit your performance and e en
these can be pedal-controlled.
While other compressors are either on or off, the Voluum’s compressor gi es you glitch-free pedal-
control to enhance the subtleties of your music.
LFO/tremolo
Tremolo is a classic effect where a low-frequency-oscillator (
LFO
) modulates the olume of your
instrument.
The Voluum
LFO
(tremolo) lets you recreate this effect, while gi ing you many more options. Smooth
tremolo sounds with multiple wa eforms featuring en elope-, pedal- and
MIDI
-controlled speed and
depth ariation, as well as
MIDI
-clock sync to keep the tremolo in time with your sequencer.
Duo mode gi es you two
LFO
s to let you get really creati e!
Volume—more than a simple volume pedal
A typical olume pedal gi es you basic control of your signal le el where the pedal replicates the
function of the olume knob on your instrument.
The olume effect on the Voluum lets you do the same thing, but without compromising your tone.
But just doing that would be boring! Voluum lets you cut or boost the signal le el to any le el you
desire while pro iding fine control o er the feel of the pedal: how its position maps to the olume
change. You can also configure fades where the pedal acts as a switch and the olume fades up or

Voluum © Copyright 2014 Sonuus Limited 7
Owner’s Manual
down smoothly o er a chosen time to gi e you super-smooth fades that are impossible to do by
using just foot-control.
In en elope mode, the le el change is triggered when you play a new note or strum a new chord.
Combine this with built-in
ADSR
shaping and you can create synth-like tones from your instrument.
Limiter
The high oltage analogue power rails in the Voluum gi e great sonic quality, but it means that high
output le els can o erdri e other effects in your chain. The limiter can be engaged to soft-limit the
signal peaks to keep them within the input range of your other effects to a oid nasty clipping
distortion.
The limiter can also limit asymmetrically, which can gi e o erdri en signals a sweeter sound.
Control
Unlike other analogue stomp boxes, the effects on the Voluum are not static, where you adjust the
parameters to get the one sound you want
Instead, the Voluum has been engineered to make many aspects of each effect controllable so that
effect parameters can smoothly go between hi and lo alues that you choose. This modulation can
be controlled using the pedal,
MIDI
controllers or the signal envelope. (See “Effect control methods”
on page 17.)
USB & MIDI interface
The Voluum has a
USB
connection and standard 5-pin
MIDI
connections. You can send
MIDI
to
the
Voluum to control effects, or send
MIDI
from
the Voluum to control other
MIDI
de ices.
USB
-
MIDI
allows
MIDI
messages to be sent straight to a computer, whereas the 5-pin
MIDI
connections
make it easy to connect the Voluum to other
MIDI
equipment.
The
USB
connection also allows you to use the Voluum Desktop Editor Software and to use the
Voluum as a
USB
-
MIDI
interface to connect
MIDI
gear to your computer.
Desktop Editor Software
Although you can access all of the effect parameters from the Voluum’s control panel, to make it
faster and e en more intuiti e, we pro ide a Desktop Editor Software application that runs on both
Microsoft Windows and Apple OSX.
The Desktop Editor Software is a ailable once you register on-line: register.sonuus.com

8 © Copyright 2014 Sonuus Limited Voluum
Owner’s Manual
Using the Voluum
In the rest of this manual, we co er e erything you need to know about the Voluum: from how to
connect it to your rig, to how to power it and how to del e in and create your own presets.
Consult the photo of the Voluum shown below to familiarise yourself with the controls and displays.
Cancel an edit / selecting preset mode
If you mo e or press a knob or touch the acti e or hi/lo buttons, the Voluum will lea e
Preset Select mode and enter Preset Edit mode. (Now the buttons won’t let you select
presets.)
The button named save has dual functionality. When held for 2s, it acts as a cancel button.
This lets you undo any preset editing you ha e done and takes you back into Preset Select
mode.
footpedal
footswitch
footswitch
LED
numeric display
up/down buttons
sa e/cancel button
acti e button
metering
LED
s
effect knob
control button
hi/lo button

Voluum © Copyright 2014 Sonuus Limited 9
Owner’s Manual
Connecting the
Voluum
The simplest way of connecting the Voluum is between your guitar and amp: connect the output of
your guitar to the input (
IN
) of the Voluum. Connect the output (
OUT
) of the Voluum to your amp’s
input.
When using other effects in your signal chain, there is no right or wrong effect order—experiment
to see what you can do, and be creati e.
Typically, time-based effects such as re erb and delay are placed after the Voluum so that these
effects are applied to the Voluum’s sound.
When using distortion, the effect of connecting this before or after the Voluum are different. When
distortion is used after the Voluum, the intensity of distortion can change as the signal le el is
modified by the Voluum. When distortion is placed before the Voluum, the Voluum is able to shape
the harmonically-rich signal from the distortion without changing the intensity of the distortion.
You can also connect the Voluum to the effects loop of your amp: connect the output of your guitar
to the input of your amp, then connect the “send” of your amp to the Voluum
IN
, and the
OUT
of the
Voluum back to the “return” of your amp. Depending on your amp this can gi e rise to excessi e
noise if the signal le el in the effects loop is too small. If you try this, it is best to set the effects loop
le el to +4dBu if you ha e that option.
MIDI
operation using the
USB
connector or the
MIDI
IN
and
MIDI
OUT
connectors is detailed in “
MIDI
operation” on page 33.

10 © Copyright 2014 Sonuus Limited Voluum
Owner’s Manual
Powering the Voluum
The Voluum can be powered by batteries, by a 9V
DC
power supply (neither of these is supplied), or
by
USB
. Select one of the following:
• insert 4 AA batteries (alkaline can be used, but we recommend rechargeable NiMH batteries)
into the battery compartment in the base of the Voluum. WARNING: obser e correct polarity!
• plug the output of a 9V
DC
power supply into the port labelled
DC
on the back of the Voluum.
The 9V
DC
power supply that you use should be capable of pro iding 500mA and ha e a
2·1mm centre pin connector. Note that the Voluum has been designed so that either polarity
(tip-positi e or tip-negati e) can be used.
• plug a
USB
cable connected to your computer or a
USB
power supply into the port labelled
USB
on the back of the Voluum. If a
USB
hub is used, it may need to be a powered hub to ensure it
can pro ide enough current to the Voluum. Howe er, sometimes
USB
power (typically desktop
PC
s) can be noisy or can cause ground loops, which may increase the noise in your signal. If this
happens and you want to use the
USB
connection, simply connect a 9V
DC
power supply and
the Voluum will use that instead of
USB
power and you won’t get these noise problems.
Note that there is no problem if you connect all three power sources at once. The
DC
supply takes
priority, then
USB
, then the batteries. This ensures your batteries are not drained when they are not
needed and allows you to connect ia
USB
without using
USB
power when a
DC
supply is present.
The Voluum is switched on when you connect
USB
or
DC
. When running from batteries, the Voluum
is switched on when an instrument cable is connected to
IN
. To prolong battery life, disconnect the
cable from
IN
when the Voluum is not being used.
LOCK
switch
On the back panel of the Voluum there is a slide switch labelled
LOCK
. When this switch is in the
locked position, the Voluum is in Preset Select mode and none of the parameters can be edited or
sa ed: the only thing that you can do is change between presets. If you try to make a change when
locked, LoC is shown briefly on the numeric display.
LOCK
mode is ideal for gigging, when you want to switch from one preset to another but be sure that
you won’t accidentally make changes to your set-up. When the
LOCK
switch is in the unlocked
position, you can tweak the Voluum settings and sa e new presets.
Top Tip: If you are using the Voluum on stage, use a
DC
power supply and batteries. That
way, if the
DC
power supply is pulled out for any reason, the Voluum will switch
to batteries and you will, in effect, ha e an un-interruptible power supply.

Voluum © Copyright 2014 Sonuus Limited 11
Owner’s Manual
Enabling and bypassing the Voluum
The main footswitch
LED
shows the status of the Voluum effect.
When this
LED
is off, the effect is completely bypassed and the input (
IN
) is directly connected to the
output (
OUT
). This connection is known as a true-bypass connection because in this state none of
the Voluum electronics are connected to the signal: this keeps your original guitar/bass signal as
pure as possible. (Unless buffered-bypass mode is enabled, see “Custom settings” on page 35,
where the Voluum electronics are acti e, but ha e minimal effect on your signal.)
When this
LED
is on, the signal is passed through the Voluum and the output (
OUT
) is the effected
signal.
The effect is enabled and disabled by briefly pressing the footswitch. Alternati ely, when the
footpedal is mo ed to the toe-down position, the effect will automatically enable. Note that this
feature can be changed using the custom settings (page 35).
Note that if the main footswitch
LED
is flashing, it means the Voluum is in foot-operated preset
selection mode (see page 13).
Footswitch LED
Off: Effect is completely bypassed (the Voluum has no effect on your sound).
On: Effect is acti e and the Voluum will affect your sound.
Flash: Foot-operated preset selection mode is acti e. The bypassed/enabled state of
the Voluum does not change in this mode but remains in whiche er state it was
in before this mode was acti ated.
True-bypass or buffered-bypass?
O er the years, there has been much discussion about which is better: true-bypass or
buffered-bypass. The answer is: it depends.
Buffered-bypass has the ad antage that the low-impedance output of the buffer can dri e
long cable runs without these cables affecting your tone.
True-bypass, on the other hand, ensures the effect has no impact on the instrument signal;
useful with large effects rigs where you may want all the pedals to be true-bypass to
minimuse their impact when bypassed.
Ultimately, you should use whiche er bypass setting sounds best in your rig. It depends on
your instruments and the other pedals in your chain, and indeed, the order of these pedals.

12 © Copyright 2014 Sonuus Limited Voluum
Owner’s Manual
Selecting a factory preset
The factory presets configure the Voluum into a ariety of set-ups, from traditional olume to
sonuus’ unique pedal-controlled compressor effects.
The Voluum has two modes: Preset Select mode and Preset Edit mode. By default, it is in Preset
Select mode and the display alternates between the 3-character preset name and the preset
number: either F00–F99 for factory presets 0 to 99 or P00–P99 for user presets 0 to 99.
If the display does not periodically show F/P00–99, then to enter preset mode do the following.
Once the Voluum is in Preset Select mode, select a preset using the buttons. A single press on
either button will increment/decrement the preset number by one. If you press and hold either
button, the preset number will increment/decrement in tens.
Your Voluum is now ready to play. Select different presets and experiment with the wide ariety of
sounds that are possible.
While you are playing, you may accidentally bump a switch or button which will take you into Preset
Edit mode. To pre ent this, and stay in Preset Select mode, you can slide the
LOCK
switch to the
locked position. Alternati ely, just re-enter Preset Select mode as described abo e.
Enter Preset Select mode
If the display is not showing a factory or user preset (F00–F99 or P00–P99), the Voluum is
in Preset Edit mode: exit this mode by pressing and holding the save button for 2s.
Alternati ely, slide the
LOCK
switch to the locked position (the Voluum is always in Preset
Select mode when locked).
Top Tip: Presets can also be selected using the footswitch and footpedal on the Voluum
(see “Foot-operated preset selection” on page 13) or by connecting external
footswitches (see “External footswitch connection” on page 37).
Top Tip: En elope-controlled presets (including gate and compressor) ha e been
designed for an instrument with a standard output le el. If your instrument has
an unusually high or low output the presets may not sound correct—either too
responsi e or not responsi e enough. Use the custom SEn parameter to adjust
the sensiti ity of your Voluum (see page 35).

Voluum © Copyright 2014 Sonuus Limited 13
Owner’s Manual
Foot-operated preset selection
Preset selection using the buttons and the save button was described in “Selecting a factory
preset” on page 12. There is an alternati e method of preset selection using the footswitch and the
footpedal. This has been specially designed to make it easy to change presets when you are gigging.
Using this method, you don’t ha e to bend down and select presets using your hands.
Preset selection using the footswitch and footpedal
Enter preset mode by pressing and holding the footswitch until the footswitch
LED
flashes.
The time you ha e to hold for has a default alue of 2s, howe er this is a custom parameter
that you can change (see “Custom settings” on page 35).
To increase the preset number, put the footpedal in toe down position (the button
LED
flashes to show that the preset number will increase) then tap (press and release) the
footswitch the desired number of times until you reach the preset number you want. To
decrease the preset number, mo e the footpedal to heel down position (the button
LED
now flashes) then tap the footswitch until you reach the preset you want.
When you ha e reached the preset number you want, you can play and e en change
presets while playing. Howe er, while in preset select mode you can’t enable or bypass the
effect: to do this you ha e to exit preset mode by pressing and holding the footswitch until
the footswitch
LED
stops flashing. The hold time to exit preset mode is the same as the hold
time to enter it.
Preset selection with the footpedal in effect on/off mode
When the footpedal is configured to be in effect on/off mode (setting the custom
parameter P.En to o.Lo or o.hi — see “Custom settings” on page 35) the method
described abo e is replaced by another method. In this case, the footpedal is not used and
foot-operated preset selection is always acti e. In addition, the footswitch is no longer used
to enable/disable the effect.
Like the method described abo e, the footswitch is used to increment or decrement the
preset (the direction being shown by the flashing of the or button
LED
s). A long press
on the footswitch (default press time of 2s) will toggle the direction of preset selection.
Note 1: In foot-operated preset selection mode, you can only step through the presets one
at a time (not in tens as you can if you use the and save buttons). We therefore
recommend that for a gig, you make sure that you sa e the presets you want to use close
in number to one another.
Note 2: In foot-operated preset selection mode, you can still use the buttons as
normal to select presets, and to increment/decrement in 10s if required.

14 © Copyright 2014 Sonuus Limited Voluum
Owner’s Manual
“Preset-Bypass” mode
Normally when the Voluum is bypassed, the sound of your instrument is not modified, allowing you
to turn your selected effect on and off. Howe er, preset-bypass mode is a way to select a global
preset that becomes acti e whene er the main effect is bypassed (the Footswitch
LED
is off).
As described in “Enabling and bypassing the Voluum” on page 11, the Voluum can operate in true-
bypass, or buffered-bypass mode. A third option “preset-bypass” can also be selected (see “Custom
settings” on page 35).
In preset-bypass mode, you choose a global preset (one of the existing factory or user presets) that
becomes acti e whene er the Voluum is bypassed. This allows you, for example, to use the Voluum
as a olume pedal or a gentle compressor when bypassed (the effect is off) then switch to any other
effect when the effect is enabled.
Using Preset-Bypass mode
Preset-bypass mode is only acti ated when the
LOCK
switch is enabled. When
LOCK
is
disabled, the Voluum will operate in buffered-bypass mode whene er preset-bypass mode
is selected.
The reason for this is to allow you to do A/B comparisons between the bypassed dry signal
and the effected signal when you are editing presets (which has to be done with
LOCK
disabled).

Voluum © Copyright 2014 Sonuus Limited 15
Owner’s Manual
Creating your own presets
You can create and store up to 100 user presets on the Voluum. The steps for creating a preset are
straight-forward.
Creating and sa ing a user preset
Ensure that the
LOCK
switch is in the unlocked position. Starting from any preset (factory or
user), adjust the Voluum settings using the
EFFECT
knob and the acti e and hi/lo buttons to
get the desired musical effect. These settings are discussed in detail later.
Sa e the preset. Press the save button. Use the buttons to select a user preset
number (P00–P99) where you would like to store your preset. The name of the existing
preset (if any) flashes alternately with the preset number to help you select either an
unused preset or a preset to o erwrite. Press the save button again when you ha e
selected your preset number. You can now edit the three-character preset name. Turn the
EFFECT
knob to cycle through A-Z, 0-9 and press the knob to ad ance to the next of the
three characters in the preset name. Finally, press the save button to write your preset to
the chosen location.
The save button flashes while this sa e process is in progress. To abandon the sa e at any
time, and re ert to Preset Select mode, press and hold the save button for 2 seconds.

16 © Copyright 2014 Sonuus Limited Voluum
Owner’s Manual
Selecting and changing parameters
When you press or mo e the
EFFECT
knob, the Voluum will enter Preset Edit mode. The
flashing
LED
shows which effect is being edited. Successi e presses on the
EFFECT
knob will
cycle between editing the parameters for the gate, compressor,
LFO
, olume and limiter
effects.
To include an effect in the signal chain, press the acti e button. The acti e button and the
LED
beside the effect will light up to show that the effect is acti e. The
LED
s for other acti e
effects will also be lit, but these will be dimmer and not flashing to show that the effects are
acti e but not being edited.
For each effect that you edit, select the method of control for this effect using the
CONTROL
button. The control methods are none (nothing selected), pedal, en elope or
MIDI
.
Successi e presses of the
CONTROL
button cycle round the alid control options for the
selected effect. Stop when the
LED
beside your choice of control for the effect is illuminated.
Note that not all control methods are alid for all effects, and each effect (
i.e.,
all the
controllable parameters in that effect) can be controlled by only one method.
Cycle round the effect’s parameters using the buttons. The name of the parameters is
shown on the display to make it clear what is being selected for editing. Turn the knob to
change the alue of the parameter that is being edited.
For some combinations of effect parameter and control method, the hi or lo
LED
will light up
to show that the alue of the parameter being edited applies to the high or low point of the
control. For a pedal-controlled parameter, hi corresponds to the “toe-down” position, lo to
the “heel-down” position. For a
MIDI
controlled parameter, hi and lo correspond to the
maximum and minimum alues of the
MIDI
controller. And for an en elope-controlled
parameter, hi and lo correspond to the signal becoming louder and quieter. Press the hi/lo
button to toggle between the hi and lo alues for the parameter being edited.
When you ha e the alue that you want for a parameter, select another parameter to edit.
When you ha e completed your editing, you can sa e your setup as described pre iously.
Top Tip: To change the hi and lo alues together so that both the hi and lo of the
parameter are set to the same alue, hold the hi/lo button down while you turn
the knob to set the parameter alue. Note that the hi and lo
LED
s will both light
when you do this to show that both alues are being updated.

Voluum © Copyright 2014 Sonuus Limited 17
Owner’s Manual
Voluum effects signal chain
The Voluum signal chain comprises fi e separate effects, as shown below.
When using indi idual effects pedals, musicians are careful about the order of the effects chain. One
reason for this is because if one effect cuts the signal le el, then the next one boosts it to
compensate, excess noise can be added to the output signal. Another reason is that often the order
of effects can affect the final sound. For example, an en elope-sensiti e effect’s sound will change
when it is placed before or after a compressor. The Voluum signal chain does things differently.
The limiter is always the last effect in the chain in order to limit the output of the Voluum. But the
other effects in the chain can be considered to be in any order—because the effects are all olume-
based, and because all of the effects monitor the input signal (
IN
), the order of the effects in the signal
chain (prior to the limiter) is no longer important. This means that, for example, you can apply hea y
compression to the signal at the same time as using an en elope-controlled
LFO
without the
compression affecting the touch-sensiti ity of the
LFO
.
Another ad antage of the Voluum signal chain is that le el control for e ery effect is done by a single
analogue circuit (the
VCA
). This minimises noise and signal distortion, so you don’t ha e to worry
about signal quality when you switch in multiple effects.
The effects in the signal chain are described in more detail in the following sections.
Effect control methods
On the Voluum effects, some parameters can be controlled (modulated) in real time where the
parameter can smoothly go between a hi and lo alue that you choose. This modulation can be
controlled using the foot pedal,
MIDI
controllers or the signal envelope.
Using the dB parameter of the volume effect as an example, when the control is set to none (no
control method is selected), the dB parameter simply sets the output le el of the olume effect.
When the control is set to pedal, then the hi and lo alues of the dB parameter are the maximum
and minimum output le els achie ed as the footpedal is rocked from one extreme to the other, and
OUTIN
gate compressor LFO volume limiter
envelope/peak detection
global sensitivity
adjustment

18 © Copyright 2014 Sonuus Limited Voluum
Owner’s Manual
the Voluum acts as a traditional olume effects pedal. Howe er, unique to the Voluum, you can also
choose to control dB using a
MIDI
controller to remotely-control or automate olume changes.
Not all control methods are a ailable for all effects, for example, the gate and compressor are
inherently en elope-controlled effects, so there is no additional envelope control method for these
effects. The control methods a ailable for each effect are shown below.
When a control method is selected for an effect, this applies to all controllable parameters within that
effect. Not all parameters are controllable (it simply doesn’t make sense for some parameters to be
controllable), but for those that are, the same control method is used for each. Note that the Voluum
allows you to use different control methods for different effects.
When you ha e enabled a control method for an effect, controllable parameters are easily identified
because the hi or lo
LED
will light to show you which alue (hi or lo) of the parameter is currently
selected. For example, if you are editing the dB parameter of the volume effect and ha e selected
pedal control, then when the hi
LED
is illuminated you are setting the output le el (in dB) for when
the foot pedal is in toe-down position, and when the lo
LED
is illuminated, you are setting the output
le el for when the foot pedal is in heel-down position. You toggle between editing the hi and lo
parameter alues by pressing the hi/lo button.
Control ia
MIDI
can be used to replicate pedal control remotely and to automate the effect. The
controller’s minimum alue corresponds to the pedal in the heel-down position, and the controller’s
maximum position corresponds to the pedal in the toe-down position. You can choose a different
MIDI
controller for each effect using the CtL parameter.
Control Methods
Effect none pedal envelope
MI I
gate
compressor
LFO
volume
limiter
Top Tip: To change the hi and lo alues together so that both the hi and lo of the
parameter are set to the same alue, hold the hi/lo button down while you turn
the knob to set the parameter alue. Note that the hi and lo
LED
s will both light
when you do this to show that both alues are being updated.

Voluum © Copyright 2014 Sonuus Limited 19
Owner’s Manual
envelope control similarly aries the controllable parameters between their hi and lo alues in
response to changes of the input signal le el. You can adjust how sensiti e this response is by using
the SEn (sensiti ity) parameter.
Metering
The real-time meters on the Voluum are clear and simple. You will find the meters in aluable when
setting up the gate and compressor effects, as well as letting you see what’s going on when the
effects are acti e.
When using the Voluum as a olume pedal effect, the olume meter can be used as a isual
indication of the position of the pedal (
i.e.,
the current olume) before enabling the effect.
Top Tip: If CtL is set to one of the coarse (
MSB
) 14-bit
MIDI
controllers (controller # 0–31),
the Voluum can be controlled using the full 14-bits of the controller to ensure
the smoothest response. (Of course, you need to ensure the fine (
LSB
) part of
the
MIDI
controller (controller # 32–63) is also being sent to the Voluum for this
to work.)
Top Tip: If you often switch between instruments with different output le els, rather than
change the SEn effect parameter (which is stored presets), use the custom SEn
parameter to adjust the global sensiti ity of your Voluum (see page 35).
noise gate — lights to show when the
gate is closing. The brighter the
LED
,
the more the gate has closed.
olume — shows the real-time effect olume scaled to the
currently set hi and lo alues. This monitors both the volume
effect and the
LFO
effect (when these effects are acti e).
compressor — shows the amount of gain reduction being
applied (see scale in dB abo e).
You can think of this as the amount of signal compression: the
more
LED
s lit, the higher the compression.
6dB
12dB
24dB

20 © Copyright 2014 Sonuus Limited Voluum
Owner’s Manual
Adjusting the gate
The gate effect on the Voluum is a noise gate/expander. A noise gate is used to suppress unwanted
noise when the signal falls to a low le el. It works by allowing signals that are abo e the gate
threshold to pass through unchanged, but reduces signals that are below the gate threshold. The
Voluum gate effect allows you to configure the threshold (thr), and the amount of reduction (rEd):
the greater the reduction, the more noticeable the effect and the more of the low-le el signal (and
hence noise) you lose. The Voluum implements a smooth transition around the threshold so that no
artificial artifacts are introduced into your sound. When the signal is below the threshold, we say that
the gate is closing, and the “closed-ness” of the gate is indicated by the intensity of the gate
LED
.
When the signal is abo e the threshold and the gate is open, the gate
LED
is not lit.
The graph below shows the difference between high and low reduction. The expander knee is the
smooth transition between the signal abo e and below the threshold. In the Voluum, the knee is
harder for high reduction and softer for low reduction alues.
The gate is also controlled by the attack (Att) and release (rEL) parameters. The attack is the
amount of time for the gate to fully open when the signal exceeds the threshold, and the release is
the amount of time for the gate to fully close when the signal falls below the threshold.
Other manuals for Voluum
1
Table of contents
Other Sonuus Music Pedal manuals

