Sony CDX-M630 User manual

Operating Instructions
Bedienungsanleitung
Mode d’emploi
Istruzioni per l’uso
Gebruiksaanwijzing
Wichtig!
Bitte nehmen Sie sich etwas Zeit, um den Geräte-Pass vollständig
auszufüllen. Dieser befindet sich auf der hinteren Umschlagseite dieser
Bedienungsanleitung.
Si dichiara che l’apparecchio è stato fabbricato in conformità all’art. 2, Comma 1 del D.M. 28.08.
1995 n. 548.
NL
IT
FR
DE
GB
FM/MW/LW Compact Disc Player
CDX-M630
For installation and connections, see the supplied installation/connections manual.
Zur Installation und zum Anschluss siehe die mitgelieferte Installations-/Anschlussanleitung.
En ce qui concerne l’installation et les connexions, consulter le manuel d’installation/
raccordement fourni.
Per l’installazione e i collegamenti, fare riferimento al manuale di istruzioni per
l’installazione e i collegamenti in dotazione.
Zie voor het monteren en aansluiten van het apparaat de bijgeleverde handleiding “Installatie
en aansluitingen”.
© 2002 Sony Corporation
3-242-546-21 (1)
FM
/
MW
/
LW
Compact Disc Player

2
Welcome !
Thank you for purchasing this Sony Compact
Disc Player. You can enjoy its various features
even more with:
• Optional CD/MD units (both changers and
players)*1.
• CD TEXT information (displayed when a CD
TEXT disc*2is played).
• Supplied controller accessory
Card remote commander RM-X117
• Optional controller accessory
Wired rotary commander RM-X4S
*1 This unit works with Sony products only.
*2 A CD TEXT disc is an audio CD that includes
information such as the disc name, artist name,
and track names. This information is recorded on
the disc.
This label is located on the bottom of the chassis.
This label is located on the drive unit’s internal
chassis.
CAUTION INVISIBLE
DO NOT STARE INTO BEAM OR
VIEW DIRECTLY WITH OPTICAL INSTRUMENTS
LASER RADIATION WHEN OPEN

3
Table of Contents
Location of controls. . . . . . . . . . . . . . . . . . . . 4
Precautions . . . . . . . . . . . . . . . . . . . . . . . . . . 6
Notes on discs . . . . . . . . . . . . . . . . . . . . . . . . 7
Getting Started
Resetting the unit. . . . . . . . . . . . . . . . . . . . . . 8
Setting the clock . . . . . . . . . . . . . . . . . . . . . . 8
CD Player
CD/MD Unit (optional)
Playing a disc. . . . . . . . . . . . . . . . . . . . . . . . . 9
Display items. . . . . . . . . . . . . . . . . . . . . . . . 10
Playing tracks repeatedly
— Repeat Play . . . . . . . . . . . . . . . . . . . . 11
Playing tracks in random order
— Shuffle Play . . . . . . . . . . . . . . . . . . . . 11
Labelling a CD
— Disc Memo*. . . . . . . . . . . . . . . . . . . . 12
Locating a disc by name
— List-up* . . . . . . . . . . . . . . . . . . . . . . . 13
*Functions available with optional CD/MD unit
Radio
Storing stations automatically
— Best Tuning Memory (BTM). . . . . . . 13
Receiving the stored stations. . . . . . . . . . . . 14
Storing only the desired stations . . . . . . . . . 14
Tuning in a station through a list
— List-up . . . . . . . . . . . . . . . . . . . . . . . . 15
RDS
Overview of RDS . . . . . . . . . . . . . . . . . . . . 15
Automatic retuning for best reception results
— AF function . . . . . . . . . . . . . . . . . . . . 16
Receiving traffic announcements
— TA/TP . . . . . . . . . . . . . . . . . . . . . . . . 17
Presetting RDS stations with AF and TA
setting. . . . . . . . . . . . . . . . . . . . . . . . . . . 17
Tuning in stations by programme type
— PTY . . . . . . . . . . . . . . . . . . . . . . . . . . 18
Setting the clock automatically
— CT . . . . . . . . . . . . . . . . . . . . . . . . . . . 19
Other Functions
Using the rotary commander. . . . . . . . . . . . 19
Adjusting the sound characteristics . . . . . . 21
Quickly attenuating the sound . . . . . . . . . . 21
Changing the sound and display settings
— Menu . . . . . . . . . . . . . . . . . . . . . . . . . 22
Setting the equalizer (EQ7). . . . . . . . . . . . . 23
Setting the Dynamic Soundstage Organizer
(DSO). . . . . . . . . . . . . . . . . . . . . . . . . . . 24
Selecting the spectrum analyzer (SA). . . . . 24
Connecting auxiliary audio equipment. . . . 25
Additional Information
Maintenance . . . . . . . . . . . . . . . . . . . . . . . . 25
Removing the unit. . . . . . . . . . . . . . . . . . . . 26
Specifications . . . . . . . . . . . . . . . . . . . . . . . 28
Troubleshooting . . . . . . . . . . . . . . . . . . . . . 29
Error displays/Messages. . . . . . . . . . . . . . . 30

4
Location of controls
Refer to the pages listed for details.
aDSPL (display mode change/
programme type) button
bNumber buttons
(1) REP 11
(2) SHUF 11
To store stations/receive stored stations.
cDSO button 24
dMENU button
To display the menus.
eSOURCE (Power on/Radio/CD/MD*1/
AUX*2) button
To select the source.
fSEEK (</,) buttons
To skip tracks/fast-forward, reverse a track/
tune in stations automatically, find a station
manually/select a setting.
gSOUND button 21
hOFF (Stop/Power off) button
9
iVOL (+/–) buttons
To turn up or down the volume.
jOPEN/CLOSE button 9, 26
kEQ7 button 23
lMODE button
To change the operation.
mLIST button 12, 13, 15
nDISC (M/m) buttons
To receive preset stations/change the disc*3,
skip albums*4/select a menu.
oENTER button
To enter a setting.
pATT button 21
*1 When an optional MD unit is connected.
*2 Available only when an optional Sony portable
device is connected to BUS AUDIO IN of the unit.
You cannot connect any optional CD/MD units at
the same time.
*3 When an optional CD/MD unit is connected.
*4 Available only when an optional CD unit with the
MP3 file control function is connected, and an MP3
file is played.
Card remote commander RM-X117
OPEN/CLOSE
DISC
–
ATTOFF
REP SHUF
DSPL
1
4
MODE
2
5
3
6
SOURCE
DISC
+
SEEK
+
SEEK
–
SOUND
ENTER
MENU
LIST
EQ7DSO
VOL
DISC
–
SOURCE
DISC
+
SEEK
+
SEEK
–
(SEEK) (<):
to select
leftwards
(DISC) (M):
to select upwards
In menu mode, the currently selectable button(s) of
these four are indicated with a “ v” in the display.
(DISC) (m):
to select downwards
(SEEK) (,):
to select
rightwards
Note
If the unit is turned off by pressing (OFF) for 2
seconds, the unit cannot be operated with the card
remote commander unless (SOURCE) on the unit is
pressed, or a disc is inserted to activate the unit first.
Tip
Refer to “Replacing the lithium battery” for details on
how to replace the batteries (page 26).

5
The buttons on the unit share the same
functions as those on the card remote
commander.
aOPEN button 8, 26
bMain display window
cqa RESET button 8
dqd Receptor for the card remote
commander
eOFF (Stop/Power off) button*
fSCRL (scroll) button
gDSPL/PTY (display mode change/
programme type) button
hSub display window
iSEEK/AMS (.m/M>) button
jMENU button
lLIST button
nTA button 17
o
CLOSE (front panel close) button
pSOURCE button
qMODE button
rVOL (–/+) button
sDSO button
tEQ7 button
uSOUND button
vDISC (+/–) buttons
wENTER button
xZ(eject) button 9
Main display side
Operation side
CDX-M630
continue to next page t

6
*Warning when installing in a car without
an ACC (accessory) position on the
ignition switch
After turning off the ignition, be sure to press
(OFF) on the unit for 2 seconds to turn off the
clock display.
Otherwise, the clock display does not turn off
and this causes battery drain.
Precautions
• If your car has been parked in direct sunlight,
allow the unit to cool off before operating it.
• Power aerials will extend automatically while
the unit is operating.
Caution
While driving, do not use the CUSTOM FILE
feature or any other functions which may divert
your attention from the road.
If you have any questions or problems
concerning your unit that are not covered in this
manual, please consult your nearest Sony dealer.
Moisture condensation
On a rainy day or in a very damp area, moisture
condensation may occur inside the lenses and
display of the unit. Should this occur, the unit
will not operate properly. In such a case, remove
the disc and wait for about an hour until the
moisture has evaporated.
To maintain high sound quality
Be careful not to splash juice or other soft drinks
onto the unit or discs.

7
Notes on discs
• To keep the disc clean, do not touch the surface.
Handle the disc by its edge.
• Keep your discs in their cases or disc
magazines when not in use.
Do not subject the discs to heat/high
temperature. Avoid leaving them in parked cars
or on dashboards/rear trays.
• Do not attach labels, or use discs with sticky
ink/residue. Such discs may stop spinning
when used, causing a malfunction, or may ruin
the disc.
• Do not use any discs with labels or stickers
attached.
The following malfunctions may result from
using such discs:
– Inability to eject a disc (due to a label or
sticker peeling off and jamming the eject
mechanism).
– Inability to read audio data correctly (e.g.,
playback skipping, or no playback) due to
heat shrinking of a sticker or label causing a
disc to warp.
• Discs with non-standard shapes (e.g., heart,
square, star) cannot be played on this unit.
Attempting to do so may damage the unit. Do
not use such discs.
• You cannot play 8 cm CDs.
• Before playing, clean the discs with a
commercially available cleaning cloth. Wipe
each disc from the centre out. Do not use
solvents such as benzine, thinner, commercially
available cleaners, or antistatic spray intended
for analogue discs.
Notes on CD-R/CD-RW discs
• You can play CD-Rs (recordable CDs)/CD-
RWs (rewritable CDs) designed for audio use
on this unit.
Look for these marks to distinguish CD-Rs/
CD-RWs for audio use.
These marks denote that a disc is not for audio
use.
• Some CD-Rs/CD-RWs (depending on the
equipment used for its recording or the
condition of the disc) may not play on this unit.
• You cannot play a CD-R/a CD-RW that is not
finalized*.
*A process necessary for a recorded CD-R/CD-RW
disc to be played on the audio CD player.

8
Getting Started
Resetting the unit
Before operating the unit for the first time, or
after replacing the car battery or changing the
connections, you must reset the unit.
Press the RESET button with a pointed object,
such as a ballpoint pen.
Resetting the unit during use in sub-
display position
Notes
•After resetting the unit in the closed position, be sure
to press (OPEN) on the unit once before operating
further. If a disc is in the unit, the disc will be ejected
automatically. Insert the disc again.
•Pressing the RESET button will erase the clock
setting and some stored contents.
Setting the clock
The clock uses a 24-hour digital indication.
Example: To set the clock to 10:08
1Press (MENU), then press Mor m
repeatedly until “Clock” appears.
1Press (ENTER).
The hour indication flashes.
2Press Mor mto set the hour.
3Press ,.
The minute indication flashes.
4Press Mor mto set the minute.
2Press (ENTER).
The clock starts. After the clock setting is
completed, the display returns to normal play
mode.
Tips
•You can set the clock automatically with the RDS
feature (page 19).
•When D.Info mode is set to on, the time is always
displayed (page 22).
RESET button
RESET button

9
CD Player
CD/MD Unit (optional)
In addition to playing a CD with this unit, you
can also control external CD (MP3 playable CD)/
MD units. If you connect optional MP3 playable
CD units (eg., MP3 CD changer), you can play
MP3 files; compressed audio files (tracks) with
quality of sound.
Note
If you connect an optional CD (MP3 playable CD) unit
with the CD TEXT function, the CD TEXT information
will appear in the display when you play a CD TEXT
disc.
Playing a disc
(With this unit)
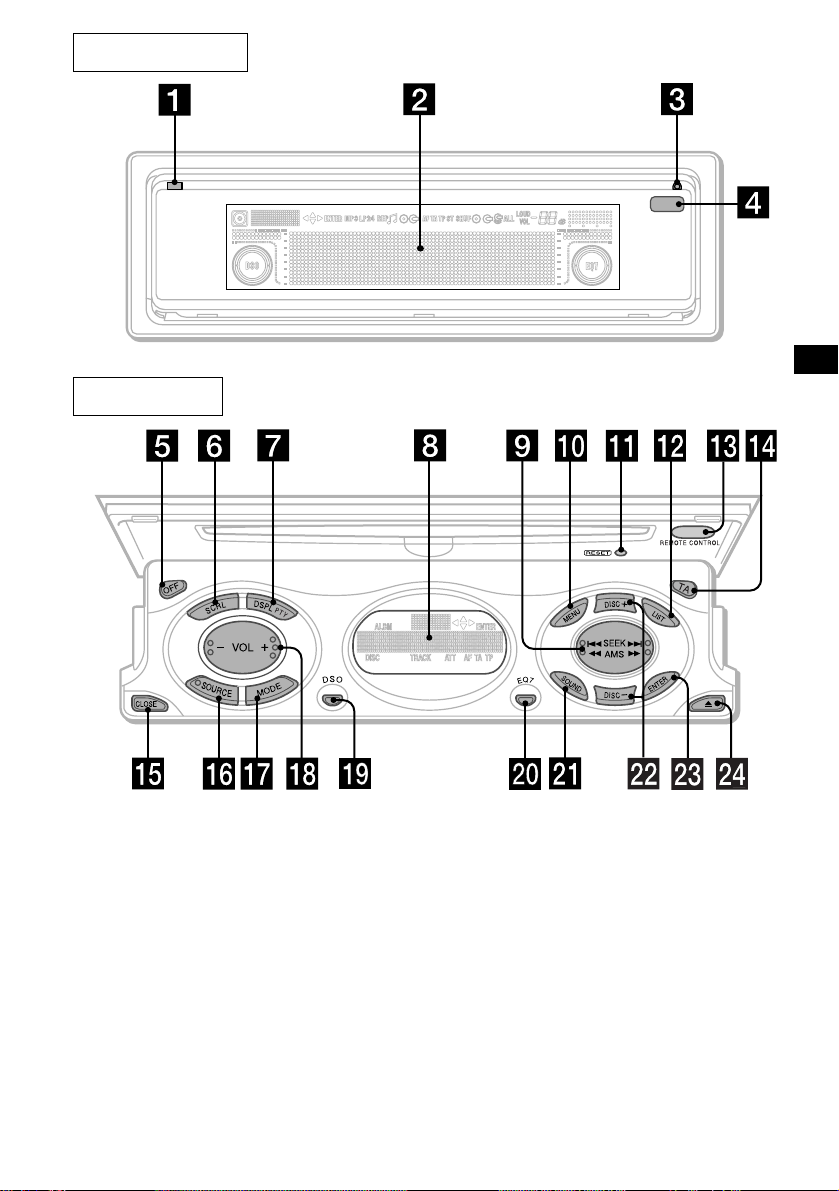
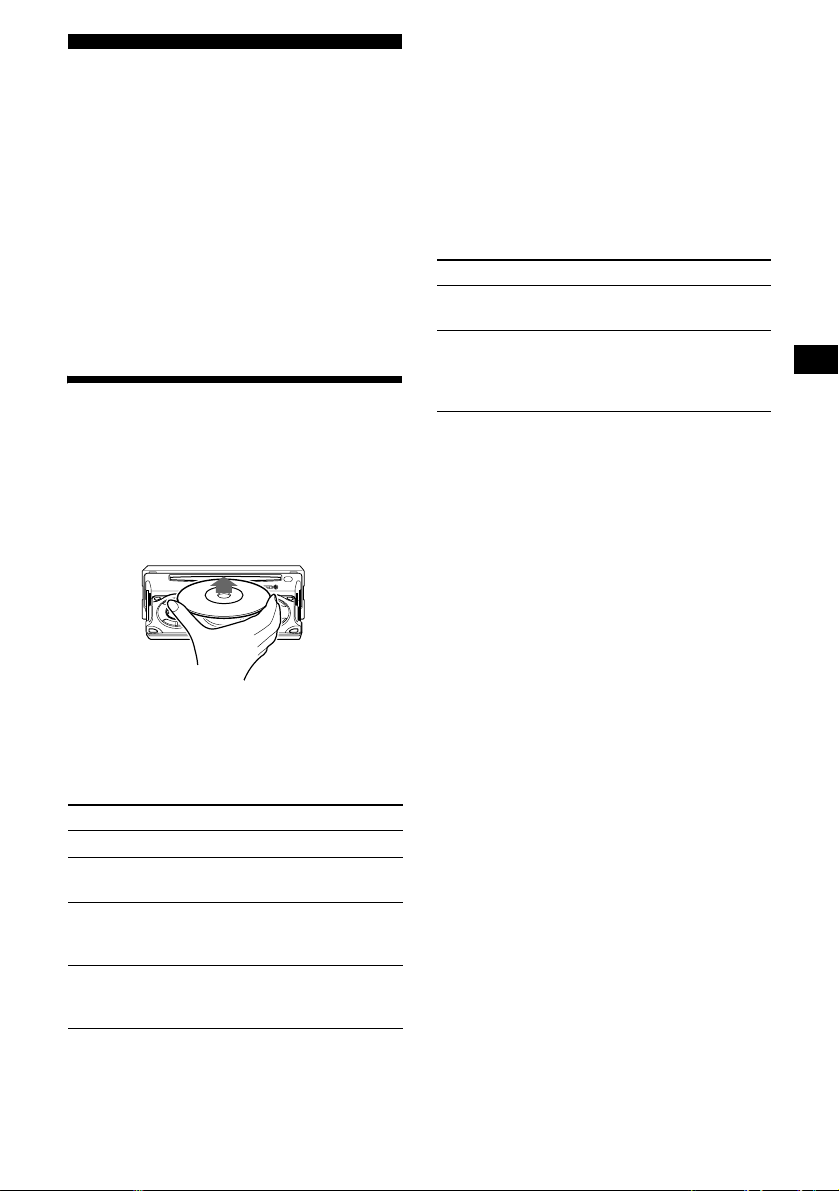
1Press (OPEN/CLOSE) or (OPEN) on the
unit and insert the disc (labelled side
up).
Playback starts automatically.
2Press (OPEN/CLOSE) or (CLOSE) on
the unit to close the front panel.
If a disc is already inserted, press (SOURCE)
repeatedly until “CD” appears to start playback.
Notes
•While the first/last track on the disc is playing, if
<or ,is pressed, playback skips to the last/first
track of the disc.
•When the last track on the disc is over, playback
restarts from the first track of the disc.
•With an optional unit connected, playback of the
same source will continue on to the optional CD/MD
unit.
(With optional unit)
1Press (SOURCE) repeatedly to select
“CD” or “MD (MS*1).”
2Press (MODE) repeatedly until the
desired unit appears.
Playback starts.
*1 MS: MG Memory Stick System-up Player MGS-X1
*2 Available only when an MP3 file is played. Albums
are folders of a CD containing MP3 files.
Cautions when connecting MGS-X1 and MD unit(s)
This unit recognizes MGS-X1 as an MD unit.
•Whenyou want to play MGS-X1, press (SOURCE) to
select “MS” or “MD.” If “MS” appears in the source
display, MGS-X1 starts to play. If “MD” appears in
the source display, press (MODE) to select “MS,” to
start playback.
•When you want to play an MD unit, press (SOURCE)
to select “MD” or “MS.” If your desired MD unit
appears in the source display, it starts to play. If “MS”
or another MD unit appears in the source display,
press (MODE) to select your desired MD unit, to
start playback.
Note when connecting MP3 playable CD unit(s)
Before playing a track, this unit reads all track and
album information on the disc. Depending on the track
structure, it may take more than a minute before
playbackbegins. During this time, “Read” is displayed.
Please wait for play to start automatically when the
reading is complete.
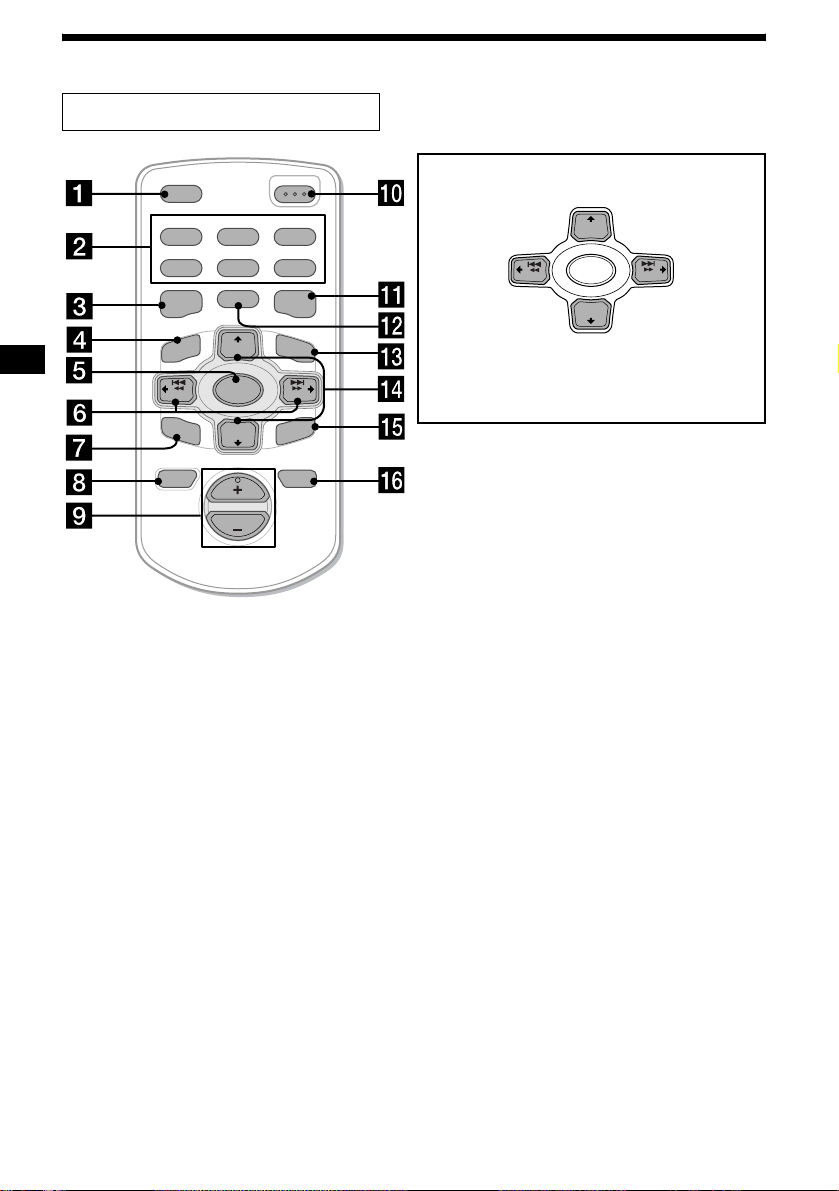
To Press
Stop playback (OFF)
Eject the disc (OPEN/CLOSE) or
(OPEN) then Z on the unit
Skip tracks
– Automatic
Music Sensor
(SEEK) (</,)
[once for each track]
Fast-forward/
reverse
–Manual Search
(SEEK) (</,)
[hold to desired point]
To Press
Skip discs
–Disc selection (DISC) (M/m)
Skip albums*2
–Album selection (DISC) (M/m) during
playback of a CD containing
MP3 files
[hold to desired point]

10
Display items
When the disc/album/track changes, any
prerecorded title*1of the new disc/album/track is
automatically displayed (if the Auto Scroll
function is set to “on,” names exceeding 12
characters will be scrolled (page 22)).
*1 When pressing (DSPL), “NO Disc Name”, “NO
Album Name”, or “NO Track Name” indicates that
there is no disc name, album name, or track name
and “NO ID3 Tag” indicates that there is no ID3 tag.
*2 Available only when an optional MD unit with the
MDLP function is connected, and an MDLP disc is
played.
*3 When pressing (DSPL), “NO Disc Name” or “NO
Track Name” indicates that there is no Disc Memo
(page 12) or prerecorded name to display.
*4 If the disc has been labeled by this unit using the
CUSTOM FILE function, Disc Memo is displayed
preferentially.
*5 Only for CD TEXT discs with the artist name.
*6 Available only when an MP3 file is played.
Notes
•Some characters cannot be displayed. Characters
and signs which cannot be displayed appear as “ *.”
•For some CD TEXT discs or ID3 tags with very
many characters, information may not scroll.
•This unit cannot display the artist name for each
track of a CD TEXT disc or an album.
Tip
When A.Scrl (Auto Scroll) is set to off, and the disc/
track/album is changed, the disc/track/album name or
ID3 tag does not scroll.
To Press
Switch display
item (DSPL)
Scroll display item (SCRL) on the unit
Track
number Elapsed
playing time
Displayable items
• Music source
•Clock
Displayable
items
• Disc number
•Album
number*6
Displayable items
•Discname*3*4/
artist name*5
• Album name*1*6
• Track name*1
•ID3tag*1*6
MDLP display*2
LP2: LP2 playback
LP4: LP4 playback

11
Playing tracks repeatedly
— Repeat Play
The disc in the main unit will repeat a track, the
entire album, or the entire disc when it reaches
the end. For repeat play, you can select:
• REP-Track — to repeat a track.
•REP-Album*
1— to repeat an album.
•REP-Disc*
2— to repeat a disc.
*1 Available only when an MP3 file is played.
*2 Available only when one or more optional CD/MD
units are connected.
During playback, press (1) (REP)
repeatedly until the desired setting
appears in the display.
Repeat Play starts.
To return to normal play mode, select “REP-off.”
Playing tracks in random
order
— Shuffle Play
You can select:
• SHUF-Album*1— to play the albums in the
current optional CD unit with the MP3 file
control function in random order.
• SHUF-Disc — to play the tracks on the current
disc in random order.
• SHUF-Changer*2— to play the tracks in the
current optional CD (MD) unit in random
order.
• SHUF-All*3— to play all the tracks in all the
connected CD (MD) units (including this unit)
in random order.
*1 Available only when an MP3 file is played.
*2 Available only when one or more optional CD (MD)
units are connected.
*3 Available only when one or more optional CD units,
or two or more optional MD units are connected.
During playback, press (2) (SHUF)
repeatedly until the desired setting
appears in the display.
Shuffle Play starts.
To return to normal play mode, select “SHUF-
off.”
Note
“SHUF-All” will not shuffle tracks between CD units
and MD units.

12
Labelling a CD
— Disc Memo (For a CD unit with the
CUSTOM FILE function)
You can label each disc with a custom name
(Disc Memo). You can enter up to 8 characters
for a disc. If you label a CD, you can locate the
disc by name (page 13).
1Play the disc you want to label in a CD
unit with the CUSTOM FILE function.
2Press (MENU), then press Mor m
repeatedly until “Name Edit” appears.
3Press (ENTER).
The unit will repeat the disc during the
labelling procedure.
4Enter the characters.
1Press M*1repeatedly to select the
desired character.
AtBtC... t0t1t2... t+
t–t*... t*
2tA
*1 For reverse order, press m.
*2 (blank space)
2Press ,after locating the desired
character.
If you press <, you can move back to the
left.
3Repeat steps 1and 2to enter the
entire name.
5To return to normal CD play mode,
press (ENTER).
Tips
•Simply overwrite or enter “ ” to correct or erase a
name.
•There is another way to start labelling a CD: Press
(LIST) for 2 seconds instead of performing steps 2
and 3. You can also complete the operation by
pressing (LIST) for 2 seconds instead of step 5.
•You can label CDs on a unit without the CUSTOM
FILE function if that unit is connected along with a
CD unit that has the function. The Disc Memo will be
stored in the memory of the CD unit with the
CUSTOM FILE function.
Note
Repeat/shuffle play is suspended until the Name Edit
is complete.
Viewing the Disc Memo
As a display item, the Disc Memo always takes
priority over any original CD TEXT information.
Tip
To find out about other items that can be displayed,
see page 10.
Erasing the Disc Memo
1Press (SOURCE) repeatedly to select
“CD.”
2Press (MODE) repeatedly to select the
CD unit storing the Disc Memo.
3Press (MENU), then press Mor m
repeatedly until “Name Del” appears.
4Press (ENTER).
The stored names will appear.
5Press Mor mrepeatedly to select the
disc name you want to erase.
The stored names will appear.
6Press (ENTER) for 2 seconds.
The name is erased.
Repeat steps 5 and 6 if you want to erase
other names.
7Press (MENU) twice.
The unit returns to normal CD play mode.
Notes
•When the Disc Memo for a CD TEXT disc is erased,
the original CD TEXT information is displayed.
•If you cannot find the Disc Memo you want to erase,
try selecting a different CD unit in step 2.
•If you have already erased all of the Disc Memo, the
unit returns to normal CD play mode in step 4.
To Press
View (DSPL) during CD/CD
TEXT disc playback

13
Locating a disc by name
— List-up (For a CD unit with the CD TEXT/
CUSTOM FILE function, or an MD unit)
You can use this function for discs that have been
assigned custom names*1or for CD TEXT
discs*2.
*1 Locating a disc by its custom name: when you
assign a name for a CD (page 12) or an MD.
*2 Locating discs by the CD TEXT information: when
you play a CD TEXT disc on a CD unit with the CD
TEXT function.
1Press (LIST).
The name assigned to the current disc appears
in the display.
2Press Mor mrepeatedly until you find
the desired disc.
3Press (ENTER) to play the disc.
Note
Some letters cannot be displayed (exception: the
letters stored by Disc Memo).
Radio
The unit can store up to 6 stations per band
(FM1, FM2, FM3, MW, and LW).
Caution
When tuning in stations while driving, use Best
Tuning Memory to prevent accidents.
Storing stations
automatically
— Best Tuning Memory (BTM)
The unit selects the stations with the strongest
signals within the selected band, and stores them
in the order of their frequency.
1Press (SOURCE) repeatedly to select
“TUNER.”
2Press (MODE) repeatedly to select the
band.
3Press (MENU), then press Mor m
repeatedly until “BTM” appears.
4Press (ENTER).
A beep sounds when the setting is stored.
Notes
•If only a few stations can be received due to weak
signals, some number buttons will retain their former
settings.
•When a number is indicated in the display, the unit
starts storing stations from the one currently
displayed.

14
Receiving the stored stations
1Press (SOURCE) repeatedly to select
“TUNER.”
2Press (MODE) repeatedly to select the
band.
3Press the number button ((1) to (6))
on which the desired station is stored.
Tip
Press Mor mto receive the stations in the order they
are stored in the memory (Preset Search function).
If preset tuning does not work
Press (SEEK) (<) or (SEEK) (,) to
search for the station (automatic
tuning).
Scanning stops when the unit receives a
station. Repeat until the desired station is
received.
Tips
•If automatic tuning stops too frequently, turn on the
Local Seek to limit seek to stations with stronger
signals. See “Changing the sound and display
settings” on page 22.
•If you know the frequency of the station you want to
listen to, press and hold <or ,to locate the
approximate frequency, then press <or ,
repeatedly to fine adjust to the desired frequency
(manual tuning).
If FM stereo reception is poor
Select monaural reception mode
See “Changing the sound and display
settings” on page 22.
The sound improves, but becomes monaural
(“ST” disappears).
Tip
If FM broadcasts are difficult to hear, set DSO to off
(page 24).
Storing only the desired
stations
You can manually preset the desired stations on
any chosen number button.
1Press (SOURCE) repeatedly to select
“TUNER.”
2Press (MODE) repeatedly to select the
band.
3Press (SEEK) (<) or (SEEK) (,) to
tune in the station that you want to
store.
4Press the desired number button ((1)
to (6)) for 2 seconds until “MEM”
appears.
The number button indication appears in the
display.
Note
If you try to store another station on the same number
button, the previously stored station will be erased.

15
Tuning in a station through a
list
— List-up
1During radio reception, press (LIST)
momentarily.
The frequency or the name assigned to the
current station appears in the display.
2Press Mor mrepeatedly until you find
the desired station.
If no name is assigned to the selected station,
the frequency appears in the display.
3Press (ENTER) to tune in the desired
station.
RDS
Overview of RDS
FM stations with Radio Data System (RDS)
service send inaudible digital information along
with the regular radio programme signal. For
example, one of the following will be displayed
upon receiving a station with RDS capability.
*See “Tuning in stations by programme type” on page
18.
RDS services
RDS data offers you other conveniences, such as:
•Automatic retuningof a programme, helpful
during long-distance drives. — AF tpage 16
• Receiving traffic announcements, even
when enjoying another programme/source. —
TA tpage 17
• Selecting stations by the type of
programme. — PTY tpage 18
• Automatic clock time setting. — CT tpage
19
Notes
•Depending on the country or region, not all of the
RDS functions are available.
•RDS may not work properly if the signal strength is
weak or if the station you are tuned to is not
transmitting RDS data.
To Press
Switch display
item (DSPL)
Displayable items
• Radio band
•Clock
Preset
number Frequency
Displayable items*
• Station name
• Programme type

16
Automatic retuning for best
reception results
— AF function
The alternative frequencies (AF) function allows
the radio to always tune into the area’s strongest
signal for the station you are listening to.
1Select an FM station (page 13).
2Press (MENU).
3Press Mor mrepeatedly to select “AF.”
4Press ,to select “on”.
5Press (ENTER).
The unit starts searching for an alternative
frequency with a stronger signal in the same
network.
If “NO AF” flashes, the currently tuned into
station does not have an alternative frequency.
Note
When there is no alternative frequency in the area or
when you do not need to search for one, turn the AF
function off by selecting “AF off.”
For stations without alternative
frequencies
Press (SEEK) (<) or (SEEK) (,)
while the station name is flashing
(within 8 seconds).
The unit starts searching for another
frequency with the same PI (Programme
Identification) data (“PI Seek” appears).
If the unit cannot find the same PI, the unit
returns to the previously selected frequency.
Staying with one regional programme
When AF function is on: this unit’s factory-set
setting restricts reception to a specific region, so
you won’tbe switched to another regional station
with a stronger frequency.
If you leave this regional programme’s reception
area or would like to take advantage of the whole
AF function, select “Regional off” from the
Menu (page 22).
Note
This function does not work in the United Kingdom
and in some other areas.
Local Link function
(United Kingdom only)
This function enables you to select other local
stations in the area, even if they are not stored on
your number buttons.
1Press a number button ((1) to (6))
that has a local station stored on it.
2Within 5 seconds, press the number
button of the local station again.
3Repeat this procedure until the
desired local station is received.
Frequencies change automatically.
98.5 MHz
Station
102.5 MHz
96.0 MHz

17
Receiving traffic
announcements
— TA/TP
By activating the Traffic Announcement (TA)
and Traffic Programme (TP), you can
automatically tune in an FM station broadcasting
traffic announcements. These settings function
regardless of the current FM programme/source
(e.g., CD/MD/AUX). The unit switches back to
the original source when the bulletin is over.
Press (TA) on the unit repeatedly until
“TA on” appears.
The unit starts searching for traffic
information stations.
“TP” indicates reception of such stations, and
“TA” flashes during an actual traffic
announcement. The unit will continue
searching for stations available with TP if
“NO TP” is indicated.
To cancel all traffic announcements, select
“TA off.”
Tip
You can also cancel the current announcement by
pressing (SOURCE) or (MODE).
Presetting the volume of traffic
announcements
You can preset the volume level of the traffic
announcements so you won’t miss hearing them.
1Press (VOL) (+) or (VOL) (–) to adjust
the desired volume level.
2Press (TA) on the unit for 2 seconds.
“TA” appears and the setting is stored.
Receiving emergency announcements
If either AF or TA is on, the unit will switch to
emergency announcements, if one comes in
while listening to an FM station or CD/MD/
AUX.
Presetting RDS stations with
AF and TA setting
When you preset RDS stations, the unit stores
each station’s AF/TA setting (on/off) as well as
its frequency. You can select a different setting
(for AF, TA, or both) for individual preset
stations, or the same setting for all preset
stations. If you preset stations with “AF on,” the
unit automatically stores stations with the
strongest radio signal.
Presetting the same setting for all
preset stations
1Select an FM band (page 13).
2Press (TA) on the unit to select
“TA on,” and/or select “AF on” from
the Menu (page 16).
Note that selecting “AF off” and “TA off”
applies to non-RDS stations as well as RDS
stations.
3Press (MENU), then press Mor m
repeatedly until “BTM” appears.
4Press (ENTER).
BTM flashes.
Presetting different settings for each
preset station
1Select an FM band, and tune in the
desired station (page 14).
2Press (TA) on the unit to select
“TA on,” and/or select “AF on” from
the Menu (page 16).
3Press the desired number button ((1)
to (6)) for 2 seconds until “MEM”
appears.
Repeat from step 1 to preset other stations.
To Press
Cancel current
announcement (TA) on the unit

18
Tuning in stations by
programme type
— PTY
You can tune in a station by selecting the type of
programme you would like to listen to.
Note
You cannot use this function in some countries where
no PTY (Programme Type selection) data is available.
1Press (DSPL) during FM reception
until “PTY” appears.
The current programme type name appears if
the station is transmitting the PTY data.
“--------” appears if the received station is not
an RDS station, or if the RDS data is not
received.
2Press Mor mrepeatedly until the
desired programme type appears.
The programme types appear in the order
shown in the table.
“--------” appears if the programme type is not
specified in the RDS data.
3Press (ENTER).
The unit starts searching for a station
broadcasting the selected programme type.
Programme types Display
News News
Current Affairs Affairs
Information Info
Sports Sport
Education Educate
Drama Drama
Culture Culture
Science Science
Varied Varied
Popular Music Pop M
Rock Music Rock M
Easy Listening Easy M
Light Classical Light M
Classical Classics
Other Music Type Other M
Weather Weather
Finance Finance
Children’s Programmes Children
Social Affairs Social A
Religion Religion
Phone In Phone In
Travel Travel
Leisure Leisure
Jazz Music Jazz
Country Music Country
National Music Nation M
Oldies Music Oldies
Folk Music Folk M
Documentary Document

19
Setting the clock
automatically
— CT
The CT (Clock Time) data from the RDS
transmission sets the clock automatically.
1During radio reception, press (MENU),
then press Mor mrepeatedly until “CT
off” appears.
2Press ,repeatedly until “CT on”
appears.
The clock is set.
3Press (ENTER) to return to the normal
display.
To cancelthe CT function, select “CT off” in step
2.
Notes
•The CT function may not work even though an RDS
station is being received.
•There might be a difference between the time set by
the CT function and the actual time.
Other Functions
You can also control the unit (and optional CD/
MD units) with a rotary commander (optional).
Using the rotary commander
First, attach the appropriate label depending on
how you want to mount the rotary commander.
The rotary commander works by pressing
buttons and/or rotating controls.
By pressing buttons
Press To
(SOURCE) Change source
(radio/CD/MD*1/AUX*2)/
Power on
(MODE) Change operation
(radio band/CD unit/MD*1
unit)
(ATT) Attenuate sound
(OFF)*3Stop playback or radio
reception/Power off
(SOUND) Adjust the sound menu
(DSPL) Change the display item
continue to next page t
SOUND
DSPL
MODE
SOUND
DSPL
MODE
OFF
Rotate the VOL control
to adjust the volume.
(SOURCE)
(SOUND)
(ATT)
(DSPL) (OFF)
(MODE)

20
By rotating the control
Rotate and release to:
– Skip tracks.
– Tune in stations automatically.
Rotate, hold, and release to:
– Fast-forward/reverse a track.
– Find a station manually.
By pushing in and rotating the control
Push in and rotate the control to:
– Receive preset stations.
– Change discs during CD (MD) playback*1.
During playback of a CD containing MP3 files*4
Push in and repeat rotating quickly to:
– Change discs one by one.
Push in, then rotate and hold to:
– Change albums.
*1 Only if the corresponding optional equipment is
connected.
*2 Available only when an optional Sony portable
device is connected to BUS AUDIO IN of the unit.
You cannot connect any optional CD/MD units at
the same time.
*3 If your car has no ACC (accessory) position on the
ignition key switch, be sure to press (OFF) for 2
seconds to turn off the clock indication after turning
off the ignition.
*4 Available only when an optional CD unit with the
MP3 file control function is connected.
Changing the operative direction
The operative direction of controls is factory-set
as shown below.
If you need to mount the rotary commander on
the right hand side of the steering column, you
can reverse the operative direction.
Press (SOUND) for 2 seconds while
pushing the VOL control.
Tip
You can also change the operative direction of these
controls with the unit (page 22).
SEEK/AMS
control
PRESET/DISC
control
To increase
To decrease
Other manuals for CDX-M630
4
Table of contents
Languages:
Other Sony CD Player manuals

Sony
Sony CFD-RS60CP User manual

Sony
Sony MZ-R701 User manual

Sony
Sony D-E525 User manual

Sony
Sony WALKMAN D-CJ01 User manual

Sony
Sony Walkman D-EJ761 User manual

Sony
Sony CDP-C5F User manual

Sony
Sony CSD-XD55 User manual

Sony
Sony CFD-V6 User manual

Sony
Sony Giga Juke NAC-HD1E User manual

Sony
Sony CDX-C7OOOX Product guide

Sony
Sony MZ-R90/R91 User manual

Sony
Sony SCD-CE595 User manual

Sony
Sony CFD-575 - 3 Piece Cd/radio Cassette User manual

Sony
Sony CDP-XE330 User manual

Sony
Sony Sports D-FS18 User manual

Sony
Sony CFD-E10 Marketing User manual

Sony
Sony Walkman D-NE240 User manual

Sony
Sony cCFD-S20CP User manual

Sony
Sony CDX-GT780UI User manual

Sony
Sony CDX-GT40U User manual