SOtM sHP-100 User manual

www. sotm-audio.com
sHP-100 Operating Instructions
Rev. : 2.02
S
O
t
M
Ultimate High Performance Audio

- 1 -
주의 사항
반드시 본사용설명서를 모두 읽은 후제품을 사용하십시오.
Please read this instruction carefully before use.
제품의 분해, 개조 등을 하지 마십시오.
Do not attempt to disassemble or modify the product.
제품에 진동, 충격을 가하지 마십시오.
Keep the product away from the external shocks or vibrations.
손상 되거나 피복이 벗겨진 cable은사용하지 마십시오.
Do not use the damaged or peeled cables.
제품을 야외에서 사용하지 마십시오.
Do not use the unit outdoors.
제품의 외관, 내용물, 사양은 예고 없이 변경 될수있습니다.
Product specifications and features are subject to change without notice.
A/S 정보
Warranty Information
무상 A/S
Free warranty service
-정상적인 사용 중설계, 제조상의 결함으로 발생된 불량에 대하여 구입일로부터 1년간 A/S를보증 합니다.
In case of the defect is found caused by the design or the production flaw while using the device properly, a manufacturer is
responsible for the faulty product and the free warranty service for 1 year from the date of purchasing.
-무상 A/S기간 중이라도 천재지변 등불가 항력적인 요인으로 인한 제품의 고장 및파손은 무상 A/S대상에서 제외 됩니다.
Even in the warranty service period, malfunction or damage of products caused by the inevitable incident such as a natural disaster is
not subject of the free warranty service.
유상 A/S
Warranty service at a cost
-무상 A/S기간이 지난 제품.
The product that free warranty service period is expired.
-소비자 과실로 인한 제품의 고장.
Malfunction of the product caused by a user’s fault.
-사고로 인한 제품 고장.
Malfunction of the product caused by incidents.
-지진, 수해, 낙뢰 등천재지변으로 인한 제품의 고장
Malfunction of the product caused by a natural disaster such as earthquake, flood, lightning & etc.
-유상 A/S의경우 운송비는 소비자 부담 입니다.
In case of the warranty service at a cost, a customer should cover the transportation costs.
소비자 과실 유형
Samples of a user’s fault
-제품의 분해, 개조 등을 한제품
In case of attempts to disassemble or modify the device
-사용설명에 명시된 사용방법 미준수로 인한 불량
In case of not following the instructions on this manual
A/S를의뢰하기 전본사용설명서와 홈페이지의 Q&A항목을 충분히 검토 하시기 바랍니다.
Please read this operating instructions & Q&A board on our website carefully before asking for the warranty service.
기본 구성품
Supplied accessories
sHP-100 본체
sHP-100 Unit
사용 설명서
Operating Instruction
USB 케이블
USB cable
Winodws 드라이버 CD
Windows driver CD
- 2 -
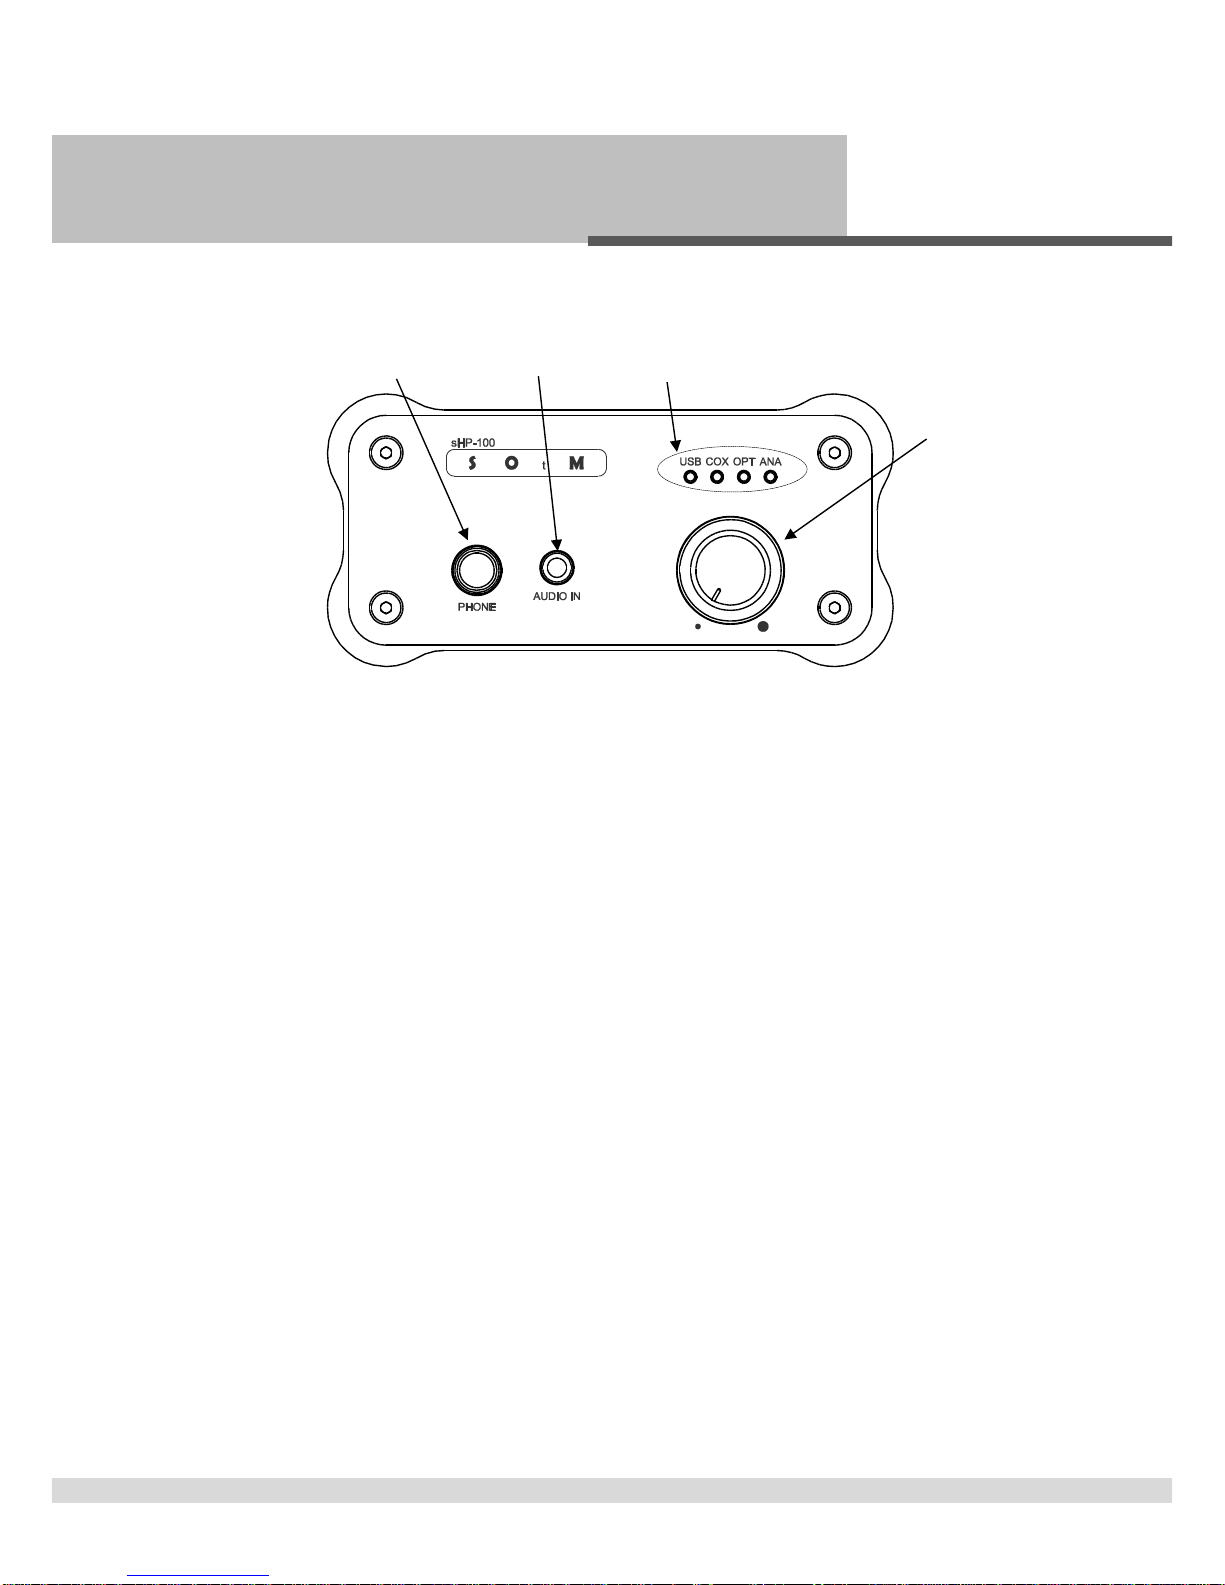
Front Panels
Front Panel
①입력 표시 램프
Input source LED
-선택된 입력 소스를 표시 합니다. : USB, Coaxial, Optical, Analog
Indicate the input source : USB, Coaxial, Optical, Analog
-뮤트 기능 동작 시입력 소스 램프가 점멸 합니다.
The input source LED blinks when mute.
②헤드폰 출력 잭: 6.3mm 헤드폰 잭을 연결 합니다. 3.5mm 헤드폰 잭은 사이즈 변환 잭을 이용하여 연결
합니다.
Headphone output jack : Connect to 6.3mm headphone jack. If you use 3.5mm headphone jack, you
should use a size conversion adaptor.
③아날로그 입력 잭: 3.5mm 스테레오 아날로그 오디오 신호 입력 잭입니다.
Analog input jack : Connect to 3.5mm stereo analog audio signal.
④볼륨 조절 노브
Volume Control knob
-좌, 우로 돌려 헤드폰 출력과 가변 라인 출력 크기를 조절 합니다.
Turn the knob left or right to control the headphone output or variable line output.
-노브를 0.5 초보다 짧게 눌렀다 놓으면 음소거 기능을 on/off 합니다. 뮤트 기능이 동작하게 되면 입력 표시
램프가 점멸 합니다.
Push the knob for less than 0.5sec to operate mute function, the input source LED blinks when mute.
-노브를 1 초이상 누르면 입력 소스가 순차적으로 변경됩니다.
Push the knob for over than 1sec to change input source.
2
1
3
4

- 3 -
Rear Panels
Rear Panel
①전원 입력 잭: 별도로 판매 되는 전원 공급 장치와 연결합니다.
Power input jack : Connect to a power supply(sold separately).
②USB 포트 : USB 케이블을 이용하여 PC 와같은 USB 오디오 기능을 지원하는 디지털 소스기기와 연결
합니다.
USB port : Connect to the digital source device which supports USB audio function as PC by USB cable.
③Optical 입력 잭: 오디오 용광케이블을 이용하여 CD player, IPTV 같은 디지털 기기의 광출력 단자와
연결 합니다.
Optical input jack : Connect to the optical output jack of digital device as CD player or IPTV by optical
cable.
④Coaxial 입력 잭: 동축케이블을 이용하여 CD player, IPTV 같은 디지털 기기의 동축 출력 단자와 연결
합니다.
Coaxial input jack : Connect to the coaxial output jack of digital device as CD player or IPTV by coaxial
cable.
⑤아날로그 라인 출력 잭: 아날로그 언밸런스 케이블을 이용하여 프리앰프나 파워 앰프와 연결 합니다.
Analog line output jack : Connect to the pre amplifier or power amplifier by Analog unbalanced cable.
⑥접지 단자 : 제품의 케이스 접지용 단자 입니다.
Earth terminal : Connect to the earth ground.
2
3
4
5
6
1
- 4 -
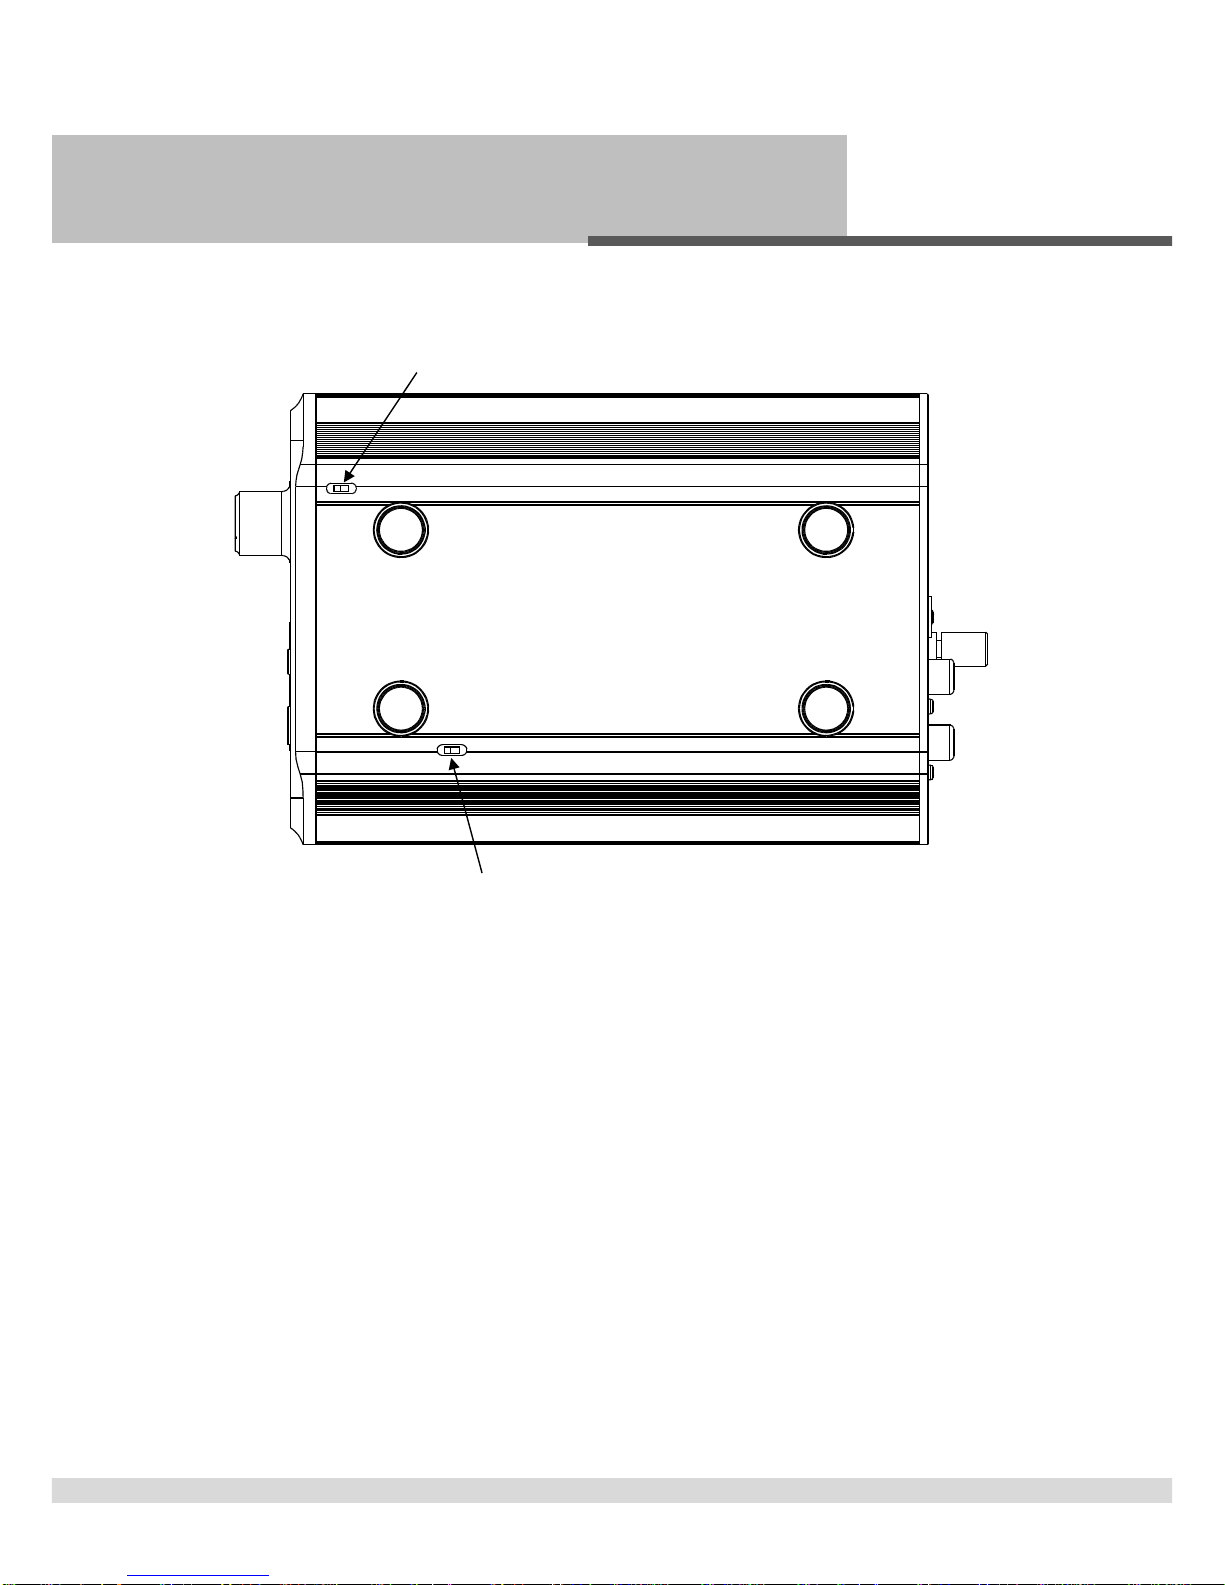
on off
on off
Function select switch
Bottom side
①헤드폰 임피던스 설정 스위치
Headphone impedance select switch
-On : 낮은 임피던스 헤드폰용 출력 선택
On : set the low impedance headphone output
-Off : 높은 임피던스 헤드폰용 출력 선택
Off : set the high impedance headphone output
②라인 출력 기능 설정 스위치 : 아날로그 라인 출력 잭의 기능을 선택 합니다.
Line output select switch : set the function for analog line output jack.
-On : 가변 출력 선택
On : set the variable line output
-Off : 고정 출력 선택
Off : set the fixed line output
1
2

- 5 -
About sHP-100
‘sHP-100’은 소형 고성능 DAC 이자 헤드폰 앰프 입니다.
‘sHP-100’is a high performance DAC and headphone amplifier.
다양한 입력 단자를 갖추고 있어 다양한 기기와 연결 하여 사용 할수있습니다.
sHP-100 has various input ports, so you can use sHP-100 with the various audio devices.
-USB input
-Coaxial input
-Optical input
-3.5mm stereo analog input
헤드폰을 제품 전면의 헤드폰 잭에 연결하여 헤드폰 앰프로 사용 할수있습니다.
You can use sHP-100 as a headphone amplifier, you need to connect a headphone to the headphone jack on the front panel of
sHP-100.
제품 하단의 헤드폰 임피던스 설정 스위치를 이용하여 낮은 임피던스 헤드폰과 높은 임피던스 헤드폰에따른 오디오 출력
신호 크기를 선택할수있습니다.
You can select audio signal output amplitude by the Headphone impedance select switch on the bottom side, the audio output
signal amplitude is differ from a low impedance headphone or high impedance headphone.
제품 후면에는오디오 라인 출력 단자가 있어 DAC 기능으로 사용 할수있습니다.
sHP-100 has audio line output jack on the rear panel, so you can use sHP-100 as a DAC.
라인 출력 잭은 제품 하단의 라인 출력 기능 설정 스위치를 이용하여 가변 출력과 고정 출력을 선택 할수있습니다.
You can select fixed line output or variable line output by the Line output select switch on the bottom side.
-가변 출력으로 설정하게 되면 제품 전면 볼륨 노브를 이용하여 출력을 가변 할수있으며 헤드폰 임피던스 설정
스위치를 이용하여 오디오 출력 신호 크기를 선택 할수있습니다.
If you set to variable line output, you can control the output by the volume control knob and audio output signal amplitude
by the headphone impedance select switch.
-고정 출력으로 설정하게 되면 볼륨 노브와 헤드폰 임피던스 설정 스위치의설정과 관계 없이 일정한 크기의 오디오
신호가 출력 됩니다.
If you set to fixed line output, the fixed audio signal outputs without adjust the volume control knob or the headphone
impedance select switch.

- 6 -
Specification
USB input
-USB specification 2.0 or higher
-USB audio class 2.0
-Support 24bit / 44.1KHz, 48KHz, 88.2KHz, 96KHz, 176.4KHz, 192KHz PCM playback
-Support 64x DSD, 128x DSD playback
-Native ASIO support
Coaxial, Optical input
-Max bit-depth : 24bit
-Sampling rate : 32KHz, 44.1KHz, 48KHz, 88.2KHz, 96KHz, 176.4KHz, 192KHz
-Coaxial impedance: 75Ω
Analog input
-Maximum input voltage : 2Vrms
-3.5mm stereo jack
Headphone output
-Maximum output voltage @ low impedance output select : 0V ~ 2.1 Vrms (± 0.1Vrms)
-High impedance output voltage gain : 4
-Output impedance : 13Ω(include headphone amplifier chip)
-THD+N : < 0.005% @ 1KHz, maximum output level
Line output
-Fixed level output voltage : 2.7 Vrms (± 0.1Vrms)
-Variable level output voltage : Refer headphone output voltage
-Output impedance : 47Ω
-THD+N : < 0.002% @ 1KHz, maximum output level
Indicate lamp
-Input select lamp x 4 : USB, Coaxial, Optical, Analog
-Mute indicate : Blink
Power input
-Input voltage range : 7Vdc ~ 9Vdc
-Input current : 2A max
Operation environment
-Operating temperature : 10℃~ 35℃
-Storage temperature : -10℃~ 50℃
-Operating & storage humidity : 10% ~ 90%
Dimension / Weight : 106mm x 53mm x 175mm / 1kg >
가정용 방송통신기자재
이기기는 가정용(B 급)으로 전자파적합기기로서 주로 가정에서 사용하는 것을 목적으로 하며, 모든 지역에서 사용할 수있습니다.
인증정보
적합성평가를 받은자의 상호 : SOtM
기자재의 명칭(모델명) : 헤드폰앰프(sHP-100)
인증번호 : MSIP-REM-SoM-sHP-100
제조자/제조국가 : SOtM/대한민국

- 7 -
Windows driver installation precautions
본제품은 Windows OS 용USB audio class 2.0 드라이버 CD 가별도로 제공되며 사용자가
직접 설치 해야 합니다.
The user should install the USB audio class 2.0 driver for Windows OS.
Linux 와Apple OS-X 의최신 버전에는 USB audio class 2.0 driver 가내장되어 있어 별도의
드라이버 설치 작업이 필요하지 않습니다.
The user doesn’t need to install the USB audio class 2.0 drivers for the latest version of Linux
and Apple OS-X.
USB audio 기능은 사용하는 OS 와PC 의상태에 따라 성능의 차이가 나타날 수있습니다.
The performance of USB audio function will be differ from the status of OS or PC.
USB 확장 cable 등은 사용하지 마십시오.(PC 내부의 USB 배선 포함)
Don’t use the USB extension cable.(including USB cables inside of PC)
최상의 성능을 위해 windows 7 이상의 OS 사용을 권장하며 ASIO 또는 WASAPI 출력 사용을
권장 합니다.
For the best audio performance, windows 7 or higher version OS is recommended and ASIO
or WASAPI output is also recommended.
Windows 8 이상의 OS 에서는 window7 호환성 모드에서 드라이버를 설치 해야 합니다.
In windows 8 or higher version OS, install the driver in windows 7 compatible mode.

- 8 -
USB audio class 2.0 driver installation
1. PC 에드라이버 CD 를넣으면 드라이버 설치 프로그램이 자동으로 실행 됩니다. (설치
프로그램이 자동으로 실행 되지 않을 경우 설치 CD 의“\SOtM USB Audio 2.0 Driver”폴더를
열고 ‘setup.exe’파일을 실행 합니다.)
Please put the driver CD into PC, and the setup program will run automatically. (If not, please
execute ‘setup.exe’in “\SOtM USB Audio 2.0 Driver”folder)
2. 다음과 같은 설치 초기 화면이 나타나면 “Next”버튼을 눌러 설치 다음단계를 진행 합니다.
Please click “Next”button to proceed the next stage.
- 9 -
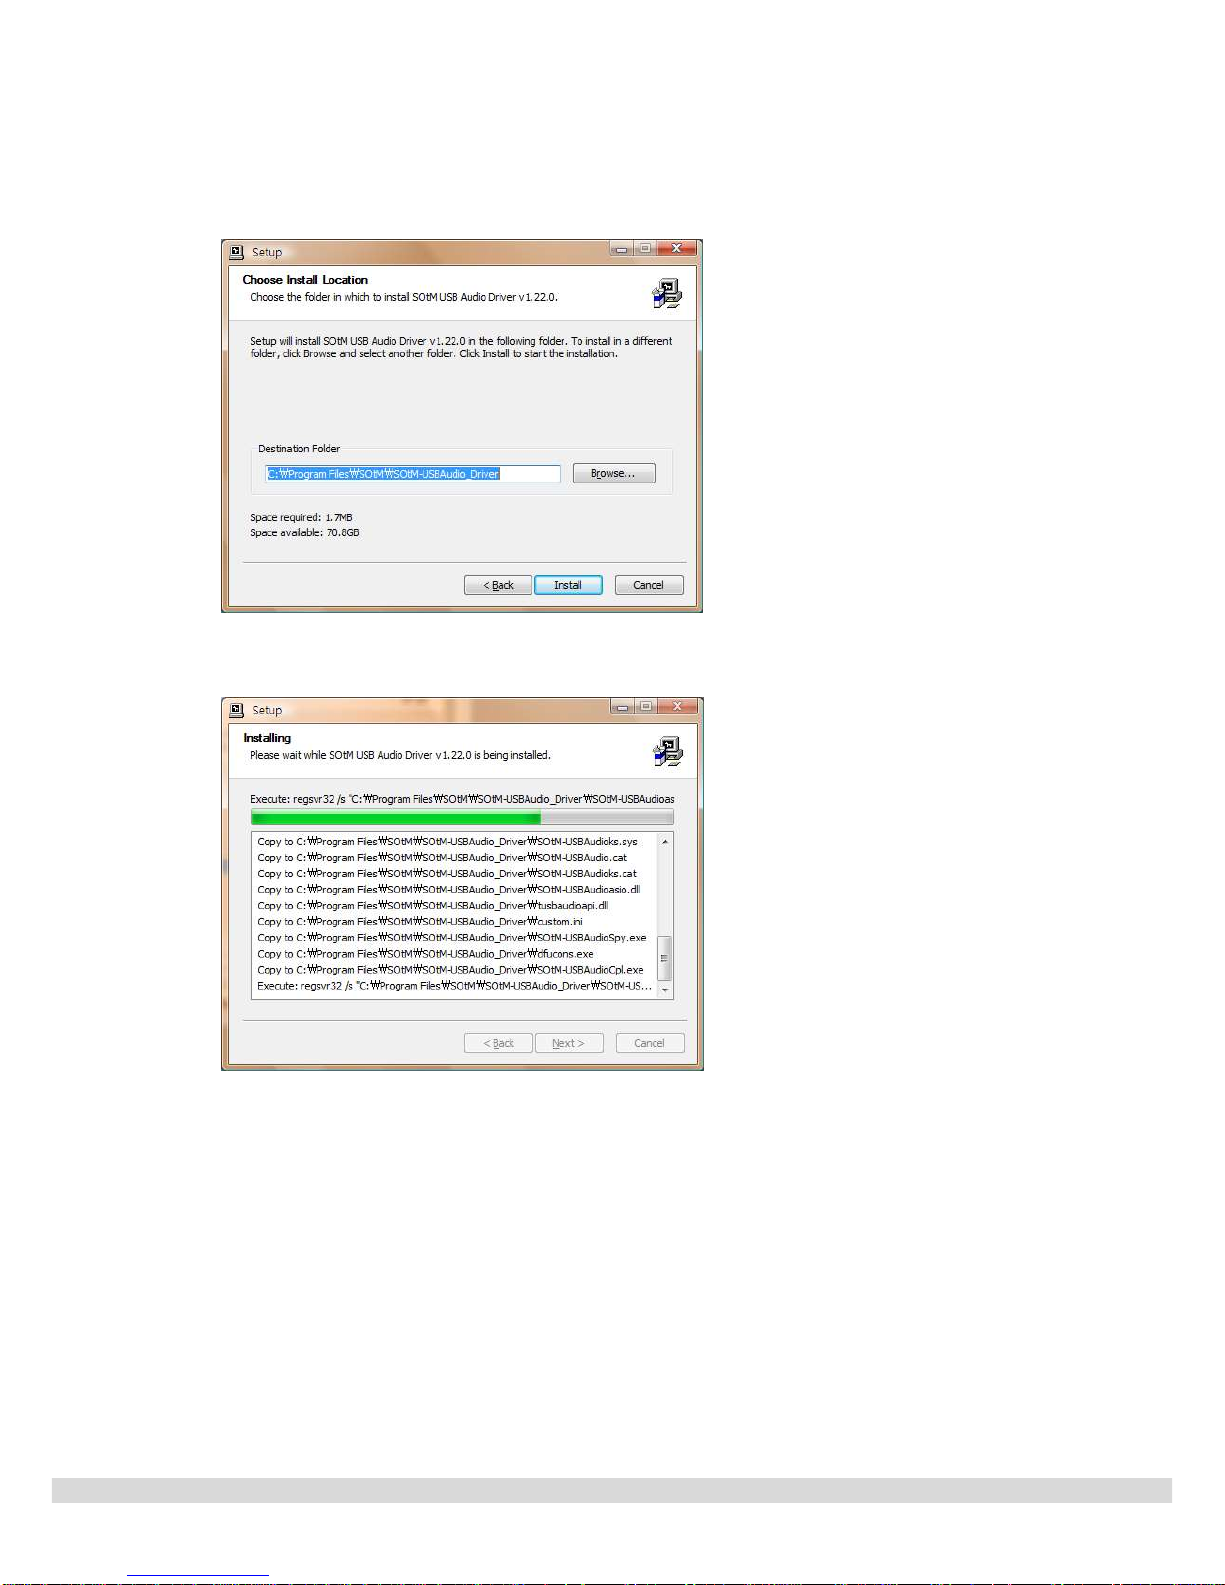
3. 드라이버가 설치 될폴더를 선택하고 “Install”버튼을 눌러 설치를 시작 합니다.
Please select the folder and click the “install”button to start the installation.
4. 필요한 프로그램이 복사되며 설치가 진행 됩니다.
The installation is started.
주의 사항 : USB audio class 2.0 driver 의버전에 따라 USB 기기를 PC 와USB 케이블로
연결 하고 제품을 동작시킨 상태에서 설치 작업을 진행해야 합니다.
Caution : Depends on USB audio class 2.0 driver version, the connection between USB device and
PC by USB cable is needed while installation.

- 10 -
5. 약간의 시간이 지나고 아래와 같이 제품을 연결하고 전원을 켜라는 메시지가 나오면 제품을
USB cable 로PC 와연결하고 제품을 동작 상태로 설정 한후“확인”버튼을 눌러 설치를 계속
진행 합니다.
After a while, the following message will be shown. Please connect the unit to PC by USB
cable and make sure the unit is in operation status, and then click the “OK”button and
proceed the installation.
주의 사항 : USB audio class 2.0 driver 의버전에 따라 아래 메시지가 4 번항목 이전에
나타나거나 생략 될수있습니다.
Caution : Depends on USB audio class 2.0 driver version, the following message will be
skipped or appeared before the 4th stage.
6. 제품 인식과 설정이 완료 되면 “Next”버튼을 눌러 종료 단계로 넘어 갑니다.
Press the “Next”button to go to the final stage once the setup is completed.

- 11 -
7. “Finish”버튼을 눌러 설치 프로그램을 종료 합니다.
To complete the installation of the driver, please click the “Finish”button.

- 12 -
USB audio control panel settings
1. 드라이버 설치가 완료 되면 아래와 같이 작업표시줄의 알림영역에 USB Audio Class Driver
Control Panel 의icon 이표시 됩니다.
The icon for USB audio Class Driver Control Panel will appear on the task bar once the
installation has finished.
2. Control panel icon 을더블 클릭하면 다음과 같은 Driver Info 창이 표시되며 드라이버의
버전정보 등을 확인 할수있습니다.
Please double click the Control Panel icon and then the Driver Info windows will appear, you
can check the driver version information and etc.
- 13 -
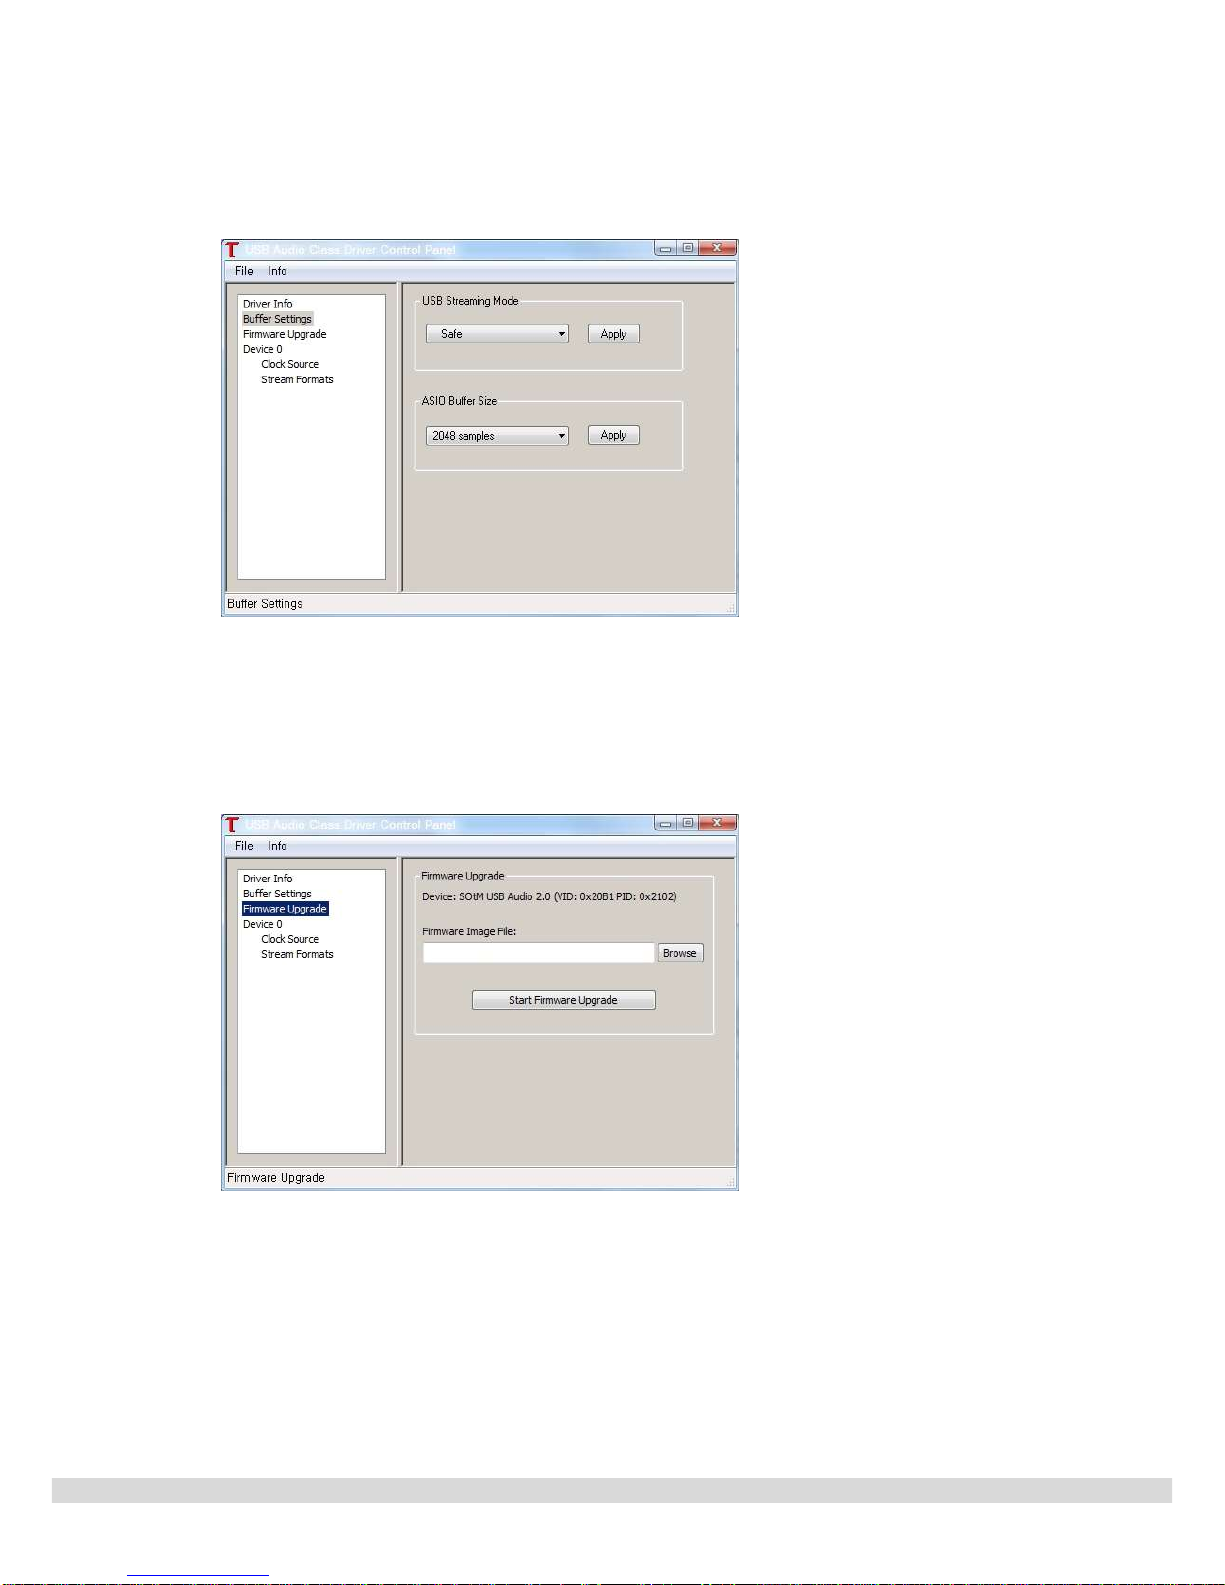
3. Buffer Settings 를선택하면 Streaming Buffer Size 와ASIO Buffer Size 를조절할 수있습니다.
If you select “Buffer Settings’, you can adjust the streaming Buffer Size and ASIO Buffer Size.
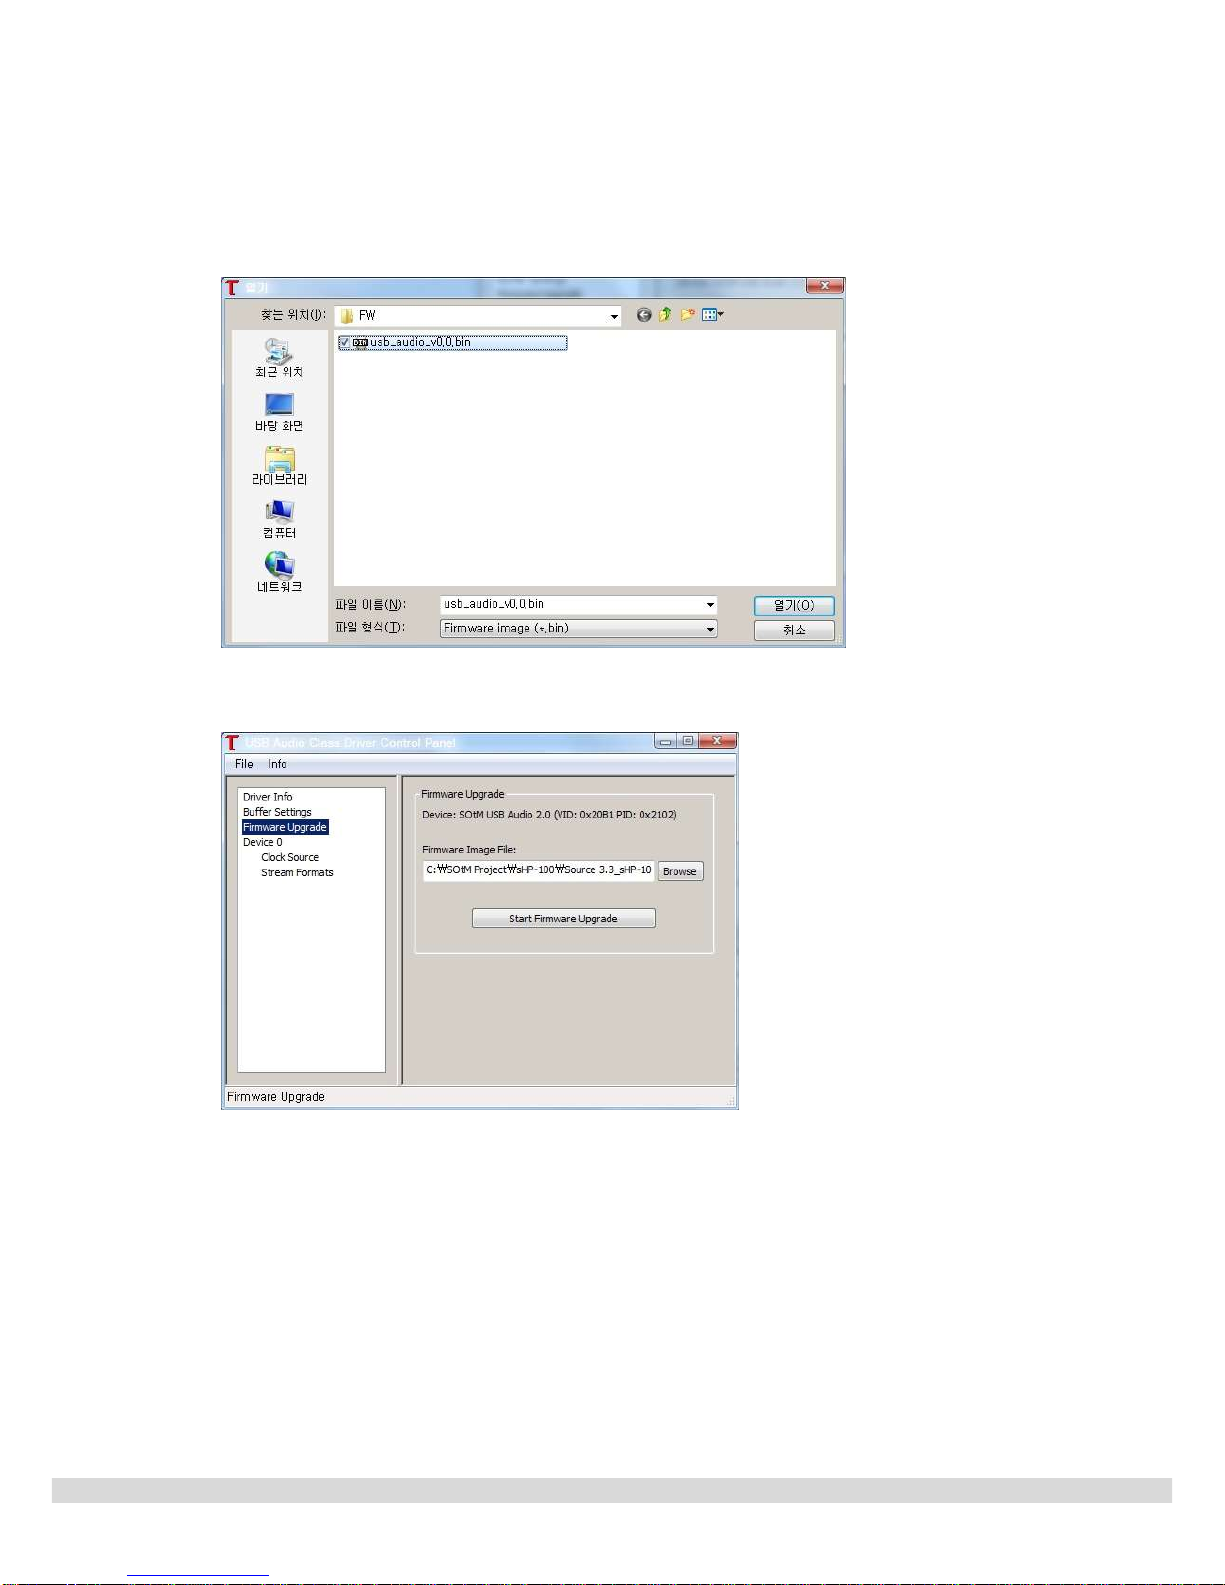
4. Firmware Upgrade 를선택하면 제품의 USB auido 기능의 프로그램을 업그레이드 할수
있습니다. “Browse”버튼을 누르면 업그레이드 펌웨어 파일을 선택할 수있는 열기 창이 표시
됩니다.
If you select “Firmware Upgrade”, you can upgrade the USB audio Firmware. Go to “brows”
button to choose the available upgrade Firmware File.
주의 사항 : 프로그램 업그레이드는 꼭필요 시에만 실행하십시오.
Caution : Please proceed the Firmware Upgrade when needed.
- 14 -
5. 열기창에 업그레이드 할펌웨어 파일을 선택한 후“열기”버튼을 눌러 펌웨어 선택을 마무리
합니다.
Please select and open the firmware file.
6. “Start Firmware Upgrade”버튼을 누르면 펌웨어 업그레이드가 시작 됩니다.
Please click the “Start Firmware Upgrade”button, and the firmware upgrade will be started.
- 15 -
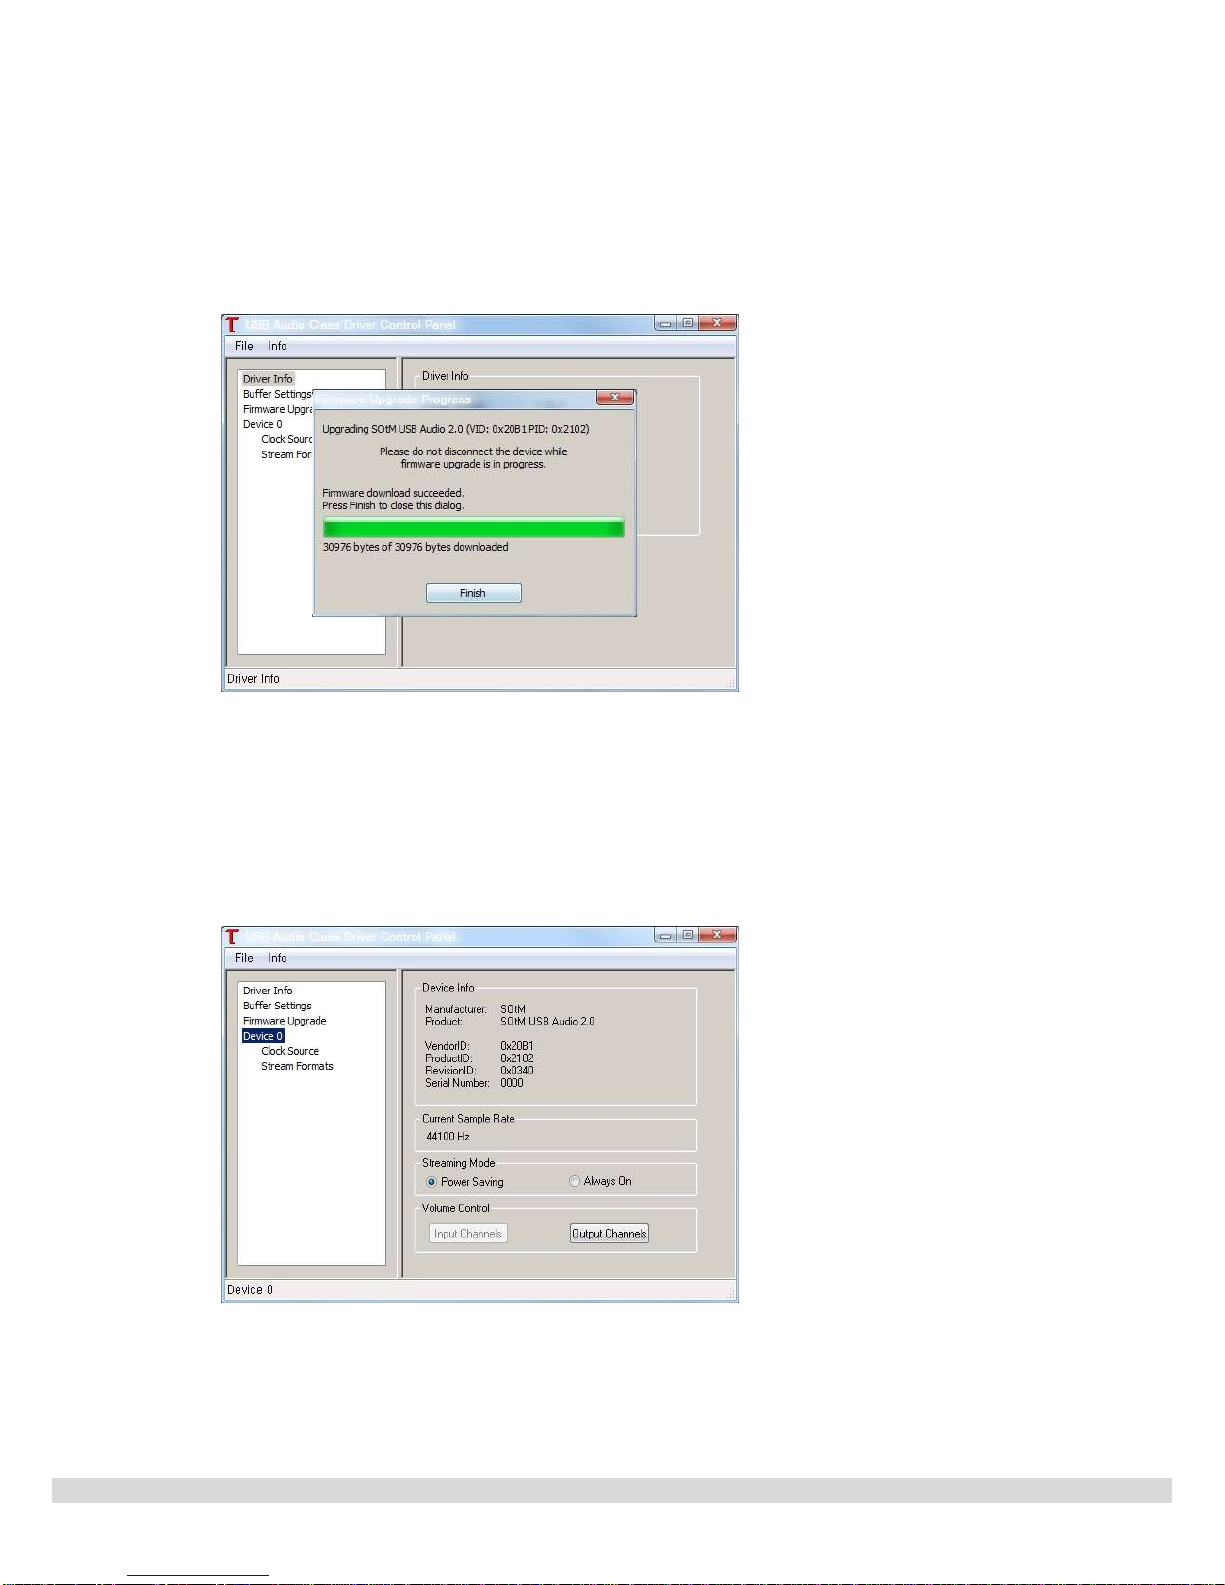
7. 펌웨어 업그레이드가 완료되면 다음과 같은 펌웨어 업그레이드 결과창이 표시됩니다. 결과를
확인 한후“Finish”버튼을 눌러 업그레이드를 종료합니다.
The following message will appear once finished. Please confirm the message and click the
“finish”button.
8. Device 0 를선택하면 설치된 드라이버와 연결된 USB 기기 정보와 샘플레이트 정보가 표시
됩니다. Volume Control 영역의 “Input Channels”또는 “Output Channels”버튼을 눌러
디지털 볼륨을 조절 할수있습니다.
If you select the Device 0, you could see the connected USB device information and the
current sample rate. At the Volume Control, you can control the digital volume by “Input
Channels”or “Output Channels”.

- 16 -
9. Volume Control 창은 아래와 같이 표시되며 최대(0dB)및최소(Mute) 값으로 버튼을 이용하여
간단하게 제어를 할수있고 슬라이드 바를 이용하면 미세 조절이 가능합니다.
The Volume Control windows will be shown as the below image, and you can control the
maximum(0dB) and minimum(Mute) value by the buttons and use the slide bar for fine
adjustment.
10. Clock Source 를선택하면 제품에 사용중인 클럭소스의 정보를 볼수있으며 필요 시
클럭소스를 선택할 수있습니다.
If you select the Clock Source, you could see the information of the clock source and choose
the clock source when needed.

- 17 -
11. Stream Formats 를선택하면 사용중인 입출력 포맷 정보를 확인할 수있으며 필요 시입출력
포맷을 설정 할수있습니다.
If you select Stream Formats, you could see the input and output formats information, and
setup the input and output formats when needed.

- 18 -
S
O
t
M
Ultimate High Performance Audio
www. sotm-audio.com
Table of contents
Other SOtM Amplifier manuals


