SOtM sPA-1000 User manual

sPA-1000 Operating instructions Rev1.1
Precaution
Please read these instructions carefully before use.
◼Do not attempt to disassemble or modify the product.
◼Keep the product away from external shocks or vibrations.
◼Do not use damaged or peeled cables.
◼Do not use the product outdoors.
◼Product specifications and features are subject to change without notice.
Warranty Information
◼Free warranty service
⚫In the case that a defect is found which is caused by a design or production flaw while using the device properly, the manufacturer is
responsible for the faulty product and there is free warranty service for 1 year from the date of purchasing.
⚫Even during the warranty service period, malfunction or damage of products caused by inevitable incidents such as a natural disaster is
not subject to the free warranty service.
◼Warranty service at a cost
⚫The free warranty service period is expired.
⚫Malfunction of the product caused by a user’s fault.
⚫Malfunction of the product caused by incidents.
⚫Malfunction of the product caused by a natural disaster such as earthquake, flood, lightning, etc.
⚫In case of the warranty service at a cost, the customer should cover the shipping costs.
◼Examples of a user’s fault
⚫In case of attempts to disassemble or modify the device.
⚫In case of not following the instructions in this manual.
◼Please read these operating instructions and Q&A board on our website carefully before asking for the warranty service.
Supplied components
◼sPA-1000 unit
◼AC power cable
◼Operating instructions
Specifications
◼User interface
Operating indicator LED x1
Standby switch(Front panel)
AC power input on/off switch(Rear panel)
◼Analog input
Voltage : 100Vac ~240Vac
Unbalanced input x1
Max input voltage 2Vrms
Input impedance : > 10KΩ
Balanced input x1
Max input voltage 2Vrms
Input impedance : > 10kΩ
All balanced circuit
High end audio grade component
◼Amplifier output
Custom design class-D amplifier
High precision amplifier power regulator
Power supply active noise canceller
Channels : 2 (Bridge tied load)
Power output : 200W@4 ohm / channel
Frequency response : 20 ~ 40KHz
THD+N : 0.05% > @ 1W, 8 ohm
SNR : TBD
Dynamic range : TBD
Input sensitivity : TBD
Output short protection
Over temperature protection
◼Trigger in/out
3.5mm audio jack in / out
12V/0.2A max
◼AC power input
Voltage : 220Vac ~ 240Vac / 100Vac ~ 120Vac
Frequency : 50Hz / 60Hz
Current : 3A / 6A
High current toroidal power transformer
◼Operating environment
Operating temperature : +10 ~ +30℃
Storage temperature : 0 ~ +40℃
Operating & storage humidity : 10% ~ 90%
◼Dimension
360 x 84 x 255(mm)
◼Weight
7.5 Kg >
Ultimate High Performance Audio
www.sotm-audio.com
○
1
○
2
○
12
○
11
○
10
○
9
○
3
○
5
○
4
○
6
○
7
○
8
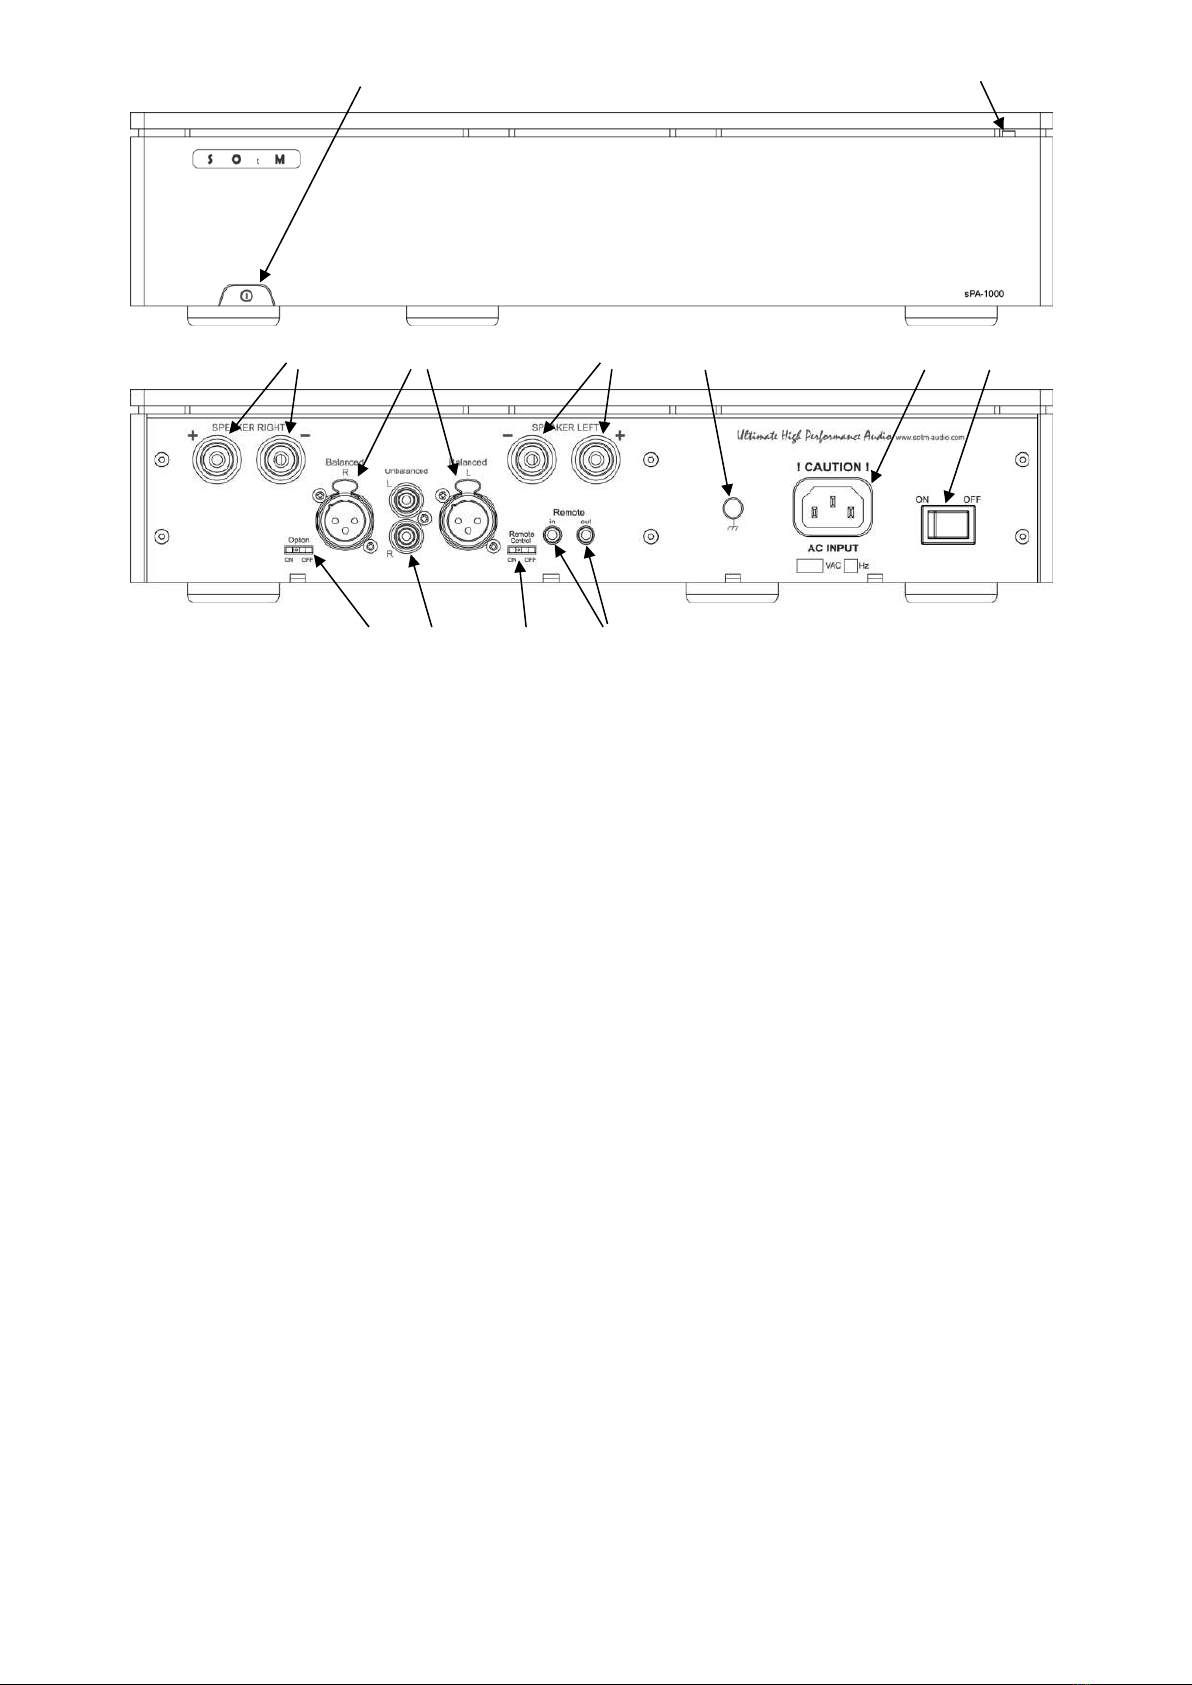
Product outline
①Operating control switch button: Press the button for more than 1 second and then release it to turn the product on and off. If the Remote operation control switch(○
8)
is set to ON, this button will not work.
②Operating indicator LED lamp : It lights up during normal operation. It blinks when the product turns on and off or when there is a problem with the product.
③Right amplifier output connector: Match the + and - polarity and connect the right speaker with the speaker cables.
④Left amplifier output connector: Match the + and - polarity and connect the left speaker with the speaker cables (Be careful with the polarity, it is opposite to the right
speaker.).
⑤Balanced audio signal input connector : Connect to the balanced audio signal output connector of a DAC or Pre amp.
⑥Unbalanced audio signal input connector : Connect to the unbalanced audio signal output connector of a DAC or Pre amp.
⑦Option switch : When the product is in operating status, it may affect AM radio reception status. If this is the case, set to OFF position to improve AM radio reception.
When not in use, set to ON position.
⑧Remote operation control switch: Set to ON position when using the remote operation control function. Set to OFF position when not using the remote operation
control function.
⑨Remote operation signal input and output jacks: When Remote operation control switch(○
8) sets to ON, the product operation is controlled according to the state of
12v remote control voltage signal input(12v : on / 0v : 0ff ) through the 3.5mm input jack. The output jack outputs the remote control signal status of the input jack
for transmitting the remote control signal to the other remote product.
⑩Grounding terminal: This is the chassis ground(earth) terminal. If separate grounding is required, connect to the ground(earth) by ground(earth) cable.
⑪AC power inlet: Connect a C13 type AC power cable.
⑫AC power switch
Precautions
◼Before connecting the AC power, check the AC power voltage, and then connect an AC power cable.
◼Turn off the AC power switch before connecting or disconnecting any cables.
◼Balanced (○
5) and Unbalanced (○
6) connectors cannot be used at the same time.
Product user guide
◼Connect the speakers and amplifier outputs connectors(○
3, ○
4) by speaker cables. Be sure to match the + and - polarities when connecting the speaker cables.
◼Connect to the audio signal output connector from a DAC or Preamp to either the Balanced or Unbalanced input connector(○
5, ○
6).
◼When using the remote operation control function, set the Remote operation control switch (○
8) to the ON position and connect the remote control signal cable to the
Remote operation signal input and output jacks (○
9)
◼Make sure that the AC power switch (○
12 ) is off and connect the AC power cable to the AC power inlet(○
11 ).
◼Make sure that all connections are good, and then turn on the AC power switch (○
12 ).
◼When the power is on, the front LED lamp blinks several times and turns off.
◼Press the Operating control switch button (○
1) on the front panel for more than 1 second and then release the button to turn the product on. When using remote control
function, you can turn on the product by applying remote control signal (12v).
◼Play music through connected audio devices.
◼When not using the product, press the Operating control switch button (○
1) on the front panel for more than 0.5 second and then release the button to turn off the product.
When remote control function is used, you can turn off the product by not applying remote control signal (0v).
◼When the product is not in use for a long time, turn off the AC power by setting AC power switch (○
12 ) to OFF.
Table of contents
Other SOtM Amplifier manuals


