SOtM sMS-1000 User manual

Ultimate High Performance Audio
www.sotm-audio.com
sMS-1000 Operating Instructions
Rev 1.0a

Page 2
Precautions
반드시 본 사용설명서를 모두 읽은 후 제품을 사용하십시오.
Please read this instruction carefully before usage.
제품의 분해, 개조등을 하지 마십시오. •
Do not attempt to disassemble or modify the device.
제품에 진동, 충격을 가하지 마십시오.•
Keep the device away from external shock or vibration.
손상 되거나 피복이 벗겨진 cable은 사용하지 마십시오.•
Do not use damaged or peeled cable.
USB cable은 반드시 USB 2.0이 지원되는 제품을 사용하십시오.•
Use USB cable that supports USB 2.0 specicatioin.
제품 설치 시 제품의 방열구멍이 막히지 않게 설치 하십시오.•
When installed, do not block the hole for radiation of heat.
제품을 실외에서 사용하지 마십시오.•
Do not use outside.
제품과 함께 제공된 전원장치만을 사용 하십시오.•
Use the adaptor that is supplied with product.
본 제품과 타 제품과의 케이블 연결은 전원 케이블이 연결되지 않은 상태에서 모두 연결 •
하시고난 후 전원 케이블을 연결 하십시오.
Connect power cable only after the device is connected to all other devices.
본 제품과 타 제품과의 케이블의 분리는 전원을 o한 후 전원 케이블을 분리하고 다른 케•
이블을 분리 하십시오.
Turn o the device and disconnect power cable before disconnect other cable with
other devices.
본 메뉴얼에 설명 되는 모든 기능 및 사양은 예고 없이 변경 또는 기능이 삭
제 될 수 있습니다.
Product specications and features to improve performance are subject to
change or remove without notice.

Page 3
Contents
제품 보증 정보 (Waranty information)......................................... 04
구성품 (Supplied Accessories)................................................... 05
전 후면 이름 및 기능 (Front & Rear Panels)............................... 06
sMS-1000의 사용 방법 (Using sMS-1000)................................. 08
스마트폰 App 정보(Smartphone App information)..................... 09
시작, Web GUI 연결 (Start up, Connect Web GUI).................... 10
Web GUI
연결 및 주 메뉴 (Web GUI Main Menu)............................... 11
네트워크 문제 해결 (Network troubleshooting).................... 12
CD, DVD 자동 리핑 (CD and DVD auto ripper)................... 13
FLAC파일 자동 복제 (FLAC Mirror)..................................... 14
시스템 정보 (System Information)....................................... 15
네트워크 설정(Network Conguration)................................ 16
시스템 설정 (System Conguration).................................... 17
USB 백업 (USB Backup)..................................................... 18
DLNA UPnP 서버 (DLNA(UPnP) Server)............................ 19
DAAP(iTunes) 서버 (DAAP(iTunes) Server)....................... 20
Vortexbox Player 설정 (Congure VortexBox Player)......... 21
업그레이드 상태 (Upgrade Status)...................................... 22
Logitech Media Server
연결 및 주 화면 (Logitech Media Server)............................ 23
음원 탐색 (LMS - My Music)............................................... 24
인터넷 라디오 (LMS - Internet Radio)................................ 25
음원 재생 (LMS - Music Play)............................................. 26
네트웍 파일 서버 (NFS)............................................................. 27
윈도우 파일 공유 (Samba server)
Vortexbox 삼바서버 (Vortexbox Samba server)................. 28
공유 폴더 (SMB - Share folder).......................................... 29
공유 폴더 탐색 (SMB - Browse folder)................................ 30
제품 사양 (Specication)............................................................ 31

Page 4
Waranty information
A/S 정보
Warranty service information
1. 무상 A/S
Free warranty service
- 정상적인 사용중 설계, 제조상의 결함으로 발생된 불량에 대하여 구입일로 부터 1년간 A/S를 보증 합니다.
In case of defect of the device is found, that is caused by design or aw from production, while using the device
properly, Manufacturer is responsible for that faulty product and guarantee free warranty service for one year
from the date of purchasing
- 무상 A/S기간 중 이라도 천재지변등 불가 항력적인 요인으로 인한 제품의 고장 및 파손은 무상 A/S대상에서 제외
됩니다.
Even in warranty service time, malfunction or damage of the device that is caused by inevitable incident such as
natural disaster is not subject of free warranty service
2. 유상 A/S
Warranty service at a cost
- 무상 A/S기간이 지난 제품
Product that free warranty service period is expired.
- 소비자 과실로 인한 제품의 고장
Malfunction of the product, which is caused by user’s fault.
- 사고로 인한 제품 고장
Malfunction caused by incident.
- 지진, 수해, 낙뢰등 천재지변으로 인한 제품의 고장
Malfunction caused by natural disaster such as earthquake, ood, lightning & etc.
- 유상 A/S의 경우 운송비는 소비자 부담 입니다.
In case of warranty service at a cost, customer should cover the freight cost
3. 소비자 과실 유형
Samples of user’s fault
- 제품의 분해, 개조등을 한 제품
In case of attempt to disassemble or modify the device
- 사용설명서에 명시된 사용법 미 준수로 인한 불량
In case of not follow instructions on this manual.
4. A/S를 의뢰하기전 본 사용설명서와 홈페이지의 Q&A항목을 충분히 검토 하시기 바랍니
다.
Please read this instruction manual & Q&A on our website carefully before asking for
warranty service.
SOtM은 본 제품과 함께 사용되는 내, 외장 저장 장치의 자료에 대해서는 어떠한 책임•
도 지지 않습니다.
SOtM is not responsible for any loss of the data in the internal or external storage
device that is used with product.
Page 5
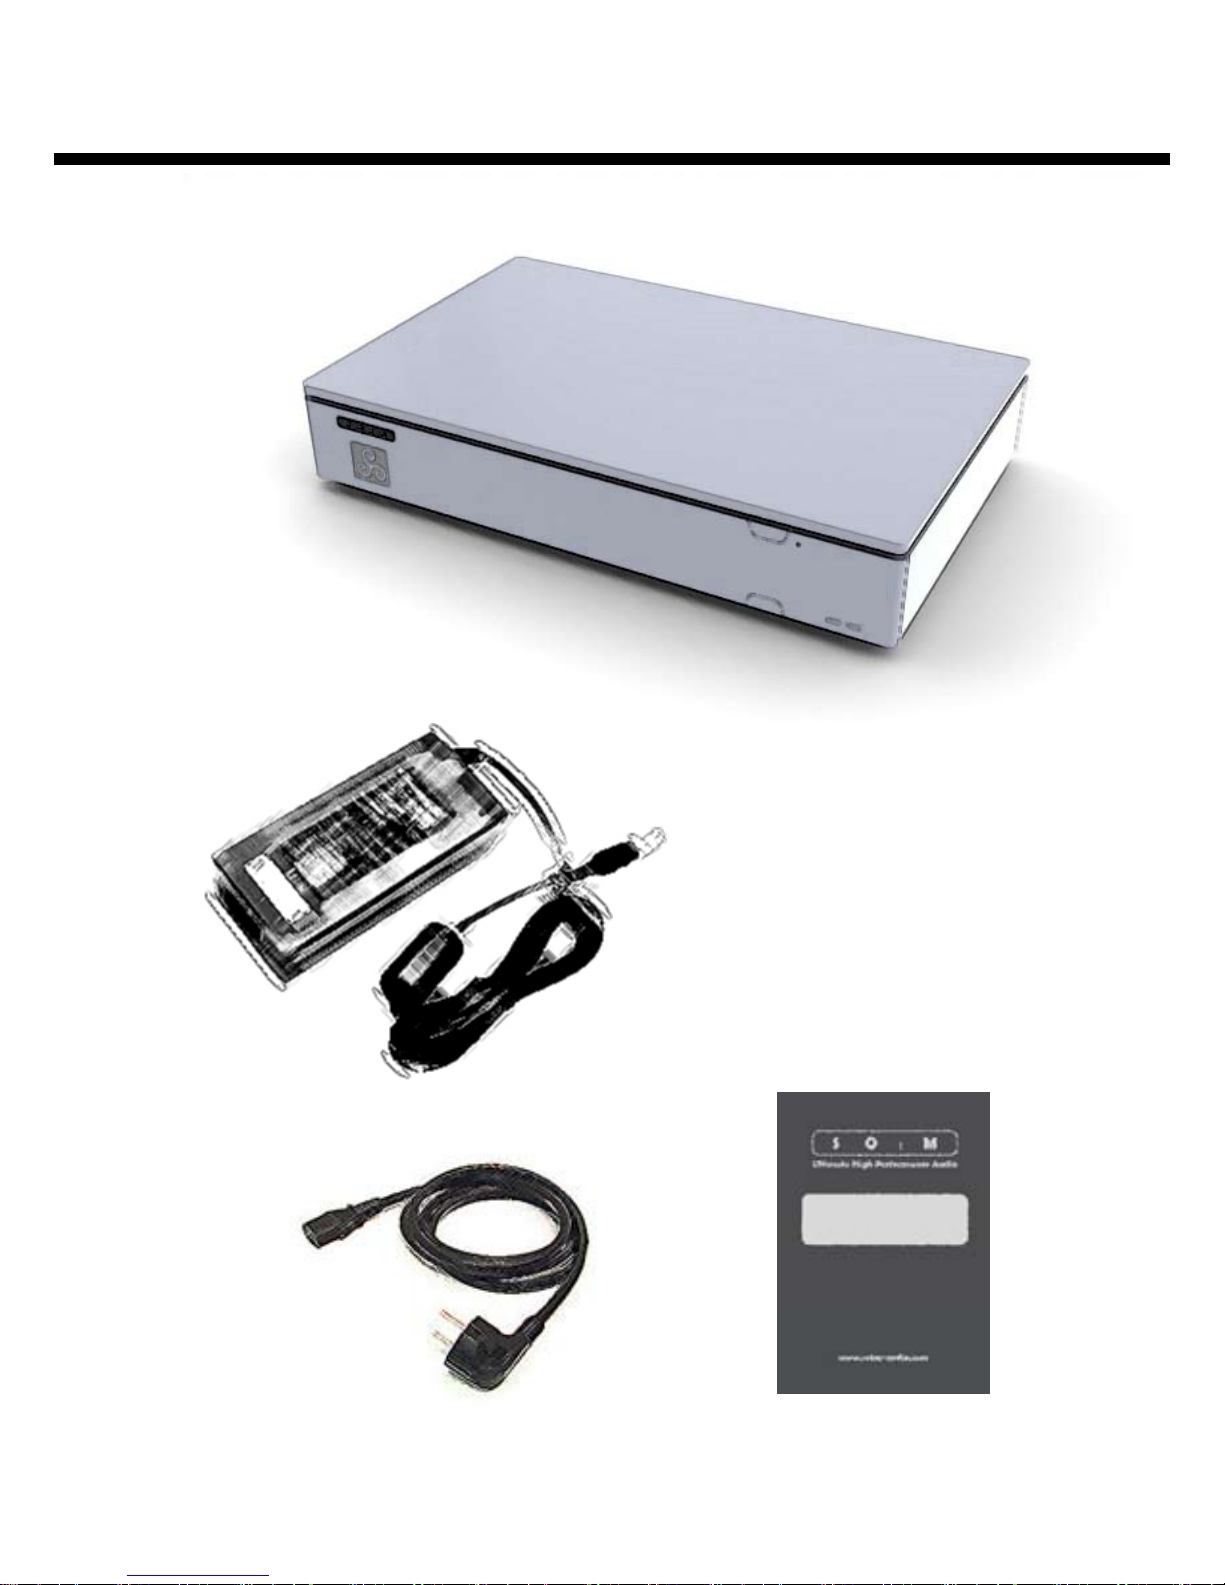
Supplied Accessories
1. sMS-1000
2. DC adaptor
4. Operating instructions
3. Power cable

Front & Rear Panels
1. Power input
DC Power input jack.
전원 입력 잭 입니다.
2. Power on/o switch
DC Power on/o switch.
전원 on/o 스위치 입니다.
3. Earth terminal
Connect to earth(ground).
접지 연결 터미널 입니다.
4. USB port power switch
Control USB +5v output of USB port 1.
USB port 1의 전원을 on/o 제어 합니다.
5. Audio grade USB port 1
Connect to USB device.
USB audio 기기와 연결 합니다.
6. Audio grade USB port 2
Connect to USB device.
USB 기기와 연결 합니다.
7. Main board USB port
Connect to USB device.
USB 기기와 연결 합니다.
8. LAN port
Connect to network router.
이더넷 공유기와 연결 합니다.
10. N.C
Not connect.
사용하지 않는 커넥터 입니다.
Page 6
1
23
POWER INPUT
USB PORT 1 USB PORT 2
POWER
PORT 1
ON
OFF
DC INPUT
VGA
DVI
USB USB
LAN
LINE
1
23456
N.C N.C
78
1. Standby button
Press to standby/operate.
전원을 on/o 하는 버튼 입니다.
2. Eject button
Press to eject CD.
CD를 꺼내는 버튼 입니다.
3. Power & HDD LED
Indicate power status and storage device operation status.
전원 상태와 저장장치 동작 상태를 표시 합니다.
Front panel
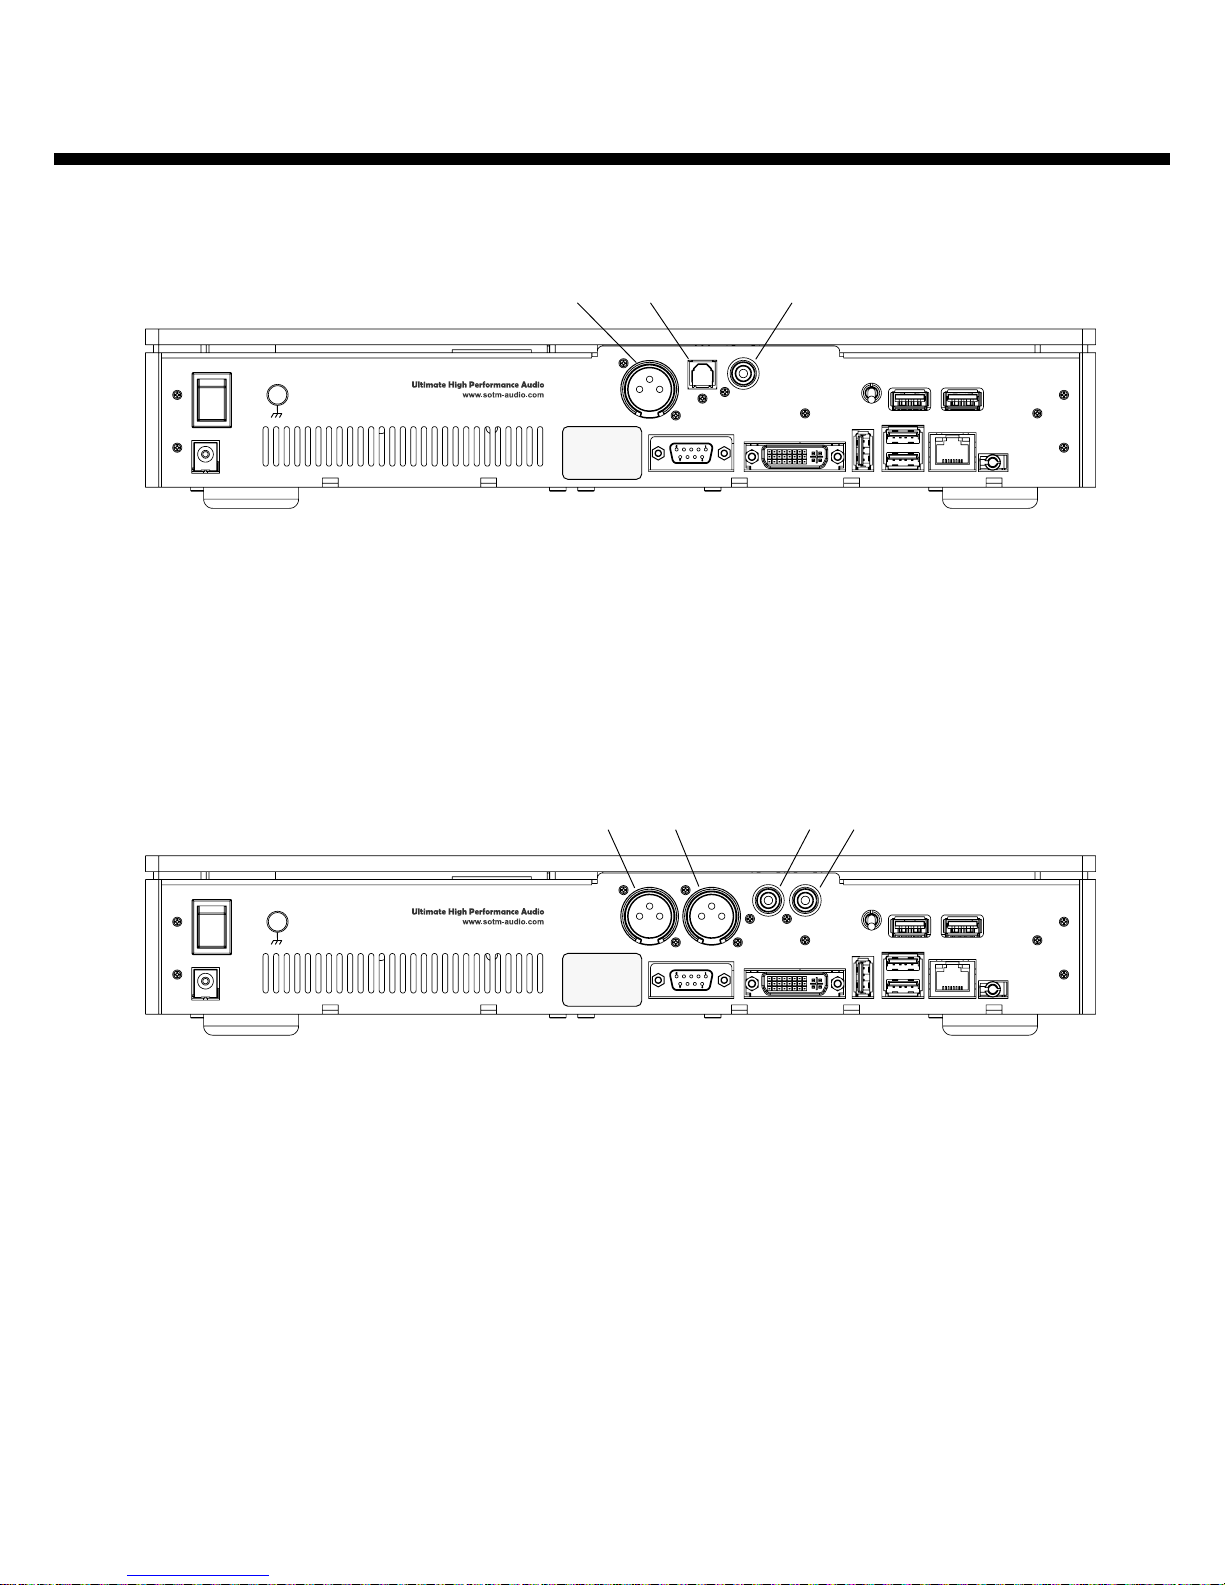
Rear panel - USB output model (sMS-1000u)
Page 7
POWER INPUT
USB PORT 1 USB PORT 2
POWER
PORT 1
ON
OFF
AES/EBU OPTICAL COAXIAL
DC INPUT
VGA
DVI
USB USB
LAN
LINE
123
RIGHT LEFT RIGHT LEFT
POWER INPUT
USB PORT 1 USB PORT 2
POWER
PORT 1
ON
OFF
DC INPUT
VGA
DVI
USB USB
LAN
LINE
1234
Rear panel - Digital output model (sMS-1000d)
1. AES/EBU digital output
Connect to DAC AES/EBU input.
DAC의 AES/EBU 입력과 연결 합니다.
2. Optical digital output
Connect to DAC optical input.
DAC의 optical 입력과 연결 합니다.
3. Coaxial digital output
Connect to DAC coaxial input.
DAC의 coaxial 입력과 연결 합니다.
1. Right balance analog output
Connect to amplire right balance input.
앰프의 우측 발란스 아나로그 입력과 연결 합니다.
2. Left balance analog output
Connect to amplire left balance input.
앰프의 좌측 발란스 아나로그 입력과 연결 합니다.
3. Right unbalanced analog output
Connect to amplire right unbalance input.
앰프의 우측 언발란스 아나로그 입력과 연결 합니다.
4. Left unbalanced analog output
Connect to amplire left unbalance input.
앰프의 좌측 언발란스 아나로그 입력과 연결 합니다.
Rear panel - Analog output model (sMS-1000a)
Rear Panels
주의 사항
Caution
동시에 두 개 이상의 USB 포트를 사용하지 •
마십시오.
Do not use more than two USB port at the
same time.
USB 키보드와 USB 마우스를 사용하지 마•
십시오.
Do not use USB keyboard and USB
mouse.
VGA, DVI, LINE 커텍터는 사용하지 마십•
시오.
Do not use VGA, DVI and LINE connector.

LAN cable
LAN cable
Wireless LAN
Wireless LAN
Wireless LAN
Using sMS-1000
sMS-1000은 제품에 내장돤 HDD에 저장되어 있는 음악파일을 재생 할 수 있는 뮤직 플
레이어 이자 저장된 파일을 공유할 수 있는 파일서버 입니다.
sMS-1000 is music player that can play music les saved in built-in HDD and le server
for sharing saved les.
제품에 설치되어 있는 vortexbox OS의 다양한 기능들을 이용하여 아주 쉽게 음악을 재
생하고 저장된 파일을 공유 할 수 있습니다.
By using various functions of vortexbox OS installed on product, you can play music
les and share saved les quite easily.
이를 위해 sMS-1000은 PC또는 스마트폰이 연결되어 있는 네트워크 공유기를 통해 네트
워크에 연결 되어 있어야 합니다.
For this, sMS-1000 should be connected to network through network router that is con-
nected to PC or smart phone.
네트워크에 연결된 sMS-1000은 웹브라우져와 전용 앱(App)을 통해 제어 됩니다.
sMS-1000 connected to network is controlled by web-browser or exclusive App.
또한 PC의 파일 공유 기능(Samba 기능)을 이용하여 sMS-1000에 내장된 HDD에 저장된
파일을 관리(복사, 이동, 삭제, 수정등) 할 수 있습니다.
Also, using le sharing function of PC(Samba server), you can manage(copy, move,
erase & modify) saved le in built-in HDD of sMS-1000.
Page 8

Smart phone App information
Page 9
Logitech Squeezebox Controller App이 설치된 스마트폰 또는 타블릿 PC로 저장된 음악
을 다양한 방법으로 탐색하고 재생 할 수 있으며 인터넷 라디오를 청취 할 수 있습니다.
Logitech Squeezebox Controller App installed smart phone or tablet PC can browse
and play saved music les by various ways and also listening internet radio is possible.
안드로이드(Android) 제품은 안드로이드 마켓에서 , iOS 제품은 App Store에서 Logitech
Squeezebox Controller를 다운로드 받아 설치 하십시오.
Download and install Logitech Squeezebox Controller App from Android market for
Android products or App Store for iOS products.
Play Music Browse Albums Internet Radio
자세한 사용 방법은 App의 사용 설명을 참고 하십시오.
For detail, please refer operating instructions of App
주의 : Logitech Media Server를 제어하기 위한 스마트 폰 또는 타블릿은 sMS-1000•
과 동일한 네트워크에 연결 되어 있어야 합니다.
Caution : Smartphone or tablet for controlling Logitech Media Server should be con-
nected to same network with sMS-1000.
Start up
전원 인가전 준비 작업
Preparation before power supply.
반드시 네트웍 케이블을 제품 후면의 LAN포트에 연결 하십시오.1.
Make sure to connect network cable to the LAN port on the rear panel.
전원을 연결 하기전 필요한 모든 신호선을 연결 하십시오.2.
Connect all necessary signal cables before connect power cable
제품 후면의 전원 입력 잭에 전원 케이블을 연결하고 전원 스위치를 on 한 후 제품 전면의 standby 스위치를 3.
눌러 전원을 인가 하십시오.
After connect power cable to the power input jack and turn on power switch on the rear panel and press the
standby switch on the front panel to supply power.
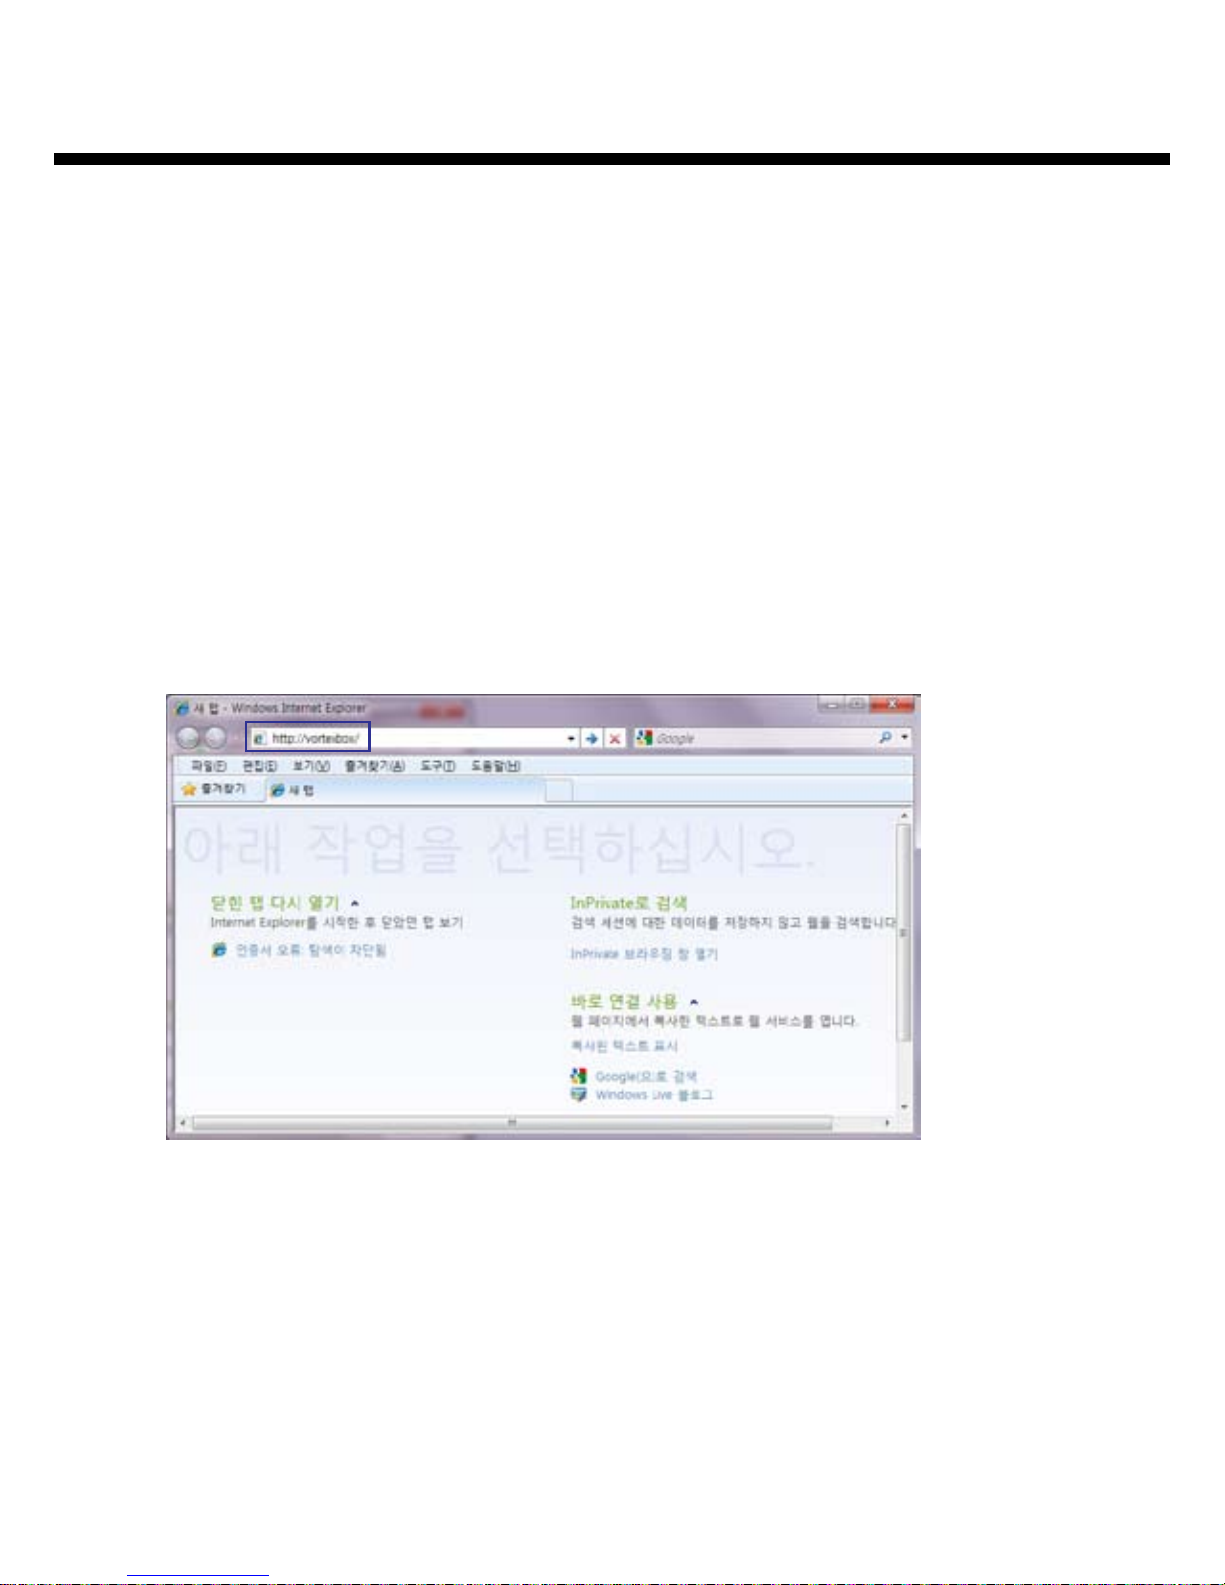
웹브라우저를 이용한 sMS-1000의 Web GUI 연결.
Web GUI connection of sMS-1000 using web browser.
PC의 웹브라우저를 실행 합니다.1.
Run web browser program.
웹브라우저의 주소표시줄에 ‘http://vortexbox/’를 입력한 후 엔터키를 누룹니다.2.
Type ‘http://vortexbox/’ on URL of web browser and press Enter.
Page 10
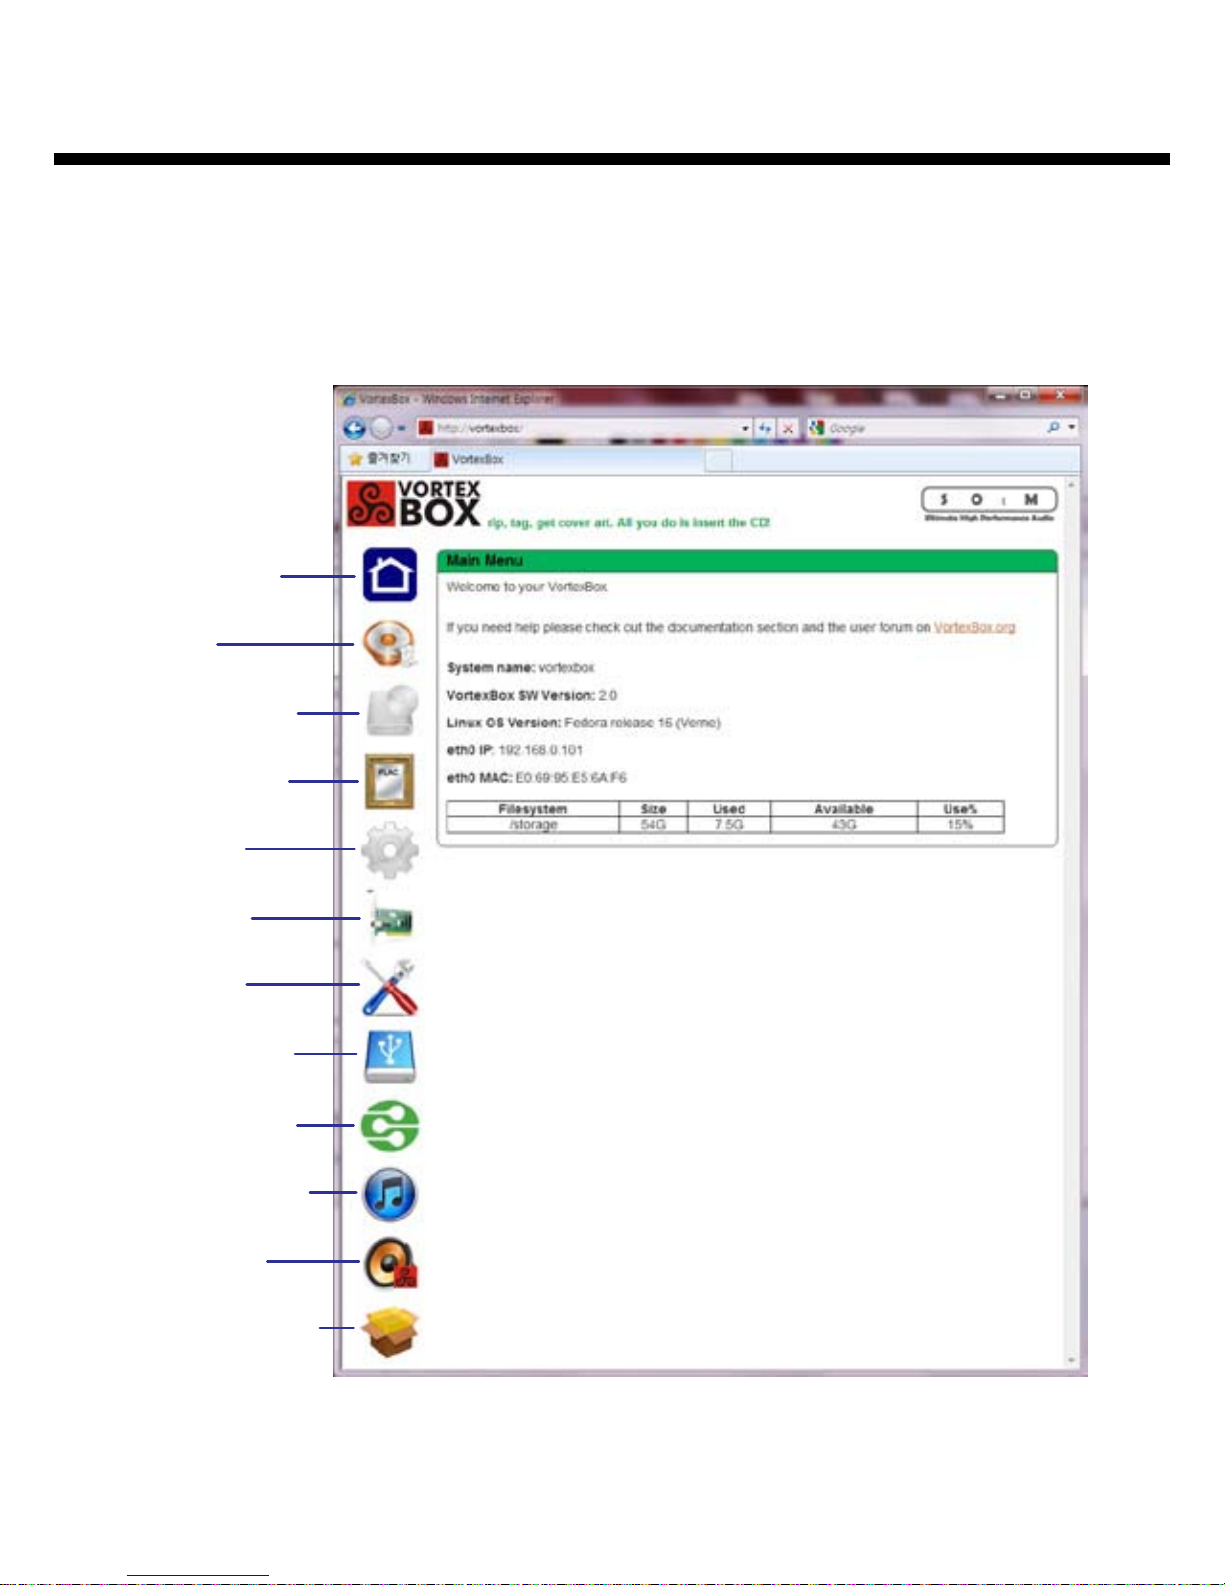
Web GUI Main Menu
정상적으로 Web GUI가 연결이 되면 아래와 같이 Vortexbox web GUI의 Main Menu가
연결되어 표시 됩니다.(Web GUI가 연결이 되지 않을 경우 Network troubleshooting 페
이지를 참고 하십시오)
When connected Web GUI properly, below Main Menu of Vortexbox web GUI is
displayed. (When the connection to Web GUI is not working, please refer Network
troubleshooting page)
Page 11
LMS
(Logitech Media Server)
CD and DVD
auto ripper
FLAC Mirror
Main Menu
System
Informatioin
System
Configuration
Network
Configuration
USB Backup
DLNA Server
DAAP(iTunes)
Server
Configure
Vortexbox Player
Upgrade Status
LMS기능은 Logitech Media Server 페이지를 참고 하십시오.
For LMS function, please refer Logitech Media Server page.

Vortexbox web GUI가 연결되지 않을 때는 아래 내용을 참고 하시어 문제를 해결 하십시
오.
When the connection to Vortexbox web GUI is not working, please refer below to solve
the problem.
네트웍 케이블이 제품 후면의 LAN포트에 연결되어 있는 지 확인 하십시오.1.
Make sure network cable is connected to LAN port on the rear panel.
네크웍 공유기가 DHCP를 지원하도록 설정 하십시오.(거의 대부분의 네트워크 공유기는 DHCP를 기본 설정2.
으로 지원하도록 되어 있습니다. 자세한 내용은 사용 중인 네크웍 공유기의 메뉴얼을 참고 하십시오.)
Set network router to support DHCP (Almost every network router is set to support DHCP basically. For
detail, please refer the manual of network router.)
전원 LED를 이용하여 전원상태를 확인 하고 전원이 o상태일 때는 전원 스위치를 이용하여 전원을 인가하3.
여 주십시오.
Check the power status using power LED. If power is o, turn it on using power switch and standby switch.
전원이 인가된 후 정상적인 동작을 위해서는 1분에서 최대 3분 정도의 시간이 필요 합니다. 전원 인가 후 조4.
금 기다려 주십시오.
Please wait 1 to 3 minutes for normal operation after power on.
‘http://vortexbox/로 web GUI가 연결되지 않을 때에는 IP주소를 확인하여 ‘http://192.168.0.xxx/’와 같이 연결 5.
하여야 합니다.
Please check IP address when connection of web GUI to ‘http://vortexbox/’ is not working and connect it to
‘http://192.168.0.xxx/’.
sMS-1000의 IP주소 확인 방법
Method to nd IP address of sMS-1000
네크웍 공유기 메뉴얼을 참고 하여 sMS-1000(VORTEXBOX)의 IP주소를 확인할 수 있습니다.•
You can nd IP address of sMS-1000(VORTEXBOX) referring to manual of network router.
IP 검색기를 이용하여 sMS-1000(VORTEXBOX)의 IP주소를 확인할 수 있습니다.•
You can also nd IP address of sMS-1000(VORTEXBOX) using IP scanner.
참고 : sMS-1000의 HOSTNAME은 ‘VORTEXBOX’입니다.
Note : Host name of sMS-1000 is ‘VORTEXBOX’.
Network troubleshooting
Page 12

Page 13
CD and DVD auto ripper
CD, DVD를 자동으로 리핑(Ripping)하는 기능 입니다.
Function for CD or DVD ripping.
Restart Auto Ripper1.
자동 리핑 기능을 재시작 합니다.
Restart auto ripper function.
View full log2.
리핑 기록을 보여 줍니다.
Show full ripping record.
Clear log3.
리핑 기록을 삭제 합니다.
Delete ripping record.
Get Cover Art4.
CD 커버를 자동으로 검색하여 저장 합니다.
Search & store CD cover art automatically.
Rip any track longer than ___ seconds.5.
설정된 시간보다 긴 트랙을 리핑 합니다.
Rip track longer than setting time.
Mirror tracks to mp46.
mp4파일을 추가 생성 합니다.
Create additional mp4 le.
Mirror tracks to m2ts7.
m2ts파일을 추가 생성 합니다.
Create additional m2ts le.
Submit8.
변경된 설정을 저장하고 사용 합니다.
Save & use the revised setting.
1234
5
6
7
8

FLAC Mirror
Page 14
FLAC파일을 자동으로 MP3, ALAC파일로
복제하는 기능 입니다.
Function to mirroring FLAC le to MP3,
ALAC le automatically.
Start mp3 mirroring1.
FLAC파일을 mp3파일로 복제를 시작 합니다.
Start mirroring FLAC le to mp3.
Start ALAC mirroring2.
FLAC파일을 ALAC파일로 복제를 시작 합니다.
Start mirroring FLAC le to ALAC le.
Stop mirroring3.
자동 복제를 중단 합니다.
Stop automatic mirroring.
View full log4.
자동 복제 기록을 보여 줍니다.
Show automatic mirroring record.
Clear log5.
자동 복제 기록을 삭제 합니다.
Delete mirroring record.
Delete all mp36.
모든 mp3파일을 삭제 합니다.
Delete all mp3 les.
mp3 Quality7.
mp3복제 시 사용 할 mp3 파일의 품질을 선택 합니다.
Choose the quality of mp3 le when mirroring to mp3.
Enable automatic mp3 mirroring8.
자동으로 mp3파일로 복제를 하도록 설정 합니다.
Set to mirroring to mp3 le automatically.
Enable mp3 embedded cover art9.
mp3파일에 커버이미지를 내장하도록 설정 합니다.
Set to include cover image to mp3 le.
Enable automatic ALAC(Apple lossless) 10.
mirroring
자동으로 ALAC파일로 복제를 하도록 설정 합니다.
Set to mirroring to ALAC le automatically.
Submit11.
변경된 설정을 저장하고 사용 합니다.
Save revised setting and use.
1234
6
7
8
9
5
11
10
Page 15
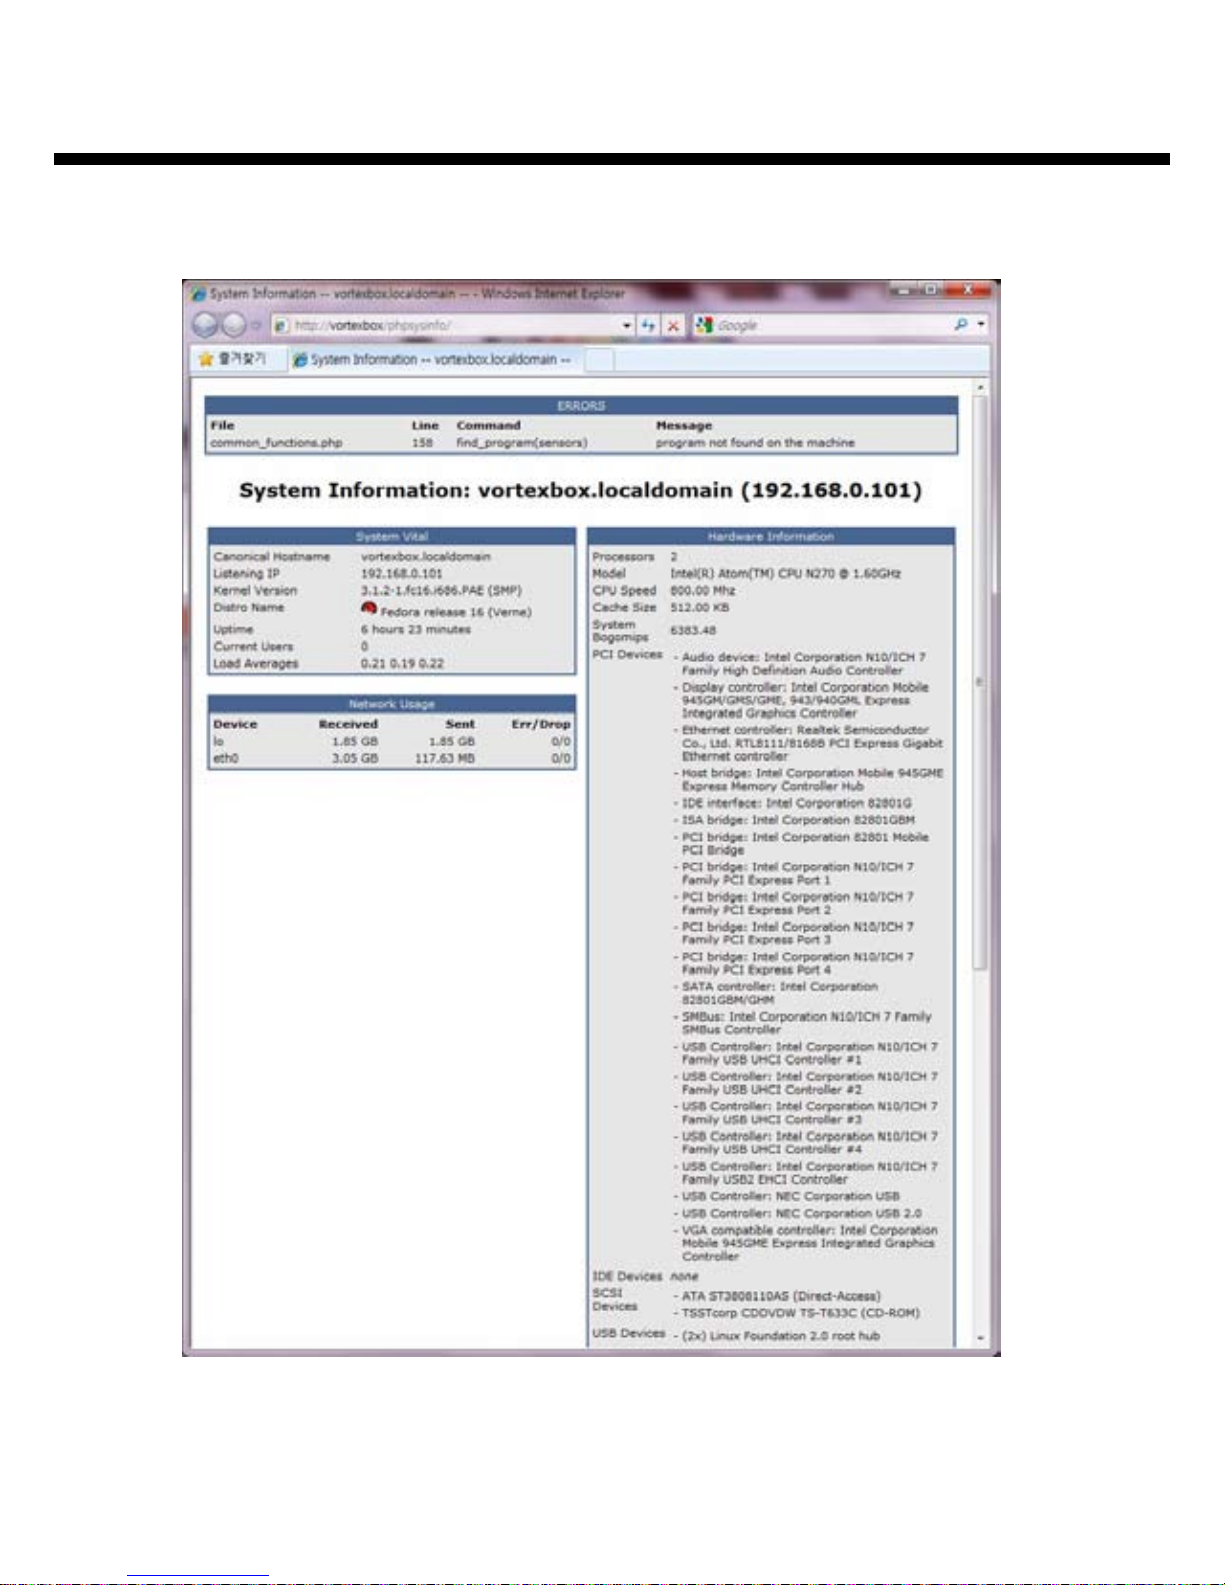
System Information
다양한 시스템 정보를 확인 할 수 있습니다.
You can check various system information.
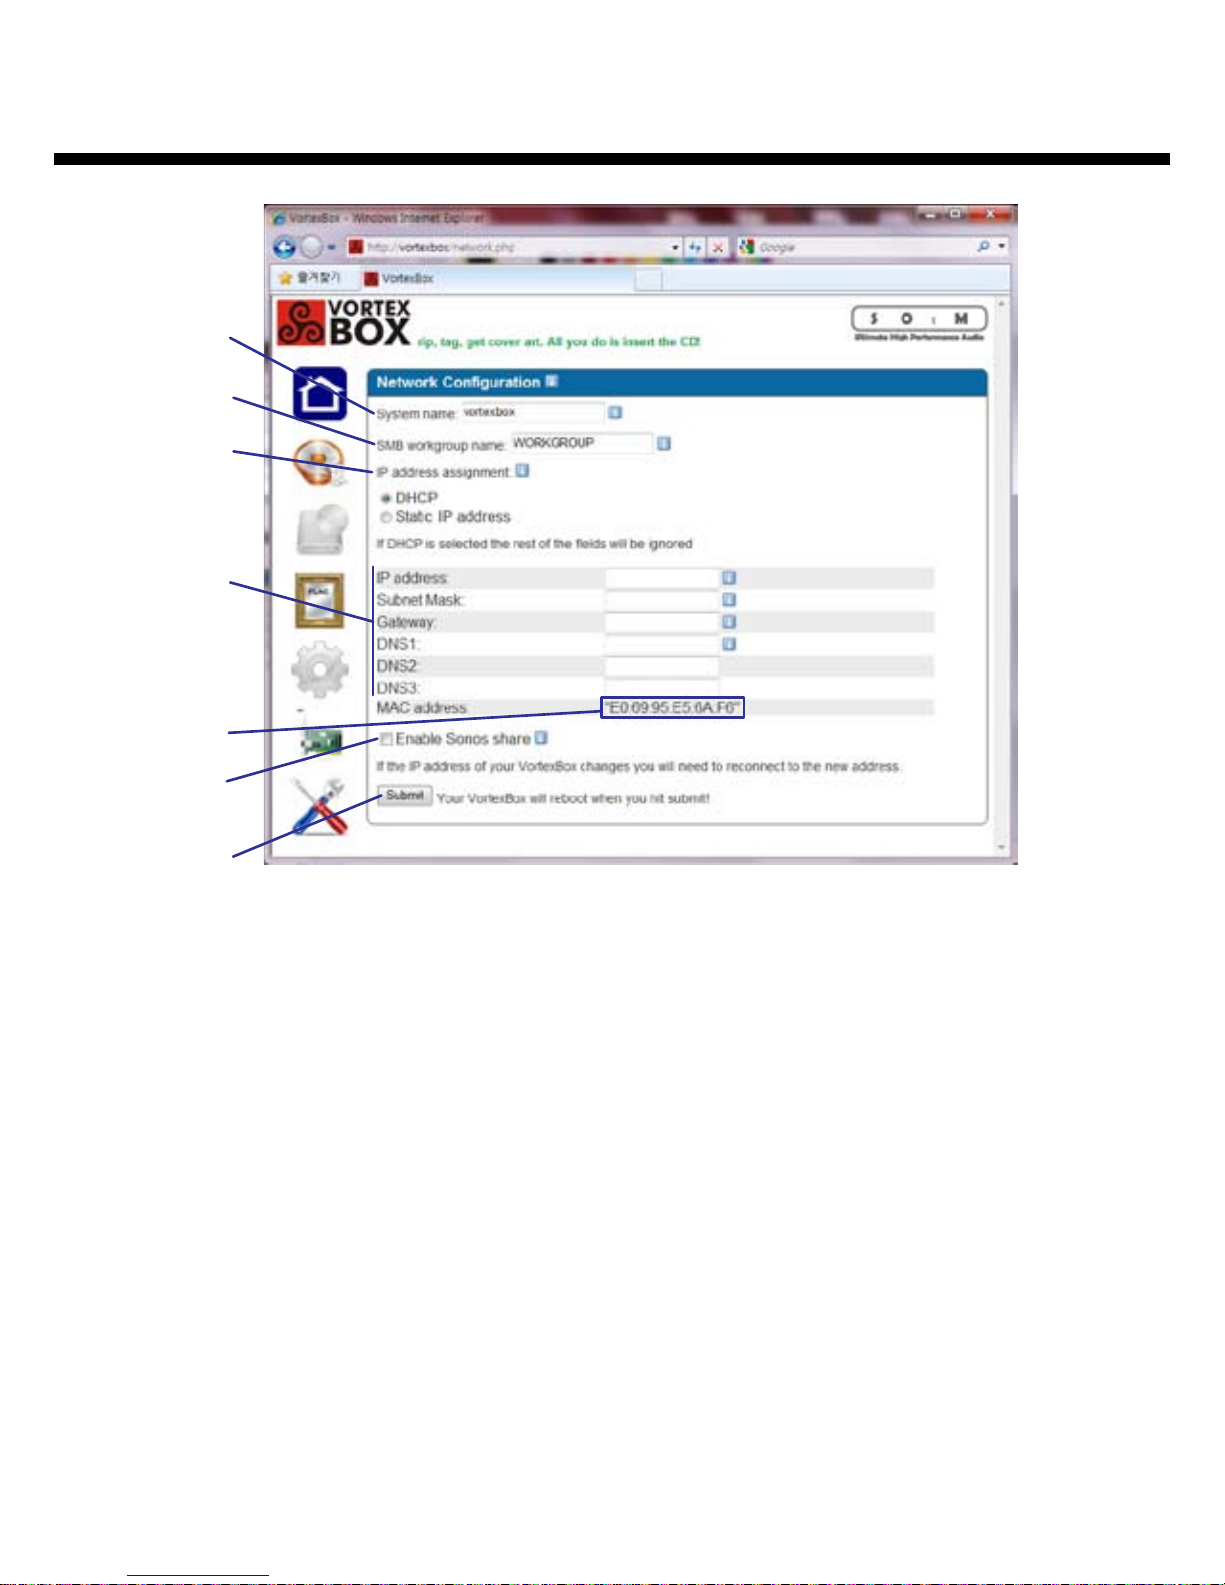
Network Conguration
Page 16
sMS-1000의 네트웍 설정을 변경 합니다.
Change network connection setting of
sMS-1000.
주의 : 잘못된 네트웍 설정은 제품 사용에 문제가 발
생할 수 있습니다. 전문적인 지식이 없으신 분들은 반
드시 기본설정 값으로 사용하여 주십시오.
Caution : Incorrect change of Network Conguration
setting may cause trouble to the product. For those
who do not have enough knowledge, basic setting is
strongly recommended.
System name1.
네크웍에서 사용할 뮤직서버의 이름 입니다.
Name of the music server to use on network.
SMB workgroup name2.
Samba server(삼바서버)에서 사용할 워크그룹 이름 입
니다.
Workgroup name to use on Samba server.
IP address assignment3.
IP주소를 지정하는 방법을 선택 합니다.
Choose the way to assign IP address.
DHCP : 자동으로 네트웍 라우터 에서 IP주소를 지•
정합니다. 네트웍 라우터가 DHCP를 지원하여야
합니다.
DHCP : Assign IP address on network router auto-
matically. Network router should support DHCP.
Static IP address : 수동으로 IP주소를 선택 합니다.•
Static IP address : Assign IP address manually.
Static IP information4.
Static IP address를 선택할 경우 사용할 IP주소 정보를 입
력 합니다. DHCP를 사용할 경우는 입력된 정보는 무시 됩
니다.
If Static IP address is selected, enter IP address informa-
tion to use. If DHCP selected, entered information is
ignored.
MAC address5.
뮤직서버의 이더넷 하드웨어 주소 입니다.
Address of Ethernet hardware of music server.
Enable Sonos share6.
Sonos기기 공유 기능을 사용하게 설정 합니다.
Set to use share function of Sonos device.
Submit7.
변경된 설정을 저장하고 사용 합니다. 이 버튼을 누르면 뮤
직서버는 자동으로 재시작 됩니다.
Save changed setting and use. If this button pressed,
music server restarts automatically.
1
2
3
5
6
7
4

Page 17
System Conguration
sMS-1000의 동작상태를 확인하고 변경
합니다.
Check the operating status of sMS-1000
and change.
Reboot1.
sMS-1000을 재시작 합니다.
Restart sMS-1000.
Power down2.
sMS-1000의 전원을 o합니다.
Turn o sMS-1000.
Correct System Time3.
sMS-1000의 시스템 시간을 보정 합니다.
Calibrate system time of sMS-1000.
Time zone4.
사용 중인 지역으로 타임존을 설정 합니다.
Set the time zone for your area.
Temperature Format5.
온도 표시 방법을 선택 합니다.
Choose display temperature unit
Submit6.
변경된 설정을 저장하고 사용 합니다.
Save changed setting and use.
Service Manager7.
sMS-1000의 서비스 기능의 동작 상태를 확인 하고 각 기능
을 정지, 시작 할 수 있습니다.
Check the operating status of sMS-1000 service function
and stop or start each function.
123
4
5
6
7

USB Backup
Page 18
USB backup기능 입니다 외장 USB HDD가 연결되면 기능 버튼이 모두 표시 됩니다.
USB backup function. When external USB HDD is connected, all function buttons are
displayed.
View full log1.
USB backup 기록을 보여 줍니다.
Show USB backup record.
Clear log2.
Backup 기록을 삭제 합니다.
Delete backup record.
Backup to USB3.
외장 USB HDD로 자료를 저장 합니다.
Save data to external USB HDD.
Restore from USB4.
외장 USB HDD에 저장된 자료를 복원 합니다.
Restore data saved at external USB HDD.
Abort5.
현재 진행 중인 작업을 중지 합니다.
Abort ongoing work.
Format Drive6.
외장 USB HDD를 초기화 합니다.
Format external USB HDD.
123456

Page 19
DLNA(UPnP) Server
DLNA(UPnP) server기능을 설정 합니다.
DLNA기능은 네트웍으로 음악, 영상, 사진
을 공유하는 기능 입니다.
Set DLNA(UPnP) server function. DLNA
function is a function to share music,
video & picture on network.
View full log1.
DLNA server의 동작 기록을 보여 줍니다.
Show operating record of DLNA server.
Clear log2.
동작 기록을 삭제 합니다.
Delete operating record.
Rescan3.
미디어 자료를 재검색 합니다.
Rescan media data.
Reset to defaults4.
DLNA 설정을 초기화 합니다.
Initialize DLNA setting.
Audio Files5.
DLNA서버에서 사용 할 음원 파일의 폴더를 설정 합니다
Set the folder of music les to be used on DLNA server.
VIdeo Files6.
DLNA서버에서 사용 할 동영상 파일의 폴더를 설정 합니다.
Set the folder of video les to be used on DLNA server.
Pictures7.
DLNA서버에서 사용 할 사진 파일의 폴더를 설정 합니다.
Set the folder of picture les to be used on DLNA server.
Max size of cover art8.
앨범 표지 이미지의 최대 크기를 설정 합니다.
Set the maximum size of image of album cover art.
Submit9.
변경된 설정을 저장하고 DLNA 서버를 재시작 합니다.
Save the changed setting and restart DLNA server.
1234
5
6
7
8
9
10

DAAP(iTunes) Server
Page 20
DAAP server기능을 설정 합니다. DAAP기능은 지정된 폴더의 음원을 DAAP 기능을 지
원하는 기기나 소프트웨어로 공유 하는 기능 입니다.(예 : iTunes)
Set the DAAP server function. DAAP function is a function to share music in the des-
ignated folder with the device or software that support DAAP function (for example :
iTunes).
View log1.
DAAP(iTunes) Server의 동작 기록을 보여 줍니다.
Show operating record of DAAP(iTunes) Server.
Reset to defaults2.
모든 설정을 기본값으로 복원 합니다.
Reset the setting to default.
Delete Database3.
사용 중인 데이터베이스를 삭제 합니다.
Delete database in use.
Audio Files4.
DAAP server에서 사용할 음원 자료의 폴더를 설정 합니다.
Set the music folder to use on DAAP server.
Description5.
DAAP server 설명 문구를 설정 합니다.
Set the description of DAAP server.
Submit6.
변경된 설정을 저장하고 DLNA 서버를 재시작 합니다.
Save changed setting and restart DLNA server.
1 2 3
4
5
6
Other manuals for sMS-1000
1
Table of contents


