Soundbarrier LINE X2 User manual

1
LINE X2 SYSTEM
INSTRUCTION MANUAL

2

3
Explanation of Graphical Symbols
The lightning flash with arrowhead symbol within an equilateral
triangle is intended to alert the user to the presence of uninsulated
‘dangerous voltage’within the product’s enclosure that may be of
sufficient magnitude to constitute a risk of electric shock to persons.
The exclamation point within an equilateral triangle is intended to alert
the user to the presence of important operating and maintenance
(servicing) instructions in the literature accompanying the product.
IMPORTANT SAFETY INSTRUCTIONS
1
2
3
4
5
6
7
8
9
Read these instructions.
Keep these instructions.
Heed all warnings.
Follow all instructions.
Do not use this apparatus near water.
Clean only with dry cloth.
Do not block any ventilation openings. Install in accordance with the
manufacturer’s instructions.
Do not install near any heat sources such as radiators, heat registers,
stoves, or other apparatus (including amplifiers) that produce heat.
Do not defeat the safety purpose of the polarized or grounding-type
plug. A polarized plug has two blades with one wider than the other.
A grounding type plug has two blades and a third grounding prong.
The wide blade or the third prong are provided for safety. If the
provided plug does not fit into your outlet, consult an electrician for
replacement of the obsolete outlet.
10
11
12
13
14
Protect the power cord from being walked on or pinched particularly at
plugs, convenience receptacles, and the point where they exit from the
apparatus.
Only use attachments/accessories specified by the
manufacturer.
Use only with the cart, stand, tripod, bracket, or table
specified by the manufacturer, or sold with the
apparatus. When a cart is used, use caution when
moving the cart/apparatus combination to avoid
injury from tip-over.
Unplug this apparatus during lightning storms or when unused for long
periods of time.
Refer all servicing to qualified service personnel. Servicing is required
when the apparatus has been damaged in any way, such as power-supply
cord or plug is damaged, liquid has been spilled or objects have fallen into
the apparatus, the apparatus has been exposed to rain or moisture, does not
operate normally, or has been dropped.
WARNING
TO REDUCE THE RISK OF FIRE OR ELECTRIC SHOCK, DO NOT EXPOSE THIS APPARATUS TO RAIN OR MOISTURE.
PLEASE READ CAREFULLY BEFORE PROCEEDING
Please keep this manual in a safe place for future reference.
WARNING
Always follow the basic precautions listed below to avoid the possibility of serious injury or even death from electrical shock, short-circuiting, damages,
fire or other hazards. These precautions include, but are not limited to, the following:
Power supply/Power cord Water warning
•Only use the voltage specified as correct for the device. The required
voltage is printed on the name plate of the device. •Do not expose the device to rain, use it near water or in damp or wet
conditions, or place containers on it containing liquids which might
spill into any openings.
•Use only the included power cord. •Never insert or remove an electric plug with wet hands.
•Do not place the power cord near heat sources such as heaters or radiators,
do not excessively bend or otherwise damage the cord, place heavy objects
on it, or place it in a position where anyone could walk on, trip over, or
rollanything over it.
If you notice any abnormality
•If the power cord or plug becomes frayed or damaged, there is a
sudden loss of sound during use of the device, or any unusual smells
or smoke should appear, turn off the power switch, disconnect the
electric plug from the outlet immediately, and have the device
inspected by qualified service personnel.
Do not open
•Do not open the device or attempt to disassemble the internal parts or
modify them in any way. The device contains no user-serviceable parts. If
it should appear to be malfunctioning, discontinue use immediately and
have it inspected by qualified service personnel.
•If this device is dropped or damaged, immediately turn off the power
switch, disconnect the electric plug from the outlet, and have the
device inspected by qualified service personnel.
•Do not open the device or attempt to disassemble the internal parts or
modify them in any way. The device contains no user-serviceable parts. If
it should appear to be malfunctioning, discontinue use immediately and
have it inspected by qualified service personnel.
WARNING
PRECAUTIONS
BEFORE OPENING
PULL MAIN PLUG
CAUTION VORSICHT
VOR DEM OFFNEN
NETZSTECKER ZIEHEN
CAUTION:TO REDUCE THE RISK OF FIRE REPLACE WITH
ONLY SAME TYPE AND RATING OF FUSE

4
Always follow thebasic precautionslisted below to avoid the possibility of physical injury to you or others, or damage to the device orother property. These
precautions include, but are not limited to, the following:
Power supply/Power cord Connections
•Remove the electric plug from the outlet when the devices is not
to be used for extend periods of time, or during electrical storms.
•Before connecting the device to other devices, turn off the power for
all devices. Before turning the power on or off for all devices, set all
volume levels to minimum.
When removing the electric plug from the device or an outlet,
always hold the plug itself and not the cord. Pulling by the cord
can damage it.
For the SPEAKERS jacks, Use only the included speakers and speakers
cables. Use of other types of speakers and cables may result in damage
to the device(s), or even fire.
Location Handling Precautions
When transporting or moving the device, always use two or more
people.Attempting to lift the device byyourselfmay damage your
back, result in other injury, or cause damage to the device itself.
Before moving the device, remove all connected cables.
When setting up the device, make sure that the AC outlet you are
using is easily accessible. If some trouble or malfunction occurs,
immediately turn off the power switch and disconnect the plug
from the outlet.
Do not use the device in a confined, poorly ventilated location.
Make sure that there is adequate space between the mixer and
surrounding walls or other devices: at least 1’ ft. at the side, 1’ft.
behind and 1’ft. above. If the mixer is to be used installed into
the speaker cabinet, make sure to allow adequate space between
the speaker and the surrounding walls or other devices: at least 1’
ft. at the sides, 1’ ft. behind and 1’ ft. above. Inadequate
ventilation can result in overheating, possibly causing damage to
the device(s), or even fire.
Do not use the speaker’s handles for suspended installation.
Doing so could result in damage or personal injury.
Avoid setting all equalizer controls and faders to their maximum.
Depending on the condition of the connected devices, doing so
may cause feedback and may damage the speakers.
Do not expose the device to excessive dust or vibrations, or
extreme cold or heat (such as in direct sunlight, near a heater, or
in a car during the day) to prevent the possibility of panel
disfiguration or damage to the internal components.
Do not place the device in an unstable position where it might
accidentally fall over.
Do notblock the vents. This mixer has ventilation holes at the top
to prevent the internal temperature from becoming too high. In
particular, do not place the device on its side or upside down.
Inadequate ventilation can result in overheating, possibly causing
damage to the device(s), or even fire.
Do not use the device in the vicinity of a TV, radio, stereo
equipment, mobile phone, or other electric devices. Doing so may
result in noise, both in the device itselfand in the TVor radio next
to it.
When turning on the AC power in your audio system, always turn on
the device LAST, to avoid speaker damage. When turning the power off,
the device should be turned off FIRST for the same reason.
Do not insert your fingers orhands in any gaps oropenings onthedevice
(vents, ports, etc.).
Avoid inserting or dropping foreign objects (paper, plastic, metal, etc.)
into any gaps or openings on the device (vents, ports, etc.). If this
happens, turn off the power immediately and unplug the power cord
from theAC outlet. Then have the device inspected by qualified service
personnel.
Do not use the device for a long period of time at a high or
uncomfortable volume level, since this can cause permanent hearing
loss. If you experience any hearing loss or ringing in the ears, consult a
physician immediately.
Do not operate the device if the sound is distorting. Prolonged use in
this condition could cause overheating and result in fire.
Do not rest your weight on the device or place heavy objects on it, and
avoid use excessive force on the buttons, switches or connectors.
Protective Circuit (poly switch)
All full-range loudspeakers are fitted with a self-resetting poly switch
that protects the high-
frequency driver from damage caused by
excessive power. If a loudspeaker cabinet loses high-frequency output,
immediately remove power from the unit and wait for two to three
minutes. This should be long enough to allow the poly switch to reset.
Reapply power and check the performance of the high frequency driver
before continuing, with the power reduced to a level that doesnot cause
the poly switch to interrupt the signal.
Interference From Cell Phone
Using a cell phone near the speaker system can induce noise. If this
occurs, move the cell phone further away from the speaker system. Air
blowing out of the bass reflex ports is normal, and often occurs when
the speaker is handing program material with heavy bass content.
Always turn the power off when the device is not in use. The
performance of components with moving contacts, such as switches,
volume controls, and connectors, deteriorates o
ver time. Consult
qualified service personnel about replacing defective parts.
The manufacturer will not be responsible for damagecaused by
improper use or modification to the device.
5
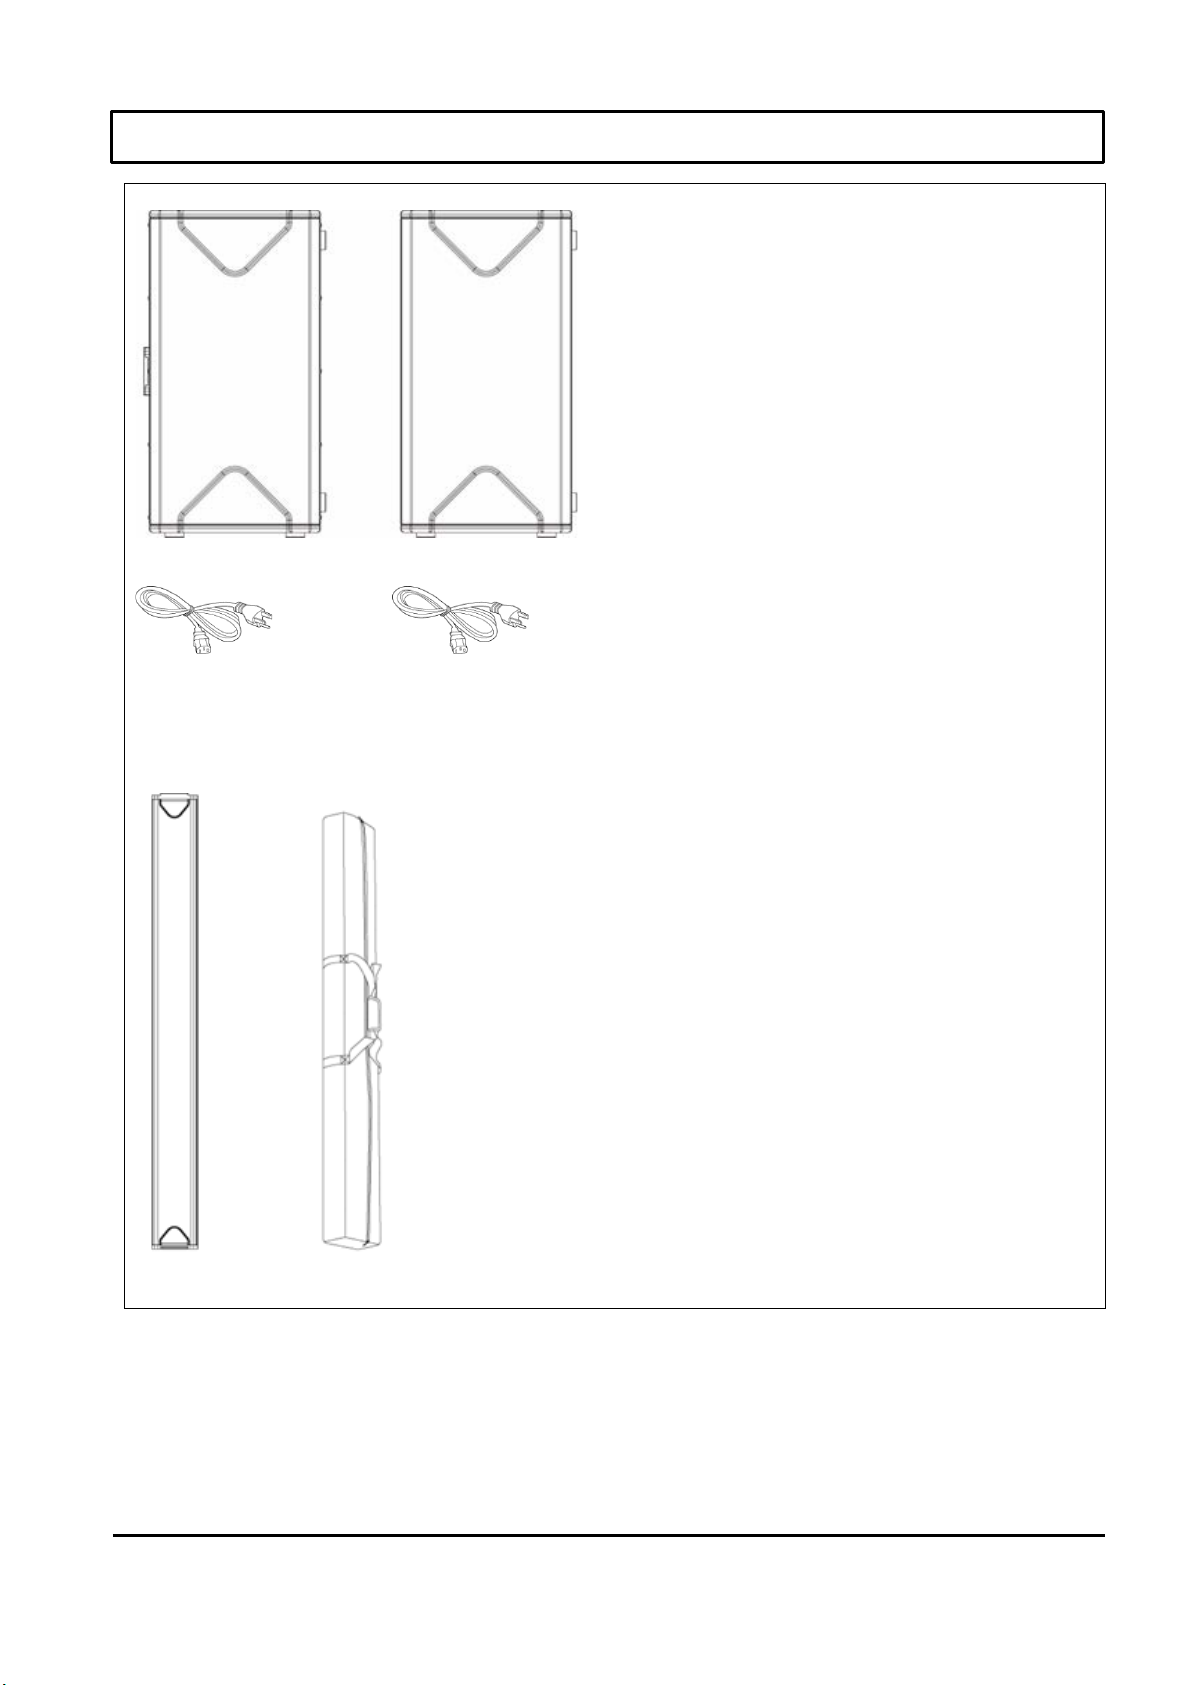
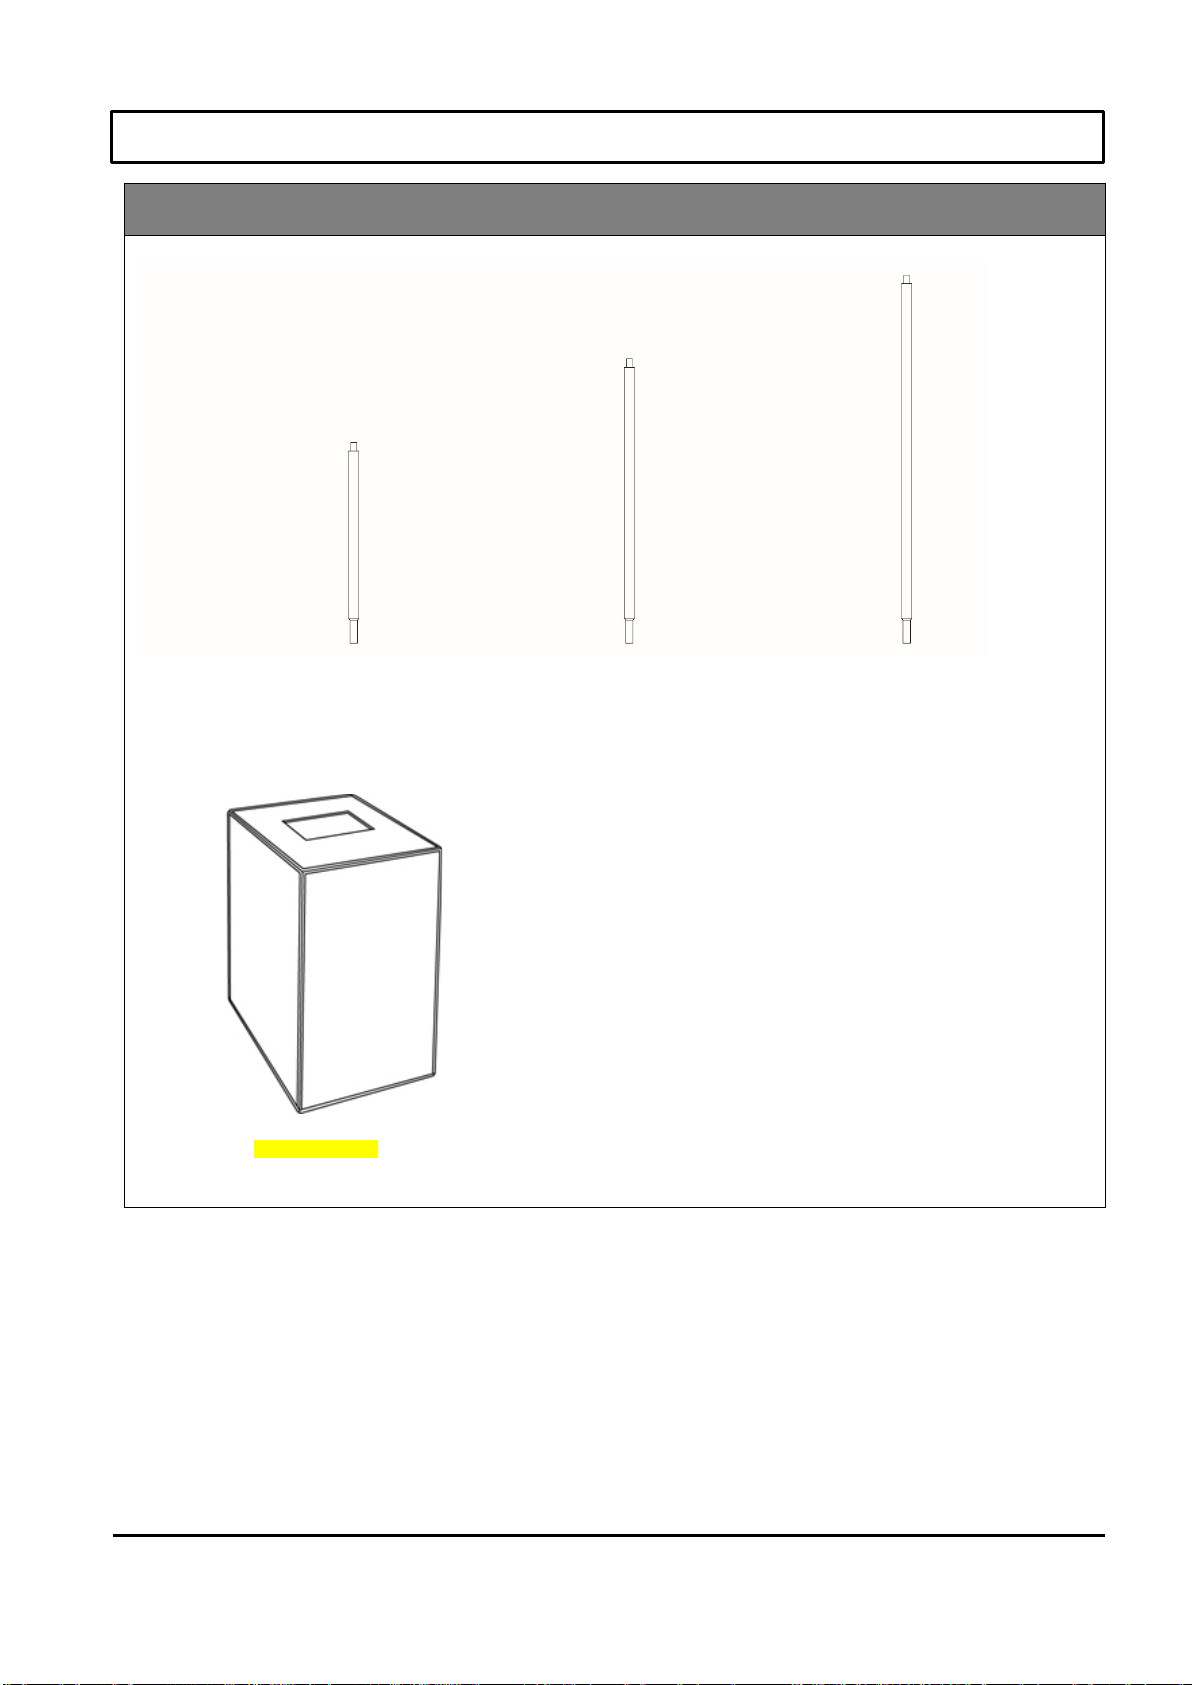
LINE X2 SYSTEM COMPONENTS
Subwoofer components
==========================================================================================================
Satellite components
LX12275
POWER CABLE
LX12275 BAG
LX210A
LX210AS
POWER CABLE

6
Combination Modes
LINE X2 systems components can be combined with numerous different systems, the following diagram shows the LINE X2 systems can be used for
different combination modes.
Remarks:
1. LX210AS have a DSP power output. LX210S has a link output.
2. Extra a LX210S subs can be used to reinforce the Bass if combination mode 1/2/3 bass is not enough.
ATTENTION:
When used individually the bass loudspeakers can be operated in either a vertical or horizontal position, Column /
Satellite only can be operated vertically.
1. No more than three LX12275 vertically.
2. DO NOT stack Subwoofers vertically.
3. NO MORE than two Subwoofers can be stacked horizontally.
MODE 1:
LX12275 + LX210AS
**LX210A
MODE 2:
2 x LX12275 + LX210AS
**LX210A
MODE 3:
3 xLX12275 + LX210AS
** 2 x LX210A
** OPTIONAL
7
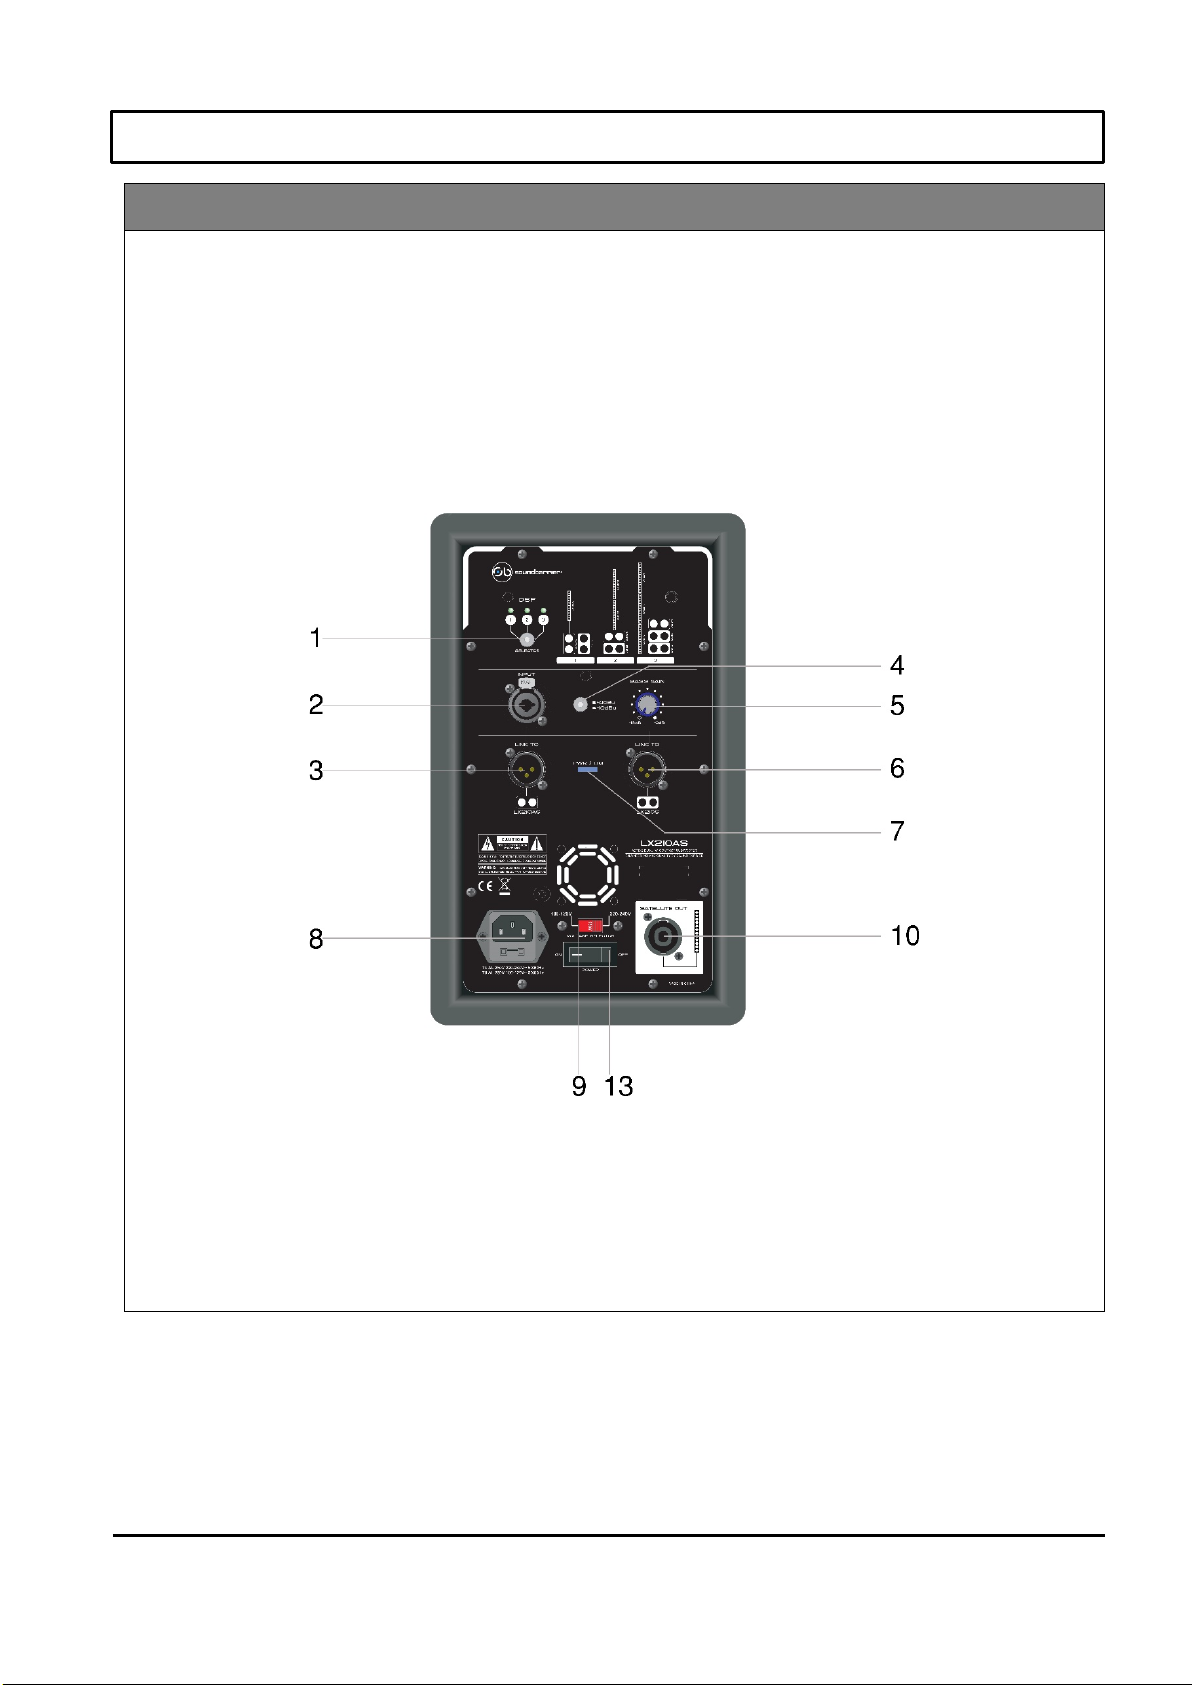
Functions
LX210AS

8
Functions
LX210S

9
Functions
Pre-amp
Pre-amp
1.DSP selector modes
Selector modes corresponding to different 1/2/3 combination
modes.
2.Input
This combination socket can accommodate XLR/TRS plugs, input
the signal.
3.Link output
Parallel XLR output to forward the input signal to additional active
component.
4.Sensitivity switch
If input low sensitivity, select the -10dB. If input high sensitivity,
select the +4dB.
5.Bass Gain
This knob adjusts the volume of bass component but not Satellite
components, it can be configured within the range -12 to 6dB, and
we recommend starting with 0dB setting.
6.Output
XLR output to forward the input signal to a Bass component
LX210S
.
7.Power/Limiter Indication
Green= ready for operation
Red= Signal is over-amplified
8.Power Socket
IEC mains socket with integrated EMI filter. Insert the mains cable
into this socket, but make sure the device is switched off before
connecting the cable to the mains. For your safety, never disconnect
the earth lead.
9.Voltage selector
Choose the right voltage 115V/230V as per local voltage .
10.SatelliteOutput
Speakon Amplifier output to another passive Satellite component.
11.Input
Bass component XLR ou
tput to forward the input signal to
Subwoofer component.
12.Power Indication
Green= ready for operation
13. Power On/Off
Use this switch to turn ON/OFF the unit.

10
Specifications
Model LX210AS LX210S LX12275
Type Active subwoofer with DSP Active subwoofer Passive full-range satellite
RMS Power 500W + 250W 500W 200W
PEAK Power 1000W + 500W 1000W 400W
Impedance
4Ω+4Ω 4Ω+4Ω 8Ω
(-10dB) Frequency
response 50 Hz-200 Hz 50 Hz-200 Hz 200 Hz-20K Hz
MAX SPL 121dB 121dB 117dB
Sensitivity Switch +4dBu/-10dBu +4dBu/-10dBu -
Input 1x XLR-Combo 1x XLR 1x Speakon, Touch-Connect
Output 2x XLR, 1x Speakon, 1x XLR -
Speaker 10" Subwoofer with 2.5" VC 10" Subwoofer with 2.5" VC 2.75"Full-Range with 0.75"vC
Speaker Quantity 2 2 12
Crossover 200Hz,24dB/oct 200Hz,24dB/oct. -
support fix 1xφ25mm,1x M20 - 1xφ25mm
power supply 100-120~,220 – 240 VAC ~ 50
/ 60Hz 100-120~,220 – 240 VAC ~ 50 /
60Hz -
fuse T3.15AL/250V/,
T6.3AL/250V T3.15AL/250V/, T6.3AL/250V -
Cabinet Material PLY PLY Aluminum
Dimensions (HxWxD) 360 x 650 x480 mm 350 x 650 x480 mm 935 x95 x106 mm
Weight 28.5 kg 28 kg 6.6 kg

11
Installation Operation Instructions
Column Connected with Subwoofer
STEP 1: Push the “A” side lever and let the copper positioner pop-up.
STEP 2: Take off the protective cover on column and subwoofer.
STEP 3, Position the “A” base downward, place the column speaker base in an incline and slowly position column base to match the Subwoofer connector
socket. The copper positioner will affix and connect the column to the subwoofer.
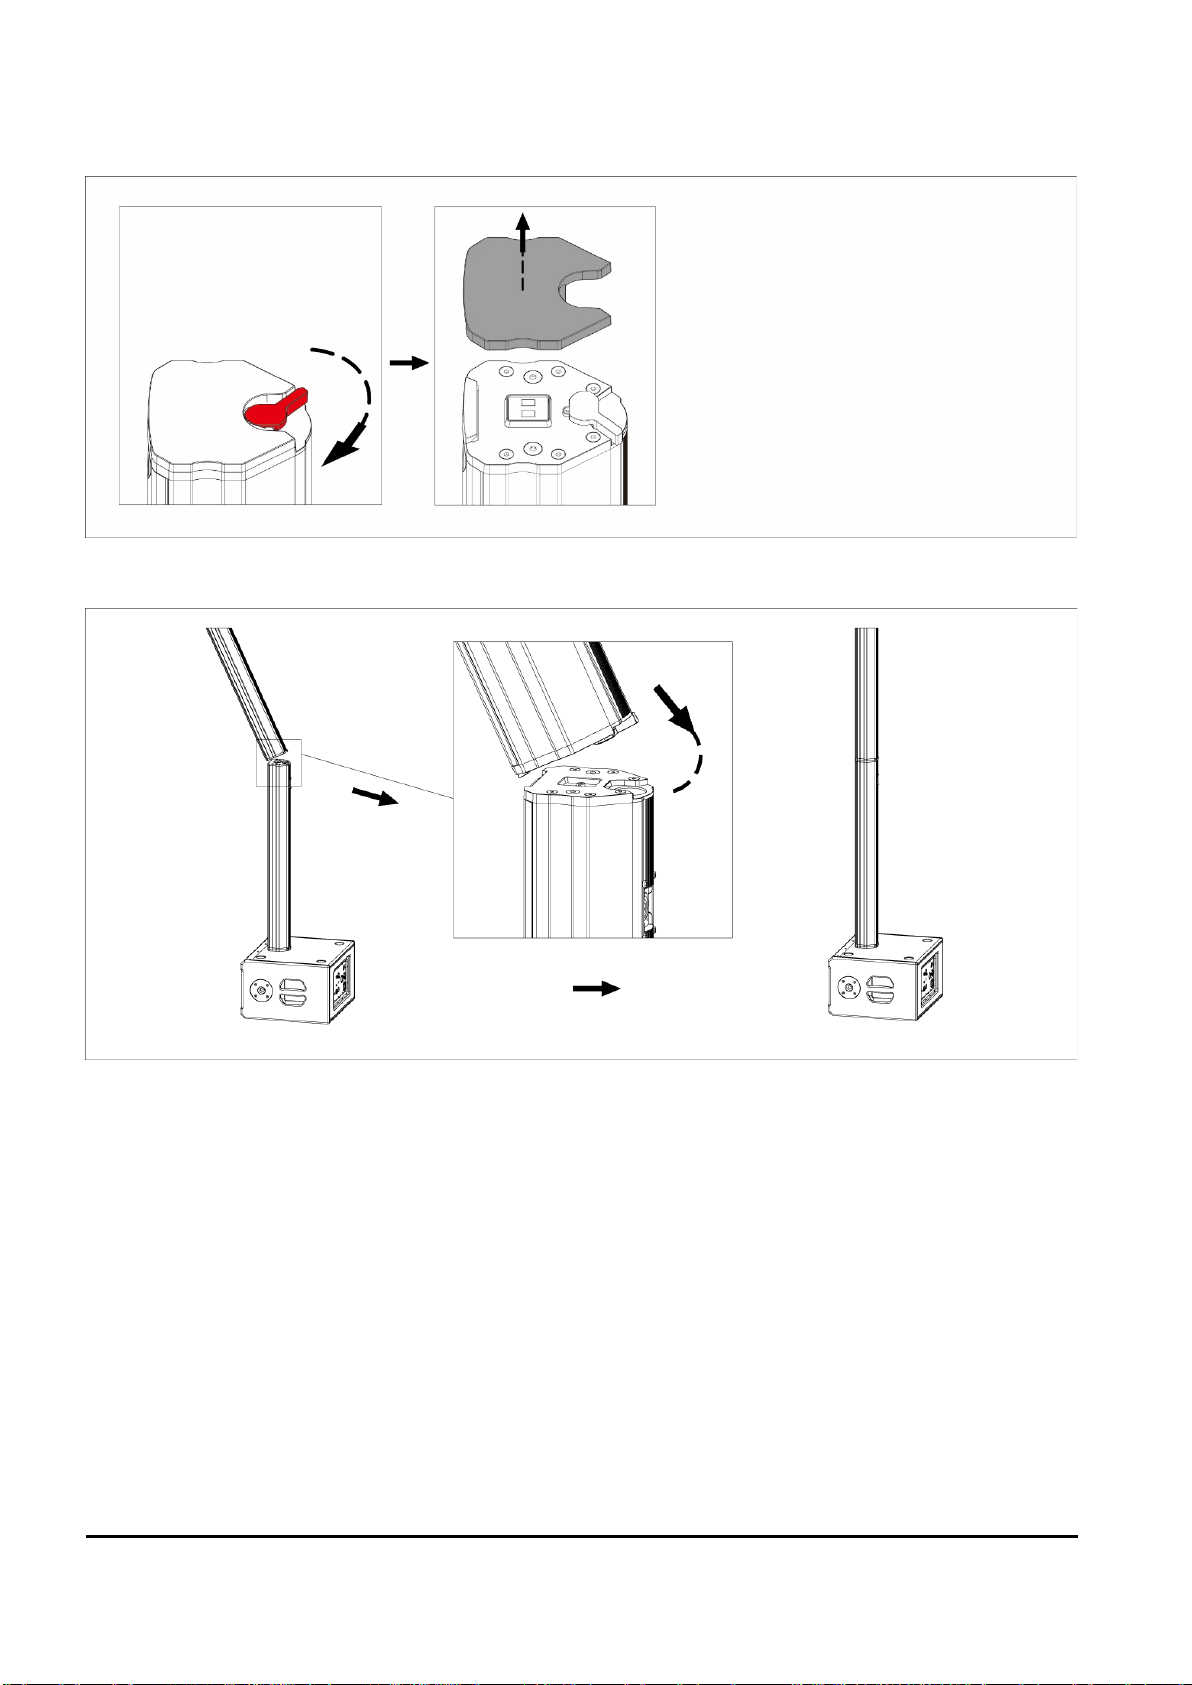
12
Column Connected with Column
STEP 1: Push the “A” side lever and let the copper positioner pop-up.
STEP 2: Take off the protective cover on columns.
STEP 3: Ensure the additional column “A” base is down, and place the column base to match the column “B” connector socket. The copper positioner
will affix to the column.

13
Satellite Connected with Subwoofer via Pole-mount.
STEP 1: Push the “A” side lever and let the copper positioner pop-up.
STEP 2: Please insert the pole-mount on a subwoofer base socket and insert the pole-mount in the column “B” pole-mount socket
STEP 3: Use a cable with two speakon plugs to connect column speaker and subwoofer.
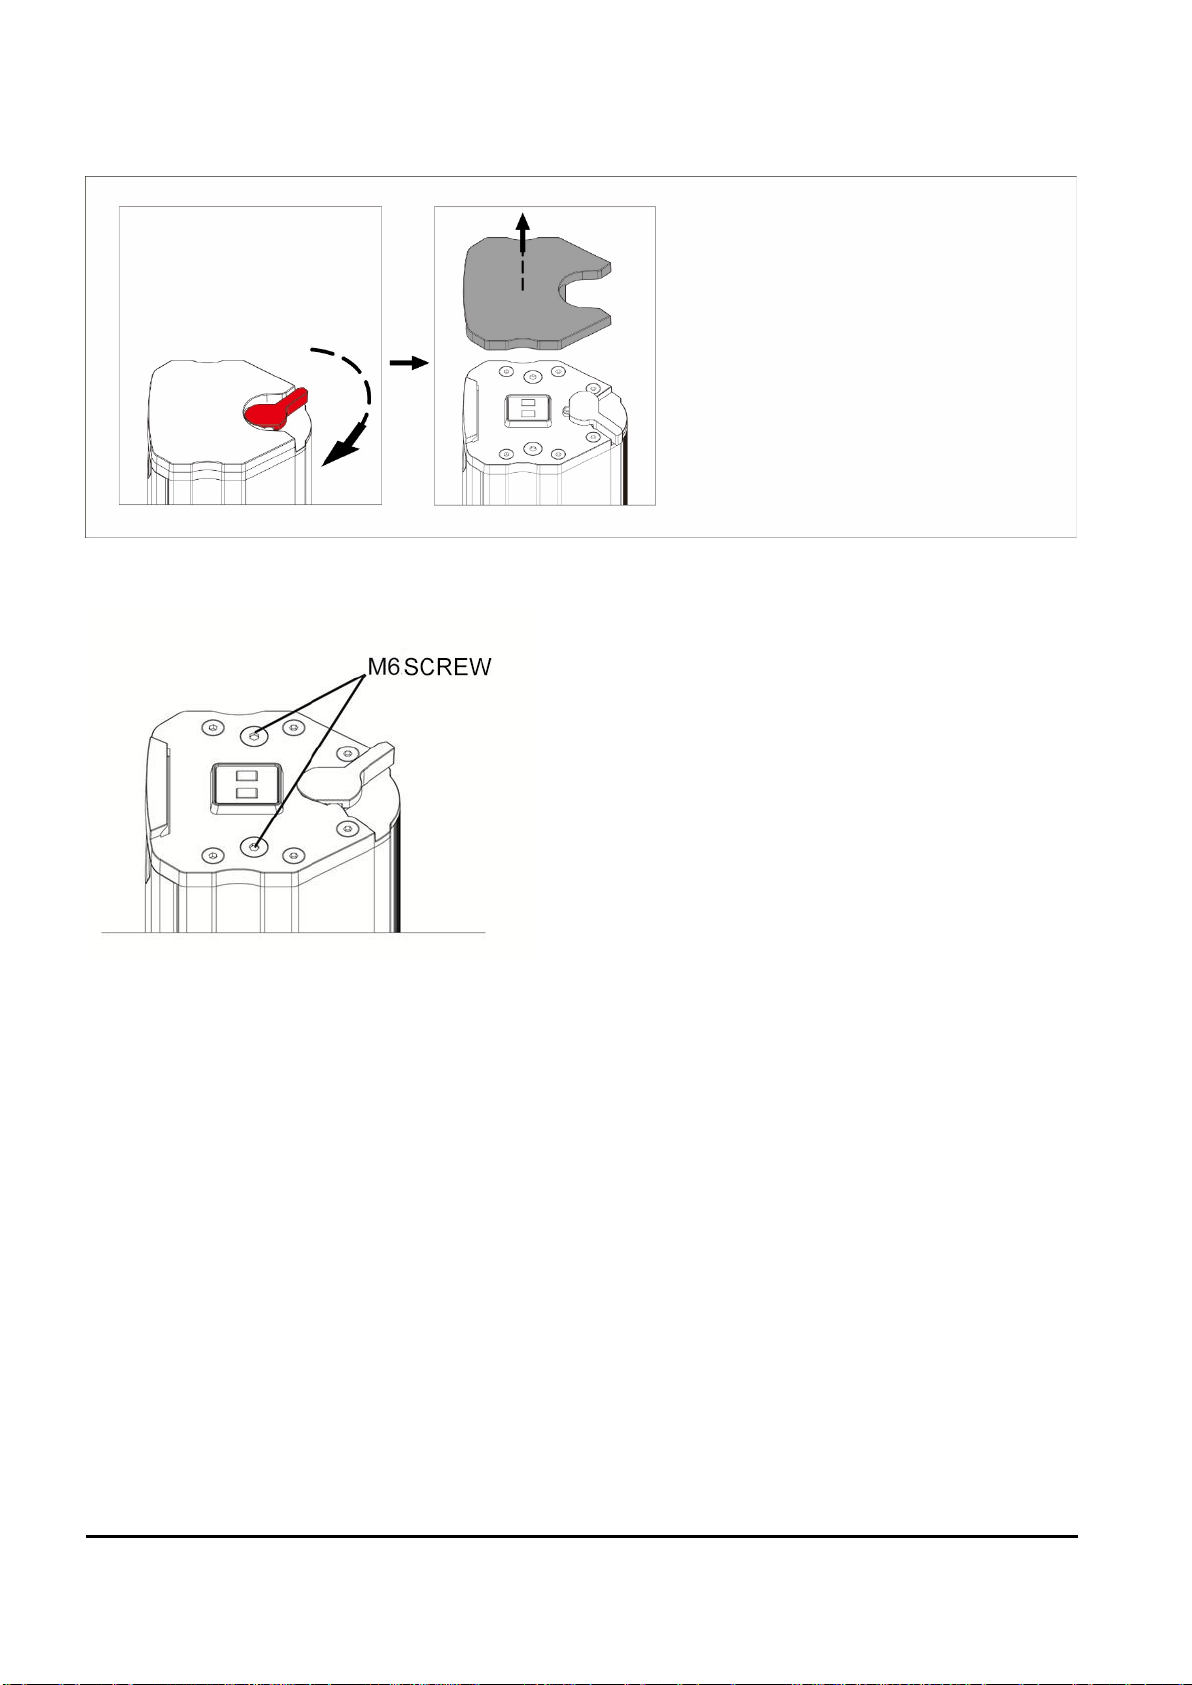
14
Hoisting Connection
STEP 1: Push the “A” side lever and let the copper positioner pop-up.
STEP 2, Take off column “A” side’s two M6 screws before hoisting.
15
Optional Accessories
Optional Accessory
LX600 LX900 LX1100
LX 210S/210AS BAG
This manual suits for next models
3
Table of contents


