SoundGate GMPD4 User manual

GMPD4
Copyright© 2004-2007 SoundGate®. All Rights Reserved.
SoundGate® is a registered trademark of Stillwater Designs, Inc.
All other trademarks are the property of their respective owners.
www.soundgate.com
Rev 20080624
Purpose
The GMPD4 lets you connect and
control an Apple iPod directly from the
controls on your factory GM radio. All
factory options, including XM, continue
to operate!
Features
The GMPD4 uses a simple “Y” or “T”
harness for installation using factory
connectors. There is no need to cut or
splice any wires, including power and
ground!
If you experience problems, call SoundGate Technical Support at 800-256-0808, or email us at [email protected].
The GMPD4 works in the following vehicles:
Before You Start
WARNING
DO NOT DISASSEMBLE OR ALTER
Doing so may result in an accident, fire, or electric shock.
Do not block your view
Do not mount product or any added audio/video equipment where it can block your view through the windshield or block your view
of dashboard indicators and displays.
Do not block safety devices
Do not mount product or any added audio/video equipment where it can obstruct the operation of any safety device, such as the
airbag.
Distraction warning
Do not allow product or any added audio/video equipment to distract you while you are driving.
BEFORE WIRING, DISCONNECT THE CABLE FROM THE NEGATIVE BATTERY TERMINAL
Before starting any installation work , wait 90 seconds after turning the ignition switch to the LOCK position and disconnecting the negative (-) terminal from the battery. The
supplemental restraint system (SRS), or airbag(s) is equipped with a backup power source. If installation work is started less than 90 seconds after disconnection of the negative
(-) battery terminal, the SRS may deploy. When the negative (-) terminal cable is disconnected from the battery, the clock and audio systems’ memory may be erased. Before
starting installation work, make a record of the clock and audio systems’ memory settings. When installation is complete, reset the clock and audio systems to their previous
settings. Power tilt, power telescopic steering column, power seats, power mirrors, power shoulder belt anchorage, and other power accessories may or may not be equipped
with a memory function; consider keeping a record of these settings as well.
When installation is complete, readjust the features to their previous settings.
Never use a backup power supply (such as another battery) during installation work in an attempt to avoid losing these memory settings.
CAUTION
DO NOT SPLICE INTO ELECTRICAL CABLES
Never cut away cable insulation to supply power to other equipment. Doing so will exceed the current carrying capacity of the wire
and may result in fire or electric shock.
1
23
4
– GMPD4 Module
– Apple iPod dock connector
– “Y” harness (for radios with factory XM)
– “T” harness (for radios without factory XM)
Note: More than one “T” harness is included. Please read the INSTALLATION
section for details on which harness you should use for your vehicle.
1
2
3
4
iPOD Details
The GMPD4 is designed to interface only with the GM vehicles listed on the front of this manual and the Apple iPod (4th generation
and later), iPod Mini, iPod Nano, iPod Photo, and iPod Video.
We recommend that you turn on your iPod’s SoundCheck option. On certain factory radios, you may experience audible distortion
if SoundCheck is not turned on.
Installation Overview
Please read this section fully and follow these steps closely to ensure that the GMPD4 functions correctly upon installation. The
basic install procedure is outlined below (detailed steps are presented in the INSTALLATION section of this manual).
Configure DIP switches on GMPD4 module.1.
Connect “T” harness to factory radio (or “Y” harness to factory XM module).2.
Connect “T” (or “Y”) harness to GMPD4 module.3.
Connect iPod dock connector cable (and optionally connect an AUX input source) to GMPD44.
module.
Mount the GMPD4 module.5.
Connect iPod to GMPD4 iPod dock connector cable.6.
IMPORTANT
During configuration of the DIP switches, no cables should be connected to the GMPD4 module. If you change
DIP switch settings while cables are connected, you must unplug the cables and reconnect them before the
changes will take effect. This is especially important to remember if transferring the GMPD4 from one vehicle
to another, as re-programming the DIP switches may be necessary.
Five DIP switches are located on the rear of the GMPD4. To configure a switch to the ON position, press
the switch downward. Press the switch upward for the OFF position. In this example, switch 1 is turned
ON.
2345
DIP ON
ON
DIP settings for the GMPD4 iPod interface: GMLAN 11-bit radios.
Please refer to the REFERENCE section on pages 5-6 to determine whether the factory radio in your vehicle is of type
“1” or type “2”.
DIP settings for the GMPD4 iPod interface: GMLAN 29-bit radios.
Use these DIP settings if your vehicle is equipped with a GMLAN 29-bit radio. Please refer to your owner’s manual or
a GM dealer/specialist to determine whether your GMLAN radio is 11-bit or 29-bit.
DO NOT ALLOW CABLES TO BECOME ENTANGLED IN SURROUNDING OBJECTS
Cables or wiring that obstruct or get caught on places such as the steering wheel, shift lever, brake pedals, etc. can be extremely
hazardous.
DO NOT INSTALL IN LOCATIONS WITH HIGH MOISTURE OR DUST
Moisture or dust may result in product failure.
HAVE THE WIRING AND INSTALLATION DONE BY EXPERTS
The wiring and installation of this product requires special technical skills and experience.
USE ONLY SPECIFIED ACCESSORY PARTS
Use of other than specified parts may damage product internally.
FOLLOW THE OPERATIONAL AND INSTALLATION MANUALS.
YOU SHOULD READ AND FAMILIARIZE YOURSELF THOROUGHLY WITH THE FOLLOWING INFORMATION PRIOR TO INSTALLING AND
USING THIS UNIT. IN ADDITION, YOU MUST CAREFULLY READ AND FOLLOW THE INSTALLATION SCHEMATICS AND INSTRUCTIONS
FOR THE PRODUCT AND THE VEHICLE IN WHICH IT IS BEING INSTALLED. FAILURE TO FOLLOW INSTALLATION INSTRUCTIONS MAY
DAMAGE THE PRODUCT AND THE VEHICLE, WILL VOID THE PRODUCT WARRANTY, AND MAY VOID THE VEHICLE WARRANTY.
CHECK YOUR LOCAL LAWS
Some States/Provinces or other governmental jurisdictions (such as cities) may have laws that prohibit the operation of a video
screen within the sight of the driver. If you have purchased such a product, you should use the product only in locations where it is
legal to do so, and if you do use the product, set up the screen so it is only visible to passengers.
TROUBLESHOOTING
Should this product fail to operate properly, please contact your Dealer or SoundGate Technical Support.
2 3
2345
DIP ON
2345
DIP ON
1: ON
2: ON
3: OFF
4: ON
5: OFF
1: OFF
2: ON
3: OFF
4: ON
5: OFF
1: ON
2: ON
3: ON
4: ON
5: OFF
1: OFF
2: ON
3: ON
4: ON
5: OFF
11-bit Type “2”
WITH Factory XM
WITHOUT Factory XM
2345
DIP ON
2345
DIP ON
11-bit Type “1”
WITH Factory XM
WITHOUT Factory XM
BUICK
Enclave* 2008
CADILLAC
STS/STS-V* 2006–2008
CHEVROLET
Cobalt* 2005–2006
HHR* 2006–2008
Malibu/MAXX 2006–2008
GMC
Acadia 2007–2008
PONTIAC
G5* 2007–2008
G6* 2005–2008
Solstice* 2006–2008
SATURN
Aura* 2007–2008
ION* 2004–2008
Outlook* 2007–2008
Sky* 2007–2008
VUE* 2005–2008
Configuration
The GMPD4 must be configured before installation and use. On the rear side of the GMPD4 module is a series of five small, DIP-style
switches that must be set to a specific combination of ON and OFF, depending upon whether or not your vehicle has a factory-
equipped XM tuner. Use the diagrams below to configure the DIP settings for your vehicle.
1: OFF
2: ON
3: OFF
4: OFF
5: OFF
Standard Radio
WITH Factory XM
WITHOUT Factory XM
2345
DIP ON
2345
DIP ON
1: ON
2: ON
3: OFF
4: OFF
5: OFF
Navigation Radio
WITH Factory XM
WITHOUT Factory XM
1: ON
2: OFF
3: OFF
4: OFF
5: OFF
1: OFF
2: OFF
3: OFF
4: OFF
5: OFF
2345
DIP ON
2345
DIP ON
*Vehicle must be XM Radio Ready
Note: Your radio must have a BAND button to be compatible with the GMPD4.
Check www.soundgate.com for the most current compatibility information.
8
Connect iPod to GMPD4 iPod dock connector. Plug the connector in straight. Do not insert the
cable at an angle or wiggle the cable during insertion.
Detailed Installation Guide
Turn your vehicle off and disconnect the negative terminal of your battery. Configure the DIP swtiches on the rear of the
GMPD4 module (see page 3 for details).
If your vehicle is not equipped with a factory XM tuner, connect the included “T” harness to the GMPD4 module and use
the following steps suffixed with a. You may need to skip ahead to step 3a to determine which included “T” harness to
use. If your vehicle is equipped with a factory XM tuner, connect the included “Y” harness to the GMPD4 module and
use the following steps suffixed with b.
If your vehicle is not equipped with a factory XM tuner, the GMPD4 will interface directly to the back of your factory
radio. Consult factory literature or professional help for detailed radio access information. Generally, the trim panel
around the outside of the radio will pull free on late model radios, exposing the bolts holding the radio in place. Remove
the bolts (7mm) to view the desired connections (other radios may require extra panels to be removed before the back of the radio
can be viewed). The radio may contain several connectors, but only two will match the connectors on one of the included GMPD4
“T” harnesses. Locate the matching connectors and disconnect them from the factory radio. These connectors are typically 14-pin
and 16-pin; however, depending upon the vehicle, the number of pins may differ. Ensure that you only disconnect the connectors
that match the GMPD4 “T” harness.
If your vehicle is equipped with a factory XM tuner, the GMPD4 will interface directly with your factory XM module. Locate
the XM module in your vehicle or consult with a professional for help. Typically, the XM module is located behind the glove
compartment in SUVs or in the back deck in cars and “crossover” vehicles.The XM module has a single 16-pin connector
and an antenna connected. Disconnect the 16-pin connector from the factory XM module.
Connect the factory 14-pin and 16-pin connectors that you disconnected from the radio in step 3a to the matching
locations on the GMPD4 “T” harness.
Connect the factory 16-pin connector that you disconnected from the XM module in step 3b to the matching location
on the GMPD4 “Y” harness.
Connect the remaining 14-pin and 16-pin connectors on the GMPD4 “T” harness to the matching locations on the back
of the factory radio.
STEP
1
STEP
2
STEP
3a
Connect the remaining 16-pin connector on the GMPD4 “Y” harness to the matching location on the factory XM
module.
Connect the iPod dock connector cable to the GMPD4 module. You may also connect an optional AUX input to the RCA
connectors on the GMPD4 module (white = LEFT, red = RIGHT).
Mount the GMPD4 module either behind the dash or glove compartment (mounting hardware not included). Be careful
not to drill into wiring or vehicle mechanisms. You are solely responsible for securely fastening the GMPD4 in your
vehicle. Ensure that the iPod dock connector is left in a convenient place for connection to your iPod/iPhone.
Connect your iPod to the GMPD4 dock connector. Plug the connector in straight. Do not insert the cable at an angle or
wiggle the cable during insertion.
STEP
3b
STEP
4a
STEP
4b
STEP
5a
STEP
5b
STEP
6
STEP
7
STEP
8
Operation Instructions
The following instructions will demonstrate how to navigate through your iPod music and playlists using the controls on your factory
radio. The factory radio controls’ corresponding functions are illustrated here. Please note that these examples only represent the
most common GMLAN 11-bit and 29-bit radio interfaces—your radio’s controls may differ slightly.
Please use the following section as a general operational guide for the GMPD4 interface and the following GMLAN 11-bit and 29-bit
radios. Use the REFERENCE section on Page 11 for distinction between 11-bit radios of type “1” and type “2”.
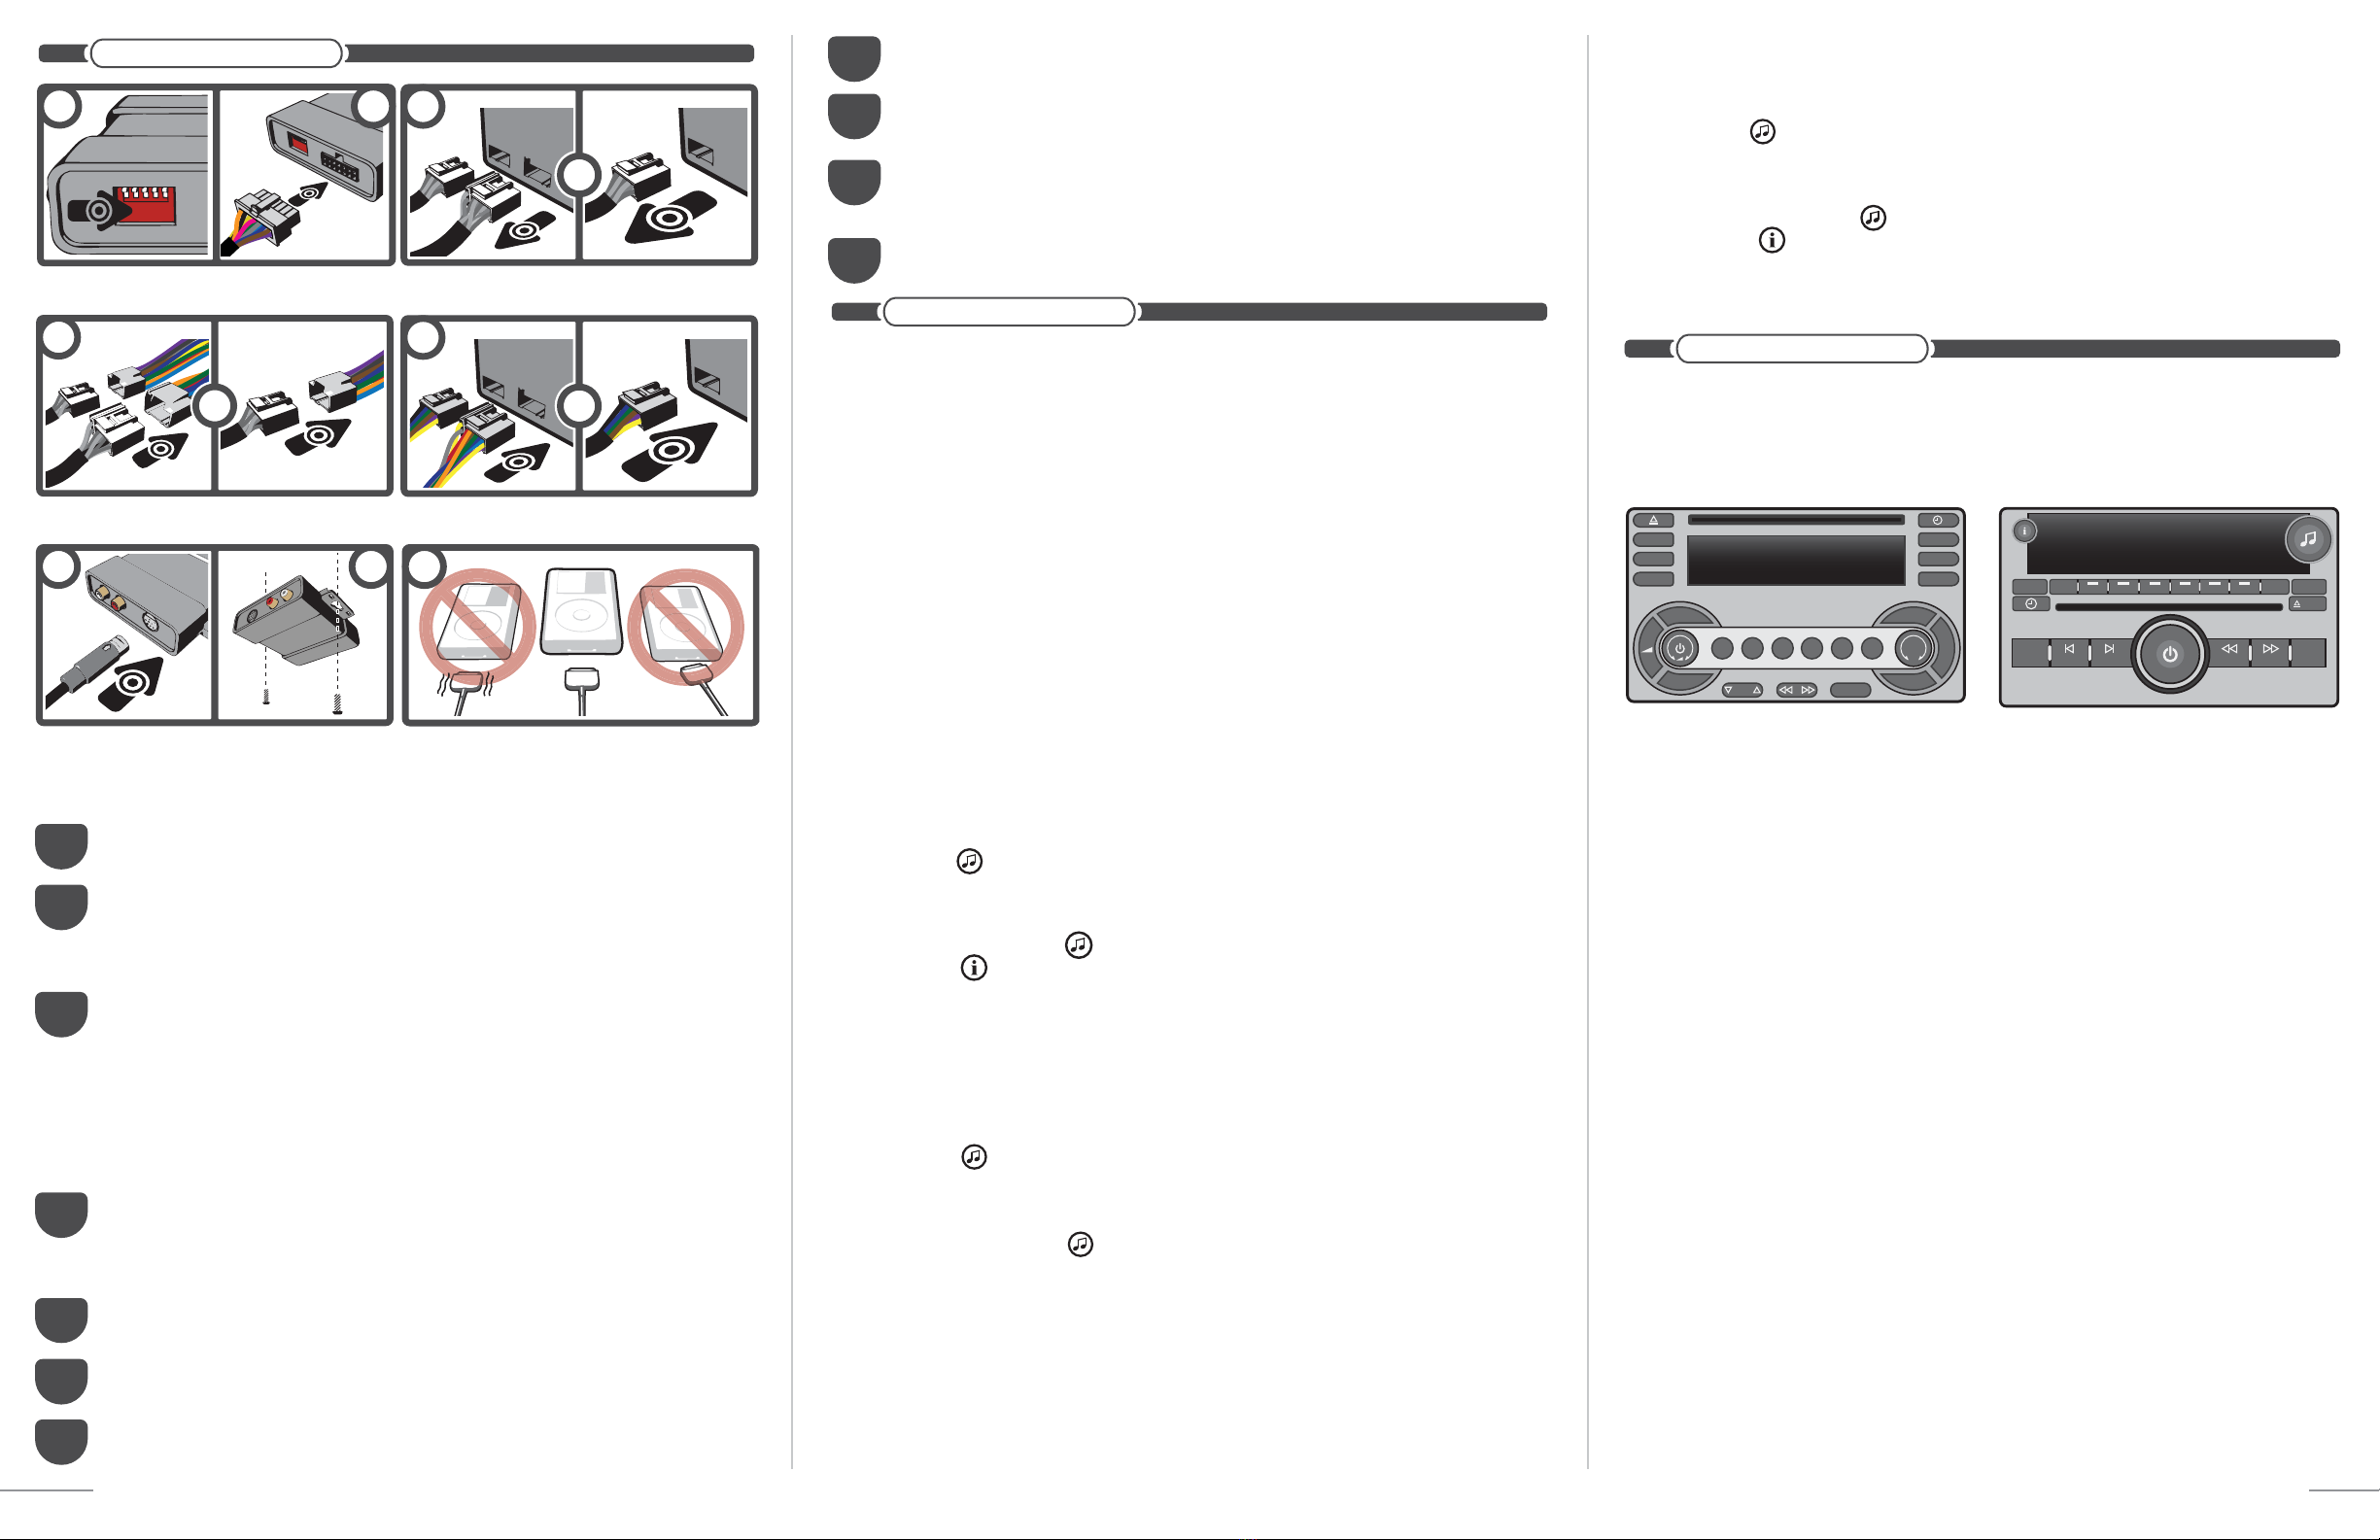
GMLAN 11-bit Radio - Type “1”
Using the• BAND button, select XM1 for iPod; select XM2 for AUX input. Note: every other rotation through the
BAND selections will switch between XM (if equipped) and iPod/AUX input.
Press the• P-TYPE button to display iPod playlists.
Use the• DISPLAY ADJUST knob to scroll through iPod playlists.
Select a displayed playlist with• SEEKS.
Press• P-TYPE again to exit the playlist selection menu.
Use the• TSEEKSbuttons to move forward or back through the current playlist.
Press and hold the• TSEEKSbuttons to FF or RW. Press the buttons again to stop FF/RW.
During playback, turn the• DISPLAY ADJUST knob to advance through songs by increments of 10.
Press the• INFO button then turn DISPLAY ADJUST to display Song number, Name, Artist, and Album.
GMLAN 11-bit Radio - Type “2”
Press and hold• WSEEK while in XM mode to switch between factory XM and iPod/AUX input.
Use the pushbuttons below the• IPOD and AUX labels on the display to switch between iPod and AUX input.
Press the• CAT button to show folders on the display for iPod playlists, Artist, Album, Genre, Song, and AUX input.
Use the TUNE [ ] knob to navigate through folders.
Select a displayed item with• SEEKX.
During playback, use the• WSEEKXbuttons to move forward or back through the current iPod folder.
Press and hold the• WSEEKXbuttons to FF or RW. Press the buttons again to stop FF/RW.
During playback, turn the• TUNE [ ] knob to advance through songs by increments of 10
Press the• INFO [ ] button to display Song number, Name,Artist, and Album.During playback, Press the INFO
button on the touchscreen to display Song number, Name, Artist, and Album.
Why SoundGate Dealers have the
edge...
The technologies used in today’s vehicles are as
sophisticated as any laptop computer. At SoundGate we
believe these new technologies are full of opportunities for
mobile electronic dealers across the nation. We make it a
high priority to not only research these new systems, but
to understand them and their impact on the aftermarket
car audio industry. Armed with this knowledge, we are
well equipped to help you integrate new components into
these systems with our innovative, high-performance
interfaces and unparalleled technical support.
Be sure to ask your autosound
specialist about these other
exciting SoundGate products...
Auxiliary Input Interfaces and Docking Stations•
which allow you to input audio from MP3
Players, DVD/Video, Satellite Radio, and more
to OEM and aftermarket car audio systems
High-performance Radio Replacement•
Interfaces for seamlessly integrating new•
receivers or CD players into OEM audio systems
Competition-Grade Interfaces for adding amplifiers•
Remote Audio Control Interfaces that let•
you control aftermarket receivers and CD
players from your factory rear seat, or
steering-wheel mounted audio controls.
And many others!•
Copyright© 2004-2008 SoundGate®. All Rights Reserved.
SoundGate® is a registered trademark of Stillwater Designs, Inc. All
other trademarks are the property of their respective owners.
www.soundgate.com
iPod is a trademark of Apple Computer, Inc., registered in the U.S. and
other countries.
OR
4
Connect double multi-pin factory
connectors to matching locations on the
GMPD4 “T” harness.
a. without factory XM
Connect 16-pin factory connector to
matching location on the GMPD4 “Y”
harness.
b. with factory XM
67
Connect iPod Dock cable to the GMPD4.
You may optionally connect an AUX input
source as well.
Mount the GMPD4 (behind dash or glove
compartment). Be careful not to drill into
wiring or vehicle mechanisms.
OR
5
Connect GMPD4 “T” harness to factory
radio.
Connect GMPD4 “Y” harness to factory
XM module.
b. with factory XMa. without factory XM
456
Operation
Reference
INFO
MENU
ENTER
P-TYPE
TRAF
MSG
BAND
SRCE
AUTO
TONE
BAL/FADE
AUTO
TONE
DISP
ADJ
RPT RDM
123456
SEEK
GMLAN 11-bit Radio Type “1”
BAND SEEK SEEK REV FWD
CD/
AUX
FAV MENU EQ CAT
EJECT
GMLAN 11-bit Radio Type “2”
Simple-fi.
™
12
Configure DIP switches (see previous
section).
Connect appropriate “T” or “Y” harness to
GMPD4 module (see below for details on
which harness you should use).
OR
3
Disconnect double multi-pin factory
connectors from your factory radio (see
page below for details).
Disconnect 16-pin factory connector from
your factory XM module.
a. without factory XM b. with factory XM
Installation
GMLAN 11-bit Radio Visual Reference
Use the diagrams on the following page as a general visual reference to differentiate between GMLAN 11-bit radios of type “1” and
type “2”. Please note that your radio’s controls may differ slightly.
GMLAN 29-bit Navigation Radio
standard screen view
Press and hold• WSEEK while in XM mode to switch between factory XM and iPod/AUX input.
Press the• Center Folder (iPod songs, albums, artists, etc.) on the touchscreen to advance to the search-screen
view.
Use the• TUNE [ ] knob to navigate through folders selected via the search-screen view.
Press• SEEKXto select a displayed item for playback.
During playback, use the• WSEEKXbuttons to move forward or back through the current iPod folder.
Press and hold the• WSEEKXbuttons to FF or RW. Press the buttons again to stop FF/RW.
During playback, turn the• TUNE [ ] knob to advance through songs by increments of 10.
search-screen view
Select• MUSIC to view iPod search options. Your iPod can be navigated by Playlist, Artist, Album, Genre, or All
Songs simply by selecting one of these categories, then pressing the BACK button. Note: after pressing the
BACK button on the touch-screen, you will return to the standard screen view.
Select• SOURCE to view audio source options. Select IPOD for iPod audio. Select AUX to switch to AUX input.
Select RADIO to return to standard AM/FM/XM. Note: changes do not take effect until you press the BACK button
on the touch-screen.
Select• SWREV to view the current GMPD3 software revision.
GMLAN 29-bit Standard Radio
Press and hold• WSEEK while in XM mode to switch between factory XM and iPod/AUX input.
Use the pushbuttons below the• IPOD and AUX labels on the display to switch between iPod and AUX input.
Press the• CAT button to show folders on the display for iPod playlists, Artist, Album, Genre, Song, and AUX input.
Use the TUNE [ ] knob to navigate through folders.
Select a displayed item with• SEEKX.
During playback, use the• WSEEKXbuttons to move forward or back through the current iPod folder.
Press and hold the• WSEEKXbuttons to FF or RW. Press the buttons again to stop FF/RW.
During playback, turn the• TUNE [ ] knob to advance through songs by increments of 10.
Press the• INFO [ ] button to display Song number, Name, Artist, and Album.


