Soundmatters MAINstage HD User manual

soundmatters, inc. san francisco, california
tel 415.255.1960 toll-free 800.698 SOMA fax 415.255.1965
email [email protected] www.soundmatters.com
rev 06.05-F3-mshd

3
Important Safety Precautions
CAUTION Rik f elecic hck D e
USA ad Caada: T ee elecic hck, ach ide blade f lg ide l, ie fll.
1. Read ici – All the safety and operating instructions should be read before the product is operated.
2. Reai ici – The safety and operating instructions should be retained for future reference.
3. Heed Waig – All warnings on the product and the Users Guide should be adhered to.
4. Fll ici – All operating and use instructions should be followed.
5. Wae ad ie – The product should not be used near water – for example, near a bathtub, washbowl,
kitchen sink, laundry tub, in a wet basement, or near a swimming pool and the like.
6. Lcai – This product should be placed in a stable location. Placing the product in an unstable location such
as an unstable cart, bracket or table, may cause the product to fall, causing serious injury to a child or an adult,
and serious damage to the product.
7. Veilai – Slots or openings in the cabinet are provided for ventilation and to ensure reliable operation of
the product and to protect it from overheating, and these openings must not be blocked or covered. Placing the
product on a bed, sofa, rug or similar surface should never block the openings. The product should not be
placed in a built-in installation such as a bookcase or rack unless proper ventilation is provided or the
manufacturer’s instructions have been adhered to.
8. Hea – The product should be situated away from the heat sources such as radiators,heater, registers,stoves or
other appliances that produce heat. If placed near an amplifier,check with the manufacturer for the applicability.
9. Pe Sce – This product should be operated only from the type of power source indicated on the
marketing label. If you are not sure of the type of power supply in your home, consult your product dealer or
local power company. For products intended to operate from battery power or other sources, refer to the
operating instructions.
10. Pe-cd eci – Power supply cords should be routed so that they are not likely to be walked on or
pinched by items placed upon or against them, paying particular attention to cords at plugs, convenience
receptacles, and the point where they exit from products.
11. Cleaig – Unplug this product from the wall outlet before cleaning. Do not use liquid cleaners or aerosol
cleaners. Use a damp cloth for cleaning.
12. N-e eid – The power cord of the product should be unplugged from the outlet when left unused for
long periods of time.
13. Lighig – For added protection for this product during a lightning storm, or when it is left unattended or
unused for long periods of time, unplug it from the wall outlet and disconnect the antenna or cable system. This
will prevent damage to the product due to lightning and power-line surges. A surge-filter can also prevent
damage and is recommended.
14. Oeladig – Do not overload wall outlets, extension cords, or integral convenience receptacles, as this can
result in risk of fire or electric shock.
15. Objec ad liid e – Never push objects of any kind into this product through openings, as they may
touch
dangerous voltage points or short-out parts that could result in a fire or electric shock. Never spill liquid or any
kind on the product.
16. Daage eiig eice – Unplug this product from the wall outlet and refer to qualified service personnel
under the following conditions:
a. The power supply cord or plug has been damaged; or
b. Objects have fallen onto, or liquid has been spilled into, the product; or
c. The product has been exposed to rain or water; or
d. The product does not operate normally when following the operating instructions. Adjust only those controls
that are covered by the operating instructions, as an improper adjustment of other controls may result in
damage and will often require extensive work by a qualified technician to restore this product to its normal
operation; or
e. The product has been dropped, or the enclosure damaged; or
f. The product does not appear to operate normally or exhibits a marked change in performance.
17. Aache – Do not use attachments not recommended by the product manufacturer, as they may cause
hazards.
18. Relacee a – When replacement parts are required, be sure the service technician has used
replacement parts specified by the manufacturer or have the same characteristics as the original part.
Unauthorized substitutions may result in fire, electric shock or other hazards.
19. Safe check – Upon completion of any service or repairs to this product, ask the service technician to perform
safety checks to determine that the product is in proper operating condition.
20. Seicig – Do not attempt to service this product yourself, opening or removing covers may expose you to
dangerous voltage or other hazards. Refer all servicing to qualified service personnel.
21. Backe Mig – Refer to the mounting bracket manufacturer for instructions; confirm that bracket is
designed to securely mate with a 1/4"x20 threaded insert.
Connections & Placement – important note
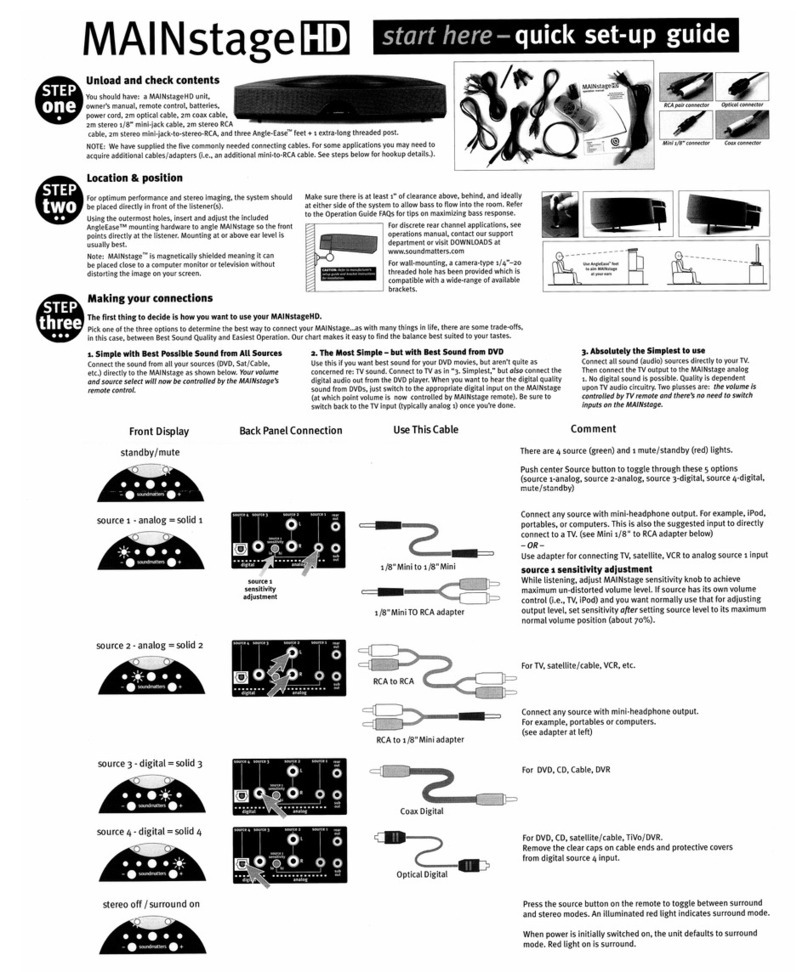
Prior to using this Operation Manual, please follow the instructions in the Setup Guide for
making all connections and proper positioning of the MAINstage HD.
2
Source 1 – analog 1/8" mini input
(green LED)
Stereo/Surround indicator
(red LED)
Source 2 – analog RCA pair input
(green LED)
Source 3 – digital optical input
(green LED)
Standby/Mute indicator
(red LED)
Source 4 – digital coax input
(green LED)
Source select button
Volume decrease button Volume increase button
AC Power
Angle-Ease
™ feet (3)
Power/Vacation switch
source 4 – digital input
(Optical/TosLink)
source 3 – digital input
(Coaxial/RCA)
Subwoofer
output
source 2 – analog
input (RCA pair)
Rear
speaker
output
source 1 – analog
input (1/8" stereo mini)
Hi/Low Sensitivity
adjustment for source 1
Surround/Stereo select
Source select
Sleep/Mute on & off
Volume decrease
Dialog+
EQ on & off
• = normal
+ = enhanced
Woofer decrease
Volume increase
Woofer increase
Back view
Remote Control
Front view

4 5
Slee/Me
To select mute mode, press the sleep/mute button on the
remote, or repeatedly press the control button on the front
panel until the red light (top right) illuminates.
Tip: When using MAINstageHD with a digital signal that is never off (i.e., optical out from a
satellite receiver) use the Sleep/Mute button to put the MAINstageHD into the Standby/Mute
mode when turning off your TV.
Dialg+ ice clai cici
Using the IR remote, push either Normal (•), or Increase (+) which provides
additional output and clarity at typical vocal frequencies.
Se ee
The MAINstageHD system uses sophisticated computer controlled electronics to virtualize the
soundfield and control audio functions. Should the unit appear to operate erratically, simply
unplug it from the wall outlet for 60 second and plug it back in to reset the internal computer
to normal operation.
IMPORTANT: From the Off position, you will need to re-engage any special settings (i.e., stereo,
reversed channels, rear channels on).
Seake Peci
The MAINstageHD uses a state-of-the-art digital amplifier section which allows significantly
higher music peaks to be heard cleanly. If the system is played at levels that might harm
the speakers, the amplifiers will shut down to protect the speakers from damage. When the
protection system is activated, you will hear the system repeatedly mute and unmute. To
deactivate the protection system, simply turn down the volume.
T O he Rea Chael O
When the rear channel outputs are turned off (factory default position), the MAINstageHD’s
VMD surround algorithms directs all information to the MAINstageHD. To create its virtual
surround, the MAINstageHD’s default surround mode directs all information to the internal
speakers. To add real rear surround speakers, you must turn on the Rear Channel Outputs (see
Set-Up Guide).
To turn on the rear channels, simultaneously press both the front panel
source and volume down (–) buttons. The system will make a “beep”
sound to confirm.
Repeating this process will make a “boop” sound, turning off the rear channels and
re-integrating them with the front for virtual surround.
Reee he chael
Mounting the MAINstageHD upside down under a counter or using it as the rear channels in a
5.1 surround system are two reasons one might want to reverse the left and right channels.
To reverse the channels, simultaneously press both the source and
volume up (+) buttons on the MAINstageHD front panel. The system will
make a “beep” sound to indicate the function has changed to the reverse
mode. Do it again, and the system will make a “boop” sound to signal
that it is back to normal L/R.
1. Operation
Vacai (ae e) ich
Make sure that the rear-located power switch is left On (–) for normal
use/standby operation. If the system is unused for extended periods
(i.e., vacation) it may be turned Off (O).
IMPORTANT: From the Off position, you will need to re-engage any special settings
(i.e., stereo, reversed channels, rear channels on).
Vle
To adjust the volume level, use the remote volume + and –,
or use the front panel buttons ( + and –)
Sce eleci
To select the source, press the Source button on the remote
control, or press the center control button on the front panel
of the unit. Lights on the front panel will indicate the source
selected. Repeated presses will toggle the unit through the
source inputs sequentially.
Starting with the 1/8˝ mini jack (source 1 - analog), then the RCA jacks (source 2 - analog), then
the coaxial digital input (source 3 - digital), then the optical digital input (source 4 - digital),
finally the unit will switch to mute mode indicated by illuminated red (top right) LED, one more
press will bring the unit back to the 1/8˝ mini jack input.
A -/-ff
MAINstageHD has an automatic turn-on/turn-off feature. It will turn off (standby mode)
when the source equipment (TV, etc.) has no sound output for approximately one minute (or
immediately for digital signals) and will immediately turn on when a signal is present. When in
Standby, the red LED flashes.
Ba leel
Use the remote control to adjust the bass + or –. Adjusting the bass from the
remote will also adjust the level of an external subwoofer if one is connected,
such as soundmatters’ SUBstage.
I Seiii (Sce 1)
A continuously variable input selection knob is provided. See Set-Up Guide on
proper level matching.
Sd
The system always powers up from Vacation (master on/off) with the virtual
surround sound feature On. It is the default position. Press the surround button
on the remote to turn off the surround feature, the upper left red light will go off.
Press again to turn surround mode back on, illuminating the light.
Add a second MAINstageHD or amplified speaker pair in the rear of the room to provide a
total 5.1 surround experience. You will need to activate the rear channel outputs (see Turn
on the Rear Channel Outputs, next page), and reverse the channels on the rear MAINstage
(either electronically on the HD, or with cabling on an original MAINstage). Adjust the level
of the rear amplifier/speaker for best balance between the front and rear (for questions
contact our customer support department). If using a MAINstage in the rear, use the
source 1 - analog 1 input.

Q6. H d I cl he MAINageHD ad TV f a igle ee cl?
The MAINstageHD’s remote control functions be easily captured by most “third party” learning
remote controls. Refer to the instructions provided with the learning remote. Alternately
you can feed the TV signal directly from the TV to the MAINstage. See the accompanying
Connection/Setup Poster for details.
Q7. Ca I e MAINageHD he I ael eea?
MAINstageHD uses an advanced 130kHz digital power supply and will therefore operate on
most any worldwide household voltage… 100–265Vac, 85WRMS. Just replace the power cord
with one that meets local outlet requirements.
Q8. Will he MAINageHD la DVD ih DTS?
Yes and no. The Zoran VMD® algorithms used by MAINstageHD extract spatial information
from Mono, Stereo, and Dolby® encoded material. It doesn’t extract or playback DTS®, but
all commercially available DVDs, including those with DTS®, are required to include a Dolby®
Digital sound (other than a few special DTS-only disks). Just make sure that if there’s an option
to do so, DTS® is off in your DVD player’s set-up menu.
Q9. D eced lggig MAINageHD i a ge ec?
MAINstageHD, like all electronic appliances, may benefit from surge protectors.
Q10. Thee a ld he I e he ea acai e ich ff he
MAINageHD. Wh?
We don’t suggest that you use the switch in the back on a daily basis. It’s only there to allow
you to totally cut power to the unit, such as in a vacation home (don’t forget to turn off the
water to the washing machine as well). Actually, we only added it at the request of our German
distributor to meet what many feel is an obscure European safety requirement.
Q11. De MAINageHD g i adb de b ielf d I eed ich i?
After MAINstageHD stops sensing a signal (Dolby Digital signals immediately, other signals
after 2 minutes), it automatically switches to standby mode.
Q12. Whe ichig beee al ad ehaced (+) Dialg+ EQ de, eie I
hea a big diffeece ad eie e a all. Wh?
There are a number of possible reasons. When you have the bass level set to maximum, it may
overshadow the dialog boost. Obviously, some program material has no vocals in it, so when
that’s the case, you will hear little or no difference. Also, the frequency range of some dialogue
may fall outside (or partially outside) the range of the boost.
6 7
2. Frequently Asked Questions
For the latest FAQs visit our website at www.soundmattters.com
Q1. A i h lcae/ii MAINageHD i he f he be eface?
While MAINstageHD sounds pretty darn good in virtually any application, like any good
loudspeaker, best performance will be achieved if one takes a bit of care in its placement.
Best Hi-Fidelity: The system should always be centered in front of the listener(s), ideally at eye
level or a bit higher… for example, on a TV. Use the built-in AngleEase™ mounting system to
point MAINstageHD directly at the listener(s). If in a cabinet, move as far forward as possible
to allow widest dispersion.
Best Surround: The surround effect is enhanced with reflective walls on all four sides and
the ceiling, although a good spatial effect is achievable in most small to medium sized rooms.
Generally, the closer you are to MAINstageHD the more dramatic the surround effect.
Most Bass: Placing any speaker against a hard surface will reinforce (increase) its bass. The
more surfaces MAINstageHD sits against, the more bass. Least would be floating in the middle
of the room. Most would be in a corner at the floor or ceiling.
Also, since the built-in subwoofer fires both up and from the back, there must be adequate
space left around the unit (about an inch) for the bass to vent into the room.
Q2. The ba i e aaig f ch a all all-i-e b . . . b I a e! Ca I add
a eeal bfe?
Yes, MAINstageHD has a subwoofer output jack for connecting to the acoustically-matched
soundmatters SUBstage™
, or virtually any good-quality hi-fi powered subwoofer. We use a
space-saving 1/8" mini-jack, so if you’re not using our SUBstage, you’ll need an 1/8"stereo
mini to RCA adapter for most subwoofers (included with the SUBstage).
Q3. Sggei f hicall ig he MAINageHD?
If the TV you’re mounting on has a narrow top surface (or you live in earthquake country),
consider securing the MAINstageHD with Velcro®… if it’ll stick David Letterman to a wall, it will
probably handle our 4.8 lbs.
If you are wall mounting using our 1/4”–20 thread camera insert, carefully follow the bracket
manufacturer’s instructions, making sure that the bracket is securely anchored to the wall.
Q4. I le MAINagHD, b a e le?
A couple of options – either add an external subwoofer such as a SUBstage100 (or two) and/or
add an additional MAINstageHD in the back for the rear channels. If the problem occurs only
when using the Source 1 input, the Input Sensitivity Knob probably needs adjusting.
Q5. Wha ae he ade-ff ih MAINageHD Vial Sd . “eal d?
The traditional solution of 6 speaker boxes (and lots of wiring) for low-cost home theater
provides 360° of surround, but is a radical sonic compromise. Since the design and engineering
budget must be split between the many components, you won’t find true hi-fi speakers being
used. They may provide audio all around, but if you’re at all used to good sound, you’ll probably
find it less than adequate for either music or extended soundtrack listening.
MAINstageHD, on the other hand, provides true high-fidelity sound while in most rooms
creating a pretty convincing ambient surround effect from just one little TV set-top box. With
no rear speakers, it obviously doesn’t provide a complete 360° surround, but what it does do
is envelop you in a great sounding hi-fi surround experience; perfect for any small to medium
sized room where running wires to 6 speakers just isn’t practical.
A simple step-up with minimal additional wiring is to add a second MAINstageHD to the center
back of your room, this provides a truly remarkable 6.1 surround experience.

8 9
4. Specifications
MAINageHD Digial Theae/Mic Se
• Surround Sound 5.1 channels, Digital
• DSP Processor Zoran 38601-50M IPS
• Surround Algorithm Zoran VMD®
• Class-D Amplifiers
2 x 20WRMS <0.8%THD into 4 Ohms (satellites) (80W Music)
2 x 20WRMS <0.8%THD into 4 Ohms (subwoofer) (80W Music)
• Maximum SPL@1m 104dB
• Main Speakers 2 each 50x70 mm with patented Neo-sandwich magnets
• Internal Subwoofer 1 each Super-4˝ with patented Neo-sandwich magnet
• Power Supply Digital, 130kHz 95–265Vac 50/85Wdc
• Inputs (4)
Source 1 - Analog: 150mV–2V variable
Source 2 - Analog: 2V
Source 3 - Digital: SP/DIF coax
Source 4 - Digital: Optical / TosLink
• Outputs (1)
Analog: Sub-subwoofer out
• Rear Channel Outputs (normal/default off )
• Accessories
IR remote control
AngleEase™ TV-top leveling feet + 4˝ extension
1 each 2m optical
1 each 2m 1/8˝ mini phone jack cable
1 each 2m 1/8˝ mini phone jack to stereo RCA cable
1 each 2m stereo RCA cable
1 each 2m coax RCA cable
• Controls System
Volume (IR and front panel)
Subwoofer level (IR only)
Dialog+ EQ (IR only)
Source select, mute (IR and front panel)
Surround/stereo (IR only)
Source 1 input sensitivity (back panel knob)
• Modes: On, Mute/Sleep, Vacation (Off )
• Software Options (user config.) L/R channel reverse, rear channel on/off
• Standby Power: Less than 4.5W
• Display: Six LEDs
• Wall Mounting Capability: 1/4˝ x 20 threaded
• Weight: Approx. 2.2kg (4.85lbs)
• Dimensions (WxHxD): 425 x 65 x 230 mm (16.7˝ x 2.5˝ x 9˝)
soundmatters® believes in a policy of continuous product improvement,
therefore specifications are subject to change without prior notice.
3. Troubleshooting
1. Pble: N d f ahig
Solutions:
a. Check that source unit is on and playing (i.e., DVD or TV)
b. Check that vacation power switch turned on
c. Is AC cord securely inserted into back of MAINstageHD and connected to live AC?
d. Is volume up on MAINstageHD?
e. Push source button on MAINstageHD or remote to select an active input
2. Pble: N d f he digial 1/2 i MAINageHD he ig DVD
lae, eehig ele k.
Solution:
Confirm the DVD player’s digital-out is turned-on (in its Audio Set-up Menu). Unfortunately,
it’s not pre-set on many DVD players. Select Dolby®Digital/Surround/ Bitstream On. Refer to
your DVD players owners manual, or use its setup menu to configure the audio settings as
follows: 1) Digital Out ON. 2) Dolby®Digital ON. 3) DTS® OFF (if option available).
3. Pble: N egh ba
Solutions:
a. Raise bass level via remote
b. See faq/tips #3 on how placement affects bass
c. Add a SUBstage subwoofer!
4. Pble: I d hea a egh ial d effec
Solutions:
a. Confirm left red LED is illuminated on front panel. If it isn’t, push surround on the remote
b. Make sure that your DVD player has been set to Dolby Digital 5.1, Bitstream, or Surround
and that all EQ & surround modes built into the DVD player are turned-off!
c. See faq/tips #1 on placement
d. See faq/tips #5 on what to expect
e. Turn on MAINstageHD rear output. Add powered speakers to the rear of the room.
5. Pble: Eaic ee eai
Solutions:
a. Confirm that batteries are fresh
b. If using with a plasma TV, optional “eye patch” cover for IR sensor is available. Contact
our technical support department.
6. Pble: F d
Solution:
a. Confirm that all DSP/surround/sound enhancement modes are off on all components
connected to the MAINstageHD
b. If using Source 1 - Analog, make sure the input sensitivity knob is correctly adjusted.
7. Pble: N egh le
Solution:
a. If using a low-output signal (i.e., some portables or cellphone mp3 players) connected
to the Source 1 - Analog, adjust sensitivity knob toward HI
8. Pble: Ceced f Cable b b hee i d
Solutions:
a. Unfortunately many cable boxes have digital out or even analog audio (red/white RCA)
audio connections that are dummies (not internally connected in the box). Check with
your cable provider to confirm the output capabilities of your box.
b. If using the digital output of your cablebox, you may find that it only works when you
are on an HDTV channel, to access the audio for other channels you will also need to
connect to the analog audio output and switch to the correct input on the MAINstageHD.
9. Pble: Oical cable fi
Solutions:
a. Makes sure clear protective covers are removed from cable ends
b. Make sure protective cap removed from Source 4 -Digital input

10 11
Thi aa de ce:
• Damage that is the result of misuse, abuse, accident (including but not limited to damage
by water), faulty hookup, defective or maladjusted associated equipment, or the use of the
Product with equipment for which it was not intended.
• Cosmetic defects that appear more than thirty (30) days after the date of purchase. Cosmetic
damage caused by improper handling is also excluded.
• Products that are used for commercial purposes.
• The cost of removing or reinstalling the Product.
• Damage that occurs while the Product is being shipped to whoever will service it. See the
information above regarding shipping procedures.
This warranty is void if:
• The Product identification or serial number label is removed or defaced in any way.
• The Product is serviced or repaired by any one other than soundmatters or an authorized
soundmatters dealer or service agency.
F aa ifai cac:
soundmatters,inc san francisco, ca 94110
phone 800-698 SOMA (800-698-7662)
email: [email protected]
web: www.soundmatters.com
5. Warranty/Service
There are two things you must do to ensure trouble free service in the event you need warranty
repairs.
1. Keep your original sales receipt in a safe place. A copy of the receipt will be required to
obtain warranty service.
2. Be sure your retail dealer has written the date, the model number, and the serial number (if
applicable) of the Product on the receipt.
To give yourself an extra measure of protection, make a separate record of the information
about your purchase and keep it in a safe place. In the event you misplace the sales receipt,
your dealer may be able to give you a copy. Take a moment now to read the terms of your
warranty. Check to be sure your sales receipt is dated and has the Product model number and
serial number (if applicable) on it. Then put it away in a safe place.
When shipping a product in for service:
• Email or call soundmatters for the proper ship to address for servicing and an RMA (return
merchandise copy of your original sales receipt that has the date, the Product model number
and serial number (if applicable) written on it. You must place your RMA number on the
shipping label of any unit returned to soundmatters for service.
• Always ship Products in the complete original packing material.
• Avoid shipping Products via the Postal service. If you must use the Postal service, be sure to
register and insure the package.
dae Liied Waa
soundmatters, inc.(soundmatters) warrants to the original consumer purchaser of the
soundmatters Products described in this manual, that the Product will be free from defects
in materials and workmanship for a period of two (2) years after the date of purchase.
soundmatters’ sole obligation under this warranty shall be to provide, without charge, parts
and labor necessary to remedy the defects, if any, that appear during the warranty period.
This warranty is the sole and exclusive express warranty given with respect to the Product. All
other express warranties are hereby excluded. Neither soundmatters nor the authorized dealer
who sells the Product is responsible for indirect, incidental, or consequential damages. Some
states do not allow the exclusion or limitation of incidental or consequential damages, so the
above limitation or exclusion may not apply to you. This warranty gives you specific legal rights
and you may also have other rights, which vary from state to state.
IMPORTANT – Keep your original sales receipt. Be sure the retail dealer has written on it the
date, model number, and serial number (if applicable) of the Product. This information is
required for warranty service.
Thi aa i liied :
• Products purchased from authorized soundmatters retail dealers in North America.
soundmatters will supply a list of authorized dealers on request.
In order to obtain service you must:
• Return the Product, freight prepaid, to the soundmatters dealer from which it was purchased,
an authorized soundmatters independent service agency, or to soundmatters. If necessary
you may call soundmatters Customer Service Department for the names and addresses of
authorized independent service agencies in your area.
• Provide proof of purchase in the form of a copy of your original sales receipt, the date,
model number, and serial number (if applicable) of the Product must be written on the sales
receipt.
Table of contents
Other Soundmatters Stereo System manuals
