SousVideTools IVIDE THERMAL CIRCULATOR HOME 2.0 User manual

IVIDE THERMAL
CIRCULATOR HOME 2.0
USER GUIDE

2
EN // USER GUIDE
Important 4
Safety Regulation 5
Special Safety Regulation 6
Ground Installation 6
Sous Vide Cooking 6
Product Function 7-8
Product Structure 8
The APP 9
Operation 10
Maintenance 11
Cleaning 12
Troubleshooting 12
Technical Specication 13
Warranty 13
CE Certicate 14
IT // MANUALE D’ISTRUZIONI
Importante 37
Avvertenze sulla Sicurezza 38
Speciali Avvertenze sulla Sicurezza 39
Messa a Terra 39
Cottura Sous Vide 39
Funzioni del Prodotto 40-41
Descrizione del Prodotto 41
L’Applicazione 42
Funzionamento 43
Manutenzione 44
Pulizia 45
Troubleshooting 45
Speciche Tecniche 46
Garanzia 46
Certicato CE 47
FR // NOTICE D’UTILISATION
Important 15
Règles de sécurité 16
Règles Spéciales de Sécurité 17
Installation 17
Cuisson Sous Vide 17
Fonctionnement du produit 18-19
Structure du Produit 19
L’Appli 20
Fonctionnement 21
Maintenance 22
Nettoyage 23
Dépannage 23
Spécication technique 24
Garantie 24
Certicat CE 25
DK // BRUGERVEJLEDNING
Vigtigt 48
Sikkerhedsbestemmelser 49
Særlige Sikkerhedsregler 50
Installation 50
Sous Vide Tilberedning 50
Product Function 51-52
Produktstruktur 52
The APP 53
Operation 54
Vedligeholdelse 55
Rengøring 56
Fejlnding 56
Teknisk specikation 57
Garanti 57
CE-certikat 58
DE // BENUTZERHANDBUCH
Wichtig 26
Sicherheitsbestimmungen 27
Besondere Sicherheitsbestimmungen 28
Erdungsinstallation 28
Sous Vide Kochen 28
Produktfunktion 29-30
Produktstruktur 30
Die APP 31
Bedienung 32
Instandhaltung 33
Reinigung 34
Fehlerbehebung 34
Technische Daten 35
Garantie 35
CE Zertikat 36
ES // MANUAL DEL USUARIO
Importante 59
Regulaciones de Seguridad 60
Normas especiales de seguridad 61
Instalación de puesta a tierra 61
Cocción Sous Vide 61
Funciones del producto 62-63
Estructura del producto 63
La aplicación 64
Operación 65
Mantenimiento 66
Limpieza 67
Solución de problemas 67
Especicaciones Técnicas 68
Garantía 68
Certicado CE 69
SE // ANVÄNDARMANUAL
Viktigt 70
Säkerhetsföreskrifter 71
Särskilda säkerhetsföreskrifter 72
Installation av jord 72
Sous Vide Matlagning 72
Produktfunktion 73-.74
Produktstruktur 74
Appen 75
Användning 76
Underhåll 77
Rengöring 78
Felsökning 78
Teknisk specikation 79
Garanti 79
CE Certikat 80

3
NO // BRUKERMANUAL
Viktig 81
Sikkerhetsreguleringer 82
Spesielle sikkerhetsforskrifter 83
Jording 83
Sous Vide Matlaging 83
Funksjoner 84-85
Produktstruktur 85
Appen 86
Bruk 87
Vedlikehold 88
Rengjøring 89
Feilsøking 89
Tekniske spesikasjoner 90
Garanti 90
CE-sertikat 91
PL // INSTRUKCJA OBSŁUGI
Ważne 114
Rozporządzenie dotyczące bezpieczeństwa 115
Specjalne Przepisy Bezpieczeństwa 116
Uziemienie instalacji 116
Metoda gotowania “Sous Vide” 116
Funkcje Produktu 117-118
Struktura Produktu 118
Aplikacja 119
Obsługa 120
Konserwacja 121
Czyszczenie 122
Diagnostyka 122
Specykacja techniczna 123
Gwarancja 123
Certykat CE 124
PT // MANUAL DO USUÁRIO
Importante 103
Regulamentos de Segurança 104
Regulamentos especiais de segurança 105
Instalação de aterramento 105
Cozimento do Sous Vide 105
Função do produto 106-107
Estrutura do produto 107
O Aplicativo 108
Operação 109
Manutenção 110
Limpeza 111
Solucionando problemas 111
Especicação técnica 112
Garantia 112
Certicado CE 113
RO // MANUAL DE INSTRUCȚIUNI
Important 136
Reguli de siguranță 137
Reglementări speciale de siguranță 138
Instalare de pregătire 138
Gătire Sous Vide 138
Funcția produsului 139-40
Structura produsului 140
Aplicația 141
Punerea în funcțiune 142
Întreținere 143
Curățare 144
Depanare 144
Specicație tehnică 145
Garanție 145
Certicat CE 146
NL// GEBRUIKERSHANDLEIDING
Belangrijk 92
Veiligheidsvoorschriften 93
Speciale veiligheidsvoorschriften 94
Aardingsinstallatie 94
Sous Vide koken 94
Functies van het apparaat 95-96
Opbouw van het product 96
De app 97
Werking 98
Onderhoud 99
Schoonmaak 100
Probleemoplossingen 100
Technische specicaties 101
Garantie 101
CE-certicaat 102
GR // ΟΔΗΓΙΕΣ ΧΡΗΣΗΣ
Σημαντικο 125
Κανόνες ασφαλείας 126
Ειδικοί κανονισμοί ασφαλείας 127
Εγκατάσταση γείωσης 127
Μαγειρική Sous Vide 127
Λειτουργία προϊόντος 128-129
Δομή προϊόντος 129
Η εφαρμογή 130
Λειτουργία 131
Συντήρηση 132
Καθάρισμα 133
Αντιμετώπιση προβλημάτων 133
Τεχνικές προδιαγραφές 134
Εγγύηση 134
Πιστοποίηση CE 135

4
IMPORTANT - READ BEFORE USE
Please read this user manual carefully before using the appliance.
Please note: This item only works when immersed in water.
Running the item out of water will display an H20 error code.
Keep these instructions with the appliance.
HINTS ON DISPOSAL
According to the European waste regulation
2012/19/EU this symbol on the product or
on it's packaging indicates that this product
may not be treated as household waste.
Instead it should be taken to the appropriate
collection point for the recycling of electrical
and electronic equipment. By ensuring this
product is disposed of correctly, you will help
prevent potential negative consequences for
the environment and human health, which could
otherwise be caused by inappropriate waste
handling of this product. For more detailed
information about recycling of this product,
please contact your local council or your
household waste disposal service.
• Remove all protective packaging and wrapping.
• Check to make sure the appliance is undamaged.
In case of incomplete delivery or damages,
• DO NOT use the appliance and contact the
supplier (See Warranty). Clean the
appliance before use (See Cleaning and
Maintenance).
• Attach the appliance securely at the side of the
container.
• Do not operate the appliance near any heated
sources or ammable objects. Ensure the
appliance is completely dry.
• Note: Due to manufacturing residues, the
appliance may emit a light odor during the rst
few uses.
EN // USER GUIDE
5
SAFETY REGULATIONS
• The appliance must only be used for the purpose for which it was intended and designed. The manufacturer
is not liable for any damage caused by incorrect operation and improper use.
• Keep the electrical plug away from water and any other liquids. Do not use until the appliance has been
checked by a certied technician. Failure to follow these instructions could cause a risk to lives.
• Never attempt to open the casing of the appliance yourself.
• Do not insert any objects in the casing of the appliance.
• Do not touch the plug with wet or damp hands.
• Danger of electric shock! Do not attempt to repair the appliance yourself. In case of malfunctions, repairs
are to be conducted by qualied personnel only.
• Never use a damaged appliance! Disconnect the appliance from the electrical outlet and contact the retailer
if it is damaged.
• Regularly check the power plug and cord for any damage. If the power plug or power cord is damaged, it
must be replaced by a service agent or similarly qualied persons in order to avoid danger or injury.
• Make sure the cord does not come in contact with sharp or hot objects and keep it away from open re.
• To pull the plug out of the socket, always pull on the plug and not on the cord.
• Ensure that the cord (or extension cord) is positioned so that it will not cause a trip hazard.
• We recommend you check the appliance regularly when in use.
• Turn off the appliance before pulling the plug out of the socket.
• Never carry the appliance by the cord.
• Do not use any extra devices that are not supplied along with the appliance.
• Only connect the appliance to an electrical outlet with the voltage and frequency mentioned on the
appliance label.
• Connect the power plug to an easily accessible electrical outlet so that in case of emergency the appliance
can be unplugged immediately. To completely switch off the appliance pull the power plug out of the
electrical outlet.
• Always turn the appliance off before disconnecting the plug.
• Never use accessories other than those recommended by the manufacturer. Failure to do so could pose a
safety risk to the user and could damage the appliance. Only use original parts and accessories.
• This appliance is not intended for use by persons (including children) with reduced physical, sensory or
mental capabilities, or lack of experience and knowledge.
• This appliance must not be used by children under any circumstances.
• Keep the appliance and its cord out of reach of children.
• Always disconnect the appliance from the mains if it is left unattended or is not in use, and before assembly,
disassembly or cleaning.
EN // USER GUIDE
6
SPECIAL SAFETY REGULATIONS
• The appliance is intended only for cooking food packed in vacuum bags at the precisely controlled
temperature in household use. Any other use may lead to damage of the appliance or personal injury.
• Do not use this appliance for cooking food products, heating substances which are ammable, dangerous or
otherwise unsafe.
• Use the appliance only as described in this manual.
• Caution! Hot surface! The temperature of the surface is hot during use. Hold the handle or upper part of the
appliance.
• Never use the appliance near explosive or ammable materials, credit cards, magnetic discs or radios.
• This appliance is not intended to be operated by means of an external timer or separate remote control
system.
• Keep the appliance away from any heat sources and open ames.
• Do not use the appliance near explosive or ammable materials, credit cards, magnetic discs or radios.
• The appliance should be mounted vertically to the container.
• During use, put the food for heating inside the water container, make sure the water level should be controlled
between the lowest water level “MIN” and the highest water level “MAX”, to avoid damage to the appliance.
• Only water should be heated with this appliance. Other liquids could damage the appliance. Do not use the
appliance without water inside.
• Never cover the appliance with foils, cloths, etc while using.
• Check the water temperature with the temperature display. Do not touch the water.
• Do not use hard utensils to hit the heating plate surface. Do not use water jet, ush directly with water or
steam cleaner as the parts will get wet and electric shock might be resulted.
• Do not clean or store the appliance unless it is completely cooled down.
This appliance is classied as protection class I appliance and must be connected to a protective ground
Grounding reduces the risk of electric shock by providing an escape wire for the electric current. This
appliance is equipped with a cord having a grounding wire with a grounding plug. The plug must be plugged
into an outlet that is properly installed.
GROUNDING INSTALLATION
SOUS VIDE COOKING
“Sous Vide” is a precise cooking technique which cook food at lower temperature under longer period of time.
The essence of food is retained and cook to perfection. Vegetables can retain its nutritional value as well.
EN // USER GUIDE
7
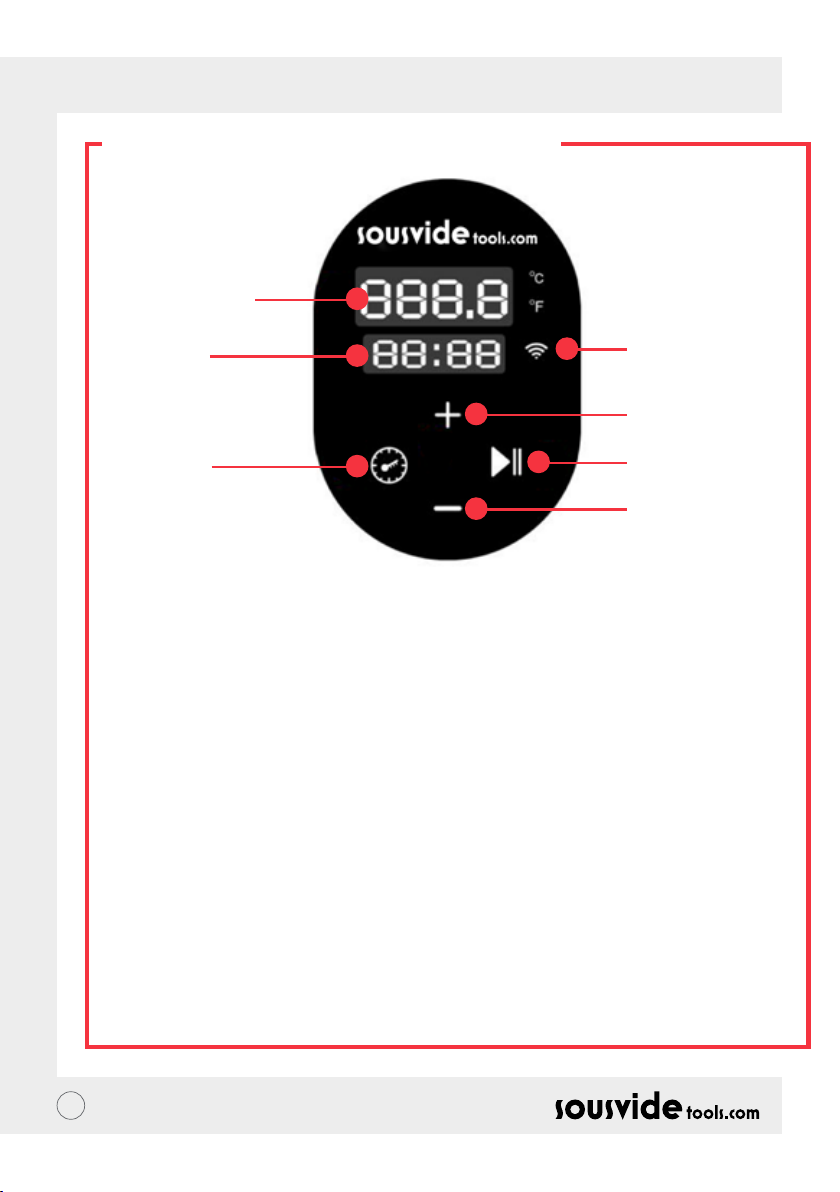
PRODUCT FUNCTION
Temperature &
Time button
Time Display
Temperature Display
Start/Stop Button
WiFi
+ / - Adjustment Button
+ / - Adjustment Button
Temp/Time Button
Click the Temp/Time button to toggle the temperature or time setting. When the temperature display is
ashing, set the desired target temperature with “+” and “-”; when the time display is ashing, the desired
target time can be set with “+” and “-”.
* After the light ashes 10 times, if there is no setting operation, the machine will exit the Temp/Time setting.
If you need to reset it, click the temp/time button again to enter the setting state.
* In the working mode, press and hold the Temp/Time button, the digital tube displays the time and
temperature that have been set.
Start/Stop Button
In standby mode, press the Start/Stop button to start the machine.
Pressing the Start/Stop button for a second time will start the time to count down.
Pressing the Start/Stop button for a third time will stop the machine and it will go back in to standby mode.
+ / - Adjustment Button
Use the button to increase or decrease the temperature and time setting, after selecting the appropriate function.
Temperature Display
Displays real-time working temperature.
Time Display
In standby mode, the set target time is displayed. In working mode, the remaining working time is displayed.
**WIFI indicator is used when operating the distribution network with mobile phone. If no network and
mobile phone operation is required, this indicator is not displayed.
EN // USER GUIDE

8
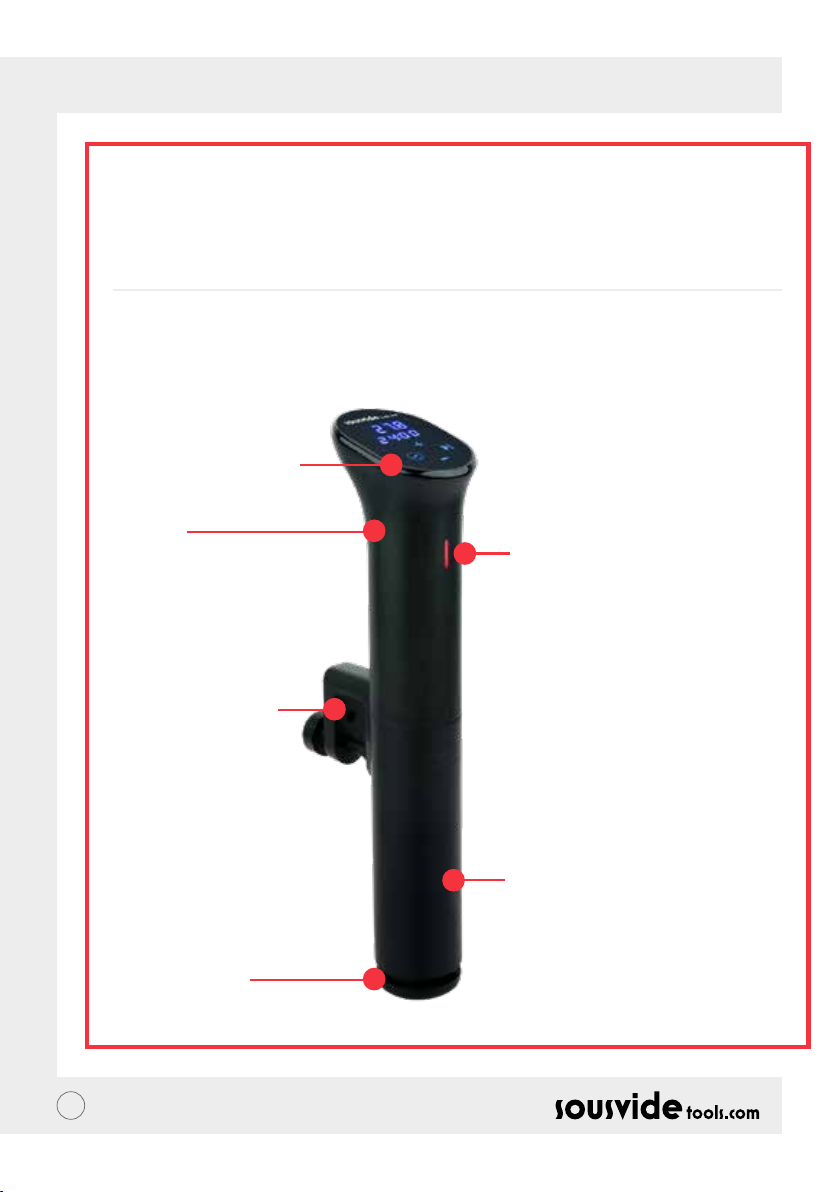
PRODUCT STRUCTURE
Control Panel
Body
Bottom Cover
Fixing Device
Indicator
Red light means the device has not
reached the preset temperature
Green light means the device has
reached the preset temperature
and the countdown begins.
The Green light will remain on
whilst the time countdowns, the
process is complete or to remind
you it's time to cook.
Housing
Reset to Default
Under the ready working mode, press and hold the Start/Stop and + the Temperature Display will display the
setting temperature 60ºC. The Time Display will display the setting time 24:00. Release the Start/Stop and +
buttons and the display will ash 10 times at the same time and exit the setting mode.
If you need to switch the Celsius and Fahrenheit, press + and - simultaneously to switch.
EN // USER GUIDE
9
THE APP
Downloading The iVide APP
If the iVide APP has not yet been downloaded, it can be downloaded from the Apple Store (IOS) or Google Play
(Android). It is compatible with IOS version 9.3.5 and later. It is compatible with Android version 4.3 and later.
Note: Please check with your mobile phone or device’s manufacturer if you have aquestion about downloading APP.
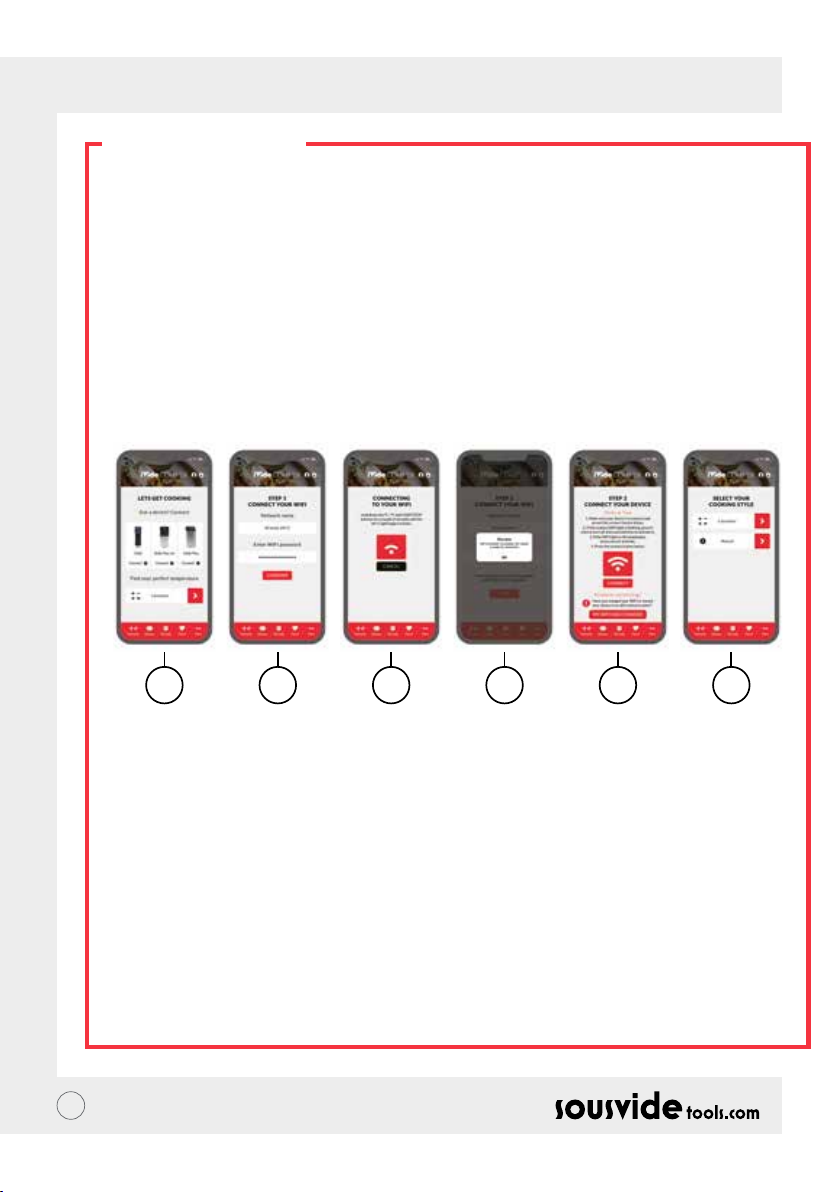
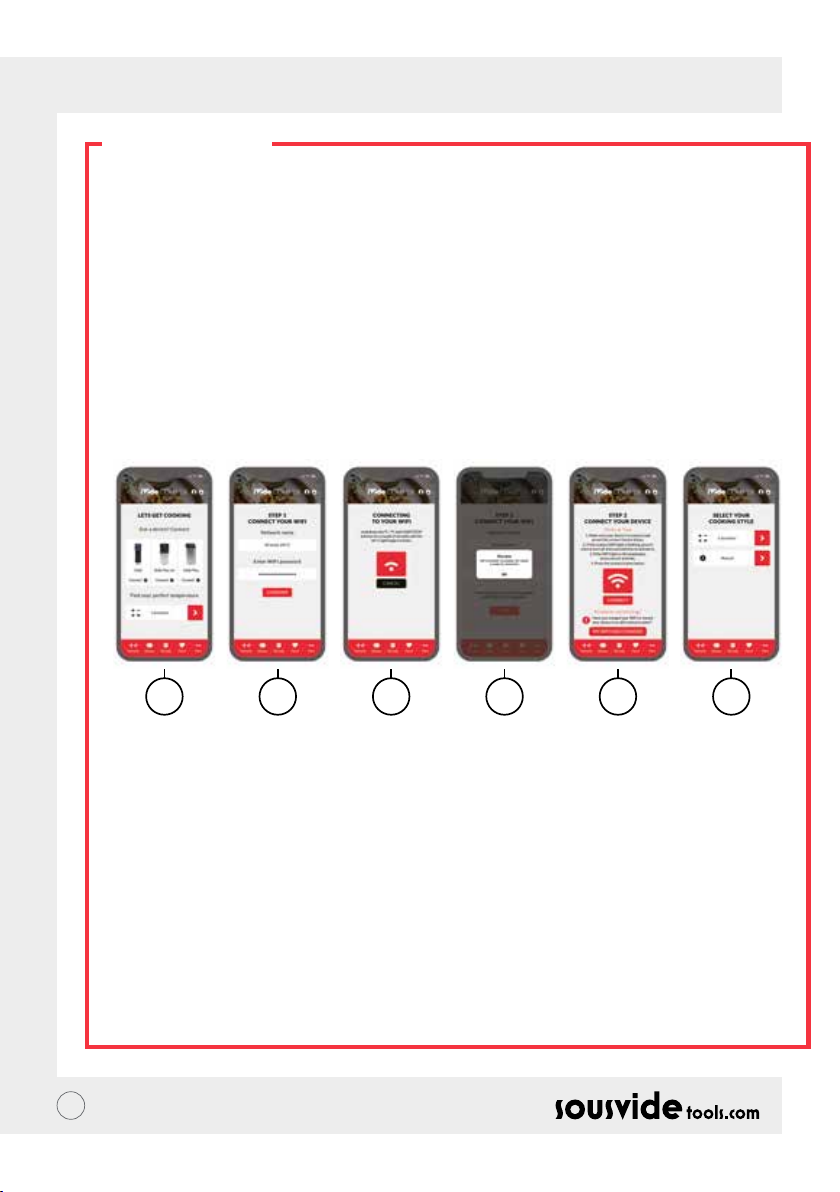
Six Steps To Congure The iVide APP
Installing the iVide APP is quick, in contrast to some other apps. The iVide APP allows instant use, providing
the necessary information exactly when you need it. We have developed a completely new approach to this
kind of applications because every moment in the kitchen should be unforgettable. The APP is compatible
with the SousVideTools® iVide Thermal Circulator Home 2.0 with Wi-Fi. The App makes cooking with the
iSousVideTools® iVide Thermal Circulator Home 2.0 incredibly easy. Simply select the food, adjust the settings,
and press Start.
Six Easy Steps
1 Select the appliance you want to use, and press “CONNECT”.
2 The app will detect a connected Wi-Fi network. Enter the password and press ‘Conrm’.
3 The application starts searching for the SousVideTools® iVide Thermal Circulator Home 2.0. Hold down
the Temp/Time and Start/Stop buttons for a couple of seconds until the Wi-Fi light begins to ash. Wait
until the appliance nishes automatic conguration.
4 At the end, you will see a message conrming the appliance is ready to be connected.
5 Make sure the Wi-Fi light has stopped ashing and then press the ‘Connect’ button. If you need help, read
the hints and tips on the display.
6 Congratulations! The SousVideTools® iVide Thermal Circulator Home 2.0 has just been congured! Enjoy
your cooking!
Possible Error: If the distribution network has timed out after 60 seconds and the network fails to be deployed,
the WIFI indicator could be switched off.
WIFI indicator prompts: 1, no light, no connection to the network; 2, ash: distribution process; 3, slow ash:
connect to the router, not connected to the M2M server. 4. Always on: Connect to the M2M server.
Note:The Apple and iPhone logos are trademarks of Apple Inc., registered in the USA and other countries. Apple
Store is a service mark of Apple Inc. Android; Google Play and Google Play logo are trademarks of Google Inc.
123456
EN // USER GUIDE

10
• Place the SousVideTools® iVide Thermal Circulator Home 2.0 in a heat resistant container that is
sufciently deep to hold the device using the clamp.
• Fill the container with water level between the MIN and MAX markings on the heating element housing.
Note: Placing vacuum bag with food will increase the water level. Check the water level afterwards to
ensure that it does not beyond MAX marking.
• Connect the power cable to the power supply. Press the Start/Stop button.
A: VIA THE CONTROL PANEL
1. Use the Temp/Time button to select Temperature and then set the desired value with the + and - buttons.
2. Use the Temp/Time button to select the required time, again using the + and - buttons.
3. When you select the temperature and time of cooking, press the Start/Stop button to start the appliance.
After reaching the required temperature, light will turn from red to green. Place the bag in water.
CAUTION! The water will be hot.
4. After reaching the set cooking time, remove the bag from the hot water using kitchen tongs. The machine
will beep once the cooking has nished.
Note: If there is no operation, the machine will emit a continuous beep after 20 seconds, while the water
temperature will remain at the preset temperature.
5. Finish the cooking process by searing the meat in a pan to obtain the taste of fried meat and crunchy crust.
Add a little butter and briey sear the cooked meat on both sides.
6. After the cooking process is nished, disconnect the device from the power supply and leave it to cool down
before cleaning. To avoid any risk of burns, leave the water to cool before pouring it from the container.
B: BY USING THE IVIDE APP (REPLACES STEPS 1 & 2)
Connect the device (if this is the rst time you perform this operation, please refer to the information above).
Select the recipe or use the calculator and then follow the directions on the display. The application will
automatically select the correct temperature and time of cooking. Select ‘Start cooking’. The SousVideTools®
iVide Thermal Circulator Home 2.0 will start heating water to the set temperature. For safety reasons do not
place bags with food in water before reaching the set temperature.
COMPATIBILITY DISCLAIMER
Wireless performance is dependent on your device’s WI-FI wireless technology, please refer to your device’s
manufacturer. SousVideTools.com will not be liable for any lost of data or leakage resulting from the use of
these devices.
OPERATION
EN // USER GUIDE

11
MAINTENANCE
MAINTENANCE
To avoid burning, please make sure the power is turned off on the machine and it has cool down to room
temperature before cleaning.
1 Place the machine vertically after cleaning, do not place it horizontally or upside down.
2 During cleaning, do not damage the components inside the machine. Once the components are damaged,
please ask specialist to check and repair. Do not attempt unauthorised repairs to avoid accidents.
3 Abandon old water after each use and ll with fresh water next time. If the water is reused many times, some
mineral substance may subside or adhere to the surface of the components, thus inuencing the machine
performance.
If you notice the discharge capacity reduce massively or the machine’s components are covered in ash and dirt,
please disassemble the low part of the machine’s housing to clean the heat tube and probe.
HOW TO DISASSEMBLE QUICKLY
It is recommended to not put the
hot machine in to cool water. The
machine should be cooled down to
room temperature and then put into
cool water to use. Otherwise it will
inuence the machine function and
lifetime. We also recommend to not
put a cold machine in to hot water.
Use the tool to
remove screw
Remove the low
part housing to
clean the inner
components
EN // USER GUIDE
12
If the appliance does not function properly, please check the below table for the solution. If you are still unable
to solve the problem, please contact the supplier/service provider.
TROUBLESHOOTING
Error Possible Cause
The water level is lower than the
lowest water level
H20
1. The heating pipe isn't normal;
2. The internal wiring of the machine
isn't normal;
3. The temperature sensor isn't normal
E02
Troubleshooting
Turn off the machine power, add the
right amount of water to the container.
Need to ask a professional to repair
CLEANING
HOW TO CLEAN
PREPARATION:
Food grade vinegar (white vinegar, apple vinegar, etc.)
WHY NEED TO CLEAN:
Normally tap-water contains minerals which can cause limescale. When the water is heated to a certain
temperature, the limescale will appear on the heater or surface of the machine, this could affect the
performance of the machine. We suggest you clean the machine after every 20 uses or 200 hours.
HOW TO CLEAN:
1 Mix 75% water and 25% vinegar and pour it into a container until you reach the Max line of the machine.
2 Turn on the machine, set the working temperature to 80°C/176°F) and set the time 3 hours (03:00) then
press the Start/Stop button. When the machine reaches the preset temperature press the Start/Stop
button to start the timer.
3 When the timer indicates 00:00, stop the machine and turn off the power, unplug and let the machine cool.
4 Drain out the water from the container and use fresh water to clean the device.
EN // USER GUIDE
13
Any defect affecting the functionality of the appliance which becomes apparent within one year after purchase
will be repaired by free repair or replacement provided the appliance has been used and maintained in
accordance with the instructions and has not been abused or misused in anyway. Your statutory rights are not
affected. If the appliance is claimed under warranty, state where and when it was purchased and include proof
of purchase (e.g. receipt).
In line with our policy of continuous product development we reserve the right to change the product,
packaging and documentation specications without notice
TECHNICAL SPECIFICATION
WARRANTY
Operating voltage & frequency: 220 – 240V~ 50Hz
Rated input power: 1200W
Waterproof protection class: IPX7
Temperature range: 5°C ~ 90°C
Network details: Compatible standards: IEEE 802.11 b/g/n
Frequency band: 2,412MHz -2,484MHz
Operating frequency/Max output power: 2,412MHz - 2,484MHz / < 20,0dB
At the end of the life of the appliance, please dispose of the appliance according to the regulations and
guidelines applicable at the time. Throw packing materials like plastic and boxes in the appropriate containers.
DISCARDING & ENVIRONMENT
• The following information is only applicable to equipment sold in countries applying EU directives.
• This equipment is intended to be used with the iVide WIFI Cooker APP and is veried to comply with the
essential requirements of the Directive 2014/53/EU.
• We hereby declare that this equipment (item no.: 224076) is in compliance with the essential requirements
and other relevant provisions of Directive 2014/53/EU.
• The full text of the EU Declaration of conformity is available below and the following internet address:
www.SousVideTools.com
STATEMENT ON COMPLIANCE
EN // USER GUIDE
14
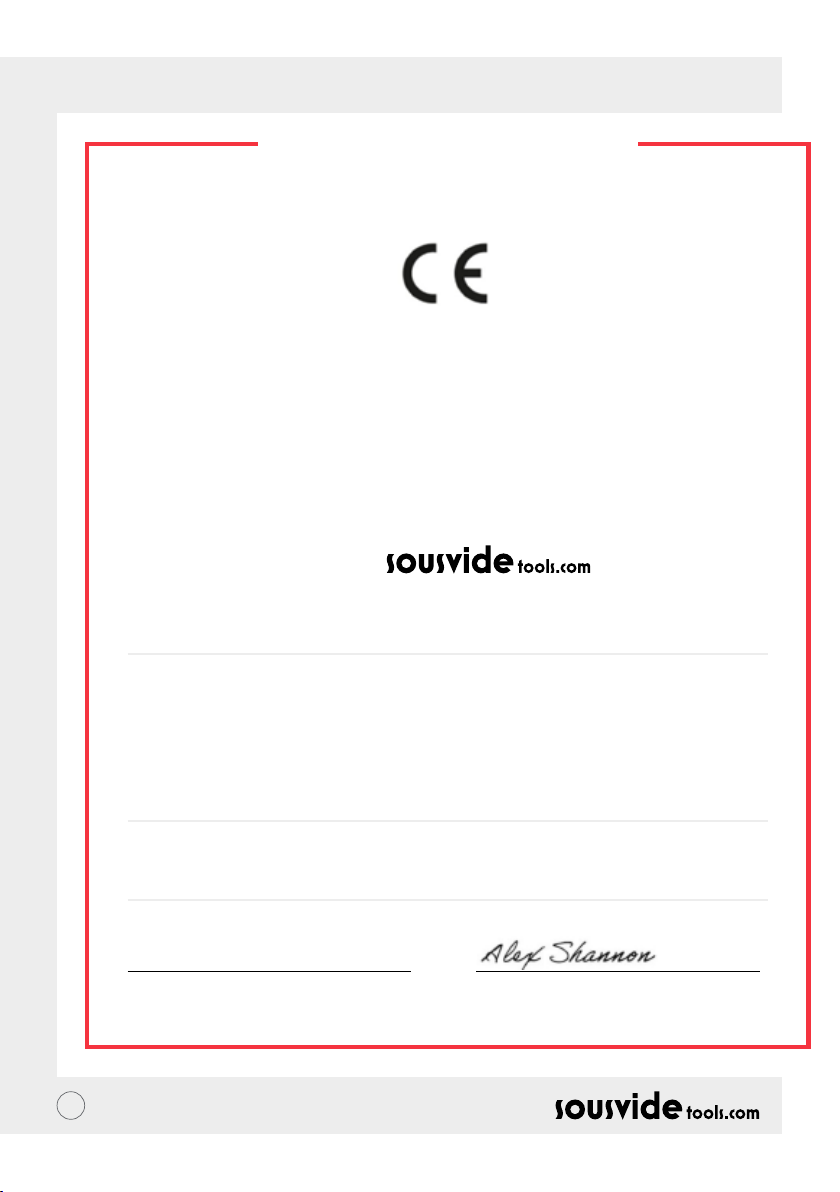
CE CERTIFICATE
European Declaration of Conformity
Marking we
Gastronomy Plus Ltd t/a Sousvidetools.com
Central Barn
Claughton Business Park
Hornby Road
Claughton
Lancaster
United Kingdom
declare under our sole responsibility that the product
Article: Sous Vide Circulator
Model no.: SVT-01046 & SVT-01046EU
To which this declaration relates is in conformity with the following harmonized standards
EN 60950-1: 2006+A11(2009)+A1(2010)+A12
(2011)+A2(2013)
EN 62479: 2010
EN 55014-1:2006/A2:2011
EN 55014-2:2015
EN 61000-3-2:2014
EN 61000-3-3:2013
ETSI EN 301 489-01 V2.l.1 (2017-02)
ETSI EN 301 489-17 V3.l.1 (2017-02)
EN 300 328 V2.l.1: 2016-11
EN 60335-1:2012/All:2014
EN 60335-2-74:2003/A2:2009
EN 62233:2008
Following the provisions of
2014/53/EU (RED directive) 2014/30/EU (EMC directive) 2014/35/EU (LVD directive)
Trademark:
01.10.2020
Date / Place Name: Alex Shannon
Position: Managing Director
EN // USER GUIDE

15
IMPORTANT - LIRE AVANT L’UTILISATION
Veuillez lire attentivement ce manuel d’utilisation avant d’utiliser l’appareil
Remarque: Cet article ne fonctionne que lorsqu’il est immergé dans l’eau.
Le fait de le sortir de l’eau afchera un code d’erreur H20.
Conservez ces instructions avec l’appareil.
CONSEILS SUR L’ÉLIMINATION
Selon le règlement européen sur les déchets
2012/19/UE, ce symbole sur le produit ou sur
son emballage indique que ce produit ne peut
pas être traité comme un déchet ménager.Il
devrait plutôt être acheminé au point de collecte
approprié pour le recyclage des équipements
électriques et électroniques.En vous assurant
que ce produit est éliminé correctement, vous
aiderez à prévenir les conséquences négatives
potentielles pour l’environnement et la santé
humaine, qui pourraient autrement être causées
par la manipulation inappropriée de déchets
de ce produit.Pour plus d’informations sur le
recyclage de ce produit, veuillez contacter votre
municipalité ou votre service d’élimination des
déchets ménagers.
• Retirer tous les emballages et emballages
protecteurs.
• Vérier que l’appareil n’est pas endommagé.En
cas de livraison incomplète ou de dommages,
• NE PAS utiliser l’appareil et contacter le
fournisseur (voir Garantie).Nettoyer l’appareil
avant utilisation (voir Nettoyage et entretien).
• Fixez l’appareil solidement sur le côté du
contenant.
• Ne pas utiliser l’appareil à proximité de sources
chauffées ou d’objets inammables.S’assurer
qu’il est complètement sec.
• Remarque: En raison des résidus de fabrication,
l’appareil peut émettre une légère odeur durant
les premières utilisations.
FR // NOTICE D’UTILISATION
16
RÈGLES DE SÉCURITÉ
• L’appareil ne doit être utilisé qu’aux ns pour lesquelles il a été conçu.Le fabricant n’est pas responsable des
dommages causés par un mauvais fonctionnement et une mauvaise utilisation.
• Tenez la che électrique éloignée de l'eau et de tout autre liquide. Ne pas utiliser tant que l'appareil n'a pas
été vérié par un technicien agréé. Le non-respect de ces instructions peut entraîner un risque pour la vie.
• N’essayez jamais d’ouvrir le boîtier de l’appareil vous-même.
• Ne pas insérer d’objets dans le boîtier de l’appareil.
• Ne pas toucher le bouchon avec les mains mouillées ou humides.
• Danger de choc électrique!N’essayez pas de réparer l’appareil vous-même.En cas de défaillance, les
réparations doivent être effectuées par du personnel qualié seulement.
• N’utilisez jamais un appareil endommagé!Débranchez l’appareil de la prise électrique et communiquez avec
le détaillant s’il est endommagé.
• Vérier régulièrement la che d’alimentation et le cordon pour détecter tout dommage.Si la che
d’alimentation ou le cordon d’alimentation est endommagé, il doit être remplacé par un agent de service ou
des personnes qualiées de la même manière an d’éviter tout danger ou blessure.
• Assurez-vous que le cordon n’entre pas en contact avec des objets pointus ou chauds et gardez-le à l’écart
du feu.
• Pour retirer la che de la prise, tirez toujours sur la che et non sur le cordon.
• S’assurer que le cordon (ou la rallonge) est positionné de façon à ne pas causer de risque de trébuchement.
• Nous vous recommandons de vérier régulièrement l'appareil lors de son utilisation.
• Éteignez l’appareil avant de débrancher la prise.
• Ne portez jamais l’appareil par le cordon.
• Ne pas utiliser d’appareils supplémentaires qui ne sont pas fournis avec l’appareil.
• Ne raccorder l’appareil à une prise électrique qu’avec la tension et la fréquence indiquées sur l’étiquette de
l’appareil.
• Branchez la prise électrique à une prise électrique facilement accessible an qu’en cas d’urgence, l’appareil
puisse être débranché immédiatement.Pour éteindre complètement l’appareil, retirez la che
d’alimentation de la prise électrique.
• Éteignez toujours l’appareil avant de débrancher la prise.
• Ne jamais utiliser d’accessoires autres que ceux recommandés par le fabricant.Ne pas le faire pourrait poser
un risque pour la sécurité de l’utilisateur et pourrait endommager l’appareil.Utilisez uniquement les pièces
et les accessoires d’origine.
• Cet appareil n’est pas conçu pour être utilisé par des personnes (y compris des enfants) ayant des capacités
physiques, sensorielles ou mentales réduites, ou un manque d’expérience et de connaissances.
• Cet appareil ne doit en aucun cas être utilisé par des enfants.
• Garder l’appareil et son cordon hors de la portée des enfants.
• Toujours débrancher l’appareil du secteur s’il est laissé sans surveillance ou s’il n’est pas utilisé, et avant de
l’assembler, de le démonter ou de le nettoyer.
FR // NOTICE D’UTILISATION

17
RÈGLES SPÉCIALES DE SÉCURITÉ
• L’appareil est destiné uniquement à la cuisson des aliments emballés dans des sacs sous vide à la
température précisément contrôlée dans l’usage domestique.Toute autre utilisation peut entraîner des
dommages à l’appareil ou des blessures corporelles.
•Ne pas utiliser cet appareil pour la cuisson de produits alimentaires, de substances chauffantes
inammables, dangereuses ou autrement dangereuses.
• Utiliser l’appareil uniquement comme décrit dans ce manuel.
• Attention!Surface chaude!La température de la surface est élevée pendant l’utilisation.Tenez la poignée
ou la partie supérieure de l’appareil.
• N’utilisez jamais l’appareil à proximité de matériaux explosifs ou inammables, de cartes de crédit, de
disques magnétiques ou de radios.
•Cet appareil ne doit pas être utilisé au moyen d’une minuterie externe ou d’un système de télécommande
distinct.
• Garder l’appareil à l’écart des sources de chaleur et des ammes nues.
• Ne pas utiliser l’appareil à proximité de matériaux explosifs ou inammables, de cartes de crédit, de disques
magnétiques ou de radios.
• L’appareil doit être monté verticalement sur le contenant.
• Pendant l’utilisation, placer la nourriture pour le chauffage à l’intérieur du réservoir d’eau, s’assurer que le
niveau d’eau doit être contrôlé entre le niveau d’eau le plus bas «MIN» et le niveau d’eau le plus
élevé «MAX», an d’éviter d’endommager l’appareil.
• Ne chauffer que de l’eau avec cet appareil.D’autres liquides pourraient endommager l’appareil.N’utilisez
pas l’appareil sans eau à l’intérieur.
• Ne jamais couvrir l’appareil de feuilles, de chiffons, etc. pendant l’utilisation.
• Vérier la température de l’eau à l’aide de l’écran de température.Ne pas toucher l’eau.
• Ne pas utiliser d’ustensiles durs pour heurter la surface de la plaque chauffante.Ne pas utiliser de jet
d’eau, rincer directement avec de l’eau ou un nettoyeur à vapeur car les pièces seront mouillées et des chocs
électriques pourraient en résulter.
• Ne pas nettoyer ni entreposer l’appareil à moins qu’il ne soit complètement refroidi.
INSTALLATION
Cet appareil est classé comme un appareil de protection de classe I et doit être raccordé à une mise à la terre
de protection.
La mise à la terre réduit le risque de choc électrique en fournissant un l d’échappement pour le courant
électrique.Cet appareil est équipé d’un cordon avec un l de terre et une che de mise à la terre.La che doit
être branchée à une prise correctement installée.
CUISSON SOUS VIDE
Le «Sous Vide» est une technique de cuisson précise qui permet de faire cuire les aliments à basse température
pendant une période plus longue. L’essence des aliments est conservée et cuite à la perfection. Les légumes
peuvent également conserver leur valeur nutritive.
FR // NOTICE D’UTILISATION

18
FONCTIONNEMENT DU PRODUIT
Bouton Température
et Temps
Afchage de l’heure
Afchage de la température
Bouton Start/Stop
WiFi
+ / - Bouton d’ajustement
+ / - Bouton d’ajustement
Bouton Temp/Time (Température/Heure)
Cliquez sur le bouton Temp/Time pour basculer le réglage de la température ou de l’heure.Lorsque l’afchage
de la température clignote, dénissez la température cible désirée avec «+» et «-»;lorsque l’afchage de
l’heure clignote, l’heure cible souhaitée peut être réglée avec «+» et «-».
* Lorsque le voyant clignote 10 fois, s’il n’y a pas d’opération de réglage, la machine quitte le réglage Temp/
Time.Si vous devez le réinitialiser, cliquez à nouveau sur le bouton Temp/Time pour entrer l’état de réglage.
* En mode de travail, appuyez sur le bouton Temp/Time et maintenez-le enfoncé, le tube numérique afche
l’heure et la température qui ont été réglées.
Bouton Start/Stop (Marche/Arrêt)
En mode veille, appuyez sur le bouton Start/Stop pour démarrer la machine.
Appuyer une seconde fois sur le bouton Start/Stop pour commencer le décompte.
Appuyer une troisième fois sur le bouton Start/Stop pour arrêter la machine et la remettre en mode veille.
+ / - Bouton d’Ajustement
Utiliser le bouton pour augmenter ou diminuer le réglage de la température et du temps, après avoir
sélectionné la fonction appropriée.
Afchage de la Température
Afche la température en temps réel.
Afchage de l’Heure
En mode veille, le temps cible déni s’afche. En mode de travail, le temps de travail restant s’afche.
**L’indicateur WIFI est utilisé pour l’exploitation du réseau de distribution avec un téléphone mobile. Si
aucune opération de réseau et de téléphone mobile n’est nécessaire, cet indicateur n’est pas afché.
FR // NOTICE D’UTILISATION
19
STRUCTURE DU PRODUIT
Panneau de commande
Menu
Capot inférieur
Dispositif de xation
Indicateur
La lumière rouge indique que
l’appareil n’a pas atteint la
température prédénie
Le voyant vert indique que
l’appareil a atteint la température
prédénie et que le compte à
rebours commence.
Le feu vert restera allumé alors que
le compte à rebours, le processus
est terminé ou pour vous rappeler
qu’il est temps de cuisiner.
Logement
Réinitialisation par défaut
Quand l’appareil est prêt à marcher, maintenez la touche Start/Stop et + enfoncée, l’écran de température
afchera la température de réglage à 60ºC. L’afchage de l’heure afchera l’heure de réglage à 24h. Relâchez
les boutons Start/Stop et + , l’écran clignotera 10 fois et quittera le mode de réglage.
Si vous avez besoin de changer les degrés Celsius et Fahrenheit, appuyez sur + et - simultanément pour changer.
FR // NOTICE D’UTILISATION
20
L’APPLI
Télécharger l’Appli iVide
Si l’application iVide n’a pas encore été téléchargée, elle peut être téléchargée depuis l’Apple Store (IOS) ou
Google Play (Android).Il est compatible avec IOS version 9.3.5 et ultérieure.Il est compatible avec Android
version 4.3 et ultérieure.
Remarque: Veuillez vérier auprès du fabricant de votre téléphone portable ou de votre appareil si vous avez
déjà téléchargé l’application.
Six Étapes Pour Congurer l’Application iVide
L’installation de l’application iVide est rapide, contrairement à d’autres applications. L’application iVide permet une
utilisation instantanée, en fournissant les informations nécessaires exactement quand vous en avez besoin. Nous
avons développé une approche complètement nouvelle de ce genre d’applications parce que chaque moment dans
la cuisine devrait être inoubliable. L’application est compatible avec le SousVideTools® iVide Thermal Circulator
Home 2.0 avec Wi-Fi. L’application rend la cuisson avec le iSousVideToolsMD iVide Thermal Circulator Home 2.0
incroyablement facile. Sélectionnez simplement l’aliment, ajustez les paramètres et appuyez sur Démarrer.
Six Étapes Simples
1 Sélectionnez l’appareil que vous voulez utiliser et appuyez sur «CONNECT».
2 L’application détectera un réseau Wi-Fi connecté.Entrez le mot de passe et appuyez sur «Conrmer».
3 L’application commence à rechercher le SousVideTools® iVide Thermal Circulator Home 2.0. Maintenez
les boutons Temp/Time et Start/Stop enfoncés pendant quelques secondes jusqu’à ce que le voyant Wi-Fi
commence à clignoter.Attendez que l’appareil ait terminé la conguration automatique.
4 À la n, vous verrez un message conrmant que l’appareil est prêt à être connecté.
5 Assurez-vous que le voyant Wi-Fi a cessé de clignoter, puis appuyez sur le bouton «Connect».Si vous avez
besoin d’aide, lisez les conseils et astuces à l’écran.
6 Félicitations!L’iVide Thermal Circulator Home 2.0 de SousVideTools® vient d’être conguré!Protez de
votre cuisine!
Erreur possible: Si le réseau de distribution a expiré au bout de 60 secondes et que le réseau ne se déploie pas,
l’indicateur WIFI peut être éteint.
Indicateur WIFI invite: 1, pas de lumière, pas de connexion au réseau;2, ash: processus de distribution;3, ash
lent: se connecter au routeur, pas connecté au serveur M2M. 4. Toujours activé: connectez-vous au serveur M2M.
Remarque:Les logos Apple et iPhone sont des marques commerciales d’Apple Inc., enregistrées aux États-Unis
et dans d’autres pays.Apple Store est une marque de service d’Apple Inc.Android;Google Play et le logo Google
Play sont des marques commerciales de Google Inc.
123456
FR // NOTICE D’UTILISATION
This manual suits for next models
2
Table of contents
Languages:


