Southwestern Bell FA970 User manual

1
Southwestern Bell
Freedom Phone®
All-Digital Telephone
Answering System
with Voice Day/Time
Stamp
FA970 OWNER'S MANUAL
TOLL FREE HELP LINE
1-800-366-0937
http://www.swbfreedomphone.com/

2
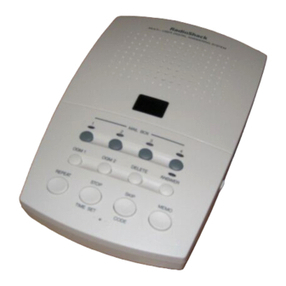
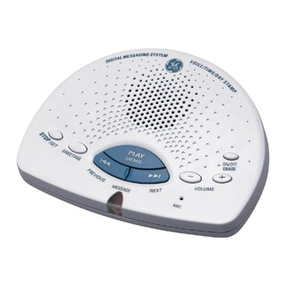
LOCATION OF CONTROLS
TOP VIEW 1. Battery Low LED Indicator
2. Answer On/Off Button
3. Time Set / Repeat Button
4. Mailbox 2 Play/Skip Button
5. Mailbox 2 Message LED
6. Mailbox 1 Play/Skip Button
7. Mailbox 1 Message LED
8. Microphone
9. Greeting Button
10. Stop / Save Button
SIDE VIEW
11. Rotary Volume Control
REAR VIEW
12. Ring Select 2/4/TS
13. Telephone Line
14. AC Adaptor Jack
15. Telephone Extension Line

3
PLEASE READ IMPORTANT SAFETY
INSTRUCTIONS ON PAGES 2-4 BEFORE USE.
Congratulations!
You have purchased an FA970 Digital Answering System with Voice Day/Time
Stamp manufactured to the highest standards of SOUTHEWSTERN BELL
FREEDOM PHONE®RETAIL SALES.
Digital Technology
This digital design utilizes a computer chip to perform answering system functions
more efficiently and with more versatile features than microcassette answering
machines.
BEFORE INSTALLING AND OPERATING THIS ANSWERING
SYSTEM, IT IS VERY IMPORTANT THAT YOU READ THIS OWNER’S
MANUAL.
IMPORTANT SAFETY INSTRUCTIONS
BEFORE USING YOUR TELEPHONE EQUIPMENT, BASIC SAFETY
PRECAUTIONS SHOULD ALWAYS BE FOLLOWED TO REDUCE THE
RISK OF FIRE, ELECTRIC SHOCK AND INJURY TO PERSONS,
INCLUDINGTHE FOLLOWING:
1. Read and understand all instructions.
2. Follow all warnings and instructions marked on the product.
3. Unplug this product from the wall telephone jack and power outlet before
cleaning. Do not use liquid cleaners or aerosol cleaners. Use a damp cloth for
cleaning.
4. Do not use this product near water, for example, near a bath tub, wash bowl,
kitchen sink, or laundry tub, in a wet basement, or near a swimming pool.

4
5. Do not place this product on an unstable cart, stand, or table. The product may
fall, causing serious damage to the product.
6. Slots or openings in the cabinet and the back and bottom are provided for
ventilation, to protect it from overheating. These openings must not be blocked or
covered. The openings should never be blocked by placing the product on a bed, or
other similar surface. This product should never be placed near or over a radiator or
heat register.
7. This product should be operated only from the type of power source indicated on
the marking label. If you are not sure of the type of power supply to your home,
consult your dealer or local power company.
8. Do not allow anything to rest on the power cord. Do not locate this product
where the cord will be abused by persons walking on it. Do not attach the power cord
to building surfaces.
9. Do not overload wall outlets and extension cords as this can result in the risk of
fire or electric shock.
10. Never push objects of any kind into this product through cabinet slots as
they may touch dangerous voltage points or short out parts that could result in the
risk of fire or electric shock. Never spill liquid of any kind on the product.
11. To reduce the risk of electric shock, do not disassemble this product, but
take it to a qualified serviceman when some service or repair work is required.
Opening or removing covers may expose you to dangerous voltages or other risks.
Incorrect reassembly can cause electric shock when the appliance is
subsequently used.
12. Unplug this product from the wall outlet and refer servicing to qualified service
personnel under the following conditions:
a. When the power supply cord or plug is damaged or frayed.
b. If liquid has been spilled into the product.
c. If the product has been exposed to rain or water.
5
d. If the product does not operate normally by following the operating
instructions. Adjust only those controls that are covered by the operating instructions
because improper adjustment of other controls may result in damage and will
often require extensive work by a qualified technician to restore the product to
normal operation.
e. If the product has been dropped or cabinet has been damaged.
f. If the product exhibits a distinct change in performance.
13. Avoid using a telephone (other than a cordless type) during an electrical storm.
There may be a remote risk of electric shock from lightning.
14. Do not use the telephone to report a gas leak in the vicinity of the leak.
Save These Instructions
SAFETY INSTRUCTIONS FOR BATTERIES
CAUTION
TO REDUCE THE RISK OF FIRE OR INJURY TO PERSONS,
READ AND FOLLOW THESE INSTRUCTIONS.
1. Use only the 1604A size alkaline batteries mentioned in the Owner’s Manual.
2. Do not dispose of the batteries in a fire. The cells may explode. Check with local
codes for possible special disposal instructions.
3. Do not open or mutilate the batteries. Released electrolyte is corrosive and
may cause damage to the eyes or skin. It may be toxic if swallowed.
4. Exercise care in handling batteries in order not to short the batteries with
conduction materials such as rings, bracelets, and keys. The batteries or
conductors may overheat and cause burns.
5. Do not attempt to recharge the batteries identified for use with this product.
The batteries may leak corrosive electrolyte or explode.
6. Do not attempt to rejuvenate the batteries identified for use with this product by
heating it. Sudden release of the battery electrolyte may occur causing burns or
irritation to eyes or skin.

6
7. When replacing batteries, all batteries should be replaced at the same
time. Mixing fresh and discharged batteries could increase internal cell pressure
and rupture the discharged batteries.
8. When inserting batteries into this product, the proper polarity or direction must
be observed. Reverse insertion of the batteries can cause charging, and that may
result in leakage or explosion.
9. Remove the batteries from this product if the product will not be used for a long
period of time (several months or more) since during this time the batteries could leak
in the product.
10. Discard “dead” batteries as soon as possible since “dead” batteries are more
likely to leak in a product.
11. Do not store this product, or the batteries identified for use with this product, in
high-temperature areas. Batteries that are stored in a freezer or refrigerator for the
purpose of extending shelf life should be protected from condensation during
storage and defrosting. Batteries should be stabilized at room temperature prior to
use after cold storage.
Save These Instructions
GENERAL INFORMATION BOX CONTENTS
This package contains:
• FA970 Digital Telephone Answering System
• One (1) AC Adaptor 120V AC
• Owner’s Manual
• One (1) Quick Installation Guide
• One (1) Remote Access Card
• Warranty Card (Part of Owner’s Manual) If anything is missing or damaged, contact
the place of purchase, Keep the shipping carton and packaging, in case you need to
transport the telephone.

7
For your reference, keep a record of the date purchased.
Please save sales receipt for warranty reference.
Date of Purchase ____________________
INSTALLATION
CAUTION
1. Never install telephone wiring during a lightning storm.
2. Never install telephone jacks in wet locations unless the jack is specifically
designed for wet locations.
3. Never touch uninsulated telephone wires or terminals unless the incoming
telephone line has been disconnected at the network interface.
4. Use caution when installing or modifying telephone lines. Note: Refer to “FCC
Requirements” section on page 18 before connection to telephone line.
To Connect the AC Adaptor
Connect the AC adaptor into the back of the unit. Plug the other end into the AC wall
power outlet (Fig C). Do not attach (staple, etc.) the AC Adaptor cord to the
building wall.
To Install One 9 Volt Battery
IMPORTANT NOTICE
Connect the AC adaptor Before installing the battery
One 9 volt battery (not included) is required to maintain your personalized greeting
and recorded messages during a power failure. If there is a power failure and the
battery is not installed, both your personalized greeting and recorded messages will
be lost.

8
1. Using a small Philips type screwdriver, remove the screw located in the battery
compartment on the bottom of the base and lift the battery compartment door
(Fig A).
2. Install one 9 volt battery. (Fig B)

9
3. Replace battery compartment door, and replace screw.
Note: Install a replacement battery once a year to insure proper operation of the
power failure protection feature.
The battery status is indicated by the BATT. LOW indicator. If a fresh battery
is installed, the LED indicator stays off, when the unit is in the ANSWER ON
mode. Ifthe battery is low/not installed, the indicator will flash.
Choosing Your Location
Before making any connections, locate FA970 near an AC power outlet and a
wall telephone jack (RJ11C).
To Connect the Telephone Line
1. Plug the telephone line cord (connected to the back of the FA970) into the
modular outlet in your telephone wall jack.
2. If you are connecting your FA970 to an extension telephone, plug one end of
the extension telephone line cord to the extension line jack (located on back
of unit). Plug the other end into the telephone.

10
RECORDING YOUR GREETING
There are approximately 11 minutes of total recording time shared by your greeting
and incoming messages.
Your system comes with a prerecorded outgoing greeting:
“Please leave your message after the beep.”
To record your own personalized outgoing greeting:
To Record Your Greeting
1. Press and hold the GREETING button.
Note: You have a maximum of 30 seconds to record your outgoing greeting.
2. After you hear one beep, speak clearly towards the built in microphone (in the
speaker holes).
3. When finished, release the GREETING button.
4. The unit will beep once and play back your recorded greeting. The message
LEDs will be lit solid to indicate the unit is in Answer On mode.
Note: The FA970 has two personalized mailboxes. You have an option to have
callers leave messages in either of the two mailboxes.
If you want the caller to leave a message in a particular mailbox, your greeting should
instruct the callers to press either the “1” or “2” button before their message
recording. If the caller doesn’t press a key, presses a key other than “1” or “2”, or
waits longer than 3 seconds before pressing a key, the caller’s message will be
automatically recorded in Mailbox 1.
Sample Message:
“Hello, this is ______________. I can’t come to the phone right now, but please
leave your name and phone number after you hear the beep. I’ll return your call as
soon as possible. If you wish to leave a message specifically for Bob, press “1”, for
Joan, press “2”. Thank you for calling.”
Note: If the FA970 beeps while recording, you have exceeded the 30 seconds
time limit. Record a shorter greeting, by repeating the steps above.

11
To Check the Greeting
1. To check the greeting, press and release the GREETING button quickly.
2. Your outgoing greeting will be played back to you, and then your system will reset
to answer incoming calls.
Volume Control
Use the rotary VOLUME Control on the side of your unit to set the volume to the
desired sound level.
LED INDICATIONS
LED Indicator Status
Reason
Actions
BATT. LOW LED blinks
rapidly.
A 9 volt alkaline battery
(not included) has not
been installed or needs
to be replaced
Install a fresh 9 volt
alkaline battery.
Mailbox 1 or Mailbox 2
LED blinks to indicate
new messages received.
New messages have
been received.
Press PLAY button to
hear your messages.
Mailbox 1 and Mailbox 2
LEDs are lit solid.
System is in Answer On
Mode. There are no
saved messages
No Action required. Unit
is ready to receive calls.
Mailbox 1 and Mailbox 2
LEDs are off.
Unit is in the Answer Off
mode.
Press Answer ON/OFF
button to turn on
machine
ANSWERING MACHINE FEATURES
Voice Time/Day Stamp
The FA970 records the time and day at the end of each message, if set.
Note: When setting the Time/Day, do not allow more than 20 seconds to elapse
between any step:

12
Setting Voice Time/Day Stamp
Day Set
1. Press and hold the TIME SET/REPEAT button for 2 seconds. The unit will say
“Monday”.
2. Press the ANSWER ON/OFF button until you hear the correct day.
3. To return to the previous day, press the MAIL 1 or MAIL 2 button.
Hour Set
1. Once you hear the correct day, press the TIME SET/ REPEAT button to set the
hour. The unit will say “Twelve”.
2. Press the ANSWER ON/OFF button until you hear the correct hour. To return to
the previous hour, press the MAIL 1 or MAIL 2 button.
Minute Set
1. Once you hear the correct hour, press the TIME SET/REPEAT button to set the
minute. The unit will say “0” (which sounds like “oh”).
2. Press the ANSWER ON/OFF button until you hear the correct minute. To return to
the previous minute, press the MAIL 1 or MAIL 2 button.
AM/PM Set
1. Once you hear the correct minute, press the TIME SET/REPEAT button to set
AM/PM. The unit will say “AM”.
2. Press the ANSWER ON/OFF button. The unit will say “PM”. Press the MAIL 1 or
MAIL 2 button to return to “AM”.
3. Once you hear the correct AM/PM setting, press the TIME SET/REPEAT button
to complete the procedure. The unit will announce the day and time that is now set.
Note: To check the current day and time, press and release the TIME SET/REPEAT
button. If you did not set the Voice Time/Day Stamp, the unit will say “Time is not
set”.

13
Recording Memo Message
You can record a memo message, for another member of your household, in either
of the two mailboxes (Mailbox 1 or Mailbox 2). It will be played back, along with other
messages, in the corresponding mailbox.
To Record Memo
1. Press and hold one of the MAIL 1 or MAIL 2 buttons. A beep will sound and all
the message LEDs will turn off.
2. Record your message (up to 60 seconds) through the microphone in the speaker
holes.
3. When your message is completed, release the button. A beep will sound, and the
corresponding message LED will be increased by one.
Note: When the total number of combined messages in Mailbox 1 and Mailbox 2
equal 30 or more, new MEMO messages can be recorded in Mailbox 1 only.
Message Playback
When the message LED indicators blinks, you have received new messages.
It will blink to indicate the number of messages received (up to 9 times).
To Hear Your Messages
1. Press and release the corresponding Mailbox button on your unit.
2. The FA970 will automatically playback your messages in the order they were
received.
3. The set time and day will be heard at the end of each message, if you set the
Voice Time/Day Stamp.
4. Your FA970 will automatically stop and sound 3 beeps after the last message
has played back. The message count will reset, and the message LEDs will be lit
solid.
5. NEW INCOMING MESSAGES WILL REPLACE OLD MESSAGES UNLESS
YOU FOLLOW THE SAVE PROCEDURE. (see below)

14
To Stop Message Playback
During message playback, press and release the STOP/ SAVE button. Your
FA970 will reset and will save all messages.
To Repeat the Current Message
During playback, press and quickly release the TIME SET/REPEAT button ONCE.
To Repeat the Previous Message During playback, press and quickly release TIME
SET/ REPEAT button TWICE within 2 seconds.
To Skip the Current Message
During playback, press and quickly release the respective SKIP button.
To Save All of Your Messages
MESSAGE WILL BE ERASED UNLESS YOU SAVE THEM. If you wish to save
your messages after listening to them:
After the last message has played back, and 3 beep sound, press and release the
STOP/SAVE button. Both Mail 1 and Mail 2 LEDs will flash rapidly for 20 seconds.
Within this period, press MAIL 1 button to save Mailbox 1 messages or press MAIL 2
button to save Mailbox 2 messages.
To Save Selected Messages
IF YOU WISH TO SAVE A PARTICULAR MESSAGE (BUT NOT ALL OF THE
MESSAGES), PRESS THE ANSWER ON/OFF BUTTON DURING PLAY BACK OF
THAT MESSAGE. After you press the ANSWER ON/ OFF button to save a
particular message, the corresponding MAIL 1 or MAIL 2 LED will blink rapidly
during the remaining playback of that message.
IMPORTANT
1. You must follow the above “SAVE” procedure each time you listen to your
incoming messages and before the system answers a new incoming call or all
messages will be lost.
2. The maximum digital recording memory of your FA970 answering system is
approximately 11 minutes.

15
3. The maximum digital recording time for each incoming message is 60 seconds.
Message Capacity Full Detection
Your FA970 signals the caller when the message capacity is full. When the
message capacity is full, the unit will answer with 3 beeps on the 10th ring, pause 20
seconds, and then automatically disconnect the telephone line.
Voice Activated Recording (VOX)
Your FA970 records messages for up to 60 seconds, as long as the caller speaks.
To avoid unnecessary pauses due to hang-ups and to save message capacity, your
unit will automatically stop recording after 7 seconds of silence.
To Turn Unit Off
If you do not want your system to answer calls, press the ANSWER ON/OFF button.
All indicators will turn off.
Call Interrupt
If the unit answers before you do, you can turn it off by picking up any extension
phone. If the unit does not stop answering, press the hook switch of your telephone
for about one second and release. You may also press the STOP/SAVE button.
Call Screening
To listen to an incoming call without picking up the phone, let your unit answer the
phone when it rings. If you don’t want to talk to the caller, just let your unit take a
message, and adjust the volume control on the side of the unit to listen. If you don’t
want to listen to the caller’s message, just lower the volume.
Note: Callers will be unaware that you are screening their calls. If you want to talk to
the caller, pick up the phone and talk.
Battery Low Indicator
The Batt. Low LED will flash to indicate the 9 volt battery (not included) needs to be
installed or replaced.

16
Power Failure Protection/Battery Back Up
If an AC power failure occurs, or the power plug comes out of the wall, your unit will
shut down until the power is restored.
When the power is restored, any messages recorded before the power failure will be
saved IF YOU HAVE INSTALLED A 9 VOLT BATTERY. The message indicator LED
will flash to indicate the number of new messages received.
If your unit is not operating properly when the power is restored, proceed with a unit
reset.
To Reset Unit
1. Unplug the AC adaptor from the power outlet and telephone line.
2. Remove the 9 volt battery and plug the AC adaptor back into the power outlet.
3. Replace with 9V alkaline battery and insert the telephone back into the wall
jack.
4. Record a new outgoing greeting or you can use the pre-recorded announcement.
5. Reset the Voice Day/Time Stamp.
Ring Select
You can select the number of rings in which a call will be answered. Set the Ring
Select switch (on the side of unit) to 2 or 4 rings, or Toll Saver (TS).
Toll Saver (TS)
Your unit has a built-in automatic toll saving feature. This feature lets you know if you
have received any messages before it answers, thus saving you on long distance
costs.

17
How Toll Saver Works
IF YOU HAVE SET THE RING SELECT SWITCH TO TOLL SAVER (TS), when
calling your unit from a remote location to check for messages, listen to the number
of rings:
No Messages Received
If your phone rings more than two times, you have no new messages. You can hang
up on the third ring before your unit answers, and save the cost of the call.
Note: If no new messages are received, your unit will answer the call after the fourth
ring.
Messages Received
If your unit answers after only 2 rings, you have received new messages, which you
can then retrieve by following the Remote Message Playback section, below.
TONE REMOTE OPERATION
Remote Security Code
To access answering functions from an outside line, you will need to enter the three
digit security code located on the bottom of your unit. Write this number on the
Remote Access Card, which you can keep in your wallet.
Remote Turn On
If you forget to turn on your unit:
1. Call your unit from a touch-tone phone.
2. Wait 12-14 rings until the machine answers.

18
3. The FA970 will automatically answer by playing your greeting. You may hang up
the phone, and subsequent calls will be answered.
Remote Message Playback
1. Call your unit from a touch-tone telephone.
2. After your FA970 answers, it plays the outgoing greeting and beeps once.
Dial your three digit security code within 20 seconds after the beep, pressing and
holding each digit for 1-2 seconds. Allow a 2 seconds interval between each digit.
3. Your FA970 will sound one beep to indicate the code was entered correctly. (If
there are no beeps, enter your code again.)
4. You can press the following buttons on your keypad:
Option Press__________
Playback Mailbox 1 Messages (1)
Playback Mailbox 2 Messages (2)
Record Memo Message (3)
Record New Greeting (8)
Turn Off Answer Mode (9)
If you press “1” or “2” (to playback messages), you have the follow options:
Option Press__________
Erase Current Message (0)
Repeat Current Message (4)
Repeat Previous Message (4) repeatedly
Stop Message Playback (5)
Skip to Next Message (6)
To SAVE messages, hang up the telephone.

19
Note: Your FA970 will sound a series of beeps if there are no messages.
Remote Record New Greeting
If you press 8 (to record new greeting):
1. When you hear a beep, begin recording your new greeting (up to 30 seconds).
2. When you have finished recording your new greeting, press (5). The unit will
beep, and the new greeting will playback to you.
5. Hang up the telephone.
Remote Record Memo
If you press 3 (to record memo message):
1. Within three seconds of pressing “3”, press “1” or “2” to select Mailbox 1 or
Mailbox 2. Otherwise, the memo will be recorded in Mailbox 1.
2. When you hear a beep, begin recording your memo (up to 60 seconds).
3. When you have finished recording your memo message, press (5).
6. The corresponding Mailbox message count will be increased by one.
To Retrieve Messages when Recording Memory is Full
1. When the message capacity is full, the unit will sound 3 beeps after answering the
phone.
2. Within 20 seconds after the 3 beeps, dial your 3 digit security code.
3. Your FA970 will sound one beep to indicate the code was entered correctly.

20
4. Follow the remote message playback procedure.
IMPORTANT
Remote message retrieval will not work when calling from a rotary or push button
pulse dialing phone, unless a tone generator is used.
Also, some touch tone phones only output tones for a fraction of a second. If you
experience difficulty with remote operation, try another phone, or use a separate
tone generator.
ANSWERS TO COMMONLY ASKED QUESTIONS
Section One-General
Q. My answering machine won’t work. What do I do?
A. You may need to reset your machine. Refer to the “To Reset” section on
page13. If that doesn’t work, call the Toll Free Help line at 1-800-366-0937
Monday Friday 8:30 AM - 9:00 PM and Saturday 8:30AM - 12:30 PM (EST).
Q. Why are the message LED indicators flashing?
A. Refer to the “LED Indications” section on page 7.
Q. Can my unit be left on for a long period of time?
A. Your unit is designed to be on 24 hours a day.
Q. My AC Adaptor feels warm to the touch. Is this normal?
A. It is characteristic of your AC Adaptor to feel slightly warm. There is no need to
be alarmed.
Q. Will my unit operate in a very cold or hot environment?
A. Your unit is designed to perform most efficiently at room temperature. However,
it can be used in environments ranging from 50° to 120° Fahrenheit.
Q. How do I know my machine is set to answer calls?
Other manuals for FA970
1
Table of contents
Other Southwestern Bell Answering Machine manuals