Space Audio SPA-120A User manual

Mixer Amplifier with MP3 / FM / BT
Caution: Please read this manual carefully before operating
Damage caused by misuse is not covered by the warranty
INSTALLATION AND OPERATION MANUAL
SPA-120A • SPA-240A

SPA-120A • SPA-240A - User Manual • HELPLINE 0861 40 41 42 • www.spacetv.co.za
2
SAFTY WARNINGS!
1. Read and keep these instructions.
2. Heed all warnings and follow all instructions.
3. Do not use this apparatus near water.
4. Do not block any ventilation openings. Install in accordance with the manufacturer’s instructions.
5. Do not install near any heat sources such as radiators, heat registers, stoves, or other apparatus that produce heat.
6. Do not defeat the safety purpose of the polarized or grounding-type plug. A polarized plug has two blades with one
wider than the other. A grounding type plug has two blades and a third grounding prong.The wide blade or the third
prong is provided for your safety. If the provided plug does not t into your outlet, consult an electrician for replacement
of the obsolete outlet.
7. Protect the power cord from being walked on or pinched particularly at plugs, convenience receptacles, and the point
where they exit from the apparatus.
8. Only use attachments/accessories specied by the manufacturer.
9. Use only with the cart, stand, tripod, bracket, or table specied by the manufacturer, or sold with the apparatus. When a
cart is used, use caution when moving the cart/apparatus combination to avoid injury from tip-over.
10. Unplug this apparatus during lightning storms or when unused for long periods of time.
11. Refer all servicing to qualied service personnel. Servicing is required when the apparatus has been damaged in any
way, such as power-supply cord or plug is damaged, liquid has been spilled or objects have fallen into the apparatus, the
apparatus has been exposed to rain or moisture, does not operate normally, or has been dropped.
12. This appliance shall not be exposed to dripping or splashing water and that no object lled with liquid such as vases shall
be placed on the apparatus.
13. Plug this apparatus to the proper wall outlet and make the plug to be disconnected readily operable.
14. Main plug is used as disconnected device and it should remain readily operable during intended use. In order to
disconnect the apparatus from the mains completely, the mains plug should be disconnected from the mains socket
outlet completely.
15. WARNING:To reduce the risk of re or electric shock, do not expose this apparatus to rain or moisture.
16. An appliance with a protective earth terminal should be connected to a mains outlet with a protective earth connection.
WARNING!
TO PREVENT FIRE OR SHOCK HAZARD, DO NOT USETHE PLUGWITH AN EXTENSION CORD, RECEPTACLE OR
OTHER OUTLET UNLESSTHE BLADES CAN BE FULLY INSERTED TO PREVENT BLADE EXPOSURE.
TO REDUCE THE RISK OF FIRE OR ELECTRIC SHOCK, DO NOT EXPOSETHIS APPLIANCE TO RAIN OR MOISTURE.
TO PREVENT ELECTRICAL SHOCK, MATCH WIDE BLADE PLUG TOWIDE SLOT, FULLY INSERT.

SPA-120A • SPA-240A - User Manual • HELPLINE 0861 40 41 42 • www.spacetv.co.za 3
INTRODUCTION
Description
The PA Mixer Amplier with MP3, FM tuner & blue tooth, its rated power output from 120W to 240W, it is ideal for school, super
market, bank, hotel BGM and speech use. It is all in one solution with two sources, pre amplier and mixer power amplier into one
unit, which is economy but of high reliable performance.
It integrates 2 audio sources into a mixer amplier, plus Mic1(XLR) and Mic/Line input 2-3 (6.3mm Jack), two line inputs, oneTel
input and one line output. Mic1VOX with highest priority exceptTel input. One USB and one SD slots on front provide easy access and
operation for installer and end-user.
The amplier is designed with complete protection of overload, short circuit and high temp to avoid any damage.
These ampliers are suitable for applications in bank, mosque, school, hotel, restaurant, theme centers and shopping center.
Features
• 19”racksizepublicaddressamplier
• Built-in100V/70Vtransformertechnology
• TabletopamplierwithMp3player,FMradio&bluetooth
• Ratepoweroutputat120Wto240W
• Speakeroutputof100Vor70V&4Ohms-8Ohms-16Ohms
• Mp3playerwithUSB/SDinputonfrontpanel,IRremotecontrolforMp3player,FMradioandbluetooth
• LEDindicatorsforpower,clip,protectandsignal
• Mic1-3andline1-2andtelephoneinput.Mic1ofbalancedXLRinputwithphantompoweronrearpanel.Mic2-3microphoneor
line switchable unbalanced 6.3mm phone jack input. Line 1-2 input of RCA input and one RCA line output.Telephone input with
VOX priority and MOH (Music on Hold).
• VolumecontrolforMic1-3,line1-2,Mp3/FM,bass/trebleandmaster
• Withshort-circuit,clip,overloadandhightempprotection
• AC220Vor115V&24VDCbothoperationsystem

SPA-120A • SPA-240A - User Manual • HELPLINE 0861 40 41 42 • www.spacetv.co.za
4
FRONT PANEL
REAR PANEL
1. Mp3/FM/Blue tooth media player module.
2. Clip Indicator.
3. Protection Indicator
4. Power indicator.
5. Output Level Meters.
6. AC power switch.
7. MIC1 input
8. Mic1 Attenuator.
9. Mic 2 Attenuator.
10. Mic3/Line Input 1 Attenuator.
11. Mic4/Line Input 2 Attenuator.
12. Line Input 3 Attenuator.
13. Line Input 4 Attenuator.
14. Tel Input Attenuator
15. Echo
16. Bass
17. Treble
18. Master Volume Control
1. AC Power Socket.
2. AC fuse
3. FM antenna
4. 24V DC Battery Input.
5. Speaker output COM.
6. Speaker output 4 Ohms (+).
7. Speaker output 8 Ohms (+).
8. Speaker output 16 Ohms (+).
9. Speaker output 70V (+).
10. Speaker output 100V (+).
11. Tel input COM (-).
12. Tel input HOT (+), 600 Ohms, 1Volt.
13. MOH output COM (-).
14. MOH output HOT (+).
15. Input 2 Mic/Line Selector.
16. Input 3 Mic/Line Selector.
17. Dipswitch for MIC/LINE selector, phantom power and
microphone priority.
18. Microphone 1 input.
19. Line 3 Input.
20. Line 4 Input.
21. Line Output.
Male XLR-3P:
Pin1 - Ground
Pin2 - Positive signal
Pin3 - Negative signal
1 32
21201918171615
1410 1286 139 11754
132 4 5 6
181716151413121110987

SPA-120A • SPA-240A - User Manual • HELPLINE 0861 40 41 42 • www.spacetv.co.za 5
AMPLIFIER OPERATION GUIDANCE
100V Line System
For 100V line systems, connect the amplier to the rst speaker in the system using double-insulated speaker wire which has
adequate current rating to handle the total output of the amplier.
Connectthe“100V”outputterminaltothepositive(+)connectionofthespeakerand“COM”outputtothenegative(-)connectionof
the speaker. Connect further speakers in parallel to the rst speaker with all positive terminals and connected together and all
negative terminals connected together as shown below.
Speaker Terminals
These terminals are oering 3 low voltage outputs 4Ω, 8Ω, 16Ω depending on your speaker combination. A 70V/100V commercial
output is also available. Please note that one wire only should be connected to COM screw and one wire to the selected impedance
or voltage. Multiple combinations cannot be done at the output level. Four dierent types of connections are provided.The
low impedance section: 4Ω, 8Ω, 16Ω is designed for a small amount of speakers to be connected to your amplier. The 70V/100V
section is especially designed for a multiple speaker distribution.When using the 70V/100V output, speakers have to be equipped
with 70V/100V transformer. The maximum amount of speakers to be placed on your distribution line is in relation to the power
allocated to each speaker. The total wattage set on the secondary side of the transformers on your speaker line must not exceed the
maximum RMS output power: 120W to 240W. Failure to respect this may cause permanent damage to the amplier.
A 100V line speaker system can comprise of many speakers connected together.The determining factor for how many speakers can
be used on a single amplier is the power rating. For most purposes, it is advised to connect as many speakers as needed with a
combined wattage of no more than 90% of the amplier’s output power rating.
Theterminalsofa100Vspeakerareconnectedtoatransformerandinsomecases,thistransformermaybe“tapped”fordierent
power ratings.These tappings can be used to adjust the wattage (and output volume) of each speaker in the system to help achieve
the ideal total power of the system for the amplier.
The mixer amplier is featured of 6 speaker zone outputs, either one of six zone or total six zone power loading shall be equivalent or
no higher than the rated power of the amplier.

SPA-120A • SPA-240A - User Manual • HELPLINE 0861 40 41 42 • www.spacetv.co.za
6
Operation Steps
• Whenallconnectionstotheamplieraremade,turnallrotarycontrolsdownandswitchonthepowerandapower“ON”LED
will illuminate.Turn BASS andTREBLE controls to the 12 o’clock position (pointing straight up) and turn MASTER rotary control
up part way for testing.
• Ensureasignalisbeingfedtooneofthelineinputs1,2,3,4or5andgraduallyincreasethevolumecontrolforthatchannel
until the output is heard through the speakers.Turn up the MASTER to the maximum required volume level and reduce the
channel volume control if necessary.
• Note:Theinitialtestcanbemadeusingthebuilt-inUSB/SD/FMaudioplayer.Theoutputoftheamplierisrepresentedonthe
levelmeterLEDsandcareshouldbetakenthattheRed“0”LEDisonlylitmomentarilyduringuse.Anythinglongerthanashort
ash of this LED may be indicating distortion or clipping of the output signal and the MASTER should be turned down.
• IfamicrophoneisconnectedtoMIC1input,makesureitisswitchedonandifitrequiresphantompower,makesurethisfeature
is enabled. Gradually increase its volume control whilst speaking into the microphone until the required volume level is reached.
Themicrophoneshouldnotbeableto“hear”thespeakers,whichcancausefeedback(squealingorhowlingnoise).
• IftheVOXfeatureisenabled,audioplaybackthroughchannels2-5willbereducedinvolumeautomaticallywhenspeakinginto
MIC 1, use its attenuator to increase or decrease the mute level.
• InadditiontochannelandMASTERvolumecontrols,thereareBASSandTREBLEEQcontrolstoadjustthetoneoftheoverall
output. At the 12 o’clock position, these controls are applying no eect to the signal (no boost or cut). Moving the BASS control
clockwise boosts the low frequencies in the audio, whilst moving it anticlockwise will cut these low frequencies. Likewise,
moving theTREBLE control clockwise boosts the high frequencies in the audio, whilst moving it anticlockwise will cut these high
frequencies.AdjusttheseEQcontrolstosuitthetypeofaudiosignalorcompensatefortheroomacoustics.
USB/SD Playback
• PushaUSBpendriveintotheUSBportand/oranSDcardintotheSDcardinput.
• PresstheCD/USB/SDbuttontoensurethattheplayerissettoplayfromtherequiredmemorydevice.
• PressthePLAY/PAUSEbuttontoplaythecurrenttrackandpressagaintopauseasneeded.
• SearchingandplaybackoftracksisthesameasdescribedabovefortheCDplayer
Speaker Connections
SPA-120A • SPA-240A - User Manual • HELPLINE 0861 40 41 42 • www.spacetv.co.za 7
FM Tuner
• PresstheFMselectbuttontoswitchtotheFMtunerfunction.UsethePreviousorNextbuttonstoselectastoredchannel.
Tuning and storing stations
• UsetheForward/Reverseseekbuttonstomanuallytunethefrequencyinstepsof0.05MHz
• Alternatively,pressandholdtheForward/Reverseseekbuttonstoautosearchforavailablestations.
• Uponndingastation,theautosearchwillstop,givingtheoptiontostorethisstation.
• Atthispoint,pressingthePLAY/PAUSEbuttonwillasha“00”channelnumberinthedisplay.
• UsethePrevious/Nextbuttonstoselectanappropriatechannelmemory.
• PressPLAY/PAUSEagaintoconrmandstorethestationintotheselectedchannelmemory.
• AutosearchcanbestoppedatanytimebypressingtheForward/Reverseseekbuttons.
Mute On/O
• PressingtheMUTEON/OFFbuttonwillmutetheoutputoftheaudioplayer.
• PressingandholdingtheMUTEON/OFFbuttonwillputtheaudioplayerinstandbymode.
• Pressthisbuttonagaintorestorefunctionsfromstandbymode.
Music on Hold
• ThisoutputwillfeedmusiconyourtelephonesystemorPABXforpeoplewaitingtobeanswered.
• Adedicatedinputshouldbeavailableonyourtelephonesystem.
• Pleaserefertoaqualiedtechnicianifyoucan’tidentifythisinput.
• OutgoingsignalshouldbeconnectedtoGandH.
Telephone Paging Input
• ThisspecialTELinputwillallowyoutopageinyourPAsystemusingyourowntelephonesetorPABXsystem.
• Attheendoftheannouncement,thesystemwillreturntoitsnormaloperation.Thetelephonepaginginputwithpriorityexcept
EMC (re alarm) input.
• FinalvolumeadjustmentwillbemadewiththeTelPagingvolumecontrollocatedonfrontpanel.
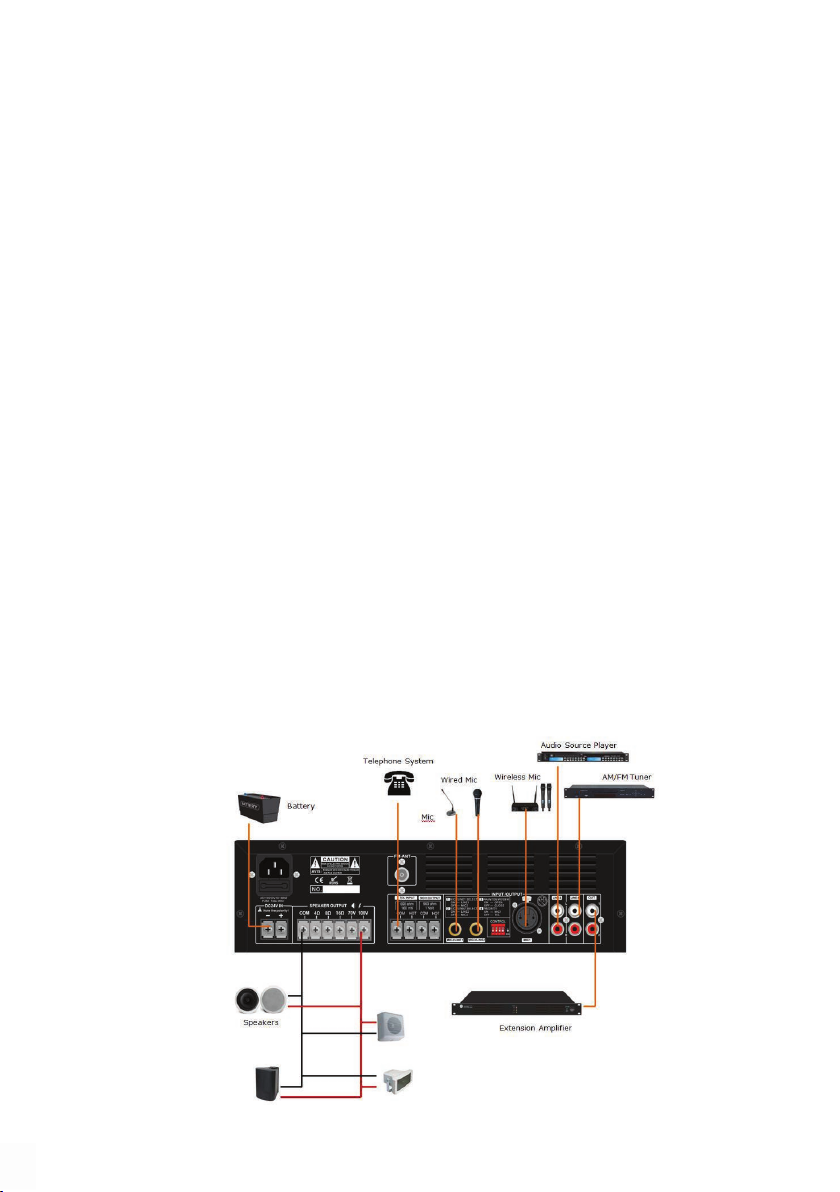
CONNECTION DIAGRAMS

SPA-120A • SPA-240A - User Manual • HELPLINE 0861 40 41 42 • www.spacetv.co.za
8
Model SPA-120A SPA-240A
Description PA Amplier with USB/SD & FM & Blue Tooth
Rated Power Output 120W 240W
Speaker Outputs 100V or 70V & 4Ohms-8 Ohms-16 Ohms
Connector Mic1 input by balanced XLR with phantom power
Input2-3 inputs Mic/Line switchable unbalanced 6.3mm phone jack
Line1-2 inputs by RCA; Line output by RCA
Attenuation Microphone1-3, line1-2 and Mp3/FM, bass/treble and master
Input MIC1-3: 5-8mV, 600Ω; Line, 150-470mV, 10KΩ, unbalanced RCA
Line Out 0.775 (0dBV)
Frequency Response 60Hz-15kHz(±3dB)
S/N Ratio Line ≥ 85dB, Mic≥ 72dB
THD Less than 0.5%
Protection short-circuit, clip, overload and high temp protection
Power Consumption 120W 240W
Power Supply AC220V or 115V & 24V DC /50-60Hz
Dimension 320(W)×210(D)×90(H)mm
Weight 10.5kg 13.5kg
SPECIFICATION SHEET
SERVICE
Ensure the problem is not related to operator error, or system devices that are external to this unit. Information provided in the
troubleshooting portion of this manual may help with this process. Once it is certain that the problem is related to the product contact
your warranty provider as described in the warranty section of this manual.
WARRANTY
This product carries a warranty by SpaceTelevision cc for 12 months from date of purchase to be free from defects and to perform as
stipulated.TheWarranty does not cover damage from incorrect use, human error, power surges and water ingress. LimitedWarranty,
including parts and labour.TheWarranty is a carry-in Warranty, alternatively this product must be returned to the store or place of
purchase. Please retain receipt as proof of purchase. Manufactured in China.
This manual suits for next models
1
Table of contents
Other Space Audio Amplifier manuals


