Spark SPL-RG-301B User manual
LED Strobe Laser Light
User Manual
SPL-RG-301B
Please read this manual carefully before use!

LED Strobe Laser Light User Manual http://www.sparklaser.com
- - 1 - -
Contents
Introduction----------------------------------------------------------------------------P2
Silkscreen on light ----------------------------------------------------------------P3
Safety instruction and product specification-------------------------------P4
Menu operation, function ---------------------------------------------------------P5
Channel instruction and controller connection----------------------------P6
Address setting--------------------------------------------------------------------- P7
Structure and material------------------------------------------------------------P8/P9
Installation and Size--------------------------------------------------------------- P10
Wiring diagram---------------------------------------------------------------------- P11
Maintenance, warning and warranty card------------------------------- P12

LED Strobe Laser Light User Manual http://www.sparklaser.com
- - 2 - -
Introduction
Thank you for purchasing this product. To optimize the performance of this product,prior to
use,please read these operating instructions carefully to familiarise yourself with the basic operation
of this unit.Please keep the manual in safe price for future reference.
This unit has been tested at our factory before being shipped to you, there is no assembly required.
Once after received this product , please take and put carefully. And check cautiously that whether
the product was damaged or not during the transportation.
Checking Parts
Please check if the following parts are included:
1 x LED Laser Light
1 x Power cable
1 x User manual
Caution
Before out factory, this device has passed strict inspection, functions stable and perfect
packing. If this device will be operated in any way different to the one described in this
manual, the product may suffer damages and the guarantee becomes void. Furthermore,
any other operation may lead to dangers like short circuit, burns, electric shock, crash etc.
If any technology changes of this manual, company do not notice in further and have
interpretation.
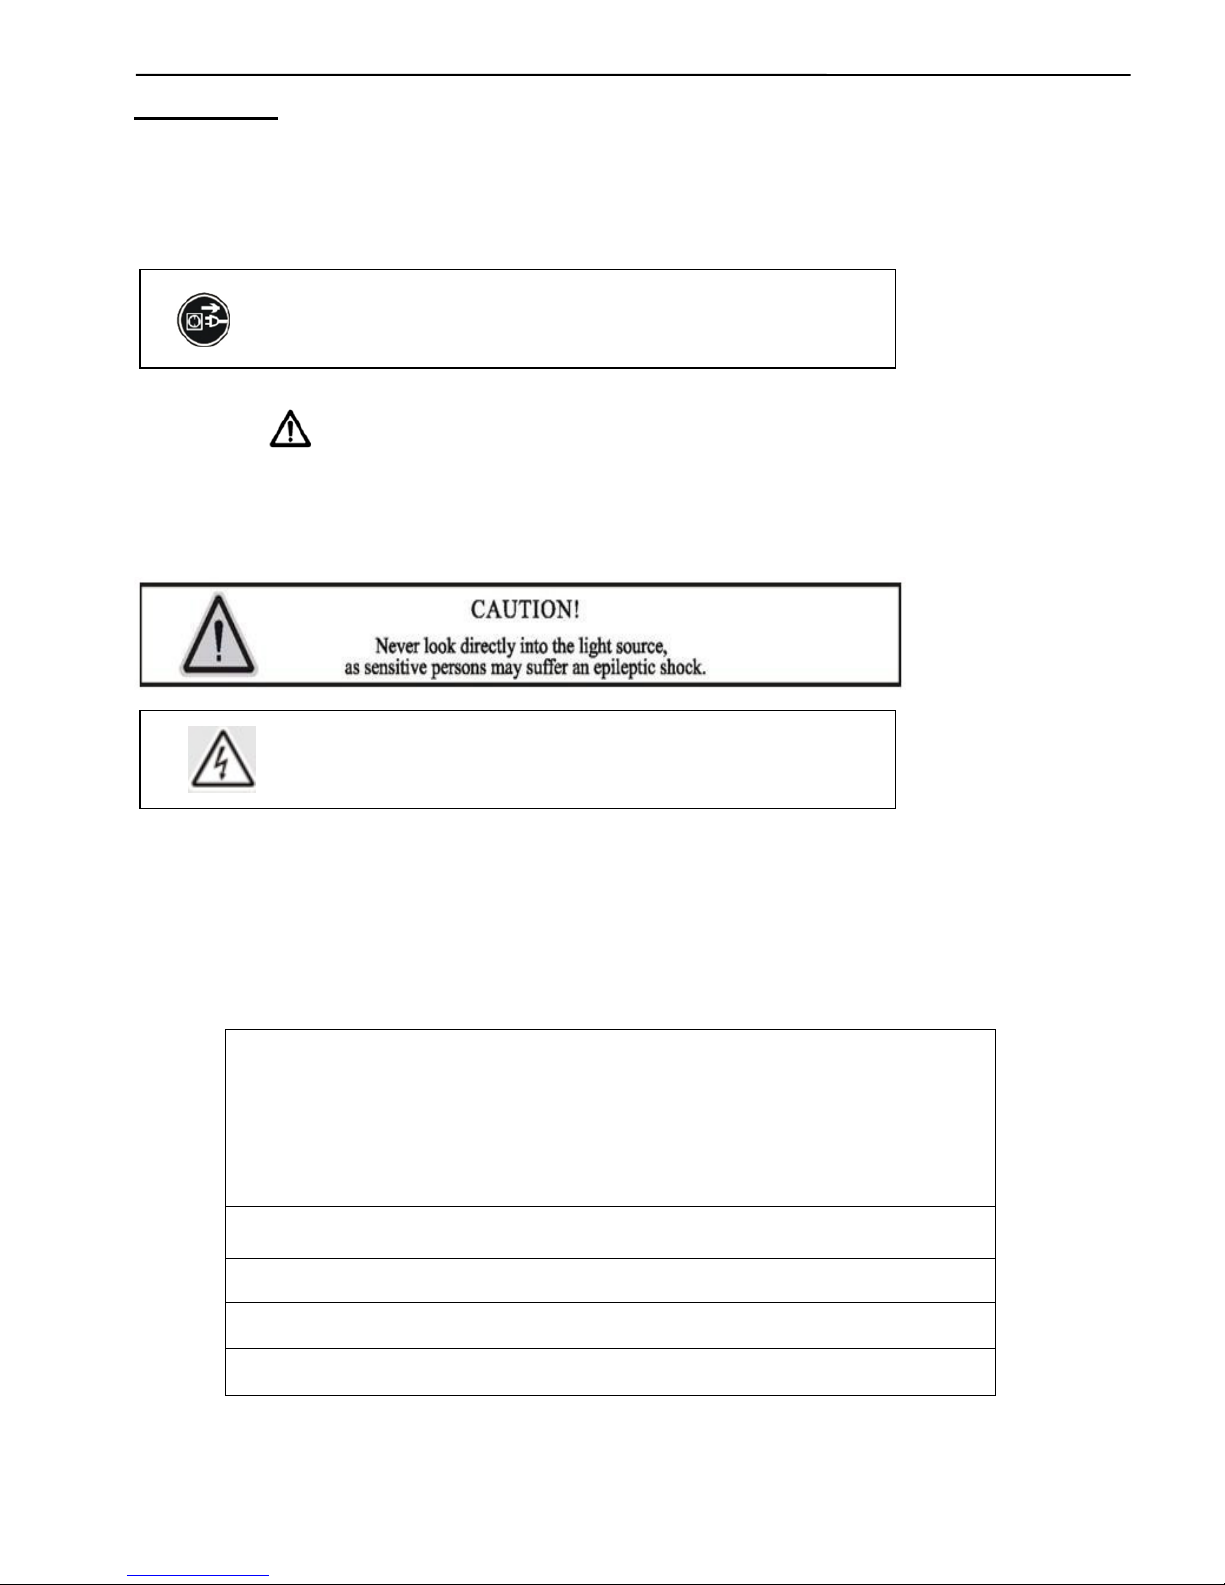
CAUTION!
Keep this device away from rain and moisture!
Unplug mains lead before opening the housing!
Warning!
Damages caused by the disregard of this user manual are not subject to
warranty. The dealer will not accept liability for any resulting defects or

LED Strobe Laser Light User Manual http://www.sparklaser.com
- - 3 - -
Silkscreen on light
-------------------------------------------------------------------------------CE compliant
-----------------------------------------------------------------------------Only indoor use
--------------------------------------------------------------------------RoHS Certificate
---------------------------The minimum distance from lighted objects(meter)
----------------------------------------------------------------Max. Ambient Temp
-------------------------------------------------------Max. Housing Temp
-------------------------------------------------------------------------- Safety caution
-------------------------------------------------------------------------Careful burns
-----------------------------------------------------------------Careful electric shock
---- Not suitable for directly installed on the surface of ordinary combustible
materials
LED Strobe Laser Light User Manual http://www.sparklaser.com
- - 4 - -
一
.Safety Instructions
Please open and check whether break or not for transport once receive this fixture, if yes, not use
it and contact dealer or manufacture as soon as possible.
The Max applicable temperature for the light is 40°C. Do not use the light under or above the
temperature. ta=40℃
The fixture is applicable for many occasions, it should keep clean, and avoid long use in
overheating or dusty environment. To prevent the fixture from the chemical liquid .
User must be careful of fire, heat, electric and fall-off that make heavy or fatal injury. Please read
this user manual carefully before power on and installation, following safety and operation
instruction in it. If still have any questions, please contact dealer or manufacture.
User must following this user manual, do not open fixture by yourself, if any problems, please
contact professional technician, maintenance should by technician.
Do not power on or start the fixture before installation, please stop after working more than 8
hours, which will longer use life.
Fixed installation, do not by strong shocks.
The minimum distance between light and the illuminated surface must be more than 1 meter.
Never look directly into the light source to avoid hurt to eyes (especially epileptics)!
When dustproof glass at light output breaks, cracks or other visible damage, user should replace
with new glass to continue to use.
二
. Installation
When install this equipment please make sure there's no flammable surfaces
(decorated things, etc) and minimum distance of 0.5M from the equipment to the flammable.
The installation of the effect has to be built and constructed in a way that it can hold 10 times the
weight and without any harming deformation.
The installation must always be secured with a secondary safety attachment, e.g. an appropriate
safety rope.Never stand directly below the device when mounting, removing or servicing the
fixture.
三、
Technical Specifications
1. Power supply: AC100V~240V 50/60Hz
2. Amp::BGDP ¢5x20mm 250VAC T2A
3. Rated power: 50W
4. Laser: R:150m/650nm,G:50mw/532nm
5. LED:6pcs 5W RGBWAP;8pcs 3W White LED
6. LED effect:Derby
7. Laser effect:8 grating effect
8. Control mode: Sound Active/ Auto-play/DMX512/Master-Slave
9. Channel:10
10. Scan system:Step motor
11. Operating temperature:10℃~40℃

LED Strobe Laser Light User Manual http://www.sparklaser.com
- - 5 - -
12. Inner Packing(mm):340*270*340
13. Outer Packing(mm):700*560*370 (4pcs)
四、
LED Digital Display
Operating Instruction: press button marked as “A” to select a function, For details, please see
the “OPERATION MENU” section. Press button marked as “B” or button marked as “C” to modify
values . Press button marked as “D” to save your settings.
LED Digital Display Operation Menu:
1.When starting up,it will display the last time’s operation .In case without any
buttons,it will close screen automatically after 20seconds.When no dmx,the first dot of
led display will keep on.When has dmx,the first dot will blink
2. The master light can choose any mode of Auto/Soun modes, the slave light is set
as A001, Just one light could be settled to be master.
3.At most 10 lights could be linked in one electricity source.
No. Menu Function
1 Addr DMX address DOWN/UP to +/- (1-512)
2 AUTO
Aut1,Auto Play1,six colors led derby effect auto play
Aut2,Auto Play2,white led auto play
Aut3,Auto Play3,laser auto play
Aut4,Auto Play4,all effects auto play
SPEE,auto speed 0-99
3 Soun
Sou1,Sound Active 1
Sou2,Sound Active 2
Sou3,Sound Active 3
SESE,sound sensitivity 0-99
4 Vers Ve1.0
E
A B C D
A
.(
MENU
)
B.(UP)
C.(DOWN)
D.(ENTER)
E.LED Display

LED Strobe Laser Light User Manual http://www.sparklaser.com
- - 6 - -
五、
Function
:
1. Press MENU to select Addr / Chnd/NAnu/ SHOU /CoLo/SPEE/ Auto/Soun / Version , Press
ENTER to the next menu or save, Press UP / DOWN to select function, Press ENTER to save;
Long Press MENU to exit.
2. Addr, Address setting,DOWN/UP to select 1-512
3. Chnd, Channel setting
4. NAnu, LED brightness adjust and laser(on or off)
5. ShoU, select scene and show
6. CoLo,select color
7. SPEE,Auto speed
8. Auto,Auto mode
9. Soun,Sound mode
10. Vers,version
六、
Channel
DMX-512Value 0-255
Details
CH1
Control Mode
0-9
Black
- out
10-39
Auto Play
1(Six colors LED auto)
40-69
Auto Play
2(White LED auto)
70-99
Auto Play
3(Laser auto)
100-129
Auto Play
4(Mixing auto)
130-159
Sound Control
1(Six colors LED sound
)
160-189
Sound Control
2(White LED sound)
190-219
Sound Control
3(Laser sound)
220-249
Sound Control
4(Mixing sound)
250-255
DMX
Mode
CH2
RGBWYV
Control
0-9
RGBWYP
black-out
10--198
Choose colors
(
63 groups
)
, each 3 data
for 1 color group
199-225
Color chase1
(single color)
226-255
Color chase
2(single or multiple)
CH3
Auto Play LED
Eotic Speed
0-255
Auto speed
,
LED color chase speed from
slow to fast
CH4
LED Strobe 0-9
LED
No strobe
10-244
LED
Strobe Speed from slow to fast
245-255
LE
D strobe by sound
CH5 White Color LED
0-9
Whit
LED black out
10-134
White LED output position choose
,
5
data for only 1 choose

LED Strobe Laser Light User Manual http://www.sparklaser.com
- - 7 - -
135-255
White LED chase effect
CH6
White Strobe and
Eotic Speed
0-127
no strobe, but White LED chase speed
from slow to fast
128-255
With strobe, white LED chase speed
from slow to fast
CH7
Laser color
control
0-9
Laser off
10-49
Red
50-89
Gre
en
90-129
Red and Green
130-169
Red and Green
flicker
170-209
Green and Red
flicker
210-249
Red, green synchronous flicker
250-255
Red, green alternative flicker
CH8
Laser Strobe
Control
0-9
Strobe Off
10-244
Strobe Speed
(from slow to fast)
245-255
Laser strobe by sound
CH9
LED Step Motor
Control
0-8
Step motor Off
9-127
Step Motor clockwise from slow to fast
128-255
Step Motor counterclockwise from slow
to fast
CH10
Laser Step Motor
Control
0-127
Laser pattern choose
128-255
Laser pattern chase from slow to fast
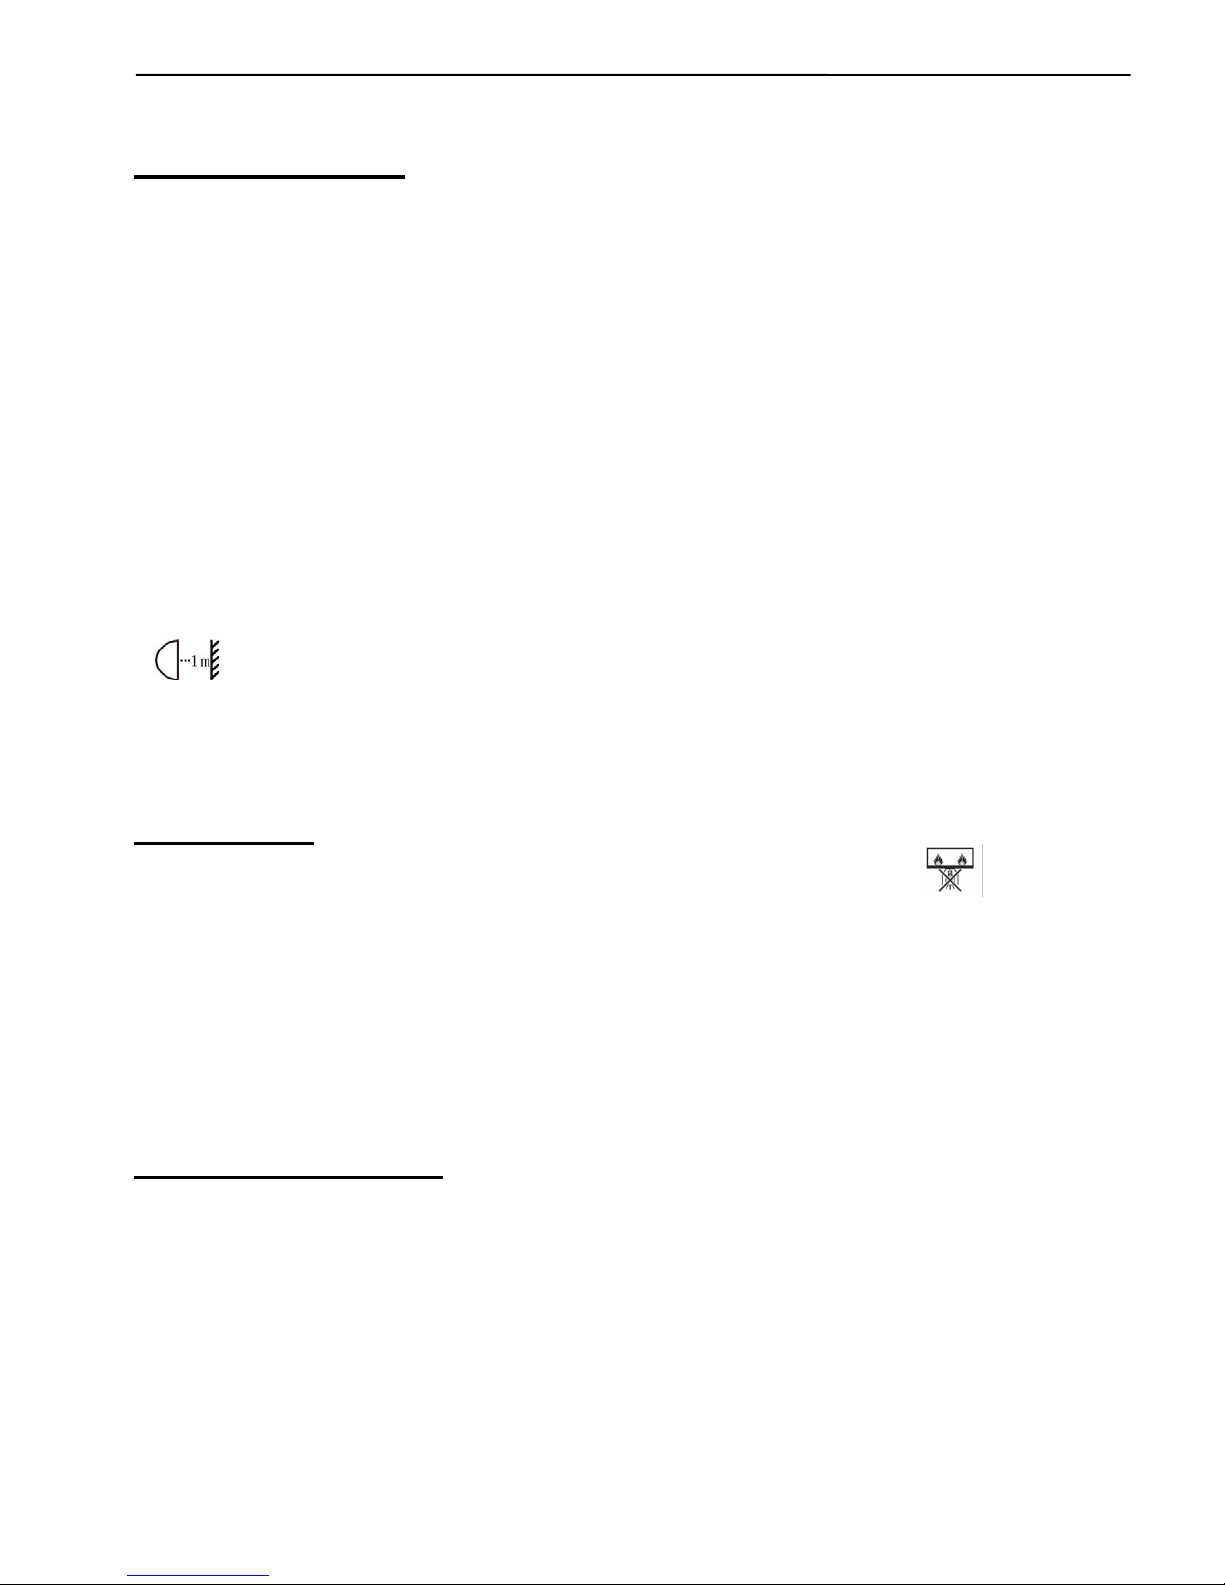
七、
DMX-512 connection
3-Pins DMX Out 3-Pins DMX In
(Female) (Male)
1 Earth 2 DMX-3 DMX+
LED Strobe Laser Light User Manual http://www.sparklaser.com
- - 8 - -
10CH for example
First(address 001)Second(address 011)Third(address021)
DMX in DMX out to next light
八、
DMX address setting
Each fixture must set a specific starting address. When receiving signal transmission, fixture will
receive channel control signals which from the starting address.
According to different requirements or easy to use, the user can set many value fixtures to the same
address, also can set up a separate address for every device.
If you set the same address,all the devices will receive from DMX channels signal. All connecting
fixtures are jointly controlled, controller can't separate control a device.
If you set a different address, each device will be separate from its particular set the starting address
and begin accepting DMX512 control signal, so that more convenient separate control one device.
Using this method must be based on channel quantity of device to determine a starting address.
This light has 10 channels. When you use 10CH, you should set the starting address of the first unit
to 1, the second unit to 11(10+1), the third unit to 21 (11+10), and so on.
LED Strobe Laser Light User Manual http://www.sparklaser.com
- - 9 - -
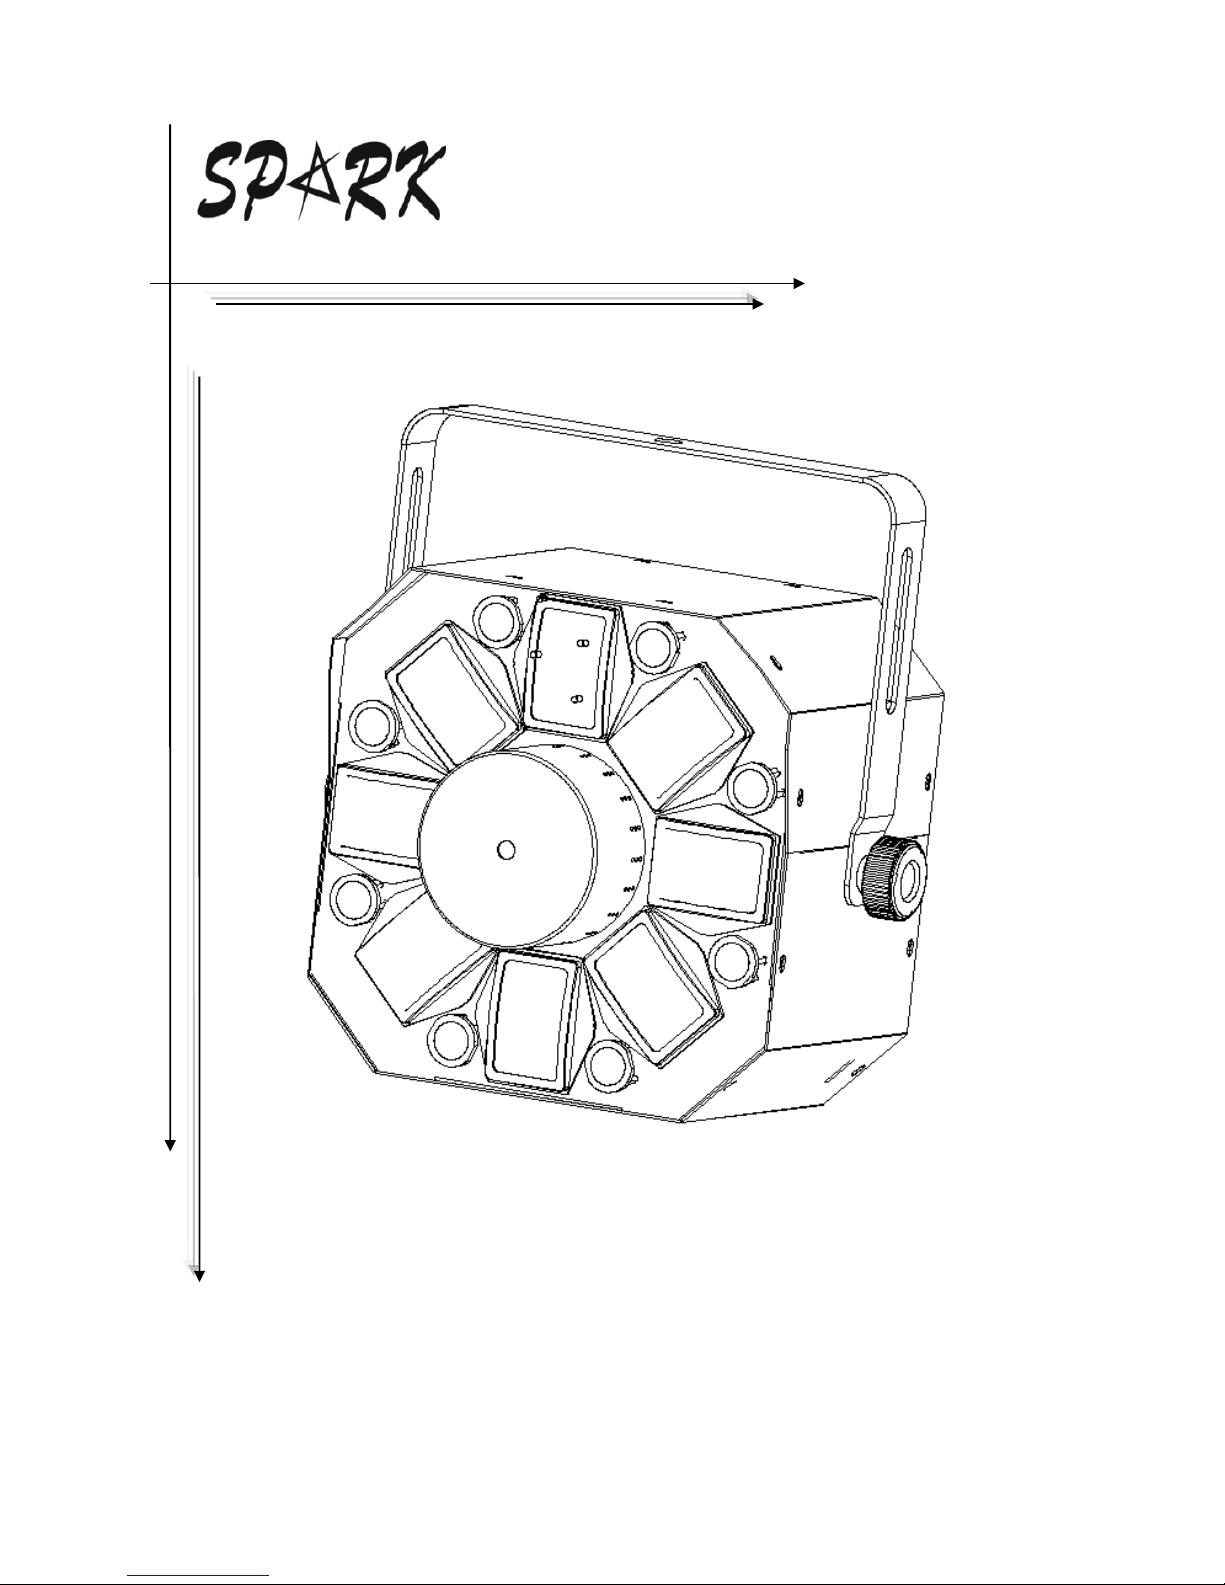
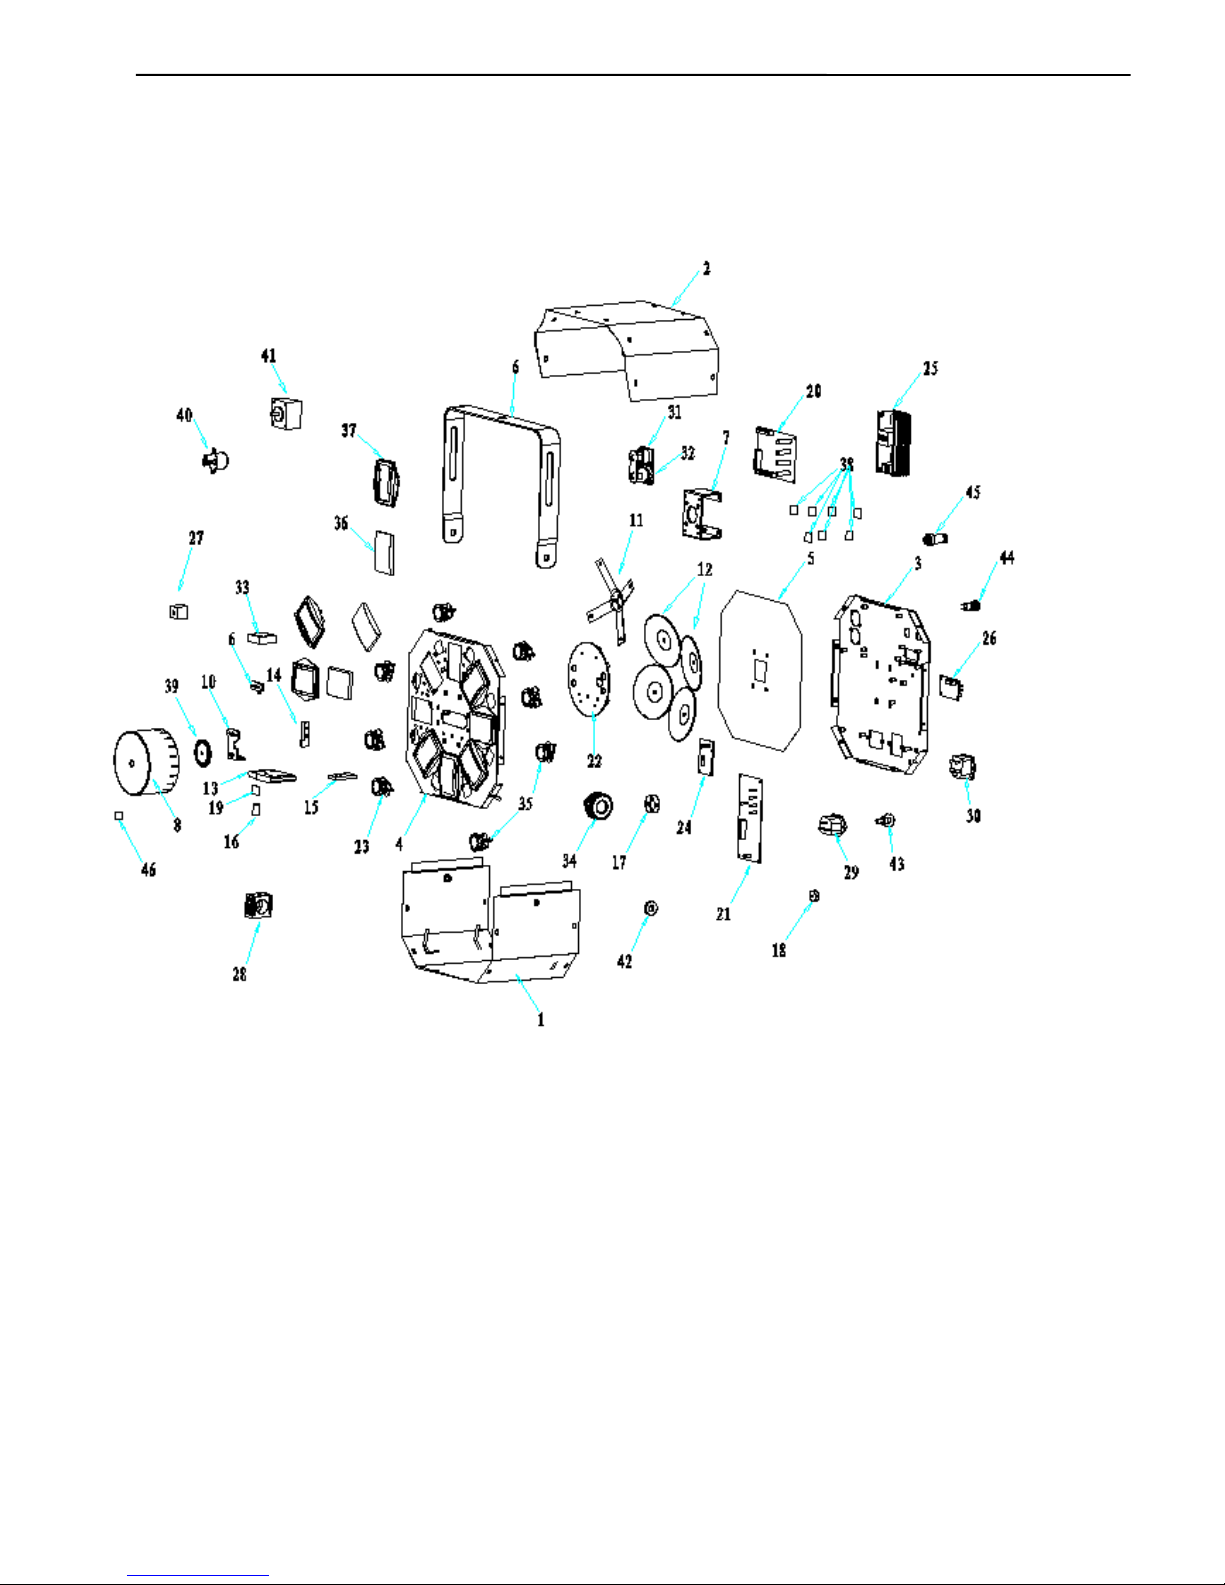
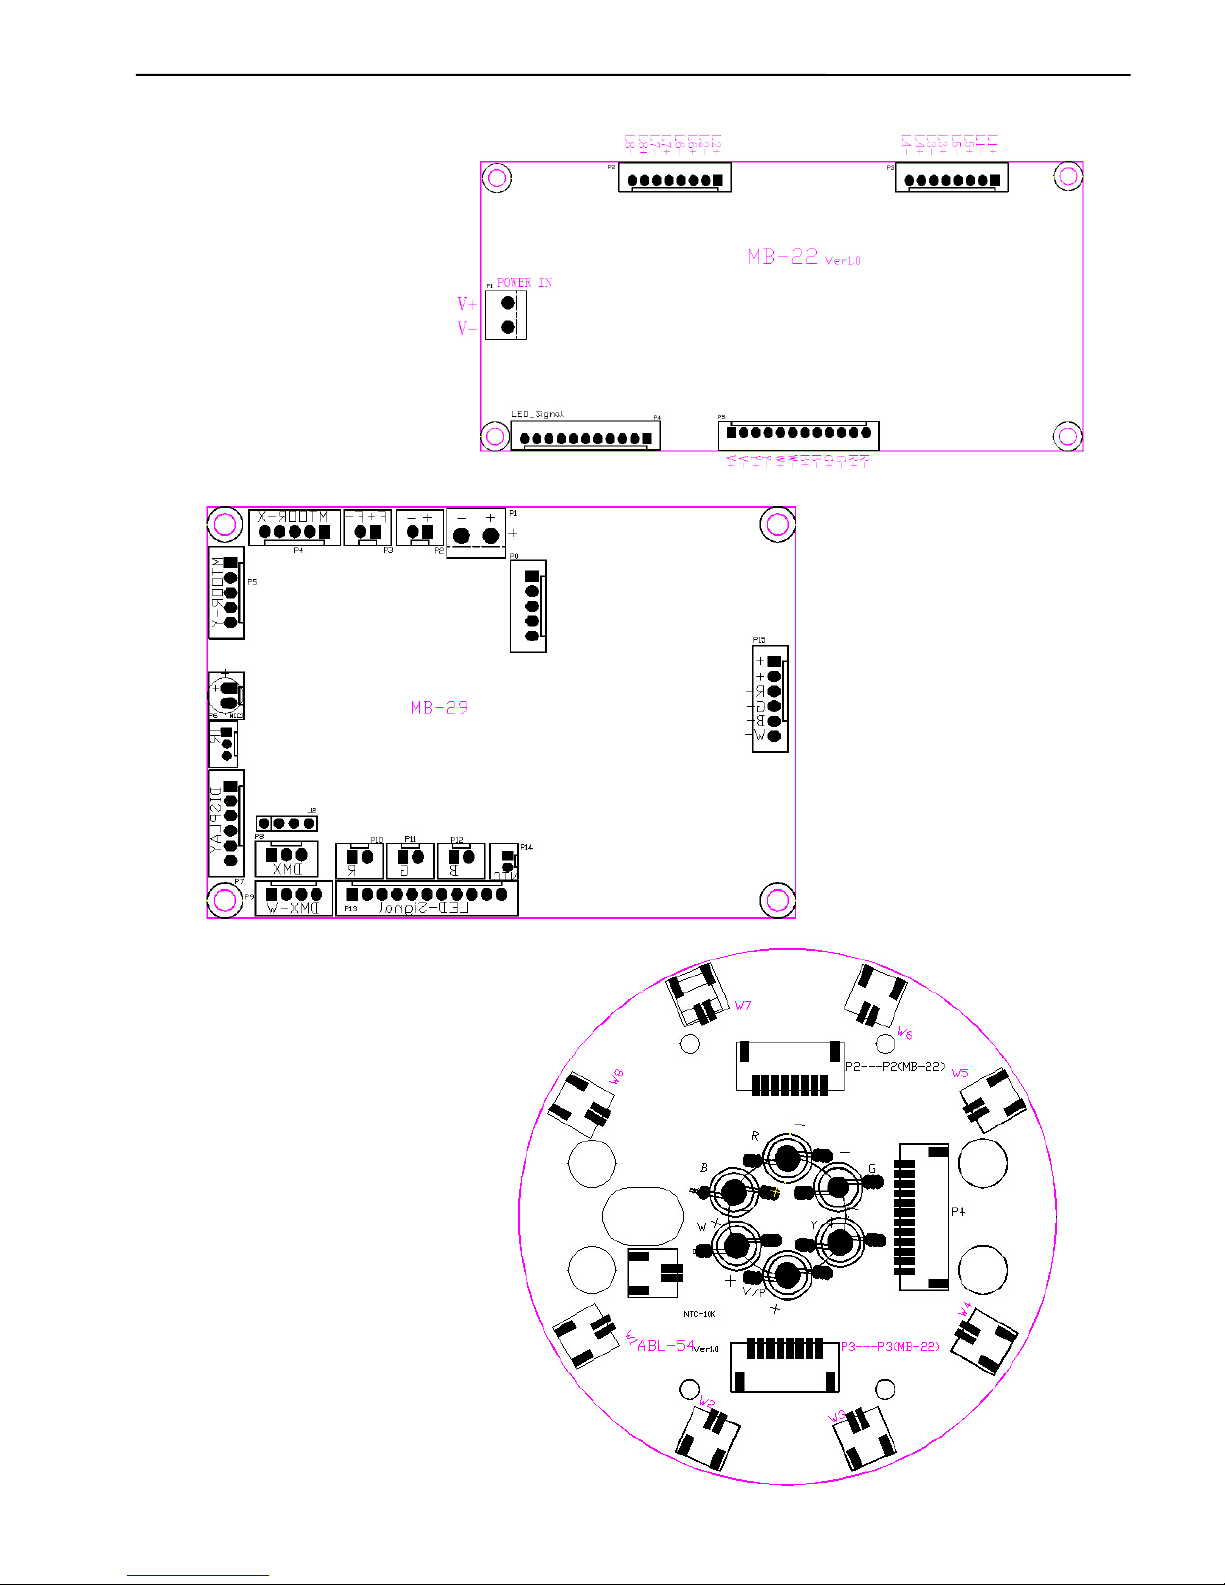
九、
Structure and material

LED Strobe Laser Light User Manual http://www.sparklaser.com
- - 10 - -
No.
Model No.
Name
quantit
Material No
1
SPL-RG-301-04
Base plate
1
311003111
2
SPL-RG-301-05
Top cover
1
311006073
3
SPL-RG-301-03
Back plate
1
311002074
4
SPL-RG-301-02
Front plate
1
311001100
5
SPL-RG-301-06
Clapboard
1
311020001
6
SPL-RG-301-07
Handle
1
316001088
7
SPL-RG-301-09
Head cover
1
311012014
8
SPL-RG-301-08
Motor stand 1
1
313001058
9
SPL-RG-301-10
Locating plate
1
321001014
10
SPL-RG-301-11
Motor stand 2
1
313001059
11
SPL-RG-301-12
Reflection plate
1
313028001
12
SPL-RG-301-13
Reflection dish
4
322013007
13
SPL-RG-301-14
FPC
1
315001100
14
SPL-RG-301-16
Red laser plate
1
313003010
15
SPL-RG-301-15
Green laser plate
1
313003008
16
SPL-RG-301-18
Reverse bracket
1
314001013
17
SPL-RG-301-17
Stand flange
1
313001060
18
SPL-RG-301-19
Motor flange
1
319001030
19 13*10*1.1mm Pass red, reflect green 1 302005003
20
MB-29
Main Board
1
205001115
21
MB-22A
LED Driver Board
1
205002023
22
ABL-54A
Aluminum base plate 1
1
205003102
23
ABL-55A
Aluminum base plate 2
8
205003103
24
LB-RG1
Power
1
203022001
25
GZLU90-S 12V-7.5A
Switch power
1
204001056
26
AB-24A
(
with indicator light
)
Display board
1
205004019
27
Red Laser
:
100MW/650NM
SPL-R180B4
1
202109007
28
Green Laser
:
50MW/532NM
SPL-G300H2
1
202008005
29
male
,
250V,10A
Power socket
1
301923008
30
250V/10A
,
with fuse
Power socket
1
301923002
31
IN
,
/K3F2C-B
Dmx in
(
male
)
1
301909007
32
OUT,/J3F2C-B
DMX out
(
female
)
1
301909008
33
3010
,
DC12V,0.08A
Fan
1
301701025
34
M8*12
Handle screw
2
306020003
35
25mm stand
,
45 degrees lens
LED lens parts
8
302018003
36
60*39.5*9.5
convex mirror
8
302012028
37
Plastic parts
convex lens holder
8
303010012
38
14*14*1.2mm
Shivering glass
80
302019026
39*
HYS8-12
,¢
40*2,
¢
3mm
8 grating
1
302001108
40 24BYJ48-36,DC12V Step Motor 1 301601012
41
39HB105C-12
Step Motor
1
301601004
42
¢
20*
¢
8*3.0mm
Rubber mat
2
303002004
43
M6,Outer ring 20mm
Ring
1
306019007
44
¢
12
Safety lock
1
308010001
45
M16,
中心
6mm
,
steel
Plug
1
301935004
46
meteor shower 020T
,
10*10*1.1mm
Grating filter
1
302001104

LED Strobe Laser Light User Manual http://www.sparklaser.com
- - 11 - -
十、
Installation
1 Clamp
2 Handle
When install this equipment please make sure there's no flammable surfaces
(decorated things, etc) within at least 2.5M and maintain minimum distance of 0.5M
from the equipment to the walls.
Please make sure that there's no other equipment or decorating materials obstructed
the exhaust fan and the vent-pipe.
Products should be install immobility.
In case of safety, it's very important that to connect the earth with line.
十一
、
Product size
LED Strobe Laser Light User Manual http://www.sparklaser.com
- - 12 - -
十二、
Wiring diagram
LED Strobe Laser Light User Manual http://www.sparklaser.com
- - 13 - -
Declaration
Cleaning and maintenance
Cleaning should be performed every 15-day period, by using a sponge which is dipped with
alcohol, rather than wet cloth or other chemical liquid, to clean the mirror.
Attention
Do not see directly light source when open the light, and make sure power off before do any
installation or maintenance.
Warranty Card
This product is made of high-brightness transistor. We will provide 1 year
warranty under the condition that user has operated the light normally and
lifetime service. We won't provide warran
ty if the damage is caused by
artificial or force majeure event. Cost of fittings should be charged by user if
product need maintenance after 1 year .Please cut this warranty card and
shipped it along with the product to our factory when applying for warranty.
Product
:
Purchasing date
:
Code of invoice
:
Warranty date: From To
User’s name
:
Add
:
Company
:
Tel
:
Cut off power before cleaning and maintenance!
CAUTION
Wires connection must be professional person!
CAUTION
Table of contents
Other Spark Dj Equipment manuals


