SPARKFOX Pro-Kam User manual

Pro-Kam
Keyboard and Mouse Adapter
DISCLAIMER PLEASE READ:
This product is designed for use with wired and 2.4GHz wireless (USB)
keyboards and mice only. Although widely compatible with many
products, it will not be compatible with all. If your product does not work,
please contact us with the make and model and we will try to find a
solution for you.
Instructions on how to program/key bind your keyboard can be
found from page 7 below, please follow the instructions carefully.
As we continue to look to improve this product, we will release additional
software and updates as they become available.
See "Product Updates" section on page 13.
Manual Revision: 3.2

Product Description
This innovative product allows you to play games on different consoles
(Nintendo Switch™, Xbox One™, Xbox 360™, PlayStation®3 &
PlayStation®4) with a wired keyboard and wired mouse and will also work
with a lot of 2.4G wireless keyboard and mice that use a USB dongle for
connection.
Product Specifications:
Standard LED Indication
Product Size: 2.4 x 2.5 x 0.8 (inches)
USB Type A Ports: 3 (Mouse / Keyboard / Controller)
USB Type C Ports: 1 (DC Input / To console)
3.5mm Headset Port: 1
USB Cable Length: Approximately 32cm
LED Light Colours: White, Red, Green, Gold (used for connection status)
Product Material: ABS Plastic
Connect the adapter to a game console (Nintendo Switch, Xbox One,
Xbox 360, PS4, PS3). The LEDs will light up WHITE.
Connect the first device (keyboard or mouse) to the adapter (without the
original controller connected), The LEDs will turn RED.
Connect the second device (keyboard or mouse) to the adapter (without
the original controller connected), The LEDs will turn GREEN.
Connect the original controller (please ensure the controller is powered
OFF). The LEDs will turn GOLD.
1.
2.
3.
4.
1
Standard LED Indication
Connect the adapter to the Nintendo Switch console using the USB data
cable included, the LED will light up WHITE.
Connect the wired or 2.4GHz wireless mouse to the mouse port on the
adapter,the LED will turn RED.
Connect the wired or 2.4GHz wireless keyboard to the keyboard port on
the adapter, the LED will turn GREEN.
Activate the adapter by pressing the “Space Bar” on the keyboard.
1.
2.
3.
4.
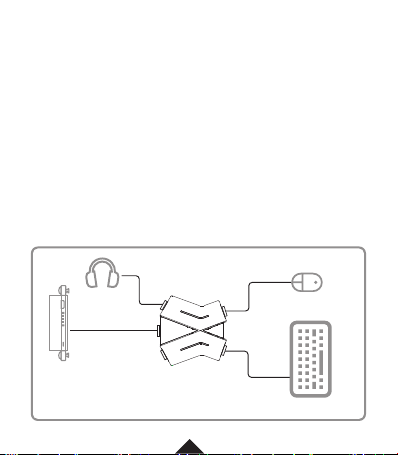
Nintendo Switch Setup:
Before you start:
For the adapter to work, please make sure that the "Pro Controller Wired communication"
option is turned "ON" in the console. "System Settings > Controllers and Sensors"
PLEASE NOTE:
If using a headset, please connect directly to the Pro-Kam Adapter AFTER the keyboard and
mouse have successfully been connected.
Connecting your console
2
SWITCH DOCK
ADAPTER
KEYBOARD
MOUSE
PLEASE NOTE:
If using a headset, please connect directly to the Pro-Kam Adapter AFTER the keyboard and
mouse have successfully been connected.
Connect the adapter to Xbox One/ Xbox 360 console using the USB data
cable included, the LED will light up WHITE.
Connect the wired or 2.4GHz wireless mouse to the mouse port on the
adapter, the LED light will turn RED.
Connect the wired or 2.4GHz wireless keyboard to the keyboard port on the
adapter, the LED light will turn GREEN.
Use the original USB data cable to connect the Xbox One/ 360 controller to
the corresponding console port on the adapter, the LED will turn GOLD.
Activate the adapter by pressing the "Home" button on Xbox One/ 360
controller.
1.
2.
3.
4.
5.
Xbox One / Xbox 360 Setup:
IMPORTANT:
This adapter only supports official Xbox One or Xbox 360 controllers. It does not support
other third-party controllers.
The controller must be switched OFF before it is connected to the adapter for setup to
work correctly.
A data cable must be used for connection to the controller. The adapter will not support a
cable with charging function only.
When using the keyboard and mouse through the adapter the controller may still vibrate.
The vibration can be turned off in the game settings.
This adapter cannot map the “Home” button to the keyboard. If necessary, still use the
“Home” button on the Xbox One/ 360 controller.
This adapter does not support the use of a headset connected through the Xbox One
controller.
3

4
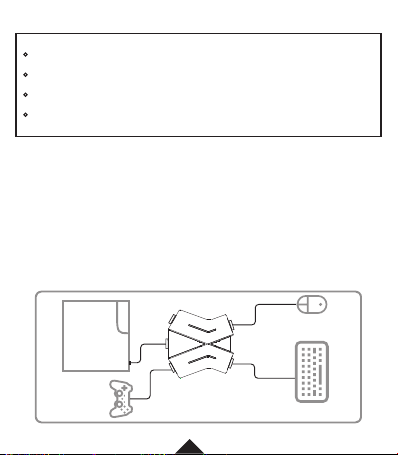
PlayStation 4 Setup:
IMPORTANT:
This adapter only supports official PlayStation 4 controllers. It does not support other
third-party controllers.
The controller must be switched OFF before it is connected to the adapter for setup to work
correctly.
A data cable must be used for connection to the controller. The adapter will not support a
cable with charging function only.
When using the keyboard and mouse through the adapter the controller may still vibrate.
The vibration can be turned off in the game settings.
This adapter does not support the use of a headset connected through the PlayStation
controller.
The adapter will also work on a PlayStation 4 games being played on a PlayStation 5
console (Using PlayStation 4 controller for connection).
ADAPTER
XBOX ONE
CONTROLLER
KEYBOARD
MOUSE
CONSOLE

PLEASE NOTE:
If using a headset, please connect directly to the Pro-Kam Adapter AFTER the keyboard and
mouse have successfully been connected.
Before you start:
Complete the following steps on PS4 console setting option before connecting: Go to:
Settings - Devices - Controllers - Communication Method – then select “Use USB Cable”.
The USB communication method is only necessary for controllers that support it. If you do not
see the option then you don't need to enable it.
Connect the adapter to the PlayStation 4 console using the USB data cable
included, the LED will light up WHITE.
Connect the wired or 2.4GHz wireless mouse to the mouse port on the
adapter, the LED light will turn RED.
Connect the wired or 2.4GHz wireless keyboard to the keyboard port on the
adapter, the LED light will turn GREEN.
Use the original USB data cable to connect the PlayStation 4 controller to
the corresponding console port on the adapter, the LED will turn GOLD.
Activate the adapter by pressing the "Home" button on PlayStation 4
controller.
1.
2.
3.
4.
5.
5
CONSOLE
ADAPTER
KEYBOARDDUAL SHOCK 4
MOUSE
PLEASE NOTE:
Headsets are not supported on PS3
6
PlayStation 3 Setup:
IMPORTANT:
This adapter only supports official PlayStation 3 controllers. It does not support other
third-party controllers.
The controller must be switched OFF before it is connected to the adapter for setup to work
correctly.
A data cable must be used for connection to the controller. The adapter will not support a
cable with charging function only.
When using the keyboard and mouse through the adapter the controller may still vibrate.
The vibration can be turned off in the game settings.
Connect the adapter to the PlayStation 3 console using the USB data cable
included, the LED will light up WHITE.
Connect the wired or 2.4GHz wireless mouse to the mouse port on the
adapter, the LED light will turn RED.
Connect the wired or 2.4GHz wireless keyboard to the keyboard port on the
adapter, the LED light will turn GREEN.
Use the original USB data cable to connect the PlayStation 3 controller to
the corresponding console port on the adapter, the LED will turn GOLD.
Activate the adapter by pressing the "Home" button on PlayStation 3
controller.
1.
2.
3.
4.
5.
KEYBOARD
MOUSE
CONSOLE
ADAPTER
PS3

7
Programming / Key-Binding - (PS4, PS3, Xbox One, Xbox 360):
Programming / Key-Binding (Nintendo Switch):
Once setup is complete, simultaneously (at the same time) press “F11 +
F12” on the keyboard. The LED on the adapter will turn BLUE.
Press and hold the button you want to set on the controller, then press
the button on the keyboard or mouse you want to program, then release
the button on the controller to set it.
To program the next button, repeat the above steps (you can program
up to a maximum of 8 buttons)
Press “F11 + F12” again at the same time to complete programming the
buttons.
To restore the controller to default settings: Press and hold "F1 + F10 +
F12" on the keyboard for 5 seconds.
Example:
If you would like to program the "B" button on the controller to the "T" key on your keyboard,
the steps are as follows:
Press and hold “F11 + F12” on the keyboard, wait until the adapter LED is blue and then
release the keys.
Press and hold the "B" button on the controller, do not let go!
Press the "T" key on the keyboard, then release the "B" button on the controller;
To complete, hold down “F11 + F12” on the keyboard then release.
1.
2.
3.
4.
IMPORTANT:
This adapter only supports the official Nintendo Switch Pro Controller. It does not support
other third-party controllers.
The controller must be switched OFF before it is connected to the adapter for setup to
work correctly.
A data cable must be used for connection to the controller. The adapter will not support a
cable with charging function only.

8
Once setup is complete as shown above, connect the official Nintendo
Switch Pro Controller to the console port on the adapter using the official
data charge cable supplied with the controller. The LEDs on the adapter will
turn GOLD.
Simultaneously (at the same time) press “F11 + F12” on the keyboard. The
LED on the adapter will turn BLUE.
Press and hold the button you want to set on the controller, then press the
button on the keyboard or mouse you want to program, then release the
button on the controller to set it.
To program the next button, repeat the above steps (you can program up
to a maximum of 8 buttons on the controller)
Press “F11 + F12” again at the same time to complete programming the
buttons.
To restore the controller to default settings: Press and hold "F1 + F10 + F12"
on the keyboard for 5 seconds
1.
2.
3.
4.
5.
Mouse Sensitivity Settings
Mouse sensitivity can be adjusted up to 8 different levels.
Example:
If you would like to program the "B" button on the controller to the "T" key on your keyboard,
the steps are as follows:
Please note: The default mouse sensitivity level is level 4.
Press and hold “F11 + F12” on the keyboard, wait until the adapter LED is blue and then
release the keys.
Press and hold the "B" button on the controller, do not let go!
Press the "T" key on the keyboard, then release the "B" button on the controller;
To complete, hold down “F11 + F12” on the keyboard then release.
Hold down “F12 + 1” on the keyboard, the mouse sensitivity is reduced
to the Minimum (slowest) setting.
Hold down “F12 + 8” on the keyboard, the mouse sensitivity is increased
to the maximum (fastest) setting.

9
Default Mouse Settings / Key Bindings
Replace Button
Nintendo Switch Xbox One / 360 PS4 PS3
ZLRight Button LT L2 L2
ZRLeft Button RT R2 R2
R3Middle Button R3 R3 R3
Right Joystick
UP
Mouse Move
UP
Right Joystick
UP
Right Joystick
UP
Right Joystick
UP
Right Joystick
LEFT
Mouse Move
LEFT
Right Joystick
LEFT
Right Joystick
LEFT
Right Joystick
LEFT
Right Joystick
DOWN
Mouse Move
DOWN
Right Joystick
DOWN
Right Joystick
DOWN
Right Joystick
DOWN
Right Joystick
RIGHT
Mouse Move
RIGHT
Right Joystick
RIGHT
Right Joystick
RIGHT
Right Joystick
RIGHT
Mouse Buttons

10
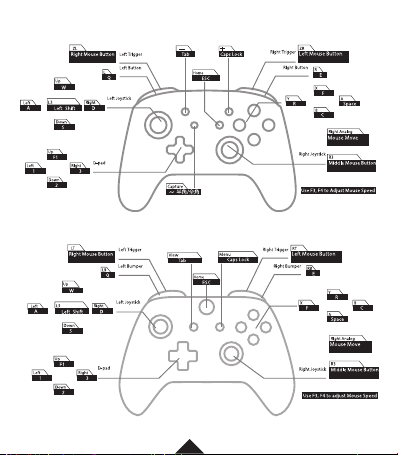
Default Keyboard Settings / Key Bindings
Replace Button
Nintendo Switch Xbox One / 360 PS4 PS3
LQ LB L1 L1
RE RB R1 R1
D-pad UPF1 D-pad UP D-pad UP D-pad UP
D-pad LEFT1D-pad LEFT D-pad LEFT D-pad LEFT
D-pad DOWN2D-pad DOWN D-pad DOWN D-pad DOWN
D-pad RIGHT3D-pad RIGHT D-pad RIGHT D-pad RIGHT
Left Joystick UPW (UP) Left Joystick UP Left Joystick UP Left Joystick UP
Left Joystick LEFTA (LEFT) Left Joystick LEFT Left Joystick LEFT Left Joystick LEFT
Left Joystick DOWNS (DOWN) Left Joystick DOWN Left Joystick DOWN Left Joystick DOWN
Left Joystick RIGHTD (RIGHT) Left Joystick RIGHT Left Joystick RIGHT Left Joystick RIGHT
L3LEFT SHIFT L3 L3 L3
-TAB View Option Select
HomeESC Home PS Button PS Button
Capture~ / Share /
+CAPS LOCK Menu Press Touchpad Start
YR Y
XF X
BC B
ASPACE A
Keyboard
Buttons
11
Default Key Mapping Guide – Nintendo Switch
Default Key Mapping Guide – Xbox One / Xbox 360

12
Default Key Mapping Guide – PlayStation 4
Default Key Mapping Guide – PlayStation 3
SPECIFICATION & APPEARANCE ARE SUBJECT TO CHANGE WITHOUT PRIOR NOTICE.
THIS PRODUCT IS NOT DESIGNED, MANUFACTURED, SPONSORED OR ENDORSED BY
MICROSOFT CORPORATION, NINTENDO® OR ANY OF THEIR DIVISIONS.
“ ”,“ ” AND “PLAYSTATION”ARE REGISTERED TRADEMARKS OF SONY
INTERACTIVE ENTERTAINMENT INC. “SONY” IS A REGISTERED TRADEMARK OF SONY
CORPORATION. ALTHOUGH THIS PRODUCT IS COMPATIBLE WITH SONY®OR
PLAYSTATION®RELATED PRODUCTS, THIS PRODUCT IS NOT LICENSED, AUTHORIZED
OR ENDORSED BY THOSE COMPANIES, OR THEIR RELATED ENTITIES. SPARKFOX LTD.
FOXHILLS FARM BUSINESS PARK LONGCROSS ROAD, CHERTSEY, SURREY, KT16 0DN.
TM & © 2021 SPARKFOX LTD. ALL RIGHTS RESERVED.
13
Precaution and Maintenance
Product Updates
We are continually looking to improve the compatibility and function of this
product: Software / Firmware updates will be made available on
WWW.SPARKFOX.CN as they are released.
Store in a cool, dry and dust free area.
Do not store in areas of extreme low temperatures (0ºC) or High (40ºC).
Avoid direct sunlight and heat sources.
Do not allow the product get wet or dirty; doing so may cause damage.
Do not clean with benzene, paint thinner, acetone, alcohol or other
solvents.
Do not take the product apart; doing so will void your warranty and may
cause electrical shock or damage to internal components.
Please help to conserve the environment by recycling the cardboard
packaging of this product.
This product should NOT be disposed of in normal household waste. It
should be disposed of separately. Please take it to an electrical waste
collection point.
Table of contents


