sparklypets HALT41D User manual

1
23
No-Pull Dog Halter Harness
MODEL NO. HALT41D
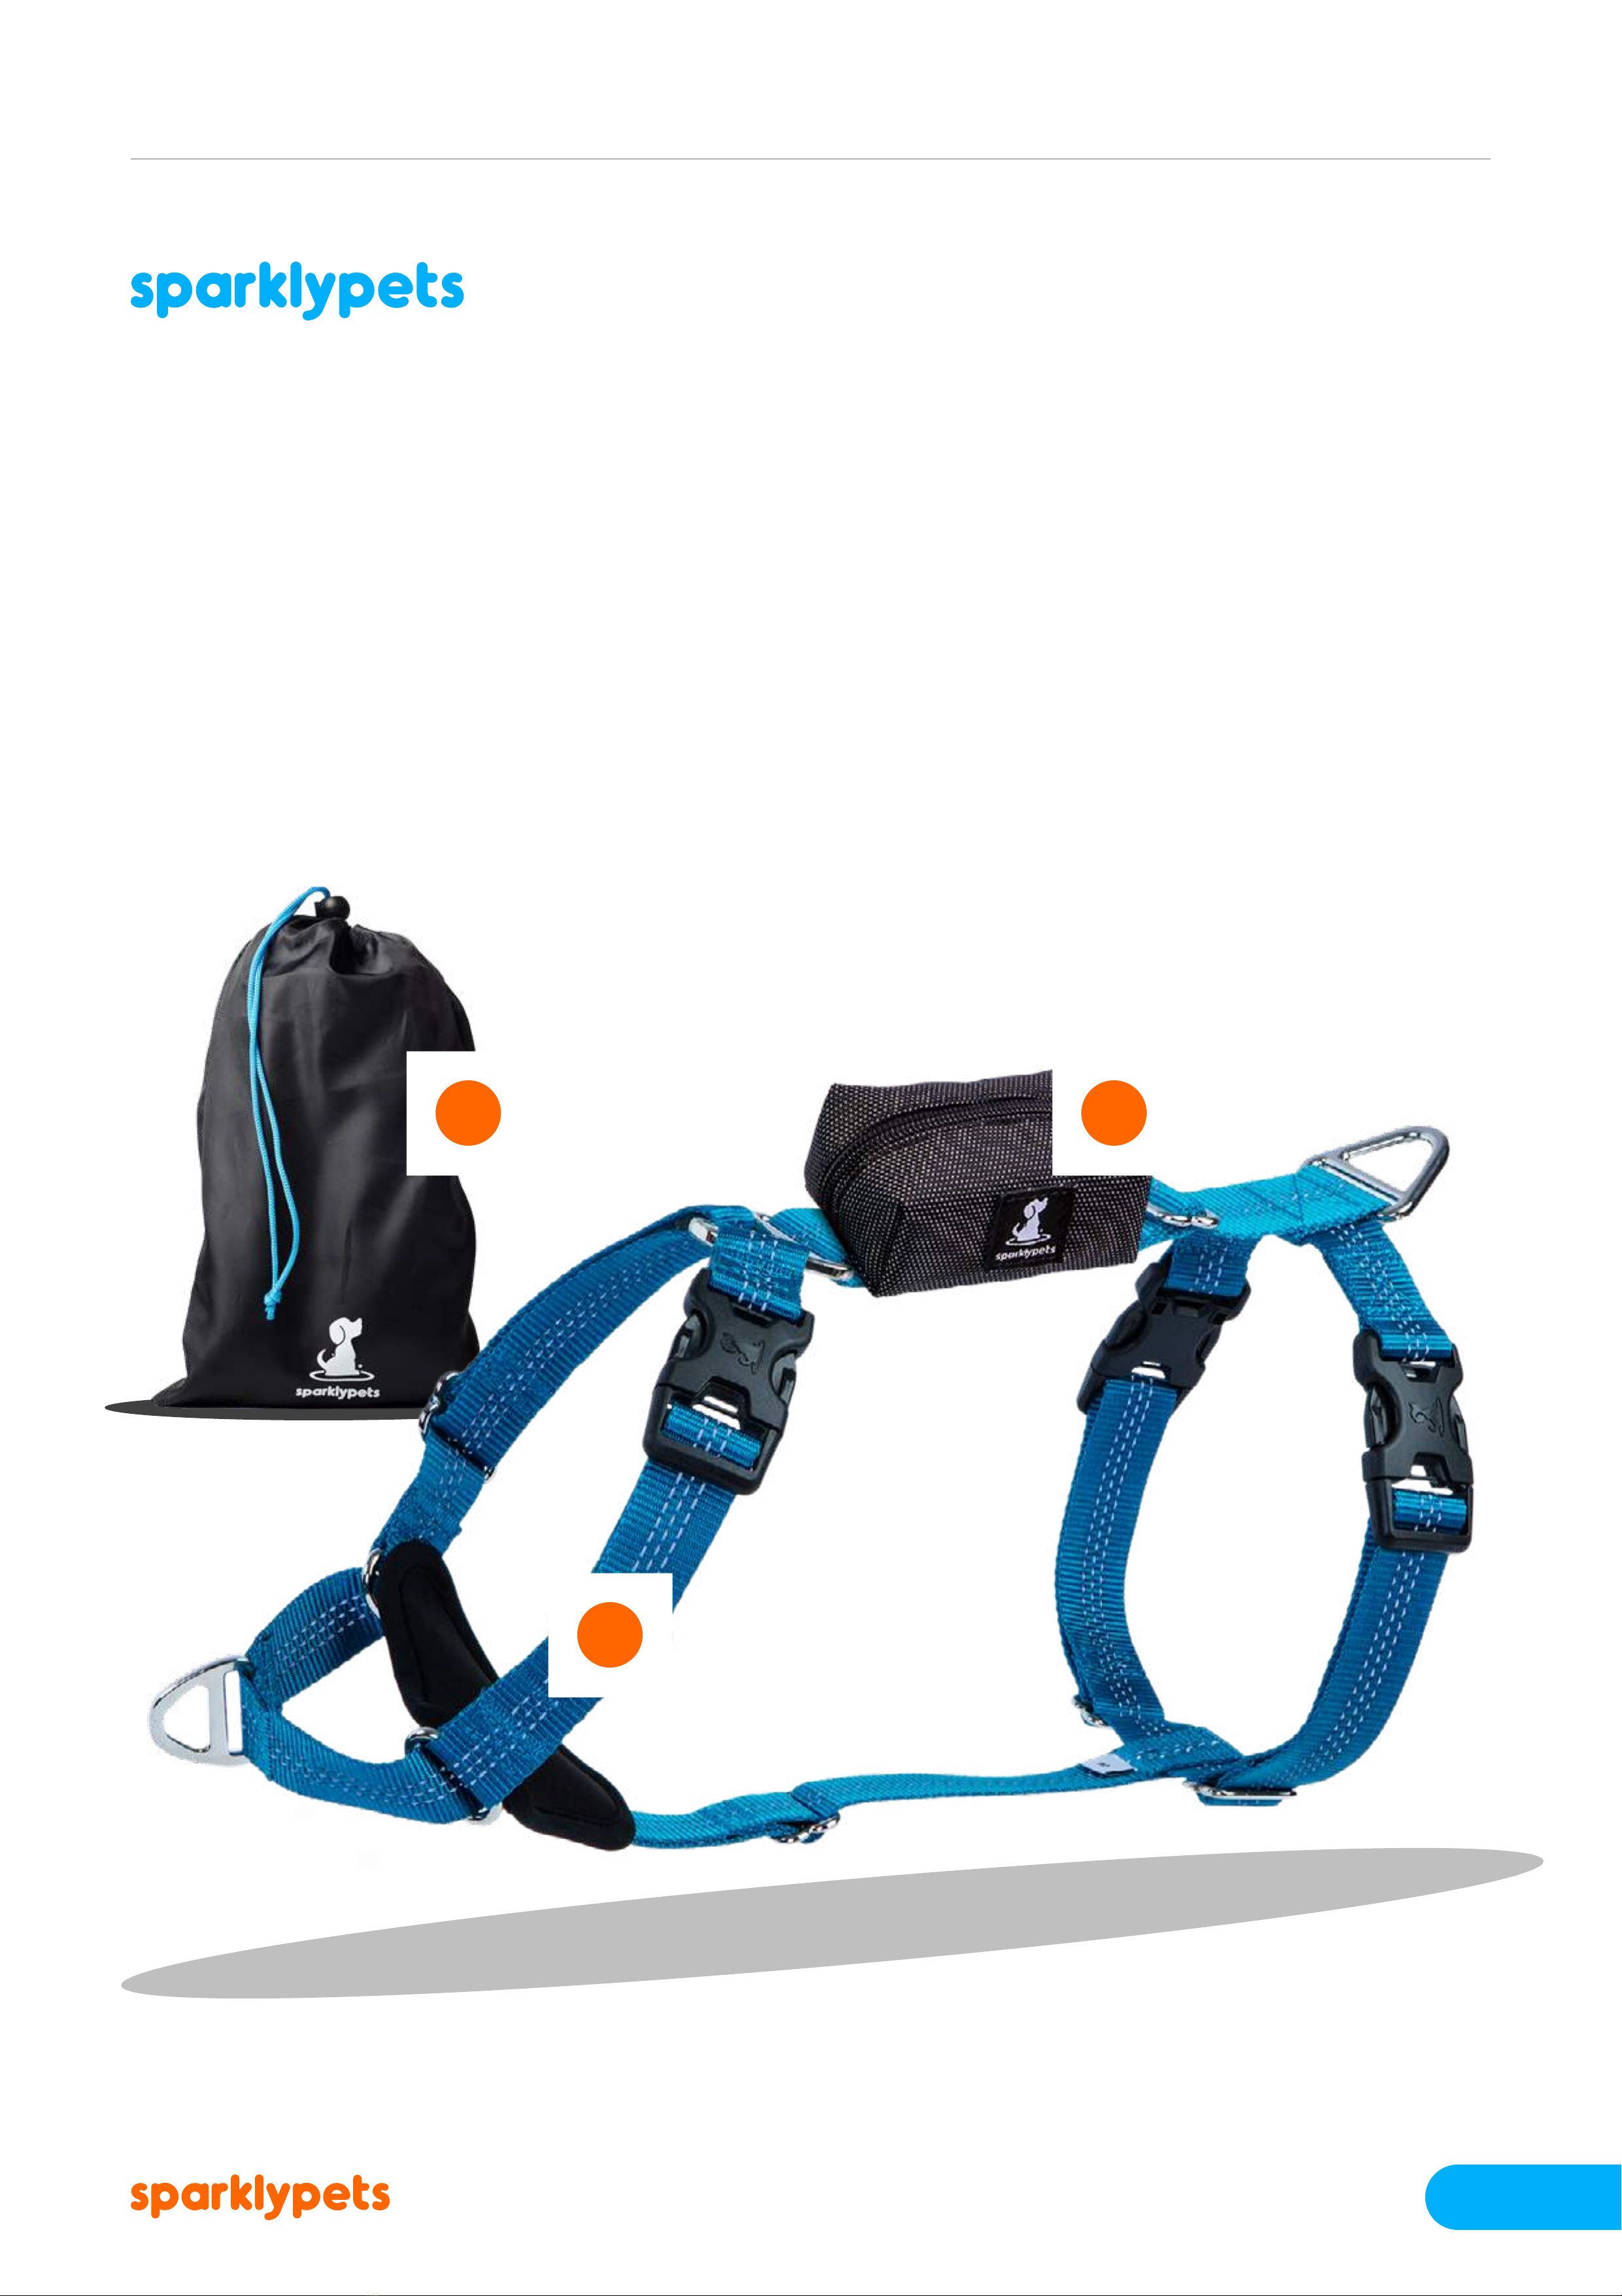
PACKAGE COMPONENTS:
1. Halter Harness
2. Detachable poop bag dispenser
3. Storage Bag
www.sparklypets.com info@sparklypets.com
1

WARRANTY
We are pleased to oer a 3YEAR WARRANTY on our SparklyPets No-Pull
Dog Halter Harness, starting from the date of purchase.
However, it’s important to note that while our harness is made with the
highest quality materials, it is not chew-proof. To ensure the longevity of
your harness, we kindly advise keeping it away from dogs who may be
prone to chewing.
During the initial period when your dog is getting accustomed to the
harness, we recommend safely storing it in the provided storage bag
after each use. This helps protect the harness from any potential
damage and keeps it in optimal condition.
If you have any questions or concerns regarding the warranty or proper
use of the harness, please don’t hesitate to reach out to our customer
support team. We are here to assist you and ensure that you and your
furry friend have the best experience with our product.
For any support, inquiries, or improvements, please write to us or call us:
info@sparklypets.com | +1(252) 220-0094
Failure to follow these instructions could result
in serious injury for you and your dog.
© Copyright Sparkly Innovation. SparklyPets and all associated logos are trademarks.
2

Dear dog lover,
First and foremost, we want to express our heartfelt gratitude for choosing us
as your trusted partner for your furry buddy.
I am Christian, the founder of SparklyPets, and it brings me immense joy to introduce
you to our (No-Pull) Halter Harness, a dog harness that represents countless hours of
innovation and dedication.
In the following sections, we will guide you step-by-step on how to properly set up the
harness for your beloved dog. We have taken great care to provide clear and detailed
instructions to ensure a comfortable and secure t.
We highly recommend nding a quiet indoor space, free from distractions, where you
and your furry companion can focus entirely on adjusting the harness.
To make the process more enjoyable, you may want to have some treats on hand, as
there might be a few slight adjustments and movements involved.
Once again, thank you for choosing SparklyPets, and please know that we consider
you a valued friend and customer, and we want to provide the best for your furry friend.
With warm regards,
Christian
Founder of SparklyPets
3

BACK
CHEST LOOP
FRONTAL
NECK LOOP
Easy step-by-step process to properly use the
SparklyPets No-Pull Dog Halter Harness
STEP 1
GETTING FAMILIAR WITH THE SPARKLYPETS HARNESS
Carefully remove the harness from its packaging and ensure that
all parts and accessories are included and in good condition.
If not, please contact us to resolve this manner.
Take a moment to familiarize yourself with the dierent straps and loops
of the harness. To ensure it is in the correct position, when you hold the
harness, on one side, you have the loop labeled“FRONTAL NECK LOOP”
which represents the strap that will go over the dog’s neck.
Additionally, on the dog’s chest, there will be a Martingale D-ring attachment
point. On the other side of the harness, there’s a loop labeled as the
“BACK CHEST LOOP.”This particular loop should be positioned on the lower
part of the dog’s body, just before the last two real ribs (more details to follow).
Depending on your dog’s size, now is the time to prepare the harness
by widening or narrowing the straps. The goal is to ease your future
adjusting on your dog to have a snug yet comfortable t.
www.sparklypets.com info@sparklypets.com
4

STEP 2
PLACING THE HARNESS ON THE DOG
Unfasten the front buckle, the one on the Neck loop, and gently place the
harness around your dog’s neck, similar to a regular collar, ensuring that
the Martingale D-ring attachment point is placed on your dog’s chest.
Now fasten the buckle.
www.sparklypets.com info@sparklypets.com
5
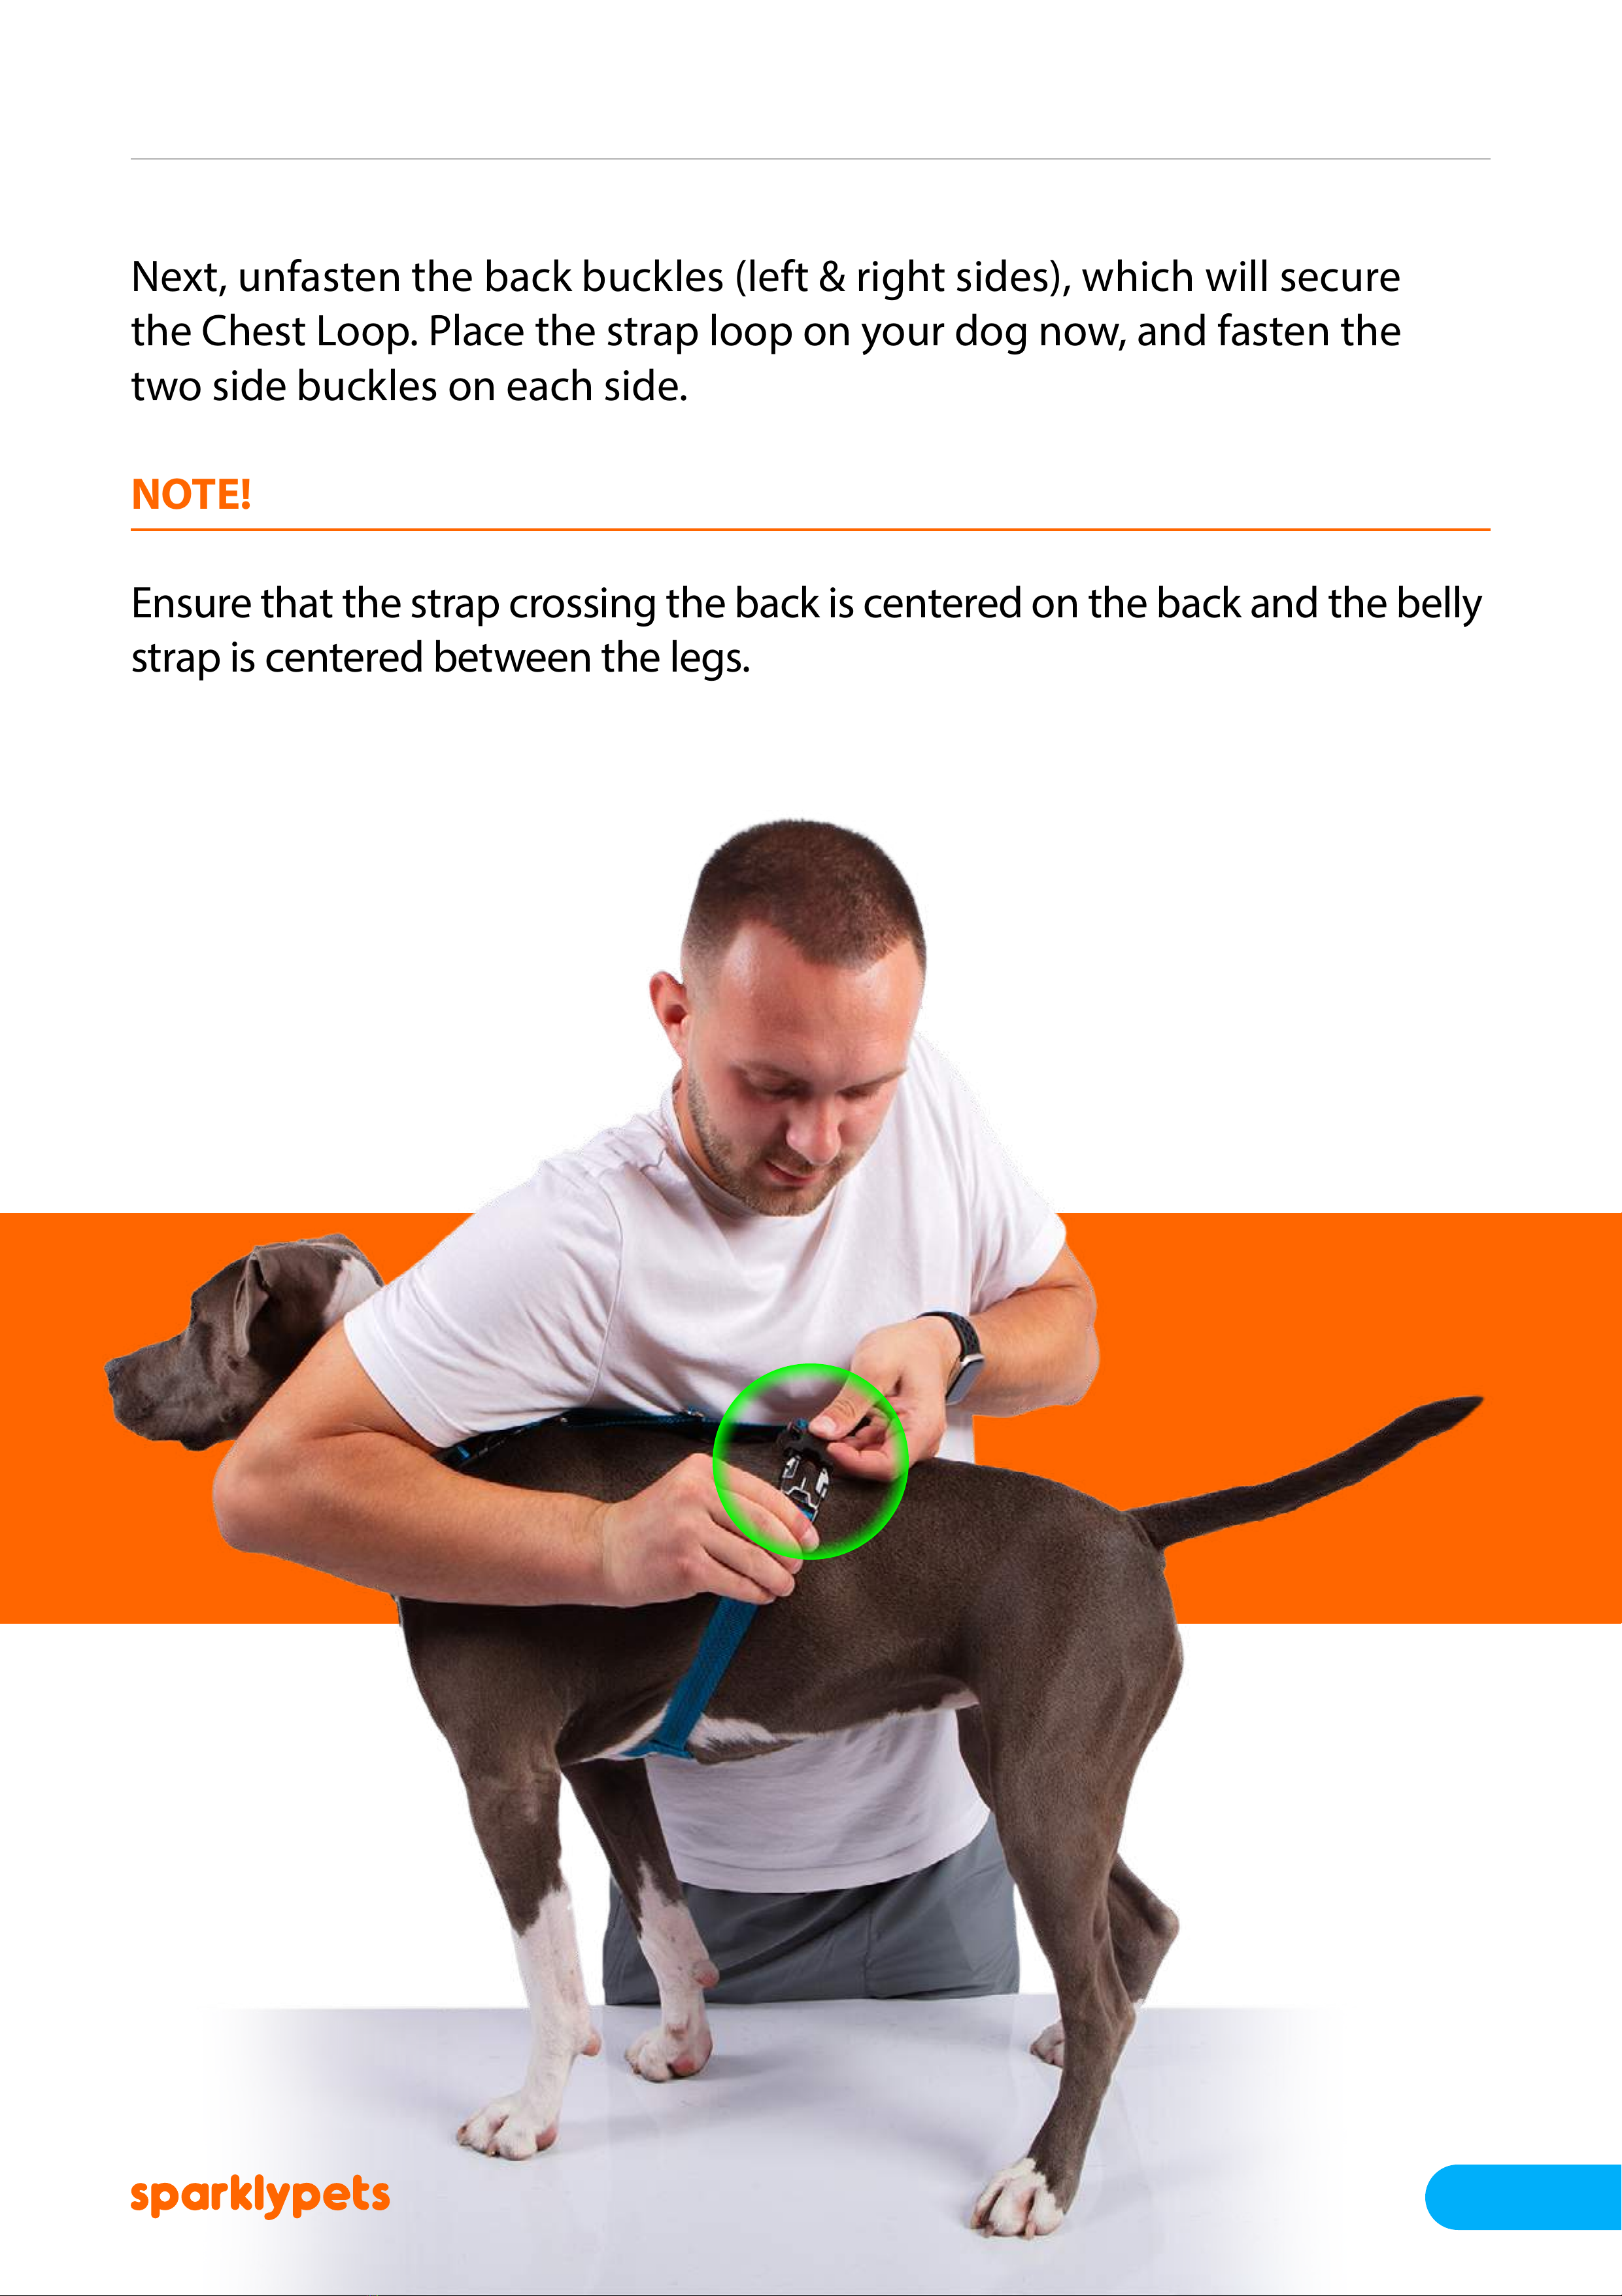
Next, unfasten the back buckles (left & right sides), which will secure
the Chest Loop. Place the strap loop on your dog now, and fasten the
two side buckles on each side.
NOTE!
Ensure that the strap crossing the back is centered on the back and the belly
strap is centered between the legs.
www.sparklypets.com info@sparklypets.com
6

During adjustment,
ensure that the neck
loop is not too tight.
Begin adjusting the loop
by sliding the two
tri-glides on the left and
right sides so that they are
evenly aligned and parallel
to each other.
www.sparklypets.com info@sparklypets.com
Like in the picture:
STEP 3
ADJUSTING THE NECK LOOP
Make sure that the Neck loop sets
at the base of your dog’s neck on
the lower bony part.
7

To ensure it is positioned correctly, you should be able to t no more than
two ngers between the strap and the dog’s body.
www.sparklypets.com info@sparklypets.com
8
STEP 4
ADJUSTING THE CHEST LOOP
Similar to the Neck loop, adjust the two tri-glides on the chest loop for
a secure and comfortable t.
Pay close attention to the nal position of the harness!
The chest loop should not be more than three ngers away from the armpit
nor from the last real rib (the last rib which is connected to the rib cage).
Ensure that the harness is not too tight and it’s positioned correctly.
To check, you should be able to t not more than two ngers between
the strap and the dog’s body.
For reference check
the images below:
www.sparklypets.com info@sparklypets.com
9

STEP 5
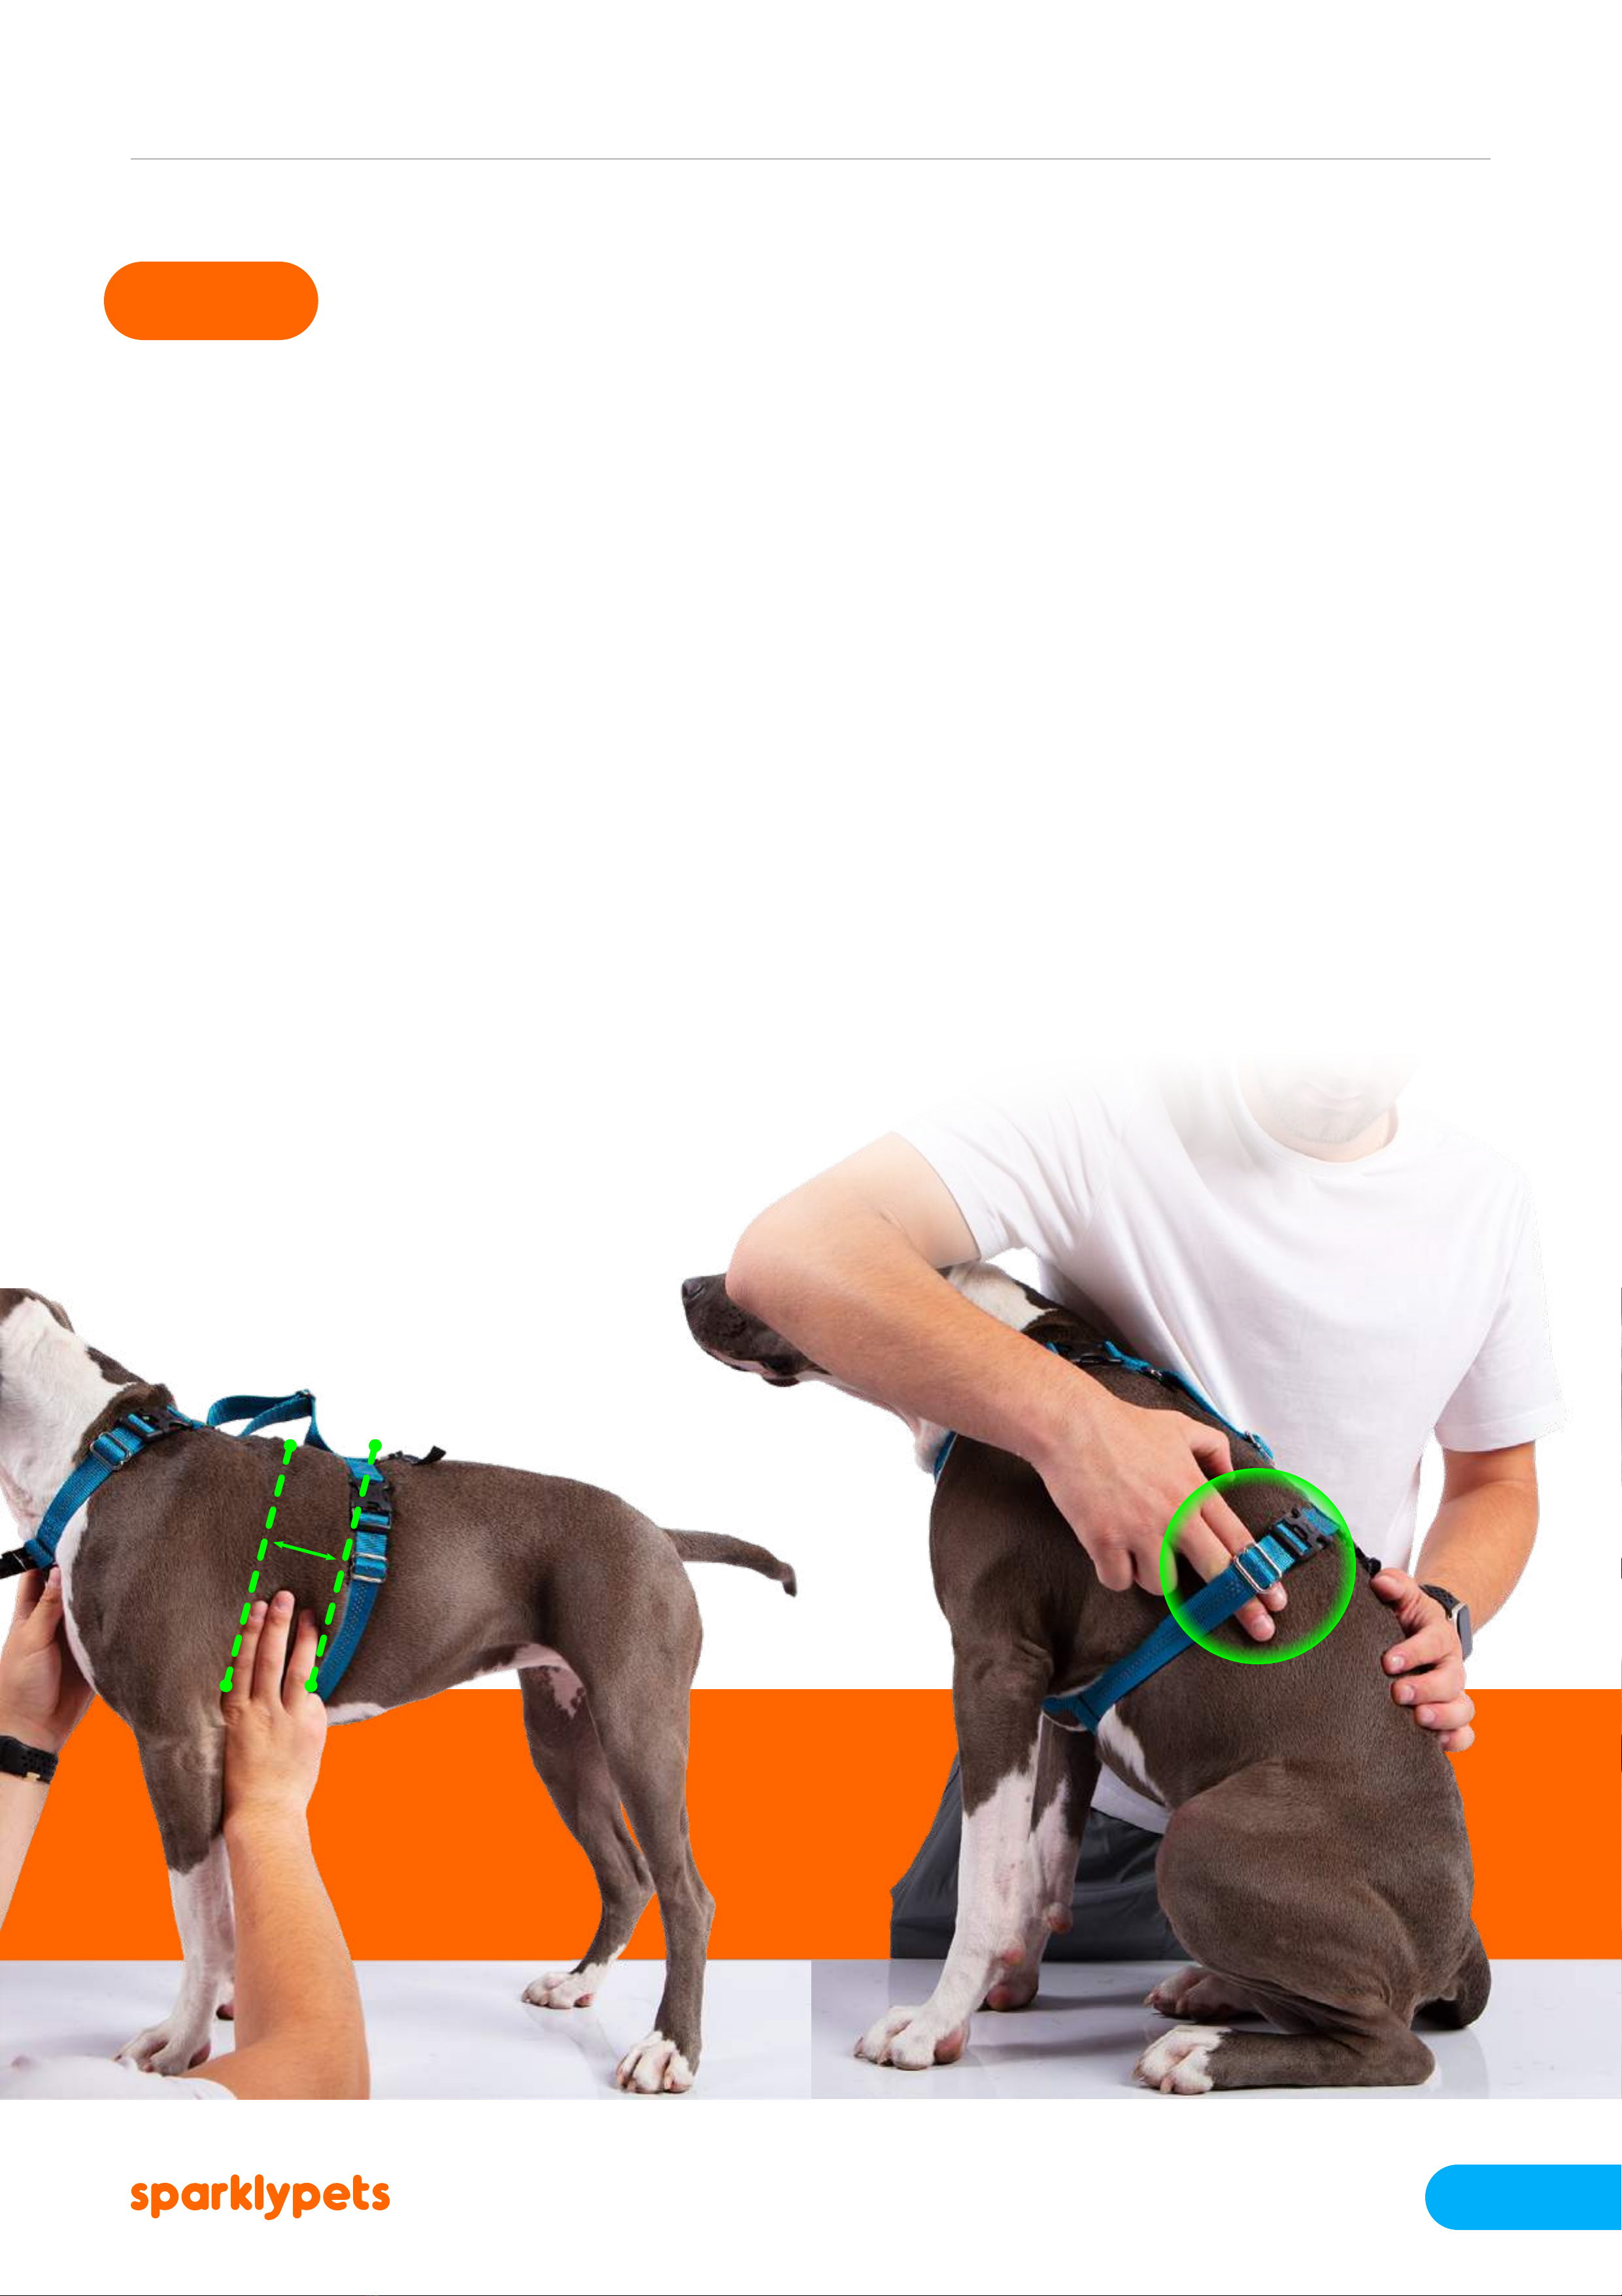
ADJUSTING THE BACK AND BELLY STRAPS
After securing and adjusting the front and back loops, it’s important
to ensure that the horizontal straps (the ones on the back and the chest)
are properly xed.
Take a moment to adjust the tri-glide from the belly strap, allowing
enough space for two ngers to comfortably t between the harness
and your dog’s belly.
Similarly, with the back strap, make sure you can insert two
ngers between the strap and your dog’s back after making
the necessary adjustments.
For reference check the images below:
www.sparklypets.com info@sparklypets.com
10
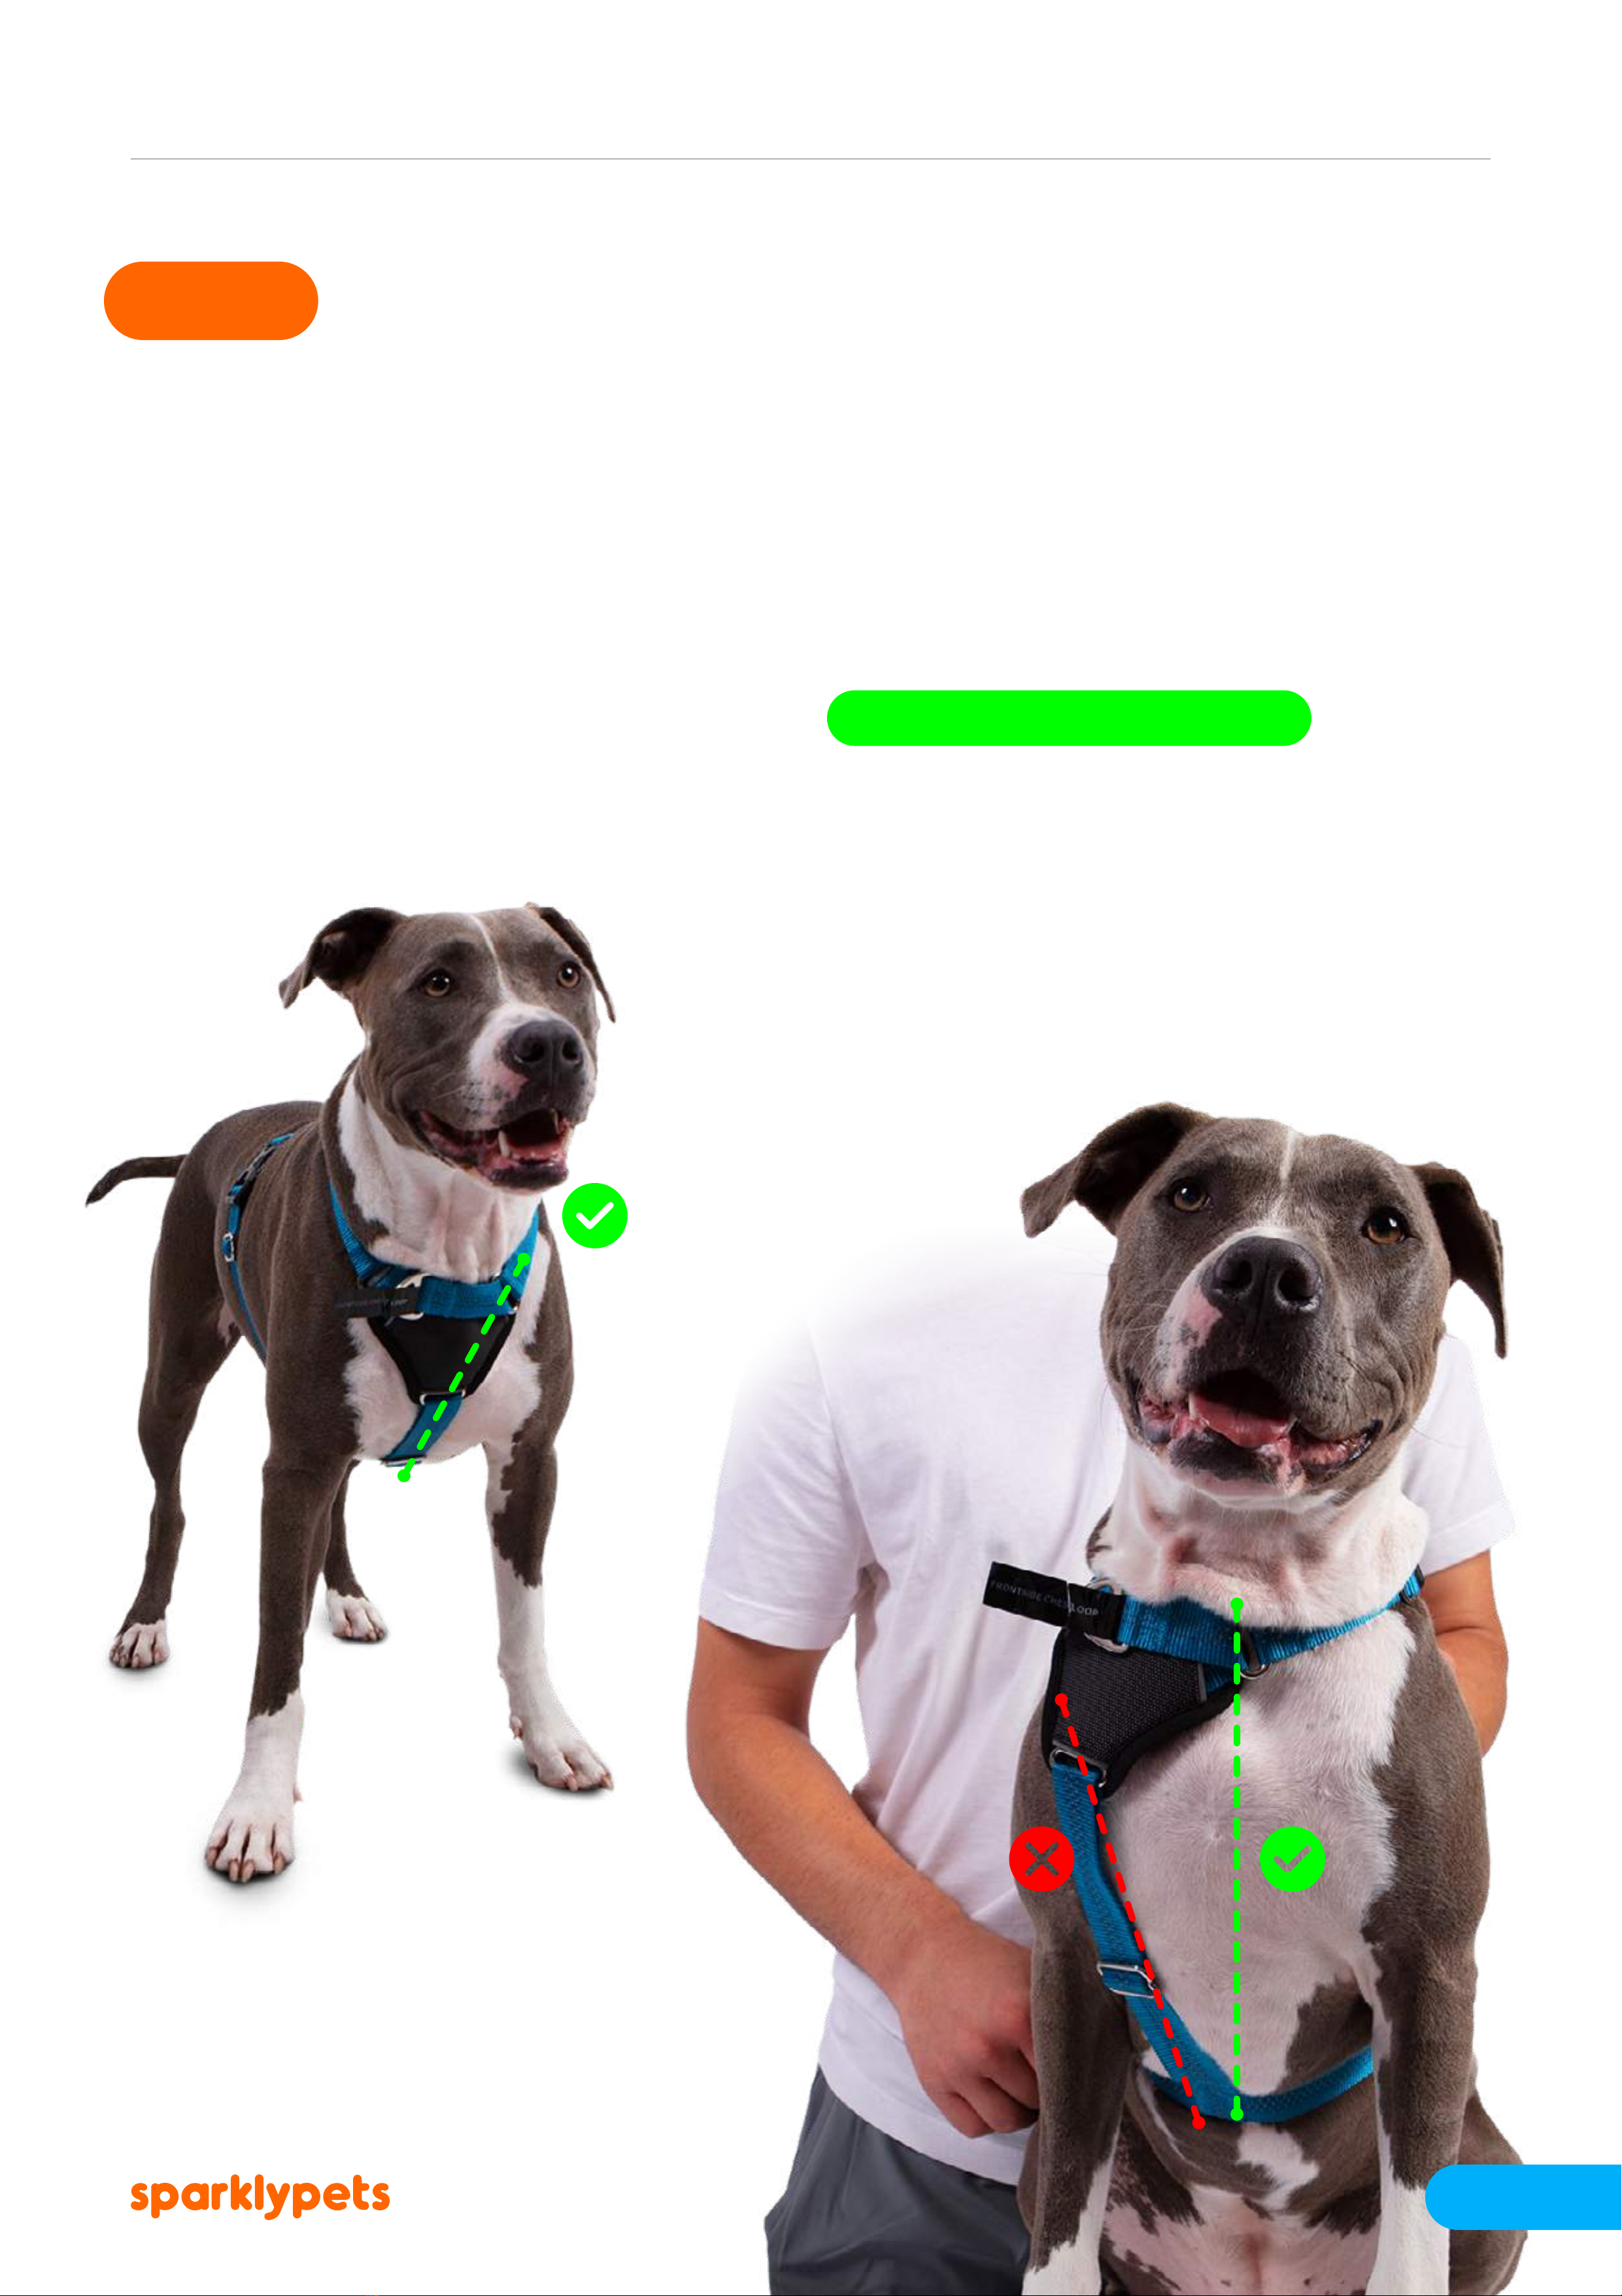
STEP 6
FINAL CHECKS
After setting the harness on your dog, ensure everything is correctly
adjusted and nicely t on your dog with no loose or tight parts.
A good reference is the padded Martingale D-ring attachment
point which should sit perfectly in the center of the dog’s chest,
as shown in the image below:
www.sparklypets.com info@sparklypets.com
11
WWW.SPARKLYPETS.COM
Enjoy your walks together!
If you have followed the steps outlined in this manual, congratulations!
Your harness is now properly set, and you and your furry companion
are ready to go for a walk. After your walk, we recommend removing
the harness from your dog. When you put it back on, take a moment to
inspect the harness and ensure that no part has become loose.
Please note that with new harnesses, it may take a few uses to
properly settle into place.
Remember to readjust and verify the position of each harness
strap, using the two-nger check, to ensure proper alignment
and a comfortable t for your dog.
www.sparklypets.com info@sparklypets.com
12
Table of contents
Other sparklypets Pet Care Product manuals

Popular Pet Care Product manuals by other brands


Zolux
Zolux PANAS COLOUR 50 CONNECTABLE Assembly instructions

Amazon
Amazon B076VY1WVC manual

Ideal Pet Products
Ideal Pet Products E-Cat Door installation instructions

Petsafe
Petsafe Pawz Away PWF00-14040 Operating and training guide

Droll Yankees
Droll Yankees Yankee Tipper quick start guide

Havahart
Havahart 5150 quick start guide