SPC Harmony User manual

SPC HARMONY

1
INDEX
1.
Introduction 3
2.
Location of controls
3
3.
Useful tips
4
4.
First steps before switching on 4
5.
Switching on the phon e 6
6.
Unlock or turn on the phone screen -------------------------------------------- 6
7.
Call
6
a.
Calling a contact in the phonebook
b.
Calling from history
c.
Answering/rejecting a call
d.
Answering and hanging up calls by opening/closing the flap
e.
In conversation
f.
Missed call indicator
8.
Speed dialling
8
a.
Direct memories
b.
Indirect memories
9.
Bells, tones and volume
9
10.
Agenda
a.
Consult the agenda
b.
Quick search
c.
Contact options
d.
Add a contact
11.
Messages 10
a.
New message received
b.
Write a message
12.
SOS button 12
a.
SOS button configuration
b.
Using the SOS button
13.
Smart Help 13
a.
What is Smart Help?
b.
Remote Configuration
c.
Intelligent Doorbell
d.
Smart Notifications
14.
Multimedia
a.
Cameras
b.
Images
c.
Video recorder
d.
Music player
e.
Voice recorder
f.
Radio
g.
File Manager
15.
Adjustments 18
16.
Battery and charging 20
17.
Other functions/Tools menu 21

2
a.
Bluetooth
b.
Calculator
c.
Calendar
d.
Alarm
e.
World Clock
18.
Lantern 23
19.
Technical data 23
20.
Frequently Asked Questions 23
3
1.
INTRODUCTION
This document is a user manual for the HARMONY key-operated mobile phone from SPC
.
You will find information about the first steps to follow in order to use your mobile phone
and also about its different functionalities.
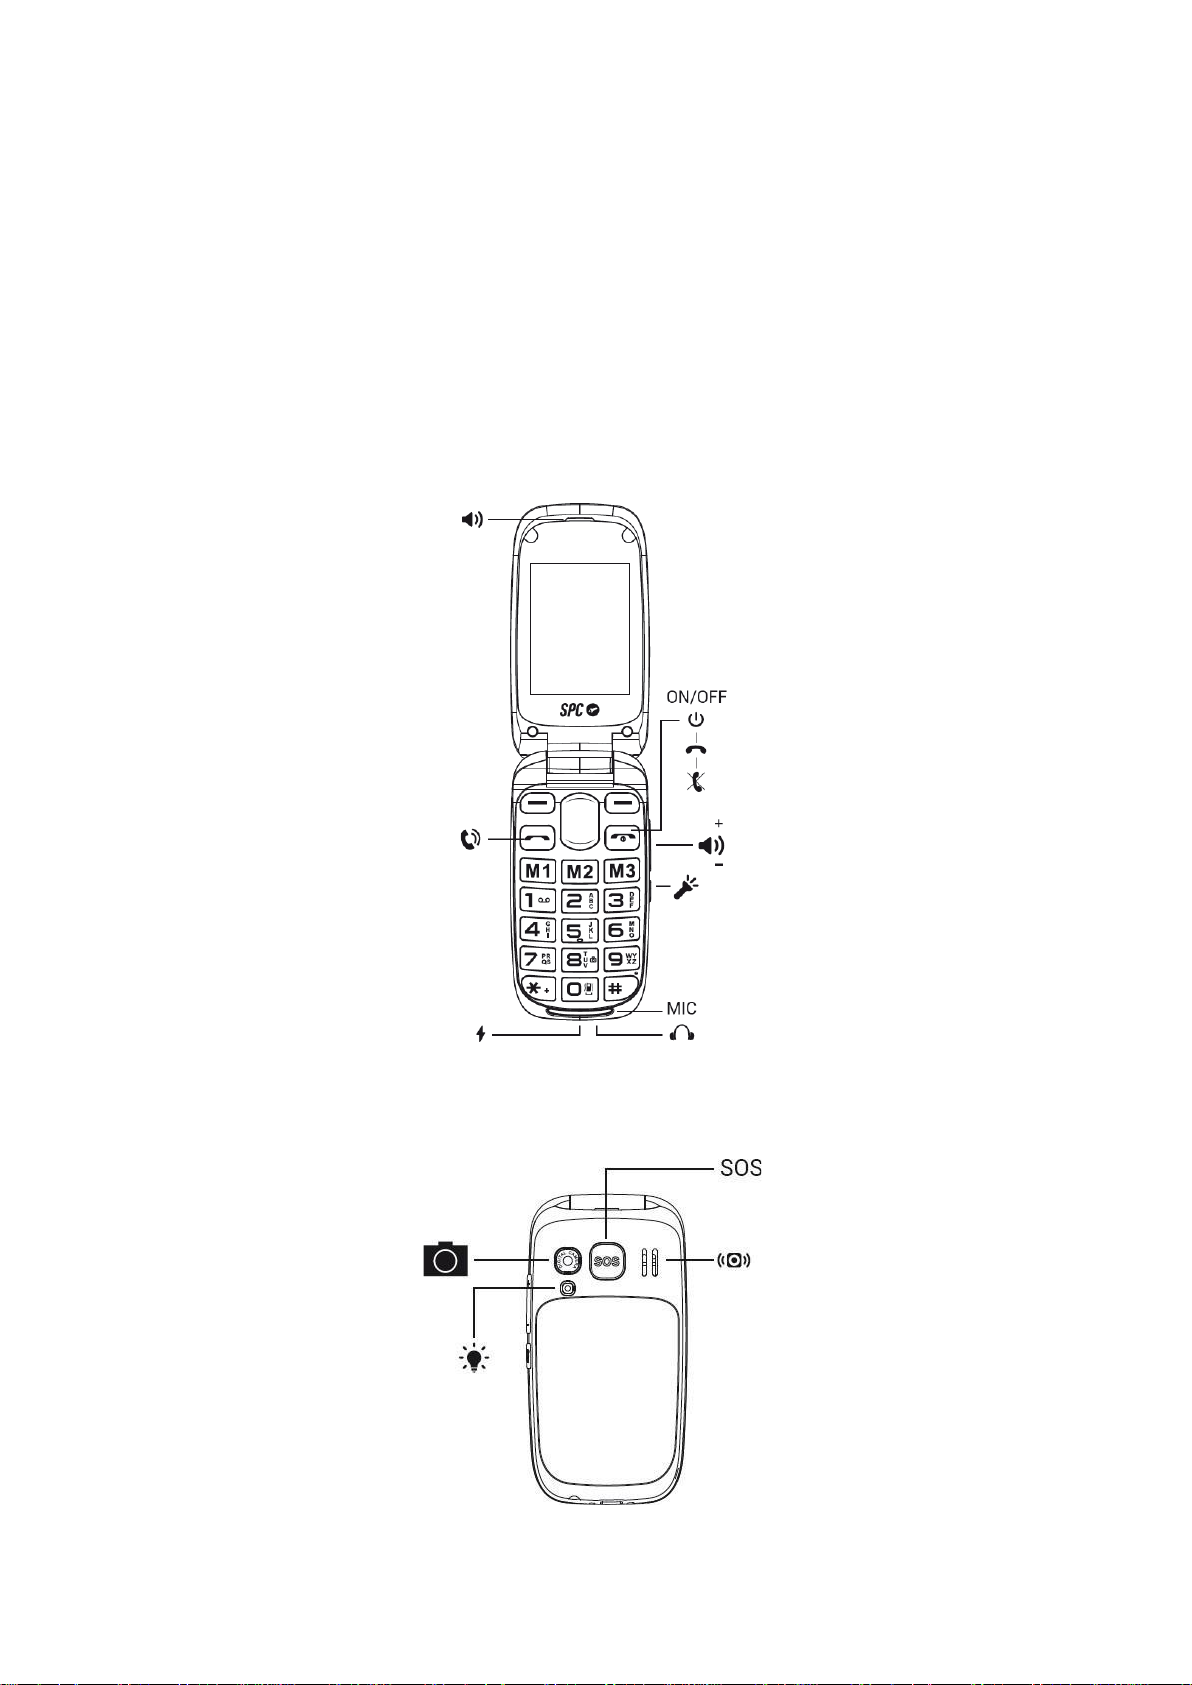
2.
LOCATION OF CONTROLS

4
3.
USEFUL TIPS
-To access the main menu when the phone is in standby, press the top leftkey.
-
To navigate up and down the main menu and different submenus, press the
edges
of the centre key up or down.
-The top left key performs the action shown at the bottom left of the screen.
-The top right key performs the action shown at the bottom right of thescreen.
-To confirm a choice, press the appropriate top key.
-To return to the home screen from the display, simply press the hang up key.
.
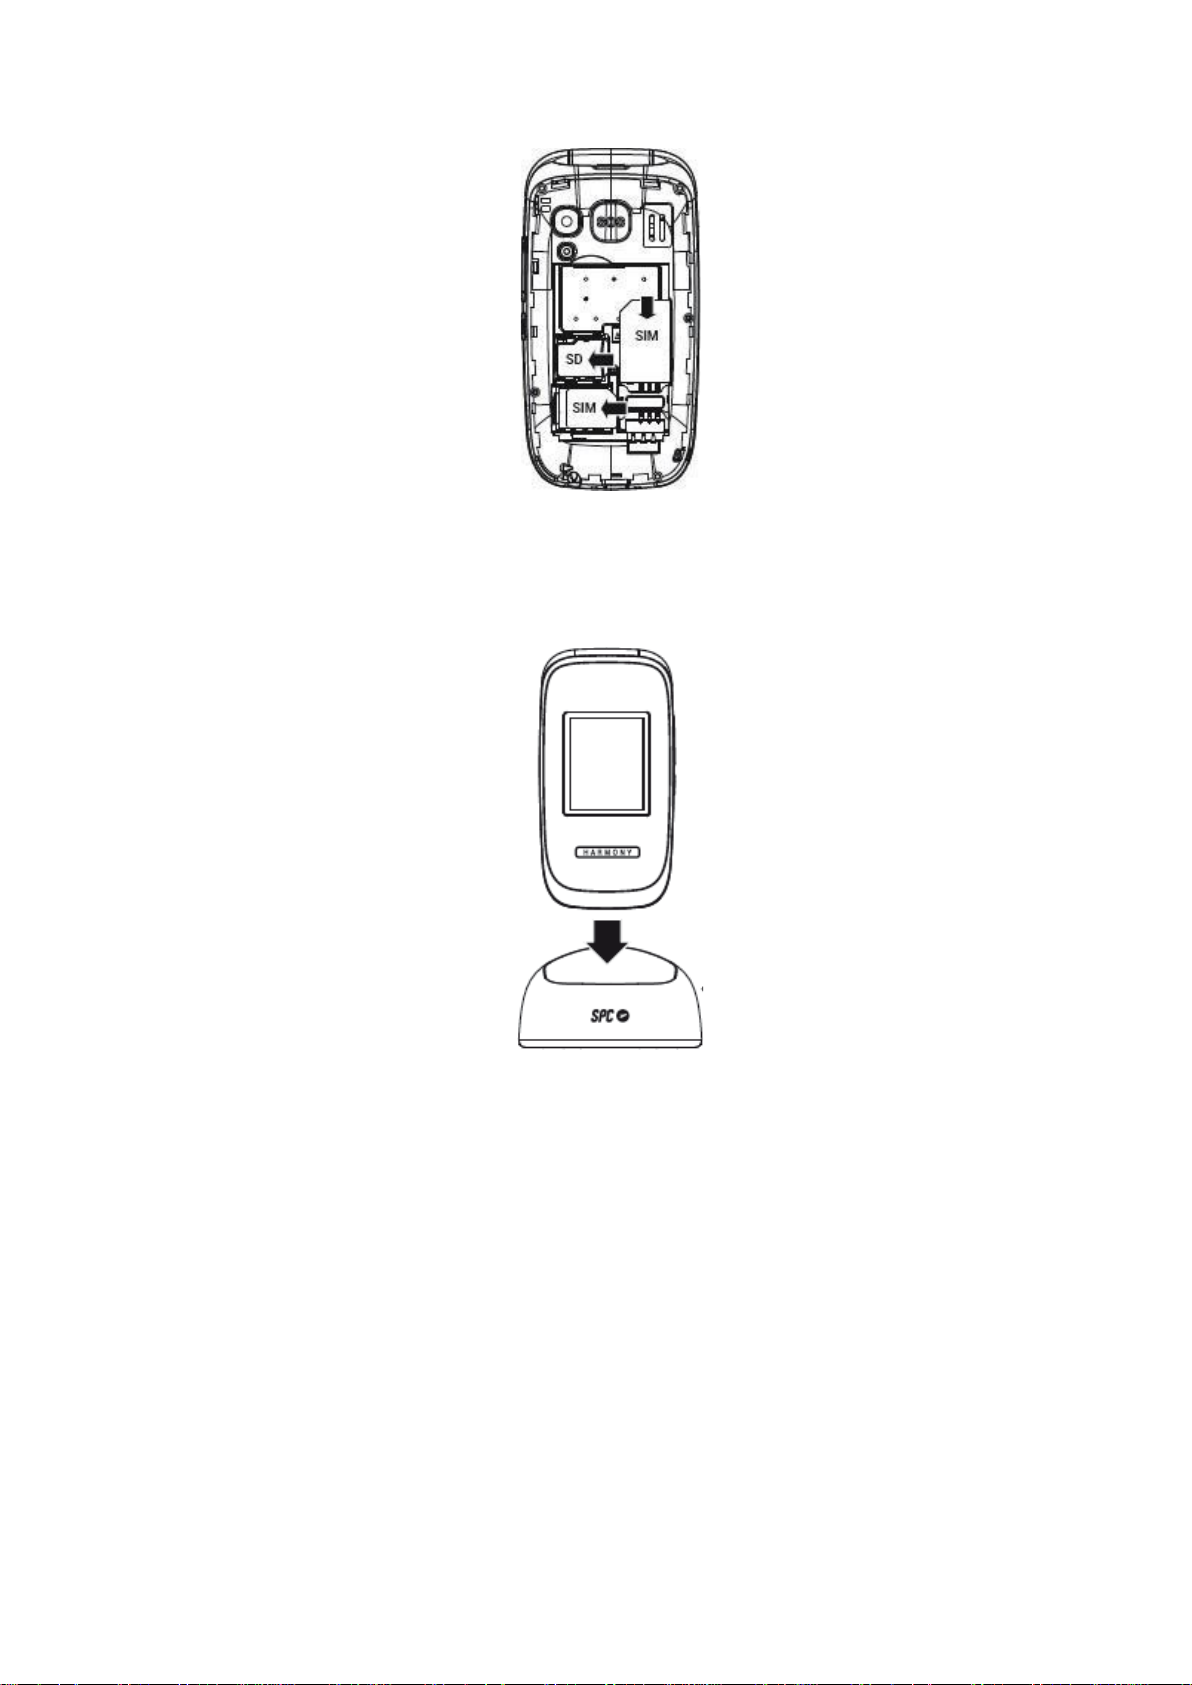
4.
FIRST STEPS BEFORE TURN IT ON
Lift the battery cover using the tab on the bottom of the phone.
5
Insert the SIM card(s) by matching the gold contacts on the phone and the card(s).Insert
the battery by matching the gold contacts on the phone and the battery.
To charge the handset, connect the power supply to the charging cradle and to any power socket
in your home. Check the orientation of the connector and do not force the connection if it is not
immediate. Place the phone on the charging cradle.
6
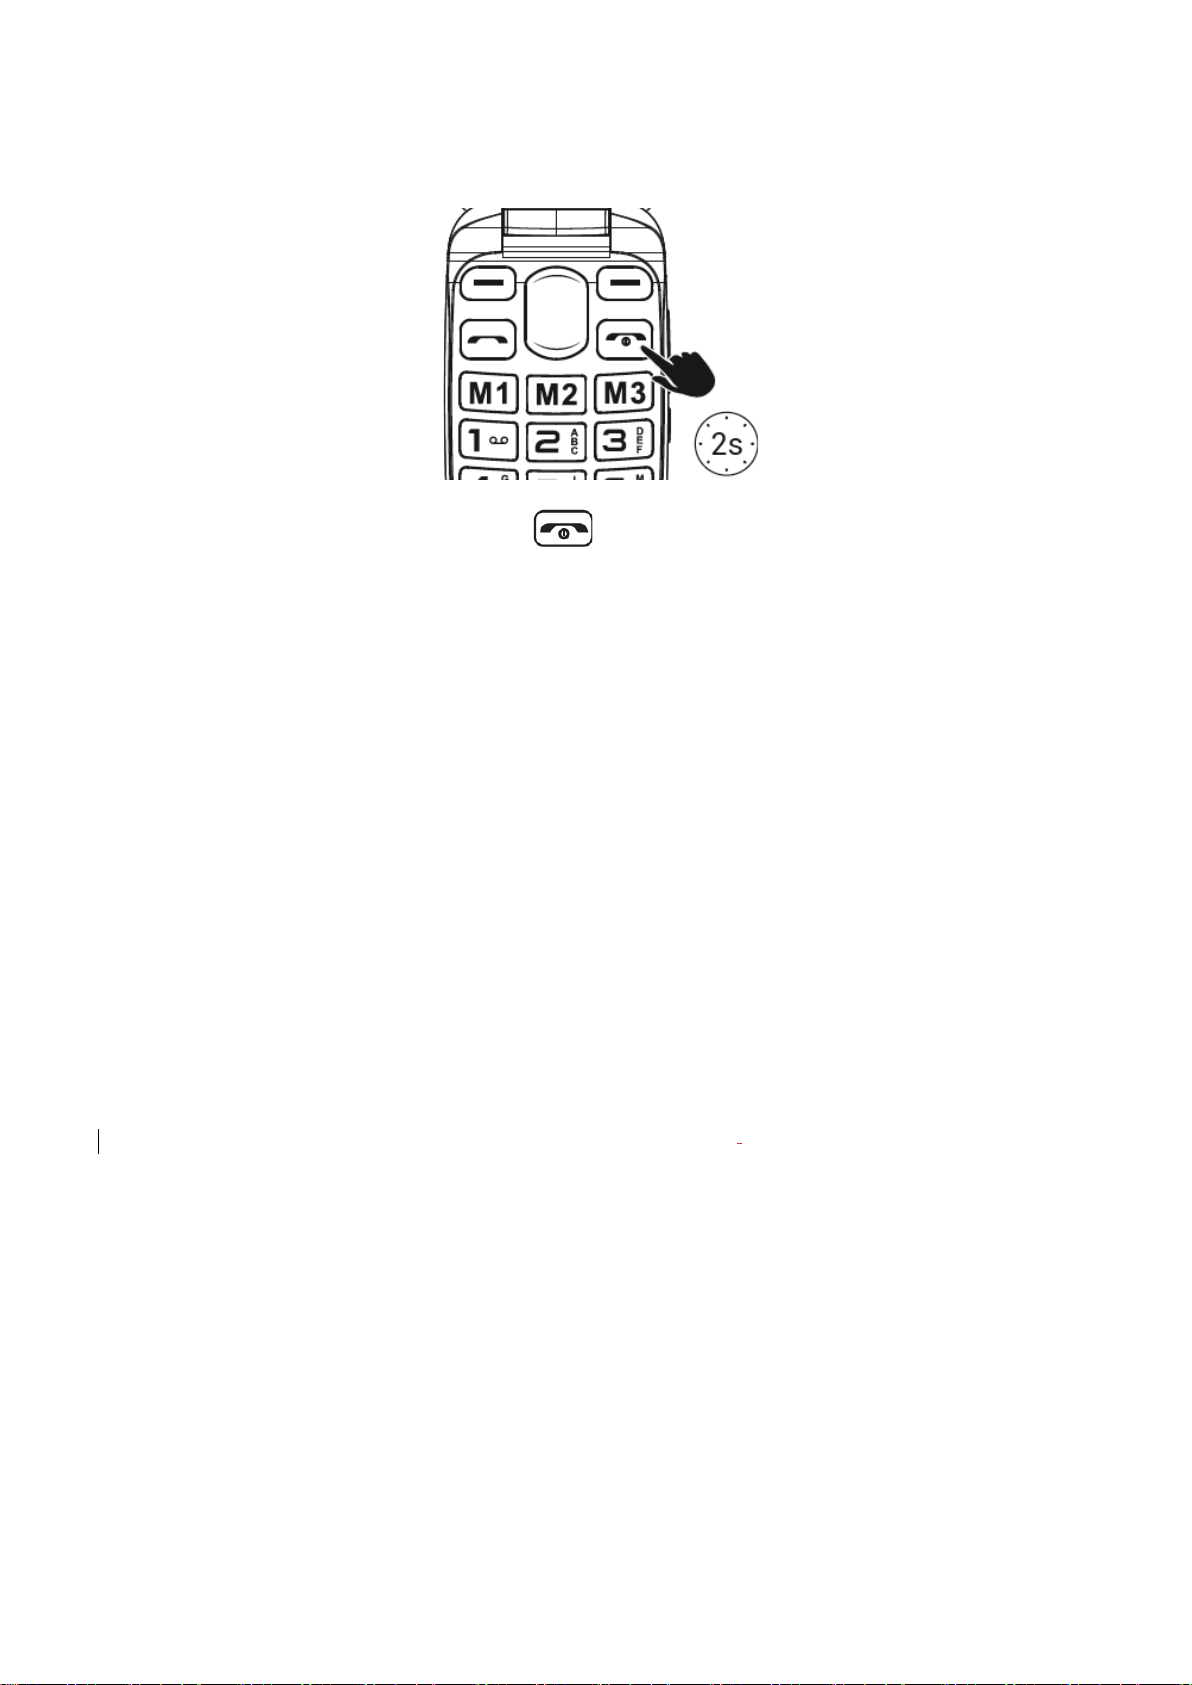
5.
SWITCH ON PHONE
Press and hold the power key for a few seconds to switch on the
phoneEnter the PIN provided with your SIM card. If two
SIM
cards are inserted
,
the phone
will ask for the PIN of SIM 1 first and then SIM 2.
Press and hold this key to switch off the phone.
NOTE: The Personal Identification Number (PIN) protects the SIM card from unauthoriseduse. The
PIN Unblocking Key (PUK number) allows you to unblock a blocked PIN. The PIN and PUK are
supplied with the SIM card. For more details, contact your operator.
6.
UNLOCK OR TURN ON THE SCREEN OF PHONE
The phone locks automatically when the flip is closed and unlocks itself when the flip isopened,
without the need to touch any keys or activate any functions.
This device has the option to lock the phone only at the moment of switching it on, so that if the
security code is not entered, the phone cannot be switched on. To activate this function you can
go to:
-
Menu --> Settings --> Security --> Phone --> Phone --> Lock Phone.
-The phone's default code is1122.
To change this code you can go to:
-Menu --> Settings --> Security --> Phone --> Change password.
7.
CALL
In the case of using two
SIM
cards
,
the phone will ask for confirmation of the SIM card to call with
before making calls.

7
During a call, you will be able to make and receive further calls from/to the same number, but you
will not be able to make or receive calls from/to the other SIM card.
1.
Dial the number you want to call.
2.
Press to delete incorrectly entered digits.
3.
Press and select the SIM card you want to make the call with. Press .
4.
When calling, if the number is stored in the phonebook, the name of the contact willappear on
the display.
5.
Press to end the call.
Calling a contact from the phonebook
1.
Press "Agenda" from the home screen with the right function key. The screenwill
display the list of contacts in alphabetical order.
2.
Use the up/down keys to scroll through the list to the desired contact.
3.
Press the call key to call the selected contact.
4.
Press the end call key to end the call.

8
Calling from history
1.
With the phone on standby, press the key toaccess the list of sent calls. Youcan
also access the call history from the main menu.
2.
Use the navigation keys to scroll through the list,select a record and press to call.
Answering / rejecting a call
When you receive a call the number or name will be shown on the display. Press thekey to
answer or to reject the call.
In conversation
During the conversation, press "Speakerphone" to activate handsfree mode. Duringthe
conversation, press "Options" to access the different options:
•
Call waiting
•
End call
•
Phone book
•
Call history
•
Messages
•
Start recording
•
Silence
8.
SPEED DIALLING
The telephone has three direct memories (M1-M2-M3) and nine indirect memories.
Indirect memories or speed dial numbers are those that are activated by holding down oneof the
digits 1 to 9.
To set up these numbers you need to have a SIM card installed and, in addition:
-
go to Menu -> Settings -> Speed dial
-
Activate it (Status: On),
-
and Set number.

9
9.
TIMBRES, TONES AND VOLUME
This setting is under the Profiles option in Settings. Here you can select and configure the type of
ringtone for calls, volume level, message tone, etc. By default, the selectedprofile is General.
With the cursor keys you can move between the available profiles (General, Silent,Meeting and
Outdoor) and enter their settings by pressing the Opt button.
You can now activate it, customise it or restart it.
You can customise a profile according to your tastes and needs and adjust the following
parameters. Hover over the setting you want to change and then Options --> Change or OK:
-
Alert type and choose between ringing only, vibrating only, vibrating and ringing;or
vibrating and then ringing.
-
Type of ringing (repeat or single beep).
-
Choose the ringing tone for incoming calls on SIM 1 (from a choice of 7 ringingtones or
select a melody stored in the phone files).
-
Choose the ringing tone for incoming calls on SIM 2 (from a choice of 7 ringingtones or
select a melody stored in the phone files).
-
Select the call volume.
-
Choose the ringtone for messages received on SIM 1 (3 ringtones to choose from).
-
Choose the ringtone for messages received on SIM 2 (3 ringtones to choose from).
-
Select the volume of received messages (7 levels).
-
Choose keyboard sound type between click, tone, voice or mute.
-
Choose the volume of the keyboard tone (7 levels).
-
Choose the power-on tone (between 3 tones and mute)
-
Choose the off-tone (between 3 tones and silence)
-
Select the tone for opening the lid (between 3 tones and silence).
-
Select the tone for closing the lid (between 3 tones and silence).
10.
AGENDA
a.
Consult the agenda
1.
With the phone on standby, press the "Phonebook" key.
2.
or access fromthe main menu, Agenda.
3.
Use the "up/down" navigation keys to scroll through the list and view all contacts.

10
b.
Quick search:
With the list of contacts displayed (previous step Consult phonebook) enter the firstletters of
the contact you are looking for. Contacts containing those letters will be displayed on the
screen.
c.
Contact options:
Select a contact and press Options to view the available options:
-
See,
-
Send SMS,
-
Call,
-
Edit,
-
Delete,
-
Copy,
-
Move,
-
Add to the blacklist,
-
Adjustments.
d.
Add a contact
1.
With the Contacts list displayed, select the "Add" option and press OK.
2.
Select the memory where you want to save the contact (on
SIM1
,
SIM2
,
or in the Phone).
3.
Enter the contact details (Name, Number, etc.).
4.
Once edited, press "Opt">"OK" to save the contact.
e.
Add a contact with image
1.
With the Contacts list displayed, select the "Picture" option and press OK.
2.
Press "Edit" and enter the contact details (name, number, etc).
4. After editing, press Options / OK to save the contact.
11. MESSAGES
a.
New message received
When you receive a new text message, the phone will beep and display an alert onthe
screen.
In
addition
,
will display the icon
To open the message:

11
1.
Go to the "Messages / Inbox" menu. New messages are marked with the icon of asealed
envelope.
Select "View" if the notification appears on the screen, or go to the "Messages --> Inbox"menu.
New messages are marked with a closed envelope icon.
2.
Press "Options / View" to open and read the message. .
3.
Each message will be marked with a "1" or "2" icon depending on the SIM card in whichthe
message is sent.
that the message has been received.
NOTE: The new message icon will remaindisplayed as long as there are
unread messages.
Message options:
When you open a message, you can:
•
See:Readthe message.
•
Reply: Reply to the message with another text message.
•
Call: Call the person who sent you the message.
•
Forward: Forward the message to another contact.
•
Delete: Delete the current message
•
Delete all: Delete all messages.
•
Saveto phonebook: Save the sender's number in the phonebook.
b.
Write a message
Go to Menu --> Messages --> Write message.
The text input mode is the font used for messages, entering contacts, etc. The icon at thetop left
indicates the mode used (predictive, numeric or touch).
From Options > Writing mode,you can select
-
Es (the first capital letter and the rest lower case),
-
EN (all caps),
-
en (all lower case),
-
Smart Es (predictive, first case and the rest lower case)
-
Smart ES(predictive, all caps)
-
Smart is (predictive, all lowercase),
-
Numeric
-
Insert symbol
You can also select the language and switch between upper and lower case letters and numbers
within Write Message
by
pressing the # key once. The icon at the top left indicates the mode used.

12
In addition, within Write Message, by pressing the * (asterisk) key once, you will have direct access
to the symbols you can include.
12.
BUTTON SOS
The SOS button is a physical button located on the back of the phone. If you find yourself in an
emergency, by simply pressing this button for a few seconds (once it is configured, see "SOS
number settings"), the phone will automatically make a call and send an emergency SMS to up to 5
numbers.
You need to configure the SOS emergency numbers tomake use of this functionality.
SOS number configuration:
From "Menu"-->"Setting"-->"SOS":
•
Activates the "Status"/"On" function.
•
Set the emergency numbers in the "SOS number list" (1 to 5), the emergency
numbers (1 to 5), the emergency numbers (1 to 5), the
numbers must be stored in the phonebook and in the phone memory.
•
Write the help message to be sent to the SOS numbers "SOS Message".You
can also disable this option from "Send message when calling".
Use of the SOS function:
If you find yourself in an emergency situation and press the SOS button, the handset:
-
It will start calling the previously defined numbers.
-
It will send the SOS message at the end of this cycle.
-
Itwill activate the loudspeaker.
-
It will call the SOS numbers in consecutive order, also sending the SOS message via SMS.

13
-
If there is no response, it will jump to the next number until one of them responds, thiscycle will
be repeated 3 times.
*If a number in the list has voicemail, the cycle will end.
SMS may increase your monthly bill depending on the type of contract you have with your
operator.
Cancel the SOS function:
If you have activated the SOS function by mistake, you can stop sending calls by pressing the key
.
13.
SMART HELP
What is Smart Help?
Smart Help is a set of intelligent help functionalities that enables HARMONY users to use their
device with peace of mind and helps their family and loved ones to take care of them even when
they are far away. You can configure them from the Settings > Smart Helper menu.
To this end, Smart Help allows:
-
Send notifications from this mobile to another phone in situations of low usage ortotal
inactivity,
-
and activate HARMONY ringing at maximum for unanswered calls.
Before going on to activate each of the functions, the phone allows you to configure the helper
contacts that the phone will notify or that will be able to remotely configure your phone. To do
this:
-
add the numbers (maximum 3) from "Settings > Smart helper number".
-
You can add numbers from the phonebook or enter numbers.
*You must include the dialling code (+34 for Spanish mobile numbers), for example
+34611222333.
The following section describes each of these functions.
Notification and Intelligent Care
With these two functions you can allow up to 3 telephone numbers to receive alerts in the
event of certain circumstances that may pose a risk.

14
Smart Notification will alert in the event of a missed call, or when the battery is low (below 15%).
Smart Care will alert you when there is a missed (unanswered) call, or when there has been no
activity in the last 24 hours, i.e. if it detects that you have not pressed any keys, opened or closed
the lid or put it on charge.
Intelligent Doorbell
With this feature, your phone will automatically increase the ringer volume if it detects that the
same person is trying to call you and you have not answered the call.
The ring volume of your phone will be set to maximum if the same phone number repeats the call
within 3 minutes. After answering the call, the volume of your phone will be set back to the
previously preset volume.
You can activate or deactivate it from:
-
Settings > Smart Helper > Smart Ringer.
Synchronisation control
This function allows them to remotely configure your phone via SMS from another phone.To this
end:
-
Activate this function from Settings > Synchronisation control.
These are the 3 HARMONY functions that can be configured remotely from another phonevia SMS.
1.
ACTIVATE AND CONFIGURE THE SOS FUNCTION
Send an SMS to your phone from one of the numbers with permission with thefollowing
codes:
-
Toactivate/deactivate the SOS function:
ACTION
SMS CODE
Activate the SOS function
*SOS#1#
Deactivate the SOS function
*SOS#0#
-
To configure phone numbers in the SOS list:
ACTION
SMS CODE
Set the number 611 111 111 as the first in the SOS list.
*SOS#2#1#611111111
111111
Set the number 622 222 222 as 2nd in the SOS list.
*SOS#2#2#2#6222222

15
222222
Set the number 633 333 333 as 3rd in the SOS list.
*SOS#2#3#633333333
333333
Set the number 644 444 444 as 4th in the SOS list.
*SOS#2#4#644444444
44
Set the number 655 555 555 as 5th in the SOS list.
*SOS#2#5#655555555
55
-
To delete numbers from the SOS list:
ACTION
SMS CODE
Remove number 1 from the SOSlist
*SOS#3#1#
Remove number 2 from the SOSlist
*SOS#3#2#
Remove number 3 from the SOSlist
*SOS#3#3#
Remove number 4 from the SOSlist
*SOS#3#4#
Remove number 5 from the SOSlist
*SOS#3#5#
2.
ADD CONTACTS TO THE PHONEBOOK OR TO THE QUICK MEMORY
By sending an SMS to HARMONY from one of the numbers with permission with thefollowing
codes:
-
To add a contact to the phonebook: ("CCC" IS THE NAME OF THE CONTACT).
ACTION
SMS CODE
Add contact 611 111 111 to phonebook
*PB#2#CCC*611111111
111111
3.
TURN THE RINGER, EARPIECE AND HANDSFREE VOLUME UP TO MAXIMUM.
By sending an SMS to HARMONY from one of the numbers with permission with thefollowing
codes:
ACTION
SMS CODE
Turning up the
volume
*VOL#MAX
14.
MULTIMEDIA
a.
Camera
A built-in memory card is required.

16
Activate the camera by pressing the navigation key below or by accessing it from themenu: "Menu"
--> "Multimedia" --> "Camera".
Use the numeric keypad to change the camera settings.
•
Up/down navigation keys: press repeatedly to zoom in/out.
•
Key 1: Press repeatedly to change the image size.
•
Key 2: Press repeatedly to change the picture quality.
•
Key 4: Press repeatedly to change the white balance.
•
Key 5: Press repeatedlyto activate/deactivate the flash.
•
Key6: Press repeatedly to set the timer.
•
Key 8: Press to capture.
Once you have taken a screenshot, the photo will be saved automatically. Press "Back" to take a new
screenshot or press "Options/Clear" to delete the screenshot. You can also sendit via Bluetooth from
"Options/Send" via Bluetooth.
To take the photo press the 8 key with camera icon
Under "Options" --> "Camera settings", the following camera parameters can be set -->"Camera
settings", the camera parameters can be set:
-
Flash: activate or deactivate with keys M1 and M3
-
Trigger tone (select from 3 sounds or switch off with keys M1 and M3)
-
EV (select from the options available with the M1 and M3 keys)
-
Contrast (select between 3 levels with keys M1 and M3)
-
Anti-flicker (select between 60Hz or 50 HZ with keys M1 and M3)
-
Scene mode (select between Auto or Night with the M1 and M3 keys)
-
Timer (select from the options available with keys M1 and M3)
Under "Options" --> "Photos" you can also access the photos you have taken. --> "Photos"you
can also access the photos you have taken. Once inside the photo,
under "Options", we can access a larger number of options:
-
you can see the capture,
-
send it via Bluetooth,
-
use it as a wallpaper,
-
rename it,
-
remove or
-
see the details of the report.
If you go back to the menu above, other functions you will find under "Options" are:
-
Switch to video
-
Picture settings
oImage size
oImage quality
-
Effects:
oNormal
oGreyscale
o
Cuttlefish

17
o
Greenish
o
Blue
oInvert colours
-
Memory (to select where you want to store the photos)
-
Restore values
b.
Image viewer
Here in Multimedia --> Images you will find the images you have taken with your phone's camera.
With its "Options" menu you will be able to do the same as we saw in point 14a.:
-
See
-
Send
-
Use as
-
Rename
-
Delete
-
Memory
-
Image information
c.
Video recording
A built-in memory card is required.
With the camera activated, go to "Options" --> "Switch to video".
You can also access directly from "Menu" --> "Multimedia" --> "Record video".
To start recording a video, press the 8 key with the camera icon. .
Press Options in camcorder mode to access the options and change the video quality and anti-
flicker.
d.
Video player (micro SD memory card required)
You can play videos stored in the phone memory or on the memory card.
The files must be saved in Videos for the phone to recognise the files and add them tothe playlist.
Press Options to access the playback options:
-
Play,
-
Send,
-
Rename,
-
Delete,
-
Delete all,
-
Memory

18
c. Audio player
You can play audios stored in the phone memory or on the memory card.The files must be saved in My
Music (audio) for the phone to recognise the files and addthem to the playlist.
Press the memory and cursor keys to access the playback controls.
e. Recording audio
A built-in memory card is required.
It is under the "Multimedia" menu. You can record conversations, and you can start, pause and
stop the recording with the function keys. Under "Options" you can access the recordings you
have made.
f. FM radio
Plug a standard headset (3.5mm) into the phone's headphone jack and make sure it isproperly
inserted.
To listen to the radio, access the Multimedia/FM Radio menu:
-
M2 key - press this key to turn the radio on/off.
-
M1 / M3 key - press these keys to search for radio stations automatically.
-
Up/down navigation keys - press these keys to change the selected frequency
manually.
-
Side volume keys - press to increase/decrease volume.
From the options menu (Options) you can:
-
Record 30 stations
-
Manual station search
-
Automatic search
-
Adjustments
obackground playback
oloudspeaker
15.
SETTINGS
The following options are available in the "Settings" menu.
a.
Profiles
See point 9.
b.
Dual SIM configuration

19
For the configuration of the dual SIM operation mode.
c.
Telephone
Here you can configure:
-
Time and date,
-
Language,
-
Display(background, lock, date and time display) and
-
Aeroplane mode
-
Shortcuts
-
Vibration when pressed
d.
Web
Here you can configure manual or automatic selection of the mobile network.
e.
SOS
See point 12.
f.
Intelligent Helper
See point 13.
g.
Synchronisation control
See point 13.
h.
Speed dialling
See point 8.
i.
Security settings
Configure and modify security and privacy settings and codes that will allow you to:
-
Set SIM card PINs.
-
Lock phone: If the phone lock is enabled, it will ask for the security password
every time it is switched on. The default security password is1122.
-
Change phone lock password.
j.
Connectivity
Bluetooth management options such as:
-
Status: activate or deactivate with the upper left button
-
Visibility: activate or deactivate with top left button
-
My device: search for new device
Other manuals for Harmony
1
Table of contents
Other SPC Cell Phone manuals


