SpeakerCraft SoundStation User manual

SpeakerCraft
OWNER’S MANUAL
SoundStation
In-Wall Audio System
®

SoundStation Owner’s Manual Page 3
Page 2 SoundStation Owner’s Manual
RESQUE DE CHOC ELECTRIQUE/NE PAS OUVRIR
RISK OF ELECTRIC SHOCK
DO NOT OPEN
CAUTION: TO REDUCE THE RISK OF
ELECTRIC SHOCK, DO NOT REMOVE
COVER (OR BACK). NO USER SERVICE-
ABLE PARTS INSIDE; REFER SERVICING TO
QUALIFIED SERVICE TECHNICIANS.
AVIS
Have The Unit Serviced If:
• The power cord or the plug has been
damaged.
• Objects have fallen, or liquid has been
spilled onto the unit.
• The unit has been exposed to rain or
excessive moisture.
• The unit does not appear to operate
normally or exhibits a marked change
in performance.
• The unit has been dropped or the
encasement is damaged.
Do not use the unit near water, such as
bath tub, washbowl, sink, laundry tub,
swimming pool, etc.
Do not allow anything to rest on, roll
over, or pinch the power cord, or place
the power cord where it is subject to
traffic or abuse; this may result in a fire
hazard.
Do not use a cart or stand not recom-
mended by the manufacturer.
Do not try to roll cart with
small casters across thresh-
olds or deep pile carpets.
Quick stops, excessive force,
and uneven surfaces may
cause the unit and cart
combination to overturn.
Do not clean the unit except as described
in the owner’s manual.
Do not attempt to service the unit servic-
ing should be referred to qualified service
technicians.
Do not leave the unit on when unat-
tended; a malfunction may result in a fire
hazard.
NOTE: For added protection during a
lightning storm or whenever the unit
will be left unattended for a long period
of time, disconnect the power source.
1. Read Instructions - All the safety and
operating instructions should be read
before the appliance is operated.
2. Retain Instructions - The safety and
operating instructions should be
retained for future reference.
3. Heed Warnings - All warnings on the
appliance and in the operating
instructions should be adhered to.
4. Follow Instructions - All operating
and use instructions should be
followed.
Safety Instructions
Do not operate the unit from any power
source except as indicated on the stereo
or in the owner’s manual.
Do not install the unit near or over a
radiator, or other heat sources.
Do not mount the unit to a wall or
ceiling except as recommended by the
manufacturer.
Do not place the unit in a built-in enclo-
sure such as a bookcase or cabinet,
unless proper ventilation is provided.
Do not block the ventilation openings
of the unit by placing it on a bed, soft
rug, etc.
Do not allow objects to fall or liquids to
spill into the unit through the openings.
Important Safety Information
WARNING
To prevent fire or shock hazard, do not
expose this appliance to rain or moisture.
If this happens, make sure the power to
the electrical outlet is turned off before you
touch or unplug the unit.
This symbol is intended to
alert the user of the presence
of important operating and
maintenance (servicing)
instructions in the literature
accompanying the appliance.
Explanation of Symbols
This symbol is intended to
alert the user of the presence
of uninsulated “dangerous
voltage” within the product’s
encasement that may be of
sufficient magnitude to con-
stitute a risk of electric shock
to persons.
IMPORTANT SAFEGUARDS
INSTALLATION.............................................................................................................................................4-7
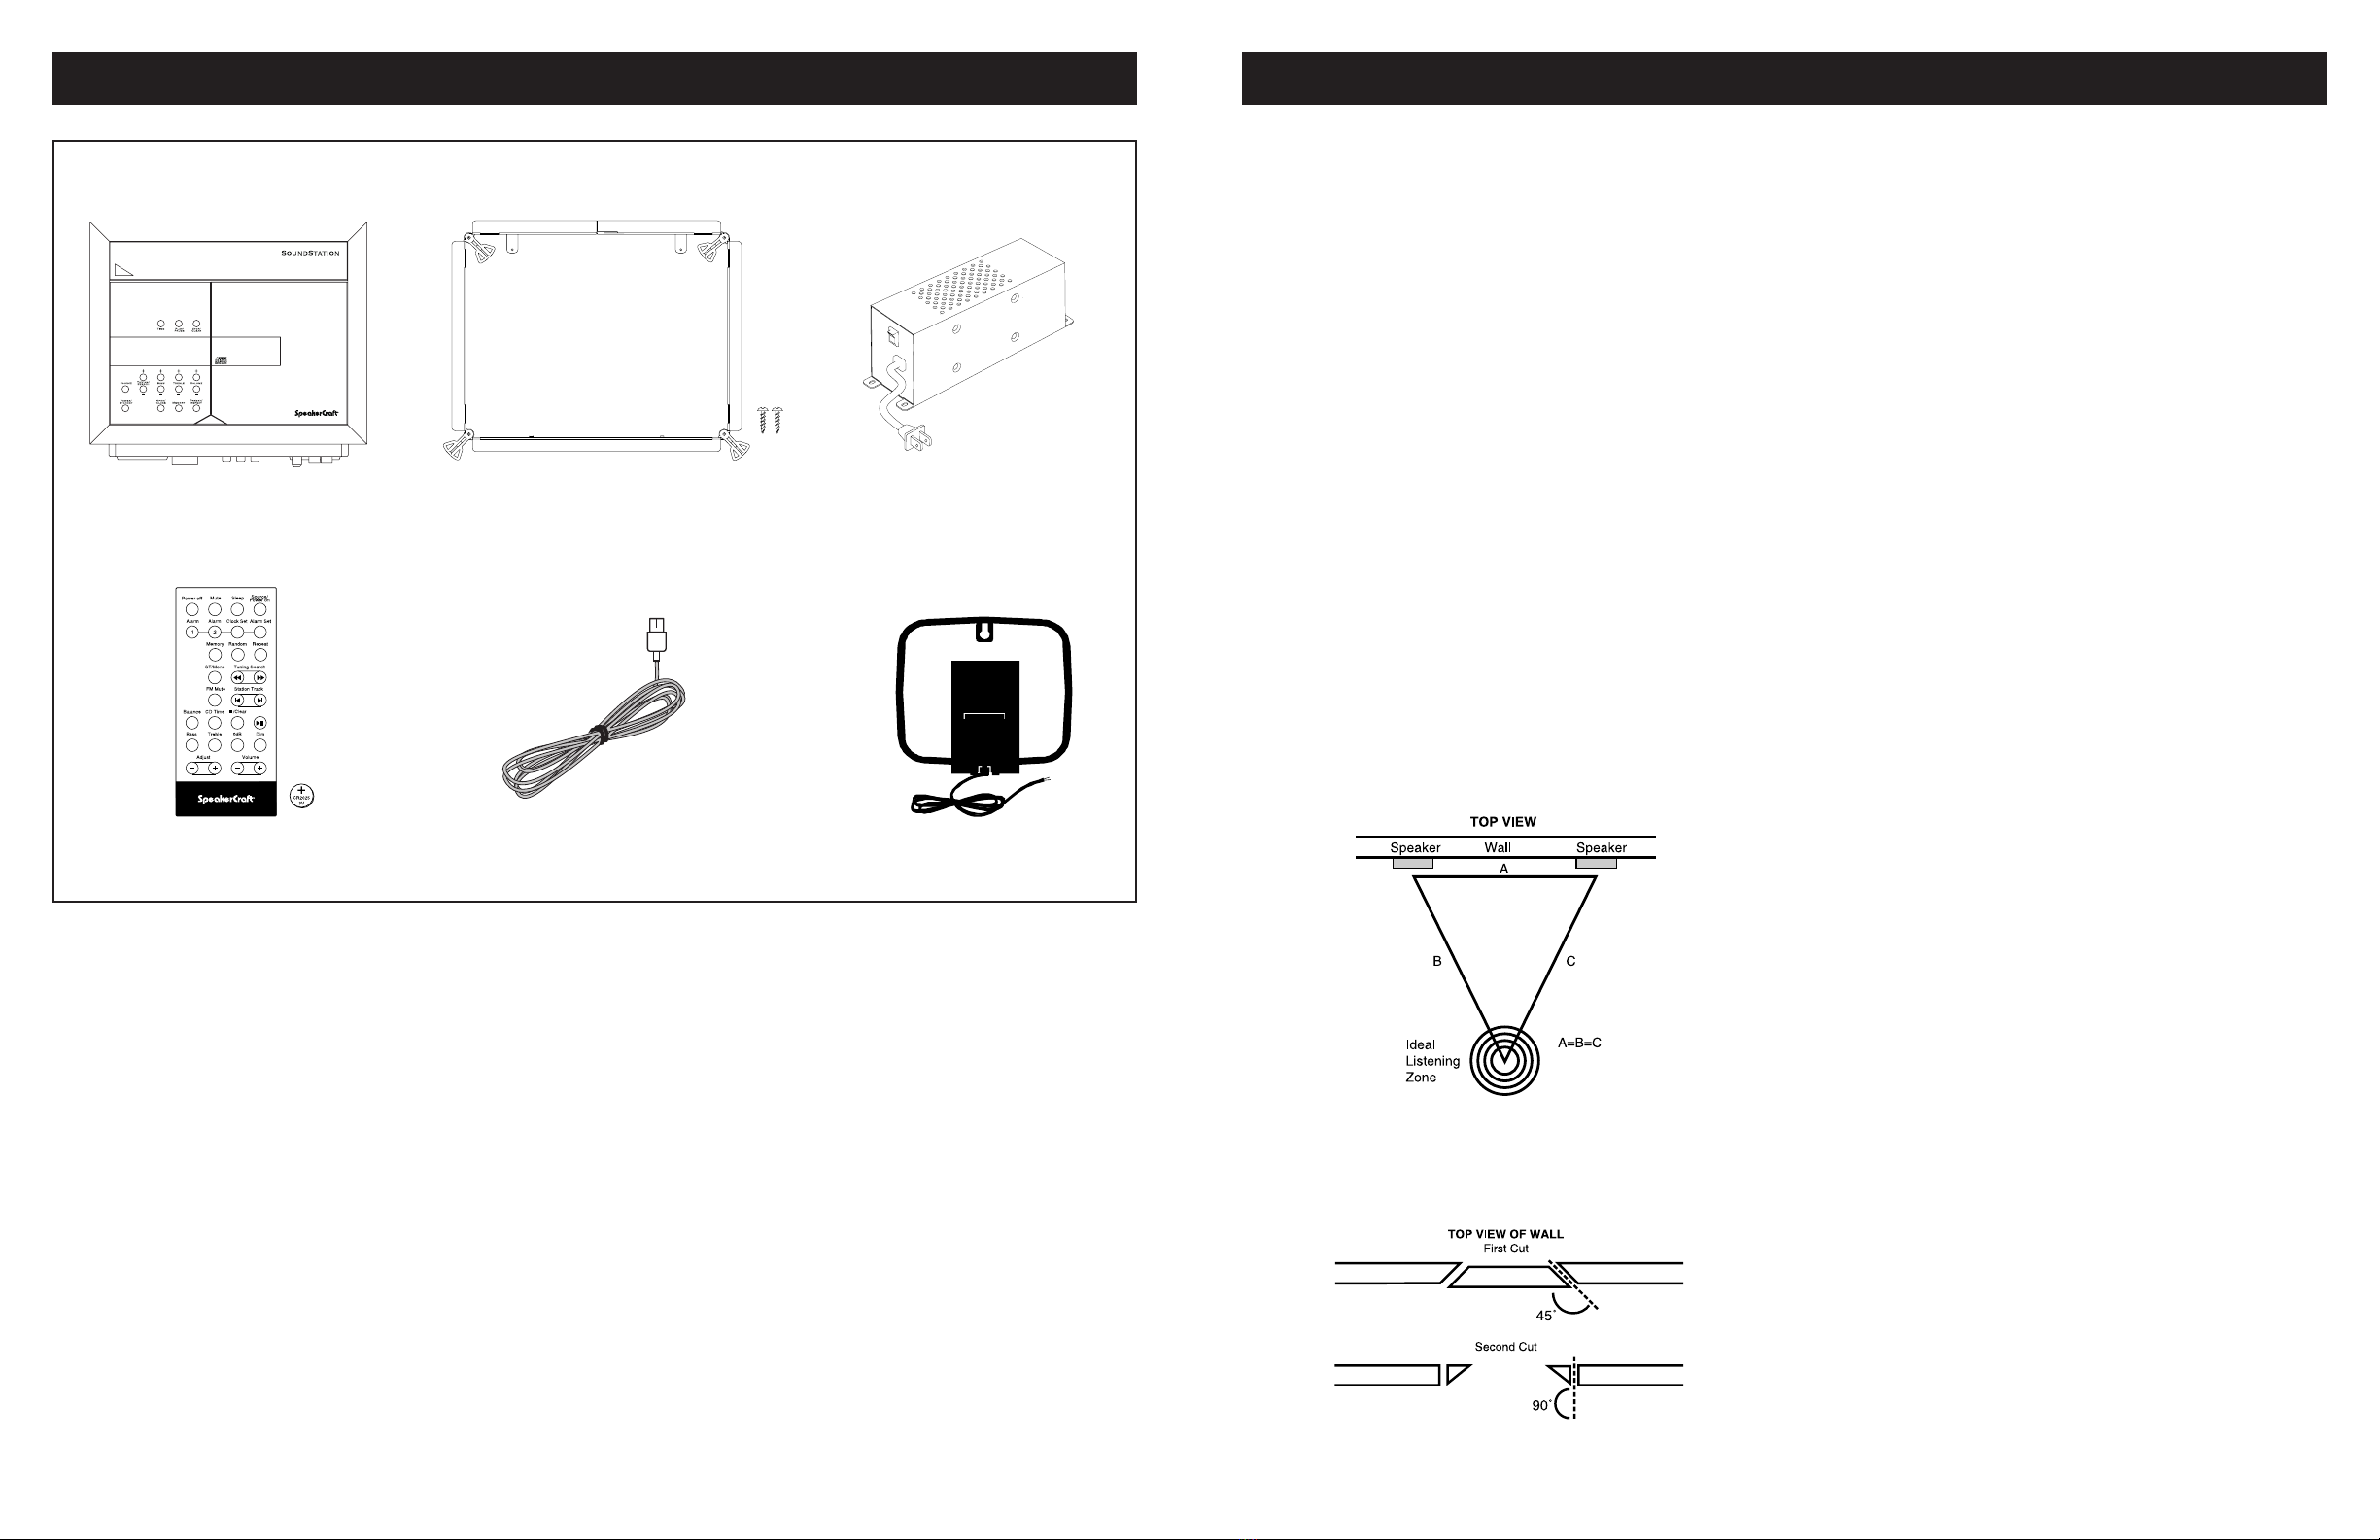
Package Contents & Optional Accessories .........................................................................................................................4
SoundStation Placement ...................................................................................................................................................5
Mounting Surface Preparation ..........................................................................................................................................5
Installing the Wall Mounting Bracket & SoundStation Unit.................................................................................................6
Connecting the SoundStation ...........................................................................................................................................7
Connecting the Power Supply ..........................................................................................................................................7
FUNCTIONAL OVERVIEW ..........................................................................................................................8-16
Front Panel.......................................................................................................................................................................8
Fluorescent Display...........................................................................................................................................................9
Remote Control .........................................................................................................................................................10-11
Clock Set ........................................................................................................................................................................12
Alarm Set........................................................................................................................................................................12
Sleep Timer.....................................................................................................................................................................13
Audio Adjustments .........................................................................................................................................................13
Loading CDs ..................................................................................................................................................................13
CD Normal Playback.......................................................................................................................................................14
CD Random Playback .....................................................................................................................................................14
CD Repeat Playback........................................................................................................................................................15
CD Memory Programming..............................................................................................................................................15
CD Memory Playback .....................................................................................................................................................15
Auto/Manual Tuning ......................................................................................................................................................16
Tuner Preset Memory......................................................................................................................................................16
GENERAL INFORMATION ........................................................................................................................17-20
Troubleshooting .............................................................................................................................................................17
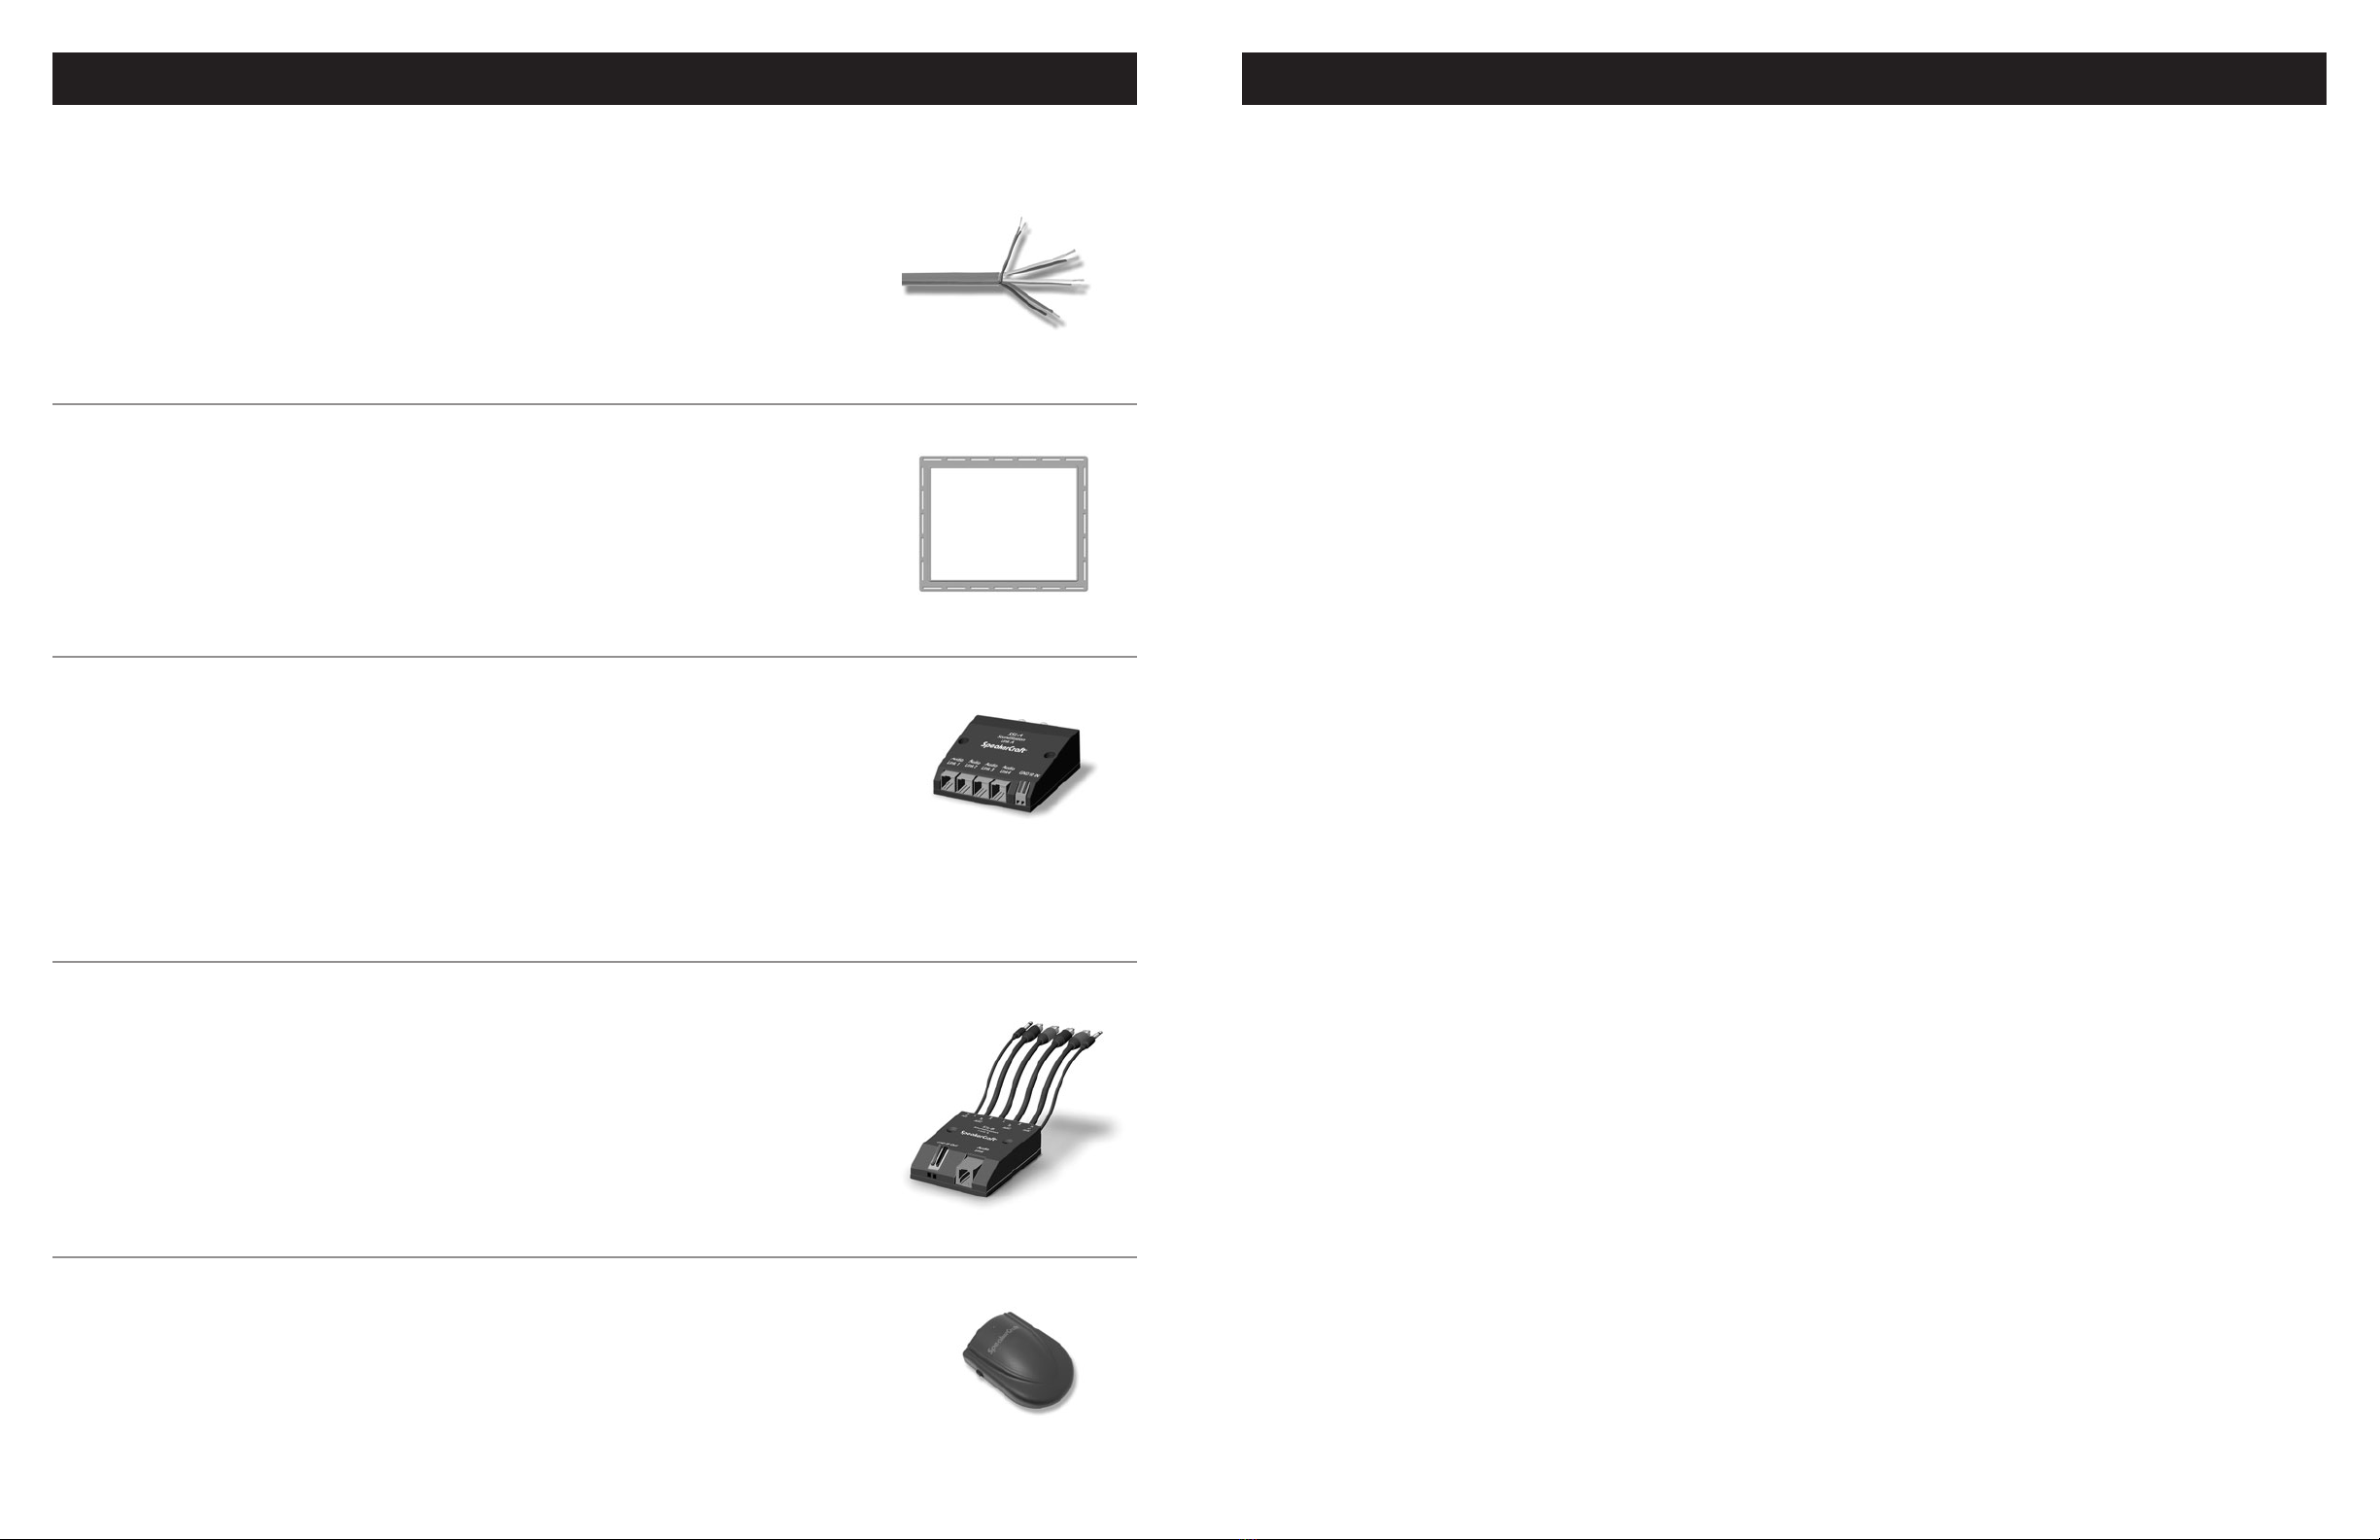
Optional Accessories.......................................................................................................................................................18
Specifications..................................................................................................................................................................19
Warranty ........................................................................................................................................................................20
TABLE OF CONTENTS

SoundStation Owner’s Manual Page 5
Page 4 SoundStation Owner’s Manual
Wall Mounting Bracket
with Mounting Screws (2)
Remote Control
with Remote Battery
FM Antenna AM Antenna
SoundStation Unit
SOUNDSTATION PLACEMENT
Before installing the SoundStation into the wall, you should
consider its placement carefully, taking into account the loca-
tion of electrical, plumbing and other fixtures. Contact your
dealer for assistance if you are not sure of the best location in
your particular room environment.
When positioning the SoundStation unit, bear in mind that
every receiver produces heat which must be able to dissipate
freely. For this reason, do not cover any vents and make sure
that there is sufficient ventilation around the unit.
DO NOT connect the SoundStation to the AC power supply
until all other connections have been made and the AC voltage
(indicated on the power supply) has been checked.
Always remove any CD before moving the SoundStation.
When installing in-wall speakers for use with the SoundStation,
ideal sound will be achieved when the tweeters are placed at
ear level or slightly higher and the usual listening area is no
closer to the wall than the distance between the speakers
themselves. (See Diagram 2)
When installing in-ceiling speakers for use with the
SoundStation, the speakers should be mounted to the left and
right of the usual listening area.
MOUNTING SURFACE PREPARATION
New Construction - Unfinished Walls
A New Construction Bracket, SpeakerCraft P/N CTL01000
(available from your dealer - see page 18), may be installed
prior to drywall application across studs (up to 24" on-center)
where the SoundStation will be located. Insulation material
should be removed prior to installing drywall. After the hole is
cut and the drywall is installed, the SoundStation can be easily
installed following the instructions under “Installing Wall
Mounting Bracket and SoundStation Unit” on page 6.
Finished Walls
Prior to the actual installation of the SoundStation, it will be
necessary to run cables to the speaker locations. Once the
cable has been properly installed, you are ready to begin
installation of the SoundStation. Following the simple steps list-
ed below will result in a professional looking installation:
1. Determine the best area to mount the SoundStation. This
area of the wall should be free of obstructions such as elec-
trical conduit, HVAC ducts, or water lines. This can best be
determined by noting the placement of fixtures and gaining
access to an attic or crawl space for further analysis of the
location of such obstacles.
2. Find the studs nearest the desired speaker mounting loca-
tion. We highly recommend using a good stud-finder tool
for this procedure. If you are lining up the SoundStation to
some other object or molding in the room, make sure you
consider the size of the faceplate which extends beyond the
mounting hole on all four sides.
3. Mark the hole. A template for outlining the hole is provided
in the box. Position the template in the desired position and
pencil an outline on the wall.
4. Cutting the hole. CAUTION: This is the most important
part of the entire installation. Because of tight tolerances,
there is little room for error. If you are not certain whether
any obstructions exist behind the desired mounting area,
you should start by cutting a small hole in the center of
your penciled mounting hole with a drywall saw. Cut at a
45º angle towards the inside of the hole (See Diagram 3).
Cutting the small hole at this angle will make drywall repair
much easier as the piece cut out can be installed neatly
back into the hole. Once you have determined there aren’t
any obstructions in your desired mounting location, start
cutting the finished hole at a 90º angle to the wall surface.
This Package Contains
• SoundStation Unit
•
Remote Control (credit card type)
• Remote Battery
• Wall Mounting Bracket
• Mounting Screws (2)
• Power Supply
• FM Antenna
• AM Antenna
Optional Accessories (See page 18 for more info)
• SoundStation New Construction Bracket (SSNC) -
Aids in new construction applications by providing a template for the dry-
wall to be cut around, creating the perfect mounting hole for the SoundStation. (SpeakerCraft P/N CTL01000)
• SoundStation Link System (SSL-A and SSL-B) - Makes connecting auxiliary audio from remote sources easier.
(SpeakerCraft
P/Ns CTL01010 and CTL01020)
• SoundStation FM Modulator (SFM-1.0) - Allows for quick & wireless connection to other sources, such as MP3 players.
(SpeakerCraft P/N CTL01100)
You Will Need
• SoundStation Cable (SSC)
For Power and IR Wiring
14/3, 16/3, 22/2
(SpeakerCraft P/N CTL01030)
• Speaker Wire For Power Connections
3 conductor 14 gauge
3 conductor 16 gauge
You May Need
• External FM Antenna
• External “Long Wire” AM Antenna
•
RCA Cable for Aux Inputs
Power Supply
Diagram 3:
Wall Cut Out
Diagram 2:
Ideal Placement
Diagram 1:
System Components
OR

Page 6 SoundStation Owner’s Manual SoundStation Owner’s Manual Page 7
CONNECTING THE SOUNDSTATION
(See Diagram 7)
1. Power
Connects the Power Cable to the SoundStation.
(See Chart A)
2. Left/Right Speakers (8Ω)
Connects the left and right front speakers. Be sure to
observe proper polarity, (+) to (+) and (-) to (-).
3. Remote Out
Connects IR out control signal to optional SSL-B accessory,
for control of optional Aux 1 & Aux 2 components.
4. ±15V DC
Powers the optional SSL-B accessory.
5. FM Antenna
For connecting the supplied 75ΩFM antenna or external
FM antenna.
6. AM Antenna
For connecting the supplied AM antenna.
7. Audio Out (L/R)
For connecting to a separate audio power amplifier.
NOTE: This is a fixed output.
8. Audio In (Aux1)
For connecting an optional audio component.
9. Audio In (Aux2)
For connecting an optional audio component.
CONNECTING THE POWER SUPPLY
1. Power Cable (See Diagram 8)
Connects the Power Cable to the Power Supply.
(See Chart A)
2. Power Switch (See Diagram 9)
Turns SoundStation system power supply on and off.
Diagram 5:
Installation - Exploded View
Diagram 6:
Installation - Side View
Diagram 7:
Bottom of SoundStation
Diagram 8:
Back of Power Supply
Diagram 9:
Front of Power Supply
Chart A
1. Rotate the Wall Mounting Bracket’s clamping dogs so that
they are inside the frame. (See Diagram 4)
2.Slide the Wall Mounting Bracket into the rough opening of
the drywall.
3. Rotate the dogs to the outside of the frame by hand, and
then slowly tighten the dog screws while holding them in
place by hand. If the wall thickness exceeds dog travel, turn
dogs upside down, reinstall screws, and proceed with install.
NOTE: Do not overtighten screws or frame will distort.
4. Make sure Wall Mounting Bracket is level and square.
5. Remove screw access panel at top of SoundStation.
6. CAUTION: Before connecting any wiring, SpeakerCraft
highly recommends doing a “practice install” to make sure
the SoundStation locates properly into the mounting frame
and that the screw holes line up. (See Diagram 5)
7. Holding the SoundStation at a slight angle, slide it into
opening, engaging the locking tabs on the bottom of unit
with the cut-outs on bottom of the Wall Mounting Bracket.
(See Diagram 6)
8. Push SoundStation flat against wall and check mounting
holes to see if they line up. If not, adjust frame squareness
and retighten frame.
9. If everything lines up properly, connect wires to bottom of
SoundStation unit and reinsert into wall. (See “Connecting
The SoundStation” on Page 7.)
10. Secure the SoundStation using the two mounting screws
provided. Because they are self-tapping, there will be an
initial resistance as the screw penetrates the metal bracket.
Be sure not to overtighten the screws. CAUTION: Do not
place screws into the larger holes. These are for snap-on
access panel only.
11. Install snap-on access panel.
INSTALLING THE WALL MOUNTING BRACKET AND SOUNDSTATION UNIT
Diagram 4:
Wall Mounting Bracket Dogs
Legend on
SoundStation &
Power Supply
+28VDC
SoundStation
Cable Color
Red
Gauge of Stranded Wire
To Use If Not Using
SoundStation Cable
14
#
1
A GND Blue 142
-28VDC Black 143
+12VDC White 164
D GND Green 165
POWER DET Yellow 166
Reserved for IR
Remote Out GND Black 22
—
Reserved for IR
Remote Out Signal Green 22
—

Page 8 SoundStation Owner’s Manual SoundStation Owner’s Manual Page 9
FRONT PANEL (See Diagram 10)
1. Power/Standby
Press this button to switch the main power on or to activate
Standby mode.
NOTE: While the system is in Standby mode, you can also
press one of the following buttons to switch on the system:
Source, Sleep, Play/Pause and Open/Close.
2. Source
Press this button repeatedly to cycle through the input
sources of FM, AM, AUX1, or AUX2.
3. Tuning/Search + / -
• In Tuner mode, press less than 1⁄2second for Manual Tuning.
• In Tuner mode, press longer than 1⁄2second for Auto Tuning.
• In CD mode, press less than 1⁄2 second will move to the
next or previous track.
• In CD mode, press longer than 1⁄2second to fast forward
or fast reverse the same track.
• In Clock Set mode and Alarm Set mode, press to adjust
the clock time. For details, see page 16.
4. Bass
• Press (+) to increase the level of Bass.
• Press (-) to decrease the level of Bass.
5. Treble
• Press (+) to increase the level of Treble.
• Press (-) to decrease the level of Treble.
6. Open/Close
Press to open or close CD door.
7. Memory
• In Tuner mode, press to store AM/FM stations in the
memory locations. For details, see page 16.
• In CD mode, press to store a CD track in the memory
locations. For details, see pages 14-15.
8. Volume
• Press (+) to raise the system
’
s volume.
• Press (-) to lower the system
’
s volume.
9. Preset/Repeat
• In Tuner mode, press this button to select an AM or FM
preset station. For details, see page 16.
• In CD mode, press this button to select Repeat Play
function. For details, see page 15.
10. Time
Press to display the secondary clock. For details, see page 12.
11. Play/Pause
Press to begin CD playback; Press again to pause CD
playback. For details, see pages 14-15.
12. Stop/Clear
• Press to stop CD playback.
•
When CD stops, press longer than 1⁄2second to clear CD
memory. For details, see pages 14-15.
Diagram 11:
Fluorescent Display
FLUORESCENT DISPLAY (See Diagram 11)
1. Sleep
Illuminates if you select the Sleep Timer function. For details,
see page 13.
2. Repeat/Repeat 1
• REPEAT illuminates if the Repeat mode is selected (Repeats
all tracks on all discs).
• REPEAT 1 illuminates if the Repeat 1 Track mode is select-
ed (Repeats 1 track). For details, see page 15.
3. Random
Illuminates if you select the Random Play function in CD
mode. For details, see page 14.
4. Memory
Illuminates if any CD track, or tuner station has been stored
in memory.
5. Stereo/Mono
Illuminates if you select either the Stereo or Mono function
in FM Tuner mode.
6.
Illuminates during CD playback. For details, see page 14.
7.
Illuminates when CD playback has been paused.
8.
Illuminates if you select the Time function.
9. Alarm 1
Press any button to turn alarm off, or the alarm will go off
automatically after 60 minutes. For details, see page 12.
10. Alarm 2
Press any button to turn alarm off, or the alarm will go off
automatically after 60 minutes. For details, see page 12.
11. FM/AM
Illuminates when band is selected when listening to a radio
station.
Diagram 10:
Front Panel
After all connections are complete, turn the power supply switch on. Note: This may be left in the “on” position. (See Diagram 9)
The SoundStation can be turned on or off from the front panel.

SoundStation Owner’s Manual Page 11
Page 10 SoundStation Owner’s Manual
REMOTE CONTROL (See Diagram 12)
1. Power Off
Press to switch the system power Off.
2. Mute
Press to lower the volume completely.
“
MUTE ON
”
shows in
the display. When you press the mute button again, the vol-
ume level will return to its previous setting.
NOTE: The Mute function can also be turned off by pressing
either of the volume buttons or most other buttons on the
remote control.
3. Sleep
Press to select Sleep mode and set Sleep Timer from 10 to
90 minutes. For details, see page 13.
4. Adjust
Press (+) or (-) to adjust the Balance, Treble or Bass level. For
details, see page 13.
5. Source/Power On
Press this button to turn system power on or press repeatedly
to cycle through the input sources of FM, AM, AUX1, or AUX2.
6. Alarm 1
Press to select Alarm 1 wake up function. For details, see
page 12.
7. Alarm 2
Press to select Alarm 2 wake up function. For details, see
page 12.
8. Clock Set
Press to select Clock Set mode. For details, see page 12.
9. Alarm Set
Press to select Alarm Set mode. For detail, see page 12.
10. CD Time
In CD mode, press to show Total Track and Total Time.
11. Memory
• In Tuner mode, press to store AM/FM stations in the
memory locations. For detail, see page 16.
• In CD mode, press to store a CD track in the memory
locations. For details, see page 15.
12. Random
Press to select Random Play function in CD mode. For
details, see page 14.
13. Repeat
Press to select Repeat Play function in CD mode.
For
details, see page 15.
Diagram 12:
Remote Control
Diagram 13:
Remote Control
REMOTE CONTROL CONTINUED (See Diagram 13)
14. Bass
Press to enter Bass Adjustment mode, then press Adjust (+)
or (-) to increase or decrease the level of bass. For details,
see page 13.
15. Treble
Press to enter Treble Adjustment mode, then press Adjust
(+) or (-) to increase or decrease the level treble. For
details, see page 13.
16. Tuning/Search
• In Tuner mode, press less than 1⁄2second for Manual tuning.
• In Tuner mode, press longer than 1⁄2second for Auto tuning.
• In CD mode, press longer than 1⁄2second to fast forward
or fast reverse the same track.
• In Clock Set mode and alarm set mode, press to adjust
the clock time. For details, see pages 12, 14, and 16.
17. ST/Mono
In FM Tuner mode, press to select either Stereo or Mono
sound. When mono indication is on, it is Mono mode.
When the mono indication is off, it is Stereo mode.
18. FM Mute
In FM Tuner mode, press to select FM Mute function. For
details, see page 16.
19. Station/Track
• In Tuner mode, press to select required preset station.
• In CD mode, press to select the required track.
20. Balance
Press to enter Balance Adjustment mode, then press
Adjust (-) or (+) to adjust the balance toward the left or
right channels. For details, see page 13.
21. Dim
Press to adjust SoundStation Display brightness.
22. Stop/Clear
Press to stop CD playback or to clear CD memory. For
details, see pages 14-15.
23. 0dB
Press to reset Balance, Bass, and Treble controls to their
default levels.
24. Volume
• Press (+) to raise the system
’
s volume.
• Press (-) to lower the system
’
s volume.
25. Play/Pause
Press to begin CD playback; Press again to pause CD play-
back. For details, see pages 14-15.
The Remote Control is shipped with the battery removed. Push the tab in to slide open the panel on the lower rear of the remote
and insert the battery as indicated.

SLEEP TIMER
The SoundStation can automatically turn itself off after a speci-
fied amount of time, ranging from 90 to 10 minutes.
1. While the SoundStation is on, press the Sleep button until
“
Sleep
”
flashes in the display.
2. Press the Sleep button repeatedly to set the Sleep Timer
from 90 to 10 minutes. The
“
Sleep
”
indicator and the time
you set will illuminate.
(See Diagram 15)
3. To cancel the Sleep Timer, simply press the Sleep button
repeatedly until the
“
00
“
indicator appears. The
“
Sleep
“
indica-
tor will start flashing.
4. Within 5 seconds, the
“
Sleep
“
indicator will disappear and
the Sleep Timer is now cancelled.
NOTE: During the last 9 minutes of the Sleep Timer, the vol-
ume will gradually decrease to the lowest level. You can press
any button to stop the decreasing of the volume.
AUDIO ADJUSTMENTS
The Adjust (-) or (+) buttons on the remote control are used
in conjunction with Balance, Treble and Bass to increment or
decrement their level.
1. Press the Balance button on the remote control. The
“
[BAL]
”
indicator will appear in the display. Press the Adjust (-) or (+)
button to adjust balance toward the left or right speakers.
2. Press the Bass button on the remote control. The
“
[BAS]
”
indicator will appear in the display. Press Adjust (-) or (+)
button to decrease or increase the level of bass. (Or press
Bass (-) or (+) on the front panel.)
3. Press the Treble button on the remote control. The
“
[TRE]
”
indicator will appear in the display. Press Adjust (-) or (+)
button to decrease or increase the level of treble. (Or press
Treble (-) or (+) on the front panel.)
LOADING CDs
1. Press the Power button to turn the SoundStation on.
2. Select CD function by pressing Source button repeatedly on
front panel or on the remote control.
3. Press Open/Close button to open CD door, then insert or
replace one disc.
4. Press Open/Close button to close CD door. The system will
automatically read the CD status which includes total play
tracks and play time of the CD. (See Diagram 16)
Page 12 SoundStation Owner’s Manual SoundStation Owner’s Manual Page 13
CLOCK SET
The Clock will display when the SoundStation is turned off.
1. In Power On or Standby mode, press the Clock Set button
on the remote control, the clock will flash in the display,
indicating that you are in Clock Adjustment Mode. (See
Diagram 14)
2. Press the Tuning/Search button until the correct
minute appears.
3. Press the Tuning/Search button until the correct hour
appears.
4. After a few seconds, the display will switch back to its
previous information and the clock will be set.
NOTE: The clock can be switched from 12-hour mode to 24-
hour mode. When in Clock Adjustment Mode, press and hold
the Clock Set button until the desired clock hour mode
appears.
To Set Secondary Clock (i.e. a 2nd Time Zone)
1. In Power On or Standby mode, press the Time button on
the front panel of the SoundStation. The indicator will
flash in the display. Press the Clock Set button on the
remote control to select Time Adjust mode.
2. Press the Tuning/Search button until the correct hour
appears.
3. After a few seconds, the display will switch back to its primary
clock and the secondary clock will be set.
4. Press the Time button at any time to view the secondary
clock.
ALARM SET
Your system can automatically turn itself on. You choose when
you want the system to turn on and when the
“
on
”
time
arrives, the system will turn on.
To turn on Alarm 1
1. Press Alarm 1 button or press Alarm Set button repeatedly
on remote control until the appears in the display to
wake to music or until the appears to wake to tone
alarm.
2. Alarm 1 always wakes up in Tuner mode.
To turn on Alarm 2
1. Press Alarm 2 button or press Alarm Set button repeatedly
on remote control until the appears in the display to
wake to music or until the appears to wake to tone
alarm.
2. Alarm 2 always wakes up in CD mode.
To set the Alarm Clock
1. Press the Tuning/Search button until the correct
minute appears.
2. Press the Tuning/Search button until the correct hour
appears.
3. Turn the SoundStation off to set the alarm.
To turn Alarm off
1. When alarm rings or plays, press the Power Off button on
the remote control or the Power/Standby button on the
SoundStation panel to reset alarm.
2. To disable alarm, press Alarm until or disappears
from display.
3. To enable alarm, press Alarm until or reappears in
display.
Diagram 14:
Clock Set
Diagram 15:
Sleep Timer
Diagram 16:
CD Status

Page 14 SoundStation Owner’s Manual SoundStation Owner’s Manual Page 15
CD REPEAT PLAYBACK
1. Press the Preset/Repeat button once on the front panel
before or during CD playback to select Repeat 1 Track
function. (Or press Repeat button on the Remote control.)
The
“
Repeat 1
”
indicator will flash on the display. (See
Diagram 20.)
2. Press the Preset/Repeat button twice on the front panel
before or during CD playback to select Repeat All Tracks
function. (Or press Repeat button on the Remote Control.)
The
“
Repeat
”
indicator will illuminate on the display. (See
Diagram 21.)
3. Press the Preset/Repeat button three times on the front
panel to deselect Repeat function. (Or press Repeat button
on the Remote Control.)
CD MEMORY PROGRAMMING
1. In CD stop mode, press the Tuning/Search buttons on the
front panel or Station/Track on the Remote Control
until the desired track number that you wish to program
appears in the display.
2. Press the Memory button on the front panel or on the
Remote Control to select the program number that appears
in the display.
3. The
“
Memory
”
indicators will flash. (See Diagram 22)
4. Select another desired track number and store the track into
the CD program by following steps 1 - 3.
5. Up to 20 CD tracks can be programmed. When the 20 tracks
have been stored,
“
MEM FULL
”
will appear in the display.
6. When the CD is stopped, press Stop/Clear longer than 1⁄2
second to erase the program.
CD MEMORY PLAYBACK
1. Once the CD tracks have been programmed, the
“
Memory
“
indicator
will illuminate.
2. Press Play/Pause button to start the CD program playback.
3. When the CD is stopped, press Stop/Clear button longer
than 1⁄2second to erase the CD program.
CD NORMAL PLAYBACK
1. Press the Play/Pause button to start CD playback; Press
again to pause CD playback.
• When a track of the inserted CD is playing, the correspond-
ing track number will keep flashing until the track ends.
(See Diagram 17)
2. Press the Stop/Clear button to stop CD playback.
3. Selecting another track during play back:
• Press and release the Tuning/Search buttons on the
front panel or the Station/Track buttons on the
remote control to select the desired track.
• The selected track number indication will start flashing on
the display.
• The current track stops and a moment later the newly
selected track begins to play.
• The current track will play again from the beginning if the
Tuning/Search buttons on the front panel or the
Station/Track buttons on the remote control are
pressed only once.
4. Searching for a passage during play:
• Press and hold the Tuning/Search buttons on the front
panel or on the Remote Control to search forwards or
backwards to the beginning or the end.
• The passage indications will be increasing or decreasing
rapidly.
• The searching speed is determined by how long a button
is pressed.
• The first two seconds fairly slowly, with sound then at the
maximum speed, with no sound.
5. When CD is stopped, press the Stop/Clear button longer
than 1⁄2second to clear CD memory.
CD RANDOM PLAYBACK
1. Press the Random button on the Remote Control before or
during CD playback to select the Random function.
2. The
“
Random
”
indicator illuminates and tracks are now
played in a random order. (See Diagram 18)
3. Each time you press the Tuning/Search (+) button on the
front panel less than 1⁄2second or the Station/Track but-
ton on the Remote Control less than 1⁄2second to select the
next random track, the message
“
Random
”
will appear and
flash for 1 second. (See Diagram 19)
4. Press and hold the Tuning/Search (+) or button more
than 1⁄2second to advance to the end of the track.
5. Press and hold the Tuning/Search (-) or button more
than 1⁄2second to return to the beginning of the track.
6. Press the Random button again if you wish to return to
normal play.
Diagram 17:
CD Normal Playback
Diagram 20:
CD Repeat 1 Playback
Diagram 21:
CD Repeat All Tracks Playback
Diagram 22:
Memory Indicator
Diagram 23:
CD Memory Playback
Diagram 18:
CD Random Playback
Diagram 19:
Selecting the Next Random Track

SoundStation Owner’s Manual Page 17
Page 16 SoundStation Owner’s Manual
AUTO/MANUAL TUNING
1. Press Power to turn the SoundStation on. Select the TUNER
function by pressing the Source button repeatedly on the
front panel or on the Remote Control.
2. For Manual Tuning, press the Tuning/Search buttons for
less than 1⁄2second to select the desired frequency.
3. For Auto Tuning, press and hold the Tuning/Search button
for more than 1⁄2second. The SoundStation will now search
until a station of sufficient strength is found. If the station is
not the desired one, simply press and hold the Tuning/
Search button for more than 1⁄2second again. Weak stations
are automatically skipped.
NOTE: When tuning, the sound will be muted to eliminate
interfering background noises. When a station is found, the
audio signal will come back on.
“
Stereo
”
will appear on the dis-
play when a stereo FM signal is received. With weak stereo FM
signals, you may hear static or background noise. These noises
can be suppressed by switching to Mono. Simply press the
ST/MONO button,
“
MONO
”
will appear in the display.
TROUBLESHOOTING
Please make these simple checks before calling service. These tips can save you time and money.
NO POWER • Make sure the power cord is fully inserted into an AC outlet.
•
Check to be sure outlet is not controlled by a wall switch.
• Unplug the power cord, wait 1 minute, then reinsert the plug and push the Power button.
• Check all power wiring to the unit.
NO VOLUME • Check the VOLUME on the unit.
• Make sure the correct source has been selected ( for instance,
“
CD
”
should be selected
when playing a CD ).
• Make sure the speakers are properly connected.
• Make sure the speaker wires are not shorted together.
REMOTE CONTROL • Check and if necessary, replace batteries.
DOESN
’
T WORK • Make sure the remote is pointed head-first at the system.
• Make sure the system is plugged into an operating wall outlet.
• The remote may be too far away from system.
CAN
’
T TUNE • Repeat channel selection.
RADIO STATIONS • Make sure the antennas are properly connected.
• Rotate the AM loop antenna for best reception.
• Use an outdoor antenna or cable for best FM reception.
NOTE: Electrostatic discharge can cause unexpected problems. In that event, you should reset the unit by disconnecting from
the household wall outlet for 1 minute and then reinsert the plug.
WARNING: IF YOU ARE UNABLE TO REMEDY A PROBLEM BY FOLLOWING THESE HINTS, CONSULT YOUR DEALER OR AN
AUTHORIZED SERVICE CENTER. UNDER NO CIRCUMSTANCES SHOULD YOU TRY TO REPAIR THE SYSTEM YOURSELF, AS THIS
WILL INVALIDATE YOUR WARRANTY.
TUNER PRESET MEMORY
Storing preset stations
You can store up to 24 stations in the Tuner’s memory.
1. Select FM or AM band with the Source button on the
Remote Control or front panel.
2. Press the Tuning/Search buttons to select the frequency
you wish to memorize.
3. Press the Memory button,
“
Memory
”
will flash in the dis-
play. Press Memory button repeatedly, preset positions will
be displayed one by one (P--1, P--2, P--3, ... etc.) Once the
desired location preset is reached, release Memory button
and wait four seconds,
“
Memory
”
will stop flashing and the
station frequency has been successfully memorized in the
desired location.
4. To set another preset station, follow steps 1 - 3.
Selecting preset stations
1. Select the band FM or AM with the Source button on the
Remote Control or front panel.
2. Press the Station/Track button on the Remote Control or
Preset/Repeat button on the front panel until the required
preset memory number appears.

SoundStation Owner’s Manual Page 19
Page 18 SoundStation Owner’s Manual
OPTIONAL ACCESSORIES
SSL-A
SoundStation Link System, Unit A
Order Stock # CTL01010
• Connects up to two audio sources, i.e. CD player and MP3 player, to the SoundStation
• Includes IR output jack
• Connects up to four SoundStation units per system
• Converts audio signals so that they can be carried over long distances without a loss in quality
SSL-B
SoundStation Link System, Unit B
Order Stock # CTL01020
• Reconverts the signal into conventional audio signals so they can be
played on the SoundStation
• Plugs into the audio inputs of the SoundStation
• Allows access of source components connected to SSL-A
• One SSL-B unit per SoundStation required
SSC
SoundStation Cable
Order Stock # CTL01030
•500' in length
• Makes power hook up to the SoundStation quick and easy!
SFM-1.0
SoundStation FM Modulator
Order Stock # CTL01100
• Allows for quick and wireless connection of other sources, such as MP3 Players,
Video Games, DVD Players
SSNC
SoundStation New Construction Bracket
Order Stock # CTL01000
•Aids in new construction applications by providing a template for the drywall
to be cut around, creating the perfect mounting hole for the SoundStation.
• Cut-out Dimensions: 81⁄16" x 103⁄8"
SPECIFICATIONS
Audio Section
Power Output/Channel (RMS, both channels driven into 8Ω)....................................................... 35 Watts @ 1 kHz
THD (at rated power) ..................................................................................................................... < 0.3 % @ 1 kHz
Input Impedance (Aux1 & 2) .......................................................................................................... > 22 K Ω
Input Sensitivity (Aux1 & 2, for rated power) ................................................................................. 200 mV
Frequency Response (@ 1 Watt) ..................................................................................................... 30 Hz - 20 kHz ± 2 dB
FM Section
Tuning Range ................................................................................................................................. 87.5 - 108.0 MHz
Sensitivity (50 dB quieting) ............................................................................................................. 22 dBf Mono, 48 dBf Stereo
S/N Ratio (@ 65 dBf)....................................................................................................................... 70 dB Mono, 60 dB Stereo
Frequency Response (Mono or Stereo)...........................................................................................40 Hz - 12 kHz ± 3 dB
Separation (@ 1 kHz) ...................................................................................................................... > 30 dB
AM Section
Tuning Range ................................................................................................................................. 520 - 1710 kHz
Sensitivity (loop antenna) ............................................................................................................... 750 uV / m
S/N Ratio (10 mV/m Input)............................................................................................................. 40 dB
CD Section
Frequency Response....................................................................................................................... 20 Hz - 20 kHz ± 2 dB
THD ................................................................................................................................................ < 0.1 %
S/N Ratio......................................................................................................................................... > 85 dB
Channel Separation ........................................................................................................................ > 40 dB
In our attempt to constantly improve our products, features and specifications are subject to change without notice.

Page 20 SoundStation Owner’s Manual
SpeakerCraft
1650 Seventh Street, Riverside CA 92507-4492
(800) 448-0976 Fax (909) 787-8747
www.speakercraft.com LIT03000
LIMITED 2-YEAR WARRANTY
SpeakerCraft Inc. warrants to the original retail purchaser only that this SpeakerCraft product will be free from defects in materials and workman-
ship for a period of two years, provided the product was purchased from a SpeakerCraft Authorized Dealer.
Defective products must be shipped, together with proof of purchase, prepaid insured to the SpeakerCraft Authorized Dealer from whom they
were purchased, or to the SpeakerCraft factory at the address listed on this installation instruction manual. Freight collect shipments will be
refused. It is preferable to ship this product in the original shipping container to lessen the chance of transit damage. In any case, the risk or loss
or damage in transit is to be borne by the purchaser. If, upon examination at the Factory or SpeakerCraft Authorized Dealer, it is determined that
the unit was defective in materials or workmanship at any time during this warranty period, SpeakerCraft or the SpeakerCraft Authorized Dealer
will, at its option, repair or replace this product at no additional charge, except as set forth below. If this model is no longer available and cannot
be repaired effectively, SpeakerCraft, at its sole option, may replace the unit with a current model of equal or greater value. In some cases where
a new model is substituted, a modification to the mounting surface may be required. If mounting surface modification is required, SpeakerCraft
assumes no responsibility or liability for such modification. All replaced parts and product become the property of SpeakerCraft Inc. Products
replaced or repaired under this Warranty will be returned to the original retail purchaser, within a reasonable time, freight prepaid.
This Warranty does not include service or parts to repair damage caused by accident, disaster, misuse, abuse, negligence, inadequate packing
or shipping procedures, commercial use, voltage inputs in excess of the rated maximum of the unit, or service, repair or modification of the
product which has not been authorized or approved by SpeakerCraft. This Warranty also excludes normal cosmetic deterioration caused by envi-
ronmental conditions. This Warranty will be void if the Serial Number on the product has been removed, tampered with or defaced.
This Warranty is in lieu of all other expressed warranties. If the product is defective in materials or workmanship as warranted above, the pur-
chaser’s sole remedy shall be repair or replacement as provided above. In no event will SpeakerCraft be liable for any incidental or consequential
damages arising out of the use or inability to use the product, even if SpeakerCraft Inc. or a SpeakerCraft Inc. Authorized Dealer has been
advised of the possibility of such damages, or for any claim by any other party. Some states do not allow the exclusion or limitation of conse-
quential damages, so the above limitation and exclusion may not apply.
All implied warranties on the product are limited to the duration of this expressed Warranty. Some states do not allow limitation on the length of
an implied warranty. If the original retail purchaser resides in such a state, this limitation does not apply.
Should you have any questions regarding this, or any other SpeakerCraft product, please call our toll-free service hotline at
1-800-448-0976. We are available to assist you every weekday, except holidays, between the hours of 7:00 a.m. and 5:00 p.m. PST.
SpeakerCraft offers a variety of accessories to make your installation of this and other SpeakerCraft products easy, economical, and
professional. Contact your authorized SpeakerCraft Dealer for more information.
®
Table of contents
Other SpeakerCraft Stereo System manuals