manuals.online logo
Brands
  1. Home
  2. •
  3. Brands
  4. •
  5. Speco
  6. •
  7. Speakers
  8. •
  9. Speco SPCBC6 User manual

Speco SPCBC6 User manual

Where To Place Your In-Ceiling Speakers
Placement can make all the difference in how your speakers sound, and how easy they will be to
install. Carefully consider where your speakers should be positioned. For optimum performance,
speakers should be mounted to the left and right of the main listening area and a minimum of 8 to
10 feet apart (See Fig. 2). Avoid mounting speakers in stud cavities containing electrical wiring,
heating ducts, water pipes, etc. Make sure the ceiling materials are sturdy enough to support the
weight of the speakers.
Adjustable Tweeters (Fig. 3)
The tweeter in your Speco speaker may be adjusted, allowing you to tailor the speaker to better
fit the listening area. The overall smoothest response is achieved with the tweeter facing straight
out; however, you may find the sound more pleasing by aiming tweeters toward a particular listen-
ing area. To adjust the tweeter, grasp the outside of the tweeter plate and gently pivot it toward the
listening area.
Speaker Installation In Existing Construction (See Fig. 4)
Once you have selected the location for your speakers, you are ready to install them.
You will need the following:
• Stud Finder • Drill & Drill Bits • Wire Cutter/Strippers•Speaker Wire
•Pencil • Phillips Screwdriver • Utility Knife or Drywall Saw • Masking Tape
Speco recommends the use of 16-gauge wire minimum. For wire options, consult your retailer or
custom audio contractor.
1. Speco Speakers are designed to be installed in the ceiling or wall area between studs. Using a stud
finder, make sure you are between two studs. Tape the supplied template to the wall and lightly trace
around the inside with a pencil.
2. Cut the hole using your drywall saw. You may want to start with a small hole in the center of the
outline. This will allow you to check for any obstructions that may exist behind the desired location.
CAUTION: Be certain electrical wiring, water pipes or heating ducts do not interfere in the planned
installation areas prior to drilling or cutting the wall.
3. Run speaker wire from your amplifier or speaker switching device to the speaker location.
4. Carefully remove the grille and inner grille backing.
(Note: The open cell foam
inner grille backing is
designed to hide speaker
components from view
and may be removed if
desired.) If you like the
standard white finish of
your Speco speakers, skip
to step 5, but if you want
your speakers to blend in
with a colored wall or
ceiling, now is the time
to paint your speaker’s
Congratulations on choosing Speco
Architectural Loudspeakers. Like all
Speco products, great care has been taken
in their design. Their combination of
advanced engineering and state-of-the-art
materials will provide you with years of
listening pleasure, while blending
smoothly into your home’s decor. Before
you get started, it is a good idea to identify
all the parts and hardware (See Fig. 1). Speaker with self-contained
mounting clamps
Metal grille with foam
inner grille cover
FIG. 2
Speco ceiling speakers can be used as rear
surround channels by mounting them (1)
on each side of, (2) just behind, or (3) in
back of the viewing position.
1
1
2
2
3
3
FIG. 3
Black
grille
adhesive
(Continued on reverse)
Model SPCBC6
61/2˝Two-Way In-Ceiling Speaker Systems
Cutout
template
Painting mask
Pivoting
tweeter
Grille
removal
tool
FIG. 1
FIG. 4
outer frame and perforated grille.
(Continued from front)
(Remove the foam inner grille backing and put it
aside in a clean and dust free area for later rein-
stallation if desired.) The speaker’s outer surface
will accept ordinary latex wall paint or aerosol
spray paint. Because the speaker baffle surface
behind the grille should remain unpainted, you will
need to cover this area with the supplied cardboard
paint mask. Cover the speaker’s interior black sur-
face, woofer and tweeter. Paint the outer speaker
frame and grille separately. (Grille painting hint:
Use a paint roller that is nearly out of paint to first
paint the inside of the grille, then the outside. This
will avoid paint filling the grille perforations.)
5. Attach the wire to the input terminals on the
rear of the speaker. Remember to maintain prop-
er polarity with the amplifier by attaching the
positive (+) lead to the red terminal and the neg-
ative (-) lead to the black terminal.
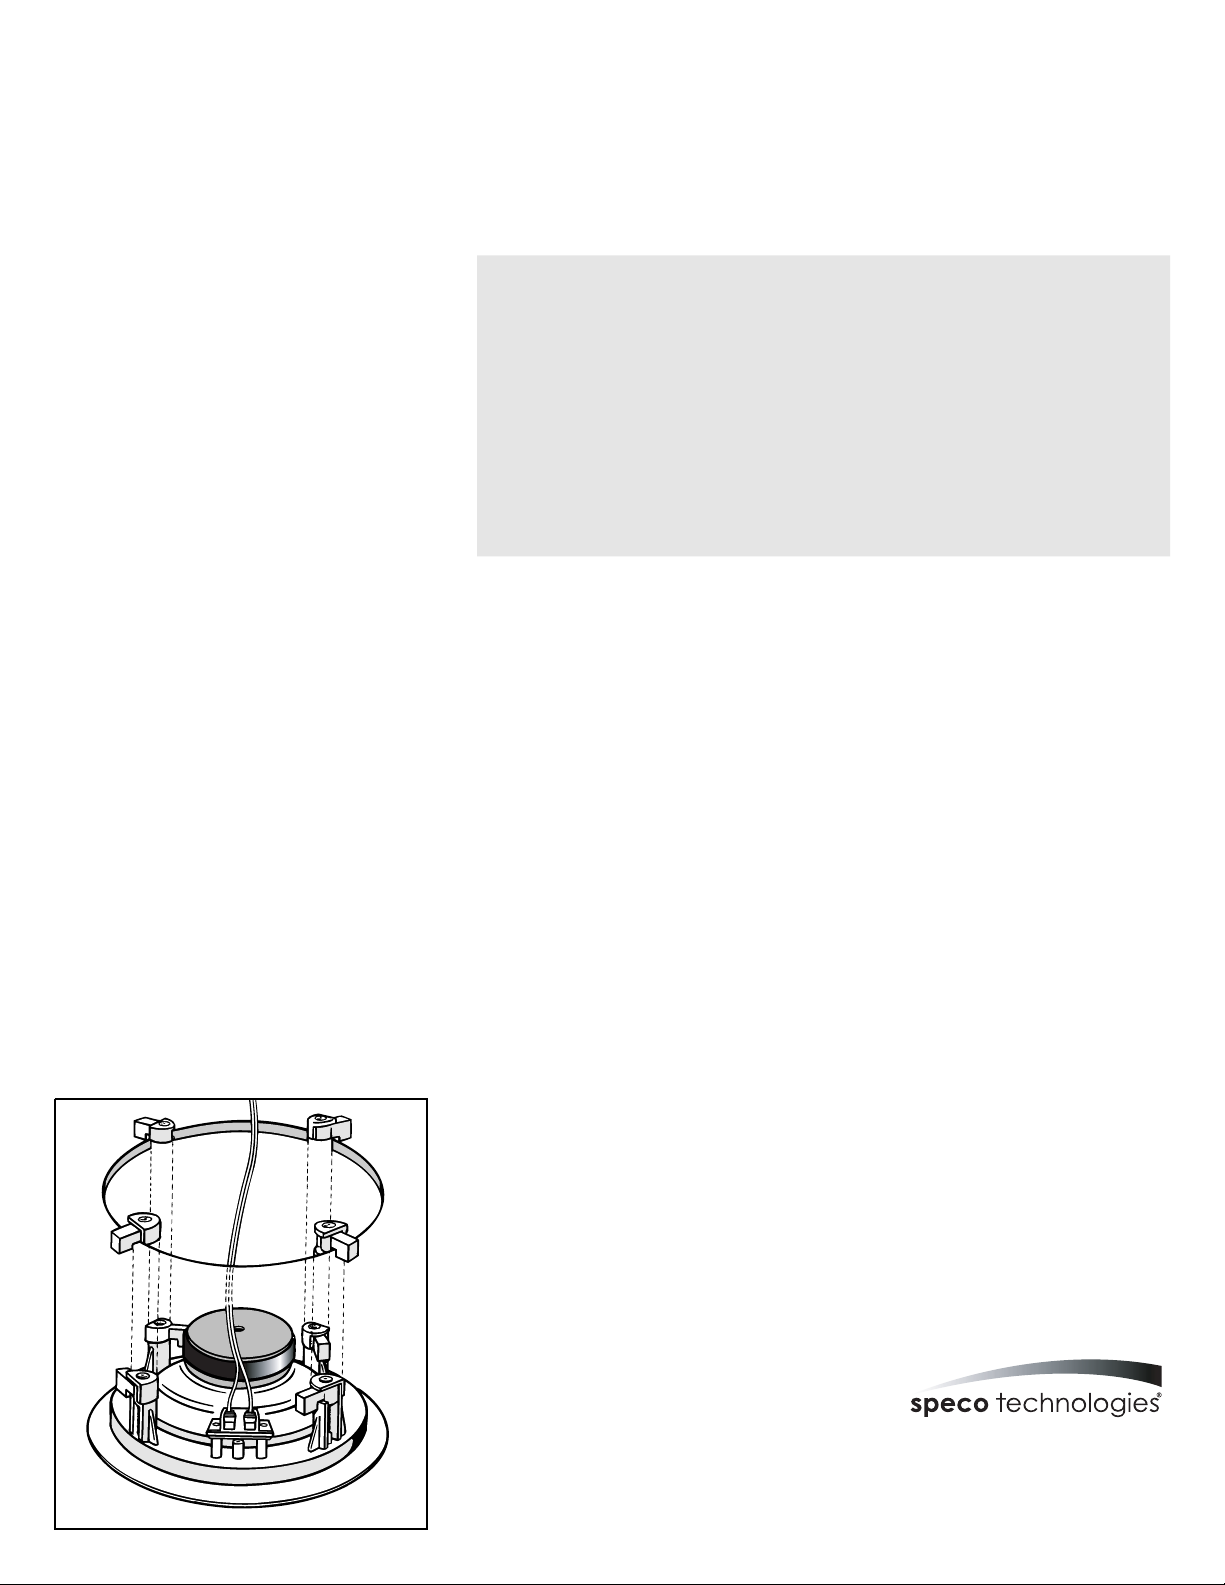
6. See Fig. 5. With the speaker wire attached to
the speaker, slide the speaker up inside the cut-
out hole. Center the speaker in the cut-out hole
and turn the four locking screws clockwise until
the speaker is drawn up snugly to the wall board
from behind, clamping the speaker in place. Try to
tighten each screw equally. Replace the speaker
grille by gently pressing it into place. If neces-
sary, use black grille adhesive to secure the grille.
New Construction
1. Determine speaker locations and mark them
on your plans for future reference.
2. If possible, run speaker wires after HVAC
and electrical wiring is in place.
3. Secure speaker wires in place along the run
with insulated staples only and be careful not to
pierce the wire’s insulation. Allow a bit of slack
for expansion of building materials.
4. Needless to say, the actual speakers should
not be installed until the wall board is in place. In
the meantime, leave several feet of wire coiled up
and secured at the back side of the mounting hole.
5. To complete the installation follow steps 2
through 5 above.
Operational Check
After making all connections, it’s a good idea to make sure every thing is working properly.
Turn on your surround or stereo system making sure the volume control is turned down and
that the balance control is in the center position. Activate a musical or movie source such as
FM, a CD or DVD player. Gently turn up the volume, you should hear sound coming from
your new Speco speakers. If no sound is heard from any or all speakers, switch off the sys-
tem immediately and check for open or loose connections, wrong polarity or shorts, or
proper source selection.
FIG. 5
Speco Indoor Speakers Lifetime Limited Warranty
This warranty is valid only on products purchased in the United States of America. This
warranty applies only to the original user/purchaser. Subject to conditions and exclusions found
below, this indoor audio speaker is warranted against manufacturing defects in material and
workmanship for the lifetime of the product, including parts and labor. Speco Technologies will
repair or replace (at our discretion) any parts found to be defective for the warranty period
specified. We will provide a replacement for any defective part.
Conditions
1. You must obtain a Return Authorization (RA) number for any merchandise being returned
to Speco Technologies, whether for return/exchange or repair, whether in or out of warranty.
2. This warranty will be honored only upon the presentation of the original dated bill of sale or
sales slip.
3. Transportation of the product to Speco Technologies for service is the responsibility of the user.
Repaired or replaced product will be returned prepaid during warranty period.
Exclusions
1. This warranty shall not cover improper adjustment of customer operated controls or products
which have been altered or abused.
2. This warranty shall not apply to the appearance of the product or accessory items including,
but not limited to cabinets, cabinet parts, knobs, etc.
3. This warranty does not apply to uncrating, setup, installation, or removal and/or reinstallation
of products prior to or after repair.
4. This warranty shall not apply to repairs or replacements necessitated by any cause beyond the
result of manufacture including, but not limited to, any malfunction, defects or failure caused by
or resulting from unauthorized service or inferior parts, neglect, accident, fire, flood, other acts
of nature or incorrect line voltage.
The foregoing is in lieu of all other expressed warranties and we do not authorize any party to
assume for us any obligation or liability. In no event shall we be liable for incidental or conse-
quential damage arising from the use of this product, or for any delay in the use of this product
due to causes beyond our control.
Some states do not allow limitations of how long an implied warranty lasts and/or do not allow
the exclusion or limitation of consequential damages. The above limitations on implied warranty
and consequential damages may not apply to you.
This warranty gives you specific legal rights. You may have other rights which vary from state
to state.
NOTE: For warranty purposes and your protection in the event
of theft or loss of this product, please fill in the information
below and keep with your sales receipt.
SPCBC6
5-60 Watts
90dB
63 Hz-21,000 Hz
6
1
/
2
˝(165mm) mineral-filled
compression-molded polymer cone
woofer with rubber surround
1
/
2
˝
(13mm) pivoting liquid-cooled
titanium anodized dome tweeter 8
ohms nominal
9˝ (229mm) dia.x 3˝ (76mm) D
7
1
/
2
˝(191mm) dia.
Specifications
Power Handling Efficiency
Frequency Response Driver
Complement
Impedance
Speaker Dimensions
Ceiling Cutout Dimensions
200 New Highway, Amityville, NY 11701
For information regarding service or return,
Call us TOLL FREE: 1-800-645-5516
In Metro New York 631-957-8700
http://www.specotech.com
Date of Purchase: ____________________________
Where Purchased: ____________________________
Purchase Price: ______________________________
Speco Technologies is constantly developing and improving products. Rev. 4/21/2020

Other Speco Speakers manuals

Speco SP-AL40 User manual

Speco

Speco SP-AL40 User manual

Speco SPIPC6AM User manual

Speco

Speco SPIPC6AM User manual

Speco SP30PT User manual

Speco

Speco SP30PT User manual

Speco SP-5IO2 User manual

Speco

Speco SP-5IO2 User manual

Speco SP-6ECS User manual

Speco

Speco SP-6ECS User manual

Speco Contractor Elite Series User manual

Speco

Speco Contractor Elite Series User manual

Speco SP-100AWX-W User manual

Speco

Speco SP-100AWX-W User manual

Speco SP-5IO2 User manual

Speco

Speco SP-5IO2 User manual

Speco Speco Custom Builder Series SP-CBC5 User manual

Speco

Speco Speco Custom Builder Series SP-CBC5 User manual

Speco SP-5INFC User manual

Speco

Speco SP-5INFC User manual

Speco SP-8CLC User manual

Speco

Speco SP-8CLC User manual

Speco SP-5AWD/T User manual

Speco

Speco SP-5AWD/T User manual

Speco SP-8ECS User manual

Speco

Speco SP-8ECS User manual

Speco SP-5AWD User manual

Speco

Speco SP-5AWD User manual

Speco SP-525C User manual

Speco

Speco SP-525C User manual

Speco SP-525C User manual

Speco

Speco SP-525C User manual

Speco CSi/SPECO SP-RK8B User manual

Speco

Speco CSi/SPECO SP-RK8B User manual

Speco SRD80T User manual

Speco

Speco SRD80T User manual

Speco SP-5CLCC User manual

Speco

Speco SP-5CLCC User manual

Speco Contractor Elite User manual

Speco

Speco Contractor Elite User manual

Speco SP-RK60CB User manual

Speco

Speco SP-RK60CB User manual

Speco SPIPH8A User manual

Speco

Speco SPIPH8A User manual

Speco STH8 User manual

Speco

Speco STH8 User manual

Speco SP-8C User manual

Speco

Speco SP-8C User manual

Popular Speakers manuals by other brands

Turbosound TCS SERIES user manual

Turbosound

Turbosound TCS SERIES user manual

Craftsman CMCR001 instruction manual

Craftsman

Craftsman CMCR001 instruction manual

Real Cable iPlug-SPK10 manual

Real Cable

Real Cable iPlug-SPK10 manual

Totem KIN Architectural series user manual

Totem

Totem KIN Architectural series user manual

EcoxGear EcoExtreme 2 user guide

EcoxGear

EcoxGear EcoExtreme 2 user guide

Manta HELIOS user manual

Manta

Manta HELIOS user manual

ION PHONESTATION Service manual

ION

ION PHONESTATION Service manual

Pioneer Elite SP-EFS73 operating guide

Pioneer

Pioneer Elite SP-EFS73 operating guide

Spracht Conference Mate quick start guide

Spracht

Spracht Conference Mate quick start guide

Tivoli Audio Dual Alarm Speaker owner's manual

Tivoli Audio

Tivoli Audio Dual Alarm Speaker owner's manual

Dynacord M 12 Specifications

Dynacord

Dynacord M 12 Specifications

Ground Zero GZHC 65C owner's manual

Ground Zero

Ground Zero GZHC 65C owner's manual

Philips TAVS500 user manual

Philips

Philips TAVS500 user manual

Nexo IDS110i user manual

Nexo

Nexo IDS110i user manual

Pure Resonance Audio PD6 Installation and operation manual

Pure Resonance Audio

Pure Resonance Audio PD6 Installation and operation manual

Steren BOC-040 user manual

Steren

Steren BOC-040 user manual

iHome iBT32 instruction manual

iHome

iHome iBT32 instruction manual

Cambridge Audio incognito ES20 user manual

Cambridge Audio

Cambridge Audio incognito ES20 user manual

manuals.online logo
manuals.online logoBrands
  • About & Mission
  • Contact us
  • Privacy Policy
  • Terms and Conditions

Copyright 2025 Manuals.Online. All Rights Reserved.