Spon NAS-8530 User manual


0
Contents
Summarize ...............................................................................................................................................................................................................1
Safety precaution.....................................................................................................................................................................................................1
Products Introduction...............................................................................................................................................................................................2
Hardware Interface Introduction............................................................................................................................................................................3
Introduction .............................................................................................................................................................................................................4
Packing list ................................................................................................................................................................................................................4
Installation..................................................................................................................................................................................................................5
Wiring..........................................................................................................................................................................................................................6
Interface Description................................................................................................................................................................................................6
Basic Network Settings...........................................................................................................................................................................................7
User-Define Terminal Parameters.....................................................................................................................................................................8
Login WEB interface................................................................................................................................................................................................8
Network Parameters................................................................................................................................................................................................8
Server Parameters...................................................................................................................................................................................................9
Shortcut Function.................................................................................................................................................................................................. 10
Offline Intercom..................................................................................................................................................................................................... 11
WEB management................................................................................................................................................................................................ 12
Reboot..................................................................................................................................................................................................................... 13
Reset to Defaults................................................................................................................................................................................................... 13
Update Firmware ( Note:otherwise special needs, please do not update thefirmware) ......................................................................... 13
Other functions ...................................................................................................................................................................................................... 13
Terminal List Settings........................................................................................................................................................................................... 13
FTP Operation ( audio file management )........................................................................................................................................................ 14
Terminal List Settings........................................................................................................................................................................................... 15
Basic Function......................................................................................................................................................................................................15
Intercom.................................................................................................................................................................................................................. 15
Broadcast................................................................................................................................................................................................................ 16
Monitoring............................................................................................................................................................................................................... 16
Fault Exclude.........................................................................................................................................................................................................17

IP Paging Microphone User Manual
1
Summarize
Safety precaution
Please abide by the warning and the relevant safety tips.
Please take this manual in convenient place after you reading the guide for future reference.
Warning
The sign means there is potential safety hazard, when operate wrong may result in death or serious injury.
The sign is used to remind user of this equipment is attached the important data of operation and
maintenance.
Setting and Installation
(1)Avoid being wet with the water.
Don’t make the machine or exposed to rain water or other liquid contamination of the environment, or lead to fire or get an
electric shock.
(2)Don’t use voltage outside of the designation
Using the marked voltage on the machine.
Using more than the logo of voltage could lead to fire or shock.
(3)Don’t scratch the power cord.
Don’t scratch the power cord or cut it.
Simultaneousl, keep the power line far way from heated objects, put heavy things on it will lead to fires or electric shock.
Using machine
(1)Once the anomalies
In use, immediately cut off power supply when finding the abnormal phenomena, please connect with the agency. if you
continue to use, it will likely fires or shock.
·The smoke or odor of the machine.
·The inside of the machine is flooded by water or foreign bodies intrusion.
·Machine falling or machine shell damage.
·The power cord damage(wire core is exposed of broken, etc)
·Fault(eg it can’t network, no sound ect)
(2)Don’t open the machine internal or modification of the machine.
Do not let foreign matters invade the machines internal.
Don’t let the metal items or inflammable objects inserting machine such as foreign inserting machines or throw into the vents
machines internal, otherwise will likely cause fires or electric shock.
(3)Please do not touch it when thunder
To avoid electric shock, please do not touch the machine and the plug when lightning, etc.
(4)Please do not place containers with liquid or small metal objects on machine above.
If gets upset containers, and let the fluid inflow to the machine that will likely fires or cause shock.
(5)Do not open the machine internal or modification of the machine.
The machine internal contains high voltage parts, once the open cover, or modification of the machine, it will likely fires or
cause shock. All about maintenance and other such matters within the machine to transform should be operated by
professional personnel.
(6)Maintenance or the precautions when not in use for long time.

IP Paging Microphone User Manual
2
When Maintenance, if the machine not in use in 10 days or more than 10 days, in order to ensure the safe, please shut off
power supply switch, and will power plug. If failure to comply with this provision, it will likely cause electric shock or fires.
Products Introduction
IP network paging microphone is embedded with IP Audio digital network audio technology which is in our company own
intellectual property, with power input interface, SD card interface, audio input and output interface, RJ45 network interface.
With 4.3” TFT True Color LCD, directly indicate the corresponding shortcut zones.
With high speed industrial grade dicaryon ((ARM + Dual DSP) processing chip, start time ≤3 seconds
Built-in 3W power loudspeaker, large voice, small distortion; With detachable hose type microphone pole, longer life,
good maintenance.
Support for “incoming calls/ outgoing calls” which is showed in Chinese and English bilingual indication.
Built-in high-capacity memory, used for save intercom recording file, broadcasting MP3 audio; And remote operate the
memory file.
To operate the device audio file within broadcasting, it can realize the voice remote playing.
With selection menu for hang the call to switch the intercom mode during talking.
Automatically detect the audio input and output, it`s good for audio circuit switching.
It can select 16 keys expansion panel, using double TFT true color LCD to display the custom function, the intercom
and broadcasting is rapidly.
It can select the receiver, it`s convenient for privacy communication.
With Ethernet port access, support for across network segment and route.

IP Paging Microphone User Manual
3
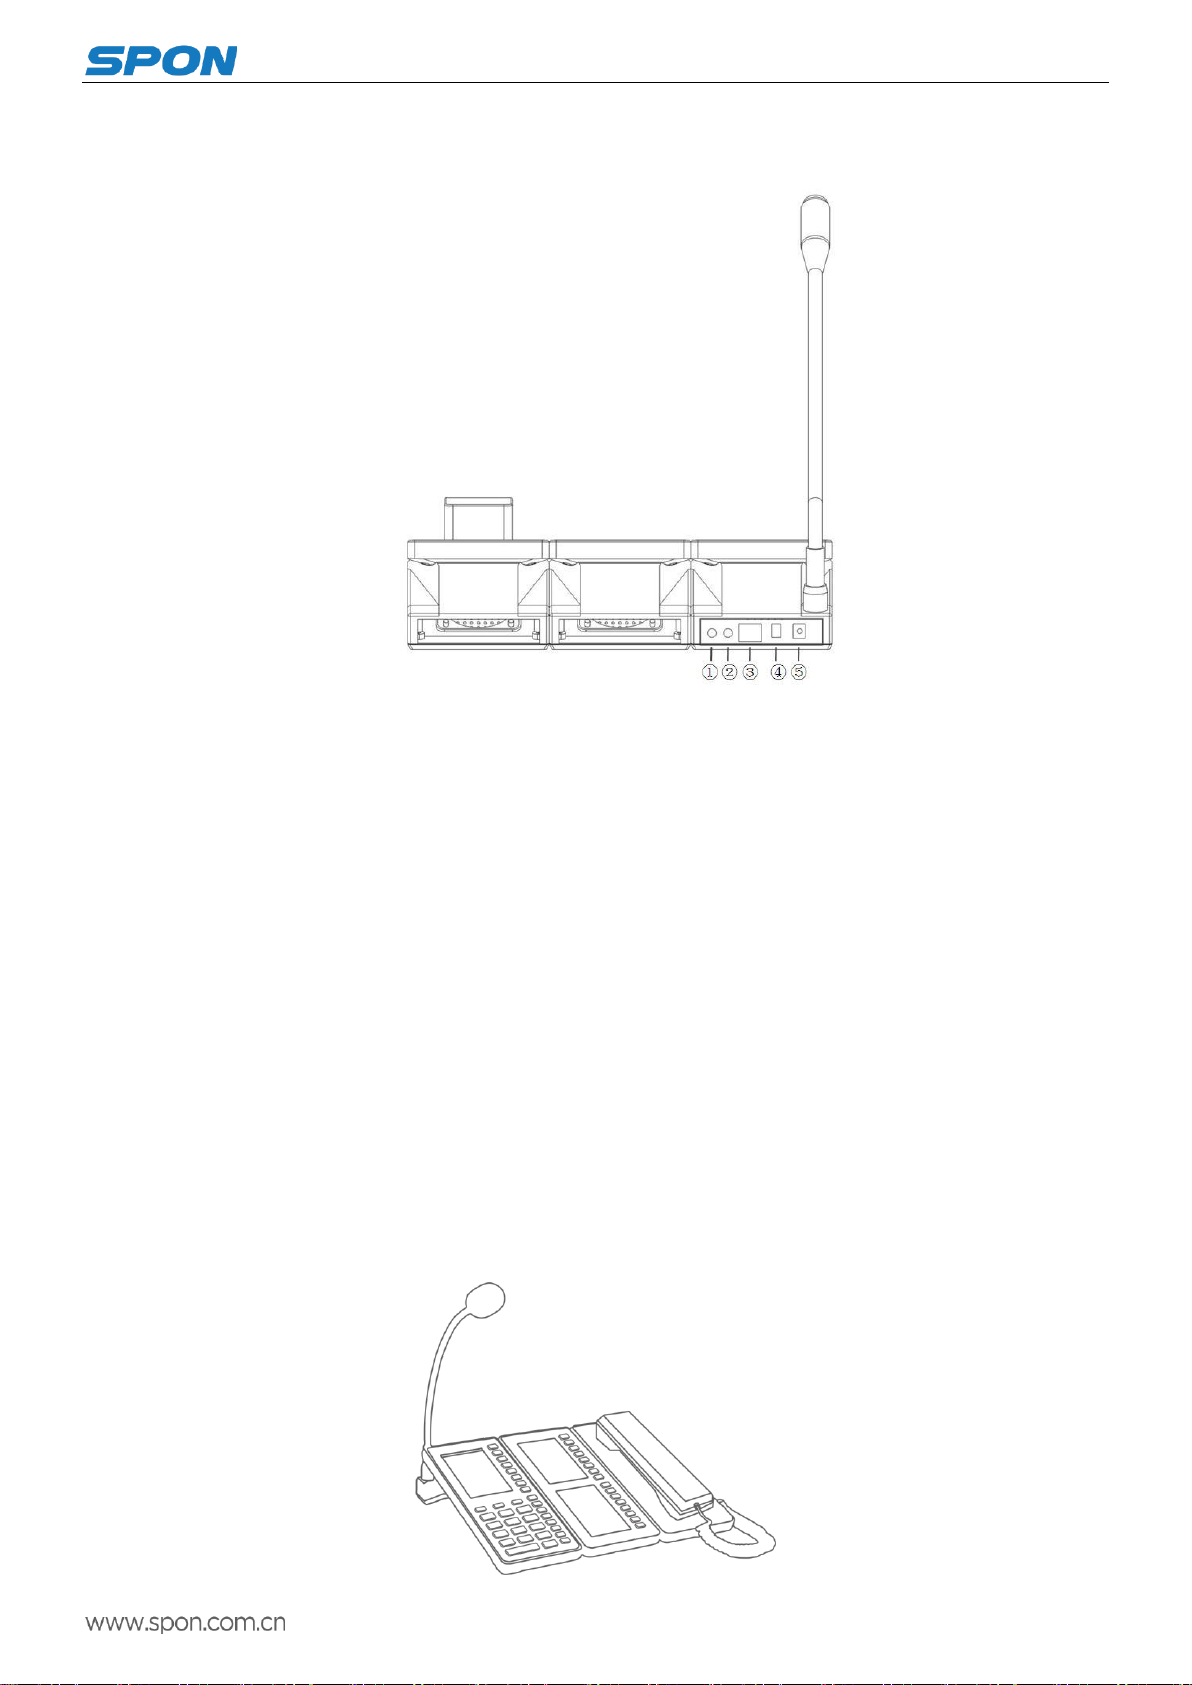
Hardware Interface Introduction
Front
1.IP network paging microphone 2.Expansion panel(optional configuration) 3.Telephone receiver panel(optional configuration)
①Microphone pole
Collect the live voice
②Loudspeaker
Built-in loudspeaker, restore the
far-end and local voice.
③Keyboard
Mutual input channel, accept
Command input.
Keyboard Operation
Key
Function Description
Emergency Key
Press Emergency Key on 1 second, it may broadcast to all zones.
File Key
Check the SD card file through this key, press the F1-F8, it will play the
corresponding file by pressing the F1-F8 key.
Information Key
Check the terminal network parameters, system parameters and system
software version information etc.
Recording Key
Reserved, it`s not enabled at present.
Monitor Key
Press this key to enter into the monitoring status.
Broadcast Key
Press this key to enter into the broadcasting status.
Volume + Key
When it`s playing the audio by pressing this key to increase the speaker
volume.
Volume - Key
When it`s playing the audio by pressing this key to decrease the speaker
volume.
Intercom Key
Press this key to enter into the intercom status.
Cancel Key
Press this key to cancel the operation or back to the main interface.
“ ” Key
Press this key to realize the left page turning.
“ ” Key
Confirmation Key
“ ” Key
Press this key to realize the right page turning.
“ ” Key
The key is located on the expansion panel to match the double display screen, it
can realize the shortcut intercom or broadcasting when pressing this key.
“F1-F8”
Press the corresponding key to enter into the shortcut key left corresponding
function interface.
“0-9”
Used for the intercom and broadcasting zones selection.
①Key
②Display screen
True color display screen indicate
complete machine login status,
volume value, partition list and
other relevant information
①Earphone
Built-in loudspeaker and
microphone,restore the far-end
and collect scene voice.
IP Paging Microphone User Manual
4
Back
①Audio input interface
Used for connect the earphone or other 3.5mm audio plug.
②Audio output interface
The interface output is restored audio signal, it can used as the sound source to amplifier or active loudspeaker, used for
broadcasting back background music, the factory setting is audio output.
③Ethernet interface
Connect with the server related cables in order to make the terminal login normally.
④Alarm input or output interface
With alarm input and output port for linkage with external device, factory defaults as alarm output.
⑤Power input interface
To provide 12V input voltage for the terminal
Introduction
Packing list
IP network paging microphone is including the following fittings, please check the fittings before the installation, if any
missing, please contact the distributor.
(1)IP Paging Microphone 1pcs (Remark: expansion panel and receiver panel is optional configuration.)

IP Paging Microphone User Manual
5
(2)Microphone pole(DC-300B)1pcs
(3)Power adapter(DC12V/2A)1pcs
(4)Certification 1pcs
(5)Installation instructions 1pcs
Installation
(1)Microphone pole groove install accordance with the pedestal raised groove,as follows:
(2)Screwing the rotary knob tightly according to the graphic direction
Remark: expansion panel and receiver panel is optional.
IP Paging Microphone User Manual
6
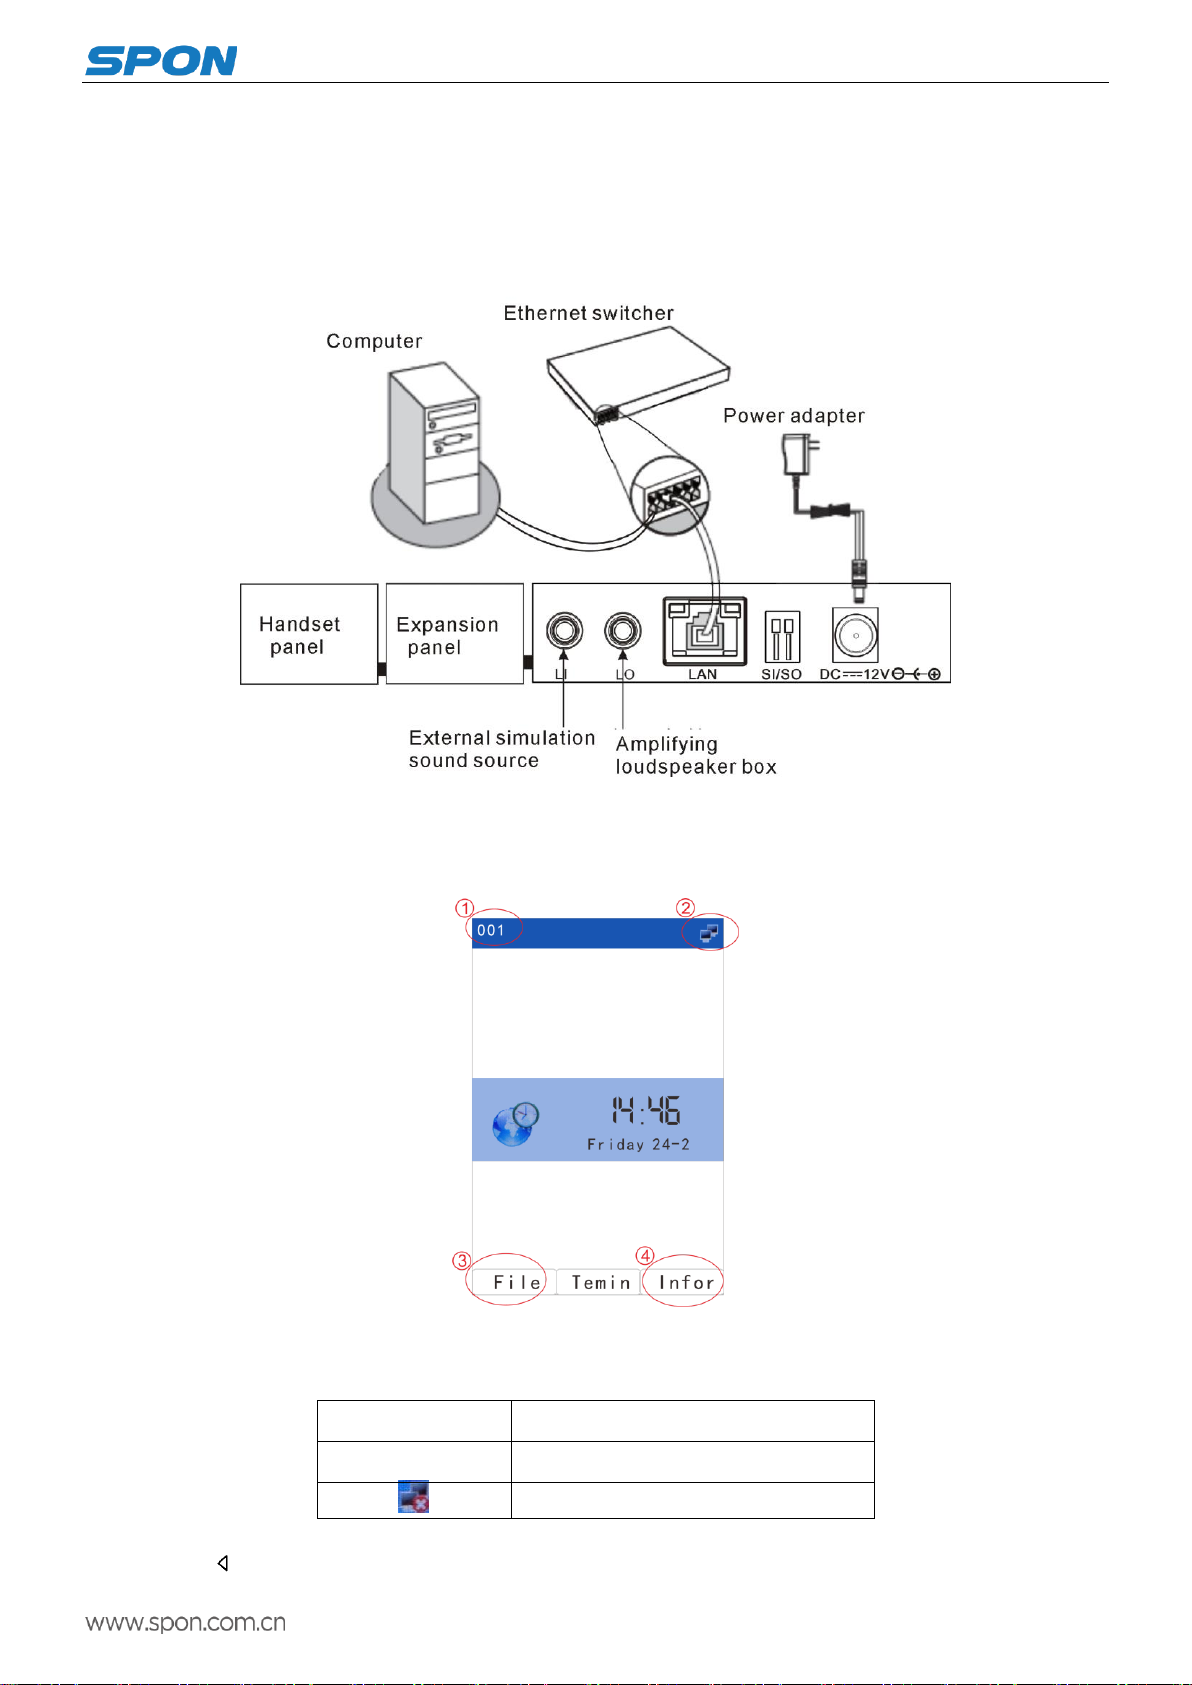
Wiring
(1)Make one port of the power adapter connect with theIP Paging Microphone DC12V port, and the other Port connect
with the power socket.
(2)Make one port of the Ethernet line connect with the IP Paging Microphone LAN port, and the other port connect with
the switcher.
Interface Description
After the power on for 15 seconds to enter the main interface successful, it will display the time and date information.
Main interface
①IP paging microphone ID
②Terminal status icon
Icon(color)
Terminal Status
Blue
Terminal login the server
Cables is not properly connect
③File: Display audio file list
Press “ ” or【File】key to enter the list of file broadcasting. Press the corresponding shortcut key to the right of the

IP Paging Microphone User Manual
7
music to play the audio file. Press “cancel” key to end the music.
Remark: The contents of the file playlist can be set via the FTP server.
④Information: Display terminal parameters information. Press “ ” or 【info】key, enter password 【123456】and login
into the system setting interface.
Basic Network Settings
Connect the IP paging microphone terminal well as per the installation manual, plug in the power, press “info” key for network
parameters checking, and modify the network parameters according to the using environment, there are two methods:
Keyboard Operation
(1)Press or【info】key, input the terminal password 【123456】enter the system setting interface. Press , key
to move, press numeric keys to modify equipment ID, IP address, server IP and other parameters, then press button to save.
(Note: ID and IP can not be same as other terminal or mainframe.)
Remark: modify the password only can through the server, the detailed steps are: setting-advanced setting-input default
password( default one is 123456)-parameter2-input new password-modify all terminal`s password -OK(confirm).
If you choose to modify all terminal`s password, then all the terminal`s password in the same server will be modified to the
IP Paging Microphone User Manual
8
same one.
Web Page Mode
Enter into the IP Paging Microphone web interface, then modify the terminal each parameters according to the environment,
after setting completed, click “save”.
Specific operation please refer to the custom terminal network parameters setting.
User-Define Terminal Parameters
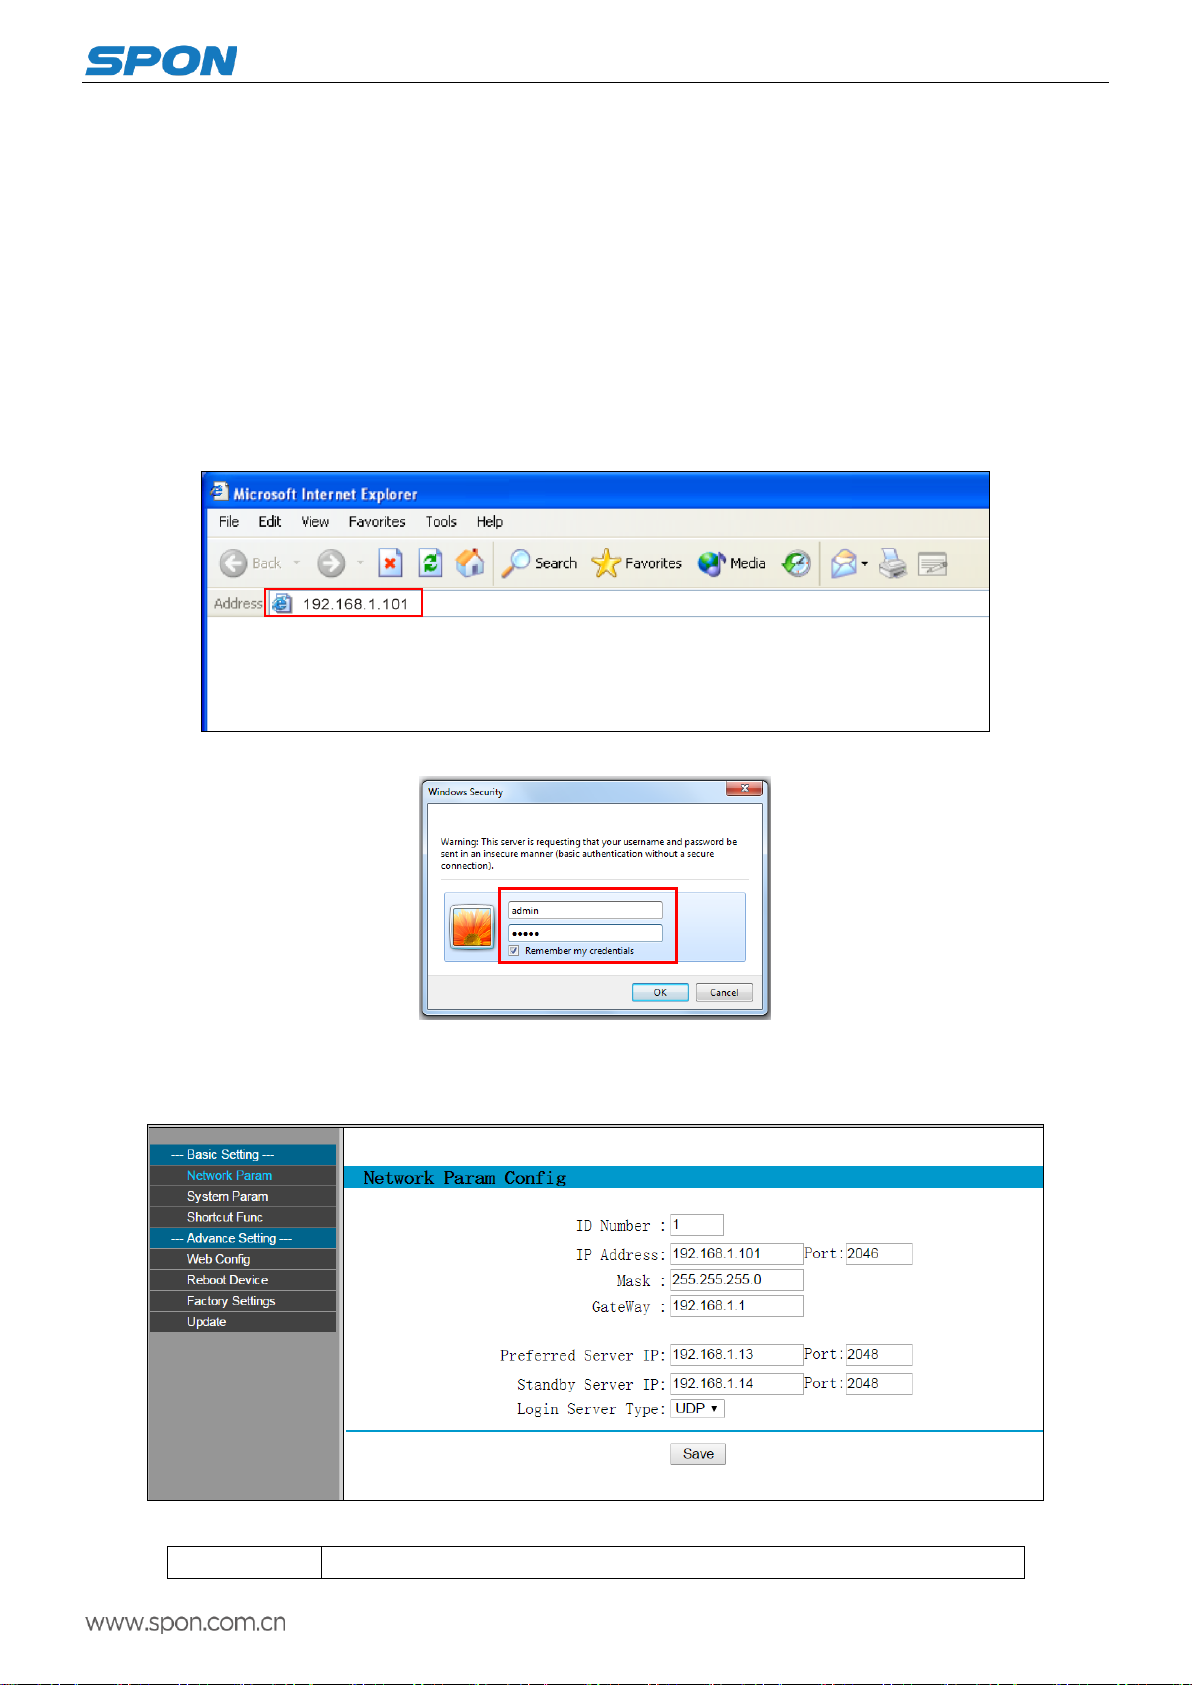
Login WEB interface
(1)Please input the IP Paging Microphone IP address to the browser address column (the factory default IP address is
192.168.1.101), then enter.
(2)Enter the user name and password in the web page (the default is : admin, password : Rdc070#*).
(3)Click OK to enter terminal web page.
Network Parameters
Enter Network settings, relevant parameters list:
Device ID
The only number to identify mainframe, it can`t repeat with other device or mainframe.

IP Paging Microphone User Manual
9
the factory default device NO is 1
Terminal IP
Terminal IP address and port, the factory default IP address is 192.168.1.101
Note:It can`t revise except with the special situation (The default is 2046)
Subnet mask
The subnet mask of the terminal
Default gateway
The network gateway of the terminal
Preferred server
IP
Set the IP address of preferred server, the factory defaults is 192.168.1.13
The server is a bridge to communicate with other devices, and has the right to control
devices, VOD, and broadcast, etc.
Alternate server
IP
Se the IP address of Preferred server, the factory defaults is 192.168.1.14
Login server
mode
The device can log onto the server in either UDP or TCP. If the corresponding server
supports both UDP and TCP communication, UDP is used by default.
Server Parameters
Enter the settings of "system parameters" and the corresponding parameters list.
Intercom input
volume
Terminal volume adjustment, range 0~15
Intercom output
volume
Terminal volume adjustment,range 0~15
Intercom sampling
rate
Set intercom sampling rate, 8K or 22K for optional, the defaults is 8K.
Intercom ADPCM
coding
Set whether intercomADPCM encoding is enabled

IP Paging Microphone User Manual
10
Echo cancellation
It`s enable by default, it will have echo when it`s disable
The third parties
talking function
Set the third party talking function, the defaults is enable.
Broadcast input
volume
Terminal volume adjustment, range 0~15
Broadcast output
volume
Terminal volume adjustment, range 0~15
Broadcast
sampling rate
Set broadcast sampling rate,8K or 22K for optional, the defaults is 22K.
Broadcast
ADPCM coding
Set whether intercom ADPCM encoding is enabled
Broadcast prompt
tone
Set the broadcast prompt tone, the defaults is enable.
File broadcasting
Auto-pause: in the process of initiating audio file broadcasting to other terminals, a
music will stop automatically after playing.
Loop play: in the process of initiating audio file broadcast to other terminals, a music
will be played repeatedly after playing.
Ringing volume
Terminal volume adjustment, range 0~15
Ringing output
mode
Set ringing output mode of the terminal,horn or line output can be choose
Query original ID
Set the terminal query original ID number
Number of queries
Set the number of terminal queries
Terminal language
Set the language of the terminal WEB page, Chinese or English can be choose, it’s
default as Chinese.
Intercom
password settings
Set the password to enter the Settings menu
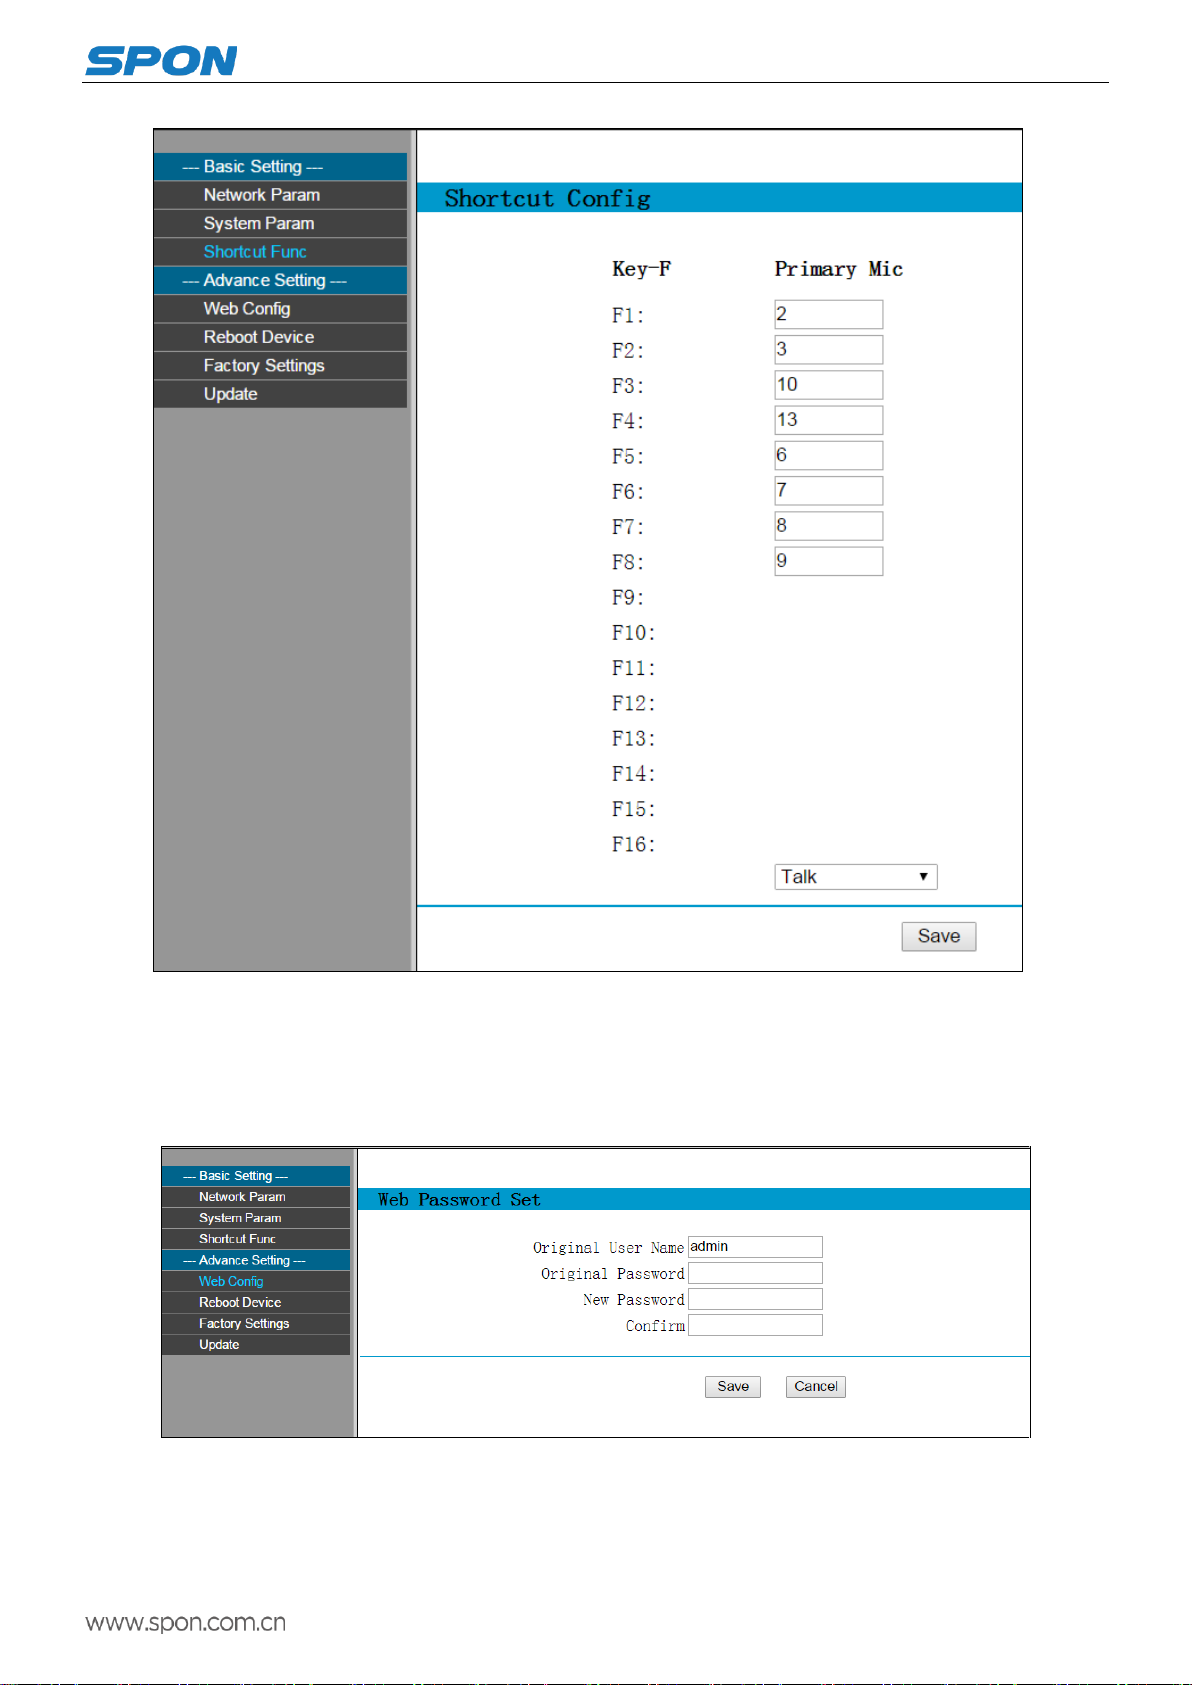
Shortcut Function
Customize the terminal ID number or partition number corresponding to the keyon the main interface and extension board in
the shortcut function list. ( Please enter” ID#terminal number”, when setting shortcut calling to terminal ). Select the function to
intercom, broadcast or partition broadcast (default is intercom), then click” Save” after setting.
After the shortcut mode parameters is workable, press 【F1】-【F8】key on the main interface or the 16 the shortcut key on
the expansion panel can make the intercom calling or broadcasting to the corresponding target terminals.

IP Paging Microphone User Manual
11
Offline Intercom
Ensure all offline call terminals are logged in to the service software.
Set shortcut call button: Select the function to intercom on the web page of IP paging microphone, and configure
terminal number of offline intercom to the shortcut call button. (Offline call number is decided by the number of
shortcuts.)
Below is set to terminal 8 to shortcut F1, terminal 5 to shortcut key F2, terminal 3 to shortcut key F3, terminal 6 to
shortcut key F4:
IP Paging Microphone User Manual
12
Enter the settings interface of IP paging microphone, and then click “Save”.
Completed settings. After close the server software, it could call offline terminal normally without the affect of restart.
WEB management
You can modify the web page login account and password from the WEB management parameters.
IP Paging Microphone User Manual
13
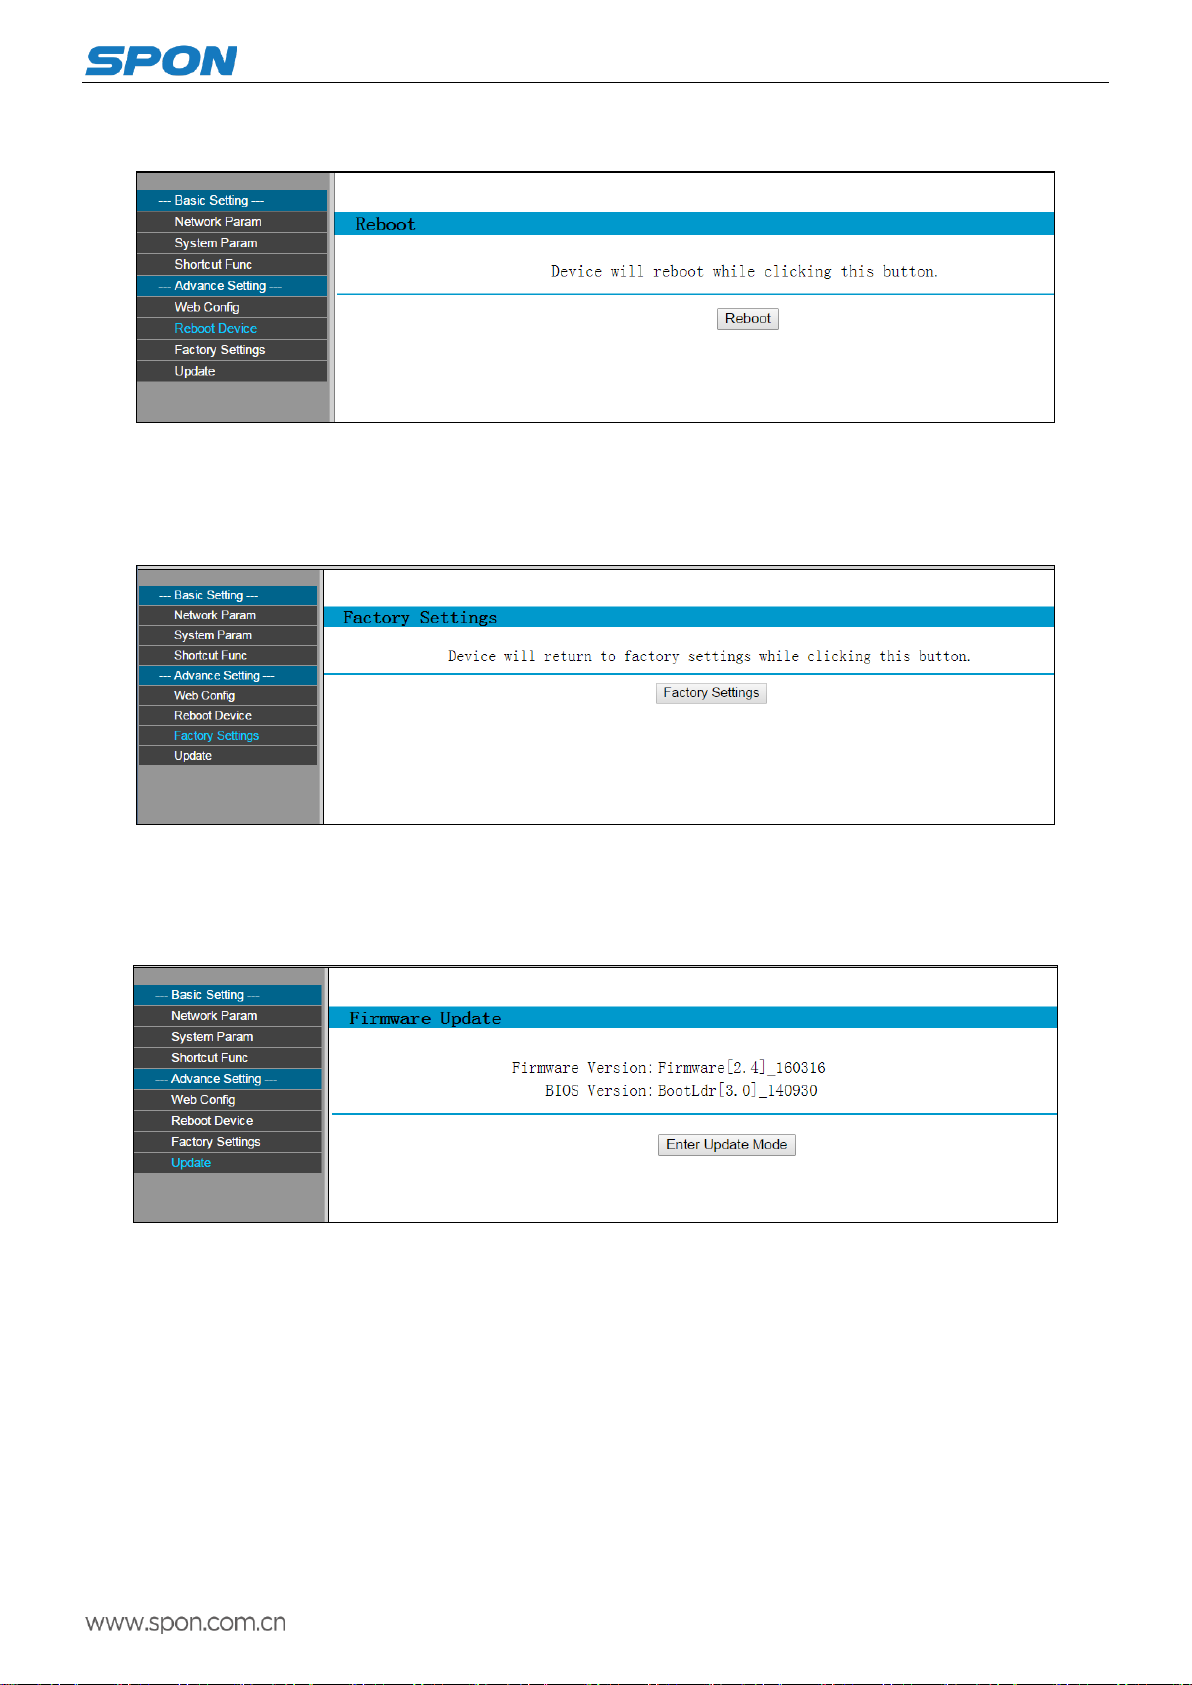
Reboot
All modified parameters of web pages will be effective after rebooting.
Reset to Defaults
Click the “Factory Settings” and all parameters will return to factory defaults.
Update Firmware ( Note:otherwise special needs, please do not update the firmware)
Visit the terminal Web pages from Web browser, click "firmware upgrade" key and wait for 20 seconds to enter the firmware
update WEB page ,then choose the factory offered firmware update file , click "firmware upgrade" key to upgrade.
Note: if you need to upgrade the firmware, please contact the dealer.
Other functions
In addition to above function, IP paging microphone could coordinate with the server to accomplish the timing ringing,
real-time broadcasting and the timing broadcasting all these functions, for the details please refer to the server software operation
instruction.
Terminal List Settings
It could user-defined the each terminal name and other information from the server terminal setting according to the situation,
please refer to software operation instruction for details.

IP Paging Microphone User Manual
14
FTP Operation ( audio file management )
(1)Please enter the “ftp://terminal IP address(The factory default is 192.168.1.101)”in the browser, then press the enter.
(2)Input user name and password (the default is : admin, password : Rdc070#*) in appeared login window, chick “Log on”
enter into FTP.
it can use the server build-in WAN program making tools to switch the audio documents.
Remote playing file: AudioFile. Make the converted audio file (22K, WAV file) copy to AudioFile folder. Press “file” on theIP
Paging Microphone can use the uploaded files.
Ringer folder :RingFile.Make the converted audio file (22K, WAV file) copy to RingFile folder. Ringing filename format:
terminal number. wav

IP Paging Microphone User Manual
15
For example: terminal 1 is 001.wav, terminal 23 is 023.wav,001.wav、002.wav means terminal 1 and terminal 2
respectively incoming ringing, others are same as it.
Terminal List Settings
It could user-defined the each terminal name and other information from the server terminal setting according to the situation,
please refer to software operation instruction for details.
Basic Function
Intercom
Dialing
Press the key 【numbers】input the target terminal ID number, then press the key【intercom】shortcut key to talk with the
target terminal.
Press the key 【cancel】, exit the intercom status.
Speed dial
Firstly, we need to set up the intercom mapping between the keyboard and the corresponding terminal (for the details please
refer to the shortcut function settings on the web page.) Press 【F1】-【F8】key on the main interface or the 16 the shortcut key
on the expansion panel can make the intercom calling or broadcasting to the corresponding target terminals.
Note: IP Paging Microphone and extension panel can call the terminal within(including) 65000 , this function needs to
cooperate with the dedicated version server to achieve.
Trigger
Press【Trigger】shortcut key to close alarm output port 1 of the target terminal, and then disconnect after 5 seconds.
Transferring
Press【transfer】shortcut key , the intercom target will transfer to the next preset target terminal automatically.
Third parties talking
Set the function of third parties talking is enable or not, it`s enabled by default.

IP Paging Microphone User Manual
16
When the third parties talking is enable, no matter in the state of initiating or receiving intercom, call or call from a third party
can be initiated or received to realize third party talking.
Initiate intercom: In the intercom process, press the three parties to enter the terminal ID number, and then press the OK
key to initiate the third parties talking.
Receiving intercom: Press【Intercom】key to receive.
Note: During the process, the three parties can clearly hear the voice of the other two parties.
Broadcast
Terminal broadcast
Press number key to input the broadcast terminal ID number, then press【broadcast】button to realize the broadcasting with
the target terminal.
Note: after pressing the number key, use [*] interval to come out, and then press [broadcast] key to realize multiple terminal
broadcasts.
For example: to select terminal 1, terminal 2, terminal 3, terminal 5, terminal 10, please press "1*2*3*5*10", and then press
[broadcast].
Partition broadcast
Press【*】,then press【Number】key to enter the broadcasting zones, and last press【Broadcast】to realize zone broadcast.
Note: If you want to select multiple broadcasting zones, please with【*】space between zones.
For example: to select terminal 1, terminal 2, terminal 3, terminal 5, terminal 10, please press "1*2*3*5*10", and then press
[broadcast]..
remote broadcast
In the processing of broadcasting, press【File】to select audio file.
Monitoring
(1)Press【figure】to input the ID number of monitored terminal, then press【monitor】key to realize monitoring with the
target.
(2)Press【cancel】to exit the monitor status.

IP Paging Microphone User Manual
17
Fault Exclude
Terminal can not login the server?
1、Check the server software and main control computer is normally open or not. It must close all the firewall before open
the service software, (including the systemic firewall and other antivirus software.)
2、Check the network connection is normally working or not. When the terminal is power on, the network port green
indicator light will be normal on, and orange indicator light will rapidly short flicker, it means the cable hard-link is normal. If the
network port green indicator light is not light up, there is network hard-link problem, please check the cable and switch which is
connected the terminal, check if there is any damage and poor contact abnormal working.
3、Check the terminal IP setting. Checking the terminal ID NO, server IP, local IP and gateway IP these parameters is correct
or not.
Terminal can not login to the server, intercom and broadcast is not normal?
1、Check the bandwidth is limited or not( use the network bandwidth tools to test it), it should broaden the bandwidth if
it`s limited.
2、Detected a lot of data flow of bandwidth, please restrict this IP address.
3、Checking the ID number and host IP address is conflict or not, please reset the ID number or host IP address if it`s
conflict.
4、If ID number and IP address is not conflict, but it can not make normal conversation, please acquire the data package
and submit to the factory for analyzing.
How to solve the warning of “terminal network service (UDP)” failed during the process of the starting the service
software?
Server local network connection is disconnected, connect the local network cable, exit the service software and
Restart, it will be ok.
Can not be transferred?
1、Target terminal is not login the server.
2、Target terminal is not support for transfer function.
Web display abnormal?
Emptying the cache or change the browser.
How to modify the account number and password to login the web page?
1、Click the password setting of the web page.
2、Please input previous user name and password under the original user name and password respectively.
3、Input the new user name and password in the new one.
4、Input the new password in the command confirmation.
5、Click for save.

IP Paging Microphone User Manual
18
Copyright statement
Copyright
The manual, which is created or developed on the basis of SPON copyright, is the intellectual property of SPON. Without
prior written consent by SPON,any reproduction, modification, or retransmission, in any form or by any means, is illegal and
strictly prohibited.
In accordance with relevant laws, translation and conversion are contained in reproduction.
Only for private use, downloading and printing of the manual is not prohibited when it is spreading on internet and media.
No part of the manual is allowed to be reproduced or used for commercial purpose. And SPON shall take no responsibility
for any losses or damages caused by the illegal reproduction and conversion of the manual.
Warranty
The manual is subject to modification, and there is no further notice if it is modified. Accurate statement, information and
suggestion are provided in the manual to the best. But any expression or implication are not guaranteed by SPON, and
users bear full responsibility for the application of product.
SPON made no guarantee about the manual, including but not limited to any contained marketability or specific guarantees.
SPON bears no responsibility for any indirect or incidental losses caused by improper use of the manual.
Other manuals for NAS-8530
1
Table of contents
Other Spon Microphone manuals


