Sport Art TR12F User manual

1
4
4
4
6
6
11
11
11
12
13
13
16
17
18
20
21
22
23
TABLEOFCONTENTS
Introduction
1.ImportantSafetyInstructions................................................................................
2.AssemblingYourTreadmill....................................................................................
InstallationRequirements.....................................................................................
ListofParts...........................................................................................................
3.TreadmillAssembly...............................................................................................
StepbyStepInstructions......................................................................................
5.TR12FOperatingInstructions.....................................................................................
Display...................................................................................................................
FeedbackWindowSpecifications..........................................................................
BasicInformation...................................................................................................
SafetyKeyOperation.............................................................................................
HowtoOperateTR12FTreadmill..........................................................................
6.GuidelineForExercise.........................................................................................
7.AdjustTheRunningBelt.......................................................................................
8.BeltAdjustmentProcedure...................................................................................
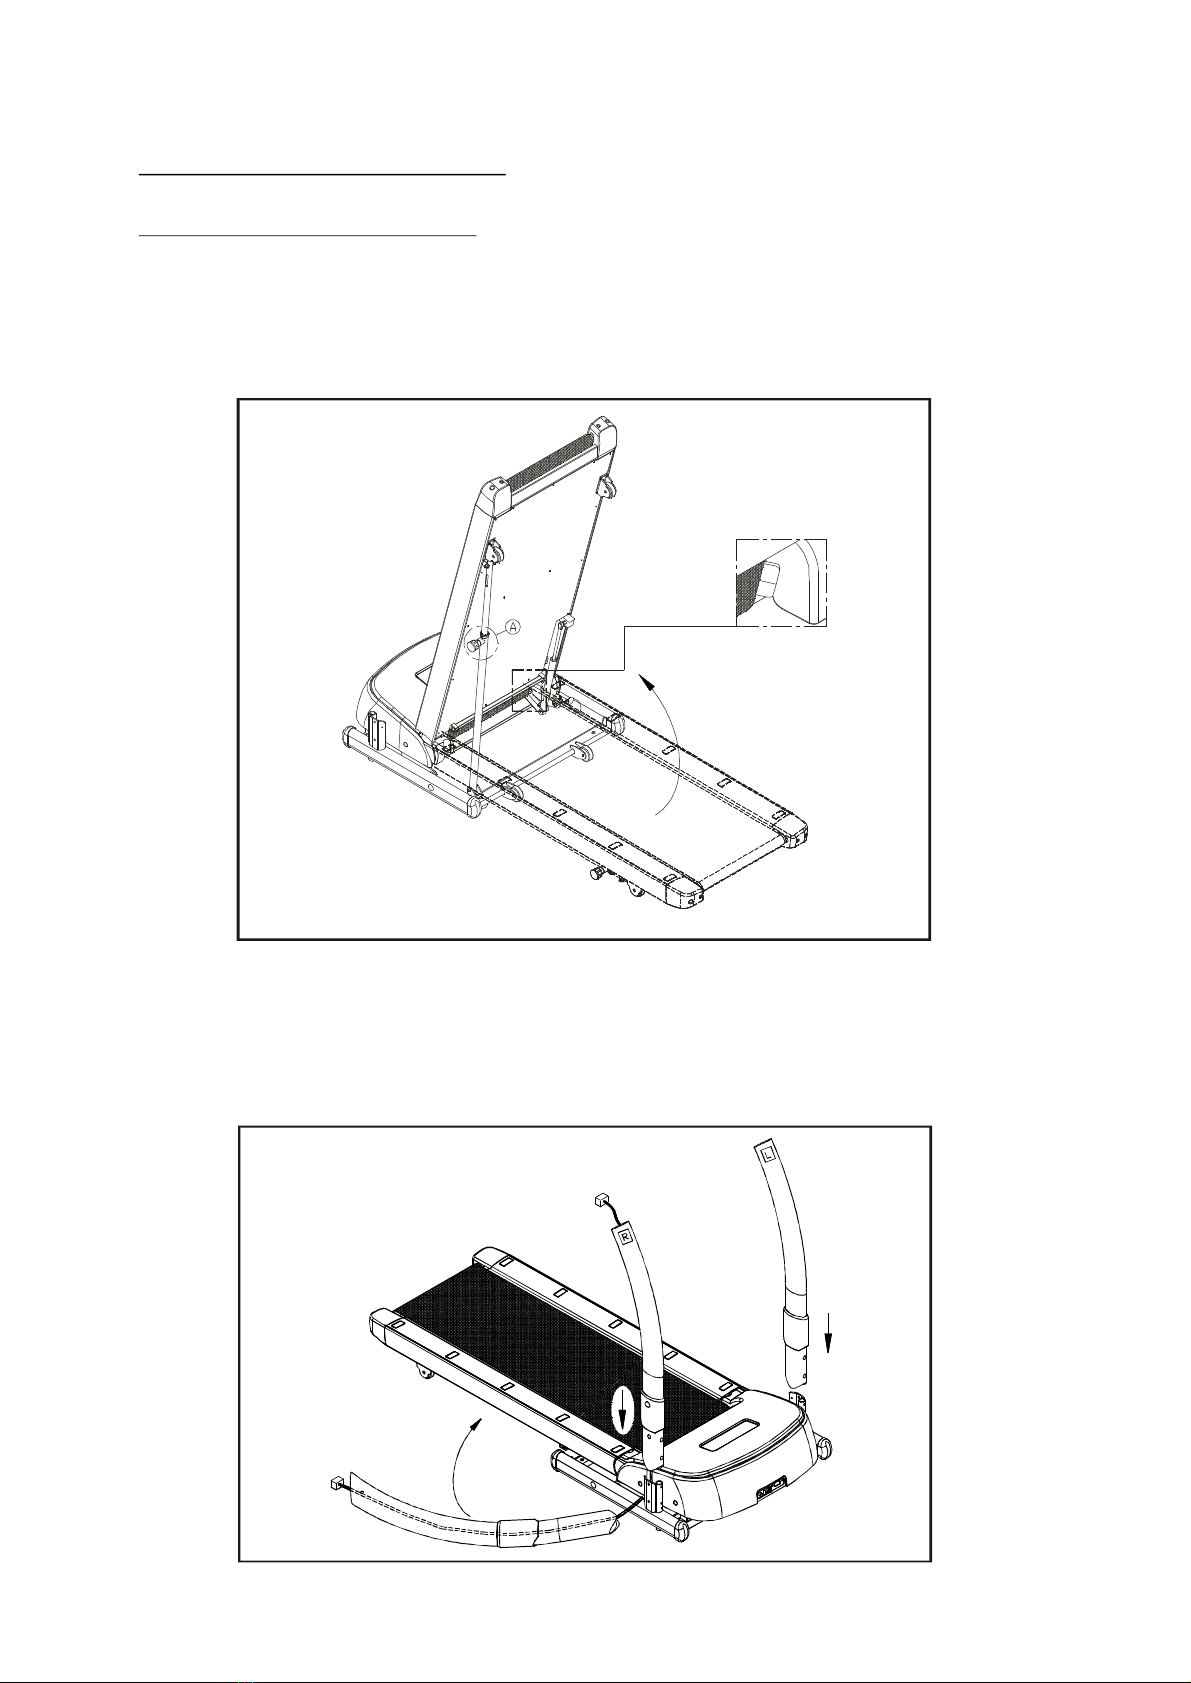
9.FoldingAndUnfoldingTheTreadmill..................................................................
10.FloorLevelAdjustment.......................................................................................
11.MainFuseFailure...............................................................................................
12.WiringSchematic...............................................................................................

1
YourSportsArttreadmillwasdesignedandbuiltforoptimumsafety.However,certain
precautionsapplywheneveryouuseyourtreadmill.
Pleasereadtheentiremanualbeforeassemblyandoperation.Also,pleasenoteand
savethefollowingsafetyinstructions:
-Toreducetheriskofelectricshock:
Improperconnectionoftheequipment-groundingconnectorcanresultinariskof
electricshock.Checkwithaqualifiedelectricalorservicepersonifyouareindoubt
astowhetherthetreadmillisproperlygrounded.Donotmodifytheplugprovided
withtreadmill,ifitdoesn'tfittheoutlet,gettheproperoutletinstalledbyaqualified
technician.
Alwaysunplugthistreadmillfromtheelectricaloutletimmediatelyafterusingand
beforecleaning.
-Toreducetheriskofburns,fire,electricshock,orinjurytopersons:
1)Thetreadmillshouldneverbeleftunattendedwhenpluggedin.Unplugfromoutlet
whennotinuse,andbeforeputtingonortakingoffparts.
2)Donotoperateunderblanketorpillow.Excessiveheatingcanoccurandcause
fire,electricshock,orinjurytopersons.
3)Closesupervisionisnecessarywhenthistreadmillisusednearchildren,invalids,
ordisabledpersons.
4)Usethistreadmillonlyforitsintendeduseasdescribedinthismanual.Donotuse
attachmentsnotrecommendedbythemanufacturer.
5)Neveroperatethistreadmillifithasadamagedcordorplug,ifitisnotworking
properly,ifithasbeendroppedordamaged,ordroppedintowater.Returnthe
treadmilltoaservicecenterforexaminationandrepair.
6)Donotcarrythistreadmillbysupplycordorusecordasahandle.
7)Keepthecordawayfromheatedsurfaces.
8)Neveroperatethetreadmillwiththeairopeningsblocked.Keeptheairopenings
freeoflint,hair,andthelike.
9)Neverdroporinsertanyobjectintoanyopening.
10)Donotuseoutdoors.
IMPORTANTSAFETYINSTRUCTIONS
DANGER
WARNING

2
11)Theweightlimitforthistreadmillis276Ibs.(125kgs)
12)Donotoperatewhereaerosol(spray)productsarebeingusedorwhereoxygen
isbeingadministered.
13)Todisconnect,turnallcontrolstotheoffposition,thenremoveplugfromoutlet.
14)Assembleandoperatethetreadmillonasolid,levelsurface.Keepthearea
behindthetreadmillclear.
15)Neverallowchildrenonornearthetreadmill.Therunningbeltwillnotstop
immediatelyifanyobjectbecomescaughtinthebeltorrollers.
16)Keephandsawayfrommovingparts.
17)Wearproperworkoutclothing:Donotwearlooseclothing.Donotwearshoes
withleathersolesorhighheels.Tiebackalllonghair.
18)Straddlethemachinewithyourfeetontherightandleftstagingplatformbefore
startingtherunningbelt.
19)Workwithinyourrecommendedexerciselevel,doNOTworktoexhaustion.
20)Ifyoufeelanypainorabnormal,STOPYOURWORKOUTandconsultyour
physicianimmediately.
21)Connectthistreadmilltoaproperlygroundedoutletonly.
22)Alwaysusethesafetycordwhenoperatingthetreadmill.
23)Pleasebecautiousrunningbeltmuststopcompletelyandinclinemustsetto0%
beforefolding.
TheTreadmillisdesignedforyouruseandenjoyment.Pleasefollowtheabove
safetyinstructionsandusinggoodjudgmentandcommonsense.

3
SPORTSARTTR12FTREADMILL
INTRODUCTION
Congratulationsonpurchasingoneofthefinestpieceofexerciseequipmentonthe
markettoday,theSportsArtTR12Ftreadmill.TheTR12Fisdesignedwiththeend
userinmindandconstructedofhighqualitymaterialsanddesignedforyearsof
trouble-freeuse.
BeforeusingyourSportsArtTR12Ftreadmill,werecommendthatyoufamiliarize
yourselfwiththisOwner'sManual.Whetheryouareafirsttimeuserofatreadmillor
aseasoned"PRO",understandingthecorrectuseoftheequipmentwillenhance
yourabilitytoachieveyourexercisegoalssafelyandsuccessfully.
Treadmillprofile:
BookHolder
CupHolder
LeftHandleCap
HandTouchReadout
LeftLifePost
RunningBelt
BeltAdjustmentBolt
ElectronicDisplay
DisplayBack
SafetyKey
RightHandleCap
RightLiftPost
PowerSwitch
MotorShroud
Leveler
Cylinder
TronsportWheel
SupportBracket

4
ASSEMBLINGYOURTREADMILL
InstallationRequirements
ListofParts
ThankyouforpurchasingaSportsArtFitnessproduct.Forproperinstallationplease
readandfollowtheinstructions.Ifthetreadmillisnotassembledproperly,youcould
voidtheSportsArtFitnessLimitedWarranty.
Ifthereareanypartsortoolsthataremissingpleasecontactyourdealer
immediately.
Toensuresafetytoyourselfandthetreadmill,werecommendyoudropthe
sidesoftheboxandslidethetreadmillfromtheboxratherthanlifting.
Beforeassemblingyourtreadmill,makesurethatyouhaveallfollowingitems:
1.T-handlehexkeywrench(M6)
2.T-handlehexkeywrench(M5)
3.Two-wayscrewdriver
4.Onesafetykey
5.Fuse
6.Screwcap(2)
Caution:
(7A/220V,12A/110V)

5
Pleaseseethepartillustrationsbelow
1.RightLiftPost
2.LeftLiftPost
3.ElectronicDisplay
4.Handrail
5.RightHandlecap
6.LeftHandlecap
7.watercup
TREADMILLASSEMBLY
StepbyStepInstructions
1.1.1Releasethecordsfromtherightliftpostandpiercethecordthroughpost,then
firmitinthesupportbracket
1.2Placethewalkbeltbetweenthetwobeltguidesonthedeck.
(asshownonFig.1)
2.
Installtheleftliftposttotheleftliftpostsupportbracketinthetreadmill'sframe.
Notethescrewsattachedtotheliftpostbracketsandpleaseremovethesescrews
firstly.Insertthedatacableintotherightliftpost,thenrouteitthroughtheliftpost
supportbracketonthetreadmill'sframe.Tuckthecableinplacewhereitwillnot
bepinched.
6
Fig.1
Fig.2

3.UsetheT-handlehexkeywrench(M6)tofastentheleftandrightliftpost,please
donotfullytightenityet(seeFig.3)
4.4.1Connecttheribboncableondisplayboardtorightliftpost,theninsertthe
displayboardintotheliftpostsecurely.Pleasemakesuretheribboncableis
fullyinsidethepost.(screwsarelocatedonthetopoftheliftpost,please
removethembeforeinstallthedisplayboard)
4.2Tightenthescrewsonthebottomforbothpostfirst,thentightentheoneson
thetop.
Fig.3
curvedwasher flatwasher
Fig.4
curvedwasher flatwasher
7

5.Pressdowntosecurethesupportbracket,thanplacecoversonthescrewheads
aftertighteningthescrews.
6.InsertthewatercuptothedisplayboardasshownonFig6.
Fig.6
8
Fig.5
curvedcap flatcap

7.7.1Connecttheribboncableconnectorfromthehandlebartothedisplayboardas
shownindiagram7-1(p.s.HRequippedonly)
7.2Securelystorethecableinsidethepostasshownindiagram7-2.Please
makesurethecableisnotsquashedortwisted.Screwswereplacedunderthe
cover,pleaseremembertoremovethembeforeinstallation.
7.3Insertthehandlebarintodisplayboard,andfastenitwithscrewsasshownin
diagram7-3.
7.4Doesthesametotheotherhandlebar.(asshownonFig7)
8.Removescrewsfromthehandleconnectorcovers.Pushhandleconnectorcovers
intoplaceasshownindiagramand.Tightenthescrewfromthebottomup
Fig8.
Fig.8
9
Fig.7
(7-1) (7-2)
(7-3)
LR

9.ConnectthepowercableasindicatedinFig.9,andsecureitbytighteningthe
screws.
10
Fig.9
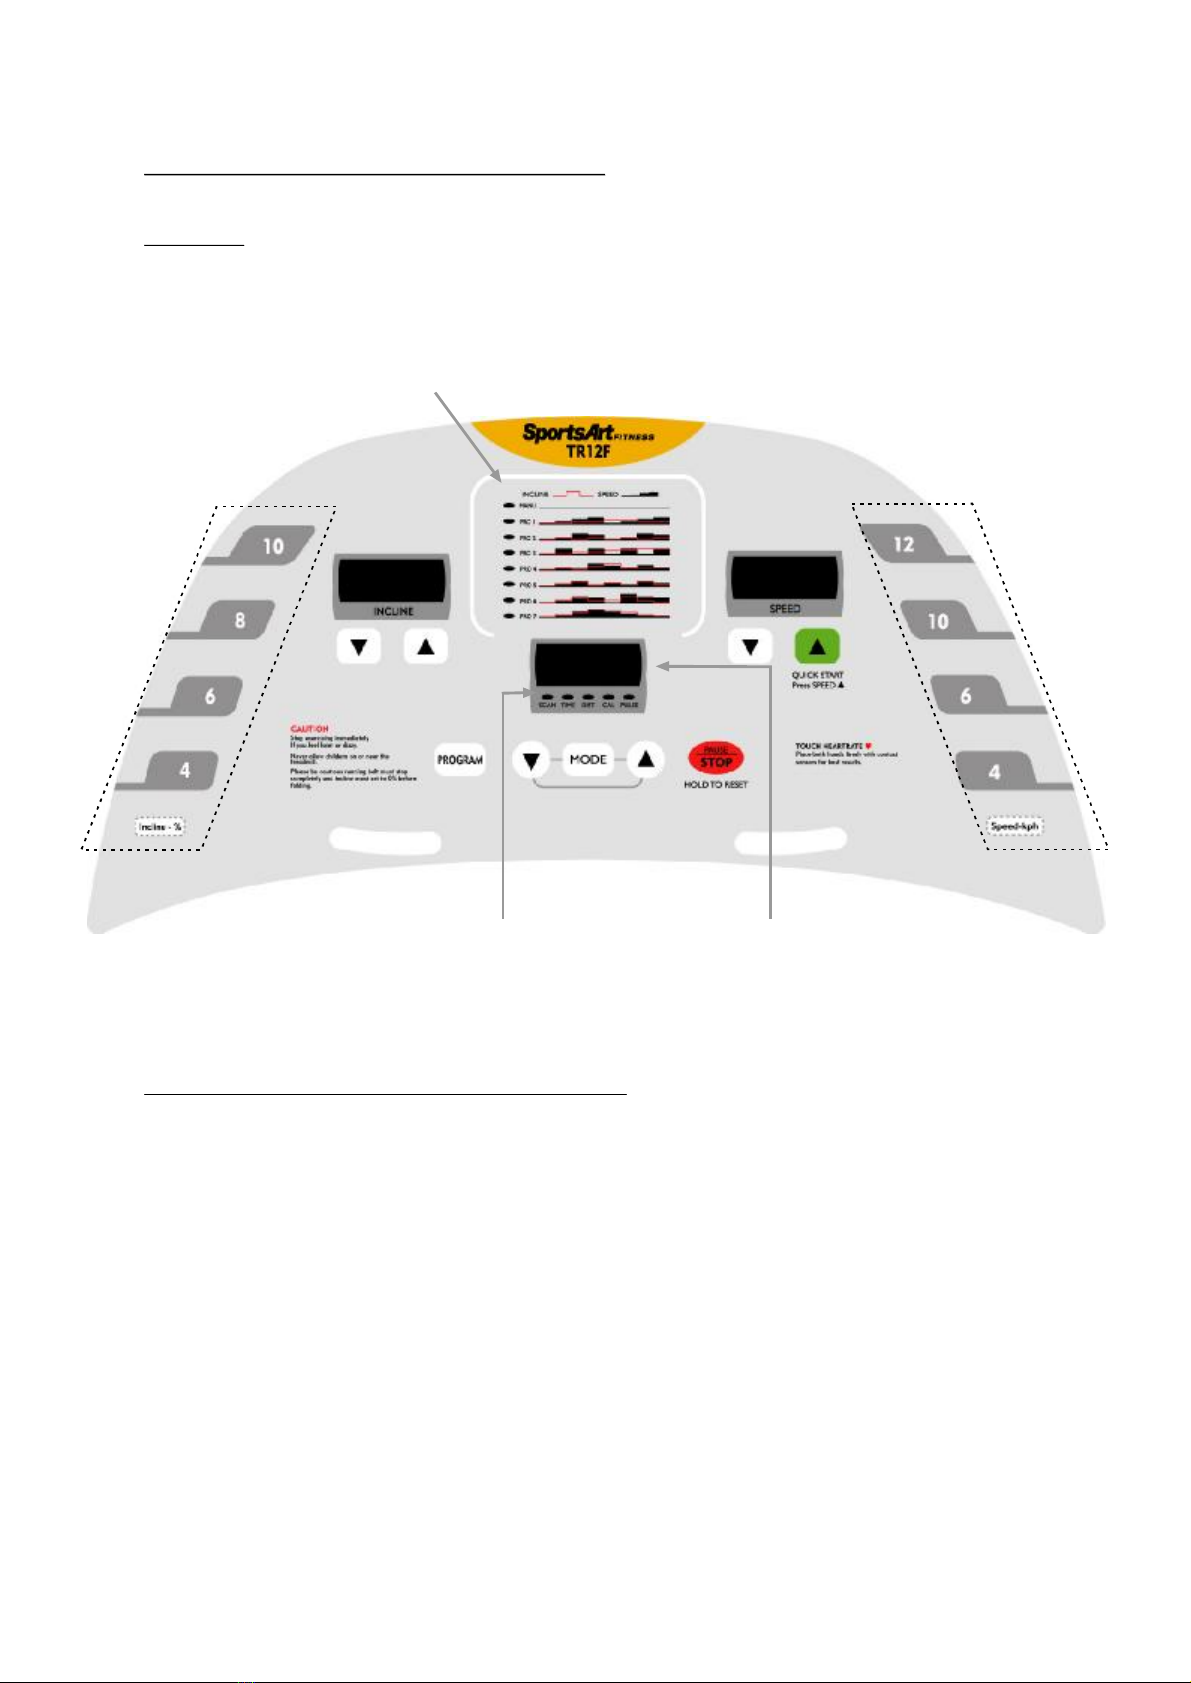
TR12FOperatingInstructions:
Display
1.FeedbackWindowSpecifications:
CALORIES-0.0to9999KCAL.Windowshowscaloriesexpenditure.
SPEED-0.5~9.0MPHor0.814.5KPH
TIME-00:00to99:59,setuprange5:00~99:00
DISTANCE-0.00to9999Mile/Km,setuprange0.10~99.99Mile/Km
HEARTRATE-40to250beats
INCLINE-0to12%,onetimetoadvance+/-1%
WEIGHT-50to220LB/22to100KG(Defaultsetting:75KG/165LB)
PROGRAMS:MANUALPROG1~PROG7
、
11
ProgramIndicators
QuickElevationKey QuickSpeedKey
InclineWindow SpeedWindow
ModeWindow
ActiveModeIndicators

2.BasicInformation
3.SafetyKeyOperation
4.HowtoOperateTR12FTreadmill
ProgramIndicatorslighttoindicatetheactiveexerciseprogram:MANUAL
PROG1~PROG7.
ActiveModeIndicatorslighttoindicatetheactivemode:SCANTIMEDIST
CALPULSE
FunctionKeysactivatespecificfunctions:SPEEDSPEEDSTOPMODE
MODEMODEPROGRAMINCLINEINCLINE.
QuickKeyscanbeusedtoimmediatelyestablishaspecificinclineandspeedlevel.
Thedisplaywillshow""ifthesafetykeyisnotinplace.Pleaseputthe
safetykeyintoplacetooperatetheunit.
4-1QuickMode
PresstheQuickSpeedkeyorSPEED.Thetreadmillwillstartatlowspeed,
afterwhichthespeedcanbemodified.
4-2Workout
Togetanaccuratecalorieexpenditurereading,followinstructionsbelowtoinput
youruserweight.
(1)Whilethemotorisnotmoving,presstheMODEkeyforthreesecondsto
entersetupmode.Alldisplaywindowswillblacken,excepttheMODE
window,whichwillshowthepresentweightvalue(default75KG/165LB).
PressMODE/keytoadjustthevalue.
Weightrange:50220LB(22100Kg).PresstheMODEkeytoexitsetup.
(2)Toestablishaworkouttarget(timeordistance),presstheMODEkeyuntil
TIMEorDISTANCEappears.UseMODE/toestablishyourdesired
value.PresstheMODEkeyagaintoconfirmyourchoice.
PressthePROGRAMkeytochooseyourfavoritemode.PresstheQuick
SpeedbeyorPressSPEEDtostart.
、
、、、
、
▲、 ▼、、
▲、、▼、、
▲、▼
▲
▲▼
▲▼
▲
12

13
5.OperatingInstructions
5-1TheQuickKeys
5-2SPEEDWindow
5-3INCLINEWindow
5-4MODEWindow
5-5MANUALMODE
(onthebothsideofthedisplay)
(1)QuickSpeedcontrolkeysareontheright.Pressthesekeystoworkoutatthe
relatedspeed.OnceaQuickSpeedKeyispressed,theSPEEDwindowwill
indicatedtheselectedspeedvalue.Themotorwilloperateattheselected
speed.
(2)Quickelevationcontrolkeysareontheleft.Pressthesekeystoworkoutat
therelatedincline.OnceaQuickElevationKeyispressed,theincline
windowwillindicatedtheselectedinclinevalue.Themotorwilloperateat
selectedincline.
SPEED/keysareundertheSPEEDwindow.Pressthesekeystoadjust
thespeed+/-0.1MPH/KPH.
INCLINE/keysareundertheINCLINEwindow.PressINCLINE/keys
toadjusttheinclinelevel+/-1%,fromaminimumof0%toamaximumof12%.
(1)Therearefivemodes:SCAN,TIME,DIST(distance),CAL(calories),
PULSE(heartrate).PresstheMODEkeytochangegradually.(PULSEis
onlyavailableonmachineswiththeheartrateoption.)
(2)InSCANmode,thedisplaytogglestothenextmodeeveryfourseconds.
SCAN,TIMESCAN,DISTSCAN,CALSCAN,PULSESCAN,TIME
(3)Toestablishaworkouttimegoal,followinstructionsbelow:
3.1:WhileTIMEindicatorlights,pressMODE/key.Onetimeto
advance+/-1min.TheprevioussetDISTgoalwillreturnto"0".
(4)Toestablishaworkoutdistance,followinstructionsbelow:
4.1:WhileDISTindicatorlights,pressMODE/key.Onetimeto
advance+/-0.1Mile/0.1Km.TheprevioussetTimegoalwillreturnto"0".
MANU(manual)modeputstheuserindirectcontrol.Inthismode,theusermust
establishunitspeedandincline.Themachinewillnotstopuntiltheuserpresses
theSTOPkey.
▲▼
▲▼▲▼
→→→→
▲▼
▲▼

14
5-6PROGRAMKEY
5-7STOP&RESET
5-8COOLDOWN
5-9MachineFolding
5-10ERROR
(1)WhenyoupressthePROGRAMkey,theprogramwillchangeintheorder
shownbelow:
PROG1PROG2PROG3PROG4PROG5PROG6PROG7
MANU
(2)EachPROGRAMhaseightsegments.Eachsegmentlasts60seconds.
(3)Whileexercising,youcanchangethespeedofanyprogramatanytime.That
changewillalsoapplytothecorrespondingprogramfromthereafter.
(1)STOP
Aworkouttargetvaluecanbesetupduringaworkoutorwhenthe
equipmentstops.PresstheSTOPkeytostopthemachinebeforethetarget
valuehasbeenobtained.Thewalkbeltwillstopmovingandtheworkout
feedbackwillstopaccumulating.Toresumeyourworkout,presstheSPEED
key.Alloperationswillresume.
(2)RESET
HoldtheSTOPkeydownoverthreesecondstoresetalldata.
Afterreachingyourexercisegoal,themachinewillenterCOOLDOWNmode.
Thespeedwillslowlydecreaseuntilthevaluereaches0.
(1)Thistreadmillfoldsupforeasystorage.Beforefoldingthetreadmill,please
bringtheinclinelevelto"0".Ifnot,theinclinewillautomaticallymoveto"0".
(2)IfE-14appearswhilethetreadmillisbeingfoldedupduringworkout,thanthe
motorwillstopworking.Andiftheinclinelevelisnotinlevel"0",itwillmove
to"0"automatically.
(3)Themachinecannotbeusedwhilefolded.
Thefollowingerrormessages(whichappearintheMODEwindow)indicate
malfunctionsasexplainedbelow:
(1)E-1:Speedmalfunction;Pleaseinspectwiresfromtheopticsensortothe
driveboard.
→→→→→→→
▲

(2)E-3:Actualspeedisoverthanthespeedsetting;Thiserrorwillnotstopunit
operation.Donotpullthebeltfasterthenthespeedsetting.
(3)E-7:Inclineerror;Contactaserviceprovider.
(4)E-10:Motorstopsabnormally;Pleaseinspectthedriveboard.
(5)E-14:
a:Motorisoverheated
Ifthismessageappearswhenmotorisrunningandnotwhiletheunitis
beingtoldedup,themotorisoverheated;ifthismessageoftenappears,
pleasecontactyourlocaldealer.
b:AbnormalFolding
Thismessagecanappearwhenmotorisrunningandtheunitisbeing
foldedup.
c:AbnormalStarting
ThismessageappearsifsomeonepressedtheSPEEDkeywhilethe
machineisfolding.
15

16
GUIDELINESFOREXERCISE
HowhardshouldIexercise?
HowlongshouldIexercise?
HowoftenshouldIexercise?
Studiesshowthattoachievethe
benefitsofaerobicexercise,itis
necessarytoworkwithinyour
trainingzone.Yourtrainingzone
dependsonyourageandlevelof
fitness.
Theabovechartindicatesthe
recommendedHeartRatetraining
zones(darkenedareaofthechart).
Thesefiguresarecalculatedby
taking220minusyourage,and
calculating80%foryourmaximum
and65%fortheminimumheart
rateforaerobicexercise.
Thedurationofyourexercisesessiondependsonyourfitnesslevel.Ingeneral,itis
recommendedthatyoumaintainyourheartrateinthetrainingzoneforatleast15to
20minutestorealizeanaerobicbenefit.Beginnersshouldalwaysstartslowlyand
bringtheirworkoutsessionsupto20minutesormore.Asyourfitnesslevel
increases,youwillbeabletomaintainyourheartrateinthetrainingzoneforlonger
periods:Usuallybetween20and30minutes.
Whenfirststartingyourworkout,usethefirstseveralminutestowarmup,then
slowlyincreaseyourworkloadtobringyourheartrateintoyourspecifictrainingzone.
Attheendofyourworkout,graduallydeceaseyourworkload,thenexerciselightlyas
a"cooldown".
Researchindicatestoachievethegreatestbenefits,shouldbeperformed3-5timesa
week.Itisimportanttoallowsufficienttime,atleast24hours,foryourbodyto
recoverafterexercise.
CAUTION:
HeartRatetrainingzonesareapproximations.Alwayscheckwithyour
physicianstolearnwhatappropriateheartratelevelisbestforyourfitness
level.
HE

ADJUSTTHERUNNINGBELT
Thebeltisproperlyalignedatthefactory.However,thebeltmaymoveoffthecenter
duringshippingandhandlingorbyuseonanunevensurface.Therefore,itis
importantthatyoucheckthebelt'salignmentbeforeusingthetreadmill.
Thecorrectalignmentoftherunningbeltiscriticalforthesmoothoperationofthe
treadmill.
Donotallowanyonetowalkontherunningbeltduringthisprocedure.
Thegapbetweentheedgeoftherunningbeltandtheedgeofthelandingstrip
shouldbeequalonbothsidesofthetreadmill.IfgapAandBarenoteven,adjust
thewalkbeltimmediately.
Failuretoadjustthewalkbeltcouldresultindamagewhichisnotcoveredbythe
warranty.Pleasefollowthebeltadjustmentprocedureasfollows.
CAUTION:
Fig.10
17

BELTADJUSTMENTPROCEDURE
1.Turnonthepowerswitchlocatedatthefrontofthetreadmill.Placethesafetykey
initsposition.
2.PresstheSPEEDbuttontoincreasethespeedto2.0mph/3.2kph.Determine
beltplacementinrelationtolandingstripsonbothsidesofthetreadmill.Make
suretheedgeofthewalkbeltisalignedandparalleltotheedgeofthelanding
strip.AlsomakesurethewidthofareaAandBisapproximatelythesame.
Observewalkbeltoperationforabout30seconds.
3.Adjustthewalkbeltimmediatelyifitisnotparalleltotheedgeofthelandingstrip
andthewidthofareaAandBarenotthesame.Pleasefollowthestepsbelowto
returnthebelttotheproperarea.
4.Ifthebeltistoofarleft:Turntheleftbeltadjustmentboltlocatedattherearofthe
treadmillclockwise1/4turnatatime,usingtheAllenwrench.Thenturntheright
beltadjustmentboltcounterclockwise1/4turn.Letthetreadmillrun30seconds,
thencheckthepositionofthebelt.Ifthebeltstillhasnotreturnedtotheproper
zone,repeatwithanother1/4turnonbothsidesuntilthebelthasreturnedtothe
properzone.Donotturntheadjustingboltmorethan1/4turnatatime.
5.Conversely,ifthebeltistoofarright,turntherightbeltadjustmentboltclockwise
1/4turn,thenturntheleftadjustmentboltcounterclockwise1/4turn.Thenletthe
treadmillrunatleast30seconds;checkthepositionofthebelt.Ifitstillhasnot
returnedtotheproperzone,repeatwithanother1/4turnuntilthebelthas
returnedtotheproperzone.Donotturnadjustingboltmorethan1/4turnata
time.
▲
18

Periodicallymonitorthepositionofthebelttoensurepeakperformance:
Overtighteningofthebeltcausesdamageandprematurefailureofthe
precisionbearingsinthefrontandrearrollers.
Whenyouareusingthetreadmill,ifyoufeelapauseinthebeltwitheachfootplant,
thebeltmaybetooloose.Stopthemachinetocheckthebelttension,pullthe
runningbeltupinthemiddle(seeFig.11-1&11-2).Thereshouldbeabout30m/m(1
1/8")or3kgsof"give"inthebelt(seeFig.11-3).Ifthereistoomuch,adjustbothrear
rollerboltsclockwise1/4turnatatime(seeFig.11-1).Then,checkthebelttension
again,ifmoreadjustingisrequired,givebothadjustingboltsanotherslightturn.Do
notadjustover2fullturns.
Conversely,ifthereisnotenough"give",adjustbothrearrollerbolts
counterclockwise1/2turnatatime.
Toavoidinjury,specialcaremustbetakenwhenadjustingtherunning
belt.Removeanylooseclothingorshoelacesandtiebackyourhair.Be
verycarefultokeepyourfingersoranyotherobjectsclearofthebeltand
rollers.
Thetreadmillisdesignedtocarryspecificweightsatspecificspeeds.Thetreadmill
willnotstopimmediatelyifanobjectbecomescaughtinthebeltorrollers.
CAUTION:
19
Fig.11-1
Fig.11-2
Fig.11-3
Table of contents
Other Sport Art Treadmill manuals


