Spotnails XS6650 User guide

1100HicksRoad,RollingMeadows,IL60008USA
Phone:847‐259‐1620*800‐873‐2239Fax:847‐259‐9236*888‐369‐2588
www.spotnails.com
Takenocetotheschemacdiagramincludedinthismanual
Pleasecontactcustomerservicetoplaceanorderfor
replacementparts:
Operation, Maintenance
and Safety Manual
Pneumatic Tools
PLEASEREAD!Thismanualcontainsimportantinformationabout
productsafetyandshouldbereadbyalloperatorsofthistool.Contact
yourSpotnailsrepresentativeordistributorwithanyquestions
concerningthetoolanditsuse.
Spotnails
1100HicksRoad,RollingMeadows,Il60008
1‐800‐873‐2239
Distributed by: BEST MATERIALS ®
Ph: 800-474-7570, 602-272-8128 Fax: 602-272-8014

TABLEOFCONTENTS
Page
Safety Instructions ………………………………….. 3
Safety Warnings ……………………………………. 3
Employer Responsibility …………………………… 3
Operation …………………………………………… 4
Explosion Hazard ………………………………….. 5
Air Supply & Connections ………………………… 5
Loading ……………………………………………. 6
Tool Service/Maintenance ………………………… 7
Tool Troubleshooting Guideline …………………… 8
Warranty ……………………………………………. 11
NOTE: Spotnails tools are quality built and designed to provide
maximum performance when used with Spotnails fasteners.
Spotnails cannot assume responsibility for performance if our tools
are used with fasteners or accessories not meeting the same high
quality standard as Spotnails fasteners and accessories. Spotnails
cannot assume responsibility for performance of tool if tool has
been modified or repaired by non-authorized people.
Page2
WARRANTYITEMS
Warrantyforcapassembly’s,casngsandhousingcasngsisoneyear
Warrantyforbumpers,‘o’rings,driverbladesandpistonringsisnotapplicableas
theyarenormalwearingpartswhoselifeisdependentonapplicaon.
Warrantyforallotherpartsis90days.
WARRANTYCONDITIONS
Thebeginningdateinwhichthewarrantyisinforceisthedateofpurchase.
Thewarrantyisnottransferable.
Thewarrantyisvoidedbyanyofthefollowing:
A.Abuse,misuseordamagetothetool.
B.UseofpartsotherthangenuineSpotnailsparts.
C.Useoffastenersnotdesignatedforuseinthetool.
D.Modificaonstothetoolthataltertheoriginalfunconorintent
ofuseofthetoolbyanyoneotherthanSpotnails.
Spotnailsretainstherighttoreplaceorrepairanywarrantyitemsitdeemsnecessary.
Page11

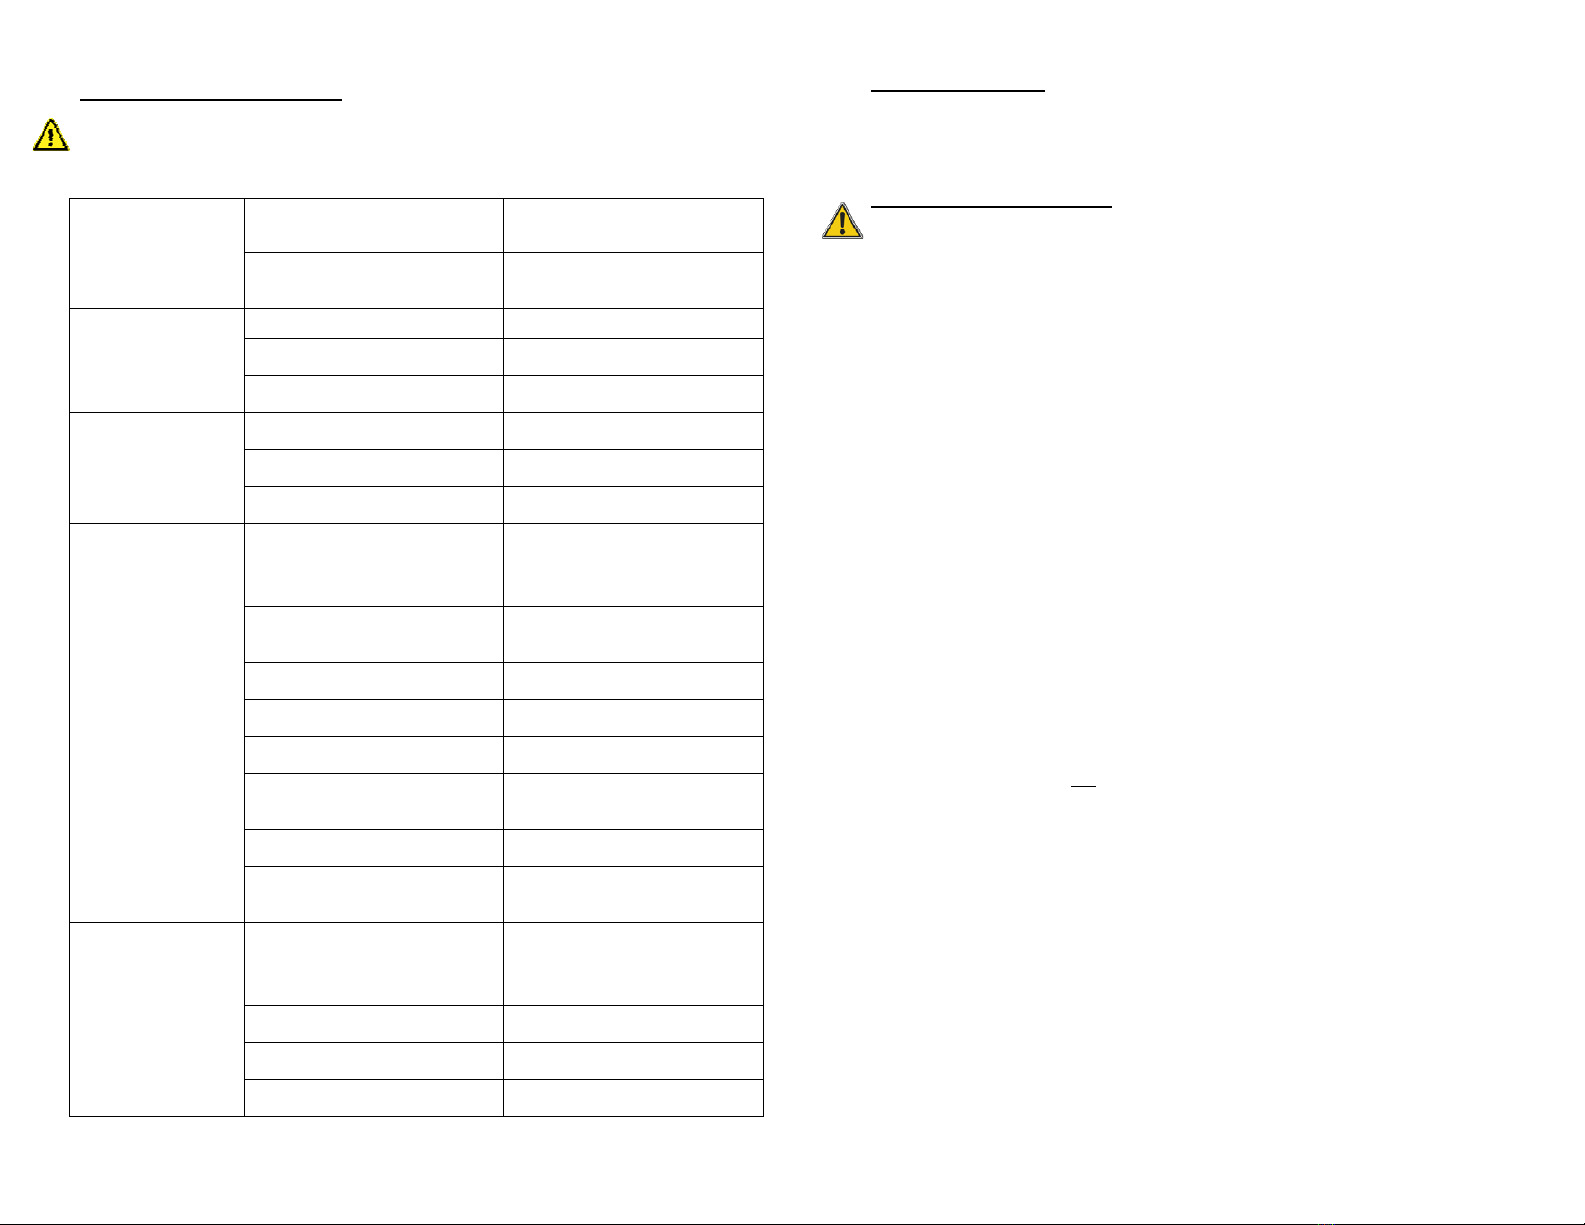
SYMPTOM CAUSEFIX
COILNAILERS
Skippingfasteners
1.Drypistonfeed1.Addoilintoairinletin
2.Feedpistono‐rings2.Replaceo‐rings
3.Checkfeedpawlto
ensurefreemovement
3.Inspectpawlandwipe
clean
4.Canisterboomhas
wrongfastenerseng
4.Adjustcanisterboom
forcorrectlengthofnails
5.Brokenwireweldnails
incanister
5.Removecoilofnailsand
replacewithnewcoil
Fastenersjamming
incanister/tool
1.Wrongfastenersbeing
used
1.Useonlyrecommended
fastenersfortool.
2.Brokenwireweldnails
incanister
2.Removecoilofnailsand
replacewithnewcoil
ALWAYSDISCONNECTTOOLFROMAIRSUPPLYANDREMOVEFASTENERS
FROMMAGAZINEPRIORTOPERFORMINGREPAIRSORCLEARINGJAMS
Page10
SAFETYINSTRUCTIONS
Beforeoperangthistool,alloperatorsshouldreadthismanualtounderstandand
followallsafetywarningsbeforeconnecng,disconnecng,loading,operang,
maintaining,changingaccessorieson,orworkingnearthetool.Failuretodosocanresult
inseriousbodilyinjuryorevendeath.
EyeProtecon
Theoperatorandallpersonnelinthegeneralareashouldweareyeproteconthat
conformstotherequirementsofANSIZ87.1.Eyewearmustprovideproteconagainst
flyingparclesbothfromthefrontandside.
HearingProtecon
Theoperatorandallpersonnelinthegeneralareashouldwearhearingproteconin
workingareawhereexposuretoloudnoiselevelmaycausehearingdamage.
HardHatProtecon
Insomeenvironments,itmaybenecessarytowearheadproteconthatconformstothe
requirementsofANSIZ789.1
SAFETYWARNINGS
Failuretofollowanyoftheinstruconsbelowcouldresultinsevere
injurytotooluserandbystandersorcausedamagetotoolandproperty.
Readandunderstandallinstruconspriortooperangtool.Stayalert,focusonyourwork
andusecommonsensewhenworkingwithtools.Donotusetoolwhilered,aerhaving
consumeddrugsoralcoholorwhileundertheinfluenceofmedicaon.Neverpointthe
tooltowardyourselforanyotherperson.
Keepbystandersandchildrenawaywhileoperangtool.Donotengageinhorseplaywhile
usingthetool.Respecttoolasaworkingimplement.Donotuseasahammerorawedge.
Donotli,pullorlowertoolbythehose.
EMPLOYERRESPONSIBILITY
Employer,toolownerandtooloperatorareresponsibleforthesafeuseofthetooland
ensuringthatthemanufacturersOPERATINGANDSAFETYINSTRUCTIONSareavailableto
operators.
Employerisresponsiblefortrainingtheoperatorinthesafeuseofthetoolandallowing
onlypersonswhohavereadandunderstandthetoolOPERATINGANDSAFETY
INSTRUCTIONStooperateand/orrepairthetool.Iftoolneedsrepair,employerisrespon‐
sibleforremovingthetoolandtaggingitforrepair.
Employerisresponsibleinselecngtheappropriatetoolactuaonsystemforthetool,
takingintoconsideraontheworkapplicaonsforwhichthetoolisused.
Employerisresponsibleforpersonalsafetywhenthetooloperatorandallotherpersonnel
intheworkareaarewearingappropriateeyeproteconequipmentandwhenrequired,
otherappropriatepersonalprotecveequipmentsuchashead,hearingandfootprotecon
equipment.
Page3

OPERATION
Donotusetoolwithmissingordamagedsafetywarninglabels
Inspectthetoolforproperoperaonpriortouse.Checkformisalignmentorbindingof
movingpartsandanyothercondionthatmayaffectthetoolsoperaon.Donot
overreach.Keepproperfoongandbalanceatallmes.
Alwaysassumethatthetoolcontainsfastenersandneverholdorcarrythetoolwitha
fingeronthetriggerorpointthetoolatyourselforanyoneelse.Keephandsandbody
awayfromfastenerdischargeareaoftool.Donotloadtoolwithfastenerswhenany
oneoftheoperangcontrolsareacvated.
Nevertamperwiththesafetydeviceorusethetoolifthesafetydeviceisnotfunconing
properly.
Donotactuatetoolunlesstoolitisplacedfirmlyagainsttheworkpiece.Drivefasteners
intoproperworksurfaceonlyandnotintootherfasteners.
DonotoperatetoolwithanypowersourceotherthanthatspecifiedintoolOPERATING
ANDSAFETYINSTRUCTIONS.Donotoperatetoolwithanyoperangpressureotherthan
thatspecifiedintoolOPERATINGANDSAFETYINSTRUCTIONS.
Alwaysselectanactuaonsystemthatisappropriatetothefastenerapplicaonandthe
trainingoftheoperator.
Useextracauonwhendrivingfastenersintoexisngwallsorotherblindareasto
preventcontactwithhiddenobjectsorpersonsonotherside(e.g.,wires,pipes,etc.)
Whenworkingclosetoanedgeofaworkpieceoratsteepangles,usecaretominimize
chipping,splingorsplinteringorfreeflightorricochetoffastenerswhichmaycause
injury.
Disconnectthetoolwhen:
Performingrepairsandclearingjams.
Elevang,loweringorotherwisemovingthetooltoanewlocaon
Toolisoutsideoftheoperator’ssupervisionorcontrol
Removingfastenersfromthemagazine
Aerdrivingafastener,toolmayspringback(recoil)causingittomoveawayfromthe
worksurface.Toreduceriskofinjuryalwaysmanagerecoilby:
Alwaysmaintaincontrolofthetool.
Allowrecoiltomovetoolawayfromworksurface.
Donotresistrecoilsuchthattoolwillbeforcedbackintotheworksurface.In
“contactactuaon”mode,ifworkpiececontactisallowedtore‐contactworksurface
beforethetriggerisreleased,anunintendeddischargeofafastenerwilloccur.
Alwayskeepfaceandbodypartsawayfromtool.
Page4
ALWAYSDISCONNECTTOOLFROMAIRSUPPLYANDREMOVEFASTENERS
FROMMAGAZINEPRIORTOPERFORMINGREPAIRSORCLEARINGJAMS
PLEASECONTACTCUSTOMERSERVICEFORTECHNICALSUPPORTIFYOU
HAVEANYOTHERPROBLEMS:800‐873‐2239
Page9
SYMPTOM CAUSEFIX
Skipping
fasteners
1.Feedpistoninneedof
lubricant
1.Lubricatefeedpiston
2.O‐ringoffeedpistonworn
out
2.Replaceo‐ring
3.Socketheadcapstuck3.Cleantheobstaclethat
blockthecap
4.Bumperwornout4.Replacebumperifworn
5.Nailsincorrectlysetin
magazine
5.Adjustthenailholderand
resetthenailsproperly
6.Driverbladeblockedor
bent
6.Cleantheobstaclethat
blockthedriverbladeor
replacethedriverblade
7.Airobstructedorair
pressureinsufficient
7.Cleantheobstacleand
adjustairunderproper
pressure
8.Pistono‐ringwornout8.Replaceo‐ring
9.Lackoflubricant9.Lubricateproperly
10.Feedspringwornout10.Replacefeedspring
11.Boltsonmagazineloose11.Tightenthebolts
12.Magazinebrokenordirty12.Replacemagazineif
worn,cleanifnecessary
13.Fastenerstooshort13.Useonlyrecommended
fasteners
Fastenerswill
notdrive
completely
intoworkpiece
1.Insufficientairpressure1.Increaseairpressure
DONOTEXCEED120PSI
2.Checkdepthadjustment
sengwhereapplicable
TROUBLESHOOTINGGUIDELINE
ALWAYSDISCONNECTTOOLFROMAIRSUPPLYANDREMOVEFASTENERSFROM
MAGAZINEPRIORTOPERFORMINGREPAIRSORCLEARINGJAMS
Page8
SYMPTOM CAUSEFIX
Triggervalve
housing/stem
leaksair
1.O‐ring/sealscutorworn1.ReplaceO‐ring/seals
2.Valvepackingwornout2.Replacetriggervalve
assembly
Caporexhaust
coverleaksair
1.Capsealwornout 1.Replacecapseal
2.Boltsoncaploose2.Tightenthebolts
3.Exhaustvalvewornout3.Replaceexhaustvalve
Noseleaksair1.Boltsonnoseloose1.Tightenthebolts
2.Bumperwornout2.Replacethebumper
3.Gasket/o‐ringcutorworn3.Replacegasket/o‐ring
Lackofpoweror
nofuncon
1.Airpressureinsufficient1.Adjustairpressure
properlybetween70‐120
PSI
2.Lackoflubricant2.Lubricatepistono‐ring,
cylinderorexhaustvalve
3.Cylinderspringbroken3.Replacecylinderspring
4.Wornheadvalveo‐rings4.Replaceo‐rings
5.Headvalvestuck5.Disassembleandlubricate
6.Blockedexhaust
6.Checkbumper,head
7.Triggerassemblyworn 7.Replacetriggerassembly
8.Drivernotfunconing
properly
8.Disassembledriverto
clean
Nailsjammed
1.Inwrongspecificaon
bentorpoorqualityofthe
nails
1.Applycorrect
specificaonandqualified
nails
2.Driverbladewornout2.Replacedriverblade
3.Boltsloose3.Tightenthebolts
4.Driverguidewornout4.Replacedriverguide
EXPLOSIONHAZARD
Donotoperatetoolinexplosiveatmospheres,suchasinthepresenceofflammableliquids,
gasesorcombusbledust.Sometoolswillcreatesparksthatcanbeanignionsourcefor
afireorexplosion.
AIRSUPPLY&CONNECTIONS
Donotuseairsupplypressuresthatexceed120PSI
(8.28baror8.4kg/mm’)
Useonlyclean,regulatedcompressedairasapowersourceforthistool.Donotusebole
gases,combusblegasesoroxygenasapowersourceforthetoolasthetoolmayexplode.
Recommendedoperangpressureis80to110p.s.i.(8.28baror8.4kg/mm’)Donotexceed
therecommendedmaximumoperangairpressureastoolwearwillbegreatlyincreased.
Theairsupplymustbecapableofmaintainingtheoperangairpressureofthetool.Pressure
dropsintheairsupplycanreducethetool’sdrivingpower.
Ifaregulatorfails,thepressuredeliveredtoatoolmustnotexceed1.5mesthemaximumair
pressureor200psig(13.8bar)whicheverisgreater.
Useapressureregulatortoallowvisualinspeconoftheairpressurebeingdeliveredtothe
tool.
AirHoses
Useairhosesthathaveratedpressuresofupto150%ofthemaximumpressurethatcanbe
generatedbythepowersource.Thesupplyhoseshouldcontainafingthatwillprovide
quickdisconnecngfromthemaleplugonthetool.
Fings
Installamalepneumacfingontotherearcapofthetool,ensuringthatthefingallows
thetooltoexhaustanyairinthetoolwhentheairhoseisdisconnected.
Donotusefingsthatwillnotallowthetooltoexhaustwhentheairsupplyisdisconnected.
Lubricaon
Useairlinelubricators.Iflubricatorsarenotavailable,orifhoselengthsexceed10feet,
add2dropsofnon‐detergent20weightoildailyintotheairinletofthetool.
Addtwodropsofnon‐detergent,20weightoilintothemalefing.
ColdWeatherStorage
Removeallfastenersfromthetool.
Neverstorethetoolincoldweatherenvironmentsforanyduraonofmeasanyfrost
oriceformaoninthetoolwillcausetoolfailures.
Forprolongedstorage,addtwodropsofoiltotheairinletofthetoolpriortodisconnuing
use.Alsocleantheexteriorofthetoolwithamildsolvent.
Page5

LOADING
Alwayshandletoolwithcare.
Visuallyinspectthetoolforwornordamagedpartspriortouse.
1.Disconnectfromairsupply
2.Installamale,pneumaticfittingintotherearcapofthetoolensuringthatthefitting
allowsthetooltoexhaustanyairinthetoolwhentheairhoseisdisconnected.
3.Addtwodropsofnon‐detergent,20‐weightoilintothemalefitting.
4.ConnecngtheAirHose
a.Useaquickconnectfingtothetoolandchecktheairpressurereadingonthe
regulatortoensureitdoesnotexceed120p.s.i.Checkthetoolforanyairleaks.
b.Placethetool,emptyoffasteners,inoperangposiononascrapworkpiece.
Fullydepressthesafetyandpullthetriggertoverifythatthetoolcycles.
5.Usingthefollowingcycleguidelines,cyclethetoolseveralmestocheckforproper
tooloperaon.
BEFOREUSINGVERIFYTHETRIGGERSETTINGTOENSUREITISSET
FORDESIREDTRIGGERACTUATION
RedTrigger–Single‐sequenalactuaon–RestricveInstalled
Thetoolwillnotcycleasecondmeunlessboththetriggerandsafetyyokeare
fullyreleasedandthendepressedagain.
Black–ContactActuaon–BumpFireIncluded
Thetoolwillnotcycleasecondmeunlessthetriggerand/orsafetyyokearefully
releasedandthendepressedagain.
Blue–SelecveActuaon‐InstantConversionBump/Restricve
Thistriggerallowsforoperatortoselecteithersingle‐sequenalactuaonor
contactactuaon.Seeaboveforexplanaonbeforeusing.
6.Openthemagazineorslidethepushertothelockedpositionandloadthe
fastenersapprovedfortheuseinthetool.
7.Cyclethetoolonascrappiecetoevaluatethedepthofthepenetrationbythe
fastenerintotheworkpiece.
8.AdjustableDepthControl
Toadjustthedepthofpenetration,disconnecttheairhose,adjustthedepthcontrol
knoborscrew,connecttheairhoseandcyclethetoolonascrapworkpieceto
evaluatetheadjustment.
Repeatasneededtosetthecorrectdepth,usingtheminimumamountofair
pressuretodrivethefastener.
Page6
TOOLSERVICE/MAINTENANCE
Cleanandinspectyourtooleverymeyouuseit
Toolserviceshallberepairedorequippedonlywithpartsoraccessoriesthatare
suppliedorrecommendedbyAuthorizedSpotnailsrepairpersonnel.Serviceorrepairsby
unqualifiedpersonnelmayresultinariskofinjury.
Pleaserefertotheschemacdrawingbeforestarnganyrepairs.
Toolshouldbeinspectedperiodicallyandreplaceanywornorbrokenpartstokeepthe
tooloperangsafelyandefficiently.
Tightenallscrews.Loosescrewscanresultinunsafeoperaonoftool.
Withtooldisconnectedfromtheairsupply,regularlyinspectthesafety,thetriggerand
thespringforfreeunhinderedmovement.Neveruseatoolthatrequiresservicing.
Wheneverrepairsorreplacementofpartsinsidethebodyoccur,checkthepiston‘o’ring
foradequategreaselubricaon.
Periodicallycleanthemagazineandnoseofthetoolwithamild,non‐flammablesolvent.
Disconnecttoolfrompowersourcewhennotinuse,loweringormovingtooltoanew
locaon,toolisoutsideoftheoperator’ssupervisionorcontrolandremovingfasteners
fromthemagazine.
Wrienapprovalofthetoolmanufacturermustbeobtainedpriortomakingany
modificaonstothetool.
Page7
Distributed by: BEST MATERIALS ®
Ph: 800-474-7570, 602-272-8128 Fax: 602-272-8014
Table of contents


