Spritzer Colourflow User manual

Manual Version No.: 07 (2020)
HOT & WARM DISPENSER
e-Instruction Manual
MODEL NO.: D003
* Kindly note that the dispenser does not include any bottled water. You may purchase Spritzer Natural Mineral
Water 6 litre or 9.5 litre at your nearest store or visit Spritzer’s e-commerce shop at spritzer.com.my/shop
Electric household appliance must be equipped with three-hold socket and electrical leakage
protection switch.
If the supply cord is damaged, it must be replaced by a special cord or assembly available from the
manufacturer or its service agent
Hotline number: 1800 88 3111
Website: www.spritzer.com.my
Facebook: www.facebook.com/spritzer
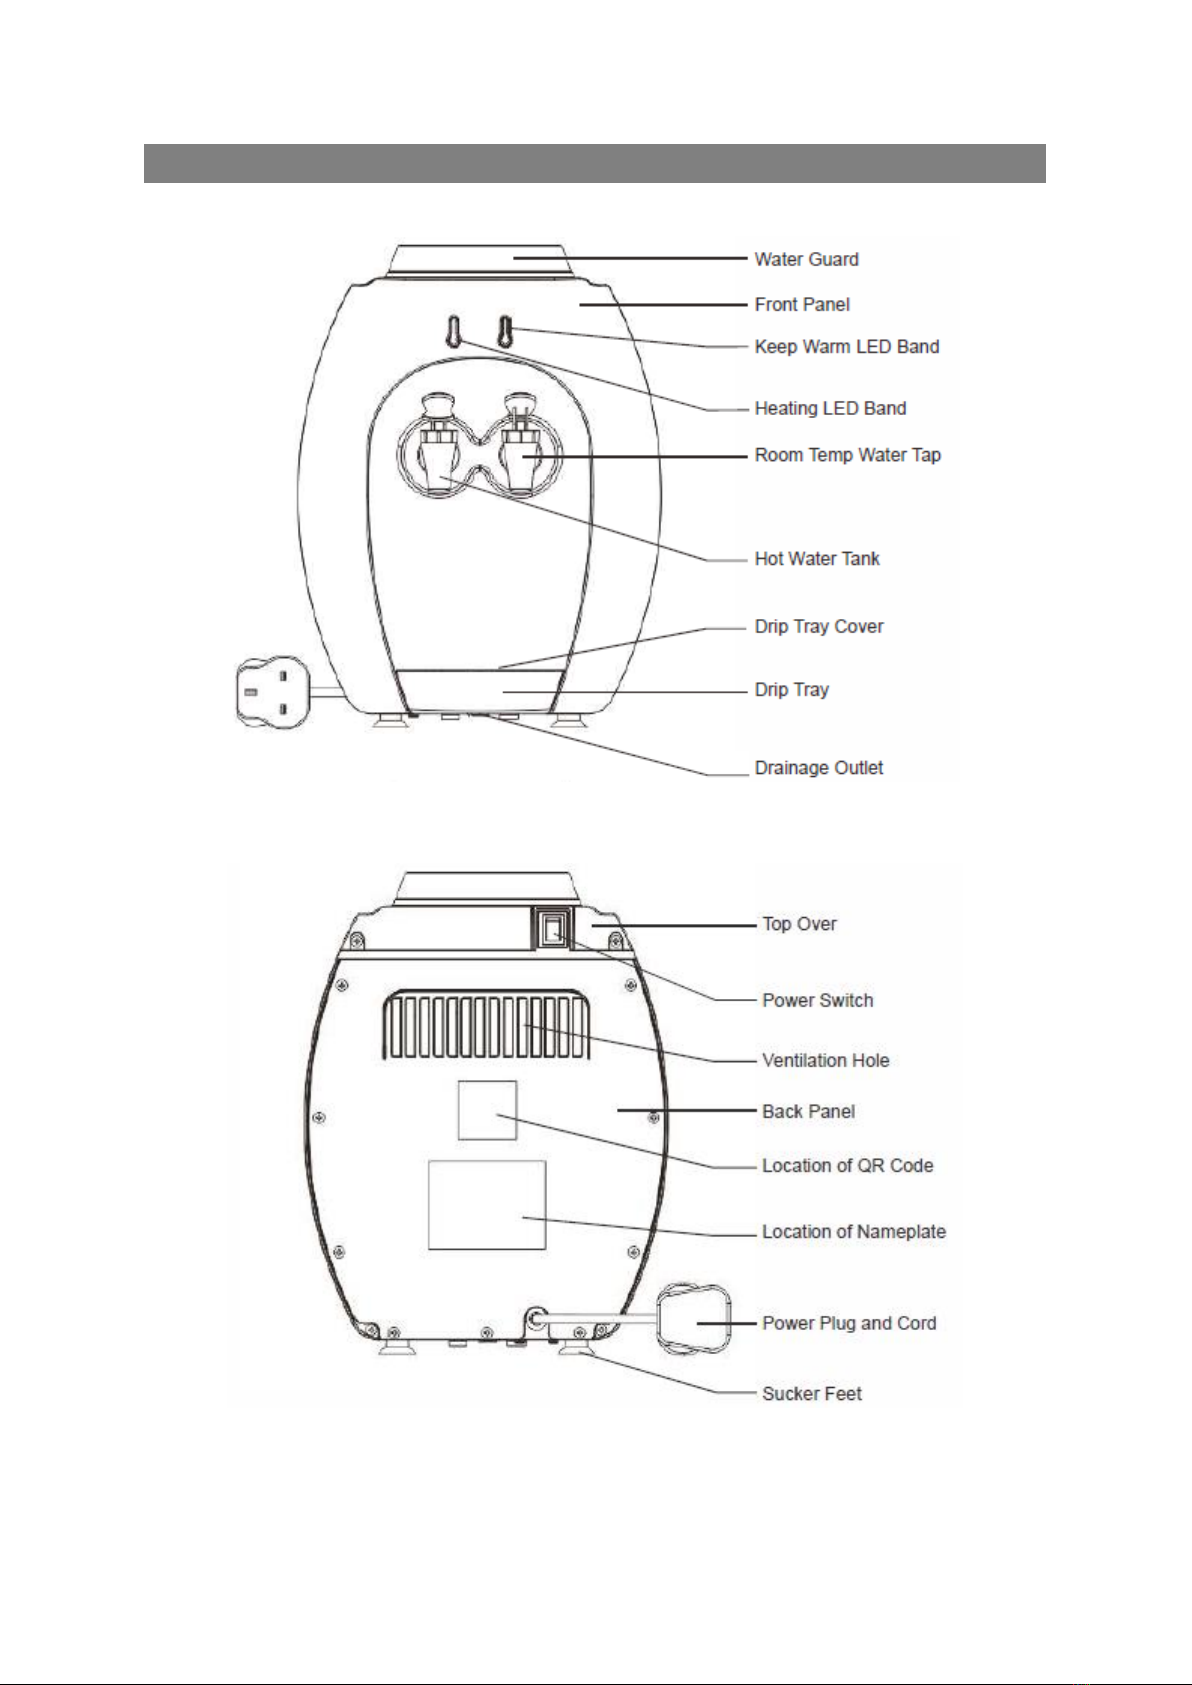
STRUCTURE AND PART NAME
1

USING INSTRUCTION
(A) Pre-use product cleaning
As to a new appliance, it’s recommended to clean the water system, prior to initial use.
1) Take out the appliance, put on a flat table. Make sure the appliance
is unplugged and the power is off.
2) Remove the water guard and rinse it using clean water. Use a wet and
clean cloth with some water to wipe the inside of water tank.
3) Pour 1 litre of clean water or (a mixture of 0.5 litre white vinegar and
0.5 litre clean water is preferable) into the water tank (the water level
should not reach beyond than the exhaust hole). Press both water taps
to ensure water flows out.
4) Connect the power plug to the power socket and switch on the
power switch located at the back panel of the dispenser.
5) Heat the water inside the water tank until the LED band turns green.
Thereafter turn off the power switch at the back panel, unplug the power
plug and wait for 15minutes.
6) After 15 minutes, pour out the water from the water tank. At the
bottom panel of the dispenser, remove the C-ring and open the drain
valve (near warning signage for hot water). Drain the water out of the
dispenser. Pour and drain out the dispenser (with the drain valve
removed) using clean water for about 1 minute.
7) Close the drain valve, install the C-ring back, put back on the flat
table, and assemble the water guard.
2

(B) Install the water bottle
1) Remove the seal from the bottle cap.
2) Slowly place the bottle vertically into the water guard, and middle pole of water guard will pull
in the inner cap into bottle.
3) Before initial use, open hot water tap and room temperature tap to drain about 500ml water,
at the same time, inside air will be exhausted, out of appliance.
4) Connect the power plug to the power socket, and switch on the power switch on the back panel
of the dispenser.
5) Heat the water until the LED bands turns green. Open the hot water tap to drain the hot water
until the LED bands turns red. Open the room temperature water tap for 5-10seconds to drain
water out.
6) Repeat step no.5 above for one more time.
(C) Dispensing hot water and room temp water
1) When the LED band is red light, it means heating. When the LED band turns green light, it means
the hot water is ready to be dispensed.
2) Open the hot water tap to dispense hot water.
3) Open the room temp water tap to dispense room temp water.
3
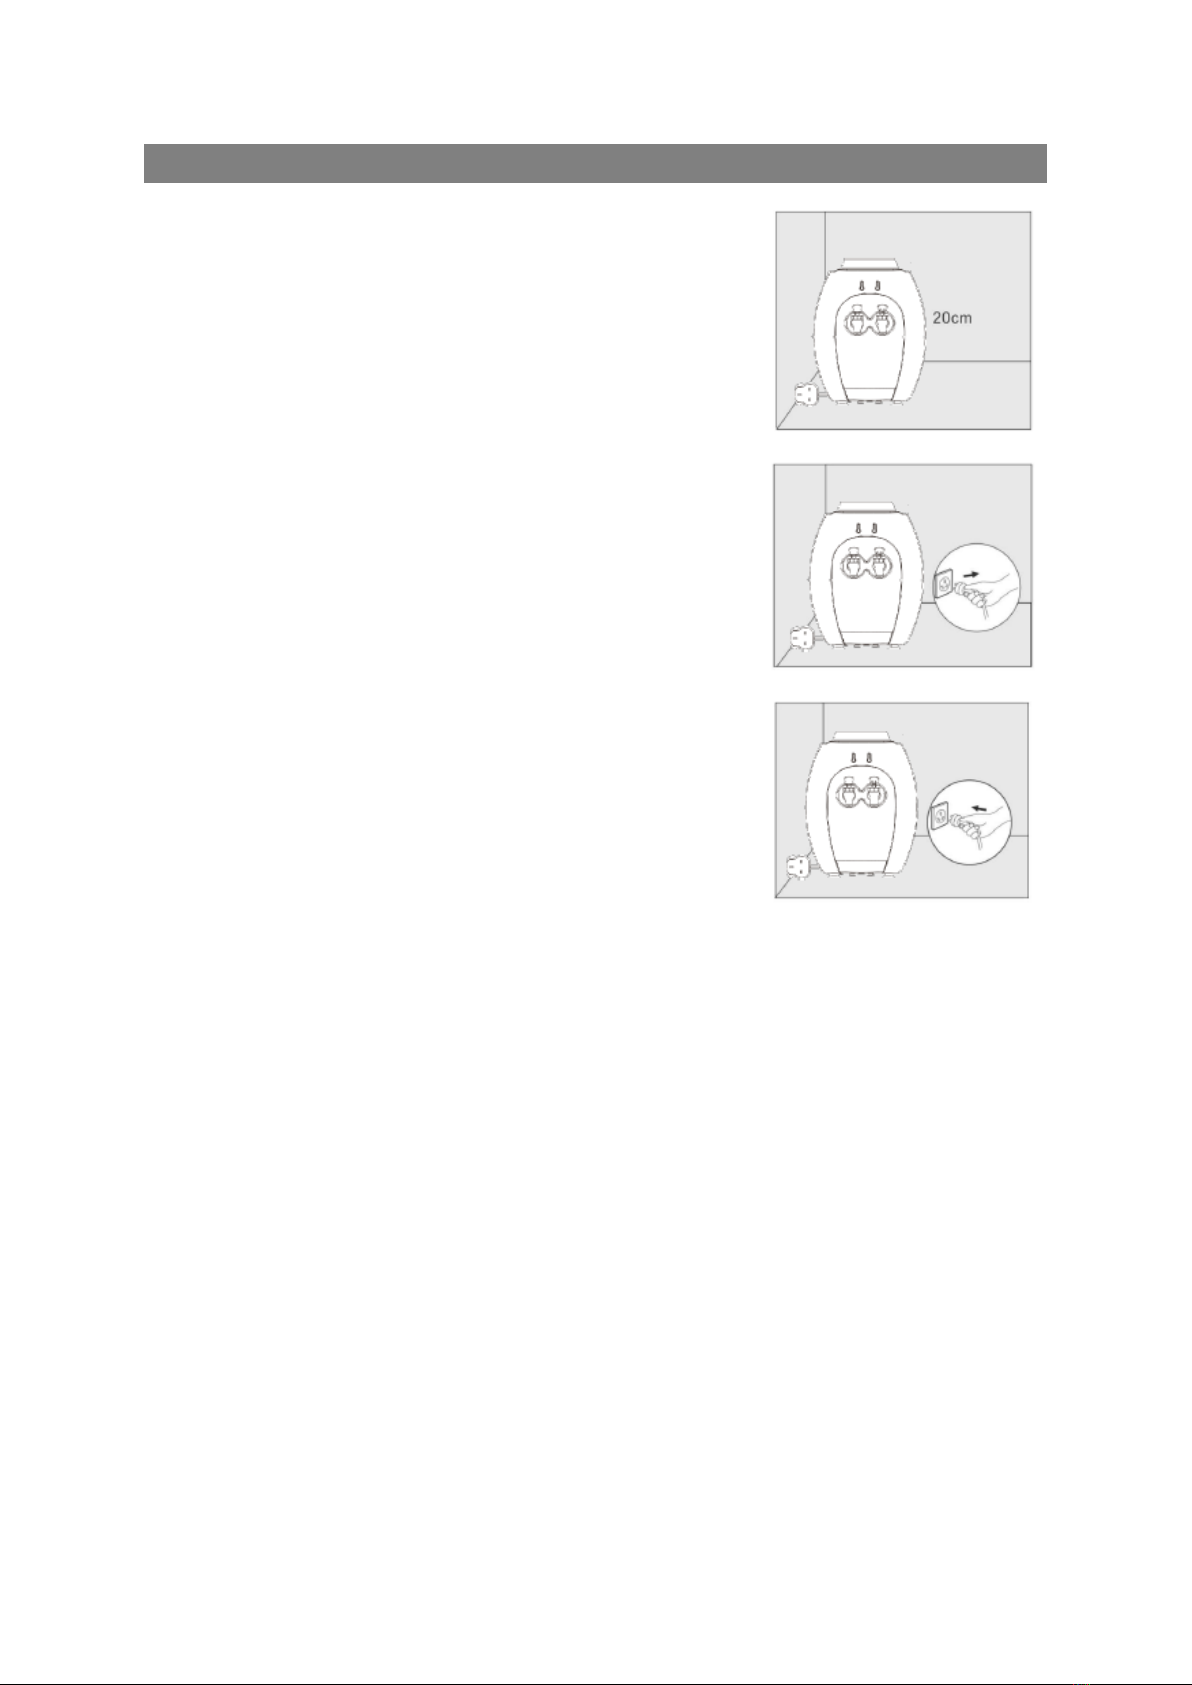
SAFETY
1) Place the appliance on a flat ground in a dry and indoor place,
away from direct sunshine, at least 20cm away from the wall,
and far away from anything flammable.
2) Use three-hold socket and electrical leakage protection switch.
3) The power cords should be connected to suitable electrical
socket. The power cords shall be exchanged by sellers or
professionals appointed, when destroyed.
4) For avoiding dry heating under no water, and destroy heating
elements, please open hot water tap until water flow out, then
connect power cord to electrical socket and turn on the power
switch.
5) If hot water has not been used for a long time, please turn off
the power switch for power saving.
6) If the dispenser has not been used for a long time, kindly turn
off the power switch, unplug the power cord and drain all the
residual water.
7) Please follow cleaning instructions outlined in this manual, to
regularly clean the dispenser.
8) At any time, the dispenser must not be immersed in water.
4

CLEANING AND MAINTENANCE
Before cleaning parts of the dispenser, please make sure that you turn off the power switch
located at the back panel of the dispenser and unplug the power cord
1) Cleaning the outside body
Using a wet cloth, lightly wipe the outside of the dispenser and then dry its surface. Never use
harsh chemical or abrasive cleaner.
2) Cleaning the drip tray
Unattached the drip tray, remove any spots and inside minor deposits. For tough deposits, add
vinegar and let it soak, until the deposits come loose. Then wash, rinse and dry thoroughly.
3) Cleaning the inside of the dispenser
To prevent mineral deposits that can affect the taste and water flow rate, and to ensure
proper product performance, the dispenser had better be cleaned every 4 to 6 months.
1) Make sure the dispenser is unplugged and power off.
2) Remove water bottle and water guard.
3) Open the drain valve on the bottom of the dispenser, to drain residual water, then close
drain valve.
4) Pour a mixture of 0.5 Litre white vinegar and 0.5 Litre clean water into the water tank, make
sure the two water taps can flow out water (Please ensure that the water level is not higher than
the exhaust hole of the water tank).
5)Connect the power plug to the power socket, and switch on the power switch located at
the back panel of the dispenser.
6)Heating water until the LED band turns to green light. Then, turn off the power switch at
the back panel of the dispenser, unplug the power plug from the power socket and wait for 15
minutes.
7)Pour out the water, remove the C-ring and open the drain valve on the bottom panel
(warning hot water scald), flush the water system with clean water about 1 minute.
8) Close the drain valve, install the C-ring back, put back on the flat table, and assemble the
water guard.
9) Repeat the “(B) Install the water bottle” and “(C) Dispensing hot water and room temp
water” written under the USING INSTRUCTION part of this manual found in page 3.
5
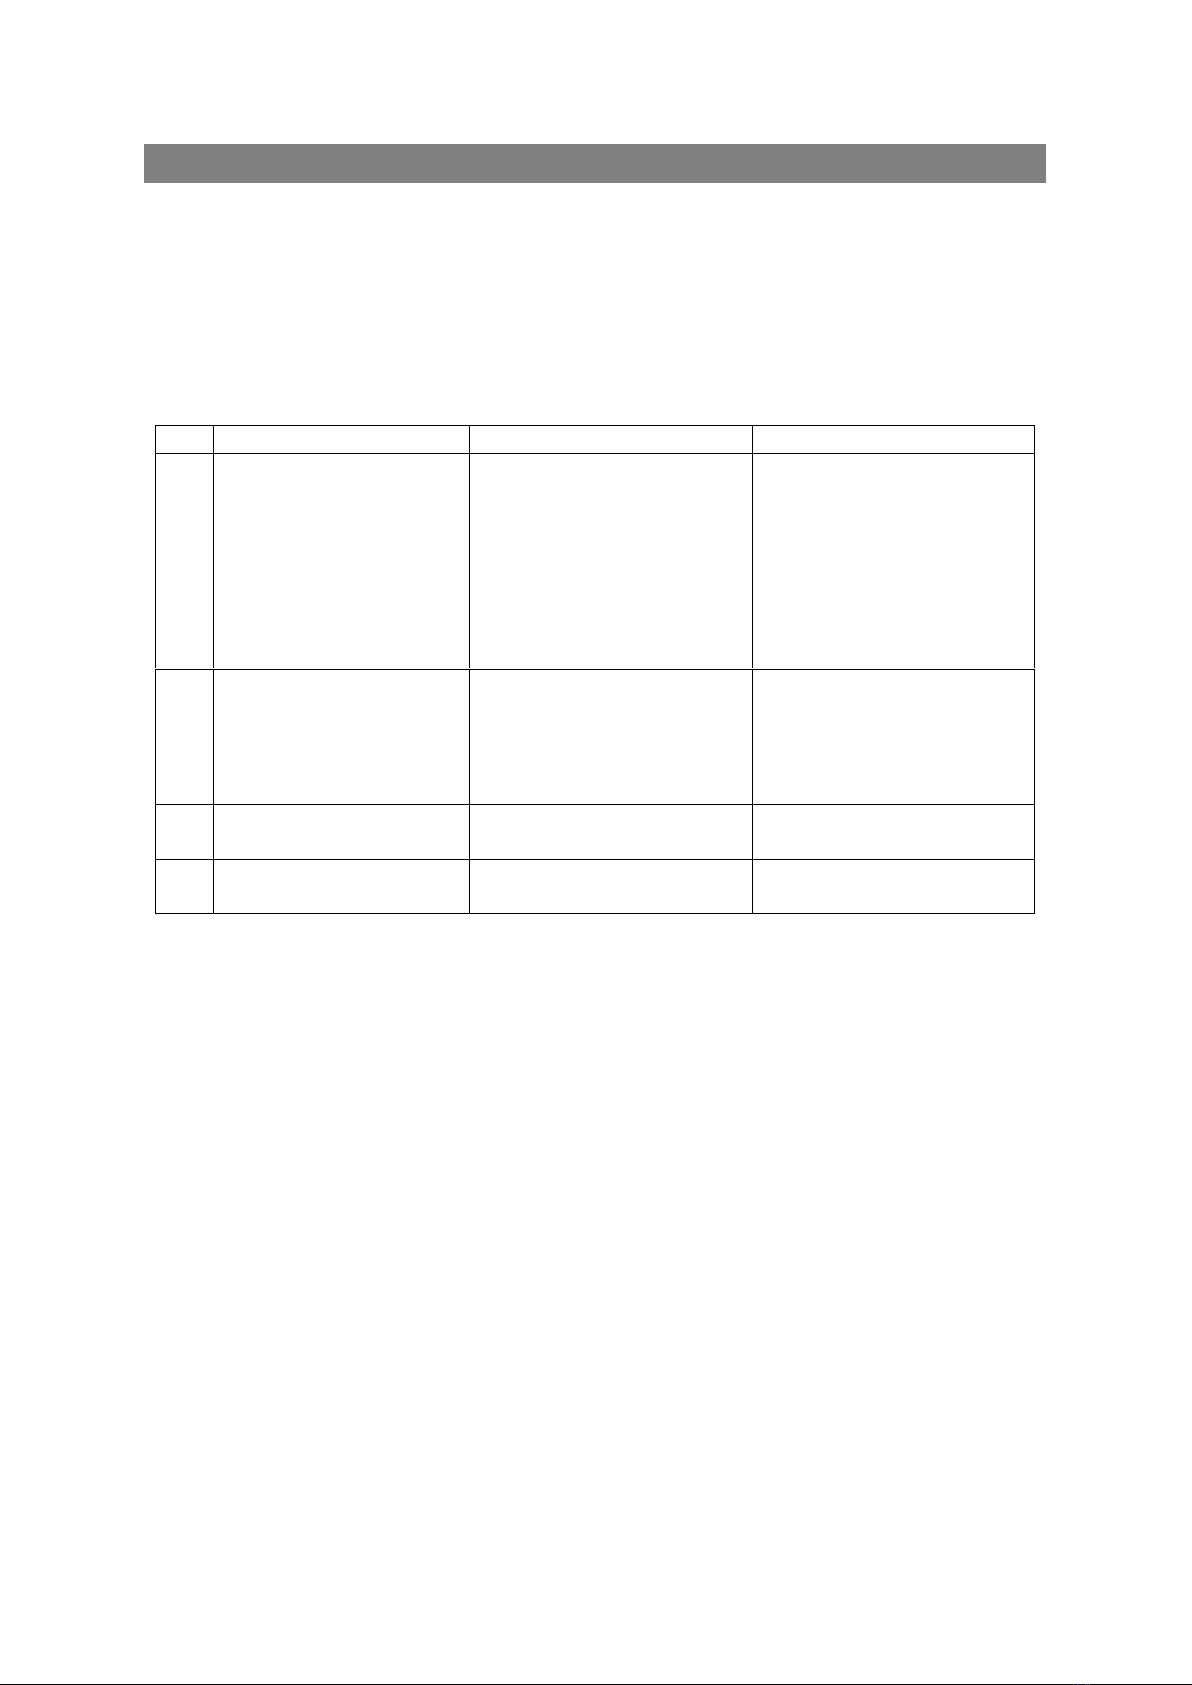
TROUBLE SHOOTING GUIDE
The dispenser is working well under the following conditions, the users may use it with no
worries:
A. It is normal that when the dispenser is heating, it will cause slight noise
B. When hot water tank is heating without water, the thermostat (anti dry heating) will be
tripping operation, and cannot be reset by users, except for professionals
No.
Malfunctions
Possible causes
Solutions
1
Unsuitable water
temperature
1. Consume too much hot
water in short time
2. No electrical power
1. Wait for a moment
before dispensing the
water again
2. Connect the power
plug and power socket.
Switch on the power
switch located at the
back of the dispenser
2
Water do not dispense
from the water tap
1. No water in bottle
2. Bottle hole is blocked
by the seal cover on the
bottle cap
1. Replenish with another
bottle water
2. Remove the seal cover
on the bottle cap, and
insert the bottle
3
Water leak from water
guard
Water bottle is broken
Replace with another bottle
water
4
Loud noise
Dispenser is not placed on
flat and stable surface
Place dispenser on flat and
stable surface
Note:
1) The above content is based on judgement and examination of normal malfunctions
2) Please don’t open or maintain the dispenser by yourself, to avoid hurt or physical harm
3) If the power plug and cord is damaged, it must be replaced by manufacturer, its service
agent or similarly qualified persons in order to avoid a hazard.
6
QUALITY GUARANTEE
1. One-year limited warranty, since buying date of this dispenser.
2. Please take the dispenser to sales agent for any repairing to avoid accidents.
3. No free repairing for the following conditions:
a) Destroyed by incorrect use, maintenance and protection
b) Repaired by others, instead of professionals from sellers.
c) No proof of purchase or invoice is not corresponding to related dispenser
d) Damaged by force majeure
e) Exceed the period of warranty
4. We will charge the cost of parts and repairing works, for the dispenser exceeding the warranty
period, or other no free repairing conditions
For replacement convenience, please keep the carton in good condition
5. Please check the dispenser before payment as physical damaged is not acceptable for return
after goods sold.
Special Declaration:
All of above contents are carefully checked
Any discrepancy from printing or contents, we reserve the right to explain
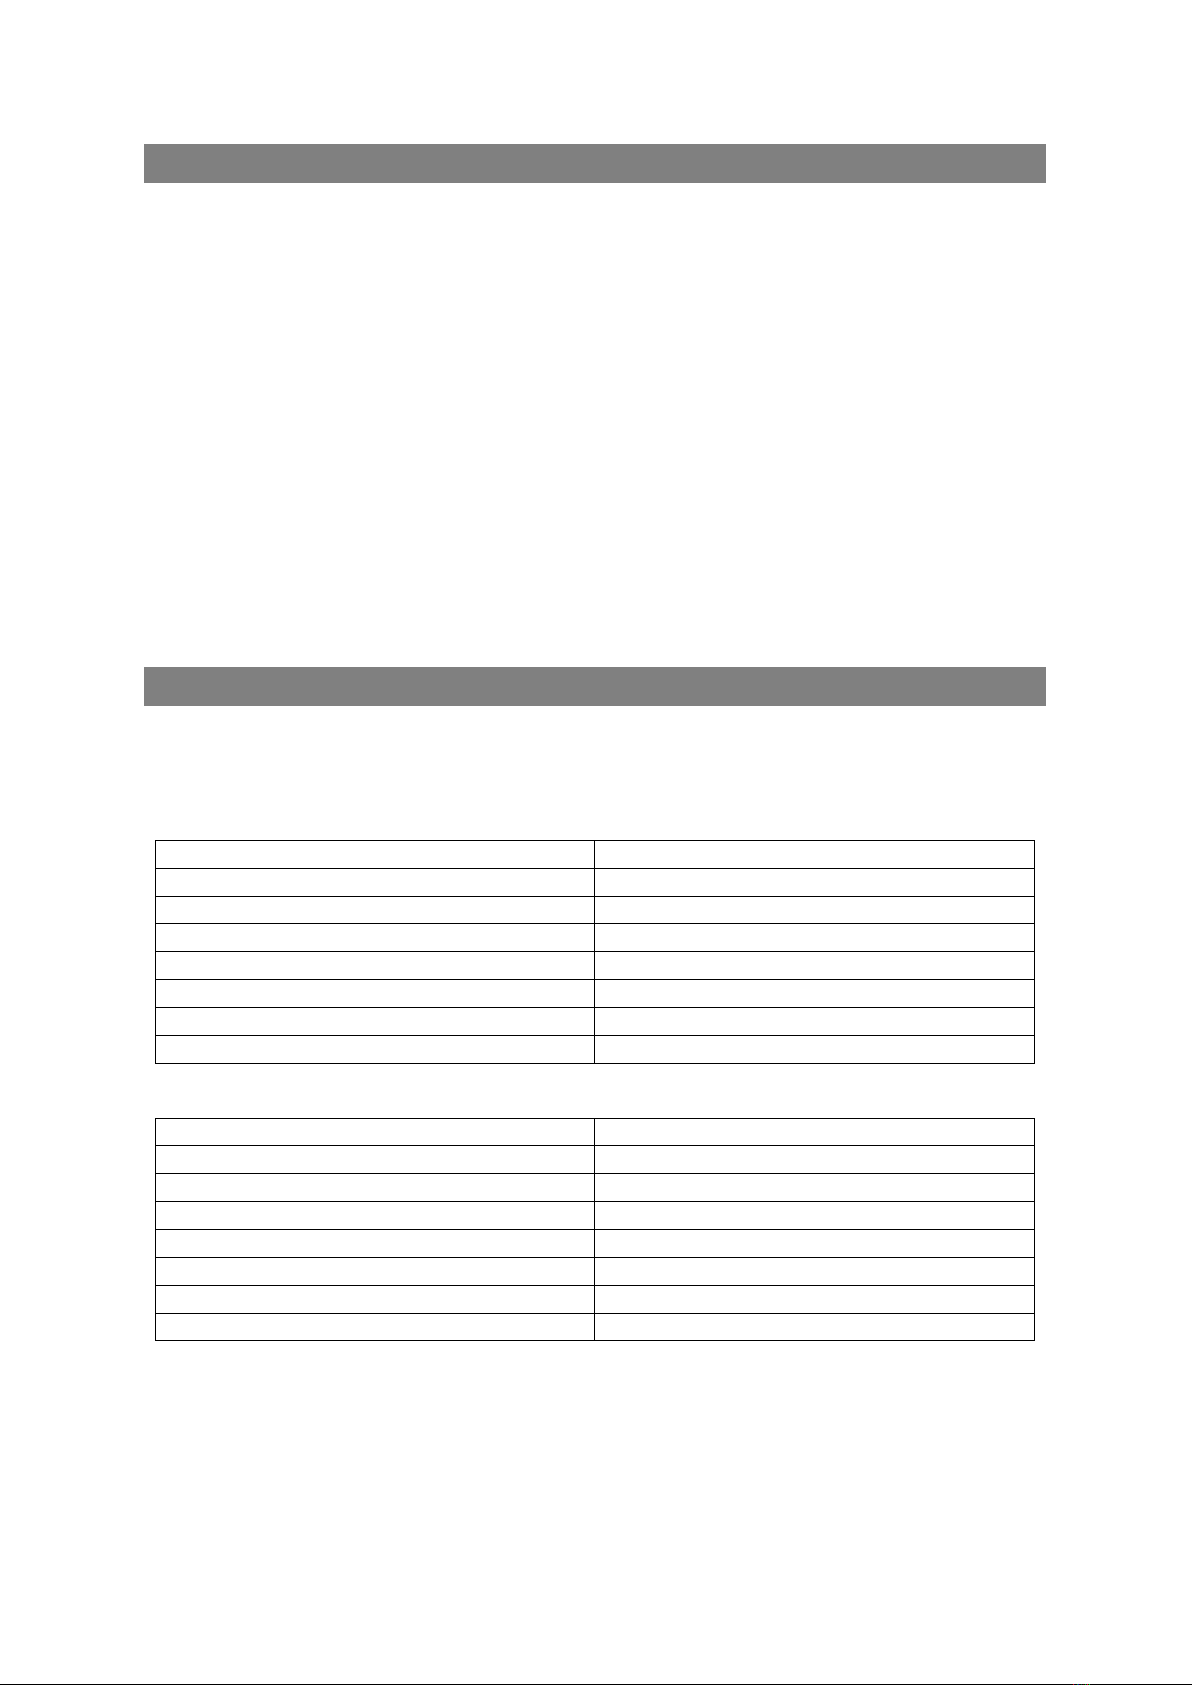
SPECIFICATION
Depending on the dispenser you have purchased, the specification will be either one of the below.
Please check the nameplate located at the back panel of the dispenser
Version no.1
Model No.
D003
Power Supply
220˜240V / 50Hz
Heating Capacity
90 °C 5L/H
Heating Power
545W (@230V)
Hot Water Tank
Stainless Steel
Warm Water Tank
ABS
Dimension (LXWXH)
250X251X320mm
Suitable For Bottle Water
5.5 ˜9.5 L Bottle Water
Version no.2
Model No.
D003
Power Supply
220˜240V - 50/60Hz
Heating Capacity
90 °C 5L/H
Heating Power
550W
Hot Water Tank
Stainless Steel
Warm Water Tank
ABS
Dimension (LXWXH)
250X251X320mm
Suitable For Bottle Water
5.5 ˜ 9.5 L Bottle Water
7
This manual suits for next models
1
Table of contents
Other Spritzer Water Dispenser manuals

Popular Water Dispenser manuals by other brands


Elkay
Elkay EFW Series Installation, care & use manual

WaterLogic
WaterLogic WL900 quick start guide

Arctic Spas
Arctic Spas Onzen Technical guide

GE
GE GNSH45E Owner's manual and installation instructions

clage
clage ZIP HYDROTAP G4 BC 100/75 Operating and installation instructions

PUR
PUR PPT711W owner's manual


