Spydro Spydro Assembly instructions

Advanced User's Manual

Introduction
Congratulations on purchasing Spydro® - Smart Fishing Camera. To get the most from your new
Spydro®, please be sure to read through all the instructions in this user manual thoroughly.
We also recommend visiting our Support page where many short video tutorials can be found
covering various common usage and troubleshooting aspects.
We welcome you to our fishing community and wish you a very exciting and empowering
experience.
Spydro® Team

What's in the Box (Spydro® Premium Kit)
Before starting, check that all the following items are included with your Spydro® premium kit. If
anything is missing, contact your dealer.
1. Spydro® 16GB or 32GB Camera
2. USB Magnetic Cable
3. Weight's Holder
4. Small and Medium-sized Weights
5. Key for Detaching the Weight Holder
6. Spydro® Branded Float
7. Branded Carrying Pouch
8. Spydro® Quick Start Guide
2
7
1
8
3
6
4
5

What's in the Box (Spydro® Kit)
Before starting, check that all the following items are included with your Spydro® kit. If anything is
missing, contact your dealer.
1. Spydro® 16GB or 32GB Camera
2. USB Magnetic Cable
3. Spydro® Quick Start Guide
2
1
3

Safety Precautions
The following precautions are provided to prevent damage to your Spydro® or injury to yourself or
others. Please make sure you follow them:
•Do not charge Spydro® in high temperatures.
•Do not direct Spydro® at the sun or an extremely bright light source.
•Keep Spydro® out of the reach of infants.
•Do not use paint thinner, benzene or other organic solvents to clean Spydro®. For further
cleaning information.
Handling Precautions
The following precautions are provided to ensure prolonged, healthy product expectancy. Make sure
to follow them throughout your Spydro® experience.
•Do not drop Spydro® or subject it to physical shock.
•Do not leave Spydro® in excessive heat (such as in a car in direct sunlight) as this may lead to
malfunction.
•Spydro® contains precision electronic circuitry. Never attempt to disassemble yourself.
•If Spydro® will not be used for an extended period, store it in a cool, dry, well-ventilated
location.

Table of Contents
Introduction............................................................................................................................................2
What's in the Box (Spydro® Premium Kit).............................................................................................3
What's in the Box (Spydro® Kit).............................................................................................................4
Safety Precautions..................................................................................................................................5
Handling Precautions .............................................................................................................................5
Get to Know Spydro® .............................................................................................................................8
Getting Started and Basic Operation.....................................................................................................9
Charging Spydro® ...............................................................................................................................9
Getting Spydro® Mobile Application .................................................................................................9
Turning Spydro® ON.........................................................................................................................10
Turning Spydro® OFF........................................................................................................................10
Connecting Spydro® to Mobile App.................................................................................................11
Logging into Spydro® Mobile App....................................................................................................12
Creating a New Account...............................................................................................................12
Sign in Using an Existing Account ................................................................................................13
Upgrading Spydro® Firmware..........................................................................................................14
Upgrade via PC .............................................................................................................................14
Upgrade via Spydro® Mobile Application....................................................................................14
Spydro® Moblie Application ................................................................................................................15
Main Screen......................................................................................................................................15
Spydro® Status Bar.......................................................................................................................16
Record your Route........................................................................................................................17
Stop Recording your Route..........................................................................................................17
Share your Route (as a screenshot).............................................................................................18
Controlling the Map .....................................................................................................................19
Fishing Diary Library.........................................................................................................................20
Video Gallery....................................................................................................................................22
Live Stream.......................................................................................................................................26
Settings Menu...................................................................................................................................27
Personal........................................................................................................................................27
Recording Settings........................................................................................................................27
Device Settings .............................................................................................................................28

Preferences:..................................................................................................................................28
Version:.........................................................................................................................................28
Spydro® Limited Warranty...................................................................................................................29
Warranty...........................................................................................................................................29
Appendix A: Rigging Spydro® on the Fishing Line...............................................................................30
Table of Figures
Figure 1: Spydro® Top View ....................................................................................................................8
Figure 2: Spydro® Side View ...................................................................................................................8
Figure 3: Spydro® Front View..................................................................................................................8
Figure 4: Charging Spydro® with the Magnetic USB Cable.....................................................................9
Figure 5: Available on App Store and Google Play..................................................................................9
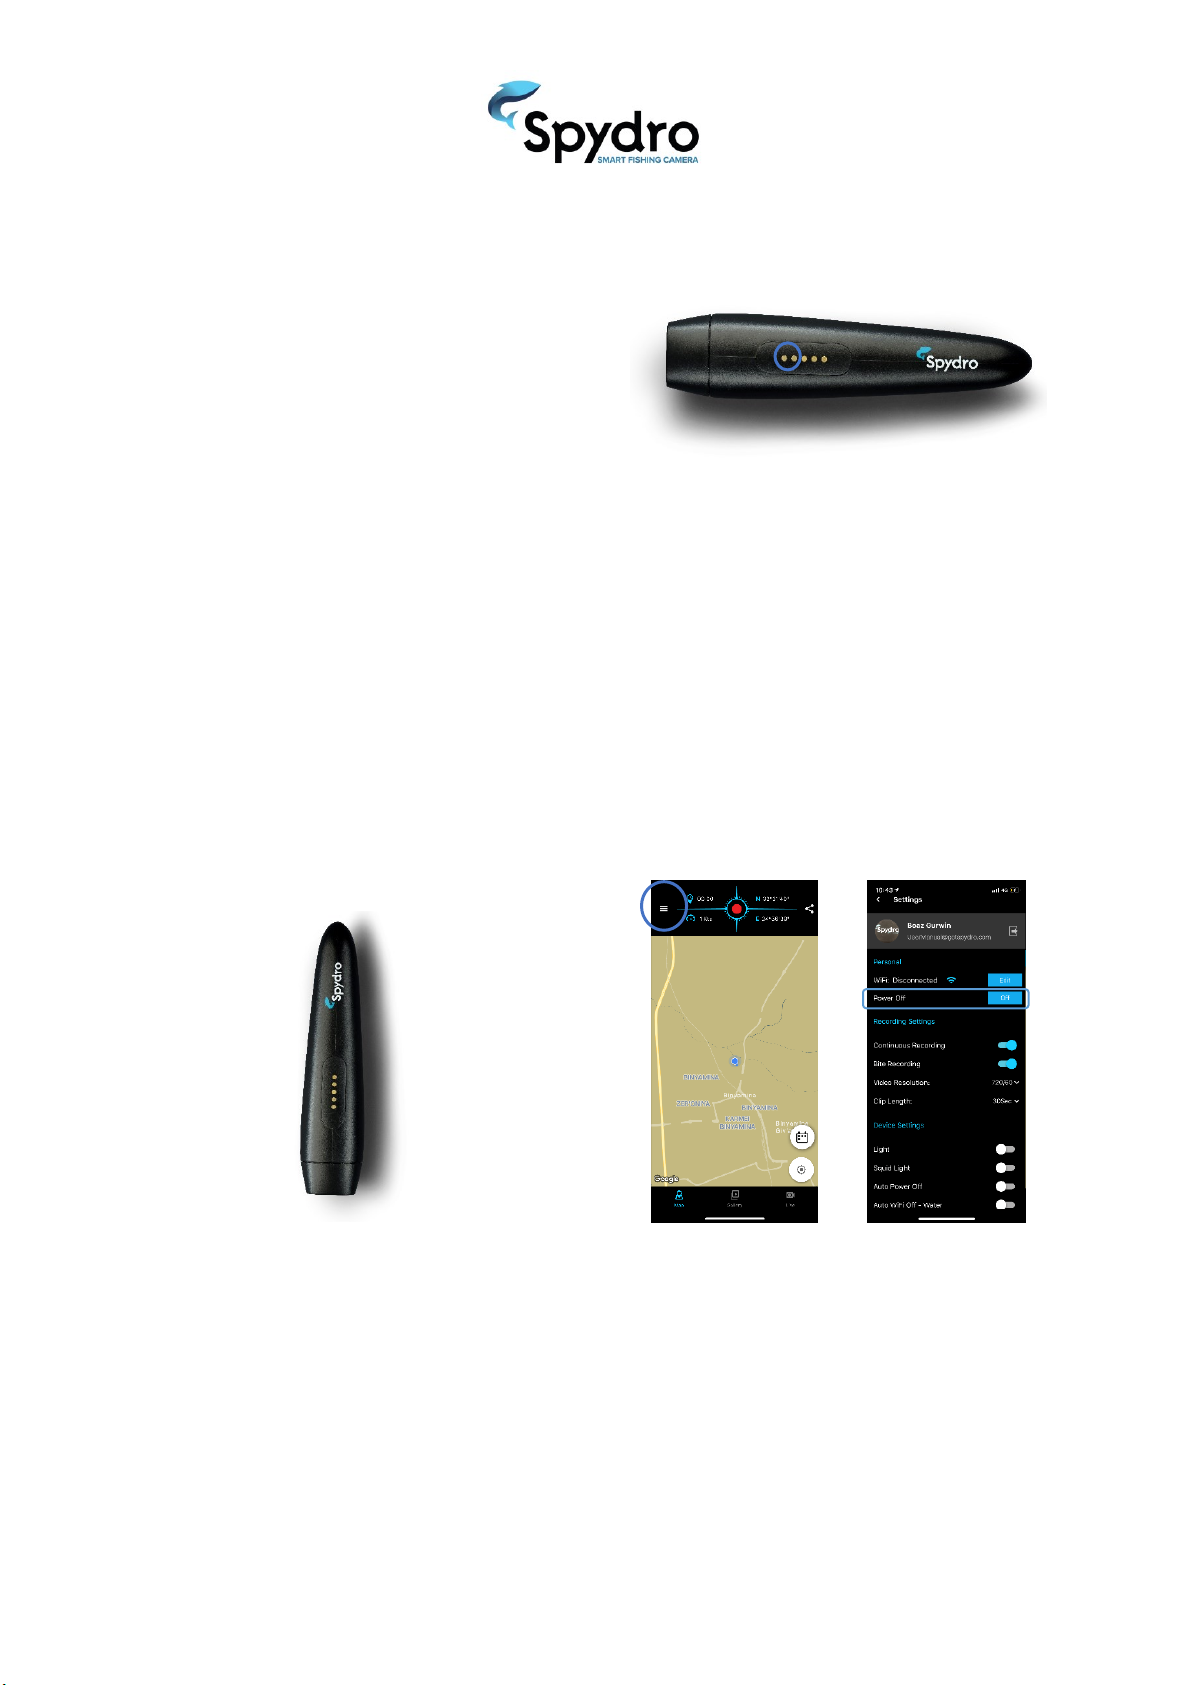
Figure 6: Turning Spydro® ON Manually...............................................................................................10
Figure 7: Turning Spydro® "Off" via App...............................................................................................10
Figure 8: Turning Spydro® OFF..............................................................................................................10
Figure 9: Creating a New Account.........................................................................................................12
Figure 10: Signing into your Account....................................................................................................13
Figure 11: Signing into your Account....................................................................................................14
Figure 12: Main Screen .........................................................................................................................15
Figure 13: Spydro® Info Bar ..................................................................................................................16
Figure 14: Spydro® Recording Modes...................................................................................................16
Figure 15: Before Recording (upper) and During Recording (lower)....................................................17
Figure 16: Sharing your Route ..............................................................................................................18
Figure 17: Accessing the Fishing Diary Library......................................................................................20
Figure 18: Selecting the Recorded Route..............................................................................................20
Figure 19: The Recorded Route ............................................................................................................21
Figure 20: Accessing the Video Gallery.................................................................................................22
Figure 21: The Recorded Route ............................................................................................................23
Figure 22: The Recorded Route ............................................................................................................24
Figure 23: Sharing, Deleting and Marking Videos as Favorites.............................................................25
Figure 24: Live Stream...........................................................................................................................26
Figure 25: Settings Menu (part I)..........................................................................................................27
Figure 26: Settings Menu (part II).........................................................................................................28
Figure 27: Most Common Fishing Techniques using Spydro®..............................................................30

Get to Know Spydro®
Familiarize yourself with Spydro®:
Figure 1: Spydro® Top View
1. Water detector, Temperature and Salinity sensors as well as Magnetic connectors for
charging the battery.
2. WiFi module (located inside Spydro® tail).
Figure 2: Spydro® Side View
3. Front mounting hole for swivel.
4. Back mounting hole for swivel.
5. Middle mounting hole for attaching the weight's holder.
6. Control LEDs (it resides in the narrow gap between the camera and its body).
Figure 3: Spydro® Front View
7. Full HD camera.
8. Two LEDs.
1
2
3
4
5
7
8
6

Getting Started and Basic Operation
This chapter describes the required steps before you can start using Spydro®.
IMPORTANT NOTICE: Before each use, and before performing firmware upgrade, Spydro® must be
fully charged.
Charging Spydro®
Figure 4: Charging Spydro® with the Magnetic USB Cable
1. Unbox Spydro® and the magnetic USB
charger cable.
2. Connect the magnetic plug to Spydro®
by gently placing it over the magnetic
connectors located on Spydro® top.
3. Connect the USB plug to any active
USB socket.
4. Spydro® LED will turn Orange while
the battery charges and Green when
charging is competed.
Getting Spydro® Mobile Application
Figure 5: Available on App Store and Google Play
1. Depend on what mobile device you
have, browse to either App Store (for
iOS-based devices) or Google Play (for
Android-based devices).
2. Search for "Spydro" mobile
application.
3. Download and install it on to your
mobile device.
4. Follow the onscreen instructions until
the application is ready to be
launched.

Turning Spydro® ON
Figure 6: Turning Spydro® ON Manually
Spydro® has water detection sensors located
on its top cover and will automatically be
turned ON when getting wet. In order to turn
it ON manually:
1. Wet your finger.
2. Gently pass the wet finger on the two
front contacts located on its top
cover.
3. Once Spydro® beeps and its LED start
blinking, you know it's turned ON.
Turning Spydro® OFF
OR:
2. You can turn it OFF right from the
mobile app by going to the Settings
menu and click the "Off" button right
next to the "Power Off" option.
Figure 7: Turning Spydro® "Off" via App
In order to turn it OFF manually, you have 2
options:
1. Place it vertically (on its lens) for 4
seconds; until you hear four beeps.
After the 4th beep; Spydro® is turned
OFF.
Figure 8: Turning Spydro® OFF

Connecting Spydro® to Mobile App
In order to configure and control Spydro® via the mobile application, first you must establish an
active link between them:
IMPORTANT NOTICE: No active internet connection is required to operate Spydro®. Spydro® acts as
a WiFi hotspot so your mobile device can connect to it everywhere.
IMPORTANT NOTICE: The default WiFi SSID is: Spydro and its default password is: Spydro1234.
IMPORTANT NOTICE: You can connect to numerous Spydro® devices using the same mobile app, but
not simultaneously. In this scenario, each Spydro® must have a unique SSID. In order to change the
device SSID, please refer to [Figure 25 on page 27].
1. Turn Spydro® ON.
2. Using your mobile device, search for
WiFi networks and connect to Spydro.
3. When prompted, enter the
corresponding password.
4. Launch the mobile application on your
mobile device.
5. Log into Spydro mobile application
(see next chapter).

Logging into Spydro® Mobile App
The first time you launch Spydro® mobile application, you will be asked to either create an account
or to sign in using an existing account.
Figure 9: Creating a New Account
Creating a New Account
1. Select whether you want to create a
new account by setting your email
and password or by using your
Facebook account details.
2. If email+password is selected; you
must set a valid email which you have
access to and a unique password
consisting of at least 8 characters
(with at least 1 letter and 1 digit).
3. Click the "Create Account" button.
4. If "Sign up with Facebook" is selected,
please follow the Facebook's
onscreen instructions.
5. Congratulations! You have
successfully created your Spydro®
account.
6. When the account is created, an
automated tutorial will be launched
to take you through the major steps
required to start working:
Watch a short
animation about
using the mobile app
Connect your
Spydro® to your
mobile device
Enable the Location
Services on your
mobile device
Start using the
mobile app

Sign in Using an Existing Account
1. Type your email and password.
2. Click the "Login" button.
3. If "Continue with Facebook" is
selected, please follow the Facebook's
onscreen instructions.
4. Congratulations! You have
successfully logged-in your Spydro®
account.
Figure 10: Signing into your Account

Upgrading Spydro® Firmware
It is recommended to check Spydro® firmware and upgrade it to the latest release.
IMPORTANT NOTICE: Before performing a firmware upgrade, you must fully charge your Spydro®.
IMPORTANT NOTICE: Following the above notice, it is also most recommended to empty Spydro® SD
card (refer to Figure 26 on page 28).
There are two firmware upgrade methods:
Upgrade via PC
6. Copy (if overwrite) the two files in the
root directory with the newly
downloaded ones.
7. Once completed, remove the
magnetic charger plug from Spydro®
and allow it to turn off.
8. Now turn Spydro® back ON and allow
approx. 30 seconds for the firmware
upgrade process to complete (the LED
will blink with Red and Blue colors
until it will be restarted
automatically).
9. Your Spydro® is now upgraded with
the latest firmware.
1. Download the firmware upgrade files
from here
(http://getspydro.com/customers/up
date/firmware/Spydro.firmware.lates
t.zip) and extract them onto your
desktop.
2. Two files should be extracted:
•“factory.brn”
•“RECOVER”
3. Turn Spydro® ON and connect the
magnetic plug to Spydro®.
4. Connect the USB plug to the PC USB
socket.
5. After couple of seconds, Spydro®
should appear as a disk on your PC.
Upgrade via Spydro® Mobile Application
Figure 11: Signing into your Account
1. You can upgrade Spydro® firmware
right from the mobile app by going to
the Settings menu and click the
"Update Version" button (at the
bottom of the Settings menu).
•The "Update Version" button will be
clickable only when Spydro® firmware
is outdated.
2. Wait while your Spydro® is being
automatically upgraded to the latest
version. You'll be prompted when the
upgrade is completed.

Spydro® Moblie Application
This chapter covers all the aspects, features and operations that can be performed via Spydro®
mobile application.
Main Screen
From the main screen you can browse the map (by dragging it with your finger), zoom-
in/out (by pinching in/out), record your route, share your location, get to the configuration
menu and more…
Figure 12: Main Screen
Settings Menu
Speed Indicator
Route Recording Counter
Longitude
Latitude
Share Location button
Route Recording button
Map
Your Current Location
Fishing Diary Library
Center Map
Map Display
Live Stream
Video Gallery
Spydro® Status bar

Spydro® Status Bar
When Spydro® is connected to your mobile device, its status bar appears at the top of the map.
When it's disconnected, the bar won't show.
Figure 13: Spydro® Info Bar
Recording mode:
Spydro® has 3 different recording modes:
•Cont. = Continuous recording mode;
meaning, Spydro® will record
continuously. The footage taken will
be divided into clips. The clip's
duration can be set on the Settings
menu.
•Bite = Bite Triggered recording mode;
meaning, Spydro® will use its
accelerometer to detect fish bites;
once detected, it will start recording.
•Combi = Continuous + Bite Triggered
combined recording mode; meaning,
Spydro® will record in continuous
mode, but when a bite event is
detected, it will create a new clip.
•Off = Spydro® will stop recording.
Figure 14: Spydro® Recording Modes
Measured Salinity ( ):
Spydro® measures the water salinity using a dedicated conductivity sensor.
Measured Temperature:
Spydro® measures the water temperature using a dedicated thermal sensor. Can be displayed in °C
or °F (note: temp reading might have a short delay ~1 to overcome internal battery heating).
SD Card Free Space ( ):
Shows how much free space is currently available for recording. Displayed in percentage.
Battery Charge ( ):
Shows how much battery charge is currently available for operation. Displayed in percentage.
Recording Mode
Measured Salinity
Measured Temperature
SD Card Free Space
Battery Charge

Record your Route
Spydro® can record your route and all its related events; and store it in the Fishing Diary library. To
record your route, follow those simple steps (fishing diary***):
1. Click the "Record Route" button.
2. The following will occur:
•The "Record" button is now changed
to "Stop" button.
•The "Route Recording Counter" icon
changes to a blinking red recording
icon.
•The "Route Recording Counter" starts
counting.
•Draw route.
Figure 15: Before Recording (upper) and During
Recording (lower)
Stop Recording your Route
1. Click the "Record Route" stop button.
2. To verify that the route recording has
stopped, please observe the
following:
•The "Record" button is now changed
back to "Record" button.
•The "Route Recording Counter" icon
changes back to its original icon.
•The "Route Recording Counter" shows
the total route recording duration.

Share your Route (as a screenshot)
1. Click the "Share Route" button.
2. Select the application by which you
want to share your route (e.g. email,
WhatsApp, etc.)
3. Please follow your mobile device
onscreen instructions to complete the
share operation.
Figure 16: Sharing your Route

Controlling the Map
The map on the main screen can be controlled easily with the following simple gestures:
Scroll (Pan):
You can scroll (pan) around the map by dragging the map with your finger.
Zoom
There are several gestures that can change the zoom level of the map:
•Double tap to increase the zoom level by 1 (zoom in).
•Two-finger tap to decrease the zoom level by 1 (zoom out).
•Two finger pinch/stretch
•One finger zooming by double tapping but not releasing the second tap, and then sliding the
finger up to zoom out, or down to zoom in.
Tilt
You can tilt the map by placing two fingers on the map and moving them down or up together to
increase or decrease the tilt angle respectively.
Rotate
You can rotate the map by placing two fingers on the map and applying a rotate motion. Once you
rotate, a compass icon will appear at the top-right corner of the map, pointing towards the North. By
clicking on the compass, the map will return to its North state.
Resetting/Re-centering:
You can always reset/re-center the map by clicking the "Center Map" button at the bottom-right
corner of the screen.

Fishing Diary Library
The fishing diary library consists of all the route recordings with the corresponding video footage and
ambient data collected at each point of interest; like, when and where Spydro® was casted and
reeled back, when and where bite triggered events occurred. The fishing diary library can be used to
review the entire route and its corresponding events either on and/or off site.
To Access the Fishing Diary Library:
1. Click the "Fishing Diary Library"
button on the right-bottom side of
the Map.
Figure 17: Accessing the Fishing Diary Library
Selecting the Recorded Route:
1. Flip through the route recordings by
dragging your finger left or right until
you find the desired route recording
you want to review.
2. Click the map to open the route
recording.
Figure 18: Selecting the Recorded Route
Table of contents
Other Spydro Digital Camera manuals