Stada Britannia Crono APO-go III Operating instructions

This guide is intended to be read alongside the
advice given in the Crono®APO-go III Pump user manual.
Crono®APO-go III Pump
Programming Guide for APO-go®INFUSION

Locking/unlocking the Crono®APO-go III Pump
Switching between APo1 and APo3 modes
Setting the bolus/priming dose and syringe volume
Bolus/priming conversion chart to show
typical settings
Switching the Crono®APO-go III Pump on
Setting the flow rate in APo1 mode
Dosage to flow rate conversion table
Programming variable flow rate in APo3 mode
Priming the line in APo1 mode
Priming the line in APo3 mode
Administering the bolus dose
Pausing the infusion
Retracting the plunger to the start position
Error functions
Contents
1
1
2
1
2
2
4
4
4
1
3
4
5
4
Introduction
The following guide provides guidance to help you when
programming the Crono® APO-go III Pump, including helpful
diagrams of what the screen should show at each step.
The Crono®APO-go III Pump has two available programming
modes: APo1 and APo3. The APo1 mode is used for a single flow
rate, whereas APo3 allows the programming of four different flow
rates, for variable flow rate. The different functionalities and a
brief explanation of these is included below.
APo1 mode APo3 mode
Locking/unlocking feature Locking/unlocking feature
10 ml or 20 ml volume setting 10 ml or 20 ml volume setting
Bolus dose function Bolus dose function
Stop/start/pause infusions on demand Stop/start/pause infusions on demand
Single flow rate Clock setting with variable flow rate
Bolus dose lockout time
Functionality
The Crono®APO-go III Pump can be locked and unlocked by a
healthcare professional (HCP) or carer, preventing a patient from
changing their dose against their prescriber’s advice. Whilst it is
locked the patient can start/stop/pause an infusion whenever
they need to and also administer the set bolus dose.
The Crono®APO-go III Pump has a bolus dose function, which
allows HCPs to programme a dose for patients to administer
whenever they require.
Once the bolus dose has been set, the HCP may specify a time
limit between bolus doses, locking the bolus dose feature
during this timeframe and avoiding multiple bolus doses being
administered in short periods of time.
The variable flow rate function on the Crono®APO-go III Pump
allows four separate flow rates to be programmed and assigned
to each hour of the day. One of the four flow rates is 0.00 for
times when a break in infusion is required.
Locking/unlocking
Bolus dose function Bolus dose lockout time
Variable flow rate
APO-go®Patient Helpline – 0808 196 4242
24 hours a day, 365 days a year
Part of the Package of Care provided by Britannia Pharmaceuticals
Adverse events should be reported. Reporting forms and information can be found at https://yellowcard.mhra.gov.uk/ or search for MHRA
Yellow Card in the Google Play or Apple App Store. Adverse events should also be reported to Britannia Pharmaceuticals Ltd at
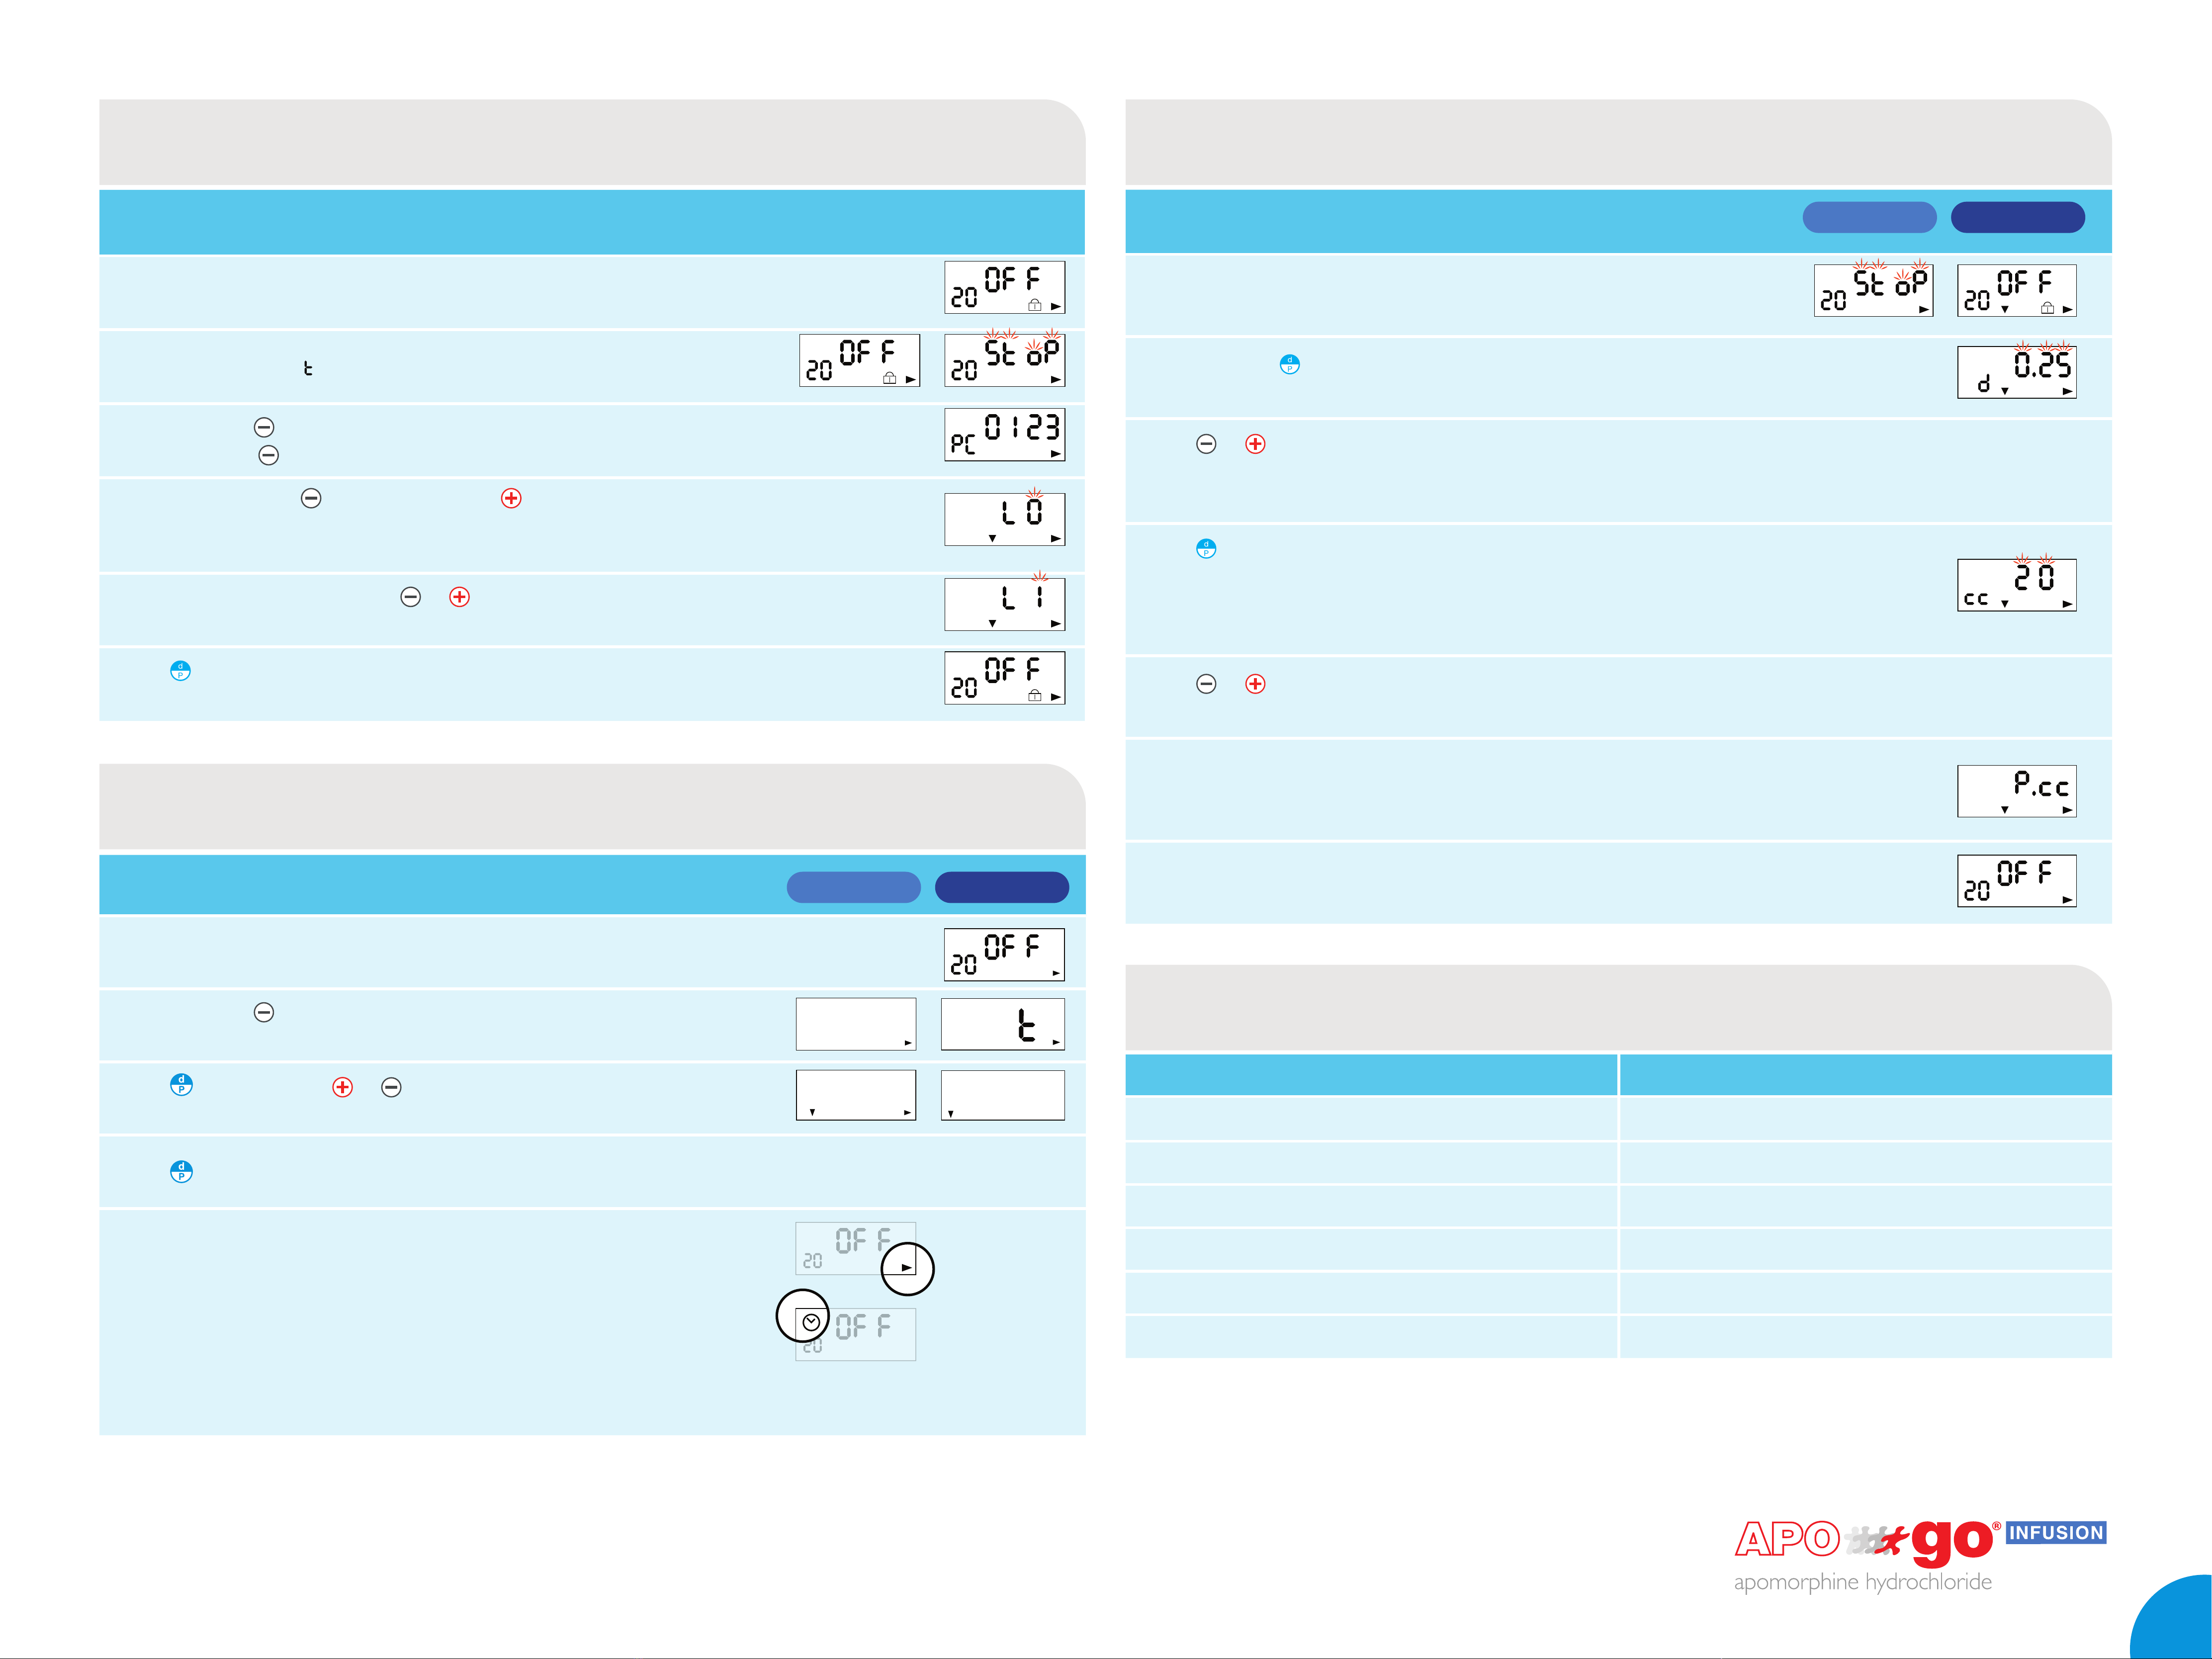
Locking/unlocking
This task requires the pressing of two buttons simultaneously Display screen
L1 = locked. Padlock symbol on display
L0 = unlocked. No padlock
Pump set to OFF or S oP
Press and hold until you hear a long beep and display shows PCXXXX -
Do not release button
Whilst still pressing immediately press too - display will flash either:
– ‘LO’ (unlocked) or
– ‘L1’ (locked)
Release the buttons and press or to switch between
locked and unlocked
Press or leave the pump for a few seconds to confirm selection –
display returns to OFF
Locking/unlocking the Crono®APO-go III Pump Setting the bolus/priming dose and syringe volume
Bolus/priming conversion chart to show typical settings
Switching between APo1 and APo3 modes
Pump set to OFF and unlocked (LO)
Press and hold until PC 0000 is displayed
Continue to hold the button down until the display shows SET
Press
once then use or to switch between
APo1 or APo3 modes
Press again to set the desired mode
NOTES: If there is an arrow visible in the bottom right-hand
corner of the screen the pump is in APo1 mode
(this will be visible even when the pump is
OFF
)
APo1 MODE
P(
0000 SE
APo1 APo3
APo3 MODE
20
20
20
20
Pump set to OFF and unlocked (L0)
Press and hold until you hear a long beep - then release.
The priming dose/bolus dose will flash with a dsymbol
Press or to decrease or increase the dose in ml
NOTE: Make any changes within 5 seconds otherwise the pump
will return to the
OFF
state
Press again to move display to syringe volume –
CC is displayed 1 ml = 1 cc
NOTE: This next setting is only modifiable if the piston is at the
start of infusion position
Press or to decrease or increase the volume to 10 or 20 and
leave for a few seconds for the change to be stored
If a change is made a beep will sound as the plunger extends to
the desired position, P.cc flashes and the display counts to the new
position. There is no beep if the plunger retracts
A final beep will sound when the desired position is reached as the
display returns to OFF
Solution used = 5 mg/ml strength. The bolus/priming volume has a setting range of 0.02 ml to 0.99 ml,
e.g. to give 3 mg dose, 3 × 2/10 = 0.6, therefore you will require a setting of 0.61 ml, since the volume increases in
increments which will not allow a setting of precisely 0.6 ml.
Bolus/priming dose in mg Bolus/priming volume in ml (setting on pump)
0.5 0.11
1 0.22
2 0.41
3 0.61
4 0.81
5 0.99
APo1 MODE APo3 MODE
1

Switching the Crono®APO-go III Pump on Dosage to flow rate conversion table
Setting the flow rate in APo1 mode
2
Pump set to OFF
The ON/OFF button is the red button, press and hold until you hear
a beep – then release
Display will scroll through the bolus/priming dose (and beep), flow rate (and beep),
length of infusion in hours (and beep)
EITHER
If no further action taken – a final beep sounds as the infusion starts - the ‘drop’
icon will start flashing and the display shows time of infusion remaining
OR
See “Setting the flow rate” to programme the infusion flow rate
Pump set to ‘ON’ (Press ) and unlocked (L0)
With the display showing duration of infusion (hours and minutes), press and
hold until you hear a long beep – then release. Flow rate flashes with Fsymbol
Press or to decrease or increase the flow rate to the desired level
NOTE: Make any changes within 5 seconds otherwise the infusion will start
When desired rate is entered, wait 5 seconds – a beep will sound as the
display returns to show revised time of infusion remaining. The ‘drop’ icon
will start flashing
APo1 MODE
Settings between 0.05 ml/hr to 5.00 ml/hr are available.
Values shown here are 0.4 ml/hr to 2.0 ml/hr. Solution used = 5 mg/ml strength (i.e. APO-go®Pre-filled Syringe).
20 ml syringe 20 ml syringe
with spacer
Flow rate value
to set on pump
20 ml setting
(i.e. 100 mg APO-go®)
10 ml setting
(i.e. 50 mg APO-go®)
mg per hour ml per hour Hours/minutes
running time
Hours/minutes
running time
2.0 0.40 25.00
2.5 0.50 20.00
3.0 0.60 16.41
3.5 0.70 14.17
4.0 0.80 24.59 12.30
4.5 0.90 22.13 11.07
5.0 1.00 20.00 10.00
5.5 1.10 18.10 9.05
6.0 1.20 16.40 8.20
6.5 1.30 15.22 7.41
7.0 1.40 14.17 7.09
7.5 1.50 13.20 6.40
8.0 1.60 12.30 6.15
8.5 1.70 11.46 5.53
9.0 1.80 11.07 5.34
9.5 1.90 10.31 5.16
10.0 2.00 10.00 5.00
3
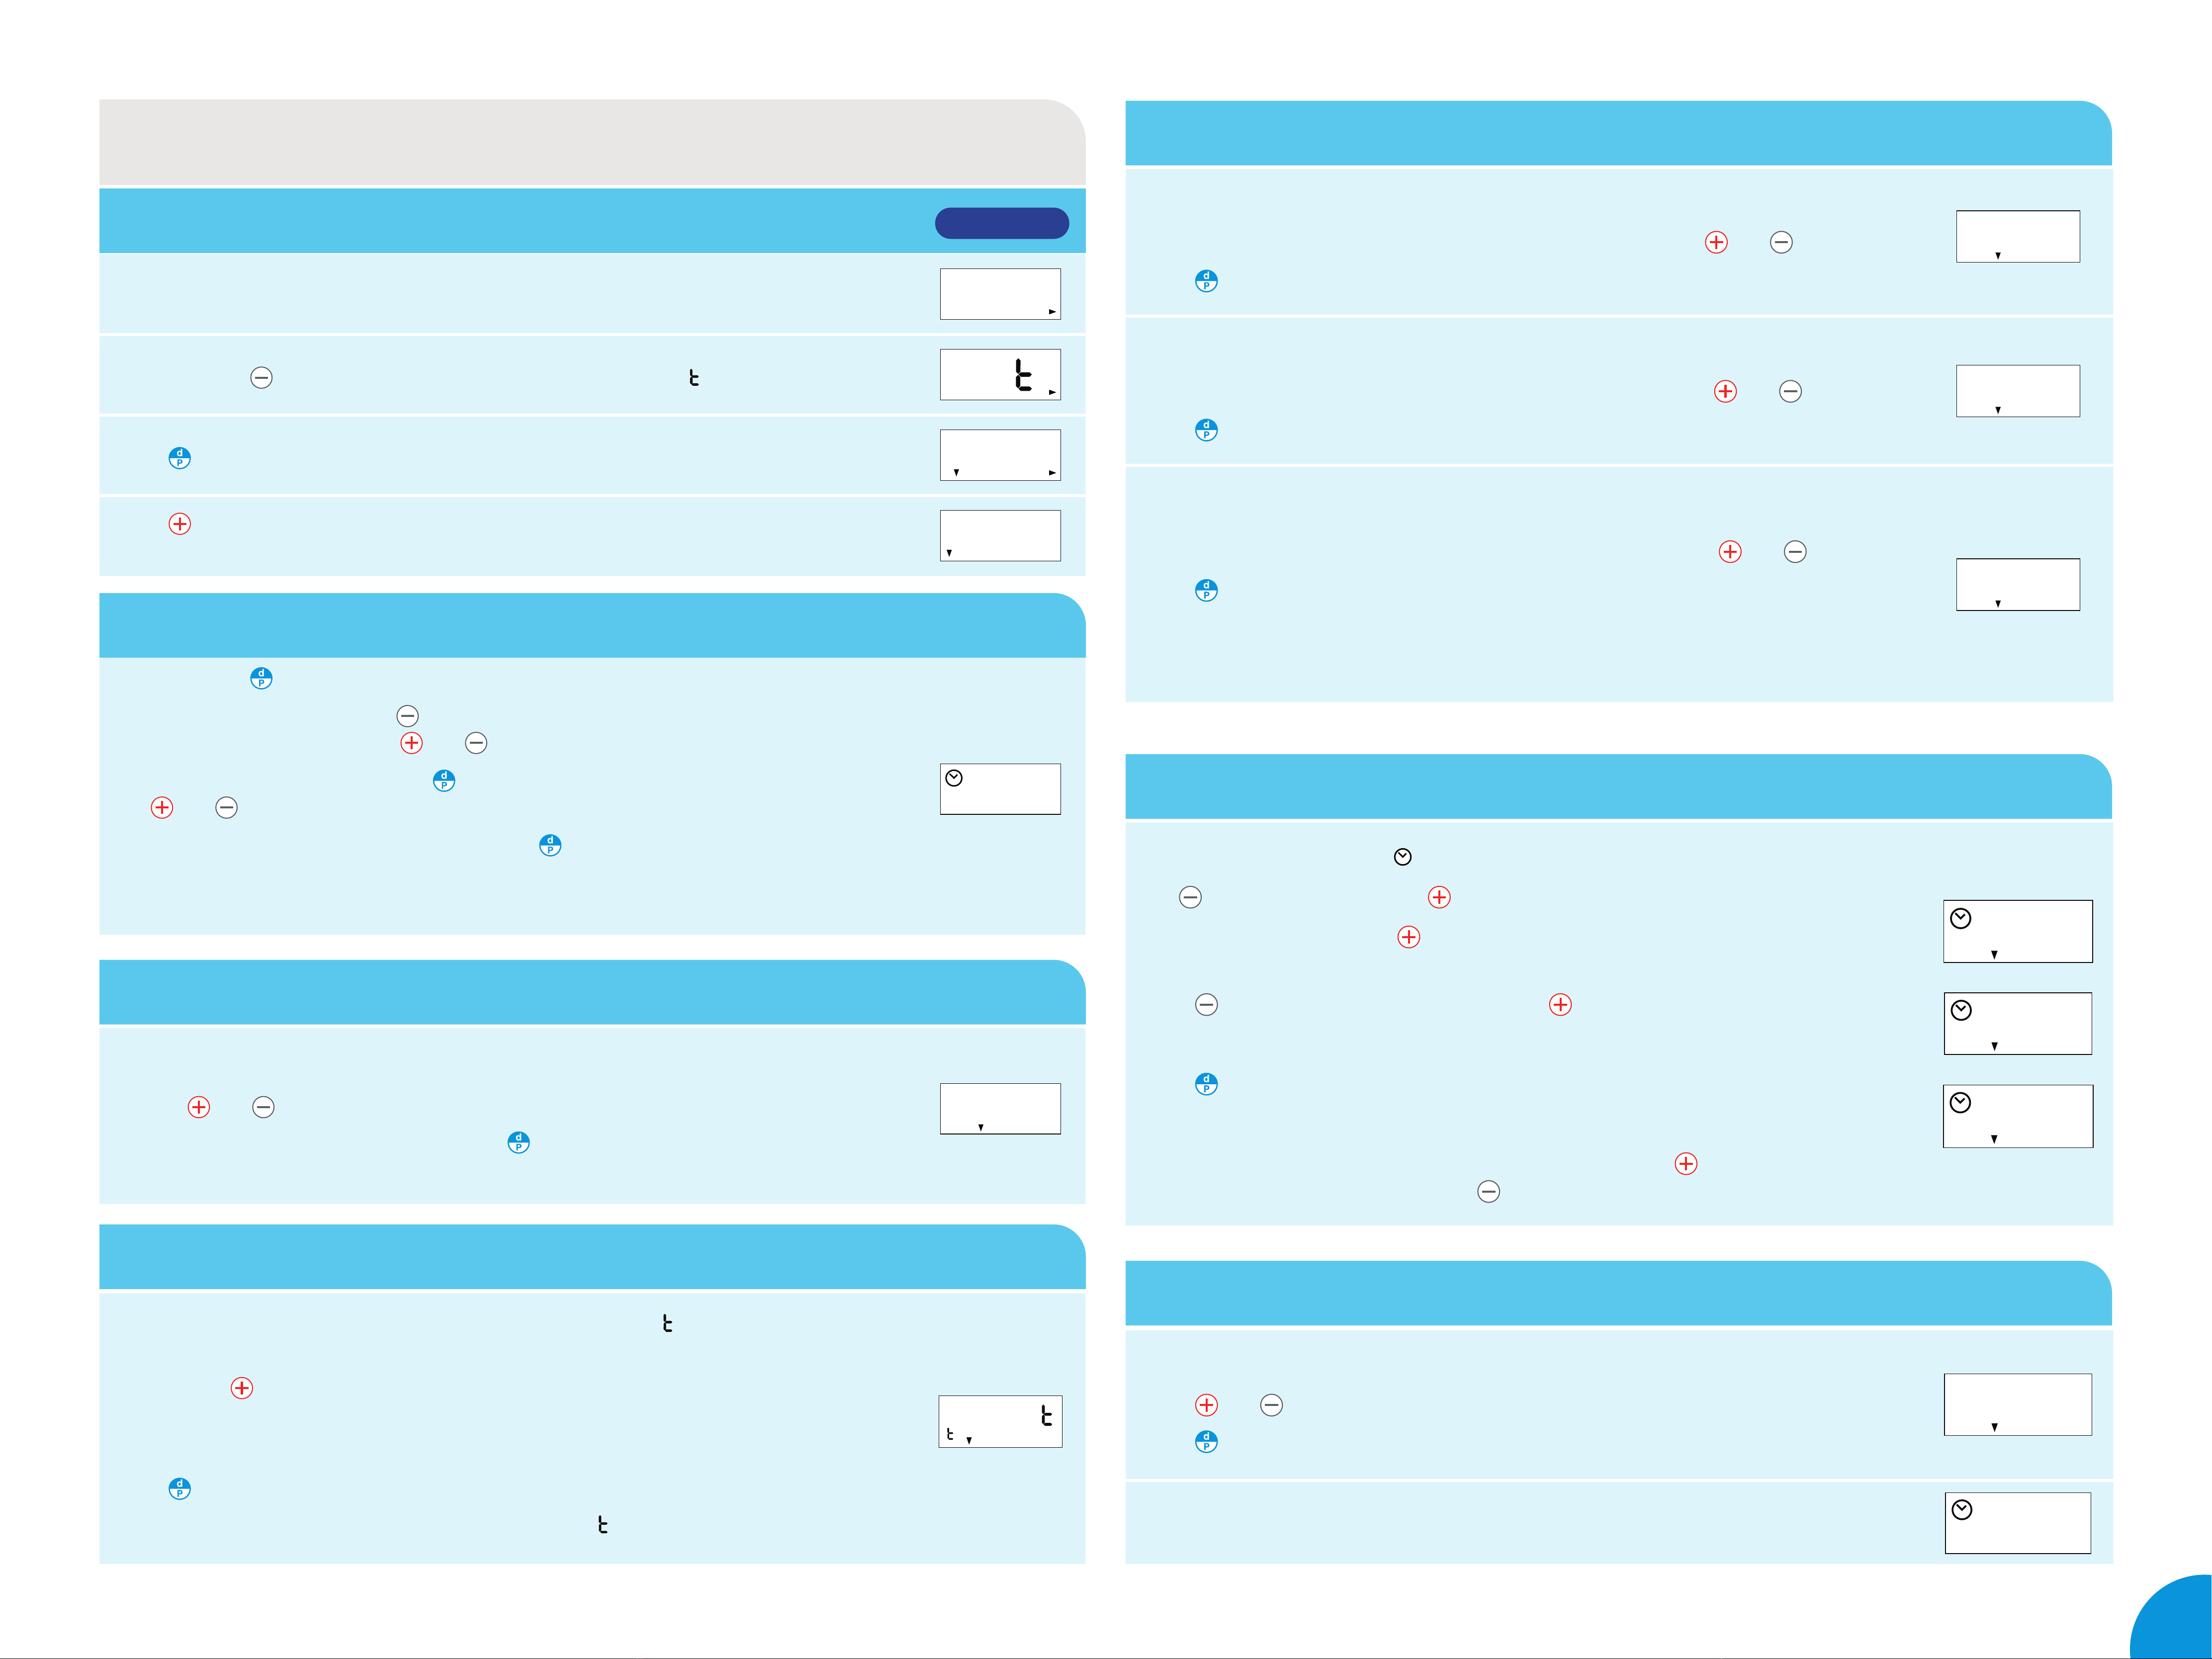
Programming variable flow rate in APo3 mode
Step 1: Entering set up mode
Step 2: Setting the time
Step 5: Setting the flow rate
Step 6: Setting the flow rate per hour
Step 7: Altering the volume
Step 3: Setting the bolus dose
Step 4: Setting the bolus dose lockout time
Ensure the pump says OFF, is unlocked and on the 20 ml setting. 20 OFF
Press and hold (for up to 10 seconds) until the screen says SE .SE
Press until the screen shows APo1.APo1
Press until the screen shows APo3.
Leave the pump to revert to the original OFF position. APo3
Press and hold until the screen displays the time.
To set the time, press and hold until the hours begin to flash.
Adjust the hour by pressing the and buttons.
Adjust the minutes by pressing the button until the minutes begin to flash,
use and to adjust appropriately.
When you have reached the correct time press .
Note: Ensure time is set to current time and ensure to change the time when the clocks
go forward or back
13:27
h
Once the correct time has been set on the pump, the screen will
display the bolus dose.
Use the and buttons to adjust the prime dose to the desired dose.
When finished setting the bolus dose press .
Note: Refer to ‘Bolus/priming conversion chart to show typical settings’ on Page 1
0.15
d
Once the bolus dose has been set the screen will display no.L ; this setting controls the
bolus dose.
Pressing the locks the bolus dose for a set time.
For example, setting this figure to 5 minutes means that once bolus dose has been
pressed, there is a 5 minute delay before it can be pressed again.
Press to progress.
Note: If this setting is not required, leave it saying
no.L
no.L
i
APo3 MODE The screen will show F1 with a number next to it. This is your first flow rate.
Referring to your flow rate record set the flow rate for F1 using and buttons.
Press to progress.
0.60
F1
The screen will show F2 with a number next to it. This is your second flow rate.
Referring to your flow rate record set the flow rate for F2 using and buttons.
Press to progress.
0.75
F2
The screen will now show F3 with a number next to it. This is your third flow rate.
Referring to your flow rate record, set the flow rate for F3 using and buttons.
Press to progress.
Note: If a third flow rate is not required skip to the next step
Refer to ‘Dosage to flow rate conversion table’ on page 2
0.80
F3
The screen will now display , hF, 0.F (1, 2or 3).
Use to control the hours and to select the flow rate.
Starting at 0(midnight), use to select the correct flow rate correlating to your flow
rate record sheet.
Press to change the hour to 1 a.m. and use to select the flow rate.
Repeat until all flow rates are set (e.g. 2 a.m., 3 a.m., 4 a.m. ...)
Press when all hours and flow rates have been set.
Note: If you go past the correct flow rate continue pressing
until it appears again
If you miss a time then keep pressing
until the time appears again
0.F1
hF
1.F0
hF
2.F2
hF
The screen will say cc20, this is your ml setting.
Press and to adjust the pump to the 10 ml setting (if required).
Press to progress.
20
cc
The screen will display OFF and set up is complete. OFF
13

PAUSING THE INFUSION While the infusion is running press and hold – the display
will now show S oP
The pump can be restarted by pressing and holding
4
Priming the line in APo1 mode Pausing the infusion
Retracting the plunger to the start position
Priming the line in APo3 mode
Administering the bolus dose
Pump set to ‘ON’
Press and hold until you hear a long beep – then release
Display will show the bolus dose being infused into the line, with dflashing.
Beeps will sound at every 0.11 ml with a long beep when the full dose had been
administered. Display shows revised time of infusion remaining
NOTES:
- This function can also be used to deliver a bolus dose
- The priming/bolus dose can be stopped by pressing the button
Press and hold to turn the pump ON – the screen will display Pr
Press and hold
until the liquid has reached the needle tip
Then press and hold , the pump will display On then show the remaining
infusion time 20
Once the line is primed, if the pump is left for a few seconds the
pump will switch to OFF with Pr flashing in the bottom right hand corner
Note: If this is the case, repeat steps 1 to 3
APo1 MODE
APo3 MODE
While the pump is on, press and hold until you hear a long beep – then release
The screen will show the bolus dose being infused with dflashing. Beeps will sound at every 0.11 ml
with a long beep when the full dose has been administered. If required, the bolus dose can be stopped
by pressing the button
Note: If a lockout time has been set (APo3 mode only) this will limit the time between bolus doses
Refer to ‘Step 4: Setting the bolus dose lockout time’ on page 3 for more details
NOTE: – The infusion line must always be DISCONNECTED from the
patient before the plunger is retracted
– The syringe should not be removed until the plunger is
fully retracted
RETRACTING IF THE INFUSION HAS NOT ENDED:
Stop by pressing and holding – display shows S oP, press
to stop beeping
Disconnect the infusion line
End infusion by pressing and together - a long beep will
sound and display will show End then I---- as the plunger
withdraws.
A beep will sound when completed and the display returns to OFF
RETRACTING AT THE END OF THE INFUSION:
NB - An intermittent beep will sound at 10 minutes and at
5 minutes before the end of infusion.
At the end of infusion an ongoing beep will sound and the display
will show
End
Pump display shows End
Disconnect infusion line
Press and hold to stop beeping and retract plunger –
display will show I----
Plunger retracts and beeps when it has reached the start position
– display shows OFF
APo1 MODE APo3 MODE

5
Error functions
Error functions for Crono®APO-go III Pump in APo1 mode only
Error Message Description Action
Err Unfeasible operation No action required
Er 2 Safety system error Press button
Er 3 Irregularity of motor circuit Press button
Er 4 Obstruction of plunger during retraction Remove obstruction. Restart pump by removing battery and reinserting after 15 seconds
Er 5 Irregularity of plunger mechanism Press button
Er 6 Motor irregularity Restart pump by removing battery and reinserting after 15 seconds
Er 7 Internal communication error Press button
Er 8 Reading memory error Restart pump by removing battery and reinserting after 15 seconds
Er 9 Motor circuit error Restart pump by removing battery and reinserting after 15 seconds
OCCL Occlusion of infusion line Clear occlusion and press button
Er,d Bolus dose set to 0.00 ml Function not available

apomorphine hydrochloride
Britannia Pharmaceuticals Limited
200 Longwater Avenue, Green Park, Reading RG2 6GP UK-APOINF-2100072 Date of preparation: May 2021
Table of contents


