Stage right Sonata Music Shell User manual

PRODUCT INFORMATION PACKET
PRODUCT NAME: Sonata Music Shell™

1
Table Of Contents
Introduction………………………………………………………………………………………………………………………………………………
General Safety Rules…………………………………………………………………………………………………………………………………
Symbols……………………………………………………………………………………………………………………………………………………
Technical Specifications……………………………………………………………………………………………………………………………
Instructions………………………………………………………………………………………………………………………………………………
Maintenance………………………………………………………………………………………………………………………………………………
Customer Service Information…………………………………………………………………………………………………………………
Introduction
The StageRight Sonata Music Shell™ has been designed and manufactured with safety, performance and
dependability as top priorities, making it easy to operate and maintain.
The care you give your Music Shell will greatly determine your satisfaction with its performance and service life.
Careful study of this manual is encouraged to obtain a thorough understanding of your new Music Shell and its
functions and maintenance.
If your manual becomes lost or destroyed, StageRight will gladly provide you with a new copy. Should you
require additional information or assistance, please feel free to contact us at 1-800-438-4499.
BECAUSE STAGERIGHT CORPORATION MAINTAINS AN ONGOING PROGRAM OF
PRODUCT DEVELOPMENT AND IMPROVEMENT, WE RESERVE THE RIGHT TO
MAKE IMPROVEMENTS IN DESIGN OR CHANGES IN SPECIFICATIONS WITHOUT
INCURRING ANY OBLIGATIONS TO INSTALL THEM ON UNITS PREVIOUSLY SOLD.
1
2
3
4
5
6
6

2
General Safety Rules
WARNING!
READ AND UNDERSTAND ALL INSTRUCTIONS.
Failure to follow all instructions listed below may result in serious
personal injury.
SAVE THESE INSTRUCTIONS
Stay clear of all pinch points.
Make sure that all fasteners are properly engaged before use.
Setup Music Shells on level surface. Use the caster brakes when shell is in place.
Save this manual. Refer to it frequently and use it to instruct others who may use the Sonata
Music Shell.
Read the Product Information Packet. Failure to read the information packet is considered a
misuse of this equipment.
Become familiar with all caution and warning decals affixed to the staging equipment
before use.
Never cover or deface caution/warning labels.
Never remove counterweight. Counterweight is meant to keep tower stabilized. Without it, the
tower could tip over.
Do not operate with damaged or missing shock.

3
Symbols
Safety Alert: Precautions that involve your safety
Read The Operator’s Manual: To reduce risk of injury, user
must read and understand operator’s manual before using this
product

4
StageRight Corporation Technical Specifications
Sonata Music Shell
Construction, Finish, and Hardware
- Constructed of ASTM specified steel or aluminum
- Baked-on powder coat finish.
- Zinc-plated hardware
-Moveable tower reflects a
maximum range of audible
frequencies
-Self-standing with counter-
weighted nesting base
5
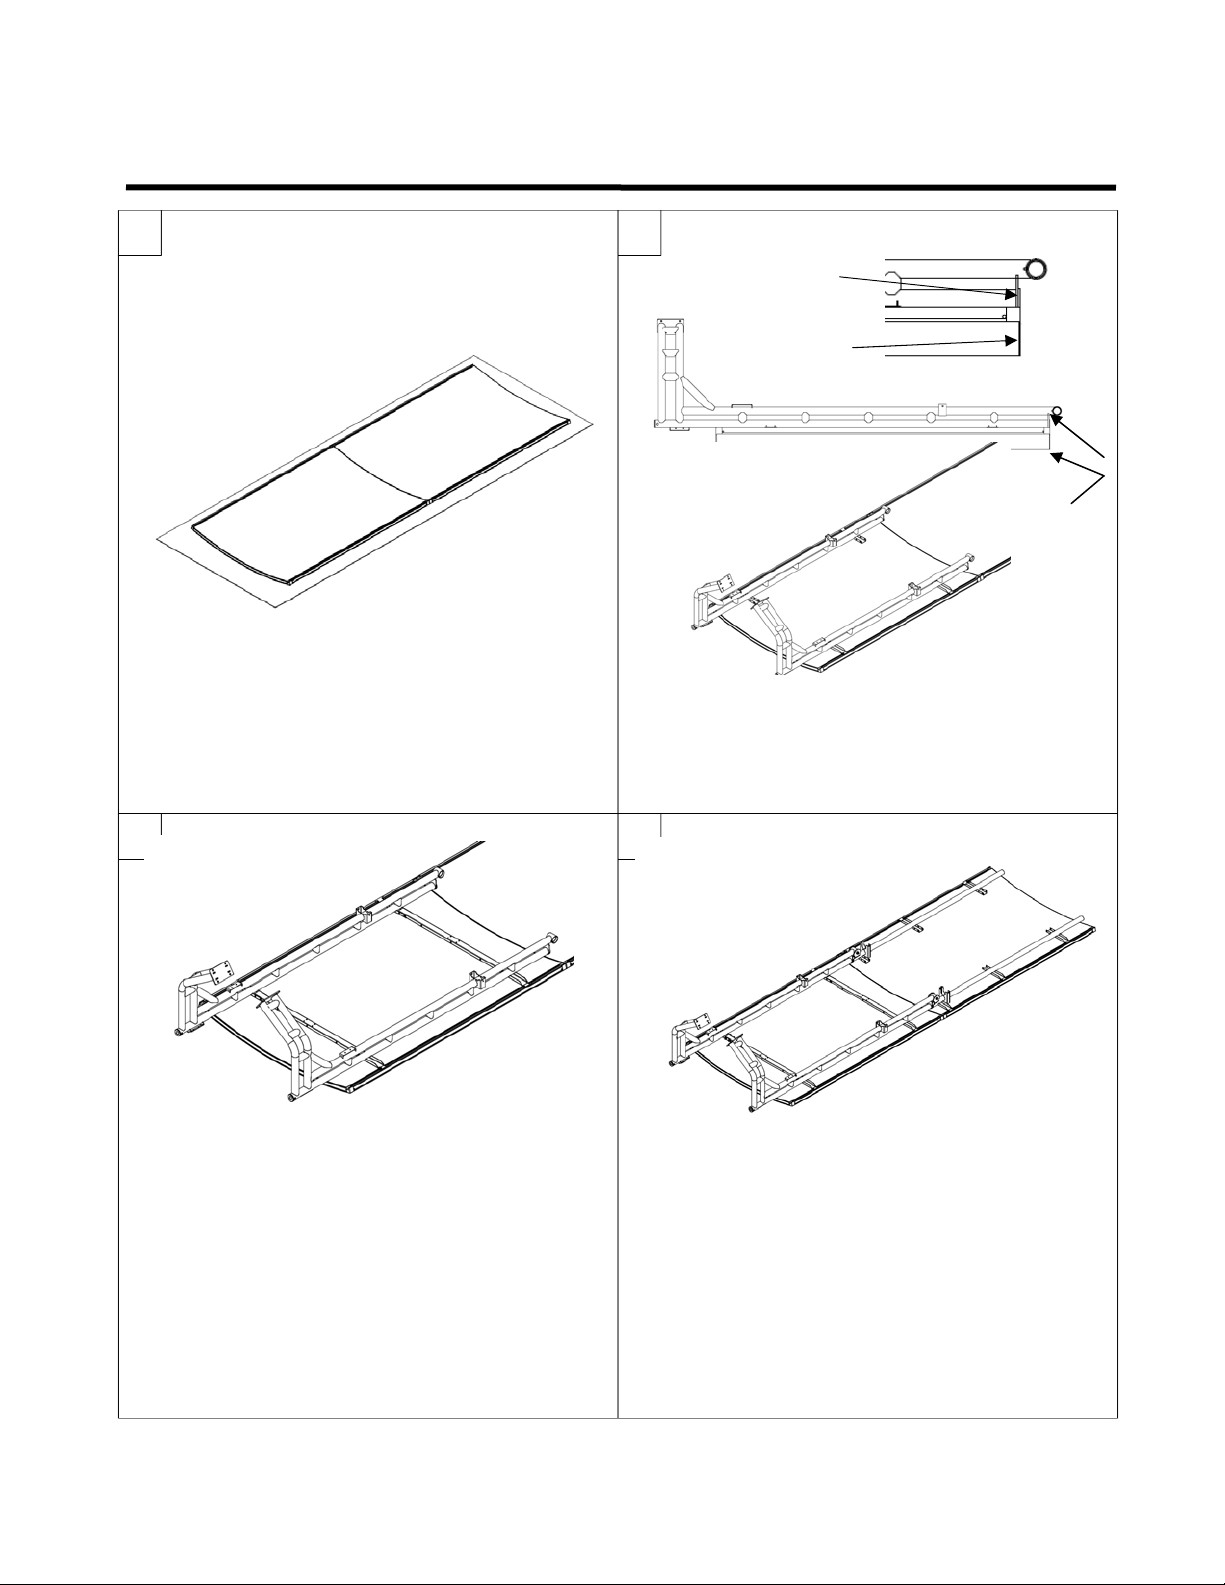
Assembly Instructions
3 4
2
1
Begin work on a clean, flat surface.
Use cardboard to prevent scratching
the surface of the panels. Lay the two
large panels on the floor, end to end
Lay lower truss sections on panel. Attach
truss with 8- 3/8X 3/4” bolts, 3/8 washers and
2" strut nut. DO NOT TIGHTEN. Align the
top of the panel with the top of the truss.
Insert cross braces between lower truss
sections. Fasten with 8- 3/8x 2-3/4” bolts
and 3/8” nuts.
Attach upper truss sections to lower truss
sections using 4- 1/2 x 3/4” bolts, 2- pivot
pins, 4-1" ID X 1-1/2" OD shim washers.
Repeat steps 2 and 3 for the upper truss
sections.
FLUSH
Panel
Truss
6
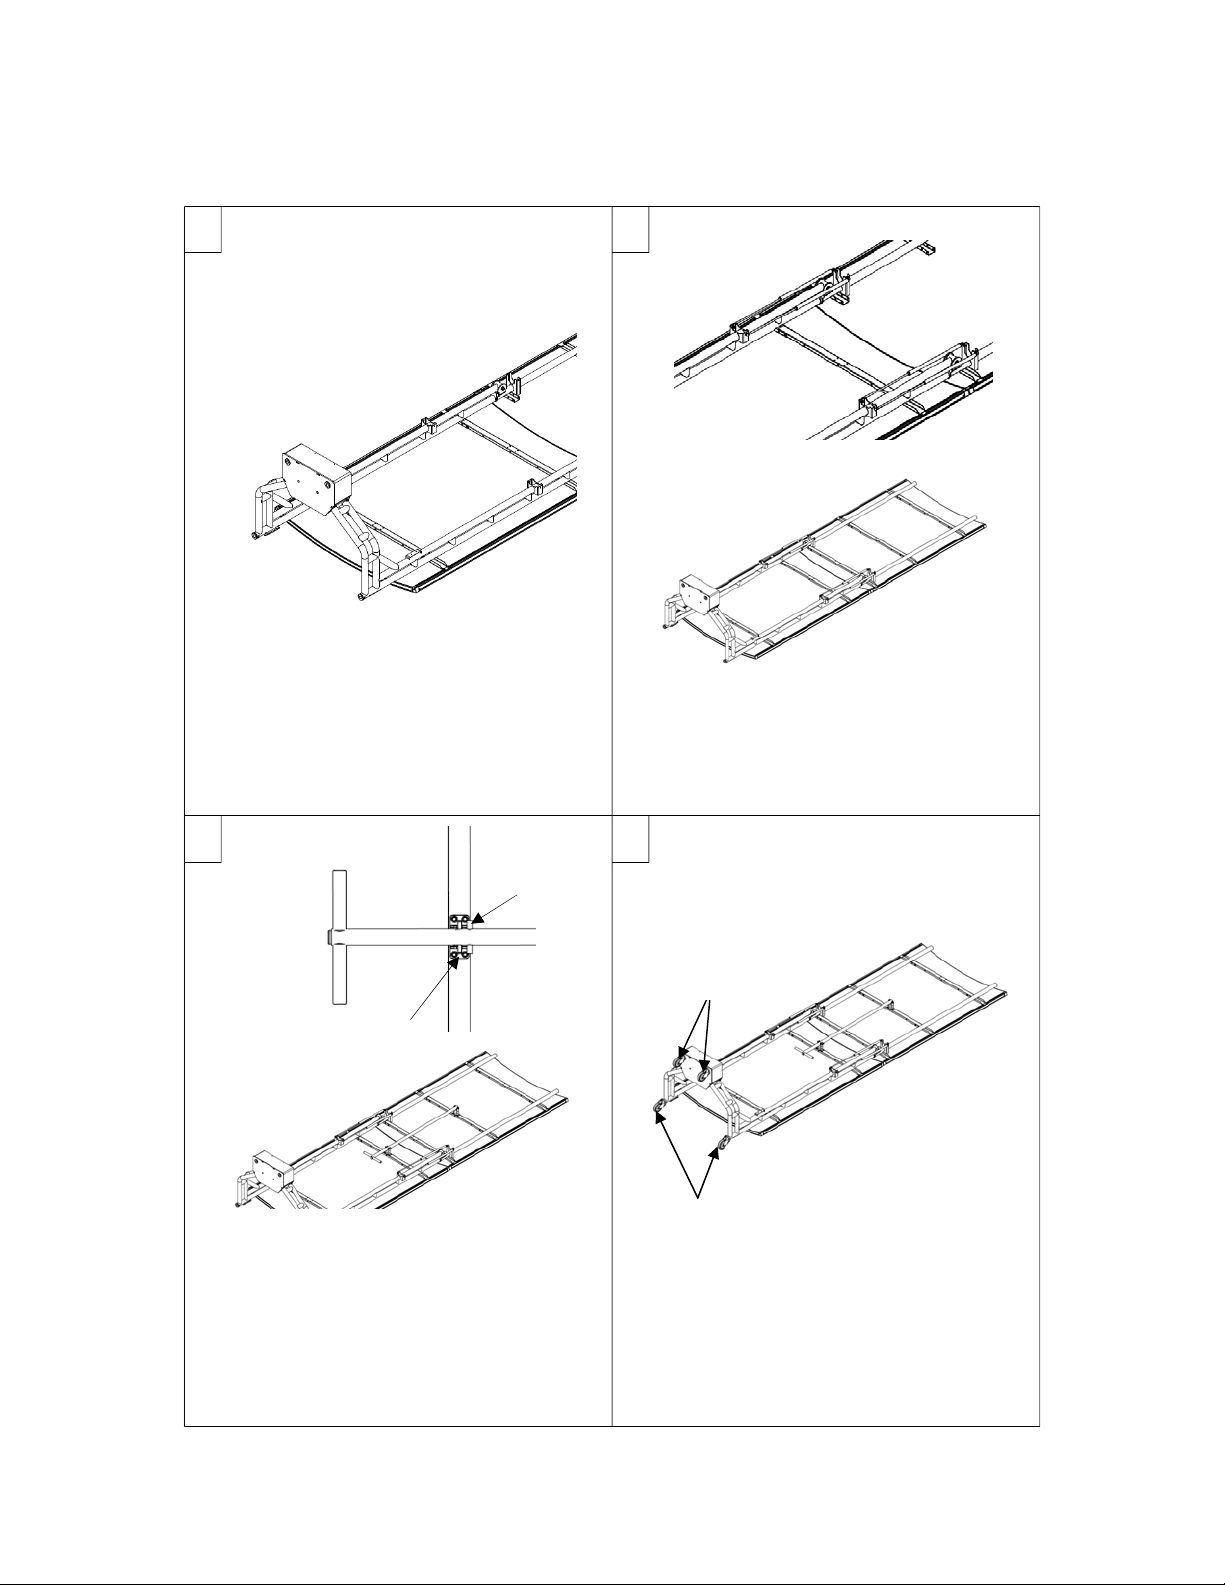
5 6
7 8
Attach counterweight box to lower
truss sections using 8- 3/8 x 1” bolts
and 3/8” nuts.
Install 4- gas springs to connect
upper and lower truss. Fasten with 8-
5/16” lock nuts.
Install handle pivot and lock bracket
using 8-1/4 x 1.75” bolts and 1/4" nuts.
Install handle using 3/8 x 2.75” bolt and
3/8” nut. Before tightening fasteners,
verify that the locking pin on the
handle is tight with the locking
bracket.
Install the casters and on the unit. Two
locking casters are placed closest to
the panels and two non-locking casters
are
p
laced on the counterwei
g
ht box.
Locking
Non-locking
Locking
pin
Locking
bracket

7
910
11 12
Close the shell. Use two people to
close the upper panel and one person
to hold the lower
p
anel stead
y
.
Lift the shell up onto the casters.
Lock the front casters to prevent
sliding. It may also be necessary to
block the wheels. Use two people to
walk the unit up and one person to
steady the base. Do not operate
without counterweight installed.
Insert 12 counterweight plates into the
counterweight box and fasten using 2
threaded rods and 4 tamper-proof
nuts. Fasten counterweight lid using
4- 3/16” rivets.
Open panel for the next three steps.
Install 4 bumpers using 8- 1/4" rivets.
Install tube caps into the ends of the
u
pp
er truss section.
Bumpers

8
13
14
Install shelf using 2- 3/8 x 3.25” bolts
and 3/8” nuts.
Install clips for hanging lower panel
using 4- #10 self-drilling screws.
Shelf
Make certain all bolts and fasteners are
tightened on unit. Operate unit to verify all parts are
functioning correctly.
15 16

9
Operation Instructions
1 2
When unit is in operation, ensure that the
handle is in the locked position
Release
button
Locking bracketLocking pin
To release handle lock, press the release
button allowing the locking pin to swing free
of the lockin
g
bracket.
3 4
Move unit into place and lock the front
casters. Raise the upper panel into position. The gas
springs will do most of the work
Locking
casters

10
To install the filler panel, remove it
from the storage location and place it
on the panel clips.
Filler panel
5
11
Maintenance
WARNING!
Read and Understand All Maintenance Procedures
Failure to follow all procedures listed below may cause serious injury
and a decrease in the equipments functional existence.
Frequently check to see that all fasteners are securely engaged.
Music equipment should be cleaned periodically with household cleaners to maintain
original surface finish.
A silicone based lubricant may be used on moving parts to maintain proper function.
Replace any damaged equipment with genuine StageRight parts. Failure to do so may result
in unsafe equipment and/or personal injury.
Customer Service
For parts or service contact StageRight Corporation. When ordering parts be sure to provide all relevant
information available including the name and part number of the equipment purchased. This information is
located on the technical specification page of this product information package. Customer Service hours are
Monday thru Friday from 8:00 a.m. to 5:00 p.m. Eastern Standard Time. Customers can phone toll-free at
(800) 438-4499 or mail:
StageRight Corporation
495 Pioneer Parkway
Clare, Michigan 48617
www.stageright.com

12
Table of contents
Popular Music Equipment manuals by other brands


Audio Design Associates
Audio Design Associates Suite 16 System design & technical documentation

Rolls
Rolls RM70 Specifications

Tascam
Tascam MP-GT1 quick start guide

Emotiva
Emotiva Stealth SP-1 user manual

Rockford Fosgate
Rockford Fosgate RFC10HB Installation & operation

EMG
EMG EMG-40-TW Installation information


