Stageline djp-104usb User manual

DJ-HIFI-PLATTENSPIELER
MIT USB-INTERFACE
DJ HIFI TURNTABLE WITH USB INTERFACE
PLATINE DISQUE HIFI POUR DJ AVEC INTERFACE USB
GIRADISCHI HIFI PER DJ CON PORTA USB
DJP-104USB Best.-Nr. 21.2160
BEDIENUNGSANLEITUNG • INSTRUCTION MANUAL • MODE D’EMPLOI
ISTRUZIONI PER L’USO • GEBRUIKSAANWIJZING • MANUAL DE INSTRUCCIONES • INSTRUKCJA OBSŁUGI
SIKKERHEDSOPLYSNINGER • SÄKERHETSFÖRESKRIFTER • TURVALLISUUDESTA

2
www.imgstageline.com
Bevor Sie einschalten …
Wir wünschen Ihnen viel Spaß mit Ihrem neuen Gerät
von „img Stage Line”. Bitte lesen Sie diese Bedienungs-
anleitung vor dem Betrieb gründlich durch. Nur so lernen
Sie alle Funktionsmöglichkeiten kennen, vermeiden
Fehlbedienungen und schützen sich und Ihr Gerät vor
eventuellen Schäden durch unsachgemäßen Gebrauch.
Heben Sie die Anleitung für ein späteres Nachlesen auf.
Der deutsche Text beginnt auf der Seite 4.
Before you switch on …
We wish you much pleasure with your new “img Stage
Line” unit. Please read these operating instructions care-
fully prior to operating the unit. Thus, you will get to know
all functions of the unit, operating errors will be pre-
vented, and yourself and the unit will be protected
against any damage caused by improper use. Please
keep the operating instructions for later use.
The English text starts on page 4.
D
A
CH
GB
Avant toute installation …
Nous vous souhaitons beaucoup de plaisir à utiliser cet
appareil “img Stage Line”. Lisez ce mode dʼemploi entière-
ment avant toute utilisation. Uniquement ainsi, vous pour-
rez apprendre lʼensemble des possibilités de fonctionne-
ment de lʼappareil, éviter toute manipulation erronée et
vous protéger, ainsi que lʼappareil, de dommages éven-
tuels engendrés par une utilisation inadaptée. Conservez
la notice pour pouvoir vous y reporter ultérieurement.
La version française se trouve page 7.
Prima di accendere …
Vi auguriamo buon divertimento con il vostro nuovo ap-
parecchio di “img Stage Line”. Leggete attentamente le
istruzioni prima di mettere in funzione lʼapparecchio.
Solo così potete conoscere tutte le funzionalità, evitare
comandi sbagliati e proteggere voi stessi e lʼapparecchio
da eventuali danni in seguito ad un uso improprio. Con-
servate le istruzioni per poterle consultare anche in
futuro.
Il testo italiano inizia a pagina 7.
F
B
CH
I
Voor u inschakelt …
Wij wensen u veel plezier met uw nieuwe apparaat van
“img Stage Line”. Lees deze gebruikershandleiding
grondig door, alvorens het apparaat in gebruik te nemen.
Alleen zo leert u alle functies kennen, vermijdt u foutieve
bediening en behoedt u zichzelf en het apparaat voor
eventuele schade door ondeskundig gebruik. Bewaar de
handleiding voor latere raadpleging.
De Nederlandstalige tekst vindt u op pagina 10.
Antes de la utilización …
Le deseamos una buena utilización para su nuevo apa-
rato “img Stage Line”. Por favor, lea estas instrucciones
de uso atentamente antes de hacer funcionar el aparato.
De esta manera conocerá todas las funciones de la uni-
dad, se prevendrán errores de operación, usted y el apa-
rato estarán protegidos en contra de todo daño causado
por un uso inadecuado. Por favor, guarde las instruccio-
nes para una futura utilización.
El texto en español empieza en la página 10.
NL
B
E
Før du tænder …
God fornøjelse med dit nye “img Stage Line” produkt.
Læs venligst sikkerhedsanvisningen nøje, før du tager
produktet i brug. Dette hjælper dig med at beskytte pro-
duktet mod ukorrekt ibrugtagning. Gem venligst denne
betjeningsvejledning til senere brug.
Du finder sikkerhedsanvisningen på side 16.
Ennen kytkemistä …
Toivomme Sinulle paljon miellyttäviä hetkiä uuden “img
Stage Line” laitteen kanssa. Ennen laitteen käyttöä
Sinua huolellisesti tutustumaan turvallisuusohjeisiin.
Näin vältyt vahingoilta, joita virheellinen laitteen käyttö
saattaa aiheuttaa. Ole hyvä ja säilytä käyttöohjeet myö-
hempää tarvetta varten.
Turvallisuusohjeet löytyvät sivulta 16.
DK
FIN
Innan du slår på enheten …
Vi önskar dig mycket glädje med din nya “img Stage
Line” produkt. Läs igenom säkerhetsföreskrifterna noga
innan enheten tas i bruk. Detta kan förhindra att problem
eller fara för dig eller enheten uppstår vid användning.
Spara instruktionerna för framtida användning.
Säkerhetsföreskrifterna återfinns på sidan 16.
S
Przed uruchomieniem …
Życzymy zadowolenia z nowego produktu “img Stage
Line”. Dzięki tej instrukcji obsługi będą państwo w stanie
poznać wszystkie funkcje tego urządzenia. Stosując się
do instrukcji unikną państwo błędów i ewentualnego
uszkodzenia urządzenia na skutek nieprawidłowego
użytkowania. Prosimy zachować instrukcję.
Tekst polski zaczyna się na stronie 14.
PL

3
2.5
0
2
1.5
1
0.5
0
0.5
2.5
2
1.5
1
Tonarm ausbalancieren
Tone arm balance Skalenring Auflagegewicht einstellen
Scale ring Stylus pressure adjustment
START/STOP
POWER
SPEED
33 45
-16
+16
0
PITCH ADJ.
AA
NN
TT
II
--
SS
KK
AA
TT
II
NN
GG
33
22
11
00
DJP-104USB
Belt Drive Turntable
1
2
3
4
13
12
11
10
9
8
7
6
5
PHONO LINE GAIN
–+
USB
14 15 16
17
18

Auf der ausklappbaren Seite 3 finden Sie alle
beschriebenen Bedienelemente und Anschlüsse.
1 Übersicht der Bedienelemente
und Anschlüsse
1Adapter für Single-Platten
2Ein-/Ausschalter POWER
3Stroboskoplampe
4Start/Stopp-Taste
5Gegengewicht für den Tonarm
6Drehknopf für die Antiskating-Einstellung
7Hebel für den Tonarm-Lift
8Verriegelungshebel für den Tonarm
9Tonarm
10 Schieberegler PITCH ADJ. zum Ändern der Ge-
schwindigkeit (±16 %)
11 Systemträger mit Tonabnehmersystem
12 Taste für die Geschwindigkeit 45 U/min
13 Taste für die Geschwindigkeit 331/3U/min
14 Umschalter PHONO/LINE für den Audiopegel
des Analog-Audioausgangs (18)
PHONO
beim Anschluss an einen Phono-Eingang
LINE
beim Anschluss an einen Line-Eingang
15 Regler GAIN für den Audiopegel am USB-
Anschluss (16)
16 USB-Anschluss (Typ B) zur Verbindung mit
einem Computer
17 Netzstecker zum Anschluss an 230 V~/50 Hz
18 Cinch-Stecker für den Analog-Audioausgang
zum Anschluss an einen Line- oder Phono-Ein-
gang, z. B. eines Verstärkers oder Mischpults
(rot = rechter Kanal, weiß = linker Kanal)
2 Hinweise für den sicheren Gebrauch
Das Gerät entspricht allen relevanten Richtlinien der
EU und ist deshalb mit gekennzeichnet.
Beachten Sie auch unbedingt die folgenden Punkte:
GDas Gerät ist nur zur Verwendung im Innenbe-
reich geeignet. Schützen Sie es vor Tropf- und
Spritzwasser, hoher Luftfeuchtigkeit und Hitze
(zulässiger Einsatztemperaturbereich 0 – 40 °C).
GStellen Sie keine mit Flüssigkeit gefüllten Gefäße,
z. B. Trinkgläser, auf das Gerät.
GNehmen Sie das Gerät nicht in Betrieb und ziehen
Sie sofort den Netzstecker aus der Steckdose:
1. wenn sichtbare Schäden am Gerät oder am
Netzkabel vorhanden sind,
2. wenn nach einem Sturz oder Ähnlichem der
Verdacht auf einen Defekt besteht,
3. wenn Funktionsstörungen auftreten.
Lassen Sie das Gerät in jedem Fall in einer Fach-
werkstatt reparieren.
GEin beschädigtes Netzkabel darf nur durch eine
Fachwerkstatt ersetzt werden.
GZiehen Sie den Netzstecker nie am Kabel aus der
Steckdose, fassen Sie immer am Stecker an.
GWird das Gerät zweckentfremdet, nicht richtig
angeschlossen, falsch bedient oder nicht fachge-
recht repariert, kann keine Haftung für daraus
resultierende Sach- oder Personenschäden und
keine Garantie für das Gerät übernommen wer-
den.
3 Einsatzmöglichkeiten
Der Plattenspieler DJP-104USB eignet sich sowohl
für den Einsatz im privaten Bereich als auch für den
professionellen DJ-Betrieb. Er ist mit einem Phono-
Vorverstärker ausgestattet und kann deshalb auch
an einen Line-Eingang angeschlossen werden.
Zum Digitalisieren der Musik von Schallplatten
lässt sich der DJP-104USB über das USB-Interface
an einen Computer anschließen. Zusätzlich wird
eine Audio-Recording-Software benötigt. Verschie-
dene Programme sind als Freeware im Internet
erhältlich.
4 Montage und Grundeinstellungen
Nach dem Auspacken aller Geräteteile sollte die Ori-
ginalverpackung für eventuelle spätere Transporte
aufbewahrt werden. Den Plattenspieler auf einer
ebenen, waagerechten Fläche aufstellen und die
beiliegende Filzmatte auf den Plattenteller legen.
4.1 Auflagegewicht einstellen
1) Zuerst den Antiskating-Drehknopf (6) entgegen
dem Uhrzeigersinn auf „0“ drehen.
2) Die Schutzkappe für die Abtastnadel nach unten
abziehen.
3) Den Hebel für den Tonarm-Lift (7) in die vordere
Position stellen.
4) Den Verriegelungshebel für den Tonarm (8) nach
rechts öffnen. Den Tonarm am Griff anfassen und
ihn vorsichtig bis kurz vor den Plattenteller füh-
ren, sodass er sich frei nach oben und unten be-
wegen lässt.
Vorsicht! Die Nadel nirgends anstoßen lassen.
5) Den Tonarm mit der linken Hand seitlich führen,
damit die Nadel nicht am Plattenteller anstößt.
Mit der rechten Hand das Gegengewicht (5) so
verdrehen, dass der Tonarm genau waagerecht
stehen bleibt und nicht nach oben oder unten
schwingt (Abb. 3).
WARNUNG Das Gerät wird mit lebensgefähr-
licher Netzspannung (230 V~) ver-
sorgt. Nehmen Sie deshalb nie selbst
Eingriffe am Gerät vor. Durch un-
sachgemäßes Vorgehen besteht die
Gefahr eines elektrischen Schlages.
Soll das Gerät endgültig aus dem Betrieb
genommen werden, übergeben Sie es zur
umweltgerechten Entsorgung einem örtli-
chen Recyclingbetrieb.
All operating elements and connections de-
scribed can be found on the fold-out page 3.
1 Operating Elements
and Connections
1Adapter for single records
2POWER switch
3Stroboscope lamp
4Start/Stop button
5Counterweight for the tone arm
6Rotary knob for the antiskating adjustment
7Lever for the tone arm lift
8Tone arm locking lever
9Tone arm
10 Sliding control PITCH ADJ. to change the pitch
(±16 %)
11 Headshell with phono cartridge system
12 Button for the speed 45 rpm
13 Button for the speed 331/3rpm
14 Selector switch PHONO/LINE for the audio level
of the analog audio output (18)
PHONO
for connection to a phono input
LINE
for connection to a line input
15 Control GAIN for the audio level at the USB con-
nection (16)
16 USB connection (type B) for connecting a com-
puter
17 Mains plug for connection to 230 V~/50 Hz
18 Phono plugs for the analog audio output for con-
nection to a line input or phono input, e. g. of an
amplifier or mixer
(red = right channel, white = left channel)
2 Safety Notes
This unit corresponds to all relevant directives of the
EU and is therefore marked with .
Please observe the following items in any case:
GThe unit is suitable for indoor use only. Protect it
against dripping water and splash water, high air
humidity, and heat (admissible ambient tempera-
ture range 0 – 40 °C).
GDo not place any vessels filled with liquid, e. g.
drinking glasses, on the unit.
GDo not operate the unit and immediately discon-
nect the plug from the mains socket
1. if there is visible damage to the unit or to the
mains cable.
2. if a defect might have occurred after the unit
was dropped or suffered a similar accident.
3. if malfunctions occur.
In any case the unit must be repaired by author-
ized personnel.
GA damaged mains cable must be replaced by
skilled personnel only.
GNever pull the mains cable to disconnect the
mains plug from the socket, always seize the plug.
GNo guarantee claims for the unit and no liability for
any resulting personal damage or material dam-
age will be accepted if the unit is used for other
purposes than originally intended, if it is not cor-
rectly connected, operated, or not repaired in an
expert way.
GImportant for U. K. Customers!
The wires in this mains lead are coloured in accor-
dance with the following code:
blue = neutral
brown = live
As the colours of the wires in the mains lead of this
appliance may not correspond with the coloured
markings identifying the terminals in your plug,
proceed as follows:
1. The wire which is coloured blue must be con-
nected to the terminal in the plug which is
marked with the letter N or coloured black.
2. The wire which is coloured brown must be con-
nected to the terminal which is marked with the
letter L or coloured red.
3 Applications
The turntable DJP-104USB is suitable both for
private application and for professional DJ opera-
tion. It is equipped with a phono preamplifier and
can therefore also be connected to a line input.
To digitalize the music of records, the DJP-104USB
can be connected to a computer via the USB inter-
face. In addition, an audio recording software is
required. Different programmes are available as
freeware in the Internet.
4 Assembly and Basic Settings
After unpacking all parts, the packing material
should be kept for a possible transportation. Place
the turntable on an even, horizontal surface and
place the supplied felt slipmat on the turntable plat-
ter.
4.1 Adjusting the stylus pressure
1) First turn the antiskating knob (6) counter-clock-
wise to “0”.
2) Pull off the protective cover of the stylus in a
downward movement.
3) Place the lever for the tone arm lift (7) in the front
position .
If the unit is to be put out of operation defin-
itively, take it to a local recycling plant for a
disposal which is not harmful to the envi-
ronment.
WARNING The unit is supplied with hazardous
mains voltage (230 V~). Leave ser-
vicing to skilled personnel only. Inex-
pert handling may cause an electric
shock hazard.
4
GB
D
A
CH

– Schwingt der Tonarm nach oben: Gegenge-
wicht entgegen dem Uhrzeigersinn drehen.
– Schwingt der Tonarm nach unten: Gegenge-
wicht im Uhrzeigersinn drehen.
6) Den Tonarm zurück auf die Tonarm-Halterung
legen und mit dem Verriegelungshebel (8) sichern.
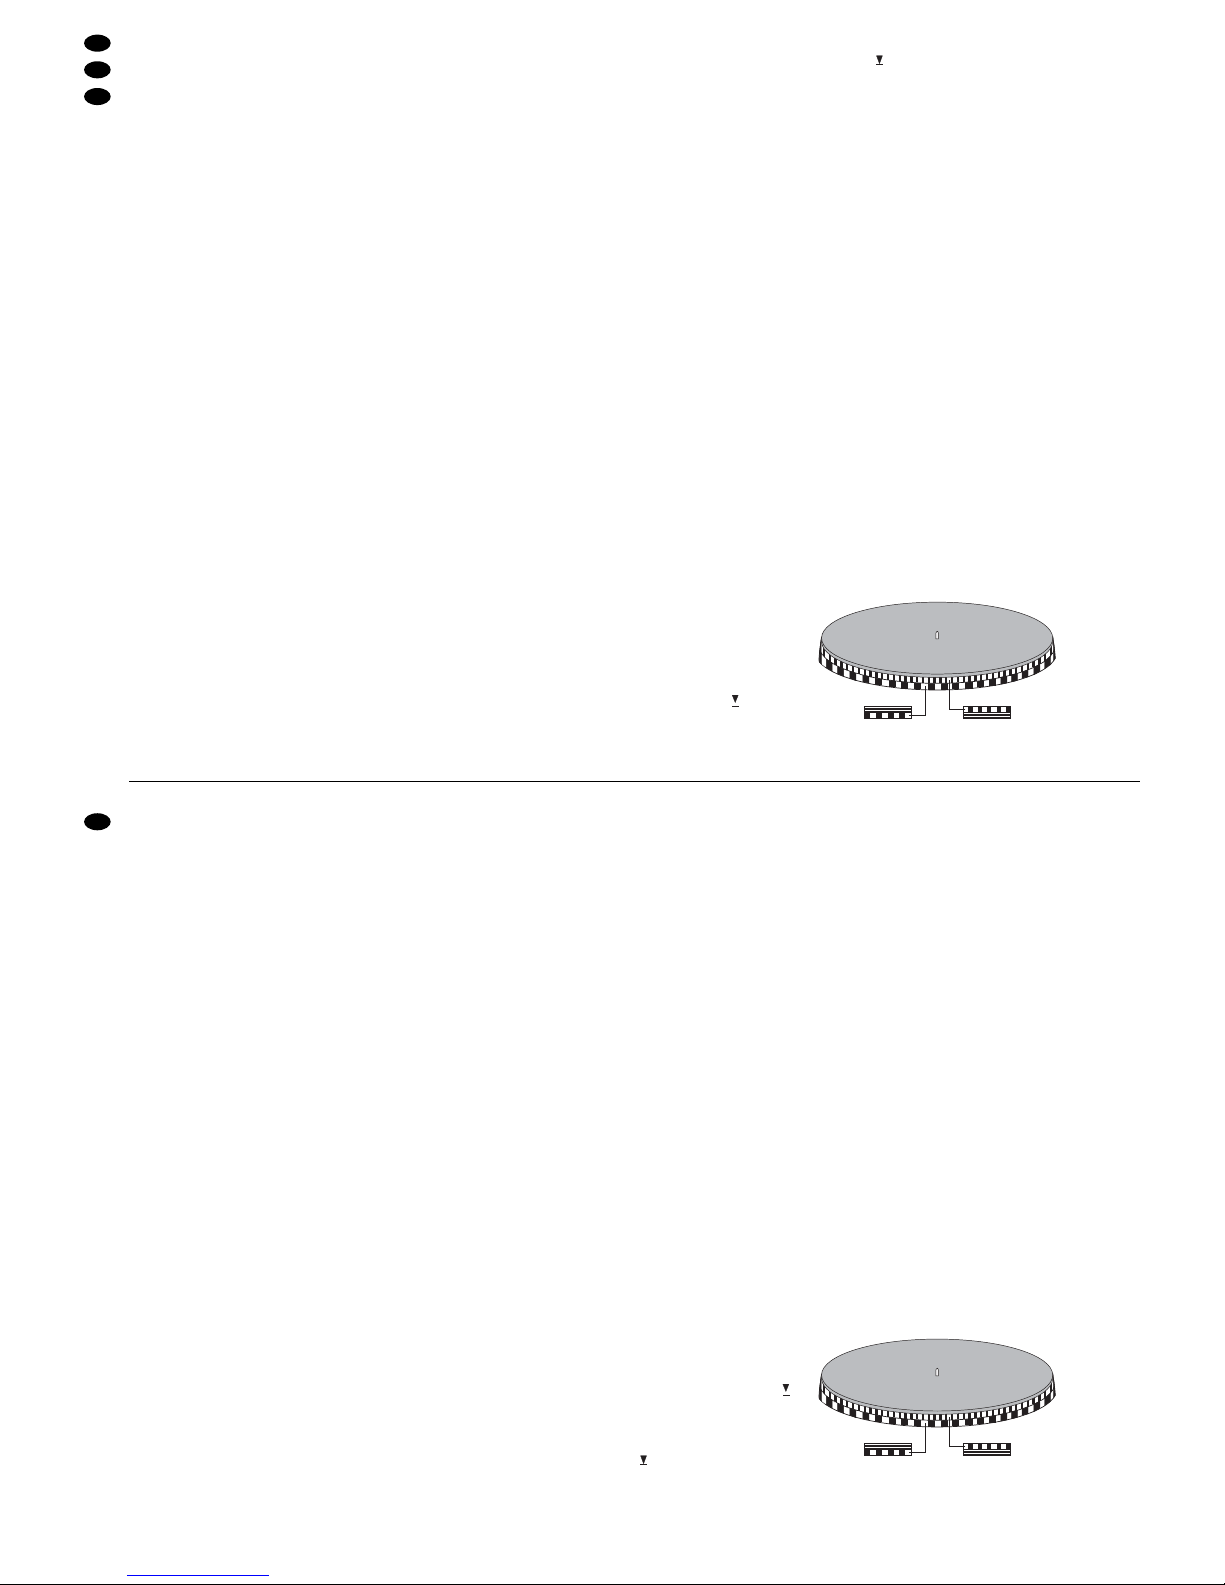
7) Am Gegengewicht befindet sich ein drehbarer,
schwarzer Ring mit einer Skala. Die rote Linie auf
dem Tonarm zeigt auf irgendeinen Wert der
Skala. Ohne dass das Gegengewicht verdreht
wird, nur den Ring auf „0“ drehen (Abb. 4).
8) Die Skala gibt das Auflagegewicht in Gramm
an. Für das mitgelieferte Abtastsystem ist ein
Auflagegewicht von 2 g erforderlich. Dazu das
Gegengewicht (nicht den Ring mit der Skala
allein!) entgegen dem Uhrzeigersinn drehen, bis
die rote Linie des Tonarms auf „2“ zeigt (Abb. 5).
Für andere Abtastsysteme das Auflagege-
wicht einstellen, welches in den dazugehörigen
technischen Daten angegeben ist.
4.2 Antiskating einstellen
Beim Abspielen einer Schallplatte treten Kräfte an
der Abtastnadel auf, welche durch die Antiskating-
Einrichtung aufgehoben werden. Dazu den Antiska-
ting-Drehknopf (6) von „0“ auf den Wert einstellen,
der dem Auflagegewicht gleich ist, d. h. bei dem mit-
gelieferten Abtastsystem auf „2“. Der Wert ist neben
dem Pfeil auf dem Drehknopf abzulesen.
4.3 Abdeckhaube montieren
Die zwei Scharniere für die Abdeckhaube aus den
beiden Styropor-Verpackungsteilen herausnehmen
und auf die Abdeckhaube stecken. Die Abdeck-
haube mit den Scharnieren auf den Plattenspieler
aufsetzen. Sie kann jederzeit wieder abgenommen
werden, wenn sie beim Betrieb stört (z.B. beim
Disco-Betrieb).
5 Plattenspieler anschließen
Vor dem Anschließen oder Ändern bestehender An-
schlüsse den Plattenspieler ausschalten.
1) Das Anschlusskabel mit den Cinch-Steckern (18)
– rot für den rechten Kanal, weiß für den linken
Kanal – mit den entsprechenden Eingangsbuch-
sen am Verstärker oder Mischpult verbinden:
a Beim Anschluss an Eingangsbuchsen für
einen Plattenspieler mit Magnetsystem den
Schiebeschalter PHONO/LINE (14) in die
Position PHONO stellen.
b Beim Anschluss an Eingangsbuchsen für Ge-
räte mit Line-Pegel den Schiebeschalter
PHONO/LINE in die Position LINE stellen.
2) Sollen Musikstücke von einer Schallplatte auf
einen Computer überspielt werden, den USB-
Anschluss (16) mit einem USB-Anschluss des
Computers verbinden. Zusätzlich wird eine
Audio-Recording-Software benötigt. Verschie-
dene Programme sind als Freeware im Internet
erhältlich. Der Regler GAIN (15) dient beim Über-
spielen zur Einstellung des Audiopegels.
3) Den Netzstecker (17) in eine Steckdose (230 V~/
50 Hz) stecken.
6 Bedienung
6.1 Schallplatte abspielen
1) Die Schutzkappe für die Abtastnadel nach unten
abziehen.
2) Den Plattenspieler mit dem Schalter POWER (2)
einschalten. Die Stroboskoplampe (3) leuchtet.
3) Zur Wahl der Geschwindigkeit die entsprechende
Taste drücken:
für 331/3U/min die linke Taste „33“ (13)
für 45 U/min die rechte Taste „45“ (12)
Zur Anzeige der gewählten Geschwindigkeit
leuchtet die jeweilige LED über der Taste.
4) Die Schallplatte auflegen. Bei Single-Platten den
Adapter (1) mit auflegen.
5) Den Verriegelungshebel (8) für den Tonarm nach
rechts öffnen. Zum Anheben des Tonarms den
Hebel für den Tonarm-Lift (7) in die hintere Posi-
tion stellen.
6) Den Tonarm am Griff anfassen und die Abtast-
nadel über den Anfang bzw. die gewünschte
Stelle auf der Schallplatte positionieren. Den
Hebel für den Tonarm-Lift (7) in die vordere Posi-
tion stellen. Der Tonarm senkt sich langsam
auf die Schallplatte.
7) Die Start/Stopp-Taste (4) drücken. Der Platten-
teller beginnt zu rotieren.
Während des Abspielens kann die Platte für
eine Unterbrechung mit der Start/Stopp-Taste
an jeder Stelle gestoppt und wieder gestartet
werden.
8) Zum Beenden des Abspielens den Tonarm mit
dem Tonarm-Lift (7) anheben und ihn per Hand
auf den Tonarm-Halter zurückführen. Den Plat-
tenteller mit der Start/Stopp-Taste (4) stoppen.
9) Nach dem Gebrauch des Plattenspielers den
Tonarm mit dem Verriegelungshebel (8) sichern
und das Gerät mit dem Schalter POWER (2) aus-
schalten. Die Abdeckhaube zum Schutz gegen
Staub herunterklappen.
6.2 Geschwindigkeit verändern
Bei Bedarf kann die Geschwindigkeit des Platten-
spielers und damit die Tonhöhe („pitch“) eines Titels
mit dem Regler PITCH ADJ. (10) um bis zu 16 %
erhöht oder verringert werden. In der Mittelstellung
(Regler rastet ein) ist die gewählte Standardge-
schwindigkeit eingestellt, d. h. exakt 331/3U/min
bzw. 45 U/min.
Zur Kontrolle der Geschwindigkeit 331/3U/min
dient der Stroboskopring am Plattentellerrand. Bei
rotierendem Plattenteller den Teil des Rings be-
trachten, der von der Stroboskoplampe (3) beleuch-
tet wird (eventuell die Raumbeleuchtung verrin-
gern): Bei einer Netzfrequenz von 50 Hz bleiben die
4) Open the tone arm locking lever (8) to the right.
Seize the handle of the tone arm and lead it care-
fully just before the turntable platter so that it can
freely be moved upwards and downwards.
Attention! The stylus must not hit against any-
thing.
5) Lead the tone arm with the left hand to the side
so that the stylus does not hit against the
turntable platter. With the right hand turn the
counterweight (5) so that the tone arm remains
exactly in a horizontal position and does not
move upwards or downwards (fig. 3).
– If the tone arm moves upwards: turn the coun-
terweight counter-clockwise.
– If the tone arm moves downwards: turn the
counterweight clockwise.
6) Put the tone arm back onto the tone arm support
and secure it with the locking lever (8).
7) The counterweight is provided with a black rotary
ring with a scale. The red line on the tone arm
points to a value on this scale. Without turning
the counterweight, only turn the ring to “0” (fig. 4).
8) The scale indicates the stylus pressure in grams.
A stylus pressure of 2 g is required for the sup-
plied stylus system. For this purpose, turn the
counterweight (not only the ring with the scale!)
counter-clockwise until the red line on the tone
arm points to “2” (fig. 5).
For other stylus systems, adjust the stylus
pressure indicated in the corresponding specifi-
cations.
4.2 Adjusting the antiskating facility
When playing a record, forces occur on the stylus
which are compensated by the antiskating facility.
For this purpose, adjust the antiskating knob (6)
from “0” to the value which equals the stylus pres-
sure, i. e. for the supplied stylus system to “2”: The
arrow next to the knob points to the corresponding
value on the knob.
4.3 Mounting the dust cover
Take the two hinges for the dust cover out of the two
polystyrene wrappings and attach them to the dust
cover. Place the dust cover with the hinges on the
turntable. It can be removed at any time if it inter-
feres with the operation (e. g. during disco opera-
tion).
5 Connecting the Turntable
Prior to connecting or changing existing connections
switch off the turntable.
1) Connect the cable with the phono plugs (18) – red
for the right channel, white for the left channel –
to the corresponding input jacks at the amplifier
or mixer:
a When connecting to input jacks for a turntable
with magnetic system set the sliding switch
PHONO/LINE (14) to position PHONO.
b When connecting to input jacks for units with
line level set the sliding switch PHONO/LINE
to position LINE.
2) For copying music pieces from a record to a com-
puter, connect the USB connection (16) to a USB
connection of the computer. In addition, an audio
recording software is required. Different pro-
grammes are available as freeware in the Inter-
net. When copying, the control GAIN (15) serves
for adjusting the audio level.
3) Connect the mains plug (17) to a socket (230 V~/
50 Hz).
6 Operation
6.1 Playing a record
1) Pull off the protective cover of the stylus in a
downward movement.
2) Switch on the turntable with the switch POWER
(2). The stroboscope lamp (3) lights up.
3) To select the speed, press the corresponding but-
ton:
for 331/3rpm the left button “33” (13)
for 45 rpm the right button “45” (12)
To indicate the selected speed, the respective
LED above the button lights up.
4) Put on the record. For single records, use the
adapter (1).
5) Open the locking lever (8) for the tone arm to the
right. To lift the tone arm, place the lever for the
tone arm lift (7) to the rear position .
6) Seize the handle of the tone arm, and place the
stylus above the beginning or the desired spot on
the record. Place the lever for the tone arm lift (7)
to the front position . The tone arm is slowly
lowered onto the record.
7) Press the Start/Stop button (4). The turntable
platter starts to rotate.
While playing, the record can be stopped at any
place and be restarted with the Start/Stop button.
8) To stop the playing, lift the tone arm with the tone
arm lift (7) and put it back onto the tone arm sup-
port by hand. Stop the turntable platter with the
Start/Stop button (4).
9) After use of the turntable, secure the tone arm
with the locking lever (8) and switch off the unit
with the POWER switch (2). Fold down the pro-
tective cover as a protection against dust.
6.2 Changing the speed
If required, the speed of the turntable and thus the
pitch of a title can be increased or reduced by up to
16 % with the control PITCH ADJ. (10). In mid-posi-
tion (control locks into place) the selected standard
speed is adjusted, i. e. exactly 331/3rpm or 45 rpm.
The stroboscope ring on the rim of the turntable
platter serves to check the speed of 331/3rpm. With
rotating turntable platter observe the part of the ring
which is illuminated by the stroboscope lamp (3) [if
necessary, reduce the room illumination]:
5
GB
D
A
CH

Quadrate des unteren Rings scheinbar stehen und
bei einer Netzfrequenz von 60 Hz die Rechtecke des
oberen Rings, wenn die Geschwindigkeit exakt
331/3U/min beträgt.
Stroboskopring bei 331/3U/min.
7 Zubehör
7.1 Ersatz-Tonabnehmersystem und -Nadel
Bei Bedarf kann das Tonabnehmersystem oder die
Abtastnadel leicht ausgewechselt werden. Im Fach-
handel sind entsprechende Ersatzteile erhältlich,
z. B. von „img Stage Line“ das Tonabnehmer-Mag-
netsystem EN-24 und die dazu passende Abtastna-
del EN-24SP.
1) Zum
Wechseln der Abtastnadel
die orange
Nadelhalterung nach vorne abziehen. Die neue
Nadel auf das Abtastsystem stecken.
2) Zum
Wechsel des Tonabnehmersystems
den
Systemträger (11) vom Tonarm abschrauben.
3) Das Tonabnehmersystem vom Träger abschrau-
ben und die Anschlussdrähte abziehen.
4) Das neue Tonabnehmersystem am Träger fest-
schrauben und die Drähte wie folgt aufstecken:
weiß linker Kanal Pluspol
blau linker Kanal Minuspol
rot rechter Kanal Pluspol
grün rechter Kanal Minuspol
5) Nach dem Austausch des Tonabnehmersystems
das Auflagegewicht und den Antiskating-Wert
neu einstellen (siehe Kap. 4.1 und 4.2).
7.2 Ersatz-Systemträger
Ein Ersatz-Systemträger (z. B. der Systemträger
EN-120 von „img Stage Line“) komplett mit einem
Tonabnehmersystem ermöglicht bei Bedarf einen
schnellen Austausch. Der Systemträger lässt sich
einfach durch Ab- und Anschrauben auswechseln.
Anschließend das Auflagegewicht und den Anti-
skating-Wert neu einstellen (siehe Kap. 4.1 und 4.2).
7.3 Filzmatte
Sollte die beiliegende Filzmatte einmal verlegt oder
verschlissen sein, kann eine neue Matte unter der
Bezeichnung DJP-2M von „img Stage Line“ bestellt
werden.
8 Wartung
8.1 Pflege
Das Plattenspielergehäuse und die Abdeckhaube nur
mit einem trockenen, weichen Tuch oder einem leicht
angefeuchteten Lappen (nicht tropfnass!) abwischen.
Keinen Alkohol, keine Chemikalien oder scharfe
Reinigungsmittel verwenden! Zum Entstauben der
Abtastnadel und Schallplatten ist im Fachhandel ent-
sprechendes Zubehör erhältlich, z. B. die Carbon-
faser-Plattenbürste DC-100 von „img Stage Line“.
8.2 Transport
Wollen Sie den Plattenspieler versenden, so achten
Sie darauf, dass das Tonarmgewicht und alle ande-
ren Teile des Gerätes nur original verpackt und/oder
extra transportgesichert verschickt werden. Ge-
häuse- und Geräteschäden, die durch lose ver-
packte Teile verursacht werden, unterliegen nicht
der Garantie und sind deshalb kostenpflichtig!
Für den Versand unbedingt beachten:
1) Die Schutzkappe für die Abtastnadel aufstecken.
2) Den Tonarm mit dem Verriegelungshebel (8)
sichern.
3) Das Gegengewicht (5) für den Tonarm durch
Drehen im Uhrzeigersinn abschrauben, einzeln
verpacken und gegen Verrutschen sichern.
4) Am besten den Original-Verpackungskarton ver-
wenden.
9 Technische Daten
effektive Tonarmlänge: . . . . 211 mm
Tonarm-Überhang: . . . . . . . 35 mm
Antrieb: . . . . . . . . . . . . . . . . Riemenantrieb
Plattenteller: . . . . . . . . . . . ∅298 mm, Kunststoff
Geschwindigkeiten: . . . . . . 331/3U/min, 45 U/min
Geschwindigkeitsregelung: ±16 %
Start-Drehmoment: . . . . . . . 0,3 kg/cm
Hochlaufzeit: . . . . . . . . . . . . < 0,8 s
Gleichlaufschwankungen: . < 0,15 %
Rumpelgeräusch-Abstand: .
-
40 dB unbewertet,
-
55 dB bewertet
Stromversorgung: . . . . . . . . 230 V~/50 Hz/15 VA
Einsatztemperatur: . . . . . . . 0 – 40 °C
Abmessungen (B × H × T): . 430 × 115 × 350 mm
Gewicht: . . . . . . . . . . . . . . . 2,9 kg
Änderungen vorbehalten.
60Hz50Hz
With a mains frequency of 50 Hz the squares of the
lower ring seem to stand still, with a mains frequency
of 60 Hz the rectangles of the upper ring seem to
stand still if the speed is exactly 331/3rpm.
Stroboscope ring at 331/3rpm
7 Accessories
7.1 Replacement phono cartridge system
and stylus
If required, the phono cartridge system or the stylus
can easily be replaced. The corresponding replace-
ment parts are available from the retailer, e. g. the
magnetic phono cartridge system EN-24 and the
matching stylus EN-24SP from “img Stage Line”.
1) To
change the stylus,
pull off the orange stylus
support in forward direction. Put the new stylus
on the stylus system.
2) To
change the phono cartridge system,
screw off
the headshell (11) from the tone arm.
3) Screw off the phono cartridge system from the
support and pull off the connection wires.
4) Tightly screw the new phono cartridge system on
the support and put on the wires as follows:
white left channel positive pole
blue left channel negative pole
red right channel positive pole
green right channel negative pole
5) After replacing the phono cartridge system, read-
just the stylus pressure and the antiskating value
(see chapters 4.1 and 4.2).
7.2 Replacement headshell
A replacement headshell (e. g. the headshell
EN-120 from “img Stage Line”) including a phono
cartridge system allows an immediate replacement,
if required. The headshell can easily be replaced
by unscrewing the existing one and screwing on
the new one. After the replacement readjust the sty-
lus pressure and the anti-skating value (see chap-
ters 4.1 and 4.2).
7.3 Felt slipmat
If the supplied felt slipmat should be displaced or
worn out, a new slipmat can be ordered under the
designation DJP-2M from “img Stage Line”.
8 Maintenance
8.1 Cleaning
It is recommended to clean the turntable housing
and the dust cover only with a dry, soft cloth or a
slightly damp cloth (not dripping wet!). Do not use
alcohol, chemicals, or aggressive detergents! For
dusting the stylus and the records, the correspond-
ing accessories are available from your retailer, e. g.
the carbon fibre brush for records DC-100 from “img
Stage Line”.
8.2 Transportation
For dispatching the turntable pay attention that the
tone arm weight and all other components of the unit
are only packed in their original packing material
and/or are especially secured for transportation.
Any damage to the housing or to the unit due to a
component that was not correctly packed is not cov-
ered by the guarantee and therefore the repair will
be charged!
It is essential to observe the following instruc-
tions for dispatch:
1) Place the protective cap on the stylus.
2) Secure the tone arm with the locking lever (8).
3) Unscrew the counterweight (5) for the tone arm
by turning it clockwise, pack it separately, and
secure it against displacement.
4) It is recommended to use the original packing box.
9 Specifications
Effective length
of the tone arm: . . . . . . . . . 211 mm
Overhang of the tone arm: . 35 mm
Drive: . . . . . . . . . . . . . . . . . belt drive
Turntable platter: . . . . . . . . ∅298 mm, plastic
Speeds: . . . . . . . . . . . . . . . 331/3rpm, 45 rpm
Speed control: . . . . . . . . . . ±16 %
Starting torque: . . . . . . . . . . 0.3 kg/cm
Starting time: . . . . . . . . . . . < 0.8 s
Wow and flutter: . . . . . . . . . < 0.15 %
Rumble: . . . . . . . . . . . . . . .
-
40 dB unweighted
-
55 dB weighted
Power supply: . . . . . . . . . . . 230 V~/50 Hz/15 VA
Ambient temperature: . . . . . 0 – 40 °C
Dimensions (W × H × D): . . 430 × 115 × 350 mm
Weight: . . . . . . . . . . . . . . . . 2.9 kg
Subject to technical modification.
60Hz50Hz
6
GB
D
A
CH
Diese Bedienungsanleitung ist urheberrechtlich für MONACOR
®
INTERNATIONAL GmbH & Co. KG ge-
schützt. Eine Reproduktion für eigene kommerzielle Zwecke – auch auszugsweise – ist untersagt.
All rights reserved by MONACOR
®
INTERNATIONAL GmbH & Co. KG. No part of this instruction manual
may be reproduced in any form or by any means for any commercial use.

Ouvrez le présent livret page 3, dépliable, de
manière à visualiser les éléments et branche-
ments.
1 Eléments et branchements
1Adaptateur pour disques 45 tours
2Interrupteur POWER Marche/Arrêt
3Lampe stroboscopique
4Touche Marche/Arrêt
5Contrepoids pour le bras
6Bouton pour le réglage anti-skating
7Lève bras
8Levier du verrouillage du bras
9Bras de lecture
10 Potentiomètre de réglage PITCH ADJ. pour mo-
difier la vitesse (±16 %)
11 Porte cellule avec système de prise de son
12 Touche pour la vitesse 45 tours/minute
13 Touche pour la vitesse 331/3 tours/minute
14 Sélecteur PHONO/LINE pour le niveau audio de
la sortie audio analogique (18)
PHONO
lorsquʼune entrée Phono est branchée
LINE
lorsquʼune entrée Ligne est branchée
15 Potentiomètre de réglage GAIN pour le niveau
audio à la connexion USB (16)
16 Connexion USB (type B) pour relier la platine
disque à un ordinateur
17 Fiche secteur du cordon secteur à brancher à
une prise 230 V~/50 Hz
18 Fiches RCA mâles pour la sortie audio analo-
gique à brancher à une entrée Line ou phono,
p. ex. dʼun amplificateur ou dʼune table de mixage
(rouge = canal droit, blanc = canal gauche)
2 Conseils dʼutilisation et de sécurité
Lʼappareil répond à toutes les directives nécessaires
de lʼUnion Européenne et porte donc le symbole .
Respectez scrupuleusement les points suivants :
GLʼappareil nʼest conçu que pour une utilisation en
intérieur. Protégez-le de tout type de projections
dʼeau, des éclaboussures, dʼune humidité élevée
de lʼair et de la chaleur (plage de température de
fonctionnement autorisée : 0 – 40 °C).
GEn aucun cas, vous ne devez poser dʼobjet conte-
nant du liquide ou un verre sur lʼappareil.
GNe le faites jamais fonctionner et débranchez
immédiatement la prise secteur lorsque :
1. des dommages sur lʼappareil ou sur le cordon
secteur apparaissent.
2. après une chute ou accident similaire..., lʼappa-
reil peut présenter un défaut.
3. des dysfonctionnements apparaissent.
Dans tous les cas, les dommages doivent être
réparés par un technicien spécialisé.
GTout cordon secteur endommagé doit être rem-
placé impérativement par un technicien spécialisé.
GNe débranchez jamais lʼappareil en tirant sur le
cordon secteur, tenez-le toujours par la fiche.
GNous déclinons toute responsabilité en cas de dom-
mages corporels ou matériels résultants si lʼappareil
est utilisé dans un but autre que celui pour lequel il
a été conçu, sʼil nʼest pas correctement branché, uti-
lisé ou sʼil nʼest pas réparé par une personne habili-
tée ; de même, la garantie deviendrait caduque.
3 Possibilités dʼutilisation
La platine disque DJP-104USB est bien adaptée
pour une utilisation dans le domaine privé et pour un
fonctionnement DJ professionnel. Elle est équipée
dʼun préamplificateur Phono et peut donc également
être reliée à une entrée Ligne.
Pour digitaliser la musique de disques, la DJP-
104USB peut être reliée, via lʼinterface USB, à un
ordinateur. Un logiciel dʼenregistrement audio est
en plus nécessaire ; différents programmes sont dis-
ponibles sur Internet sous forme de freeware.
4 Montage et réglages de base
Lorsque vous avez déballé tous les éléments, il est
recommandé de conserver les emballages pour tout
transport ultérieur. Placez la platine sur une surface
plane et horizontale et posez la feutrine livrée sur le
plateau.
4.1 Réglage de la pression du diamant
1) Tournez tout dʼabord le bouton dʼanti-skating (6)
dans le sens inverse des aiguilles dʼune montre
vers “0”.
2) Tirez le couvercle de protection du diamant vers
le bas.
3) Placez le lève bras (7) sur la position avant .
4) Ouvrez le levier de verrouillage du bras (8) vers
la droite. Saisissez le bras par sa poignée, diri-
gez-le avec précaution jusquʼau bord du plateau
sans quʼil ne touche et de telle sorte quʼil puisse
être déplacé librement vers le haut et le bas.
Attention : Ne faites pas toucher le diamant.
5) Déplacez le bras latéralement avec la main
gauche pour éviter que le diamant ne touche le
plateau. Avec la main droite, tournez le contre-
poids (5) de telle sorte que le bras reste exacte-
ment à lʼhorizontale et ne se déplace pas vers le
haut ou le bas (schéma 3).
– Si le bras se déplace vers le haut, tournez le
contrepoids dans le sens inverse des aiguilles
dʼune montre.
Lorsque lʼappareil est définitivement retiré
du service, vous devez le déposer dans
une usine de recyclage de proximité pour
contribuer à son élimination non polluante.
AVERTISSEMENT Lʼappareil est alimenté par une
tension dangereuse en 230 V~.
Ne touchez jamais lʼintérieur de
lʼappareil car, en cas de mau-
vaise manipulation, vous pouvez
subir une décharge électrique.
A pagina 3, se aperta completamente, vedrete
tutti gli elementi di comando e i collegamenti
descritti.
1 Comandi e collegamenti
1Adattatore per dischi single
2Interruttore on/off POWER
3Lampada stroboscopica
4Tasto Start/Stop
5Contrappeso del braccio
6Manopola per lʼimpostazione antiskating
7Levetta per alzare il braccio di lettura
8Levetta di blocco del braccio di lettura
9Braccio di lettura
10 Cursore PITCH ADJ. per modificare la velocità
(±16 %)
11 Portatestina con puntina
12 Tasto per velocità 45 g/min
13 Tasto per velocità 331/3g/min
14 Commutatore PHONO/LINE per il livello audio
dellʼuscita audio analogica (18)
PHONO
in caso di collegamento con un ingresso
Phono
LINE
in caso di collegamento con un ingresso Line
15 Regolatore GAIN per il livello audio alla porta
USB (16)
16 Porta USB (tipo B) per il collegamento con un
computer
17 Spina di rete per 230 V~/50 Hz
18 Connettori RCA dellʼuscita audio analogica per il
collegamento con un ingresso Line o Phono,
p. es. di un amplificatore o mixer
(rosso = canale destro, bianco = canale sinistro)
2 Avvertenze di sicurezza
Questʼapparecchio è conforme a tutte le direttive
rilevanti dellʼUE e pertanto porta la sigla .
Si devono osservare assolutamente i seguenti punti:
GLʼapparecchio è previsto solo per lʼuso allʼinterno
di locali. Proteggerlo dallʼacqua gocciolante e
dagli spruzzi dʼacqua, dallʼumidità e dal calore
(temperatura dʼimpiego ammessa 0 – 40 °C.).
GNon posare contenitori pieni di liquidi, p. es. bic-
chieri, sullʼapparecchio.
GNon mettere in funzione lʼapparecchio e staccare
subito la spina rete se:
1. lʼapparecchio o il cavo rete presentano dei
danni visibili;
2. dopo una caduta o dopo eventi simili sussiste il
sospetto di un difetto;
3. lʼapparecchio non funziona correttamente.
Per la riparazione rivolgersi sempre ad una offi-
cina competente.
GIl cavo rete, se danneggiato, deve essere sosti-
tuito solo da un laboratorio specializzato.
GStaccare il cavo rete afferrando la spina, senza ti-
rare il cavo.
GNel caso di uso improprio, di collegamento sba-
gliato, di impiego scorretto o di riparazione non a
regola dʼarte dellʼapparecchio non si assume nes-
suna responsabilità per eventuali danni conse-
quenziali a persone o cose e non si assume nes-
suna garanzia per lʼapparecchio.
3 Possibilità dʼimpiego
Il giradischi DJP-104USB è adatto sia per lʼimpiego
nel campo privato che in quello professionale per
DJ. È equipaggiato con un preamplificatore Phono e
pertanto può essere collegato anche con un
ingresso Line.
Per digitalizzare la musica di dischi, il DJP-
104USB può essere collegato con un computer per
mezzo dellʼinterfaccia USB. In più è richiesto un
software audio-recording. In Internet sono disponi-
bili vari programmi come freeware.
4 Montaggio e regolazioni base
Dopo aver disimballato tutte le parti conviene tenere
lʼimballaggio originale per eventuali trasporti futuri.
Posizionare il giradischi su un piano orizzontale e
posizionare la stuoia di feltro in dotazione sul piatto.
4.1 Regolazione del peso della puntina
1) Girare la manopola antiskating (6) in senso anti-
orario e portarla sullo “0”.
2) Sfilare la protezione della puntina verso il basso.
3) Portare la leva del lift del braccio (7) in posizione
anteriore .
4) Sbloccare il braccio spostando la levetta (8)
verso destra. Afferrare il braccio alla sua presa
ed avvicinarlo al piatto in modo che si possa
muovere liberamente in alto ed in basso.
Attenzione! Evitare qualsiasi contatto con la
puntina.
5) Sostenere il braccio con la mano sinistra per evi-
tare che tocchi il piatto, e con la mano destra gi-
rare il contrappeso (5) in modo tale che il braccio
rimanga fermo in posizione orizzontale, senza
muoversi né verso lʼalto né verso il basso (fig. 3).
– Se il braccio si muove verso lʼalto, girare il
contrappeso in senso antiorario.
– Se il braccio si muove verso il basso, girare il
contrappeso in senso orario.
AVVERTIMENTO Lʼapparecchio funziona con peri-
colosa tensione di rete (230 V~).
Non intervenire mai personal-
mente al suo interno! La manipo-
lazione scorretta può provocare
una scarica elettrica pericolosa.
Se si desidera eliminare lʼapparecchio defi-
nitivamente, consegnarlo per lo smalti-
mento ad unʼistituzione locale per il rici-
claggio.
7
I
F
B
CH

– Si le bras se déplace vers le bas, tournez le
contrepoids dans le sens des aiguilles dʼune
montre.
6) Remettez le bras sur son support, verrouillez-le
avec le levier (8).
7) Sur le contrepoids se trouve un anneau noir, rota-
tif, avec une échelle. La ligne rouge sur le bras
indique une valeur de lʼéchelle. Sans tourner le
contrepoids, mettez uniquement lʼanneau sur “0”
(schéma 4).
8) Sur lʼéchelle, vous pouvez lire la pression du dia-
mant en grammes. Pour le système livré, la
pression est de 2 g ; tournez le contrepoids (pas
uniquement lʼanneau avec lʼéchelle !) dans le
sens inverse des aiguilles dʼune montre jusquʼà
ce que la ligne rouge du bras soit en face de “2”
(schéma 5).
Pour dʼautres systèmes, réglez le contrepoids
en fonction des caractéristiques techniques spé-
cifiées.
4.2 Réglage de lʼanti-skating
Lors de la lecture dʼun disque, des forces sʼappli-
quent sur le diamant pouvant être contrées par le
réglage anti-skating. Mettez le bouton dʼanti-skating
(6) de “0” sur la valeur égale à la pression du dia-
mant, cʼest-à-dire pour le système livré sur “2”. La
valeur est lisible à côté de la flèche sur le bouton.
4.3 Montage du capot
Retirez les deux charnières du capot de leur embal-
lage de polystyrène et placez-les sur le capot. Placez
le capot avec les charnières sur la platine disque. Il
peut être à tout moment enlevé sʼil gêne pendant lʼuti-
lisation de la platine disque (p. ex. en discothèque).
5 Branchements de la platine disque
Avant dʼeffectuer les branchements ou de les modi-
fier, éteignez la platine disque.
1) Reliez le cordon de branchement avec les fiches
RCA (18) – rouge pour le canal droit, blanc pour
le canal gauche – aux prises dʼentrée correspon-
dantes sur lʼamplificateur ou la table de mixage :
a Pour brancher aux prises dʼentrée pour une
platine disque à système magnétique, mettez
le sélecteur PHONO/LINE (14) sur la position
PHONO.
b Pour brancher aux prises dʼentrée pour des
appareils à niveau ligne, mettez le sélecteur
PHONO/LINE sur la position LINE.
2) Pour copier des morceaux de musique dʼun
disque sur un ordinateur, reliez la connexion USB
(16) à la connexion USB de lʼordinateur. Un logi-
ciel dʼenregistrement audio est, en plus, néces-
saire ; différents programmes sont disponibles
sur Internet sous forme de freeware. Le réglage
GAIN (15) sert, lors de la copie, pour régler le
niveau audio.
3) Reliez la fiche secteur (17) à une prise secteur
(230 V~/50 Hz).
6 Utilisation
6.1 Lecture
1) Retirez le couvercle de protection du diamant
vers le bas.
2) Allumez la platine avec lʼinterrupteur POWER
(2). La lampe stroboscopique (3) brille.
3) Pour sélectionner la vitesse, enfoncez la touche
correspondante :
331/3tr/mn enfoncez la touche gauche “33” (13)
45 tr/mn enfoncez la touche droite “45” (12)
La LED correspondante au-dessus de la touche
brille, indiquant la vitesse sélectionnée.
4) Placez le disque. Pour des 45 tours, utilisez
lʼadaptateur (1).
5) Ouvrez le levier de verrouillage (8) du bras vers
la droite ; pour soulever le bras, mettez le levier
du lève bras (7) sur la position arrière .
6) Saisissez la poignée du bras, placez le diamant
au début du disque ou à lʼendroit voulu sur le
disque ; mettez le lève bras (7) sur la position
avant , le bras sʼincline lentement sur le disque.
7) Enfoncez la touche Marche/Arrêt (4), le plateau
commence à tourner.
Pendant la lecture, le plateau peut être arrêté
à tout instant à nʼimporte quel endroit avec la
touche Marche/Arrêt puis redémarré.
8) Pour terminer la lecture, levez le bras avec le
lève bras (7), remettez-le manuellement sur son
support. Arrêtez la platine avec la touche Marche/
Arrêt (4).
9) Après utilisation, verrouillez (8) le bras sur son
support, éteignez la platine avec lʼinterrupteur
POWER (2). Rabattez le capot pour protéger la
platine disque de la poussière.
6.2 Modification de la vitesse
Vous pouvez augmenter ou diminuer la vitesse de la
platine disque et donc la hauteur tonale (“pitch”) dʼun
titre avec le réglage PITCH ADJ (10) jusquʼà 16 % au
plus. En position médiane, (réglage enclenché), la
vitesse standard sélectionnée est réglée, cʼest-à-
dire exactement 331/3 tours/mn ou 45 tours/mn.
Pour contrôler la vitesse 331/3tours/mn, lʼanneau
stroboscopique sur le bord du plateau est utilisé.
Lorsque le plateau tourne, regardez la partie de lʼan-
neau éclairé par la lampe (3) [si besoin diminuez
lʼéclairage de la pièce] :
pour une fréquence de 50 Hz, les carrés de lʼanneau
inférieur semblent fixes et pour une fréquence de
60 Hz, les rectangles de lʼanneau supérieur semblent
fixes si la vitesse est exactement de 331/3tours/mn.
Anneau stroboscopique pour 331/3tours /mn
60Hz50Hz
6) Riportare il braccio sul suo supporto e bloccarlo
con la levetta (8).
7) Sul contrappeso si trova un anello nero girevole
graduato. La linea rossa sul braccio indica inizial-
mente un qualsiasi valore. Posizionare il solo lʼa-
nello sullo “0” senza far girare il contrappeso
(fig. 4).
8) La scala indica il peso della puntina in grammi.
La puntina in dotazione richiede un peso di 2 g.
Pertanto girare il contrappeso (non solo lʼanello
graduato!) in senso antiorario finché la linea
rossa del braccio di lettura indica “2” (fig. 5).
Nello stesso modo si imposta il peso per altre
testine a seconda delle relative indicazioni tecni-
che.
4.2 Regolazione antiskating
Durante la riproduzione di un disco, sulla puntina
agiscono delle forze che devono essere compen-
sate con il dispositivo antiskating. Girare la mano-
pola antiskating (6) dallo “0” su un valore pari a
quello del peso della puntina, nel nostro caso sul “2”.
Il valore si legge vicino alla freccia sulla manopola.
4.3 Montaggio del coperchio
Togliere le due cerniere dai due involucri di polisti-
rolo e infilarle sul coperchio. Quindi inserire il coper-
chio con le cerniere sul giradischi. Il coperchio può
essere staccato in qualsiasi momento se disturba
(p. es. in discoteca).
5 Collegare il giradischi
Prima di effettuare nuovi collegamenti o modificare
collegamenti esistenti occorre spegnere il giradischi.
1) Collegare il cavo di collegamento con i connettori
RCA (18) – rosso per il canale destro, bianco per
il canale sinistro – con le relative prese dʼin-
gresso sullʼamplificatore o mixer:
a in caso di collegamento con le prese dʼin-
gresso di un giradischi con sistema magne-
tico, portare il commutatore PHONO/LINE
(14) in posizione PHONO.
b in caso di collegamento con le prese dʼin-
gresso di apparecchi con livello Line, portare il
commutatore PHONO/LINE in posizione LINE.
2) Per trasferire dei brani musicali di un disco sul
computer, collegare la porta USB (16) con la
porta USB del computer. In più è richiesto un
software audio-recording. In Internet sono dispo-
nibili vari programmi come freeware. Durante il
trasferimento, il regolatore GAIN (15) serve per
regolare il livello audio.
3) Inserire la spina di rete (17) in una presa
(230 V~/50 Hz).
6 Funzionamento
6.1 Riproduzione di un disco
1) Sfilare la protezione della puntina verso il basso.
2) Accendere il giradischi con lʼinterruttore POWER
(2). Si accende la lampada stroboscopica (3).
3) Per selezionare la velocità premere il relativo tasto:
per 331/3g/m premere il tasto di sinistra “33” (13)
per 45 g/m premere il tasto di destra “45” (12)
Il LED sopra il relativo tasto indica la velocità
impostata.
4) Mettere il disco; nel caso di un disco single inse-
rire lʼadattatore (1).
5) Spostare la leva di bloccaggio (8) del braccio
verso destra. Per alzare il braccio, portare la leva
per il lift del braccio (7) in posizione posteriore .
6) Afferrare il braccio allʼimpugnatura e portare la
puntina sopra lʼinizio del disco o sopra il punto
desiderato. Portare la leva per il lift del braccio (7)
in posizione anteriore . Il braccio si abbassa
lentamente sul disco.
7) Premere il tasto Start/Stop (4). Il piatto comincia
a roteare.
Durante la riproduzione si può fermare e riav-
viare il disco in un qualsiasi punto per mezzo del
tasto Start/Stop.
8) Per terminare la riproduzione sollevare il braccio
con il lift (7) e riportarlo con la mano nella sua
sede. Fermare il piatto con il tasto Start/Stop (4).
9) Dopo lʼuso bloccare il braccio con la levetta (8)
e spegnere lʼapparecchio con lʼinterruttore
POWER (2). Chiudere il coperchio per proteg-
gere il giradischi dalla polvere.
6.2 Regolazione della velocità
Se necessario, la velocità del giradischi e quindi lʼal-
tezza del suono (“pitch”) del titolo attuale possono
essere aumentate o ridotte fino al 16 % agendo sul
regolatore PITCH ADJ (10). In posizione centrale (a
scatto), è impostata la velocità standard, ovvero
esattamente 331/3g/m o 45 g/m.
Per controllare la velocità di 331/3g/m ci si serve
dellʼanello stroboscopico sul bordo del piatto. Men-
tre il piatto gira, osservare la parte dellʼanello che
viene illuminata dalla lampada stroboscopica (3)
(eventualmente ridurre lʼilluminazione ambiente):
con una frequenza rete di 50 Hz, i quadrati dellʼa-
nello più basso sembrano stare fermi, e con una fre-
quenza di 60 Hz i rettangoli dellʼanello superiore
sembrano stare fermi se la velocità è esattamente di
331/3g/m.
Anello stroboscopico a 331/3g/min.
60Hz50Hz
8
I
F
B
CH

7 Pièces de remplacement
7.1 Remplacement de la cellule
et du diamant
La cellule, le diamant, peuvent, si besoin, être rem-
placés facilement.
Vous trouverez dans le commerce les pièces
de rechange, p. ex. de “img Stage Line”, la cellule
magnétique EN-24 et le diamant EN-24SP corres-
pondant.
1) Pour
remplacer le diamant,
retirez vers lʼavant le
support orange de lʼaiguille. Placez le nouveau
diamant dans la cellule.
2) Pour
remplacer la cellule,
dévissez le porte cel-
lule (11) du bras.
3) Dévissez la cellule du support et retirez les fils de
branchement.
4) Vissez la nouvelle cellule sur le support et placez
les fils comme mentionné ci-dessous :
blanc : pôle plus canal gauche
bleu : pôle moins canal gauche
rouge : pôle plus canal droit
vert : pôle moins canal droit
5) Après tout remplacement de la cellule, vous
devez régler à nouveau la pression du diamant et
lʼanti-skating. (Voir chapitres 4.1 et 4.2).
7.2 Porte cellule de rechange
Un porte cellule de rechange complet avec une cel-
lule (p. ex. EN-120 de “img Stage Line”) permet un
remplacement rapide si besoin. Le porte cellule peut
être changé simplement en dévissant puis vissant.
Après tout remplacement, vous devez régler à nou-
veau la pression du diamant et lʼanti-skating. (Voir
chapitres 4.1 et 4.2).
7.3 Feutrine
Si la feutrine livrée est une fois égarée ou usée, elle
peut être commandée sous la référence DJP-2M de
“img Stage Line”.
8 Entretien
8.1 Nettoyage
Nettoyez le boîtier de la platine disque et le capot
avec un chiffon doux, sec ou à peine humide (pas
dégoulinant). En aucun cas, nʼutilisez de produits
détergents puissants, chimiques ou dʼalcool.
Pour dépoussiérer le diamant et les disques, uti-
lisez les produits de nettoyage disponibles dans le
commerce, par exemple la brosse en fibres de car-
bone DC-100 de “img Stage Line”.
8.2 Transport
Si la platine disque doit être déplacée, veillez à ce
que le contrepoids et tous les autres éléments de
lʼappareil ne soient placés que dans leur emballage
dʼorigine et/ou soient emballés de manière à être
très bien protégés pour le transport. Tout dommage
sur lʼappareil ou le boîtier, causé par des éléments
mal emballés, ne seront pas couverts par la garan-
tie et les frais engendrés sont à la charge du client.
Pour tout transport, il est impératif de respecter
les points suivants :
1) Mettez le couvercle de protection du diamant.
2) Fixez le bras avec le verrouillage (8).
3) Dévissez le contrepoids du bras (5) en le tour-
nant dans le sens des aiguilles dʼune montre,
emballez-le séparément et évitez quʼil ne glisse.
4) Il est recommandé dʼutiliser lʼemballage dʼorigine.
9 Caractéristiques techniques
Longueur effective
du bras : . . . . . . . . . . . . . . . 211 mm
Surplomb bras de lecture : . 35 mm
Entraînement : . . . . . . . . . . entraînement par
courroie
Platau : . . . . . . . . . . . . . . . . ∅298 mm, plastique
Vitesses : . . . . . . . . . . . . . . 331/3tours/min,
45 tours/min
Réglage de vitesse : . . . . . . ±16 %
Couple de démarrage : . . . . 0,3 kg/cm
Temps de montée : . . . . . . . < 0,8 s
Pleurage et scintillement : . < 0,15 %
Bruit perturbateur : . . . . . . .
-
40 dB non pondéré,
-
55 dB pondéré
Alimentation : . . . . . . . . . . . 230 V~/50 Hz/15 VA
Température fonc. : . . . . . . 0 – 40 °C
Dimensions (L × H × P) : . . 430 × 115 × 350 mm
Poids : . . . . . . . . . . . . . . . . 2,9 kg
Tout droit de modification réservé.
7 Accessori
7.1 Testina e puntina di ricambio
Se necessario, la testina oppure la sola puntina pos-
sono essere sostituite facilmente. I relativi ricambi si
trovano in commercio, per esempio la testina EN-24
e la relativa puntina EN-24SP di “img Stage Line”.
1) Per
sostituire la puntina
sfilare in avanti il porta
puntina arancione e inserire la nuova puntina
nella testina.
2) Per
cambiare la testina
svitare il portatestina (11)
dal braccio di lettura.
3) Svitare la testina dal portatestina e sfilare i fili di
collegamento.
4) Avvitare la nuova testina sul portatestina e inse-
rire i fili come segue:
bianco positivo del canale sinistro
blu negativo del canale sinistro
rosso positivo del canale destro
verde negativo del canale destro
5) Dopo la sostituzione del sistema, reimpostare il
peso della puntina e il dispositivo antiskating
(vedere i paragrafi 4.1 e 4.2).
7.2 Portatestina di ricambio
Un portatestina di ricambio (per esempio il portate-
stina EN-120 di “img Stage Line”) completo di
testina permette una rapida sostituzione in caso
di necessità. Il portatestina può essere sostituito
svitandolo e avvitando quello nuovo. Dopodiché
occorre reimpostare il peso della puntina e il valore
antiskating (vedi capitolo 4.1 und 4.2).
7.3 Stuoia di feltro
Se si perde la stuoia di feltro in dotazione o se è con-
sumata si può ordinarne una nuova con la sigla
DJP-2M di “img Stage Line”.
8 Manutenzione
8.1 Pulizia
Pulire il contenitore e il coperchio solo con un panno
morbido asciutto o inumidito (ma non bagnato!).
Non usare alcol, prodotti chimici o detergenti ag-
gressivi. Per pulire la puntina e i dischi, sono dispo-
nibili sistemi adeguati che si trovano in commercio,
p. es. la spazzola in fibra di carbonio per dischi
DC-100 di “img Stage Line”.
8.2 Trasporto
Se si desidera spedire il giradischi, fare attenzione
che il peso del braccio e tutte le altre parti dellʼappa-
recchio si trovino nellʼimballaggio originale e/o che
siano protetti appositamente contro danni durante il
trasporto. Danni al contenitore e allʼapparecchio,
causati da parti imballate in modo sciolto, non sono
soggetti a garanzia e sono quindi a pagamento!
Per il trasporto tener presente quanto segue:
1) Mettere la protezione sulla puntina.
2) Bloccare il braccio con lʼapposita leva (8).
3) Togliere il contrappeso dal braccio (5) girandolo
in senso orario, imballarlo separatamente e far
attenzione che non possa spostarsi.
4) La soluzione migliore è lʼimpiego dellʼimballaggio
originale.
9 Dati tecnici
Lunghezza effettiva del
braccio di lettura: . . . . . . . . 211 mm
Sporgenza del braccio: . . . . 35 mm
Trasmissione: . . . . . . . . . . . a cinghia
Piatto: . . . . . . . . . . . . . . . . . ∅298 mm, plastica
Velocità: . . . . . . . . . . . . . . . 331/3g/min, 45 g/min
Regolazione velocità: . . . . . ±16 %
Coppia di avviamento: . . . . 0,3 kg/cm
Tempo regime: . . . . . . . . . . < 0,8 s
Wow and flutter: . . . . . . . . . < 0,15 %
Ronzio: . . . . . . . . . . . . . . . .
-
40 dB non valutato,
-
55 dB valutato
Alimentazione: . . . . . . . . . . 230 V~/50 Hz/15 VA
Temperatura dʼimpiego: . . . 0 – 40 °C
Dimensioni (l × h × p): . . . . 430 × 115 × 350 mm
Peso: . . . . . . . . . . . . . . . . . 2,9 kg
Con riserva di modifiche tecniche.
9
I
F
B
CH
La MONACOR
®
INTERNATIONAL GmbH & Co. KG si riserva ogni diritto di elaborazione in qualsiasi forma
delle presenti istruzioni per lʼuso. La riproduzione – anche parziale – per propri scopi commerciali è vietata.
Notice dʼutilisation protégée par le copyright de MONACOR
®
INTERNATIONAL GmbH & Co. KG. Toute
reproduction même partielle à des fins commerciales est interdite.

Op de uitklapbare pagina 3 vindt u een overzicht
van alle bedieningselementen en de aansluitin-
gen.
1 Overzicht van de bedienings-
elementen en aansluitingen
1Adapter voor singles
2POWER-schakelaar
3Stroboscooplamp
4Toets START/STOP
5Contragewicht voor de toonarm
6Draaiknop voor de antiskating-instelling
7Hendel voor de toonarmlift
8Toonarmvergrendeling
9Toonarm
10 Schuifregelaar PITCH ADJ. om de snelheid te
veranderen (±16 %)
11 Leeskophouder met leeskop
12 Toets voor de snelheid 45 tpm
13 Toets voor de snelheid 331/3tpm
14 Keuzeschakelaar PHONO/LINE voor het audio-
niveau van de analoge audio-uitgang (18)
PHONO
bij het aansluiten op een phono-ingang
LINE
bij het aansluiten op een lijningang
15 Regelaar GAIN voor het audioniveau van de
USB-aansluiting (16)
16 USB-aansluiting (type B) voor de verbinding met
een computer
17 Netstekker voor aansluiting op de netstroom
230 V~/50 Hz
18 Cinch-jack analoge audio-uitgang, voor aanslui-
ting op een lijn- of phono-ingang, b.v. van een
versterker of mengpaneel
(rood = rechter kanaal, wit = linker kanaal)
2 Veiligheidsvoorschriften
Het apparaat is in overeenstemming met alle rele-
vante EU-Richtlijnen en is daarom gekenmerkt
met .
Let eveneens op het volgende:
GHet apparaat is enkel geschikt voor gebruik bin-
nenshuis. Vermijd druip- en spatwater, uitzonder-
lijk warme plaatsen en plaatsen met een hoge
vochtigheid (toegestaan omgevingstemperatuur-
bereik: 0 – 40 °C).
GPlaats geen bekers met vloeistof zoals drinkgla-
zen etc. op het apparaat.
GSchakel het apparaat niet in resp. trek onmiddel-
lijk de stekker uit het stopcontact:
1. wanneer het apparaat of het netsnoer zichtbaar
beschadigd zijn,
2. wanneer er een defect zou kunnen optreden
nadat het apparaat bijvoorbeeld is gevallen,
3. wanneer het apparaat slecht functioneert.
Het apparaat moet in elk geval hersteld worden
door een gekwalificeerd vakman.
GEen beschadigd netsnoer mag alleen in een werk-
plaats worden vervangen.
GTrek de stekker nooit met het snoer uit het stop-
contact, maar met de stekker zelf.
GIn geval van ongeoorloofd of verkeerd gebruik,
verkeerde aansluiting, foutieve bediening of van
herstelling door een niet-gekwalificeerd persoon
vervalt de garantie en de verantwoordelijkheid
voor hieruit resulterende materiële of lichamelijke
schade.
3 Toepassingen
De platenspeler DJP-104USB is zowel geschikt
voor particulier gebruik thuis als voor professionele
DJʼs. De speler is uitgerust met een phonovoorver-
sterker en kan daarom ook op een lijningang worden
aangesloten.
Om de muziek van speelplaten te digitaliseren,
kunt u de DJP-104USB via een USB-interface aan-
sluiten op een computer. Daarnaast hebt u ook
geluidsopnamesoftware nodig. Op het Internet vindt
u verschillende programmaʼs als freeware.
4 Montage en basisinstellingen
Het is nuttig om de verpakking na uitpakken van alle
onderdelen van het toestel te bewaren voor eventu-
eel later transport. Plaats de platenspeler op een
vlakke, horizontale ondergrond en leg de meegele-
verde slipmat op de draaitafel.
4.1 De naalddruk afregelen
1) Plaats eerst de antiskatingknop (6) naar links in
de stand “0”.
2) Neem de beschermkap van het element er langs
onder af.
3) Plaats de hendel van de toonarmlift (7) naar voor
.
4) Schuif de toonarmvergrendeling (8) opzij naar
rechts. Neem de toonarm aan de greep vast en
positioneer hem voorzichtig net vóór de draaita-
fel, zodat hij vrij op en neer kan bewegen.
Opgelet! Vermijd elk contact tussen naald en
draaitafel.
5) Beweeg de toonarm met de linker hand opzij,
zodat de naald niet tegen de draaitafel stoot. Draai
het contragewicht (5) met de rechter hand zo dat
de toonarm in horizontale positie balanceert, en
niet naar boven of beneden beweegt (figuur 3).
– Indien de toonarm naar boven beweegt, draait
u het contragewicht naar links.
– Indien de toonarm naar onder beweegt, draait
u het contragewicht naar rechts.
WAARSCHUWING De netspanning (230 V~) van het
apparaat is levensgevaarlijk. Open
het apparaat niet, want door on-
zorgvuldige ingrepen loopt u het
risico van elektrische schokken.
Wanneer het apparaat definitief uit bedrijf
wordt genomen, bezorg het dan voor
milieuvriendelijke verwerking aan een
plaatselijk recyclagebedrijf.
Todos los elementos de funcionamiento y las
conexiones que se describen pueden encon-
trarse en la página 3 desplegable.
1 Elementos y conexiones
1Adaptador para discos 45 vueltas
2Interruptor POWER
3Lámpara estroboscopia
4Tecla START/STOP
5Contrapeso para el brazo
6Botón para regular el antiskating
7Levanta brazo
8Palanca de bloqueo para el brazo
9Brazo de lectura
10 Potenciómetro PITCH ADJ. para modificar la
velocidad (±16 %)
11 Porta célula con célula
12 Tecla para la velocidad 45 vueltas/minuto
13 Tecla para la velocidad 33 1/3vueltas/minuto
14 Interruptor selector PHONO/LINE para el nivel
audio de la salida audio análoga (18)
PHONO
para la conexión a una entrada “Phono”
LINE
para la conexión a una entrada de línea
15 Control GAIN para el nivel audio en la conexión
USB (16)
16 Conexión USB (tipo B) para conectar un ordena-
dor
17 Toma de alimentación del cable para conectar a
una toma de 230 V~/50 Hz
18 Tomas RCA para la salida audio análoga para la
conexión a una entrada de línea o una entrada
“Phono”, p. ej. de un amplificador o una mesa de
mezclas
(rojo = canal derecho, blanco = canal izquierdo)
2 Consejos de utilización y seguridad
La unidad corresponde a todas las directivas rele-
vantes por la UE y por ello está marcada con .
Respecte escrupulosamente los puntos siguientes:
GEl aparato está fabricado únicamente para una
utilización en interior. Protéjalo de todo tipo de
proyecciones de agua, de las salpicaduras, de
una humedad elevada y del calor (temperatura de
funcionamiento autorizada: 0 – 40 °C).
GNo deposite en ningún caso objetos que contie-
nen líquidos, p. ej. vasos, encima del aparato.
GNo deje nunca funcionar el aparato y desconéc-
telo inmediatamente cuando:
1. aparecen daños en el aparato o en el cable de
conexión.
2. después de una caída o accidente similar, el
aparato pueda presentar un defecto.
3. aparece mal funcionamiento.
En todos los casos, deberá acudir a una especia-
lista para que efectuará las reparaciones.
GUn cable de corriente dañado sólo puede repa-
rarse por el personal cualificado.
GNo desconecte nunca el aparato tirando directa-
mente del cable, sujételo siempre por la toma de
la extremidad.
GRechazamos toda responsabilidad en caso de
daños corporales o materiales si el aparato se uti-
liza en una finalidad distinta para el cual ha sido
fabricado, si no está correctamente conectado,
utilizado o reparado por una persona habilitada y
calificada; además por todos estos mismos moti-
vos el aparato carecería de todo tipo de garantía.
3 Aplicaciones
El giradiscos DJP-104USB está indicado para apli-
caciones privadas y para el funcionamiento DJ pro-
fesional. Está equipado con un preamplificador
RIAA y por ello también se puede conectar a una
entrada de línea.
Para digitalizar música de discos, se puede
conectar el DJP-104USB a un ordenador mediante
la interfaz USB. Además se necesita un software de
grabación de audio. En Internet están disponibles
diferentes programas de software gratuito.
4 Montaje y reglaje de base
Le aconsejamos al desembalar todos los elementos
de conservar los embalajes para transportes ulterio-
res. Instale el giradiscos sobre una superficie plana
y horizontal y coloque la tela entrada sobre el gira-
discos.
4.1 Reglaje de la presión del diamante
1) Gire antes de todo el botón antiskating (6) en el
sentido contrario de las agujas de un reloj hacia
la posición “0”.
2) Saque la tapa de protección del diamante hacia
abajo.
3) Coloque el levanta brazo (7) en la posición
delantera .
4) Abrir la palanca de bloqueo del brazo (8) hacia la
derecha, sujete el brazo por su maneta, diríjalo
con precaución hasta el borde del giradiscos sin
que lo toque y de manera a que pueda colocarse
libremente hacia arriba y hacia abajo.
Atención: No haga tocar el diamante.
ADVERTENCIA La unidad se alimenta con un voltaje
de red peligroso (230 V~). Deje el
mantenimiento sólo en manos de
personal especializado. Una mani-
pulación inexperta puede causar un
riesgo de shock eléctrico.
Si se debe retirar la unidad del funciona-
miento definitivamente, llévela a un centro
de reciclaje local para su disposición no
contaminante para el medio ambiente.
10
E
NL
B

6) Plaats de toonarm terug in de houder en zet hem
vast met de toonarmvergrendeling (8).
7) Op het contragewicht bevindt zich een draaibare,
zwarte ring met schaalverdeling. De rode marke-
ring op de toonarm wijst een bepaalde waarde op
de schaal aan. Zonder dat het contragewicht
meedraait, wordt de ring ingesteld op de stand
“0” (fig. 4).
8) Op de schaal wordt de naalddruk in gram uitge-
drukt. Voor de meegeleverde naald is een naald-
druk van 2 g vereist. Draai het contragewicht (niet
enkel de ring met de schaal!) hiervoor naar links,
tot de rode markering op de toonarm tegenover
“2” staat (fig. 5).
Stel voor andere naalden de naalddruk in con-
form de technische gegevens.
4.2 De antiskating afregelen
Bij het afspelen van een plaat worden er krachten op
de naald uitgeoefend die gecompenseerd worden
door het antiskatingsysteem. Draai hiervoor de
antiskatingknop (6) van “0” tot in de stand waarvan
de waarde overeenkomt met de naalddruk, d.w.z. in
de stand “2” voor de meegeleverde naald. De waar-
de kunt u naast de pijl op de draaiknop aflezen.
4.3 De stofkap monteren
Neem de twee scharnieren van de stofkap uit de sty-
roporverpakking en monteer ze op de stofkap.
Plaats de stofkap met de scharnieren op de platen-
speler. U kan ze op elk moment weer verwijderen,
indien ze hindert bij het gebruik (bijvoorbeeld bij
gebruik in een discotheek).
5 De platenspeler aansluiten
Schakel de platenspeler uit, alvorens apparaten aan
te sluiten of bestaande aansluitingen te wijzigen.
1) Verbind de aansluitkabel met de cinch-stekkers
(18) – rood voor het rechter kanaal, wit voor het
linker kanaal – met de overeenkomstige ingangs-
jack op de versterker of het mengpaneel:
a Bij het aansluiten op ingangsjacks voor een
platenspeler met magnetische cel plaatst u de
schuifregelaar PHONO/LINE (14) in de stand
PHONO.
b Bij het aansluiten op ingangsjacks voor een
apparatuur met lijnniveau plaatst u de schuif-
regelaar PHONO/LINE in de stand LINE.
2) Wenst u muziekfragmenten van een speelplaat
naar een computer te kopiëren, dan verbindt u de
USB-aansluiting (16) met een USB-aansluiting
van de computer. Daarnaast hebt u ook geluids-
opnamesoftware nodig. Op het Internet vindt u
verschillende programmaʼs als freeware. Met de
regelaar GAIN (15) regelt u het audioniveau
tijdens het kopiëren.
3) Plug de netstekker (17) in een stopcontact
(230 V~/50 Hz).
6 Bediening
6.1 Ingebruikneming
1) Neem de beschermkap van het element er langs
onder af.
2) Schakel met behulp van de POWER-schakelaar
(2) de platenspeler in. De stroboscooplamp (3)
licht op.
3) Om de snelheid in te stellen, drukt u op de over-
eenkomstige toets:
voor 331/3tpm de linker toets “33” (13)
voor 45 tpm de rechter toets “45” (12)
Om de ingestelde snelheid aan te duiden, licht de
betreffende LED boven de ingedrukte toets op.
4) Leg de plaat op de draaitafel. Vergeet niet de adap-
ter (1) te gebruiken voor het afspelen van singels.
5) Schuif de toonarmvergrendeling (8) opzij naar
rechts. Om de toonarm omhoog te bewegen,
plaatst u de hendel van de toonarmlift (7) naar
achter in de stand .
6) Neem de toonarm aan de greep vast en positio-
neer de naald boven het begin van de plaat resp.
van het gewenste fragment. Plaats de hendel
van de toonarmlift (7) naar voor . De toonarm
zakt langzaam tot op de plaat.
7) Druk op de toets START/STOP (4). De draaitafel
begint te roteren.
Het afspelen kan met behulp van de toets
START/STOP steeds onderbroken en opnieuw
gestart worden.
8) Om het afspelen te beëindigen, brengt u de toon-
arm met de toonarmlift (7) omhoog en plaats de
arm met de hand terug op de houder. Druk op de
toets START/STOP (4) om de draaitafel te stop-
pen.
9) Beveilig de toonarm met de toonarmvergrendel-
ing (8) na gebruik van de platenspeler, en scha-
kel het toestel uit met de POWER-schakelaar (2).
Sluit de stofkap.
6.2 De snelheid wijzigen
Desgewenst kunt u de snelheid van de platenspeler
en bijgevolg de toonhoogte “pitch” van een track met
de regelaar PITCH ADJ. (10) met max. 16 % verho-
gen of verlagen. In de middelste stand (regelaar klikt
in) is de geselecteerde standaardsnelheid ingesteld,
d.w.z. exact 331/3resp. 45 tpm.
Om de snelheid 331/3tpm te controleren, kunt u
de stroboscoopring op de rand van de draaitafel
gebruiken. Concentreer u bij een draaiende draaita-
fel op het deel van de ring dat door de stroboscoop-
lamp (3) wordt verlicht (dim eventueel de kamerver-
lichting):
Bij een netfrequentie van 50 Hz blijven de vierkanten
van de onderste ring schijnbaar staan, en bij een net-
frequentie van 60 Hz de rechthoeken van de bovenste
ring, wanneer de snelheid precies 331/3tpm bedraagt.
De stroboscoopring bij 331/3tpm.
60Hz50Hz
5) Desplace el brazo lateralmente con la mano
izquierda para evitar que el diamante no toque el
giradiscos. Con la mano derecha, gire el contra-
peso (5) de manera que el brazo quede exacta-
mente a la horizontal y no se desplace hacia
arriba o hacia abajo (esquema 3).
– Si el brazo se desplaza hacia arriba: gire el
contrapeso en el sentido contrario de las agu-
jas de un reloj.
– Si el brazo se desplaza hacia abajo: gire el con-
trapeso en el sentido de las agujas de un reloj.
6) Coloque de nuevo el contrapeso sobre su sopor-
te, bloquéelo con la palanca (8).
7) En el contrapeso encontrará una anilla de color
negro, rotativa, con una escala. La línea roja en
el brazo indica un valor de la escala. Sin girar el
contrapeso, ponga únicamente la anilla en la
posición “0” (esquema 4).
8) En la escala, puede leer la presión del diamante
en gramos. Para el sistema entregado, la presión
es de 2 g; gire el contrapeso (¡no solo la anilla
con la escala!) en el sentido contrario de las agu-
jas de un reloj hasta que la línea roja del brazo
esté en frente del “2” (esquema 5).
Para otros sistemas, regule el contrapeso en
función de las características técnicas especifi-
cadas.
4.2 Reglaje del antiskating
Durante la lectura de un disco, se aplican fuerzas
sobre el diamante que puede impedir mediante el
reglaje antiskating. Ponga el botón antiskating (6)
de “0” en el valor igual a la presión del diamante, es
decir, para el sistema entregado en “2”. El valor es
legible al lado de la flecha en el botón.
4.3 Montaje de la tapa
Saque las dos bisagras de la tapa de sus embalajes
de icopor y coloquelas sobre la tapa. Coloque la
tapa con las bisagras sobre el giradiscos. Puede en
todo momento sacarla si le molesta durante la utili-
zación del giradiscos (por ejemplo en discoteca).
5 Conexión del giradiscos
Antes de conectar o cambiar las conexiones exis-
tentes apague el giradiscos.
1) Conecte el cable con los enchufes RCA (18) –
rojo para el canal derecho, blanco para el canal
izquierdo – a los jacks de entrada correspondien-
tes en el amplificador o la mesa de mezclas:
a Cuando conecte a jacks de entrada para un
giradiscos con sistema magnético, ajuste el
interruptor corredizo PHONO/LINE (14) en la
posición PHONO.
b Cuando conecte a jacks de entrada para uni-
dades con nivel de línea, ajuste el interruptor
corredizo PHONO/LINE en la posición LINE.
2) Para copiar piezas de música desde un disco
hacia un ordenador, conecte la conexión USB
(16) a una conexión USB del ordenador. Ade-
más, se necesita un software de grabación de
audio. En Internet están disponibles diferentes
programas de software gratuito. Cuando se lleva
a cabo una copia, el control sirve para ajustar el
nivel de audio GAIN (15).
3) Conecte el enchufe de red (17) a una toma
(230 V~/50 Hz).
6 Utilización
6.1 Lectura
1) Saque la tapa de protección del diamante baján-
dola.
2) Conecte el giradiscos con el interruptor POWER
(2). La lámpara estroboscopia (3) brilla.
3) Para seleccionar la velocidad, pulse la tecla co-
rrespondiente:
para 33 1/3r/min pulse la tecla izquierda “33” (13)
para 45 r/min pulse la tecla derecha “45”(12)
El LED correspondiente encima de la tecla brilla,
indicando la velocidad seleccionada.
4) Coloque el disco. Para 45 vueltas, utilice el adap-
tador (1).
5) Abrir la palanca de bloqueo (8) del brazo hacia la
derecha; para levantar el brazo, ponga la palanca
del levanta brazo (7) en la posición trasera .
6) Sujete la maneta del brazo, coloque el diamante
al principio del disco o en el punto que desea del
disco; ponga el levanta brazo (7) en la posición
delantera , el brazo se inclina lentamente sobre
el disco.
7) Pulse la tecla START/STOP (4), el giradiscos
empieza a girar.
Durante la lectura, puede detener el giradis-
cos en todo momento con la tecla START/STOP
y arranque de nuevo.
8) Para acabar la lectura, levante el brazo con el
levanta brazo (7), y coloquelo manualmente
sobre su soporte. Detenga el giradiscos con la
tecla START/STOP (4).
9) Después de utilización, bloquee (8) el brazo
sobre su soporte, desconecte el giradiscos con el
interruptor POWER (2). Cierre la tapa para prote-
ger el giradiscos del polvo.
6.2 Modificación de la velocidad
Si es necesario, puede aumentar o disminuir la velo-
cidad del giradiscos y así la altura tonal (“Pitch”) de
una canción con el reglaje PITCH ADJ. (10) hasta
16 % como mucho. En posición mediana, (reglaje
encajado), la velocidad estándar seleccionada se
regula, es decir, exactamente 331/3vueltas/min o
45 vueltas/min.
Para controlar la velocidad 331/3vueltas/min, la
anilla estroboscopia en el borde del giradiscos se
utiliza. Cuando el giradiscos gira, mire la parte de la
anilla iluminada por la lámpara estroboscopia (3) [si
es necesario, disminuya la luz de la sala]:
Para una frecuencia de 50 Hz, los cuadros de la anilla
inferior parecen fijas y para una frecuencia de 60 Hz,
los rectángulos de la anilla superior parecen fijos si la
velocidad es exactamente de 331/3vueltas/min.
11
E
NL
B

7 Toebehoren
7.1 Reserveleeskop en -naald
Indien nodig kan de leeskop of de naald makkelijk
vervangen worden. In de vakhandel vindt u de no-
dige onderdelen, bijvoorbeeld van “img Stage Line”
de magnetische leeskop EN-24 en de daarbij pas-
sende naald EN-24SP.
1) Om de
naald
te vervangen, neemt u de oranje
naaldhouder er langs voor uit. Breng de nieuwe
naald aan.
2) Om de
leeskop
te vervangen, schroeft u de
leeskophouder (11) van de toonarm af.
3) Schroef de leeskop van de houder en koppel de
aansluitdraden los.
4) Schroef de nieuwe leeskop op de houder vast en
verbind de draden als volgt:
wit linker kanaal positieve pool
blauw linker kanaal negatieve pool
rood rechter kanaal positieve pool
groen rechter kanaal negatieve pool
5) Na vervanging van de leeskop moeten naalddruk
en antiskating-waarde opnieuw worden ingesteld
(zie hoofdstuk 4.1 en 4.2).
7.2 Reserveleeskophouder
Een reserveleeskophouder (b.v. de leeskophouder
EN-120 van “img Stage Line”) compleet met een
leeskop maakt een snelle vervanging mogelijk
indien nodig. De leeskophouder kan eenvoudig wor-
den gemonteerd door de huidige houder eraf te
schroeven en de nieuwe te monteren. Vervolgens
moeten naalddruk en antiskating-waarde opnieuw
worden ingesteld (zie hoofdstuk 4.1 en 4.2).
7.3 Slipmat
Mocht de meegeleverde slipmat verloren of versle-
ten zijn, dan kan deze mat onder de benaming
DJP-2M van “img Stage Line” worden besteld.
8 Onderhoud
8.1 Reiniging
Maak de behuizing van de platenspeler en de stof-
kap uitsluitend schoon met een droge, zachte doek
of een licht bevochtigde doek (niet druipnat!). Ge-
bruik geen alcohol, chemicaliën noch agressieve
detergenten! Om het stof van de naald en de platen
te verwijderen, zijn geschikte toebehoren verkrijg-
baar in de vakhandel, bijvoorbeeld de platenreiniger
met koolstofvezels DC-100 van “img Stage Line”.
8.2 Transport
Indien u de platenspeler wenst te verzenden, zorg er
dan voor dat het toonarmgewicht en alle andere
onderdelen van het apparaat alleen in de originele
verpakking en/of speciale transportverpakking wor-
den verzonden. Voor schade aan behuizing en
onderdelen als gevolg van los verpakte onderdelen
vervalt elke garantie. De schade dient op eigen kos-
ten te worden hersteld!
Let er bij verzending in ieder geval op dat:
1) de beschermkap van de naald gemonteerd is.
2) de toonarm met de toonarmvergrendeling (8)
vastgezet is.
3) Schroef het tegengewicht (5) voor de toonarm
naar rechts los, verpak het afzonderlijk en zorg
dat hij niet kan verschuiven.
4) Het gebruik van de originele verpakking is aan-
bevolen.
9 Technische gegevens
Effectieve toonarmlengte: . . 211 mm
Toonarmoverhang: . . . . . . . 35 mm
Aandrijving: . . . . . . . . . . . . . Riemaandrijving
Draaitafel: . . . . . . . . . . . . . . ∅298 mm, kunststof
Snelheden: . . . . . . . . . . . . . 33 1/3tpm, 45 tpm
Snelheidsregeling: . . . . . . . ±16 %
Startmoment: . . . . . . . . . . . 0,3 kg/cm
Starttijd: . . . . . . . . . . . . . . . < 0,8 seconden
Wow en flutter: . . . . . . . . . . < 0,15 %
Dreunafstand: . . . . . . . . . . .
-
40 dB, niet geëva-
lueerd,
-
55 dB, gemeten
Voedingsspanning: . . . . . . . 230 V~/50 Hz
Krachtontneming: . . . . . . . . 15 VA
Omgevingstemperatuur-
bereik: . . . . . . . . . . . . . . . . . 0 – 40 °C
Afmetingen (B × H × D): . . . 430 × 115 × 350 mm
Gewicht: . . . . . . . . . . . . . . . 2,9 kg
Wijzigingen voorbehouden.
Anilla estroboscopia para 331/3vueltas/min
7 Accesorios
7.1 Cambio de la célula y del diamante
Puede cambiar fácilmente la célula o el diamante.
Encontrará en el comercio los recambios, por ejem-
plo de “img Stage Line”, la célula magnética EN-24
y el diamante EN-24SP correspondiente.
1) Para
cambiar el diamante,
saque hacia delante
el soporte de color naranja de la aguja. Coloque
el nuevo diamante en la célula.
2) Para
cambiar la célula,
desatornille el porta
célula (11) del brazo.
3) Desatornille la célula del soporte y saque los
hilos de conexión.
4) Atornille la nueva célula sobre el soporte y colo-
que los hilos como indicados:
Blanco: polo positivo canal izquierdo
Azul: polo negativo canal izquierdo
Rojo: polo positivo canal derecho
Verde: polo negativo canal derecha
5) Después del cambio de la célula, debe regular de
nuevo la presión del diamante y el antiskating.
(Vea capítulos 4.1 y 4.2).
7.2 Porta célula de recambio
Un porta célula de recambio (por ejemplo EN-120
de “img Stage Line”) completo con una célula per-
mite un cambio rápido cuando sea necesario. El
porta célula puede cambiarse simplemente desator-
nillando y atornillando. Después del cambio, debe
regular de nuevo la presión del diamante y el antis-
kating. (Vea capítulo 4.1 y 4.2).
7.3 Tela
Si pierde o se desgasta la tela, puede pedirla bajo la
referencia DJP-2M de “img Stage Line”.
8 Mantenimiento
8.1 Limpieza
Limpie la caja del giradiscos y la tapa de protección
con un trapo seco y suave o a pena húmeda (¡no
empapado!). No utilice en ningún caso productos
detergentes fuertes, químicos o alcohol. Para quitar
el polvo del diamante y de los discos, útiles los pro-
ductos de limpieza disponibles en el comercio, por
ejemplo la escobilla en fibra de carbono DC-100 de
“img Stage Line”.
8.2 Transporte
Si desea cambiar el giradiscos de sitio o de lugar,
verifique que el peso de brazo y todos los compo-
nentes estén bien embalados y en los embalajes de
origen y/o asegurarlos especialmente para el trans-
porte. ¡Cualquier daño en la carcasa o en la unidad
debido a un componente que no se haya embalado
correctamente no quedará cubierto por la garantía y
por ello se cobrará su reparación!
Para el transporte, es imperativo respectar los
puntos siguientes:
1) Ponga la tapa de protección del diamante.
2) Fije el brazo con el bloqueo (8).
3) Desatornille el contrapeso (5) del brazo girándolo
en el sentido de las agujas de un reloj, embale
separadamente y evite que se deslice.
4) Le aconsejamos utilizar el embalaje de origen.
9 Características técnicas
Longitud efectiva
del brazo: . . . . . . . . . . . . . . 211 mm
Overhang: . . . . . . . . . . . . . . 35 mm
Tracción: . . . . . . . . . . . . . . . tracción por correa
Plato: . . . . . . . . . . . . . . . . . ∅298 mm, plástico
Velocidad: . . . . . . . . . . . . . . 33 1/3vueltas/min,
45 vueltas/min
Reglaje velocidad: . . . . . . . ±16 %
Tiempo arranque: . . . . . . . . 0,3 kg/cm
Tiempo subida: . . . . . . . . . . < 0,8 s
Lloro y centelleo: . . . . . . . . < 0,15 %
Ruido perturbador: . . . . . . .
-
40 dB no ponderado,
-
55 dB ponderado
Alimentación: . . . . . . . . . . . 230 V~/50 Hz
Consumo: . . . . . . . . . . . . . . 15 VA
Temperatura func.: . . . . . . . 0 – 40 °C
Dimensiones (L × A × P): . . 430 × 115 × 350 mm
Peso: . . . . . . . . . . . . . . . . . 2,9 kg
Sujeto a modificaciones técnicas.
60Hz50Hz
12
E
NL
B
Manual de instrucciones protegido por el copyright de MONACOR
®
INTERNATIONAL GmbH & Co. KG.
Toda reproducción incluida parcial con fines comerciales está prohibida.
Deze gebruiksaanwijzing is door de auteurswet beschermd aigendom van MONACOR
®
INTERNATIONAL
GmbH & Co. KG. Een reproductie – ook gedeeltelijk – voor eigen commerciële doeleinden is verboden.

13

Proszę otworzyć instrukcję na stronie 3. Poka-
zano tam rozkład elementów operacyjnych i
złączy.
1 Elementy Sterujące i Połączenia
1Krążek do singli
2Włącznik zasilania
3Lampa stroboskopowa
4Przycisk Start/Stop
5Przeciwwaga ramienia
6Regulator antypoślizgowy
7Dźwignia podnosząca ramię
8Blokada ramienia
9Ramię
10 Suwak PITCH ADJ. do regulacji tempa (±16 %)
11 System z wkładką gramofonową
12 Przycisk tempa 45
13 Przycisk tempa 33
14 Przełącznik PHONO/LINE do poziomu audio
analogowego wyjścia (18)
PHONO
Do podłączania wejścia PHONO
LINE
Do podłączania wejścia liniowego
15 Regulator GAIN poziomu audio na gnieździe
USB (16)
16 Gniazdo USB (typ B) do łączenia z komputerem
17 Kabel zasilający do połączenia z gniazdem sieci
elektrycznej 230 V~/50 Hz
18 Wtyczka chinch do analogowego wyjścia do
łączenia liniowego wejścia liniowego lub fono np.
wzmacniacza lub miksera
(czerwony = kanał prawy, biały = kanał lewy)
2 Bezpieczeństwo użytkowania
Ponieważ urządzenie spełnia wszelkie normy obo-
wiązujące w Unii Europejskiej, zostało oznaczone
symbolem .
Należy przestrzegać następujących zaleceń:
GUrządzenie przeznaczone jest do użytku tylko
wewnątrz pomieszczeń. Należy chronić je przed
zalaniem i wilgocią oraz wysoką temperaturą
(dopuszczalna temperatura otoczenia pracy to
0 – 40 ºC).
GNie wolno stawiać na urządzeniu żadnych naczyń
wypełnionych cieczami, np.: szklanek z napojami.
GNie wolno używać oraz należy natychmiast odłą-
czyć urządzenie od zasilania:
1. jeżeli widoczne są jakiekolwiek uszkodzenia
urządzenia lub kabla zasilającego,
2. jeżeli urządzenie upadło lub uległo podobnemu
wypadkowi, który mógł spowodować jego
uszkodzenie,
3. jeżeli występują nieprawidłowości w działaniu
urządzenia.
W każdym z powyższych przypadków urządzenie
musi zostać poddane naprawie przez odpowied-
nio wyszkolony personel.
GWymianę kabla zasilającego należy zlecić specja-
liście.
GNie wolno odłączać urządzenia z gniazda siecio-
wego ciągnąc za kabel zasilający, należy zawsze
chwytać za wtyczkę.
GDostawca oraz producent nie ponoszą odpowie-
dzialności za ewentualnie wynikłe szkody mate-
rialne lub uszczerbki na zdrowiu, jeśli urządzenie
było używane niezgodnie z przeznaczeniem,
zostało niepoprawnie zainstalowane lub obsługi-
wane oraz było poddawane naprawom przez nie-
autoryzowany personel.
3 Zastosowania
Gramofon DJP-104USB jest przystosowany do pry-
watnego użytku jak i zastosowań profesjonalnych.
Urządzenie jest wyposażone w przedwzmacniacz i
dlatego może być również podłączone do wejścia
liniowego.
Aby uzyskać cyfrową jakość dźwięku, gramofon
DJP-104USB można podłączyć do komputera za
pomocą kabla USB. Dodatkowo, wymagane jest
oprogramowanie do rejestracji dźwięku. Różno-
rodne darmowe programy ułatwiające zapis można
znaleźć w internecie.
4 Montaż Urządzenia
i Podstawowe Funkcje
Po rozpakowaniu poszczególnych elementów
należy zachować elementy opakowania, aby móc je
wykorzystać podczas ewentualnego transportu w
przyszłości. Gramofon należy stawiać na stabilnej,
płaskiej powierzchni i nałożyć matę poślizgową na
talerz gramofonu.
4.1 Regulacja nacisku igły
1) Ustawić pokrętło regulacji antypoślizgowej (6) w
stronę przeciwną do ruchu wskazówek zegara do
pozycji “0”.
2) Zdjąć osłonę igły ciągnąc ją w dół.
3) Ustawić dźwignię podnoszącą ramię (7) w pozy-
cji przedniej.
4) Zwolnić blokadę ramienia (8) [w prawo]. Ramię
ustawić nad płytą gramofonu tak, aby mogła być
swobodnie opuszczana i podnoszona.
Uwaga! Igła nie może w nic uderzyć.
Po całkowitym zakończeniu eksploatacji
urządzenia należy oddać je do punktu uty-
lizacji odpadów, aby uniknąć zanieczysz-
czenia środowiska naturalnego.
UWAGA Urządzenie zasilane jest prądem
elektrycznym (230 V~). Obsługę tech-
niczną urządzenia należy zlecić spe-
cjaliście. Nieostrożne obchodzenie
się z urządzeniem może spowodo-
wać porażenie prądem elektrycznym.
5) Lewą ręką przesunąć ramię w stronę środka
uważając, aby igła w nic nie uderzyła. Prawą
ręką wyregulować przeciwwagę (5) tak, aby
ramię pozostawało w pozycji poziomej i nie prze-
suwało się w dół, lub w górę (rys. 3).
– Jeżeli ramię podnosi się ponad płytę, należy
obrócić przeciwwagę w stronę przeciwną do
ruchu wskazówek zegara.
– Jeżeli ramię opada na płytę, należy obrócić
przeciwwagę w stronę zgodną wskazówek
ruchem wskazówek zegara.
6) Odłożyć ramię na podporę i zablokować (8).
7) Przeciwwaga wyposażona jest czarny pierścień
ze skalą. Czerwona linia zaznaczona na ramie-
niu wskazuje wartość na skali. Bez poruszania
przeciwwagą obrócić pierścień do pozycji “0”
(rys. 4).
8) Skala wskazuje nacisk igły gramofonowej w gra-
mach. Wymagany nacisk dla dołączonego sys-
temu z wkładką gramofonową wynosi 2 g. W tym
celu należy obrócić przeciwwagę w stronę prze-
ciwną do ruch wskazówek zegara dopóki czer-
wona linia ramienia wskaże “2” (rys. 5).
Dla innych systemów siła nacisku może być
inna. Powinna być określona na opakowaniu.
4.2 Regulacja funkcji antypoślizgu
Podczas odtwarzania płyty na igłę działają siły, które
są kompensowane poprzez system antypoślizgowy.
W związku z tym należy ustawić pokrętło (6) z
punktu “0”, do wartości odpowiadającej naciskowi
igły na płytę. W przypadku dołączonego systemu do
wartości “2”. Strzałka znajdująca się obok pokrętła
wskazuje aktualną wartość.
4.3 Montaż pokrywy ochronnej
Odpakować dwa zawiasy i przymocować je do
pokrywy ochronnej. Pokrywę wraz z zawiasami
umieścić na gramofonie. Pokrywa może być w każ-
dej chwili zdemontowana, jeżeli zajdzie taka
potrzeba (np.: podczas odtwarzania muzyki w dys-
kotece).
5 Podłączanie
Przed podłączeniem lub jakąkolwiek zmianą w ist-
niejących połączeniach, gramofon należy najpierw
wyłączyć.
1) Podłączyć kabel z wtyczkami chinch (18) – czer-
wona dla prawego kanału, biała dla lewego
kanału – do odpowiednich wejść na wzmacnia-
czu lub mikserze.
a Przy podłączaniu wtyków przy gramofonie z
systemem magnetycznym należy ustawić prze-
łącznik PHONO/LINE (14) w pozycji PHONO.
b Podczas podłączania gniazd wejściowych
przy urządzeniu z liniowym poziomem, należy
ustawić przełącznik PHONO/LINE w pozycji
LINE.
2) Do kopiowania ścieżek muzycznych na kompu-
ter, należy urządzenia podłączyć kablem USB
(16). Dodatkowo, wymagane jest oprogramowa-
nie do rejestracji dźwięku. Różnorodne darmowe
programy umożliwiające zapis dźwięku można
znależć w internecie. Podczas zapisu, regulator
GAIN (15) służy do sterowania poziomem audio.
3) Podłączyć kabel zasilania (17) do gniazdka
(230 V~/50 Hz).
6 Obsługa
6.1 Odtwarzanie płyt
1) Usunąć osłonę igły ciągnąc ją w dół.
2) Włączyć gramofon za pomocą włącznika zasila-
nia (2). Zaświeci się lampa stroboskopowa (3).
3) Należy wybrać prędkość za pomocą odpowied-
niego przycisku:
dla tempa 33 1/3obr./min. należy wcisnąć przy-
cisk “33” (13)
dla tempa 45 obr./min. należy wcisnąć przycisk
“45” (12)
Lampki sygnalizacyjne znajdujące się powyżej
przycisków wskazują aktualną prędkość.
4) Położyć płytę na talerzu gramofonu. Do odtwa-
rzania singli należy użyć odpowiedniego pier-
ścienia (1).
5) Zwolnić blokadę ramienia (8) W calu podniesie-
nia ramienia należy przesunąć dźwignię podno-
szącą ramię (7) do tyłu .
6) Przesunąć ramię z podpory nad początek płyty,
lub nad wybrany punkt na płycie. Przesunąć
dźwignię unoszącą ramie (7) do pozycji przedniej
. Ramię zostanie delikatnie opuszczone na
powierzchnię płyty.
7) Wcisnąć przycisk Start/Stop (4). Talerz gramo-
fonu zacznie się obracać.
Podczas odtwarzania talerz może być dowol-
nie zatrzymywany i startowany za pomocą przy-
cisku Start/Stop (4).
8) Aby przestać odtwarzanie należy unieść ramię
za pomocą dźwigni unoszącej ramię (7) oraz
odłożyć ramię na podporę. Talerz gramofonu
należy zatrzymać za pomocą przycisku Start/
Stop (4).
9) Po zakończeniu używania gramofonu należy za-
bezpieczyć ramię za pomocą blokady (8) oraz
wyłączyć urządzenie za pomocą przycisku (2).
Zamocować pokrywę ochronną, aby osłonić
urządzenie od kurzu.
6.2 Zmiana prędkości
W razie potrzeby prędkość talerza, a zarazem od-
twarzanego dźwięku może być zwiększana oraz
zmniejszana o 16 % za pomocą suwaka PITCH
ADJ. (10). W środkowej pozycji prędkość odpo-
wiada wybranej za pomocą przycisków prędkości.
Pierścień stroboskopowy znajdujący się na
obrzeżu talerza gramofonu służy do kontrolowania
prędkości 33 1/3obr./min. Podczas ruchu talerza
należy obserwować oświetloną przez lampę strobo-
skopową (3) część pierścienia [w razie potrzeby
należy zredukować oświetlenie pomieszczenia]:
Przy częstotliwości zasilania sieciowego 50 Hz kwa-
draty znajdujące się w dolnej części pierścienia
wydają się nie poruszać, przy częstotliwości 60 Hz
14
PL

kwadraty górnego pierścienia wydają się nie poru-
szać przy prędkości równej 331/3obr./min.
Pierścień stroboskopowy przy 331/3obr./min.
7 Akcesoria
7.1 Wymiana systemu z wkładką
gramofonową i igły
W razie potrzeby można w prosty sposób wymienić
igłę, czy wkładkę gramofonową (na np.: wkładkę
EN-24, lub igłę EN-24SP z oferty “img Stage Line”).
1) Aby wymienić igłę należy pociągnąć poma-
rańczową, plastikową część w kierunku do przo-
du. Następnie należy zainstalować nową igłę.
2) W celu wymiany wkładki należy odłączyć system
(11) od ramienia.
3) Odkręcić wkładkę od systemu i odłączyć kable
połączeniowe.
4) Delikatnie dokręcić nową wkładkę oraz podłą-
czyć przewody w następujący sposób:
biały biegun dodatni kanału lewego
niebieski biegun ujemny kanału lewego
czerwony biegun dodatni kanału prawego
zielony biegun ujemny kanału prawego
5) Po wymianie wkładki należy ponownie wyregulo-
wać nacisk igły na płytę oraz siłę antypoślizgową
(patrz rozdział 4.1 oraz 4.2).
7.2 Wymiana systemu
System zawierający wkładkę może być w razie
potrzeby natychmiastowo wymieniony (na np.: sys-
tem EN-120 z oferty “img Stage Line”). Wystarczy
odkręcić obecny i zastąpić go zamiennikiem. Po
wymianie systemu należy ponownie wyregulować
nacisk igły na płytę oraz siłę antypoślizgową (patrz
rozdział 4.1 oraz 4.2)
7.3 Mata poślizgowa
Jeżeli dołączona mata się zużyje zaleca się wymie-
nić ją na nową DJP-2M z oferty “img Stage Line”.
8 Utrzymanie
8.1 Czyszczenie
Gramofon oraz pokrywę ochronną należy czyścić
przy użyciu czystego, suchego kawałka materiału (w
żadnym wypadku obficie zmoczonego!). Nie wolno
używać do czyszczenia alkoholu, chemikaliów, ani
silnie żrących detergentów! Do czyszczenia igły
oraz płyt można używać akcesoriów z oferty “img
Stage Line”, np.: szczotki do płyt z włókien węglo-
wych DC-100.
8.2 Transport
W celu transportu urządzenia należy zabezpieczyć
ramię oraz odłączyć i zapakować w oryginalne opa-
kowania przeciwwagę oraz system. Wszelkie
uszkodzenia obudowy lub samego urządzenia wyni-
kające z nieprawidłowo zapakowania produktu nie
są objęte gwarancją i dlatego wszelkie naprawy
związane z tego rodzaju uszkodzeniami są od-
płatne.
Należy koniecznie przestrzegać poniższych
zasad podczas transportu:
1) Zabezpieczyć igłę pokrywą ochronną.
2) Zabezpieczyć ramię za pomocą blokady (8).
3) Odkręcić przeciwwagę (5) od ramienia, zapako-
wać osobno i zabezpieczyć przed przesuwaniem
się w transporcie.
4) Zaleca się używania oryginalnego opakowania
urządzenia.
9 Dane Techniczne
Efektywna długość ramienia: 211 mm
Długość ramienia
przeciwwagi: . . . . . . . . . . . . 35 mm
Napęd: . . . . . . . . . . . . . . . . paskowy
Talerz gramofonowy: . . . . . ∅298 mm, plastik
Prędkości: . . . . . . . . . . . . . . 331/3obr./min.
45 obr./min.
Regulacja PITCH: . . . . . . . . ±16 %
Moment obrotowy
przy starcie: . . . . . . . . . . . . 0,3 kg/cm
Czas startu: . . . . . . . . . . . . < 0,8 s
Trzepotanie talerza: . . . . . . < 0,15 %
Dudnienie: . . . . . . . . . . . . .
-
40 dB nieobciążony
-
55 dB obciążony
Zasilanie: . . . . . . . . . . . . . . 230 V~/50 Hz
Zużycie energii: . . . . . . . . . 15 VA
Dopuszczalna temperatura
otoczenia pracy: . . . . . . . . . 0 – 40 °C
Wymiary (Sz. × Wys. × Dł.): 430 × 115 × 350 mm
Waga: . . . . . . . . . . . . . . . . . 2,9 kg
60Hz50Hz
Z zastrzeżeniem możliwości zmian.
15
PL
Instrukcje obsługi są chronione prawem copyright for MONACOR
®
INTERNATIONAL GmbH & Co. KG.
Przetwarzanie całości lub części instrukcji dla osobistych korzyści finansowych jest zabronione.

Stereo HiFi-pladespiller
Læs nedenstående sikkerhedsoplysninger opmærk-
somt igennem før ibrugtagning af enheden. Bortset
fra sikkerhedsoplysningerne henvises til den engel-
ske, tyske, franske eller italienske tekst.
Vigtige sikkerhedsoplysninger
Denne enhed overholder alle nødvendige EU-direk-
tiver og er som følge deraf mærket .
Vær altid opmærksom på følgende:
GEnheden er kun beregnet til indendørs brug. Beskyt
den mod vanddråber og -stænk, høj luftfugtighed
og varme (tilladt omgivelsestemperatur 0 – 40 °C).
GUndgå at placere væskefyldte genstande, som
f. eks. glas, ovenpå enheden.
GTag ikke enheden i brug og tag straks stikket ud af
stikkontakten i følgende tilfælde:
1. hvis der er synlig skade på enheden eller net-
kablet,
2. hvis der kan være opstået skade, efter at enhe-
den er tabt eller lignende,
3. hvis der forekommer fejlfunktion.
Enheden skal altid repareres af autoriseret per-
sonel.
GEt beskadiget netkabel må kun repareres af pro-
ducenten eller af autoriseret personel
GTag aldrig netstikket ud af stikkontakten ved at
trække i kablet, tag fat i selve stikket.
GHvis enheden benyttes til andre formål, end den
oprindeligt er beregnet til, hvis den ikke er tilsluttet
korrekt, hvis den betjenes forkert, eller hvis den
ikke repareres af autoriseret personel, omfattes
eventuelle skader ikke af garantien.
Rengøring
Rengør pladespillerens kasse og støvlåget med en
tør eller eventuelt let fugtet, blød klud. Brug ikke sprit
eller stærkere rensemidler! Særligt rengøringstilbehør
til nål og plader kan leveres hos forhandleren, f. eks.:
kulfiberbørste til plader “img Stage Line” DC-100.
Transport
Såfremt grammofonen skai forsendes, bør der kun
anvendes original emballage til pladetallerkenen og
alle andre dele fra enheden. Det bør sikres, at alle
dele ligger fast i emballagen. Beskadigelser af enhe-
den som følge af uforsvarlig forpakning (f. eks. hvis
pladetallerkenen ikke er fjemet fra centertappen) er
ikke dækket af garantien og reparationer vil derfor
foregå pr. regning.
Før afsendelse bør følgende punkter iagttages:
1) Monter nåle-beskyttelsen.
2) Fastgør tonearmen med låsemekanismen (8).
3) Afmonter tonearmens kontravægt (5) ved at dre-
je den i urets retning.
4) Afmonter pladetallerkenen fra centertappen, pla-
cer den i særskilt emballage, som fastgøres.
5) Anvend om muligt original emballage.
Hvis enheden skal tages ud af drift for
bestandigt, skal den bringes til en lokal
genbrugsstation for bortskaffelse.
ADVERSAL Enheden benytter livsfarlig netspænd-
ing (230 V~). For at undgå fare for
elektrisk stød må kabinettet ikke
åbnes. Overlad servicering til autori-
seret personel.
Stereo HiFi skivspelare
Innan enheten tas i bruk, läs först igenom säkerhets-
föreskrifterna. Om ytterligare information önskas,
läs igenom den tyska, engelska, franska eller den
italienska texten som medföljer.
Säkerhetsföreskrifter
Enheten uppfyller samtliga Eu-direktiv och har där-
för försetts med symbolen .
Ge ovillkorligen även akt på följande:
GEnheten är endast avsedd för inomhusbruk. Skyd-
da enheten mot vätskor, hög luftfuktighet och hög
värme (tillåten omgivningstemperatur 0 – 40 °C).
GPlacera inte föremål innehållande vätskor, t. ex.
dricksglas, på enheten.
GAnvänd inte enheten och ta omedelbart kontakten
ur eluttaget om något av följande fel uppstår:
1. Enheten eller elsladden har synliga skador.
2. Enheten är skadad av fall e. d.
3. Enheten har andra felfunktioner.
Enheten skall alltid lagas på verkstad av utbildad
personal.
GEn skadad elsladd skall endast bytas på verkstad
eller hos tillverkaren.
GDrag aldrig ut kontakten genom att dra i elsladden
utan ta tag i kontaktkroppen.
GOm enheten används för andra ändamål än av-
sett, om den kopplas in felaktigt, om den används
på fel sätt eller inte repareras av auktoriserad per-
sonal upphör alla garantier att gälla och inget
ansvar tas heller för uppkommen skada på person
eller materiel.
Rengöring
Vi rekommenderas att skyddshuven och skivspela-
ren rengör endast med en torr eller eventuellt lätt
fuktad, mjuk trasa (inte drypande våt). Använd inte
alkohol eller kemikalier eller starka rengöringsmedel
då dessa kan skada huven och skivspelaren. För
rengöring av skivor och nål, finns artiklar hos den
lokala återförsäljaren, t. ex. kolfiberborste DC-100
från “img Stage Line” för rengöring av skivor.
Transport
Om skivspelaren skall transporteras, se till att en-
dast originalförpackningen används till skivtallriken
och alla andra komponenter till enheten och/eller att
de här delarna är säkert förpackade för transport.
Om skada på höljet och enheter orsakade av att
skivtallriken ej är riktigt packad eller liggande löst
(t. ex. om skivtallriken ej är borttagen från drivenhe-
ten och ej fastsatt o. dyl.), uppstår gäller inte garan-
tin och reparationen måste betalas!
Se särskilt till att följande beaktas:
1) Placera nålskyddet på pickupen.
2) Lås fast tonarmen med låset (8) på tonarmsstödet.
3) Tag loss motvikten (5) på tonarmen genom att
vrida den medurs.
4) Tag loss skivtallriken, packa den separat och se
till att den inte kan skadas.
5) Det bästa är att använda originalförpackningen.
Om enheten skall kasseras bör de lämnas
in till återvinning.
VARNING Enheten använder högspänning in-
ternt (230 V~). For att undvika en
elektrisk stöt, öppna aldrig chassit på
egen hand utan överlåt all service till
auktoriserad verkstad.
16
Stereo HiFi levysoitin
Ole hyvä ja huomioi aina seuraavat turvallisuutta
koskevat ohjeet ennen laitteen käyttöön ottoa. Katso
käyttöön liittyviä ohjeita Saksan, Englannin, Rans-
kan tai Italian kielisistä ohjeista, jos tarvitset lisää tie-
toa laitteen käytöstä.
Turvallisuudesta
Tämä laite täyttää kaikki siihen kohdistuvat EU-
direktiivit ja sille on myönnetty hyväksyntä.
Huomioi seuraavat seikat:
GTämä laite soveltuu vain sisätilakäyttöön. Suojele
laitetta kosteudelta, vedeltä ja kuumuudelta (sal-
littu ympäröivä lämpötila 0 – 40 °C).
GÄlä sijoita laitteen päälle mitään nestettä sisältä-
vää, kuten vesilasia tms.
GIrrota virtajohto pistorasiasta, äläkä käynnistä lai-
tetta jos:
1. virtajohdossa on havaittava vaurio
2. putoaminen tai muu vastaava vahinko on saat-
tanut aiheuttaa vaurion
3. laitteessa esiintyy toimintahäiriöitä
Kaikissa näissä tapauksissa laite tulee toimittaa
valtuutettuun huoltoliikkeeseen.
GVahingoittunut virtajohto tulee vaihdattaa valtuute-
tussa huoltoliikkeessä.
GÄlä koskaan irrota virtajohtoa pistorasiasta joh-
dosta vetämällä.
GLaitteen takuu raukeaa, eikä valmistaja, maahan-
tuoja tai myyjä ota vastuuta mahdollisista välittö-
mistä tai välillisistä vahingoista, jos laitetta on
käytetty muuhun kuin alkuperäiseen käyttötarkoi-
tukseen, laitetta on taitamattomasti käytetty tai
kytketty tai jos laitetta on huollettu muussa kuin
valtuutetussa huollossa.
Puhdistus
Pyyhi levysoittimen kotelo ja kansi kuivalla tai koste-
alla kankaalla. Älä käytä alkoholia, kemikaaleja
tai vahvoja puhdistusaineita! Neulan ja levyjen
pudistukseen saat tarvittavat välineet kauppiaaltasi,
esim: levyille hiilikuituisen harjan DC-100, “img
Stage Line”.
Kuljetus
Kuljetuksen aikana kiinnitä huomiota siihen, että
levysoitin on pakattu alkuperäisiin pakkauksiinsa ja
on erityisesti suojattu kuljetuksessa. Takuu ei vastaa
kuljetuksen aikana kotelolle tai levysoittimen muille
osille aiheutuneita vahinkoja, kuten, jos levysoitinta
ei ole pakattu edellä mainitulla tavalla, levylautasta
ei ole irrotettu akselistaan ja pakattu jne. Huolimat-
toman kuljetuksen aiheuttamien vahinkojen korjauk-
set joudutaan veloittamaan asiakkaalta.
Seuraavat kuljetusta koskevat ohjeet on välttämättä
huomioitava:
1) Aseta neulan suojus paikoilleen.
2) Varmista, että äänivarsi on lukittu vivulla (8).
3) Irrota äänivarren vastapaino (5) kiertämällä myö-
täpäivään.
4) Irrota levylautanen akselistaan ja pakkaa se erik-
seen ja varmistu, että se ei pääse kuljetuksen ai-
kana liikkumaan.
5) Alkuperäisen pakkauksen käyttö on suositelta-
vaa.
Kun laite poistetaan lopullisesti käytösta,
vie se paikalliseen kierrätyskeskukseen jäl-
kikäsittelyä varten.
VAROITUS Tämä laite toimii hengenvaarallisella
230 V~ jännitteellä. Välttääksesi säh-
köiskun, älä avaa laitteen koteloa.
Jätä huoltotoimet valtuutetulle, am-
mattitaitoiselle huoltoliikkeelle.
S
FIN
DK

®
MONACOR INTERNATIONAL GmbH & Co. KG
•
Zum Falsch 36
•
28307 Bremen
•
Germany
Copyright
©
by MONACOR INTERNATIONAL. All rights reserved. A-0663.99.02.02.2012
Table of contents
Other Stageline Turntable manuals