STATESMAN FD12PWE User manual
A
B
C
A
B
C
D
12
12
日 期
处数 分区
标记 更改文件号 签 名
张
第
张
共
佛山市顺德区美的
洗涤电器制造有限公司
数量
阶 段 标 记
量重
比 例 D
REV. 00
1
D
1
1
1:1
排版
审 核
编 制
性能
批 准
80G双胶
日期
校对
审 定
技术要求:
1.该手册印刷颜色均为黑色 :PANTONE BLACK C
2.纸张规格为A5
3.如果供应商的排版需要加空白页,请加在封底之前
用户手册
4. 封面页的 Serial number:后需粘贴序列号,随订单更新
(注意:红色框不用印刷)
6710025469
FD12PW (7617J )
Statesman 英国
02

Please read these instructions carefully before use and retain for future reference.
Before switching on your appliance – Always check for any damage that may have been caused in transit.
Instruction Manual
FD12PWE
60CM 12 PLACE DISHWASHER WHITE
Serial number:
Made in China

2
CONTENTS
Important Safety Instructions ................................................. 3-5
Technical Specication.............................................................. 6
Appliance Overview................................................................... 7
Control Panel..........................................................................8-9
Installation ..........................................................................10-13
Prior to Using Your Dishwasher for the First Time .............13-18
Recommended Loading of Racks...................................... 19-22
Wash Cycle Table .................................................................... 23
Operating Instructions........................................................24-25
Cleaning and Maintenance................................................. 26-29
Mains Plug Fuse Replacement................................................ 29
Troubleshooting..................................................................30-32
Error Codes ............................................................................. 32
Disposal................................................................................... 33

3
IMPORTANT SAFETY INSTRUCTIONS
Read and follow all of the instructions even if you feel you are
familiar with the product, and nd a place to keep this manual
handy for future reference.
If the appliance is sold, given away or moved, make sure the
instruction manual is kept with the machine.
Important: This product is intended for domestic indoor use only.
When using electrical appliances, basic safety precautions should
always be followed:
1. All electrical repairs must be carried out by a qualied
electrician. Inadequate repairs may result in a major source of
danger for the user and invalidate the warranty.
2. Do not operate the appliance with a damaged cord or plug,
after it malfunctions or has been dropped or damaged in any
way.
3. This appliance is equipped with a connecting cable and earthed
plug for connection to 220-240V at 50Hz. Check the voltage
of the appliance matches the household voltage on the rating
label and specication for further details.
4. This appliance must be earthed.
5. This appliance is not intended for use by persons (including
children) with reduced physical, sensory or mental capabilities,
or lack of experience and knowledge.
6. Cleaning and user maintenance shall not be made by children
7. Keep the appliance and its cord out of reach of children.
8. Children shall not play with the appliance.
9. The appliance must be used to wash domestic crockery in
accordance with the instructions in this manual.
10. Always unplug the appliance before attempting to move. When
disconnecting from the electricity supply, pull the plug and not
the cord.

4
11. When installing the appliance to the water supply ensure that
the new supplied hose set is used.
12. Before using the appliance ensure that all packaging materials
are removed.
13. Do not abuse, sit on, or stand on the door or dish rack of the
dishwasher.
14. The door should not be left open as it may create a dangerous
obstacle.
15. Do not open the door of the appliance when it is running unless
necessary; be cautious of hot steam or light spray of water.
16. The maximum number of place settings is shown in the
specication sheet.
17. Use only detergent and rinse additives designed for automatic
dishwashers.
18. Keep detergent and rinse aid out of reach of children.
19. Do not wash plastic items unless they are marked dishwasher
safe.
20. When loading items to be washed:
1) Locate sharp items so that they are not likely to damage the
door seal
2) Knives and other utensils with sharp edges must be placed
either with the points/blades facing downwards in the cutlery
basket or placed horizontally in the upper rack.
21. This appliance is intended to be used in the household and/or
similar applications such as:
- sta kitchen areas in shops, oces and other working
environments
- farm houses
- by clients in hotels, motels and other residential type
environments
- bed and breakfast type environments
22. Keep packaging out of reach of children.
23. To protect against the risk of electrical shock, do not immerse
the unit, cord or plug in water or other liquid.

5
24. Please unplug before cleaning and performing maintenance on
the appliance.
25. Do not operate your dishwasher unless all interior panels are
properly in place.
26. Open the door very carefully if the dishwasher is operating,
there is a risk of water squirting out.
27. Do not place any heavy objects on or stand on the door when it
is open. The appliance could tip forward.
28. The appliance needs to be connected to the main water valve
using new hose sets. Old sets should not be reused.
29. Do not, under any circumstances, cut or remove the earthing
connection from the power cord.
30. Some dishwasher detergents are strongly alkaline. They can be
extremely dangerous if swallowed. Avoid contact with the skin
and eyes and keep children away from the dishwasher when
the door is open.
31. Check that the detergent powder is empty after completion of
the wash cycle.
32. For unmarked plastic items which do not show to be
dishwasher safe, check the manufacturer’s recommendations.
33. Never use soap, laundry detergent, or hand washing detergent
in your dishwasher.
34. If the supply cord is damaged, it must be replaced by the
manufacturer or a qualied technician in order to avoid a
hazard.
35. During installation, the power supply must not be bent or
attened.
36. Do not tamper with the controls.
37. To save energy when in stand by mode, the appliance will
switch o automatically when there is no operation within 30
minutes.

6
TECHNICAL SPECIFICATION
Brand Mark Statesman
Model Number FD12PWE
Rated capacity in standard place settings 12
Energy eciency class (1) A++
Energy consumption per year in kWh (2) 258 kWh
Energy consumption of the standard cleaning cycle in kWh 0.908 kWh
Power consumption of the o-mode in W 0.45
Power consumption of the left-on mode in W 0.49
Water consumption per year in litres (3) 3080
Drying eciency class (4) A
Standard cleaning cycle (5) ECO 45°C
Program duration of the standard cleaning cycle 220 min
Noise level 49dB(A) re 1 pW
Mounting Freestanding
Could be built-in YES
Power consumption 1930W
Rated voltage / frequency 230V/50Hz
Water pressure (ow pressure) 0.04 - 1.0 MPa = 0.4 - 10 bar
NOTES
The information on the label and che relates to the standard cleaning cycle, this programme
is suitable to clean normally soiled tableware and it is the most ecient programme in terms of
combined energy and water consumption. The standard cleaning cycle corresponds to the Eco
cycle.
(1) A+++ (highest eciency) to D (lowest eciency)
(2) Energy consumption based on 280 standard cleaning cycles using cold water ll and the
consumption of the low power modes. Actual energy consumption depends on how the appliance
is used.
(3) Water consumption based on 280 standard cleaning cycles. Actual water consumption depends
on how the appliance is used.
(4) A (highest eciency) to G (lowest eciency)
(5) This program is suitable for cleaning soiled normally soiled tableware and that it is the most
ecient program in terms of its combined energy and water consumption for that type of tableware.

6-1
Product information sheet (EN60436)
Supplier's name or trade mark:
Supplier's address ( ):
Model identifier:
General product parameters:
Parameter Value
b
Parameter Value
Height
Width
Depth
84.5
59.8
61.0
Dimensions in cm
EEI ( )
Cleaning performance index ( )
Energy consumption in kWh
[per cycle], based on the eco
programme using cold
water fill. Actual energy
consumption will depend on
how the appliance is used.
Program duration ( ) (h:min)
Airborne acoustical noise
emissions ( ) (dB(A) re 1 pW)
Off-mode (W)
Delay start (W) (if applicable)
Minimum duration of the guarantee offered by the supplier ( ):
Rated capacity ( ) (ps)
a
a
a
a
a
Energy efficiency class ( )
Drying performance index ( )
Water consumption in litres
[per cycle], based on the eco
program. Actual water con-
sumption will depend on how
the appliance is used and on
the hardness of the water.
Type
Airborne acoustical noise
emission class ( )
Standby mode (W)
Networked standby (W)
(if applicable)
a
a
a
b
Additional information:
Weblink to the suppliers website, where the information in point 6 of Annex II to
Commission Regulation (EU) 2019/2022 ( ) ( ) is found:
( ) for the eco program.
( ) changes to these items shall not be considered relevant for the purposes of paragraph 4 of
Article 4 of Regulation (EU) 2017/1369.
( ) if the product database automatically generates the definitive content of this cell the supplier
shall not enter these data.
a
b
c
1 b
( ) Commission Regulation (EU) 2019/2022 of 1 October 2019 laying down eco design requirements
for household dishwashers pursuant to Directive 2009/125/EC of the European Parliament and of
the Council amending Commission Regulation (EC) No 1275/2008 and repealing Commission
Regulation (EU) No 1016/2010 (see page 267 of this Official Journal).
1
N/A
N/A
1.07
11.0
Free standing
E( )
c
C ( )
c
55.9
1.13
0.923
3:40
49
0.49
1.00
12
Statesman
FD12PWE
7
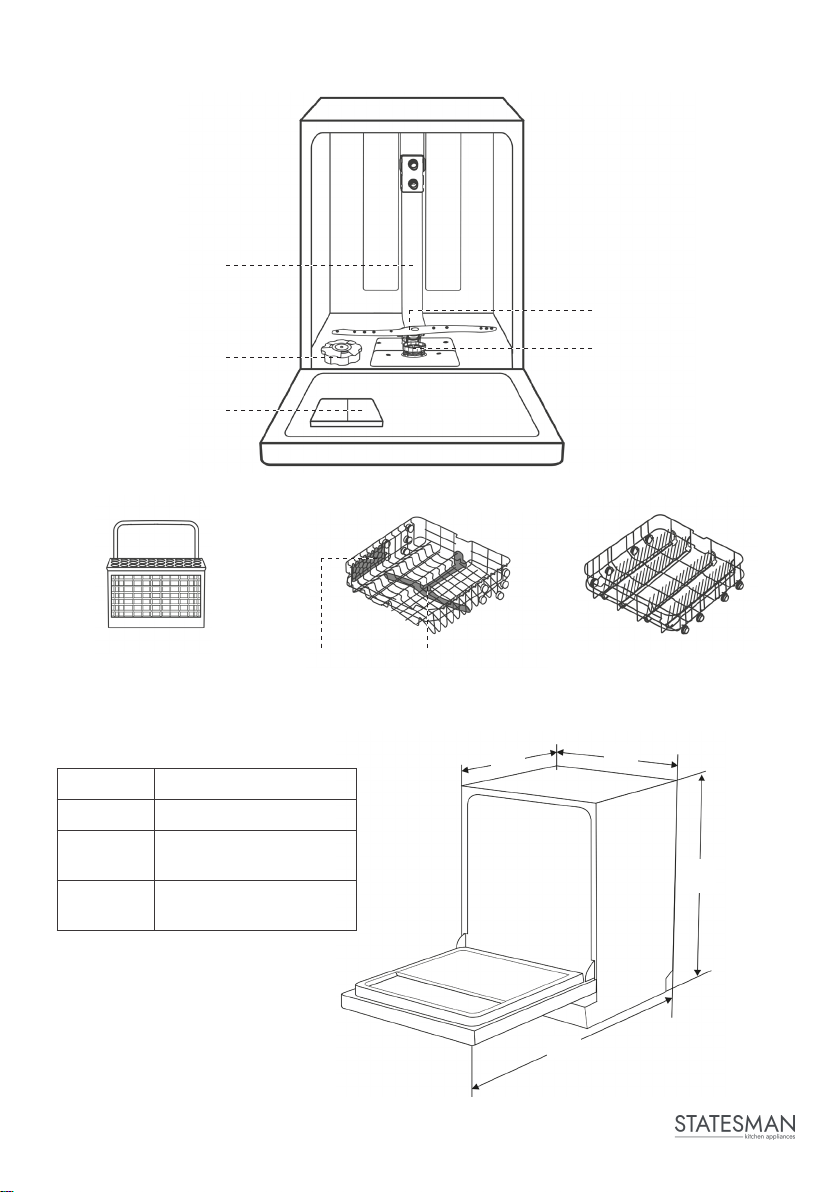
D1 W
D2
H
Inner Pipe
Salt Container
Dispenser
Lower Spray Arm
Filter Assembly
Cup Rack Upper Spray Arm
Upper Basket
APPLIANCE OVERVIEW
TECHNICAL INFORMATION
Cutlery Basket Lower Basket
Height (H) 845 mm
Width (W) 598 mm
Depth (D1) 610 mm
(with the door closed)
Depth (D2) 1175 mm
(with the door opened 90°)
8
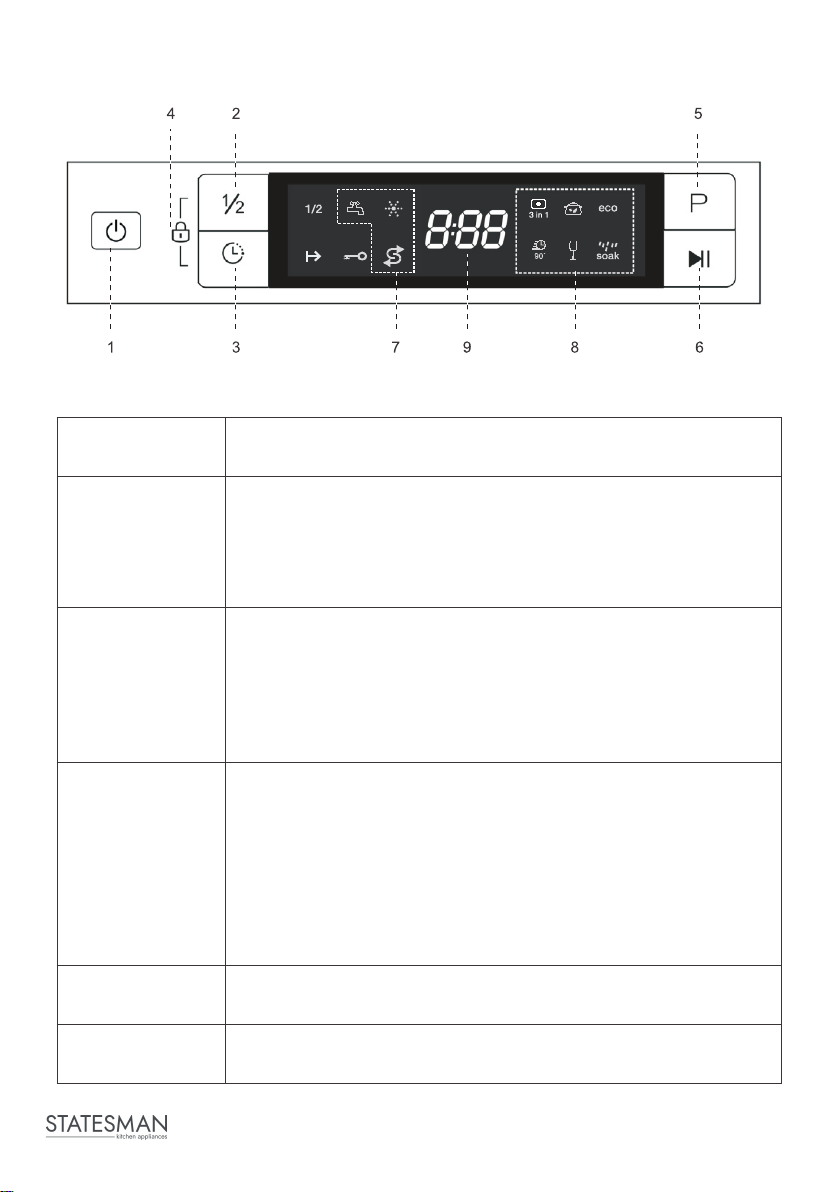
CONTROL PANEL
Operation (Button)
(1) Power Press this button to turn on your dishwasher and the screen
will light up.
(2) Half-Load
When you have 6 or less place setting dish ware to wash,
you can choose this function to save energy and water. (It
can only be used with Intensive, Normal, ECO, Glass or 90
min.) When pressing this button, the corresponding indicator
will be lit.
(3) Delay
Press this button to set how long you would like the
washing to be delayed. You can delay the start of washing
up to 24 hours. One press on this button delays the start of
washing by one hour.
When pressing this button, the corresponding indicator will
be lit.
(4) Child Lock
This option allows you to lock the buttons on the control
panel - except the Power button - so children cannot
accidently start the dishwasher by pressing the buttons
on the panel. To lock or unlock the buttons on the control
panel, press and hold the Delay button + Half load button
for 3 seconds simultaneously.
When pressing this button, corresponding indicator will be
lit.
(5) Program *Select the appropriate washing program and the selected
program indicator will be lit.
(6) Start / Pause To start the selected program or to pause the program
when the dishwasher is running.
9
Display
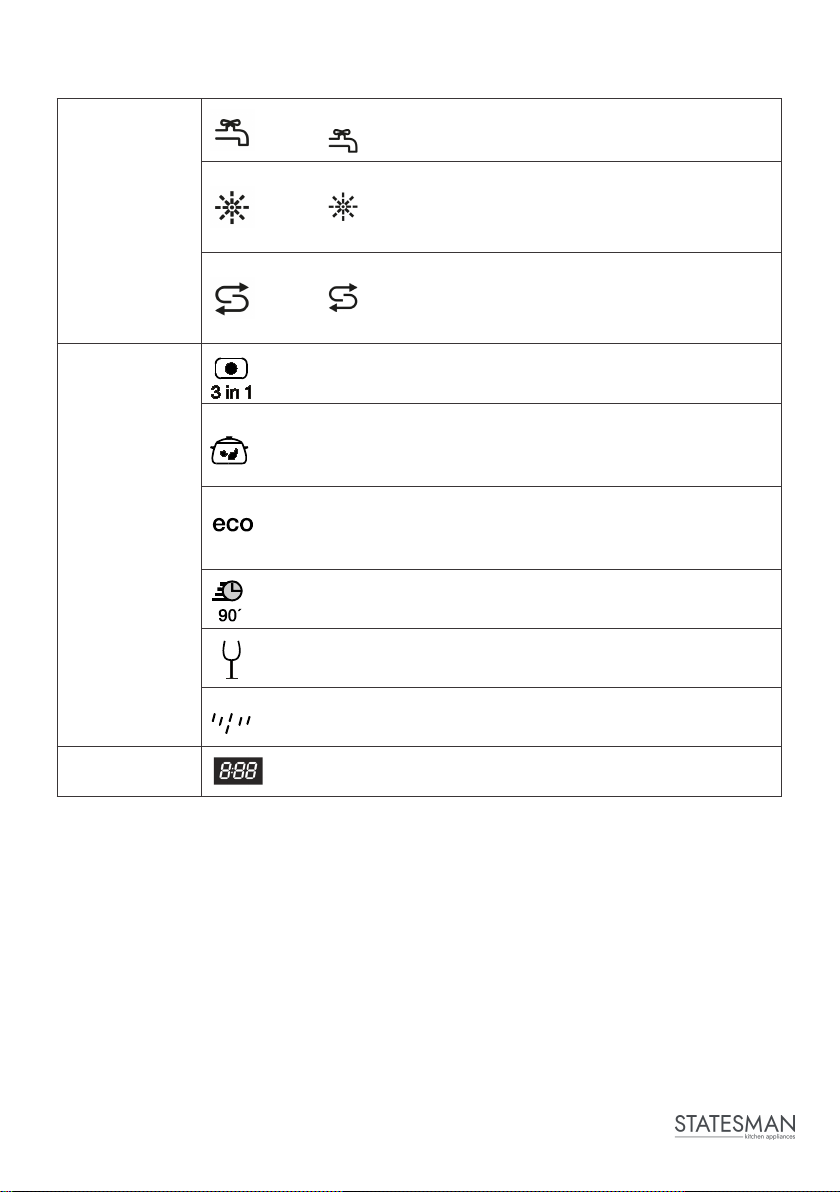
(7) Warning
Indicator
Tap
If the “ ” indicator is lit, it means the tap is closed.
Rinse Aid
If the “ ” indicator is lit, it means the dishwasher is
low on dishwasher rinse aid and requires a rell.
Salt
If the “ ” indicator is lit, it means the dishwasher is
low on dishwasher salt and needs to be relled.
(8) Program
Indicator
All in one
For soiled loads, use multi functional detergent.
Intensive
Heavily soiled items include pots and pans. With dried
on food.
ECO
This is the standard program suitable for soiled loads,
such as pots, plates, glasses and lightly soiled pans.
90 Min
For soiled loads that need a quick wash.
Glass
For lightly soiled crockery and glass.
Soak
To rinse dishes that you plan to wash later that day.
(9) Screen To show the remaining time, delay time, error code etc.
Soak
10
INSTALLATION
The dishwasher meets the requirements set out by the regulations in force
concerning safety and electrical equipment.
Warning: If the appliance must be moved at any time, keep it in an
upright position; if absolutely necessary, it may be tilted onto its back.
Any technical checks should be conducted exclusively by a trained and
authorised technician: Repairs carried out by unauthorised persons will
invalidate the guarantee, as well as posing a potential hazard to the user.
The manufacturer declines all responsibility for damage to persons or
property resulting from failure to observe the precautions, from tampering
with even a single component or from the use of non-original spare parts.
Disconnect electrical power before installing dishwasher. Failure to do so
could result in death or electrical shock.
The installation of the pipes and electrical equipment should only be done
by a qualied technician.
Positioning and Levelling
• Position the dishwasher on a level sturdy oor. If the oor is uneven, the front
feet of the appliance may be adjusted until it reaches a horizontal position. If
the appliance is levelled correctly, it will be more stable and much less likely
to move or cause vibrations and noise while it is operating.
•Place the dishwasher so that its sides or back panel are in contact with the
adjacent cabinets or the wall. This appliance can also be recessed under a
single worktop.
11
Water Supply and Drain
Cold Water Connection
Connect the cold water supply hose to a
threaded 3/4(inch) connector and make
sure that it is fastened tightly in place.
If the water pipes are new or have not
been used for an extended period of
About the Safety Supply Hose
The safety supply hose consists of double walls. The hose’s system guarantees
intervention if the supply hose breaks or if the air space between the supply hose
itself and the outer corrugated hose is full of water.
Ordinary Supply Hose
Safety Supply Hose
Warning: A hose that attaches to a sink spray can burst if it is installed
on the same water line as the dishwasher. If your sink has one, it is
recommended that the hose be disconnected and the hole plugged.
How to Connect the Safety Supply Hose
1. Pull the safety supply hoses completely out from storage compartment
located at rear of dishwasher.
2. Tighten the screws of the safety supply hose to the faucet with thread
3/4inch.
3. Turn on the water fully before starting the dishwasher.
time, let the water run to make sure that the water is clear.
This precaution is needed to avoid the risk of the water
inlet being blocked and damaging the appliance.
How to Disconnect the Safety Supply Hose
1. Turn o the water.
2. Unscrew the safety supply hose from the tap.
12
Connection of Drain Hoses
Insert the drain hose into a drain pipe with a minimum diameter of 4 cm, or let it
run into the sink, making sure to avoid bending or crimping it. The height of drain
pipe must be less than 1000mm. The free end of the hose must not be immersed
in water to avoid back ow.
Back of Dishwasher
Mains Cable
Water Inlet
Drain Pipe
ɸ 40mm
A
B
MAX 1000mm
Drain Hose
Counter
Please securely x the drain hose in either position A or position B
How to Drain Excess Water from Hoses
If the sink is 1000mm higher from the oor, the excess water in the hoses cannot
be drained directly into the sink. It will be necessary to drain excess water from
the hoses into a bowl or suitable container that is held outside and lower than the
sink.
Water Outlet
Connect the water drain hose. The drain hose must be correctly tted to avoid
water leaks. Ensure that the water drain hose is not kinked or squashed.
Extension Hose
If you need a drain hose extension, make sure to use a similar drain hose.
It must be no longer than 4 meters; otherwise the eciency of the dishwasher will
be reduced.
Syphon Connection
The waste connection must be at a height less than 1000mm from the bottom of
the dish. The water drain hose should be xed.
13
WARNING: HAZARDOUS VOLTAGE!
Under no circumstances should the water inlet hose be cut as it contains
live electrical parts.
Electrical Connection
Before inserting the plug into the electrical socket, make sure that:
•The socket is earthed and complies with current regulations;
•The socket can withstand the maximum load of the appliance as shown on
the Rating Label
•The power supply voltage falls within the values indicated on the Rating Label.
•The socket is compatible with the plug of the appliance. If this is not the case,
ask an authorised technician to replace the plug).
•Do not use extension cables or multiple sockets.
•Improper connection of the equipment-earthing conductor can result in the
risk of an electric shock.
•Do not modify the plug provided with the appliance.
Once the appliance has been installed, the power supply cable and the
electrical socket should be easily accessible. The cable should not be bent
or compressed.
PRIOR TO USING YOUR DISHWASHER FOR THE FIRST TIME
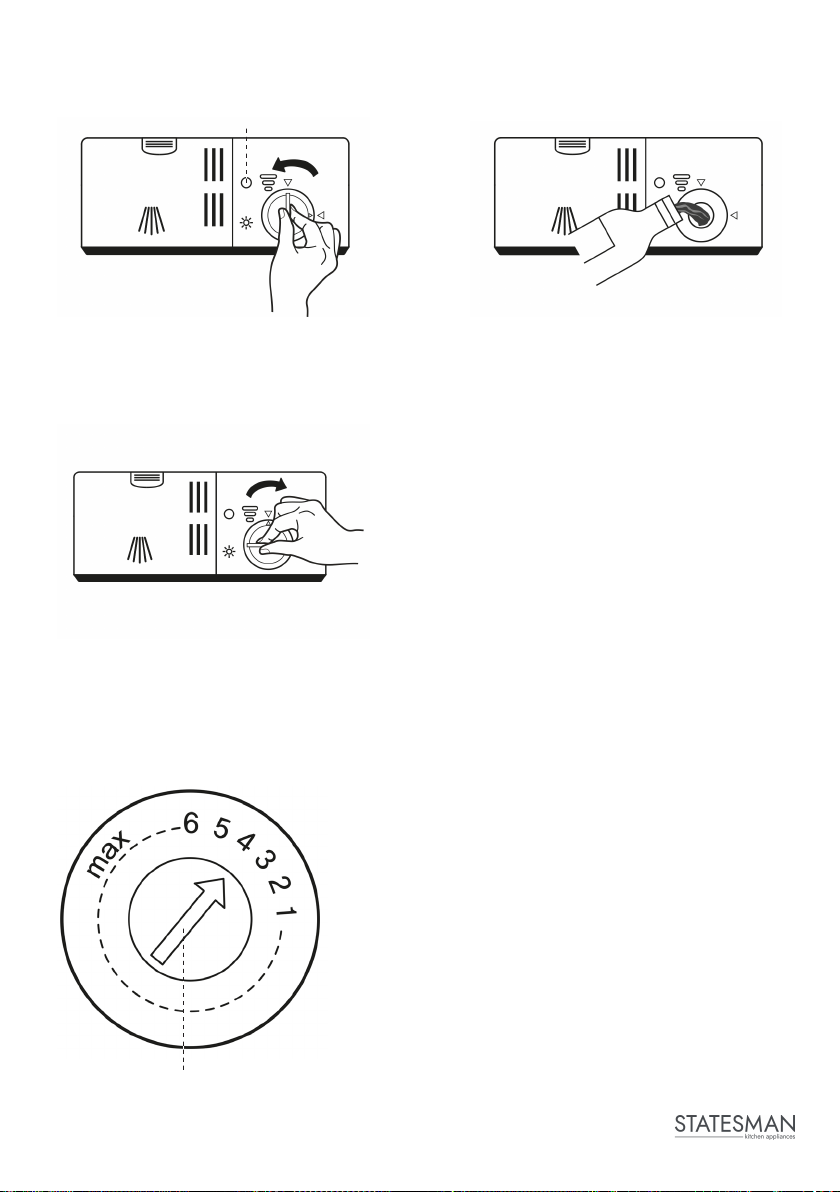
Water Softener
The water softener must be set manually, using the water hardness dial.
The water softener is designed to remove minerals and salts from the water,
which would have a detrimental or adverse eect on the operation of the
appliance.
The more minerals there are, the harder your water is.
The softener should be adjusted according to the hardness of the water in your
area. Your local water authority can advise you on the hardness of the water in
your area.
The hardness of the water varies from place to place. If hard water is used in the
dishwasher, deposits will form on the dishes and utensils.
The appliance is equipped with a special softener that uses a salt container
specically designed to eliminate lime and minerals from the water.

14
Water Hardness Water Softener
Level
Salt Consumption
(gram/cycle)
German
°dH
French
°fH
British
°Clarke Mmol/l
0 - 5 0 - 9 0 - 6 0 - 0.94 H1 0
6 - 11 10 - 20 7 - 14 1.0 - 2.0 H2 9
12 - 17 21 - 30 15 - 21 2.1 - 3.0 H3 12
18 - 22 31 - 40 22 - 28 3.1 - 4.0 H4 20
23 - 34 41 - 60 29 - 42 4.1 - 6.0 H5 30
35 - 55 61 - 98 43 - 69 6.1 - 9.8 H6 60
1°dH=1.25 °Clarke=1.78 °fH=0.178mmol/l The manufactory setting: H3 Contact your local water
board for information on the hardness of your water supply.
Adjusting Salt Usage
The dishwasher is designed to allow for adjustment in the amount of salt used
based on the hardness of the water. This is intended to optimise the amount of
salt used.
Please follow the steps below for adjustment in salt used.
1. Switch on the appliance;
2. Press the Start/Pause button for more than 5 seconds within 60 seconds of
the appliance being switched on to start the water softener mode;
3. Press the Program button to select the correct setting for your local
environment, the sets will change in the following sequence:
H1->H2->H3->H4->H5->H6;
4. Press the Power button to end the set up model.
15
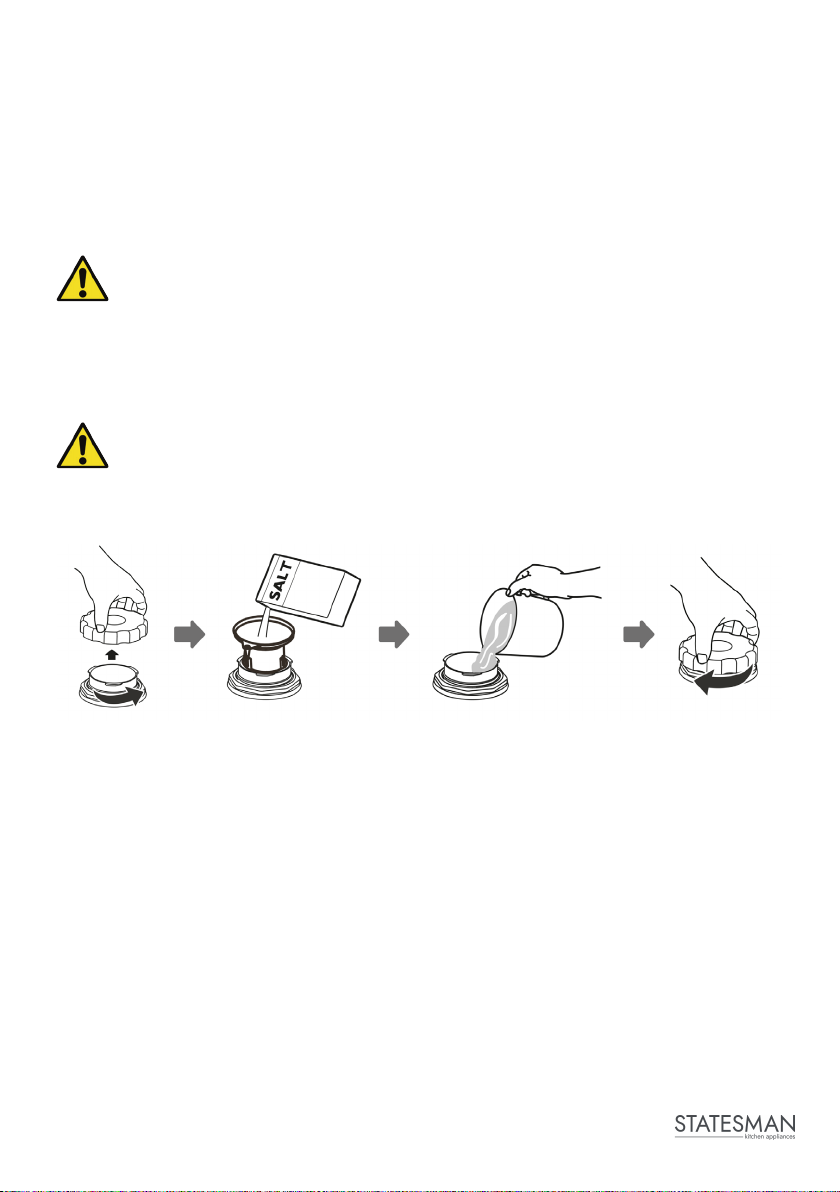
Loading the Salt
Always use salt intended for dishwasher use.
The salt container is located beneath the lower basket and should be lled as
explained in the following:
Warning: Only use salt specically designed for dishwashers use!
Every other type of salt not specically designed for dishwasher use,
especially table salt, will damage the water softener. In the scenario that
damage is caused by the use of unsuitable salt the manufacturer does not
give any warranty and is not liable for any damages caused.
Only ll with salt before running a cycle.
This will prevent any grains of salt or salty water, which may have been
spilt, remaining on the bottom of the machine for any period of time,
which may cause corrosion.
Please follow the steps below for adding dishwasher salt:
1. Remove the lower basket and unscrew the reservoir cap.
2. Place the end of the funnel (supplied) into the hole and pour in about 1.5kg of
dishwasher salt.
3. Fill the salt container to its maximum limit with water. It is normal for a small
amount of water to come out of the salt container.
4. After lling the container, screw the cap back on tightly.
5. The salt warning light will turn o when the salt container has been lled with
salt.
6. Immediately after lling the salt into the salt container, a washing program
should be ran (it is suggested this is a short program). Otherwise the lter
system, pump or other important parts of the machine may be damaged by
the salty water. This will also void the warranty.

16
Note: The salt container must only be relled when the salt warning light ( ) in
the control panel comes on. Depending on how well the salt dissolves, the salt
warning light may still be on even of the salt container has been lled.
If salt has spilled, run a soak or quick program to remove it.
Function of the Rinse Aid
The rinse aid is released during the nal rinse to prevent water from forming
droplets on your dishes, which can leave spots and streaks. It also improves
drying by allowing water to roll o the dishes. Your dishwasher is designed to use
liquid rinse aids.
Warning: Only use branded rinse aid for dishwasher. Never ll the rinse
aid dispenser with any other substances (e.g. dishwasher cleaning agent,
liquid detergent). This will damage the appliance.
When to Rell the Rinse Aid Dispenser
If the rinse-aid warning light ( ) on the control panel is not on, you are able
to estimate the amount left from optical level indicator located next to the cap.
When the rinse-aid container is full, the indicator will be dark. The size of the dark
dot decreases as the rinse-aid diminishes. You should never let the rinse aid level
be less than 1/4 full.
As the rinse aid diminishes, the size of the black dot on the rinse aid level
indicator changes, as illustrated below.
Full 3/4 Full 1/2 Full 1/4 Full Empty
Function of Detergent
The chemical ingredients that compose the detergent are necessary to remove
and dispense all dirt out of the dishwasher.
Warning: Proper Use of Detergent. Only use detergent specically made
for dishwashers. Keep your detergent fresh and dry. Don’t put powdered
detergent into the dispenser until you are ready to wash dishes.
Keep dishwasher detergent out of the reach of children.
17
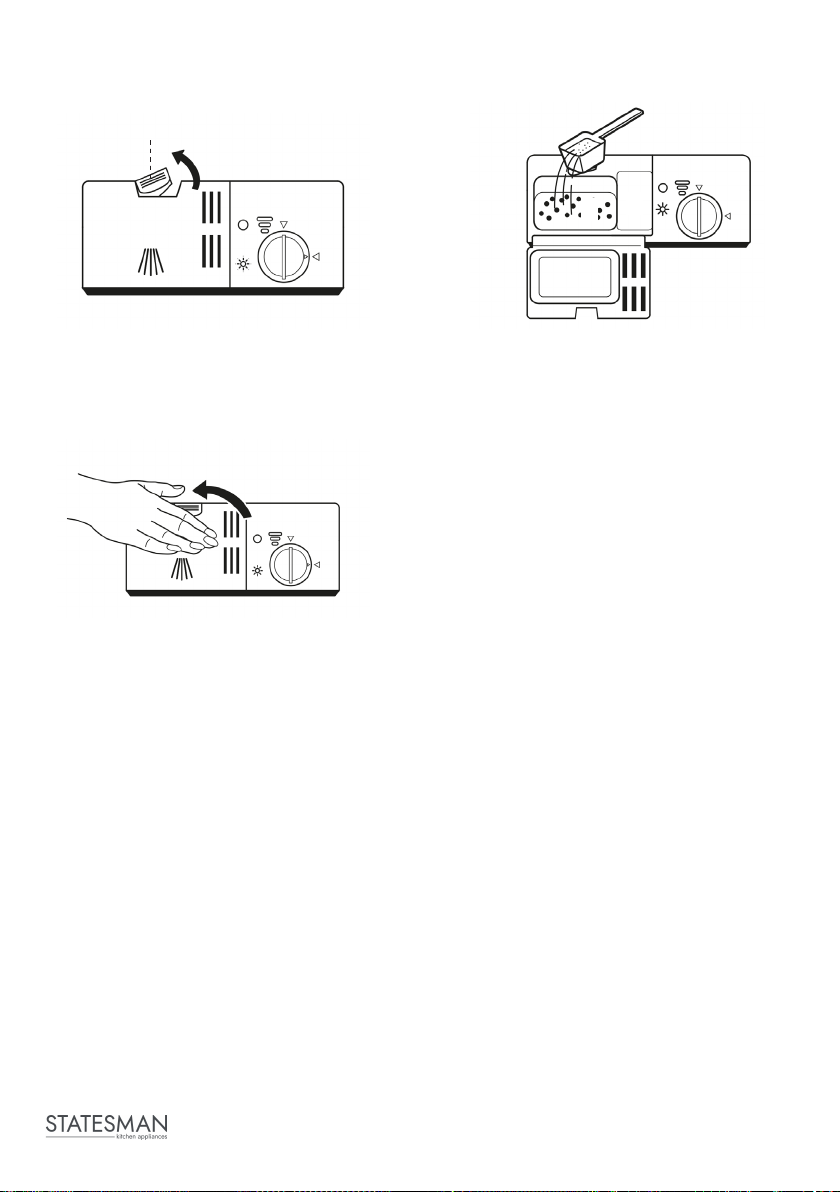
Filling the Rinse Aid Reservoir
1)
To open the dispenser, turn the
cap to the “open” (left) arrow and
lift it out.
Rinse Aid Indicator 2)
Carefully pour in the rinse-aid into
its dispenser, whilst avoiding it to
overow.
2)
Replace the cap by inserting it so that it
is aligned with “open” arrow and turning
it to the closed (right) arrow.
Note: Clean up any spilled rinse
aid with an absorbent cloth to
avoid excessive foaming during
the next wash.
Adjusting the Rinse Aid Reservoir
The rinse aid reservoir has six settings. Both
the recommended setting and the factory
setting is “4”. If the dishes are not drying
properly or are spotted, adjust the dial to the
next number up until your dishes are spot-free.
Reduce it if there are sticky white stains on
your dishes or a bluish lm on glassware or
knife blades.
Adjust Lever (Rinse)
18
Filling the Rinse Aid Reservoir
1)
Press the release catch on the
detergent dispenser to open the
cover.
Push Latch to Open 2)
Add detergent into the larger
cavity (A) for the main wash cycle .
For more heavily soiled wash
loads, also add some detergent
into the smaller cavity (B) for the
pre-wash cycle .
AB
3)
Close the cover and press down
until it locks into place.
Note: Please note the detergent manufacturer’s recommendations for the
amount to use. This may dier depending on which brand you use.
Table of contents
Other STATESMAN Dishwasher manuals


