STATESMAN BIW0714 User manual

Please read these instructions carefully before use and retain for future reference.
Before switching on your appliance – Always check for any damage that may have been caused in transit.
Instruction Manual
BIW0714 BUILT-IN 7KG 1400RPM WASHING MACHINE
Serial number:

2
CONTENTS
Important Safety Instructions ................... 3
- General Safety ......................................... 3
- Intended Use............................................ 4
- Children’s Safety ...................................... 4
Technical Specication.............................. 5
Appliance Overview.................................... 6
Installation................................................... 7
- Removing Transportation Bolts................ 7
- Appropriate Installation Location............. 7
- Connecting Water Supply .....................7-8
- Connecting to the Drain........................... 8
- Adjusting the Feet.................................... 8
- Electrical Connection ............................... 9
Transportation of the Appliance ................. 10
Built-In Installation ..............................10-13
Preparation ............................................... 14
Laundry Wash Symbols.............................. 14
Preparing Laundy for Washing ................... 15
Energy Saving Tips..................................... 15
Initial Use.................................................... 15
Correct Load Capacity ............................... 16
Loading the Laundry .................................. 16
Using Detergent and Softener.................... 16
Tips for Ecient Washing........................... 17
Operating Instructions ............................. 18
Control Panel.............................................. 18
Preparing the Appliance............................. 18
Program Selection...................................... 18
Main Programs ......................................19-20
Additional Functions................................... 20
Time Display............................................... 20
Delay........................................................... 20
Temperature Selection................................ 20
Spin Speed Selection................................. 21
Loading Door Lock..................................... 21
Changing the Speed/Temperature Settings
of a Program............................................... 21
Adding or Removing Laundry..................... 21
Child Lock .................................................. 21
Cancelling the Program.............................. 22
End Sound Signal....................................... 22
Excess Foam Removal............................... 22
Load Balancing System ............................. 22
Program and Consumption Table ........... 23
Cleaning and Maintenance...................... 24
Cleaning Detergent Drawer ........................ 24
Cleaning Loading Door and Drum.............. 24
Cleaning Body & Control Panel.................. 24
Cleaning Water Intake Filter ..................24-25
Draining Remaining Water and Cleaning
Pump Filter ................................................. 25
Troubleshooting...................................26-27
Error Display Codes ................................. 28
Disposal Information................................ 28

3
IMPORTANT SAFETY INSTRUCTIONS
Read and follow all of the instructions even if you feel you are familiar with the product, and nd a
place to keep this manual handy for future reference.
General Safety
When using electrical appliances, basic safety precautions should always be followed:
• Always have the installation and repairs carried out by a qualied electrician. Incorrect
installation or inadequate repairs may result in a major source of danger for the user and
invalidate the warranty.
• Do not operate the appliance with a damaged cord or plug, after it malfunctions or has been
dropped or damaged in any way.
• Check the voltage of the appliance matches the household voltage, which is located on the
rating label.
• Place the appliance on a rigid, at and level surface.
• Never place the appliance on a carpet-covered oor. Otherwise, lack of airow beneath the
machine will cause electrical parts to overheat. This will cause problems with your appliance.
• The water supply and draining hoses must be securely fastened and remain undamaged.
Otherwise, there is the risk of water leakage. Only install the appliance with the hose provided.
• This appliance is not intended for use by persons (including children) with reduced physical,
sensory or mental capabilities, or lack of experience and knowledge.
• Cleaning and user maintenance shall not be made by children
• Keep the appliance and its cord out of reach of children.
• Children shall not play with the appliance.
• Before using the appliance ensure that all packaging materials and transit bolts are removed,
keep the transit bolts in a safe place in case you move in the future.
• Never open the loading door or remove the lter while there is still water in the drum. Otherwise,
risk of ooding and injury from hot water will occur.
• Do not force open the locked loading door. The loading door will be ready to open approximately
two minutes after the washing cycle comes to an end. In case of forcing the loading door to
open, the door and the lock mechanism may get damaged.
• Unplug the appliance when not in use.
• Never touch the plug with wet hands! Never unplug by pulling on the cable, always pull out by
gripping the plug.
• Do not lean or put any weight on the open door of the appliance.
• Before each use ensure that all foreign objects are removed from the clothing being washed
as these may damage the appliance and garments.
• Use detergents, softeners and supplements suitable for automatic washing machines only.
• Follow the instructions on the garment tags and on the detergent packaging.
• The appliance must be unplugged during installation, maintenance, cleaning and repairing
procedures.
• Use of an extension cord is not recommended with this appliance.
• Do not install the appliance in bath rooms, wet rooms or similar rooms.
• Do not store explosive substances such as aerosol cans with a ammable propellant near
the appliance.

4
Intended Use
• This appliance has been designed for domestic use. It is not suitable for commercial use and it
must not be used out of its intended use
• The appliance must only be used for washing and rinsing of laundry that are marked accordingly.
Children’s Safety
• Packaging materials are dangerous to children. Keep packaging materials in a safe place away
from reach of children.
• The door may become extremely hot during operation; ensure that children and animals are
kept away from the appliance.
• Keep detergents out of reach of children.
• Before each use, check that the drum of the appliance is empty.
• Do not let children tamper with the appliance. Use child lock to prevent children from intervening
with the appliance.
WARNING: The appliance is heavy and care is needed when unpacking and moving it.
Get extra help and only hold the appliance by the casing – never hold by the door or detergent
drawer.
5
TECHNICAL SPECIFICATION
Trade Mark Statesman
Model Number BIW0714
Rated Capacity (kg) 7kg
Category Type Front Loading
Programs to which the information relates to [3] Cotton 60°C and 40°C
Energy Eciency Class / Scale from A+++(Highest
Eciency) to D (Lowest Eciency) A+++
Annual Energy Consumption (kWh/yr) [1] 174
Energy Consumption of the Standard 60°C
Cotton Program at Full Load (kWh) 0.82
Energy Consumption of the Standard 60°C
Cotton Program at Partial Load (kWh) 0.82
Energy Consumption of Standard 40°C
Cotton Program at Partial Load (kWh) 0.62
Weighted power “o-mode” (W) 0.5
Weighted Power “left-on mode” (W) 1
Annual Water Consumption (L/yr) [2] 1000
Spin Eciency Class
Scale from A (most ecient) to G (least ecient) B
Maximum Spin Speed (rpm) 1400
Remaining Moisture Content (%) dependent on program selected 50% – 55%
Duration of the standard program
Cotton 60°C full load (7kg) 229min
Cotton 60°C partial load (3.5kg) 209min
Cotton 40°C partial load (3.5kg) 166min
Other
Water Supply cold
Water Supply Pressure Minimum (MPa) 0.05 MPa
Maximum (MPa) 1 MPa
Noise Emission (dB) Wash (dB) 57
Spin (dB) 76
Dimensions (h*w*d) (mm) 825*595*540
Net Weight (kg) 63
Gross Weight (kg) 66
Package Weight (kg) 3
Rated Power (W) 2000W
Voltage (V) 220~240
Frequency (Hz) 50
Built-In Yes
[1] Energy Consumption based on 220 standard washing cycles for cotton programs at 60°C and 40°C at full and partial load, and the consumption of the
low-power modes. Actual energy consumption will depend on how the appliance is used.
[2] Water consumption based on 220 standard washing cycles for cotton programs at 60°C and 40°C at full and partial load. Actual water consumption will
depend on how the appliance is used.
[3] “Standard 60°C cotton programs” and the “standard 40°C cotton programs” are the standard washing programs to which the information in the label and
the che relates and these programs are suitable to clean normally soiled cotton laundry and that they are the most ecient programs in terms of combined
energy and water consumption.
IMPORTANT NOTE: Technical specications may be changed without prior notice to improve the quality of the product.

6
APPLIANCE OVERVIEW
Detergent Drawer Control Panel
Door
Power Plug
Outlet Hose
Detergent Drawer
Accessories
Transport
Hole Plug
Inlet Pipe Outlet Hose
Support
Filter
Built-in Kit Included
1. Self-tapping screws (ST4*12)
2. Self-tapping screws (M5*12)
3. Hinges
4. Counter magnet
5. Spacer
6. Positioning template
1. 2.
3. 4.
5. 6.

7
Refer to the nearest Authorised Service Agent for installation of the product. To make the product
ready for use, review the information in this user manual and make sure that the electricity, tap water
supply and water drainage systems are appropriate before calling the Authorised Service Agent. If
they are not, call a qualied technician and plumber to have any necessary arrangements carried
out.
Note: Make sure that the water inlet and discharge hoses, as well as the power cable are not folded,
pinched or crushed while pushing the product into its place after installation or cleaning procedures.
INSTALLATION
WARNING: Manufacturer shall not be held liable for damages that may arise from procedures
carried out by unauthorised persons.
WARNING: Prior to installation, visually check if the product has any defects on it. If so, do not
have it installed. Damaged products cause risks for your safety.
WARNING: Packaging materials are dangerous to children. Keep packaging materials in a safe
place away from reach of the children.
Removing transportation bolts
Before using this washing machine, the transportation bolts must be removed from the back of
the machine.
• Loosen all bolts with a suitable spanner until they
rotate freely.
• Remove transportation safety bolts by turning
them gently.
• Attach the plastic hole plugs supplied into the
holes on the rear panel
• Keep the transportation safety bolts in a safe place
to reuse when the washing machine needs to be
moved again in the future.
Note: Never move the product without the transportation safety bolts properly xed in place!
Appropriate installation location
Place the machine on a rigid oor. Do not place it on a long pile rug or similar surfaces.
Place the product on a solid and at oor that has sucient load carrying capacity!
Do not place the product on the power cable.
Do not install the product in places where temperature may fall below 0°C.
Connecting water supply
The water supply pressure required to run the product is between 0.5 to 10 bars (0.05 – 1 MPa). It is
necessary to have 10 – 80 litres of water owing from the fully open tap in one minute to have your
machine run smoothly. Attach a pressure reducing valve if water pressure is higher.
WARNING: This washing machine has a single water inlet for cold water only. It should not be
connected to the hot water tap. In such a case the laundry will get damaged or the product will
switch to protection mode and will not operate.
WARNING: Do not use old or used water inlet hoses on the new product. It may cause stains
on your laundry.
• Connect the inlet hose supplied to the cold water
inlet on the back of the appliance
• Tighten all hose nuts by hand. Never use a tool when
tightening the nuts.

8
• Open the taps completely after making the hose connection
to check for water leaks at the connection points. If any
leaks occur, turn o the tap and remove the nut. Retighten
the nut carefully after checking the seal. To prevent water
leakages and damages caused by them, keep the taps
closed when the machine is not in use.
Connecting to the drain
• Drain hose shall be attached to a stand pipe or sink waste, do not connect to surface
water drains.
• The hose should be attached to a height of at least 60 cm, and 100cm at most.
• To prevent owing of dirty water back into the machine and to allow for easy discharge, do not
immerse the hose end into the dirty water or do not drive it in the drain more than 15 cm. If it is
too long, cut it short.
WARNING: Your house will be ooded if the hose comes out of its housing during water
discharge. Moreover, there is risk of scalding due to high washing temperatures! To prevent
such situations and to ensure smooth water intake and discharge of the machine, x the end of the
discharge hose tightly so that it cannot come out.
Adjusting the feet
In order to ensure that the product operates more silently and vibration free, it must stand level and
balanced on its feet. Balance the machine by adjusting the feet. Otherwise, the product may move
from its place and cause crushing and vibration problems.
• Loosen the lock nuts on the feet by hand or
by using a suitable spanner
• Adjust the feet until the product stands level
and balanced.
• Tighten all lock nuts again by using a suitable
spanner.
100cm
60cm

9
Electrical connection
Connect the product to a grounded outlet protected by a 13A fuse. The manufacturer shall not be
liable for any damages that will arise when the product is used without grounding in accordance with
the local regulations.
• Connection must comply with national regulations.
• Power cable plug must be within easy reach after installation.
• If the current value of the fuse or breaker in the house is less than 13 Amps, have a qualied
electrician install a 13 Amp fuse.
• The voltage specied in the “Technical Specication” section must be equal to your
mains voltage.
• Do not make connections via extension cables
WARNING: Damaged power cables must be replaced by the Authorised Service Agents.
Electrical requirements
Before you insert the plug into the wall socket make sure that the voltage and the frequency shown
in the rating label corresponds to your electricity supply. We recommend that this appliance be
connected to the mains supply via a suitable switched and fused socket in a readily accessible
position.
Should the mains lead of the appliance become damaged or need replacing at any time, it must be
replaced by a special purpose made mains lead which can only be obtained from an Authorised
Service Agent.
WARNING: This appliance must be earthed
If the tted moulded plug is not suitable for your socket, then the plug should be cut o and an
appropriate plug tted.
Destroy the old plug, which is cut o as a plug with a bared cord could cause a shock hazard if
inserted into a socket elsewhere in the house.
The moulded plug on this appliance incorporates a 13A fuse. Should the fuse need to be replaced
an ASTA approved BS1362 fuse of the same rating must be used. Do not forget to ret the fuse
cover.
In the event of losing the fuse cover, the plug must not be used until a replacement fuse cover has
been tted. Colour of the replacement fuse cover must be the same colour as that visible on the pin
face of the plug. Fuse covers are available from any good electrical store.
IMPORTANT
Fitting a dierent plug
As the colours of the wires in the mains lead of this appliance may
not correspond with the coloured markings identifying the terminals
on your plug, proceed as follows:
1. Connect the green - yellow or green (earth) wire to the terminal
in the plug marked ‘E’ or with the symbol f or coloured green
and yellow or green.
2. Connect the blue (neutral) wire to the terminal in the plug marked
‘N’ or coloured black.
3. Connect the brown (live) wire to the terminal in the plug marked
‘L’ or coloured red.
With the alternative plugs a 13A fuse must be tted either in the plug
or adaptor or in the main fuse box. If in doubt contact a qualied
electrician.
10
Transportation of the Appliance
• Unplug the product before transporting it.
• Remove water drain and water supply connections.
• Drain all water that has remained in the product. See “Cleaning and Maintenance” section.
• Install transportation safety bolts in the reverse order of removal procedure. See “Removing the
transportation bolts” section.
Note: Never move the product without the transportation safety bolts properly xed in place!
BUILT-IN INSTALLATION
Before installing the washing machine, please read these Built-In Instructions carefully and keep it
for future reference.
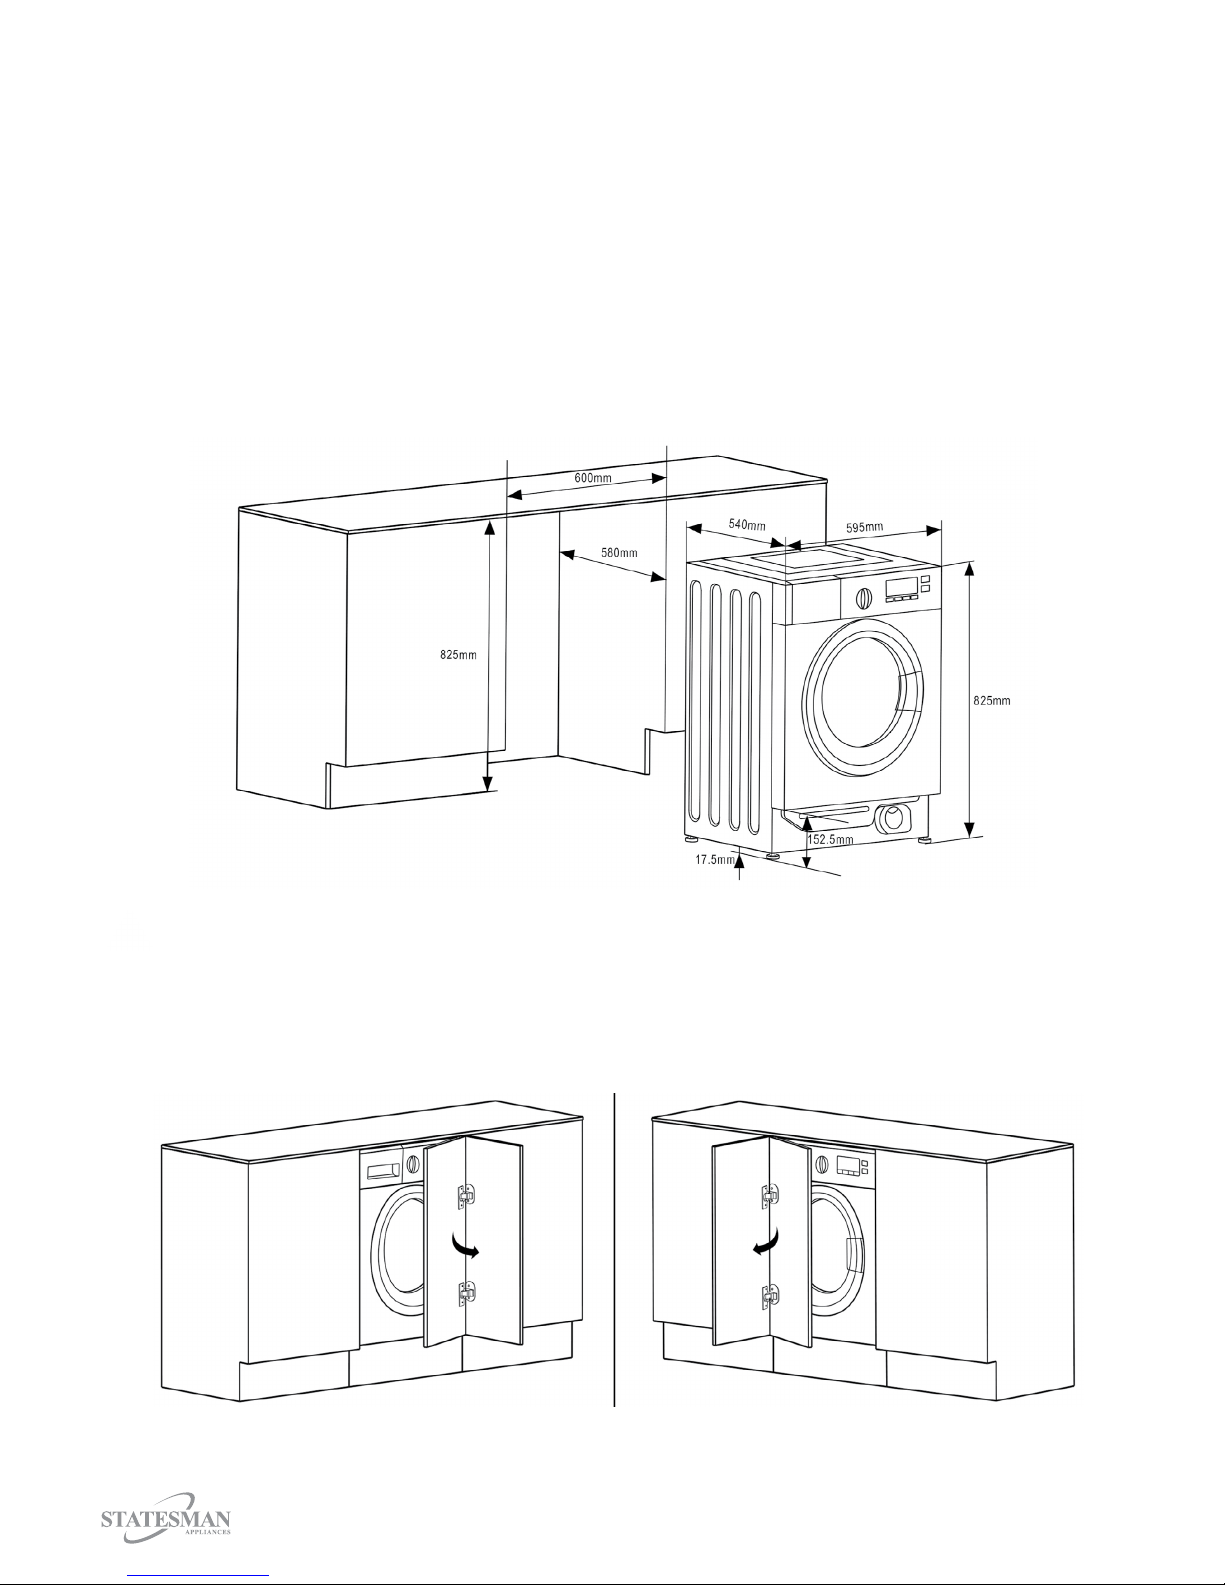
This appliance has been designed to be built into the kitchen furniture. Please refer to the diagram
below which shows the relevant recess dimensions:
WARNING: When installing the appliance into the kitchen furniture, if possible, ensure that the
hoses are placed in either of the two recesses on the back of the appliance. This will help to
prevent the hoses from becoming kinked or trapped.
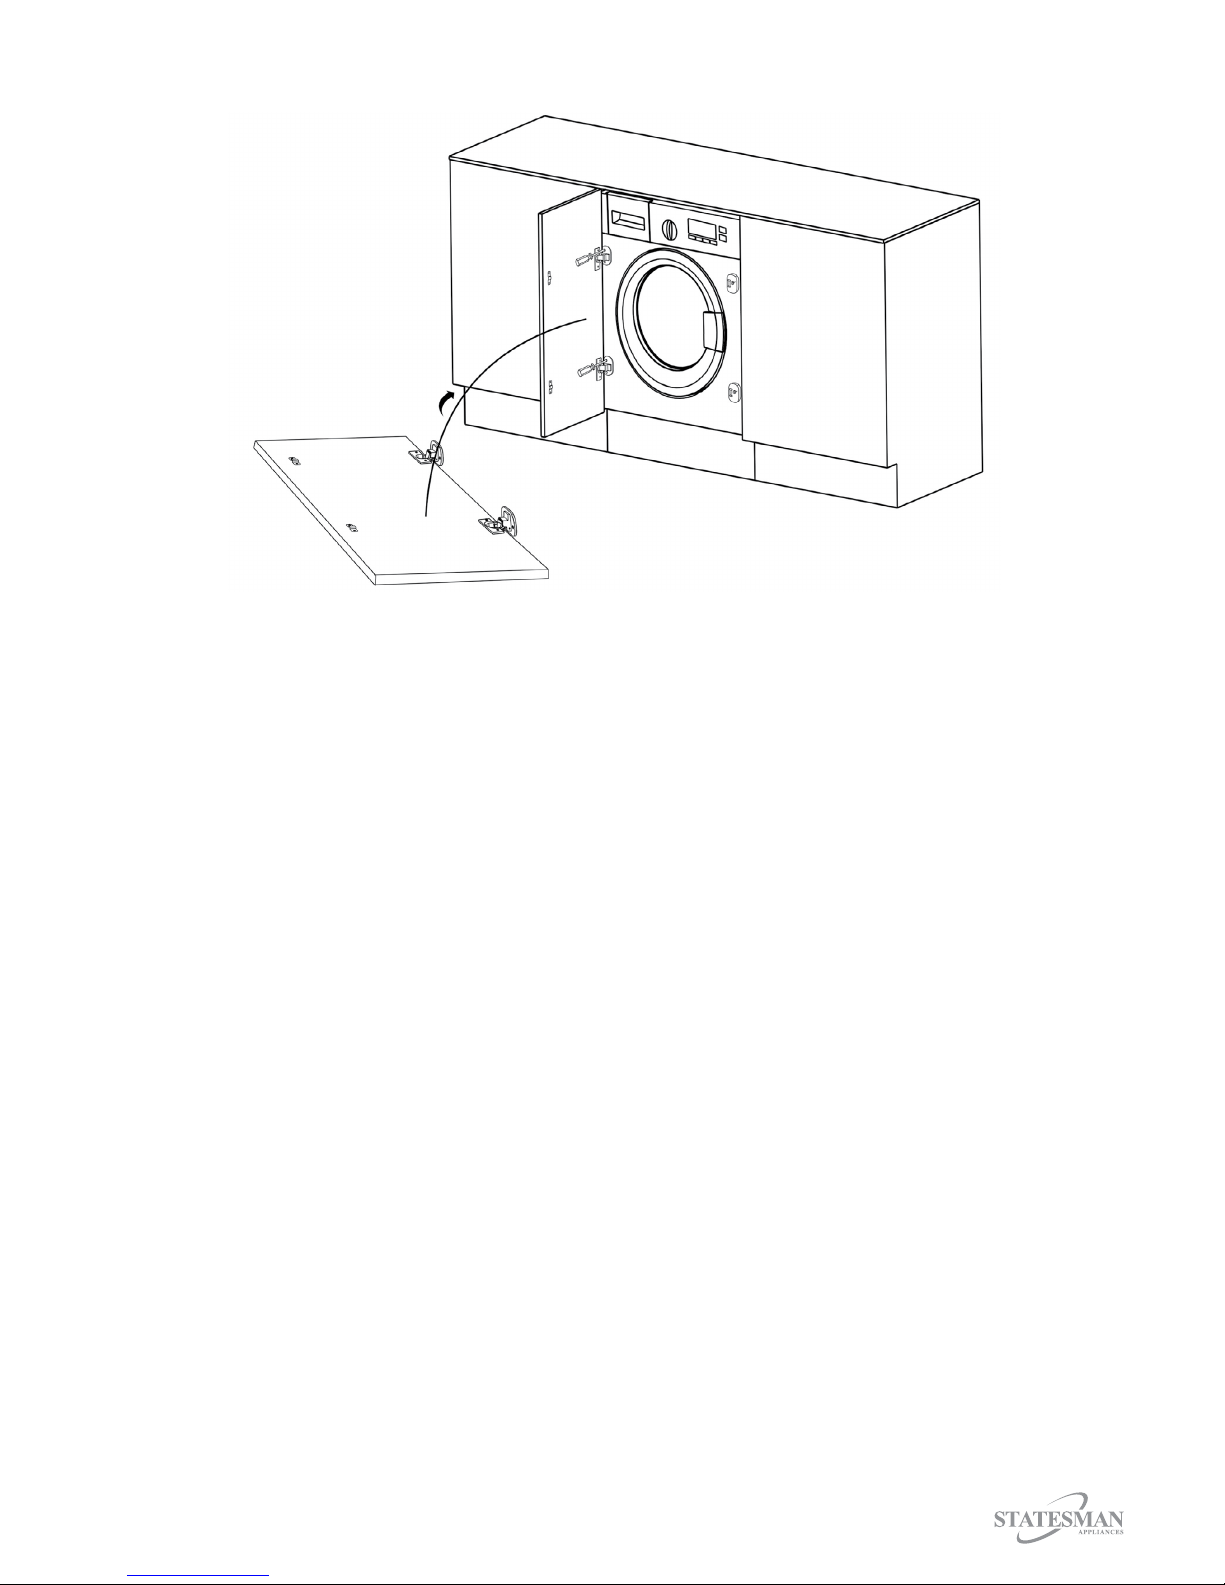
Preparation and assembly of the door
The cabinet door can be tted to open from right to left or left to right.
Door opening from left to right Door opening from right to left
11
Positioning Template
Built-in Kit Included
1. Self-tapping screws (ST4*12)
2. Self-tapping screws (M5*12)
3. Hinges
4. Counter magnet
5. Spacer
6. Positioning template
1. 2.
3. 4.
5. 6.
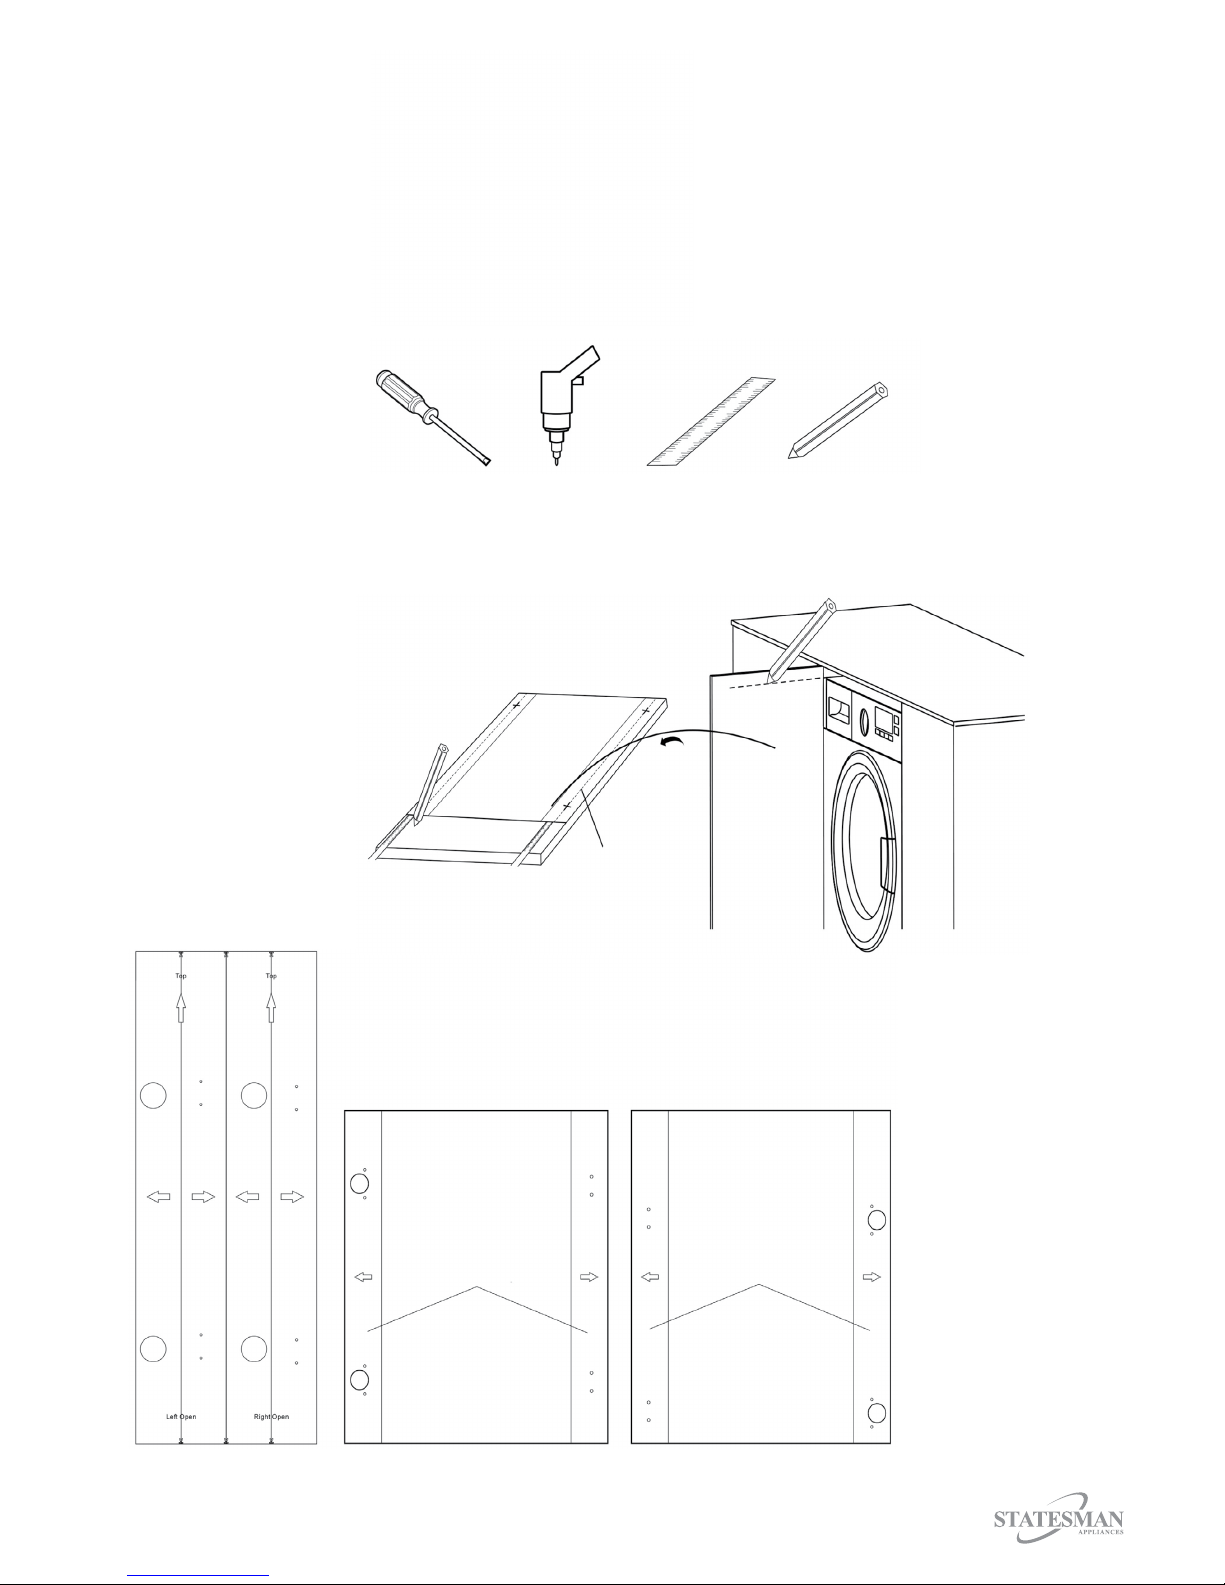
Tools required for installation
1. 2. 3. 4.
1. Screw Driver
2. Power Drill
3. Ruler
4. Pencil
Positioning Template
• Make the mark on the door according to the cupboard and washing machine height.
Positioning
Template
• Secure the positioning template onto the door.
The door on the right The door on the left
Positioning Template Positioning Template
12
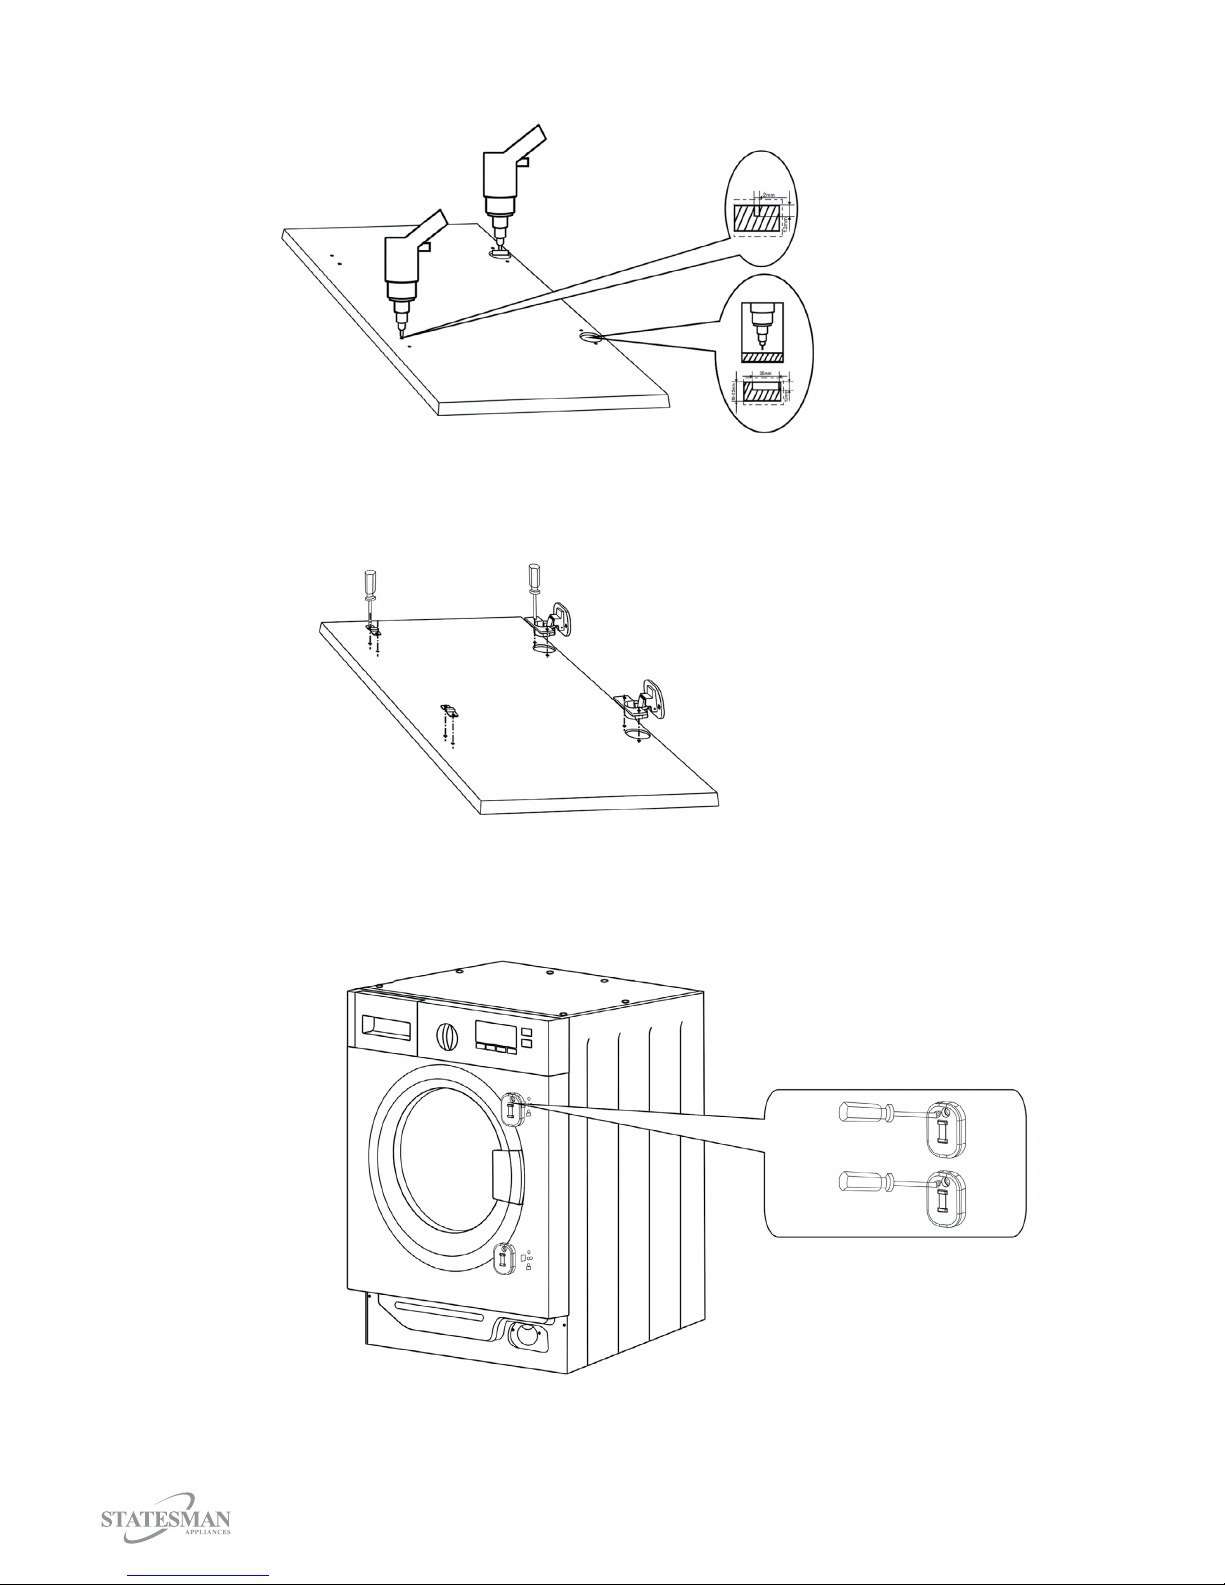
Drilling holes in cabinet door
• Drill holes in the cabinet door according to the xed positioning template.
Installation of the hinges and spacers
• Fix the hinges to the door by means of the ST4*12 screws. The hinges can be adjusted
to compensate for possible uneven thickness of the door.
Installation the counter magnet
This appliance has been designed to be tted with a magnetic cabinet door closure.
• Screw the counter-magnet into the front of the washing machine, as shown in diagram
13
Installation of the cabinet door

14
PREPARATION
You should always sort laundry according to type of fabric, colour, and degree of soiling and
allowable water temperature.
Always obey the instructions given on the garment tags.
Laundry Wash Symbols

15
Preparing laundry for washing
• Laundry items with metal attachments such as underwired bras, belt buckles or metal buttons
will damage the machine. Remove the metal pieces or wash the clothes by putting them in a
laundry bag or pillow case.
• Take out all substances in the pockets such as coins, pens and paper clips, and turn pockets
inside out and brush. Such objects may damage the product or cause noise problem.
• Put small size clothes such as infant’s socks and nylon stockings in a laundry bag or pillow case.
• Place curtains in without compressing them. Remove curtain attachment items.
• Fasten zippers, sew loose buttons and mend rips and tears.
• Wash “machine washable” or “hand washable” labelled products only with an appropriate
program.
• Do not wash colours and whites together. New, dark coloured cottons release a lot of dye.
Wash them separately.
• Tough stains must be treated properly before washing. If unsure, check with a dry cleaner.
• Use only dyes/colour changers and limescale removers suitable for machine wash. Always follow
the instructions on the packaging.
• Wash trousers and delicate laundry turned inside out.
• When washing a single large/heavy item, such as wadded jacket or jeans; it may cause
imbalance within the drum. It is suggested to add one or two more items of clothing to the load,
so that the spinning cycle will operate smoothly.
Energy saving tips
The following information will help you use the product in an ecological and energy-ecient manner.
• Operate the product in the highest capacity allowed by the programme you have selected, but do
not overload; see, “Program and Consumption Table”.
• Always follow the instructions on the detergent packaging.
• Wash slightly soiled laundry at low temperatures.
• Use faster programmes for small quantities of lightly soiled laundry.
• Do not use Pre Wash and high temperatures for laundry that is not heavily soiled or stained.
• If you plan to dry your laundry in a dryer, select the highest spin speed recommended during
washing process.
• Do not use detergent in excess of the amount recommended on the detergent package.
Initial Use
Before starting to use the appliance, make sure that all preparations are made in accordance with
the instructions in sections “Important Safety Instructions” and “Installation”. To prepare the product
for washing laundry, perform the following initial use sequence:
• Place detergent in compartment II of drawer
• Select 60°C Cotton Wash
• Press On/O button
• Press Start/Pause button
• Allow program to complete
• The appliance is now ready for rst wash load.
Note: Some water might have remained in the appliance due to the quality control processes during
production. It is not harmful for the product.

16
Correct Load Capacity
The maximum load capacity depends on the type of laundry, the degree of soiling and the washing
program desired.
The machine automatically adjusts the amount of water according to the weight of the loaded
laundry.
WARNING: Follow the information in the “Program and Consumption Table”. When
overloaded, the machine’s washing performance will drop. Moreover, noise and vibration
problems may occur.
Loading the laundry
• Open the loading door.
• Place laundry items loosely into the machine.
• Push the loading door to close until you hear a locking sound. Ensure that no items are caught
in the door.
Note: The loading door is locked while a program is running. The door can only be opened
approximately 2 minutes after the program comes to an end.
Using detergent and softener
Note: When using detergent, softener, starch, fabric dye, bleach or limescale remover, read the
manufacturer’s instructions on the package carefully and follow the suggested dosage values. Use a
measuring cup if available.
The detergent drawer of your washing machine consists of three
dierent compartments
I: Pre-detergent or washing powder
II: Main detergent (washing powder or liquid)
: Fabric softener
Each of these laundry additives are dispensed automatically at the
relevant time during the washing Program.
Do not close the drawer too fast after putting in the laundry additives
as this may cause the additives be dispensed early, creating
unsatisfactory washing results and fabric damage.
• Pull out the drawer.
• Add pre-detergent or washing powder into compartment I
(when necessary).
• Add the detergent into compartment II (either power or
liquid detergent).
• If using powder, swing liquid gate out of way and lock to side of
compartment to allow powder to dispense clearly.
• Add fabric softener into compartment (when necessary).

17
Tips for ecient washing
Clothes
Soiling Level
Light colours and
whites
Colours Dark colours Delicates/Woolens/
Silks
(Recommended
temperature range
based on soiling level:
40-90ºC)
(Recommended
temperature range
based on soiling level:
cold-40ºC)
(Recommended
temperature range
based on soiling
level: cold-40ºC)
(Recommended
temperature range
based on soiling
level: cold-30ºC)
Heavily Soiled
(dicult stains
such as grass,
coee, fruits and
blood.)
It may be necessary
to pre-treat the
stains or perform
prewash. Powder
and liquid detergents
recommended
for whites can be used
at dosages
recommended for
heavily soiled clothes.
It is recommended to
use powder detergents
to clean clay and soil
stains and the stains
that are sensitive to
bleaches.
Powder and
liquid detergents
recommended for
colours can be used at
dosages recommended
for heavily soiled
clothes.
It is recommended to
use powder detergents
to clean clay and soil
stains and the stains
that are sensitive to
bleaches.
Use detergents
without bleach.
Liquid detergents
suitable for colours
and dark colours can
be used at dosages
recommended for
heavily soiled clothes.
Prefer liquid
detergents produced
for delicate clothes.
Woolen and silk
clothes must be
washed with special
woolen detergents.
Normally Soiled
(For example,
stains caused by
body on collars
and cus)
Powder and
liquid detergents
recommended for
whites can be used at
dosages recommended
for normally soiled
clothes.
Powder and liquid
detergents
recommended for
colours can be used at
dosages recommended
for normally soiled
clothes. Use detergents
without bleach.
Liquid detergents
suitable for colours and
dark colours can be
used at dosages
recommended for
normally soiled
clothes.
Prefer liquid
detergents produced
for delicate clothes.
Woolen and silk
clothes must be
washed with special
woolen detergents.
Lightly Soiled
(No visible stains
exist.)
Powder and
liquid detergents
recommended for
whites can be used at
dosages recommended
for lightly soiled
clothes.
Powder and
liquid detergents
recommended for
colours can be used at
dosages recommended
for lightly soiled clothes.
Use detergents without
bleach.
Liquid detergents
suitable for
colours and dark
colours can be
used at dosages
recommended
for lightly soiled
clothes.
Prefer liquid
detergents produced
for delicate clothes.
Woolen and silk
clothes must be
washed with special
woolen detergents.

18
Preparing the appliance
• Make sure that the hoses are connected tightly.
• Plug in your machine.
• Turn the tap on completely.
• Place the laundry in the machine.
• Add detergent and fabric softener.
Program selection
Select the program suitable for the type, quantity and soiling degree of the laundry in accordance
with the “Program and Consumption Table” and the temperature table below.
Heavily soiled white cottons and linens.
(coee table covers, tableclothes, towels,
bed sheets, etc.)
60˚C Normally soiled, coloured, fade proof
linens, cottons or synthetic clothes (shirt,
nightgown, pajamas, etc.) and lightly
soiled white linens (underwear, etc.)
90˚C
40˚C- 30˚C Cold Blended laundry including delicate textile
(veil curtains, etc.), synthetics and
woolens.
• Step One: Select the desired program with the Program Selection dial.
• Step Two: Check default temperature of selected program. You can reduce temperature if
required by pressing the Temp. button
• Step Three: Check the default Speed of the selected program. You can reduce the speed if
required by pressing the Speed button.
• Step Four: Press the Start/Pause button to start the wash program.
Note: Programs are limited with the highest spin speed appropriate for that particular type of fabric
Note: When selecting a program, always consider the type of fabric, colour and degree of soiling
and permissible water temperature.
Note: Always select the lowest required temperature. Higher temperature means higher power
consumption.
OPERATING INSTRUCTIONS
Control Panel
Quick Wash 15
426
Program selection dial
User can select required
washing program for wash load
LED Display showing
Pre Wash/Extra Rinse/Time
Remaining/Door Lock /Child Lock
Start/Pause
Press this button to start
or pause the wash cycle
On/O
Press once to turn washing
machine on, press again to
turn washing machine o
Delay
Delay Wash 0-24h. The delay
time means the wash will
begin in (XX) hours later
Temp.
Press this button
to regulate the
temperature
Speed
Press this button
repeatedly to regulate
the spin speed
Function
Press this button repeatedly
to select the Pre Wash or
Extra Rinse functions

19
Main Programs
Depending on the type of fabric, use the following main programs.
Cotton Intensive
You can wash your durable and heavily soiled clothes on this program. This program washes for a
longer time and an extra rinse cycle will be made compared to the “Cottons” program.
Cotton 60°C/40°C/20°C
Use this program for your cotton laundry (such as bed sheets, duvet and pillowcase sets, towels,
bathrobes, underwear, etc.). Your laundry will be washed with vigorous washing action for a longer
washing cycle. The temperature cannot be adjusted; it will automatically default to the selected
program 60°C/40°C or 20°C.
Quick Wash 15
Use this program to wash a small amount of lightly soiled cotton clothes in 15 minutes.
Eco
Use this program, which is much more sensitive to environment and natural resources, to wash your
lightly soiled and unstained cotton laundry (max. 2 kg) in a shorter time and on a cold temperature.
Rinse
Use this program if you wish to rinse your laundry, after the rinse cycle is complete, the spin cycle
will automatically run.
Spin
Use this program if you wish to spin the laundry; if any water is held within the drum, the machine
will automatically drain before spinning.
Drain
Use this program if you wish to only drain the water from the drum without spinning your laundry.
Wool/Hand Wash
Use this program to wash your woollen clothes and garments that bear “not machine washable”
tags and for which hand wash is recommended. It washes laundry with a very gentle washing action
and low spin cycle so not to damage clothes.
Note: Use appropriate detergents for woollens.
Delicates
Use this program to wash your delicate clothes. It washes laundry with a very gentle washing action
so not to damage clothes.
Mixed
Use this program to wash your cotton and synthetic clothes together without sorting them.
Synthetics
Use this program to wash your synthetic clothes (shirts, blouses, synthetic/cotton blends, etc.). It
washes with a gentle action and has a shorter washing cycle compared to the Cottons program.
For curtains and veils/tulle, use the Synthetic 40˚C program with prewash function selected. As
their meshed texture causes excessive foaming, wash the veils/tulle by putting a small amount of
detergent into the main wash compartment. Do not put detergent in the prewash compartment.

Sportswear
Use this program to wash textiles made of microbers. This program is designed to remove dirt
whilst optimally preserving the technical features of the garments.
Baby Care
Use this program to wash baby laundry, and the laundry that belongs to allergic persons. Longer
heating time and an additional rinsing step provide a higher level of hygiene.
My Cycle
Create your own wash cycle. Press and hold Speed/ button for 3 seconds to set My Cycle
program.
Note: The default My Cycle program is cotton intensive.
Additional Functions
Pre Wash
Select Pre Wash for heavily soiled laundry. Not using the Pre Wash will save energy, water, detergent
and time.
Extra Rinse
This function enables the machine to perform another rinse cycle in addition to the one already
made after the main wash. Thus, the risk for sensitive skins (babies, allergic skins, etc.) to be
eected by the minimal detergent remnants on the laundry can be reduced.
Time Display
Remaining time to complete the program appears on the control panel display while the program is
running.
Note: Program time may dier from the values in the “Program and Consumption Table” depending
on the water pressure, water hardness and temperature, ambient temperature, amount and the type
of laundry, auxiliary functions selected and the changes at the mains voltage.
Delay
With the Delayed Start function the start-up of the program may be delayed up to 24 hours.
How to set the delay function:
• Select desired program.
• Press the Delay button to choose the desired time delay
• Press Start/Pause button to commence the delay operation.
How to cancel the delay function:
• If you want to cancel the delay function prior to the start of the wash cycle, press the delay
button until “0 H” is showing on the display panel.
• If the program has already started, press the On/O button.
Note: If there is any break in the power supply while the machine is operating (i.e. power cut or
tripped switch) a special memory stores the selected program and, when the power is reinstated,
the machine will resume from where it has stopped.
Temperature Selection
Whenever a program is selected, the maximum temperature for the selected program appears on
the temperature indicator. To decrease the temperature, press the Temperature Adjustment button.
Temperature decreases with increments of 10° until cold wash option appears on the display.
20
This manual suits for next models
1
Table of contents
Other STATESMAN Washer manuals


