Stealth Acoustics SA255 MKII User manual

www.stealthacoustics.com/sa255-2
SA255 MKII User Guide
250 Watt Monaural Amplifier with Low Pass Filter
IMPORTANT SAFETY PRECAUTIONS:
Read these instructions and keep this guide for future reference.
Do not block ventilation openings.
Do not install near any heat sources such as radiating heat registers, or other apparatuses that produce heat.
Do not expose this equipment to rain or moisture.
Do not defeat the safety purposes of the polarization or grounding type plug.
Ensure proper AC mains power cord is connected.
Clean only with a soft dry cloth.
Refer all repairs to a qualified service professional.

REAR PANEL
8. Speaker Level Input - Speaker level
input / output terminal block
9. Balanced Line Input – XLR-F balanced line input
10. Balanced Line Output - XLR-M
balanced line pass-through output
11. Line Level Input – RCA unbalanced input
12. Line Level Output – RCA unbalanced
pass-through output
13. Low Pass Filter - This switch will turn
o the low pass filter allowing the
amplifier to run full bandwidth.
14. No Signal Mute Switch – This is a 2 position
slide switch. In the “ON” position, the amplifier
is in a powered up mode. The power LED on
the front panel will glow blue. In the “AUTO”
position, the amplifier will monitor signal
input and power up automatically when
signal is received. The LED on the front will
glow red until it senses an audio signal, then
blue when it is activated. In auto mode the
amplifier will power down automatically after
10 to 20 minutes with no audio activity.
15. 12v Trigger
16. Ground Lift Switch
17. Amplifier Output - Binding posts provide
output to speaker(s). (Minimum 4 ohm load.)
18. Voltage Indicator - 115v-230v
50Hz/60Hz (auto selected.)
19. Power Socket – AC power cord plugs into this
socket. Appropriate IEC power cord is provided.
20. Power Switch
FRONT PANEL
1. Crossover Frequency Control – The crossover frequency
is variable from (far left) 50 Hz to 150 Hz (far right).
2. Power – Push on, push o.
3. Working Status LED – When the power is on, the LED
lights red. When power is first turned on the amplifier
enters a self-check mode followed by a standby mode.
When audio signal is detected the amplifier automatically
turns on and the LED turns blue. When the amplifier
is in protection mode the LED will show red.
4. Output Signal Level LEDs - As output increases the LEDs will
light from left to right. Right red LED indicates clipping.
5. Phase Control – Push on, push o. Will reverse
phase of output 180 degrees.
6. Display Brightness – Adjusts the front panel display lighting.
7. Volume Control – Clockwise increase, counter clockwise decrease.
Some Words of Caution:
Do not attempt to service this
product yourself. Opening or
removing the cover may expose
you to dangerous voltage or
other hazards.
Do not block intake or exhaust
(rear) vents.
Do not cycle power switch on
front panel on and o quickly and
repeatedly. Allow 5 seconds for
amplifier to complete it’s startup
routine.
1 2 3 4 5 6 7
8 9 10 1311 14 15 16 17 19 20
12 18

FUNCTIONS & FEATURES:
Rack Mountable - Requires (2) Spaces (3.5”)
Variable Low Pass Filter
Auto On/Standby Function
Speaker Level Inputs and Outputs
Line Level Inputs and Outputs
Balanced Line Inputs and Outputs
DC Protected Fixed High Pass Filter
Status LED: Red = Standby, Blue = Active
12v Trigger Function
Output Monitor LEDs
115 VAC and 230 VAC Input
Voltages (auto selected)
Fan Cooled - 8 Speed Stages
Phase Switch
SPECIFICATIONS:
Mono Output Power:
250 watts at 8 ohms<0.05 THD
350 watts at 4 ohms<0.05 THD
Total Harmonic Distortion:
<0.05 @ 1 watt 4 ohms/100Hz
Signal to Noise Ratio:
86db Below Rated Output
Crossover Section:
High Pass Filter: 18 Hz/30db/octave (fixed)
Low Pass Filter: 50 Hz to 150 Hz/18db/octave
(variable with bypass switch)
Current Draw:
6.2Amps @ 350W/4ohms/115VAC/60Hz
Dimensions:
Width: 19” (483 mm) (rack ears installed)
Width: 17” (432 mm) (rack ears removed)
Height: 3.5” (89 mm)
Depth: 13.625” (346 mm)
Shipping Weight:
31 lbs (14 kg)
*All specifications subject to change.
SA255 MKII - TIPS
Speaker Output Connection:
To use the binding-post speaker terminals (Rear Panel Detail
#17) with bare wire, unscrew the collar until the hole through
the center post is visible under the collar. Insert the bare end
of the wire through the hole in the post, then screw the collar
back down until the connection is tight. The holes in the center
of the collars are intended for banana-type connectors.
Speaker Level input Connection:
Use this installation method where the receiver/processor
does not have a subwoofer output or a volume controlled
preamp line-level output. Connect you receiver or amplifier’s
front left and right speaker terminals to the left and right
terminals on the SA255 that are marked “Speaker Level Input”
(Rear Panel Detail #8). Connect the left and right terminals
on the SA255 that are marked “Speaker Level Output” (#8) to
the corresponding terminals on the back of your front left and
right speakers. This method will also work for whole house
audio distribution systems since some multi-channel whole
house audio amplifiers do not have a line level subwoofer
output. If the amp speaker level input is after a speaker volume
control, the SA255 volume will track with the volume control.
Line Level Connection:
Use this method where the receiver/processor is equipped
with a subwoofer output or a volume-controlled preamp
line level output. Use RCA-type patch cords to connect the
line-level inputs on the SA255 (Rear Panel Detail #11). If your
receiver or amplifier only has one subwoofer output jack, then
you may connect the subwoofer output on your receiver/
preamplifier to either the left or right line-level input on the
SA255. It makes no dierence which jack you choose.
Balanced Line Connection:
This method is used when the SA255 is placed between a
preamplifier and power amplifier that connect with 3-pin XLR
type connectors (Rear Panel Detail #19 & #10).
Phase Control:
The Phase switch (Front Panel Detail #5) determines whether
the subwoofer’s piston-like action moves in and out in phase
with the main speakers or opposite the main speakers. There
is no correct or incorrect setting. Proper phase adjustment
depends on several variables such as subwoofer placement
and listener position. Adjust the Phase switch to maximize
bass output at the listening position.
Remember, every system, room and listener is dierent. There
are no right or wrong settings; this switch oers the added
flexibility to adjust your subwoofer for optimum performance
for your specific listening conditions. If at some time in the
future you happen to rearrange your listening room, you
should experiment with the Phase switch in both positions,
and leave it in the position that maximizes bass performance.
Crossover Adjustments:
The crossover Frequency control (Front Panel Detail #1)
determines the highest frequency at which the subwoofer
reproduces sounds. If your main speakers can comfortably
reproduce some low-frequency sounds, set this control to
lower frequency setting, between 50Hz – 80Hz. This will
concentrate the subwoofer’s eorts on the ultra deep bass
sounds required by today’s films and music. If you are using
smaller bookshelf speakers that do not extend to the lower
bass frequencies, set the low-pass crossover control to a
higher setting, between 80Hz – 150Hz.
Level Control:
The Volume control (Front Panel Detail #7) will adjust the level
of the subwoofer relative to the rest of the system. Proper
level adjustment depends on several variables such as room
size, subwoofer placement, type of main speaker and listener
position. Adjust the subwoofer level so that the volume of
the bass information is pleasing to you. The amplifier will
track input level changes and adjust volume relative to input
source level changes. Front panel level control determines the
maximum level of output.
Full Range Operation:
To bypass the low-pass filter, set the Low Pass Filter switch
(Rear Panel Detail #13) to “FULL RANGE”. The amplifier will
then reproduce the full audio spectrum.
StealthAcoustics.com
T 888.865.6800 | F 360.424.8872
A Division of Dimensional Communications, Inc.
1220 Anderson Road | Mount Vernon, WA 98274
©2023 Stealth Acoustics REV 23.02
For technical support
contact your local dealer or:
Email: Stealth@StealthAcoustics.com
Tel: +1 360 848 6800
Notes:
1. The SA255 may be utilized as a
subwoofer amplifier with the Low
Pass Filter set to “SUB”. When using
the amplifier for full frequency range
speaker powering, set the Low Pass
Filter switch to “FULL RANGE”.
2. When the SA255 is connected to a
speaker level volume control as a source
feed, the SA255 volume will track the
speaker volume control settings.
3. Use the convenience pass-through
outputs on SA255 to feed additional
devices.
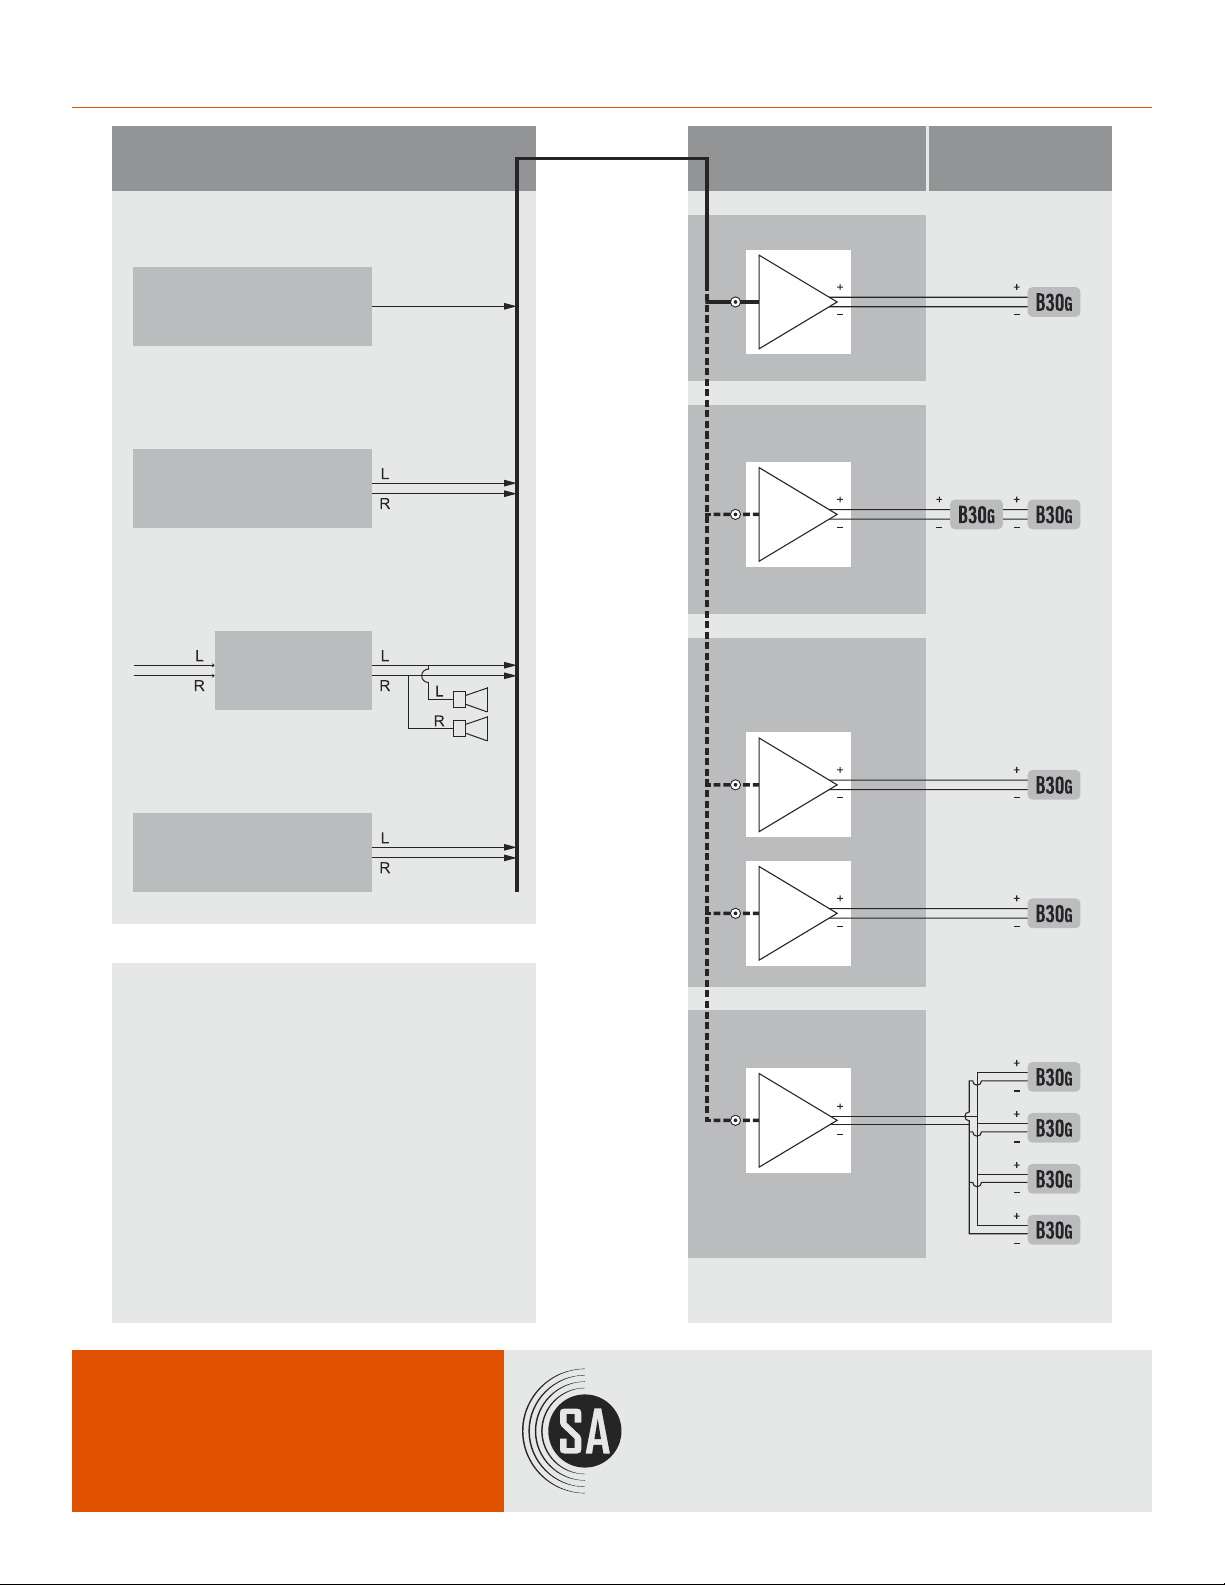
SUBWOOFER AMPLIFIER – CONNECTION EXAMPLES
QUAD PANEL
SINGLE AMP
Leave rear jumpers on
speakers at factory default
“series” positions (16Ω).
OR...
1 Amp with 4 Subwoofers
Homerun each speaker to
ensure correct phase.
Parallel connect all
panels at amplifier.
350W
4Ω
16Ω
16Ω
16Ω
16Ω
SINGLE PANEL
SINGLE AMP
Set rear jumpers on
speakers to “parallel”
positions (4Ω).
1 Amp with 1 Subwoofer
350W
4Ω
4Ω
DUAL PANEL
SINGLE AMP
(PARALLEL WIRED)
Leave rear jumpers on
speakers at factory default
“series” positions (16Ω).
OR...
1 Amp with 2 Subwoofers
250W
8Ω
16Ω16Ω
OR...
Use this optional stereo
subwoofer configuration
for increased bass output.
DUAL PANEL
DUAL AMP
Set rear jumpers on
speakers to “parallel”
positions (4Ω).
350W
4Ω
4Ω
350W
4Ω
4Ω
Invisible
Subwoofers
Subwoofer
Amplifier
Audio
Source
WHOLE HOUSE
SYSTEM
Pre-amp
GAMING
SYSTEM
Game Console
HOME THEATER
PROCESSOR
Processor
Full Range Audio
Speakers
HOME SPEAKER SYSTEM
*Speaker Level Zone Subwoofer
Speaker
Volume Control
Speaker
Feed
Audio
Source
Other Stealth Acoustics Amplifier manuals


