Steepletone BRITANNIA User manual

Model:BRITANNIA
MODULARMUSICSYSTEM
INSTRUCTIONMANUAL
PLEASEREADBEFOREUSE
Ver2021/01

1
IMPORTANTSAFEGUARDSFORAUDIOPRODUCTS
PLEASEREADCAREFULLYTHEFOLLOWINGIMPORTANTSAFEGUARDSTHATAREAPPLICABLETOYOUREQUIPMENT.
1. ReadInstructions‐Allthesafetyandoperatinginstructionsshouldbereadbeforetheapplianceisoperated.
2. RetainInstructions‐Thesafetyandoperatinginstructionsshouldberetainedforfuturereference.
3. HeedWarnings‐Allwarningsontheapplianceandintheoperatinginstructionsshouldbeadheredto.
4. FollowInstructions‐Alloperatinganduseinstructionsshouldbefollowed.
5. WaterandMoisture‐Theapplianceshouldnotbeusednearwater,forexample,nearabathtub,washbowl,kitchen
sink,laundrytub,inawetbasementornearaswimmingpoolandthelike.
6. Ventilation‐Theapplianceshouldbesituatedsothatitslocationorpositiondoesnotinterferewithitsproper
ventilation.Forexample,theapplianceshouldnotbesituatedonabed,sofa,rug,orsimilarsurfacethatmayblock
theventilationopenings,orplacedinabuilt‐ininstallation,suchasabookcaseorcabinetthatmayimpedetheflowof
airthroughtheventilationopenings.
7. Heat‐Theapplianceshouldbesituatedawayfromheatsourcessuchasradiators,heaters,ovens,cookersorother
appliances(includingamplifiers)thatproduceheat.
8. PowerSources‐Theapplianceshouldbeconnectedtoapowersupplyonlyofthetypedescribedintheoperating
instructionsorasmarkedontheappliance.
9. GroundingorPolarization‐Precautionsshouldbetakensothatthegroundingorpolarizationmeansofanappliance
isnotimpeded.
10. Power‐CordProtection–Powersupplycordsshouldberoutedsothattheyarenotlikelytobewalkedonor
squeezedbyitemsplaceduponoragainstthem,payingparticularattentiontowherethecordisconnectedtothe
powerplug,andthepointwheretheyexitfromtheappliance.
11. Cleaning‐Theapplianceshouldbecleanedonlyasrecommendedbythemanufacturer.
12. Antenna‐Thisproductisdesignedforusewiththeantennaattachedandshouldnotbeconnectedtoanyother
externalantennas.
13. Non‐usePeriods‐Thepowercordoftheapplianceshouldbeunpluggedfromthewalloutletwhenleftunusedfora
longperiodoftime.
14. ObjectandLiquidEntry‐Careshouldbetakensoobjectsdonotfallandliquidsarenotspilledintotheenclosure
throughopenings.
15. DamageRequiringService‐Theapplianceshouldbeservicedbyqualifiedservicepersonnelonlywhen:
– Thepowersupplycordoftheplughasbeendamaged.
– Objectshavefallen,orliquidhasbeenspilledintotheappliance.
– Theappliancehasbeenexposedtorain.
– Theappliancedoesnotappeartooperatenormallyorexhibitsamarkedchangeinperformance.
– Theappliancehasbeendropped,ortheenclosuredamaged.
16.Servicing‐Theusershouldnotattempttoservicetheappliancebeyondthatdescribedintheoperatinginstructions.
Allotherservicingshouldbereferredtoqualifiedservicepersonnel.
BATTERYPRECAUTIONS
Replacementofbatteriesmustbedonebyanadult.
Donotmixoldandnewbatteries.
Donotmixalkaline,standard(carbon‐zinc)orrechargeable(nickel‐cadmium)batteries.
Thesupplyterminalsarenottobeshort‐circuited.
Non‐rechargeablebatteriesarenottoberecharged.
Exhaustedbatteriesaretoberemoved.
Onlybatteriesoftheequivalenttypearetobeused.
Batteriesaretobeinsertedwiththecorrectpolarity.
Disposeofbatteriesproperly.Donotdisposeofbatteriesinfire.Thebatteriesmayexplodeorleak.

2
LOCATIONOFCONTROLS
3. RemoteSensor
6. CDI//DAB/FM/BT–CDPlay/Pause/Scan/
EnterButton
7. CDI–Open/CloseButton
8. USBPort
11. CDI–PlayModebutton
12. BTT(BluetoothTransmit)button
13. HOMEButton
14. FINALIZEButton
15. FolderUpButton
16. CD2–CDSkipUp /Down Button
17. 3.5mmAUX‐INJack
19. CD2–CDStopButton
20. CDI/BT/TapeFunctionModeButton
21. CD2RECORDButton
22. CD2–CDPlay/PauseButton
23. VolumeKnob
26. DAB+/FMFunctionModeButton
27. CD2Open/CloseButton
28. CD2/USB‐‘TS’button
(forTrackSeparation)
29. CassetteDoor(Deck1)
30. CassetteKeys(Deck1)
31. CDI–CDdoor
32. CassetteDoor(Deck2)
33. CassetteKeys(Deck2)
34. CD2–CDdoor
1. DustCover
2. LCDDisplay
4. PowerLED
5. CDI/DAB/FM/BT–CDStop/Menu
/InfoButton
9. CDI/DAB/FM/BTTune/Skip+/‐button
10. CDI/DAB/FM–Memory/Presetbutton
18. 3.5mmHeadphoneJack
24. Phono/AuxFunctionModebutton
25. CD2/USBFunctionModeButton
3
35. CD2–ManualEjecthole
36. 45rpmSpindleAdaptor
37. TurntableSpeedSelector
38. AutoStopSwitch(ON/OFF)
39. PitchControl
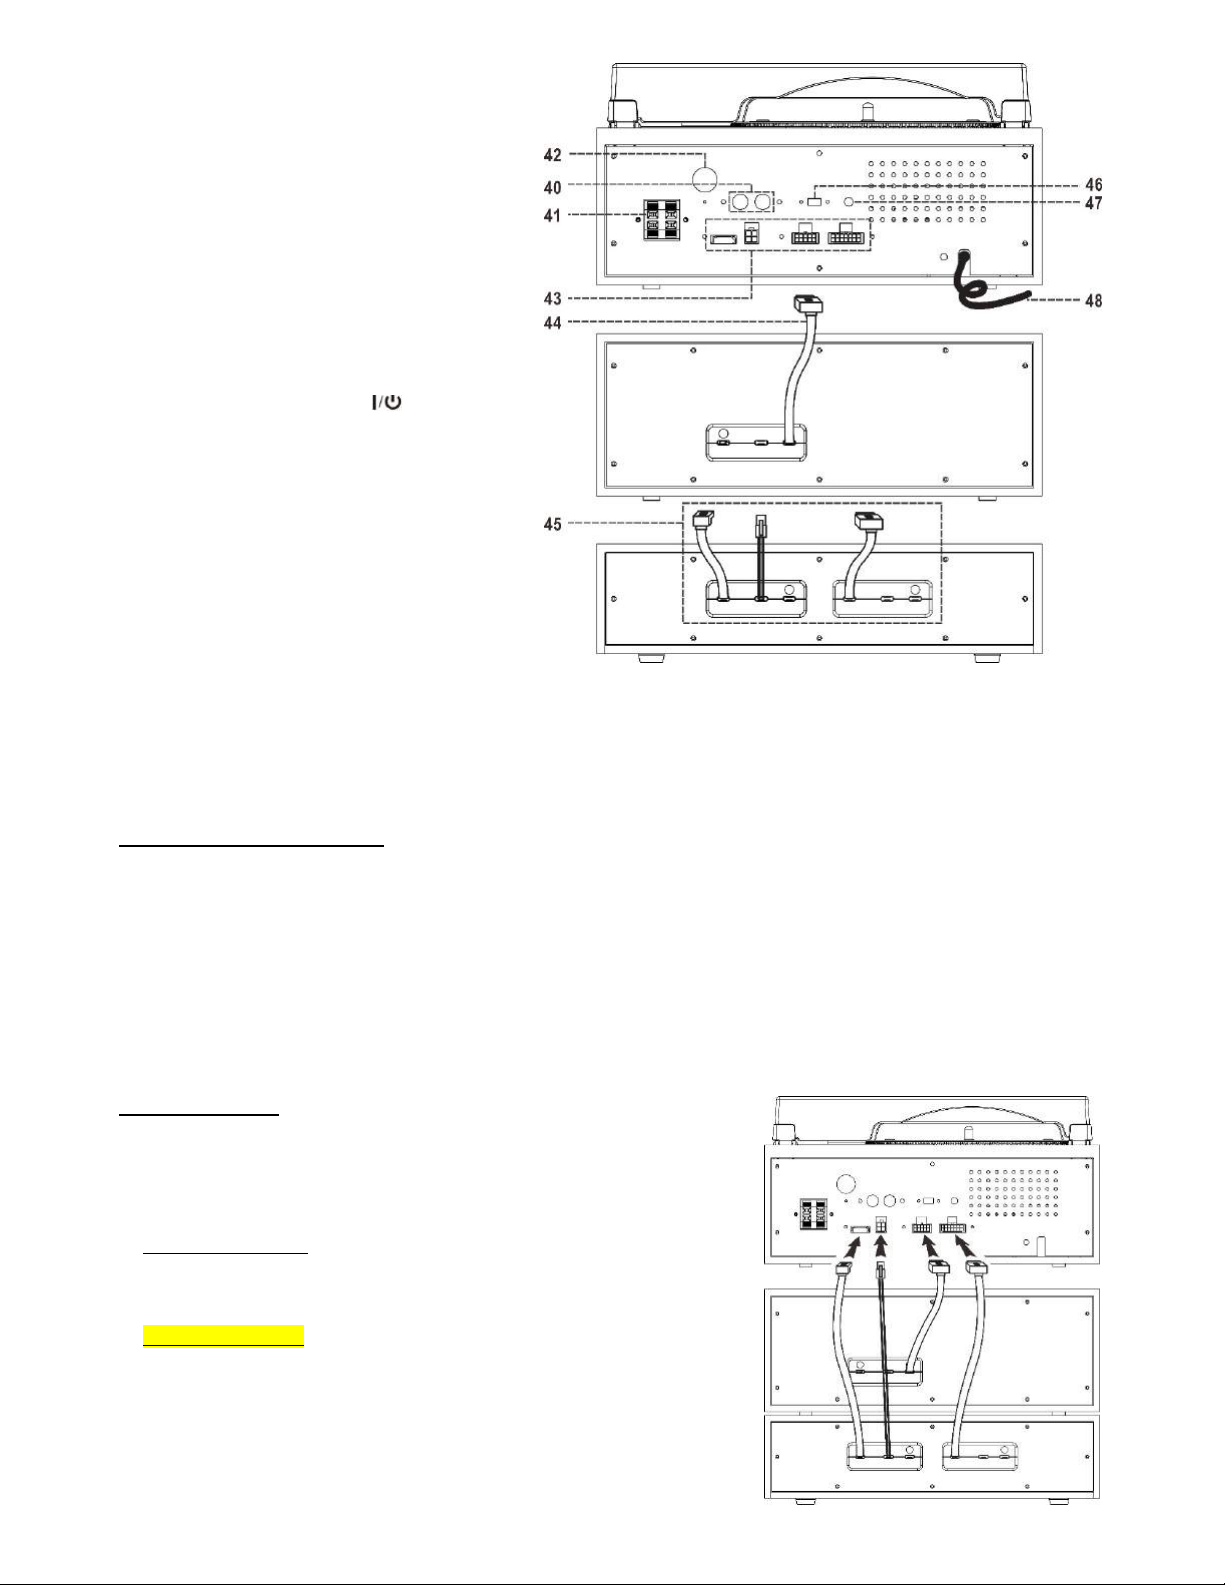
40. Line‐OutSocket(RCA/L+R)
41. SPEAKERSockets(L+R)
42. FM/DABAntennaSocket
43. SOCKET
44. CassettePower/SignalCable
45. CDPowerSupplyCable/CDSignalCable
46. ErPON/OFFswitch
47. SUBWOOFER‐outsocket
48. PowerCord
49. BTT(BluetoothTransmit)LEDIndicator
50. PowerOn/OffButton
51. X‐BassButton
52. StrobeLens
CAUTION:
USAGEOFCONTROLSORADJUSTMENTSORPERFORMANCEOFPROCEDURESOTHERTHANTHOSESPECIFIEDHEREINMAYRESULTINHAZARDOUSRADIATION
EXPOSURE.THEREFORE,THISUNITSHOULDNOTBEADJUSTEDORREPAIREDBYANYONEEXCEPTQUALIFIEDSERVICEPERSONNEL.
PREPARATIONSFORUSE
INSTALLATION
Unpackallpartsandremoveanyprotectivepackingmaterials.
Pleasekeepallpackaginguntilyouhavefullycheckedallpartsoftheunitareworkingcorrectlyandforfutureuseincasethe
unitneedsservicing.
EnsuretheRemoteControlandanyotheraccessorieshavebeentakenoutofthepackagingbeforestoringtheboxaway.
Thisunitisoperatedby230V~50HzACmainsonly.
Donotconnecttheunittothemainsbeforecheckingthemainsvoltageiscorrectfortheunitandbeforeallother
connectionshavebeenmade.
Whenpositioningtheunit,nevercoveranyventsandmakesurethatthereisaspaceofseveralcentimetersaroundtheunit
forventilation.
CONNECTIONS
Thismainmusicsystemconsistsofthreeparts‐thetoprecordplayerunitwith
maincontrolsandamplifier,themiddledoubleCassettePlayer/Recorder,andthe
bottomCDPlayer/Burnerunit.Beforeusingthesystem,theseneedtobe
connectedfirst,andsowilltheseparatespeakers.
1. Assemblethesystem:PlacetheCDPlayer/Burnerunitatthebottom,then
placetheCassettepartinthemiddleandfinallythemainunit(recordplayer)
ontop.
2. Connectthe4cables:Connectthecable(44)fromthemiddlepartandthe
cable(45)fromthebottompart,intothemainunit’ssockets(43)inthe
directionasshowninthediagramontherighthandside.
4
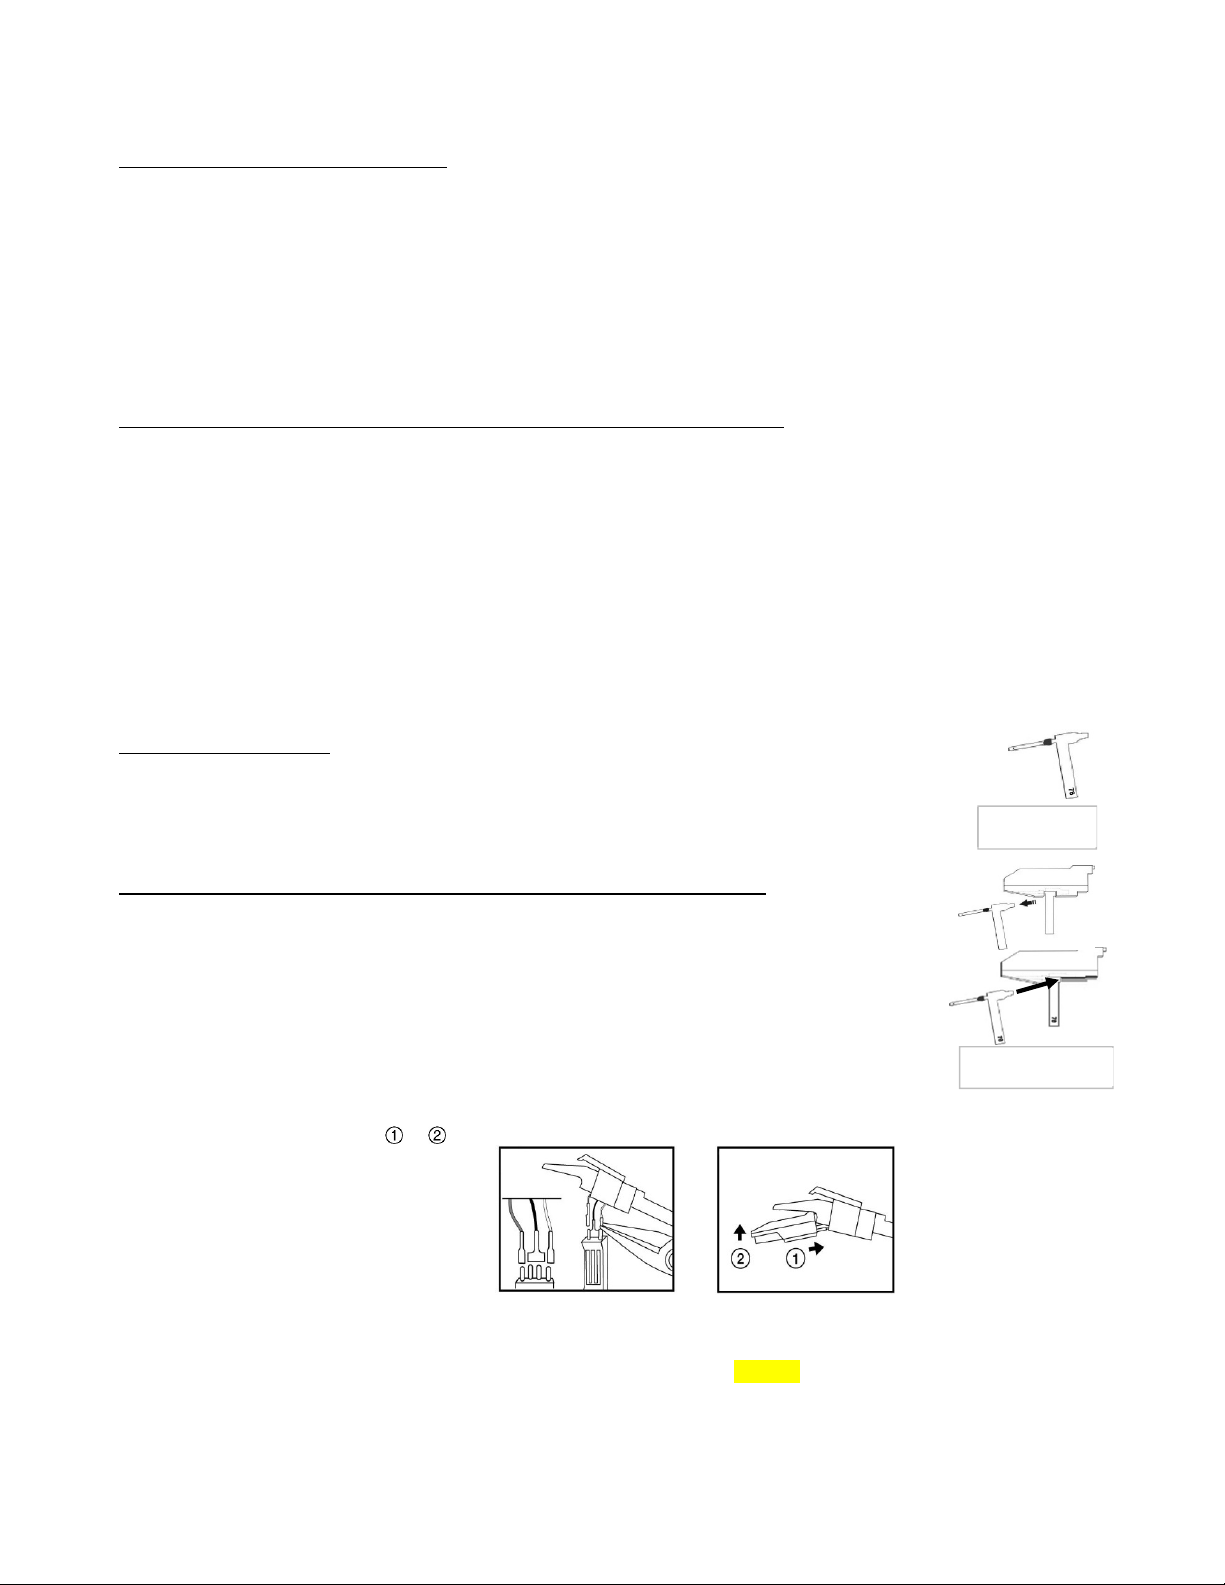
INSERT THE PLASTIC COVER BRACKETS
INTO THE BLACK HINGE SLOTS
PUSH BOTH TURNTABLE DECK BLACK
HINGES BACKWARDS
PUSH THEM DOWN FIRMLY INTO THE
HINGES TO COMPLETE THE INSTALLATION
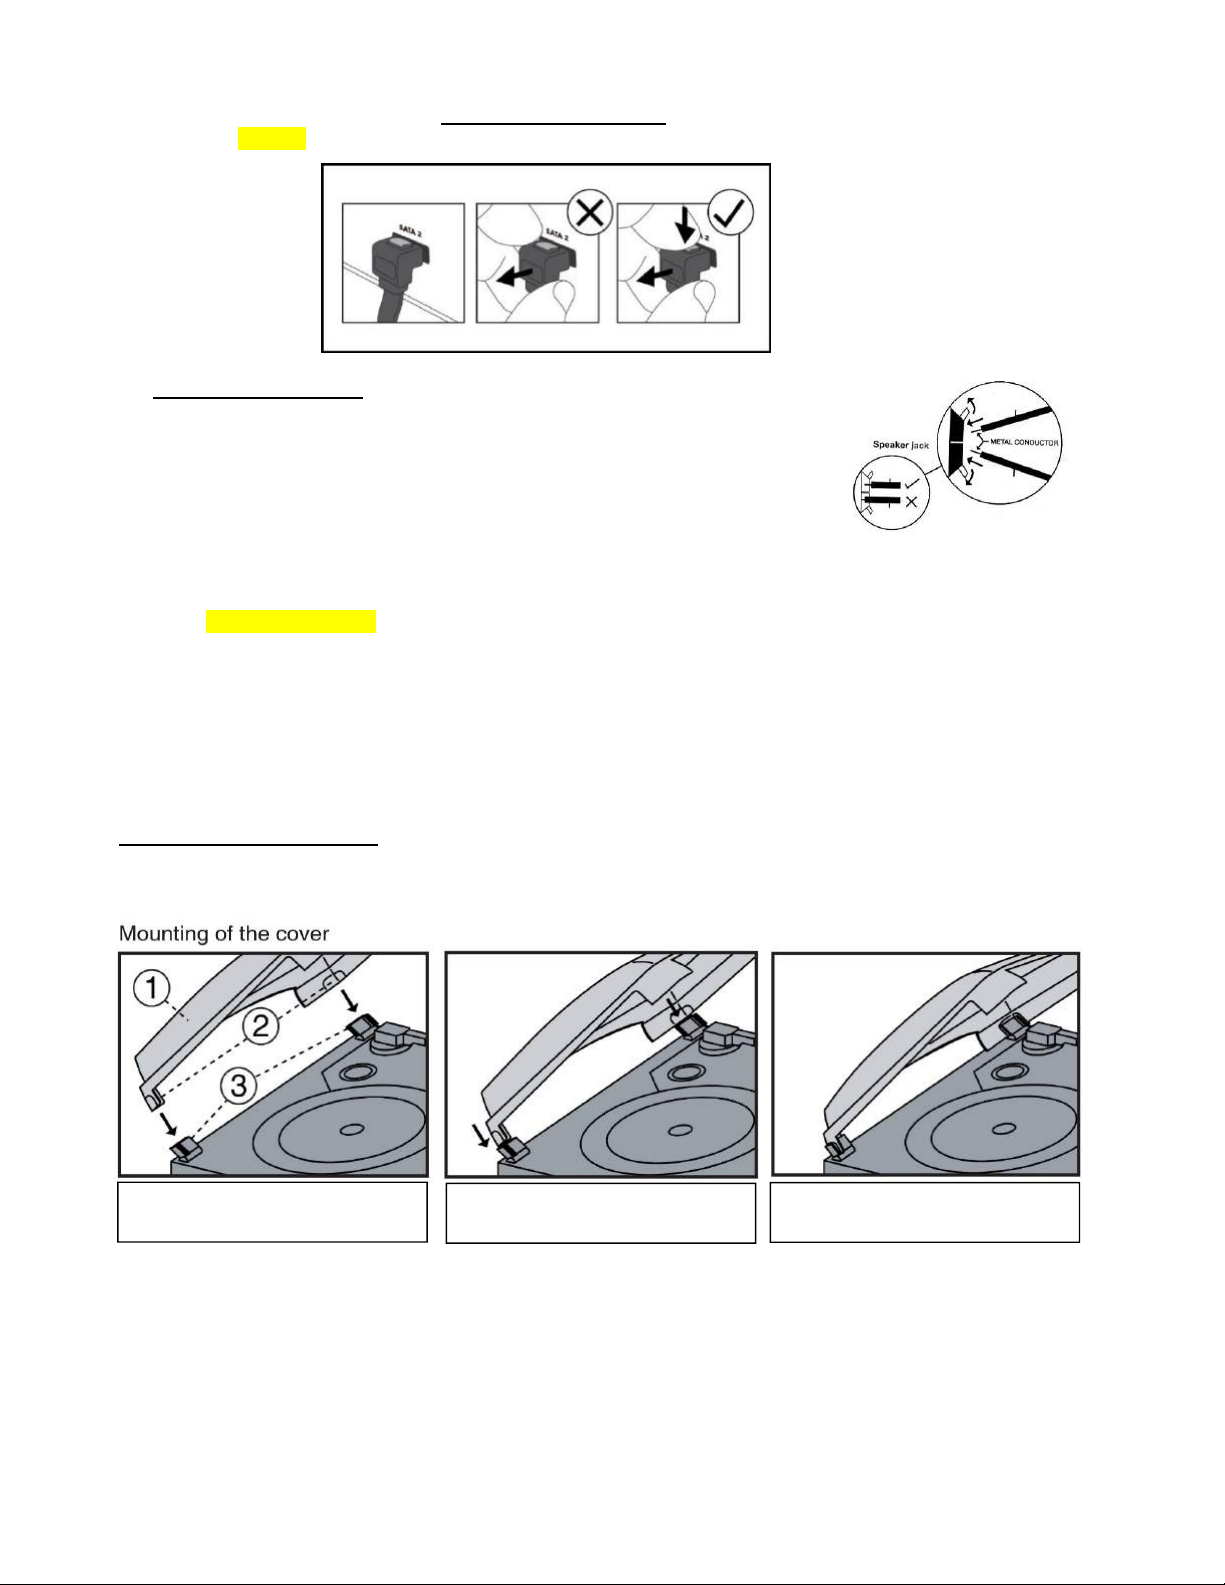
CAUTION:
- DONOTcrossthecableswhenconnectingthese!
- Todisconnectthecableplug,firstpushthetopoftheplugintoreleaseitandthenpullitoutwhilstkeeping
thetopPRESSEDin–refertothelinedrawingbelow.
3. Connectthespeakerwirestothecorrespondingspeakerterminals(41)locatedonthe
rearoftheunit:
a. PushtherightRedsocketswitchupwardstoexposetheholeinwhichtoinsertthe
Redspeakercablewire–insertjustthemetalpartofthecable‐thenreleasethe
switch.
b. PushdowntherightBlacksocketswitchandinserttheBlackcablewire.
Repeatthisprocessfortheotherspeaker.
4. ConnecttheACmainspowercord(48)toa230VACMainswalloutlet.
5. SlidethePOWERON/OFFSwitch(50)totheONposition,ifthePOWERLEDindicator(4),theLCDDISPLAY(2),theBlueLED
oftheCD2GO/PLAY/PAUSE(22)button,theRedLEDoftheREC(21)buttonslightupandsoundiscomingoutfromthe
speakers,thismeansthepowersupplyiscorrectandyoursystemisreadyforuse.
IMPORTANTNOTE:Ifyoufindtheunitswitchesitselfoffregularly,thisisnotafault.DuetotheErPstage2requirements
fortheProtectionoftheEnvironment,whentheunitisconnectedtothemainspower,asapowersavingmeasure,itwill
switchitselfoffautomaticallyifnomusichasbeenplayingforover15minutes.Tore‐activatetheunit,switchtheunitoff
withtheOn/Offswitchandafterafewsecondsonagain(50).Alternatively,ifforanyreasonthisispreferred,thereisthe
optiontoswitchtheErP2over‐rideswitch(46)ontherearpaneltoOfftodisablethispowersavingfeature.
DUSTCOVERASSEMBLY
ThePerspexDustCover(1)isfactoryfitted,butjustincaseitneedstoberemovedandthenrefitted,theinstructionsonhowto
dosoareasfollows:

5
REMOTECONTROLBUTTONDESCRIPTIONS
REPEAT/RANDOMInCD2/USBmode:TAPtoselectRepeat/Randomplaymode
PROGRAMInCD2/USBmode:TAPtosetwhenprogramming
PLAY/PAUSEInCD2/USB:TAPtoStartPlaybackorPause
InRecording/Encodingmode:TAPtoconfirmstart
Skipdown/SkipUp InCD2/USBmode:TAPtoselecttheprevious/next
Track
STOPInCD2/USBmode:TAPtostopplayback
FOLDER/PREdown/PREupInUSBmode:TAPtoselectMusicFolderup/down
VOL‐/VOL+TAPtoadjusttheVOLUMEleveldownorup
REC TAPtoactivatetheRecording/Encodingfunction
RECLEVEL‐/+TAPtoselectCD[CD‐R(W)]BurnerRecordinglevelor
USBEncodinglevel
ERASETAPtodeleteaUSBorCD‐R(W)file
TSAUTO/MANUALTAPtoactivateAutoorManualTS(TrackSeparation)function
FINALIZETAPtofinalizetheCD‐R(W)discafterrecording
CLEARInCD2/USBmode:TAPtoerasethelasttrackofa
Programmedmusicfile
(TS)TAPtoactivateManual(TS)TrackSeparationfunction
DISPLAYTAPtochangetheplaybackinformationontheLCDdisplay
CD2/USBTAPtoselecttheCD2/USBfunctionmode
DAB+/FMTAPtoselecttheDAB/FMfunctionmode
PHONO/AUXTAPtoselectthePHONO/AUXfunctionmode
HOMETAPtochangethefunctionmode
CD1/BT/TAPETAPtoselecttheCDI/BTReceiver/Tapefunctionmode
ThebelowbuttonscanbeoperateundertheCDI/DAB/FM/BTReceiverfunctionmodes
FOLDERupInUSBmode:TAPtoselectMusicFolderup
PLAYMODEInCDImode:TAPtoselectRepeat1oralltracks,Randomplaymode
STOP/MENU/INFO/ InCDImode:TAPtostopplayback
InTUNERmode:TAPtoenterthemeun/informationofDAB/FMradio
BTdisconnectButtonInBluetoothReceiver(BT)mode,TAPandholdfor5secondstodisconnecttheBT
connection

6
MEM/PRESETInCDImode:TAPtoactivateCDProgram
InTUNERmode:TAPtoPresetStationsorselectthePresetStations
TUNEdown“‐“orup“+”ButtonInTUNERmode:TAPtotunetheradiostationorselectthepre‐setmemoryStation
SKIPdown“‐“orup“+”ButtonInCDImode:TAPtoselecttheprevious/nextTrack
ENTER/SCAN/ InTUNERmode:TAPtoconfirmanoperation,orperformautoscanfunction
BTdisconnectButton InBluetoothReceiver(BT)mode,TAPtore‐connecttheBTconnection
PLAY/PAUSE InCDImode:TAPtoStartPlaybackorPause
FM&DABRADIOFUNCTION
WehaveincludedadetachableFM/DABTelescopicAntenna
provided.AttachtheAntennatotheFM/DABAntenna
Socket(42),asshownintheimage(1)&(2)ontherighthandside
beforeoperation.Extendyoumayhavetotrydifferentlocations
fortheaerialuntilgoodreceptionisachieved.Shouldyouhavean
externalaerialyoucanconnectthisasanalternative
LISTENINGTOFMRADIO
ManualTuning
1. SwitchPowerswitch(50)toPowerontheunit.
2. TAPtheHOMEbutton(13)toselectFMmode.
3. TunetotherequiredstationbyTappingtheTUNEdown“‐”orup“+”button(9).
4. TurntheVOLUMEcontrol(23)forthedesiredvolumelevel.
AutoTuning
1. TAPtheHOMEbutton(13)toselectFMmodeafterswitchingontheunit(50).
2. TAPandHOLDtheTUNEdown“‐”orup“+”button(9)for1‐2secondsandthenrelease.
3. Theunitwillstartsearchingautomaticallyandwillstopwhenaradiostationisreached.
4. Repeatstep2untilthedesiredradiostationhasbeenreached.
5. TurntheVOLUMEcontrol(23)forthedesiredvolumelevel.
PresettingStationsManually
Youcanmanuallystoreupto20FMradiostationsintomemory.Theprocedureisasfollows:
1. TAPtheHOMEbutton(13)toselectFMmodeafterswitchingontheunit(50).
2. Turntothedesiredradiostationwitheitherthe“manual”or“auto”tuningmethod.
3. TAPtheMEMORYbutton(10)toenableprogramming–“1EMPTY”willappearontheLCDdisplay.
4. TAPTUNEdown“‐“orup“+”button(9)toselectthedesiredstationtostoreintomemory.
5. TAPandholdtheSCAN/ENTERbutton(6)toconfirmthesettingandtheLCDdisplaywillshow“STORED”andthendisplay
thenameofthestoredRadiostation.
6. Repeatsteps2to5tocontinuestoringotherstations.
7. ToreturntonormalTunermode,donotTAPanykeys.
SelectingthePresetStations
Youcannowselectthepresetstationsandplaytheminthedesignatedorderasperfollows:
1. SetinFMmode.TAPtheMEMORYbutton(10).
2. TUNEdown“‐“orup“+”button(9)toselectthestationnumber.
3. TAPtheSCAN/ENTERbutton(6)toconfirmdesiredstationyouwanttohear.
Presetting&SelectingStationsAutomatically
Youcanautomaticallystoreupto60FMradiostationsintomemory.Theprocedureisasfollows:
1. TAPtheHOMEbutton(13)toselectFMmodeafterswitchingontheunit(50).
2. TAPandholdtheSCAN/ENTERbutton(6)for1‐2secondsandtheunitwillstarttostoretheFMradioststionsautomatically.
3. Toselecttheradiostation,TAPtheMEMORYbutton(10)andtheLCDdisplaywillshowthestationandthepresetnumber.
4. TAPTUNEdown“‐“orup“+”button(9)toselectthedesiredstation.
5. TAPtheSCAN/ENTERbutton(6)toconfirmdesiredstationyouwanttohear.

7
Notes:
Thesystemallows5secondstostarttheprogrammingprocedure–ifafter5secondsprogramminghasnotstarted,theunit
willautomaticallyresumenormalTunermode.
Youcanoverwriteacurrentstationbystoringanotherfrequencyinitsplace.
Thepre‐setmemorieswillbecancelledcompletelyiftheunitisdisconnectedfromthemainspower.
FM&FM‐STEREORECEPTION
TAPandholdtheMEUN/INFObutton(5)for2secondsandtheLCDdisplaywillshow“AUDIOSETTING”.
TAPSCAN/ENTERbutton(6)andthenTAPTUNEdown“‐“orup“+”button(9)toselecteitherSTEREOorMONOmode.TAP
theSCAN/ENTERbutton(6)againtoconfirmthesetting.
Ifstereosignalsareparticularlyweak,itispreferabletoreceivetheFMprogrammeinMonosound.
Ifastereosignalreceived,theStereoindicator“”willappearontheLCDdisplaytoshowtheradioisnowreceivingan
FMprogrammeinstereosound.
HINTSFORBESTRECEPTION
- FM : the receiver work with detachable DAB/FM wire antenna, make sure the antenna is plugged into the antenna socket (42)
and place it on proper location for the best reception.
LISTENINGTODABRADIO
Digitalaudiobroadcasting(DAB)radio
1. SwitchPowerswitch(50)toPowerontheunit.
2. TAPtheHOMEbutton(13)toselectDABmode,theunitwillautoscantheDABradiostations.
3. TunetotherequiredstationbyTAPingtheTUNEdown“‐”orup“+”button(9).
FACTORYRESET
Youcanclearalltheradiopresetstationsbyresetingtheunit.
1. SetinDABmode.
2. AftertheunithasautoscantheDABradiostations,thedisplaywillshow<STATIONSCAN>.
3. TAPtheSkipupbutton(9)untilthedisplayshows<SYSTEM>.TAPSCAN/ENTERbutton(6)toenterthesetting.
4. Thenthedisplaywillshow<TIMESETUP>.TAPSkipupbutton(9)andthedisplaywillshow<FACTORYRESET>.TAP
SCAN/ENTERbutton(6)toenterthesetting.
5. Thedisplaywillshow<NO>YES.TAPSkipupbutton(9)toselect<YES>andTAPSCAN/ENTERbutton(6)toconfirm.
6. Theunitwillberesetandthestoredradiostationswillbecleared.
TURNTABLEOPERATION
BeforePlayingaRecord…
Thisproducthasaflip‐overstylus,whichhastwodifferentneedlesbuiltintooneStylusHolder,so
beforeplayingarecord,selectthecorrectneedleforthecorrectRPM/sizerecord(‘78’fora78rpm
recordor‘LP’for331/3&45rpmrecordsshouldbevisible,whicheverisapplicable).Todoso,
firstremovethewhiteStylusProtector/coverbypullingitgentlyofftheStylusHolderand
Cartridgeandtowardsyou(keepthisforfutureusetoprotecttheStyluswhennotusingthe
RecordPlayer),thenpushthewhite‘handle’downandovertotheotherside.
IMPORTANTNOTE:PhonoandAuxaresharingthesamefunctionband.Oncethe3.5mmAux‐injack(17)isbeingconnected,
unitwillswitchtoAux‐infunctionautomatically.Therefore,makesurethe3.5mmAux‐injack(17)isnotbeingconnectedifyou
wishtoplayarecord.
PLAYINGARECORD
1. TurnthePoweronwiththeON/OFFswitch(50).
2. TAPthePHONO/AUXFunctionbutton(24)toenterthePhono(Turntable)function.
3. EnsurethattheToneArmCliphasbeenpushedupandovertotherighttoreleasetheToneArmbefore
operating(re‐securetheToneArmafterplayingandbeforemovingtheunittoadifferentlocation).
4. FliptheStylusHolderhandledownandovertoselecteitherthe“LP”or“78”setting,dependingonthetypeof
recordtobeplayed.
5. SettheSpeedSelectorSwitch(37)tothecorrectsetting,dependingontherecordtobeplayed(331/3/45/78rpm).
6. Placearecordontheturntableplatter‐usethe45rpmspindleadaptor(36)ifnecessary.
7. Liftthetonearmfromthearmrestandmoveitslowlytotheedgeoftherecord‐theturntablewillstart
rotating‐thengentlyplacethetonearmonthedesiredpositionontherecord.
8. AdjustthevolumelevelbyturningtheVOLUMEcontrolonthefrontpanel(23).
9. AdjustthespeedwiththePITCHCONTROLknob‐ifrequired(39).*Seesectionbelowonhowtodothis.
10. Whentherecordhasstoppedplaying,theturntablewillautomaticallystoprotating‐unlesstheAUTO‐STOPswitch(38)has
beenswitchedtoOFF–refertotheTURNTABLEAUTO‐STOPFUNCTIONsectioninthemainManual.
8
Stylus Holder &
Tone Arm Cartridge
Stylus Holder
with Stylus Tip
11. LifttheToneArmofftherecordandreturnittothearmrest.
12.
TomanuallystoptheTurntablerotatingbeforetheendoftherecord,carefullyliftthetonearmofftherecordandreturnit
tothearmrestbyhand.
TURNTABLEAUTO‐STOPFUNCTION
Somelongervinylrecordswillstopplayingbeforethelasttrackhasfinished,becausetheauto‐stopsettingrequiredisjust
outsidetheunit’spre‐setarea.Ifthatisthecase,movetheAUTOSTOPSwitch(38)tothe“OFF“position,thiswillallowthe
tonearmtocarryontotheendoftherecord.
Notes:
– WiththeAutoStopswitchinthe“OFF”position,theturntablewillnotstopturningattheendoftherecord,sotostopthe
turntablerotating,turntheunitofforswitchtheAUTOSTOPswitchbacktothe“ON“position,thenreturntheToneArmto
theArmRest.
– WiththeSwitchleftinthe“OFF”position,theturntablewillstartrotatingassoonas‘PHONO’functionisselected.
– Important:Ifanythingispluggedintothe“AUX‐IN
“
socket,theturntablewillnotbeabletorotate!
*TURNTABLEPLATTERSPEEDALIGNMENT‐USINGTHEPITCHCONTROL
Thismodelhasa‘Pro‐Deck’styleTurntableandPitchControl.Tocheckifthespeedofarecordthatisplayingiscorrect,andifit
needstobeadjusted,dothefollowing:
oDuringplaybackofforinstancea45rpmrecord,lookattheappropriatestripofStrobecalibrationdotsontheedgeofthe
turntableplatter,illuminatedbytheSTROBELENS(52):
oTheupperoneisfor331/3rpm‐‐themiddleonefor45rpm‐‐thebottomonefor78rpmrecords.
oIfthestrobedotsappeartobeflowingtotheright,itmeanstheplatterisrevolvingslowerthantheratedspeed.
SlowlyturnthePITCHCONTROLKNOB(39)inthe“+“direction.
oIfthestrobedotsappeartobeflowingtotheleft,itmeanstheplatterisrevolvingfasterthantheratedspeed.
SlowlyturnthePITCHCONTROLKNOBinthe“–“direction.
oMakesmalladjustmentswiththePitchControluntilthestrobedotsappeartobestationarywithoutmovingleftorright.
STYLUSREPLACEMENT
Whenthestyluseventuallyneedsreplacing,areplacementstylus(Code‘SSTY8’suitablefor331/3/45/
78rpmrecords)isavailableforpurchasedirectlyfromthemanufacturer.
PleasecontactyourSupplierorSteepletoneUKLtdforinformationonhowtobuyone.
SteepletoneUKLtdLocallTelephoneno:08457585681
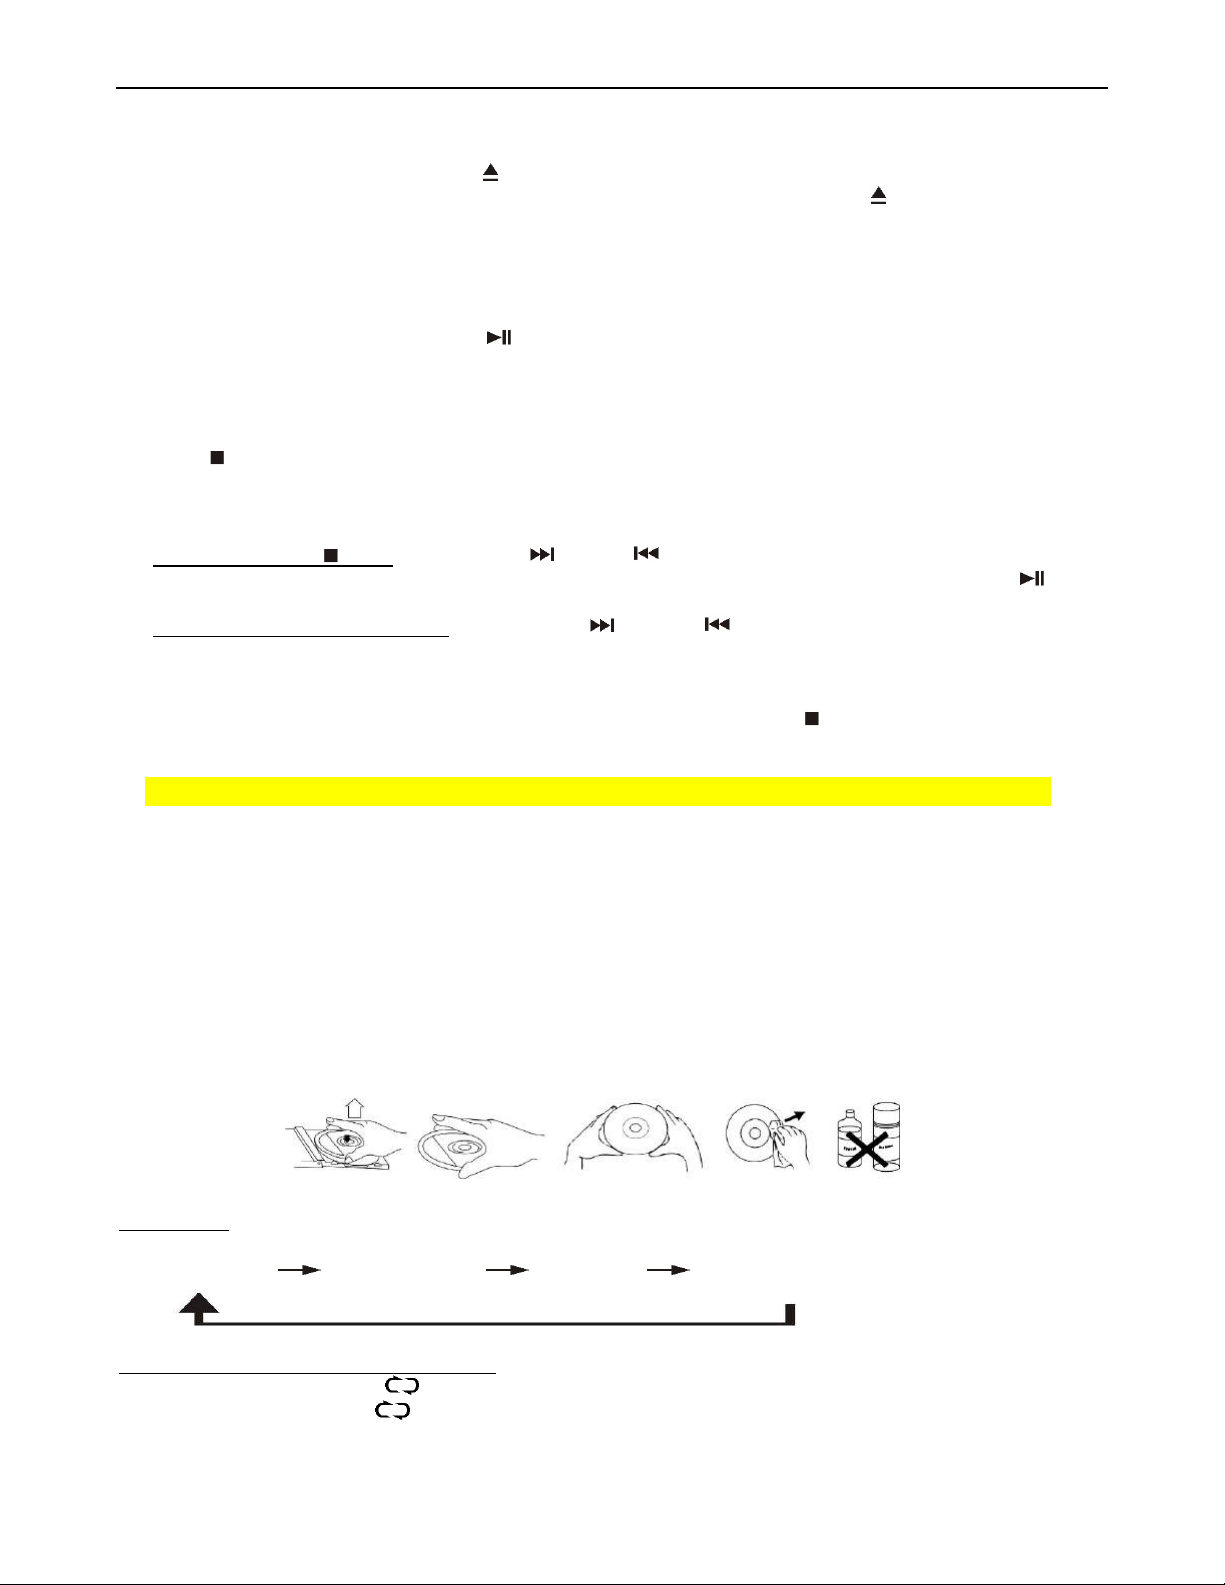
REMOVINGANDREFITTINGTHENEEDLEHOLDER(FLIP‐OVERSTYLUS)
1. ToremovetheFlip‐overStylusHolder,holdtheToneArmheadsteadywithonehand.
2. Turnthe‘handle’oftheStylusHolderdownslightly(showingeitherthe‘LP’or‘78’side.
3. Toremoveit,gentlypullthecompletewhiteStylusHolderoutoftheToneArmCartridge’s
brasscolourslotandforwards.
4. Tore‐fittheFlip‐overStylusHolder,reversetheaboveactions,makingsuretheshortwhite
plasticendisinsertedabovethesmallbrassplateinthebottomoftheToneArmCartridge.
5. JustincaseitisnecessarytoremovethewholeStylus/pick‐upassembly,usesmallplierstocarefully
disconnectthewires,thenchangetoanotherstyluscartridgeandconnectthewirestothenewstylus
againwiththepliers.(Donotpullthepick‐upwiresdirectlyasthismaycausedamagetothewires).
6. RefitasintheDiagramsabove/.
Notes:AlwayshandlethestyluswithcareastheSapphireneedletipiseasilydamaged.
Whentransportingtheturntableitisadvisabletorefittheprotectiveneedlecoveruntiltheunitisgoingtobeusedagain.
Whenremovingorre‐fittingthestylus,alwaysbecarefulnottoputtoomuchpressureonthestylusholderandthetonearm
cartridge,toavoidcausinganypossibledamagetothem.
9
PLAYINGACOMPACTDISCBYCDI
GETTINGSTARTED
1. TAPtheCDI/BT/Tapebutton(20)andTAPtheHOMEbutton(13)toselect“CD”.TheLCDdisplaywillshow“NODISC“ifthe
CDcompartmentisempty.
2. ThenTAPtheCDtrayOPEN/CLOSEbutton(7)toopentheCDtraydoor(31).
3. PlaceaCDwiththeprintedsidefacingupinsidethetrayandthenclosetheCDdoorwiththebutton.
4. TheunitwillstartreadingthediscandtheLCDdisplaywillshow“READING“‐thendisplaythetotalnumberoftracksand
totalplayingtime.
CDPLAY/PAUSEMODE
1. Theunitwillstartplaybackthefirsttrackautomatically.
2. Tointerruptplayback,TAPthePLAY/PAUSEbutton(6)once,theplayingtimewillfreezeontheLCDdisplay.
3. TAPthebuttonagaintoresumenormalplayback
STOPMODE
IftheStopbutton(5)isTAPedduringplaybackorwhenthemusicispaused,themusicwillstopplayingandthedisplaywill
showthetotalnumberoftracksontheDisc.
SKIPUP/DOWNMODE
1. WiththeCDinSTOPmode:IftheSkipupordown button(9)isTAPed,itwillgotothenextorpreviousCD
trackbutremaininStopmodeandnotplay.TostartplaybackoftheCDyouwillneedtoTAPthePlay/Pausebutton
(6).
2. WiththeCDinPLAYorPAUSEmode:IftheSkipupordownbutton(9)isTAPPED,itwillgotothenextor
previousCDtrackandthiswillstartplayingautomatically.
Notes:
– BeforeTAPPINGtheCDtrayOPEN/CLOSEbutton(7)tochangedisc,TAPthe“Stop“button(5)firsttoensuretheLCD
displayresumestotheoriginalinformation.
– IfyoukeepTappingthedifferentfunctionkeyswithinashortperiodoftime,thismaycausethesystemtomalfunction.
Ifthishappens,pleaseswitchoffandthenre‐starttheunittore‐setthesystem.
– ThereadingandplaybacktimeofCD‐R(W)discvariesfrombrandtobrandanddependsonthecompatibilityofthediscused.
– TheoperationforCDMP3discisthesameasCDdisc.
COMPACTDISCCARE
Toremoveadiscfromitsstoragecase,TAPdownonthecentreofthecaseandliftthediscout,holdingitcarefullybytheedges.
Fingerprintsanddustshouldbecarefullywipedoffthedisc’srecordedsurfacewithasoftcloth.UnlikeconventionalVinylor
Shellacrecords,compactdiscshavenogroovestocollectdustandmicroscopicdebris,soagentlewipewithasoft,lint‐freedry
andcleanclothshouldremovemostparticles.Wipeinastraightlinefromtheinsidetotheoutsideofthedisc.Neveruse
detergentsorabrasivecleanerstocleanthedisc.Ifnecessary,useaCDcleaningkit.Smalldustparticlesandlightstainswill
haveabsolutelynoeffectonsoundreproductionquality.Neverfixlabelstothesurfaceofcompactdiscsorwriteonthem,
exceptverygentlywithaspecialistCD‐RPen.
PLAYMODE(alsoontheRemoteControl)
ForCD
(1)repeatalltracks(2)repeat1track(3)random (4)offmode
PlayModeIndicatorontheLCDdisplay
Repeatalltracks CD1
Repeat1trackCD
RandomCDRAN
Offmode ‐‐‐‐‐‐‐‐‐‐

10
ForMP3Disc
(1)repeatalltracks(2)repeat1track(3)repeatsinglefolder1(4)random(5)offmode
PlayModeIndicatorontheLCDdisplay
Repeatalltracks CD1
Repeat1trackCD
Repeat1tracksinglefolderCD
RandomCDRAN
Offmode ‐‐‐‐‐‐‐‐‐‐
REPEATPLAYMODE
Withthisfunctionyoucanrepeatedlylistentoadesiredsongfileorfolder.
TAPthePLAYMODEbutton(11)beforeorduringplaybackifyouwishalltracksorasingletracktobeplayedagain:
RANDOMPLAYMODE
Withthisfunctionyoucanlistentoallfilesinrandomorshuffleorder.
1. TAPthePLAYMODEbutton(11)until“RAN“showsontheLCDDisplay‐thetrackswillbeshuffledandplaybackinanyorder.
2. TAPthisbuttonagaintocancelallplaymodes.
TAP)
CDDISCPROGRAMMING(alsobyRemoteControl)
Upto32tackscanbeprogrammedforaCDtoplayinanyorder.Beforeprogramming,makesurethesystemisinSTOPmode:
1. SelectCDmodeandSTOP)thediscplayback.
2. TAPtheMEMORYbutton(10),the“MEM“indicatorwillappearontheLCDdisplay(2).Moreover,itwillindicatetheprogram
numberanddigitsforthetracknumbertobeprogrammed(01Pxx).
3. SelectadesiredtrackbyTappingtheCDskipupordownbuttons(9).
4. TAPtheMEMORYbutton(10)tostorethetrackintomemory.
5. Repeatsteps3and4toenteradditionaltracksintothememoryifnecessary.
6. Whenallthedesiredtrackshavebeenprogrammed,TAPtheCDPLAY/PAUSEbutton(6)toplaythediscintheassigned
order.
7. Tocanceltheprogrammedfiles,TAPtheSTOPbutton(5)twiceandtheword“MEM“disappearsfromtheLCDdisplay.
– TAPPINGthedifferentfunctionbuttonswithinashorttimeofoneanothermaycausemalfunctionofthesystem.
– Ifthishappens,pleasedisconnecttheunitfromthemains,letitrestforabout15minutesandthenre‐startit.Thisshould
hopefullyre‐settheunit.
– ThereadingandplaybacktimeofaCD‐R(W)discmayvaryfrombrandtobrand.Theremaybeissuescausedbythe
incompatibilityoftheuseddisc:*RecommendedbrandsofCD‐R(W)discforrecordingareTDK,Maxell,Sony,Fuji,etc.
– ThisdeviceisdesignedforrecordingtonormalAudioCDFormat‐itdoesnotrecordtoMP3‐CDformat.
PLAYBACKOFMP3SONGSSTOREDONAUSBSTORAGEDEVICE
A) CONNECTINGAUSBDEVICE
ThesystemisabletodecodeandplaybackallMP3musicfileswhicharestoredonaUSBdevice.Astoragemediumofupto32GB
max.canbeconnected.
1. Switchthesystemon(50)‐orselectanyotherfunction‐exceptUSBmode.
2. InserttheUSBdeviceplugfacesideupintotheUSBsocket,makingsureitis
completelyinserted(8).
3. RepeatedlyTAPtheCD2/USBFunctionbutton(25)toselectUSBmode.Thesystemwill
startreadingthestoragemediumautomaticallyafterconnectingit,andtheLCDdisplaywill
showthetotalnumberofMP3filesdetected.
4. TAPtheGo/Play/PauseButton(22)tostartplaybackofthesongs.
5. RepeatthesameplaybackprocedureasforplayingCompactDiscsabove.
Notes:
– ThesystemcandetectandreadfilesinMP3formatonlythroughtheUSBsockets‐butnoothermusicfileformat.
– IfconnectinganMP3playertothissystemviatheUSBsocket,duetovariancesinMP3encodingformat,someMP3
playersmaynotbeabletoplay.Thisisnotamalfunctionofthesystem.
– TheUSBportdoesnotsupportconnectionwithaUSBextensioncableorhubandisnotdesignedfordirect
communicationwithacomputer.

11
CAUTION:ConnectingtheUSBplugupsidedownorbackwardscoulddamagetheaudiosystemorthestoragemedia.Make
surethedirectioniscorrectbeforeinsertion.
B) REMOVINGAUSBDEVICE
BeforedisconnectingaUSBdevice,toavoiddamagingthefilesonthedeviceitisrecommendedyouswitchtheunitofforchange
toanotherfunctionfirst:
ForUSB:Pulltheplugstraightout.
USBPLAY/PAUSEORSTOPMODE
1. Tointerruptorpauseplayback,TAPtheGo/Play/Pause
button(22)once,theplayingtimewillfreezeandflashonthe
USBoperationdisplay.TAPitagaintoresumenormalplayback.
2. Tostopplayback,TAPtheSTOPbutton(19)duringplayback.
USBSEARCHMODE
1. Whileinplayorpausemode,iftheSkipupbutton(16)isTAPPED,theunitwillskiptothenexttrack,displaythetrack
numberandtheneitherplaythemusicorstayinpausemode.
2. TAPtheSkipDownbutton(16)togototheprevioustrackandthemusicwillcontinueplayingorstayinpausemode.
3. TAPandholdtheSkip/(TUNE)downorSkipupbuttonduringplayback,andtheplayingtrackwillgobackwardorfastforward
untilthebuttonisreleased.
4. TAPtheFOLDERUPbuttons(15)toselectthedesiredFolder.
C) USBPROGRAMMING(BYREMOTECONTROL)
Upto32tackscanbeprogrammedforaUSBtoplayinanyorder.Beforeprogramming,makesurethesystemisinSTOPmode:
1. TAPthePROGRAMbuttonontheremotecontrol,the“PROG“indicatorwillappearontheLCDdisplay(2).Moreover,itwill
indicatetheprogramnumberanddigitsforthetracknumbertobeprogrammed(001P‐xx).
2. SelectadesiredtrackbyTAPPINGtheskipupordownbuttonsontheremotecontrol.
3. TAPthePROGRAMbuttonontheremotecontroltostorethetrackintomemory.
4. Repeatsteps2and3toenteradditionaltracksintothememoryifnecessary.
5. YoumaydeletethelastprogrammedtrackbyTAPPINGtheCLEARbuttonontheremotecontrol.
6. Whenallthedesiredtrackshavebeenprogrammed,TAPthePLAY/PAUSEbuttonontheremotecontroltoplaytheUSB
intheassignedorder.
7. Tocanceltheprogrammedfiles,TAPtheSTOPbutton(5)twiceandtheword“PROG“disappearsfromtheLCDdisplay.
– TheaboveprogrammingprocedurealsoapplicableforCD2,justselectCD2functionmodefirst.
MP3ENCODINGTOUSB
ThissystemisabletoencodemusicfromaCD,Bluetoothreceiver,Tape,Vinylrecord,Aux‐inorTunertoMP3formatandrecord
thistoaUSBdevice(sizeup32GBmax).ThesectionbelowshowshowtoencodetoUSB:
A) MP3‐to‐USBENCODINGOFANAUDIOCD
ItispossibletoencodeeitherasingleCDtrackoracompleteCDintoMP3formatontoaUSBmemorydeviceconnectedtothis
system.Theprocedureisasfollows:
MP3‐to‐USBEncodingofaSingleCDTrack
1. PlugtheUSBdevice,e.g.aFlashDrivethatyouwishtorecordonto,intotheUSBPort(8)‐makingsureithasenoughmemory
toallowencodingandonlycontainsMP3formatfiles.
2. Switchontheunit(50)andTAPCD1/BT/TAPEfunctionbutton(20).ThenTAPtheHomebutton(13)toselecttheCD1mode.
3. Followtheinstructionof“PLAYINGACOMPACTDISC”toInserttheCDtotheCD1compartment.ThenTAPtheSTOP
button(5)tostoptheCDplayback.
4. SelecttheCDmusicTrackyouwishtoencodebyTAPingtheCD1Skipupbutton(9).
5. TAPtheRECbutton(21)repeatedlytoselectUSBfortheencoding.
6. TAPtheGO/PLAY/PAUSEbutton(22)andthenTAPtheCD1PLAY/PAUSEbutton(6)tostarttherecording.
7. TheUSBiconwillflashontheLCDandencodingoftheplayingtrackhasstarted.
8. Aftertheencodinghasfinished,TAPthestop(19)tostoptheMP3encoding.TheplaybackoftheCDwillcontinue,butno
othertrackwillbeencoded.
MP3‐TO‐USBEncodingofanEntireAudioCD
1. PlugtheUSBdevice,e.g.aFlashDrivethatyouwishtorecordonto,intotheUSBPort(8)‐makingsureithasenoughmemory
toallowencodingandonlycontainsMP3formatfiles.
2. Switchontheunit(50)andTAPCD1/BT/TAPEfunctionbutton(20).ThenTAPtheHomebutton(13)toselecttheCD1mode.
12
3. Followtheinstructionof“PLAYINGACOMPACTDISC”toInserttheCDtotheCD1compartment.ThenTAPtheSTOPbutton
(5)tostoptheCDplayback.
4. TAPtheTSAUTO/MANUALbuttonontheremotecontroltoallowtrackseparation.
5. TAPtheRECbutton(21)repeatedlytoselectUSBfortheencoding.
6. TAPtheGO/PLAY/PAUSEbutton(22)andthenTAPtheCD1PLAY/PAUSEbutton(6)tostarttherecording.
7. TheUSBiconwillflashontheLCDandencodingoftheCDDISChasstarted.
8. Aftertheencodinghasfinished,TAPthestopped(19)tostoptheMP3encoding.TheCDwillstopplayback.
MP3‐to‐USBENCODINGofAudioCDTracksbyProgram
1. SelectthedesiredCDtracksbyfollowingthesameprocedureasfor“CDDiscProgramming”.
2. Followsteps4‐8asforEntireAudioCDencodingabove.
Notes:
– Therecordingspeedis1:1andaccordingtotheactualplayingtimeoftheCDtrack.
– Thesystemwillcreatean“RECORD“folderandthenstoretheencodedtrackinit.
– Therecordingformatispre‐setatMP3bitrate:128kbps,Samplingrate:44.1kHz.
– Songtitleswillnotberecordedduringencoding.
– Tostoprecording,TAPtheSTOPbutton(19)duringrecording.
B) MP3‐to‐USBENCODINGFROMBLUETOOTHRECEIVERORTAPE
1. PlugtheUSBdevice,e.g.aFlashDrivethatyouwishtorecordonto,intotheUSBPort(8)‐makingsureithasenoughmemory
toallowencodingandonlycontainsMP3formatfiles.
2. Switchontheunit(50)andTAPCD1/BT/TAPEfunctionbutton(20).ThenTAPtheHomebutton(13)toselecteither
BluetoothmodelorTapemode.
– ForencodingfromBluetoothreceiver:Followtheinstructionof“BLUETOOTHCONNECTIONANDPLAYBACK”toconnect
theBluetoothdeviceandselectthetrackyouwishtoencodeandgetitreadyforplayback.
– ForencodingfromTape:PlacethecassettetapeyouwishtoencodereadytoplayintheCASSETTEPlayerslot(32)–donot
playityet.
3. TAPtheRECbutton(21)repeatedlytoselectUSBfortheencoding.
4. TAPtheGO/PLAY/PAUSEbutton(22)tostarttherecording.TheUSBiconwillflashontheLCDandencodinghas
started.
5. FromBluetoothreceiver:startplaybackoftheBluetoothdevice,orfromTape:startplaybackofthecassettetape.
6. Afterencodinghasfinished,TAPtheSTOPbutton(19)tostoptheMP3encodingprocessandthenstoptheplaybackof
theBluetoothdeviceorTape.
C) MP3‐to‐USBENCODINGFROMPHONOORAUX‐IN
1. PlugtheUSBdevice,e.g.aFlashDrivethatyouwishtorecordonto,intotheUSBPort(8)‐makingsureithasenoughmemory
toallowencodingandonlycontainsMP3formatfiles.
2. Switchontheunit(50)andselectPHONOmodebyTappingtheFunctionbutton(24)
- ForencodingfromPhono:Placetherecordyouwishtoencodeontheturntableandgetitreadyforplayback.
- ForencodingfromAux‐in:Connecttheaudiodevice(suchasanMP3player,CDplayer,Radio,etc)viaitsheadphonesocket
tothe3.5mmAux‐injack(17)andgetitreadytoplay.
NoteforAux‐inoperation:Aconnectioncablewith3.5mmdia.Stereoplugswillberequired(notsupplied).
3. TAPtheRECbutton(21)repeatedlytoselectUSBfortheencoding.
4. TAPtheGO/PLAY/PAUSEbutton(22)tostarttherecording.TheUSBiconwillflashontheLCDandencodinghas
started.
5. FromPhono:startplaybackofthevinylrecord,orfromAux‐in:playthemusicoftheconnectedexternalaudioplayer.
6. Afterencodinghasfinished,TAPtheSTOPbutton(19)tostoptheMP3encodingprocessandthenstopthePhonoor
Aux‐inplayback.Removetherecordordisconnecttheexternaldevicewhenfinished.
D) MP3‐to‐USBENCODINGFROMTUNER
1. PlugtheUSBdevice,e.g.aFlashDrivethatyouwishtorecordonto,intotheUSBPort(8)‐makingsureithasenoughmemory
toallowencodingandonlycontainsMP3formatfiles.
2. Switchontheunit(50)andTAPDAB/FMfunctionbutton(26).ThenTAPtheHomebutton(13)toselectthetuneryouwishto
record.
3. Followtheinstructionof“FM&DABRADIOFUNCTION”totunetothedesiredradiostation.
4. TAPtheRECbutton(21)repeatedlytoselectUSBfortheencoding.
5. TAPtheGO/PLAY/PAUSEbutton(22)andthenTAPtheCD1PLAY/PAUSEbutton(6)tostarttherecording.
6. TheUSBiconwillflashontheLCDandencodinghasstarted.
7. Afterencodinghasfinished,TAPtheSTOPbutton(19)tostoptheencodingprocessandturnofftheturnerifnecessary.
13
E)
TRACKSEPARATIONDURINGMP3ENCODING
DuringMP3encoding,thetracksofthemusicbeingrecordedcanbeseparatedtocreategapsbetweenthem,whichwillallow
youtoskipforwardorbackwardduringplaybackoftheencoded/recordedsongs.
EachtimetheEncoding(trackseparation)button(28)isTappedduringencoding,thesystemwillgenerateanewtrackand
continuetheencoding.
F)
ERASINGFILESONAUSBFLASHDRIVE(ByRemoteControl)
ThesystemisabletodeleteasinglefileorallfilesstoredonaUSBflashdrive–theprocedureisasfollows–withtheUSB
connected….
Deletingthelasttrack
1. TAPtheCD2/USBfunctionbutton(25)toselect“USB“‐butstayinSTOPmode.
2. TAPandholdtheERASEbuttonontheRemoteControlfor2‐3second,“ErSALL”willshowonthedisplay.
3. TAPtheERASEbuttonagainandthedisplaywillchangeto“ErSXXX”whichisthelasttracknumber.ThenTAP
GO/PLAY/PAUSEbutton(22)toconfirmthedeletion.
4. AfterdeletingthefiletheDisplaywillshowthetotalnumberoffilesleftontheUSBflashdrive.
DeletingAllfiles
1. SelectUSBmodebutstayinSTOPmode.
2. TAPandholdtheERASEbuttonontheRemoteControlfor2‐3second,“ErSALL”willshowonthedisplay.
3. TAPtheGO/PLAY/PAUSEbutton(22)toconfirmthedeletion.
4. TheDisplaywillshow“ALL0”.
Note:AllfilesstoredonaUSBstoragedevicewillbedeletedcompletelyandpermanentlyafterconfirmingto“A LL”.
BLUETOOTHCONNECTIONANDPLAYBACK
1. TAPtheCD1/BT/TAPEfunctionbutton(20)andTAPtheHOMEbutton(13)toselectBluetoothReceiver(BT)mode.
2. TheLCDdisplay(2)willfirstshow“CONNECTING”andthenchangeto“PAIRING”andflashing–meaningtheBluetooth
functionisnowinsearchingorpairingmode.
3. SwitchontheBluetoothfunctiononyourBluetoothdevice(suchasaMobilePhone,Tablet,etc)andselecttheBluetooth
Code“BRITANNIA”–whichisforthe“BT”equipmenttostartconnectingtothisunit.
4. Oncetheconnectionisfinishedandtheequipmentsuccessfullypaired,“CONNECTED“willbeshownontheLCDdisplay.
5. StartplaybackofthemusiconyourexternalBluetoothdeviceandenjoythemusicthroughthespeakersofthisequipment.
AdjusttheVolume(23)toasafelevel.
6. YoucanTAPtheunitPLAY/PAUSE”button(22)orskipuporskipbackbutton(9)tocontroltheplayback
mode.
7. YoucanTAPandholdtheBluetoothdisconnectbuttonontheremotecontrolforaround5secondsto
disconnectthepairedexternalBluetoothdevice.
8. YoucanalsoTAPtheBluetoothre‐connectbuttonontheremotecontroloncetore‐connectthepreviously
pairedexternalBluetoothdevice.PleasemakesuretoturnontheBluetoothfunctiononyourBluetoothdevice.
Notes:
1. Refertothemanualofyourcellphone,tabletPC,computerorotherBluetoothenableddevicesforBluetoothoperationsinceitmayvary
frommodeltomodel.
2. IfyourBluetoothenableddevicedoesnotsupportA2DPprofile,itwillnotplaythemusicthroughthespeaker,evenifpaired(linked).
3. Remembertoturnofftheunitwhenyouhavefinishedlistening,
4. Don'tforgettoswitchoffthepowerofyourBluetoothdeviceaswell.
5. Themusicplaybackwillautomaticallybepausedwhenyouhaveanincomingcall.Whenthecallisended,theunitwillstartplaying
again.
BTT‐BLUETOOTHTRANSMISSION&MUSICSTREAMING
PairingtheRecordPlayerwithanexternalBluetoothSpeakersystem
Althoughthisunitissuppliedwithtwostereospeakers,italsohasabuilt‐inBluetoothTransmitter(BTT),whichgivesyoutheoptiontoplay
yourrecords/CD/TapeandlistentothemwirelesslythroughanexternalBluetoothspeakersysteminstead.
Thiscanonlybedoneiftheexternalspeakerhasabuilt‐inBluetoothReceiver.Therangeisapproximately10metres.
1.
SwitchonyourexternalBluetoothspeaker/speakersystemandwaitforaboutoneminuteforthefirstconnection.
Note:Thiswillbeshorterforthesecondconnection(ifusingthesameBluetoothspeaker)‐thisisnormalforthisunit.
2.
SwitchonthePOWER/ON/OFFbutton(50)andTAPthefunctionmodebutton(20,24,25or26),andhomebutton(13)if
necessary,toselectthedesiredfunctionmodeyouwishtoconnecteditwith.

14
3. OnceconnectedtotheexternalBluetoothspeakersystem,theBTTBluetoothTransmitLEDindicatorlight(49)ontherecord
playerlightssteadilyandthesoundfromtheconnectedBritanniaspeakerboxeswillbecutoffautomatically.Youcannow
playandwirelesslystreamyourrecordsfromtherecordplayertoyourexternalBluetoothspeaker(s)‐adjusttheVolumeon
thespeaker.
4. Ifpairingisunsuccessful,TAPtheBTTbutton(12)onthemainunitoncetodisconnectandrestartthesearchingagain.
ThenswitchyourBluetoothspeakeroffandonagainforre‐connection.
5. IfyouwanttopairwithadifferentBluetoothspeakersystem,TAPtheBTTbutton(12)onthemainunitonceto
disconnect,thenmakesureyouswitchthepreviouslyconnectedBluetoothspeakeroffandtheBluetoothtransmitterwill
returntoStandbymode.
6. SwitchontheotherBluetoothspeaker/speakersystemyouwanttoconnectto–therecordplayerwillsearchandconnectto
thealternativeBluetoothspeaker/speakersystem.Thenplayyourrecordandstreamthemusicwirelessly.
Bydefault,theBTTBluetoothTransmitLEDindicatorlight(49)willonlylightupwhenconnectionissuccessful,and
willnotbeflashingduringconnectionprocess.Thisisnormal.
Notes:
Ifyoufoundtheplaybacksoundintermittentlyafterconnection,disconnecttheBluetoothspeakersystemfromthe
Britanniarecordplayerandpowerofftheunit.Thenturnontheunitandre‐connecttheBluetoothandstartplaybackagain.
RefertotheinstructionmanualoftheexternalBluetoothspeaker/speakersystemyouareusingastheoperationwillvary
frommodeltomodel.
RemembertoturnofftheBritanniawhenyouhavefinishedlistening.
Don'tforgettoswitchoffthepowerofyourexternalBluetoothspeakeraswell.
LISTENINGTOCASSETTETAPE
Generaloperation
Stop/ejectkeyPRESStostopalldeckoperation.PRESSagaintoopenthecassettedoor.
Fastforwardkey&PRESStostartrapidtapewindingineitherforwardorreverse
Fastrewindkeydirection.PRESSstop/fastrewindkeyejectkeyswhenthecassettespoolsstopturning.
PlaykeyPRESStostartplayingtape.
PausekeyPRESStostoptapeoperationtemporarily.PRESSagaintoresumeplay.
RecordkeyPRESStogetherwithplaykeytostarttaperecording.
(deck1only)
CASSETTEPLAYBACK
1. PRESStheCD1/BT/TAPEfunctionbutton(20)andPRESStheHOMEbutton(13)toselectTapemode.
2. PRESSthe“STOP/EJ.”(eject)keytoopenDeck2.
3. Insertapre‐recordedcassettetapewiththeexposedpartofthetapefacingdownwards.
Note:seesectiononCassetteCarebelowbeforeproceeding.
4. PRESSthe“PLAY“keytostartplayback.
5. Adjustthevolume(23)tothedesiredsoundlevel.
6. Usethe“PAUSE“keytotemporarilystopplayback.
7. PRESSthe“STOP/EJ.“Keywhenfinished.PRESSitagaintoopenthecassettedoor.
8. Removethetapecassette.
“CONTINUOUSPLAY”FUNCTIONFORDOUBLECASSETTEPLAYER
Toplaycassettesinbothcassetteplayers,oneaftertheother:
1. Insertapre‐recordedmusiccassetteinbothcassetteplayersasnormal.
2. ThenPRESSthe“PLAY”buttonatDeck2,whichwillstartplaying.
3. PRESSthe“PAUSE”and“PLAY”buttonstogetheratDeck1.
4. ThetapeinDeck1willstartplayingautomaticallyafterthetapeinDeck2hasfinishedplaying.
Notes:
– Makesurethedirectioniscorrectwheninsertingatapeintothecassetteslot.Somesearchingnoisewillbeheard,thisis
quitenormal.
– ItisstronglyrecommendedthecassettetapeisremovedfromtheCassettePlayerslotaftereachuse‐don’tleavethe
cassettetapeinsidethesystemwhenyoudonotintendtoplayit.
15
RECORDINGTOCASSETTE
A.RECORDINGFROMCASSETTETOCASSETTE(DECK2TODECK1)
Thisunitenablesyoutoduplicateapre‐recordedtapetoanothertape.ThiscanonlybeperformedfromDeck2(playback)
toDeck1(recording).
DUBBING(RECORDINGTOTAPE)ATNORMALSPEED
1. SelectTAPEfunction.
2. Insertapre‐recordedcassettetapeintoDeck2andablankcassettetapeintoDeck1.
3. PRESSthe“PAUSE”keyandthenPRESSthe“RECORD”and“PLAY”keytogetheratDeck1.
4. PRESSthe“PLAY”keytostartplaybackatDeck2andthenPRESSthe“PAUS E”keyatDeck1tostartdubbing.
5. PRESSthe“PAUSE”keyatDeck1andthenthe“STOP”keyatDeck2whenfinishedrecording.
B.RECORDINGFROMRADIOTOCASSETTE
1. SelectFMorDABfunction.
2. Tunetothedesiredstationandinsertablankaudiocassettetape(preferablyabrandedC60)inDeck1.
3. Pressthe“RECORD”&“PLAY“keystogethertostartrecording.
4. Pressthe“PAUSE”keyandthenthe“STOP/EJECT”keywhenfinishedrecording.
NOTE:DuringrecordingofsomeAM(=MW)radiostations,someinterferenceinreceptionmaybeexperienced.Thisis
normalandnotamalfunctionofthesystem.
C.RECORDINGFROMTURNTABLETOCASSETTE
1. SelectPHONOfunction.
2. InsertablankcassettetapeinDeck1.
3. Pressthe“PAUSE”keyfirstandthenthe“RECORD”&“PLAY“keystogether–thecassette.Recordingfunctionisnow
instandby.
4. StartplayingtherecordtoberecordedandthenPressthecassette“PAUSEKEY”tostartrecording.
5. Tostoprecording,Pressthe“PAUSE”keyandthenthe“STOP/EJECT”keyatthecassettetapedeckfirst,thenreturn
thetonearmbacktothearmrest.
D.RECORDINGFROMCDITOCASSETTE
1. SelectCDIfunction.
2. InsertablankcassettetapeinDeck1.
3. Pressthe“PAUSE”keyfirstandthenthe“RECORD”&“PLAY”keystogetheratcassetteDeck1controls.The
recordingfunctionisnowinstandby.
4. Startplayback(6)oftheCDmode,andthenPressthe“PAUSEKEY”atDeck1tostartrecording.
5. Tostoprecording,Pressthe“STOP”button(5)inCDmodefirst,thenPressthe“PAUSE”keyatDeck1andthenthe
cassette“STOP/EJECT”key.
E.RECORDINGFROMUSBTOCASSETTE
1. SelectUSBfunction.
2. InsertablankcassettetapeinDeck1.
3. Pressthe“PAUSE”keyfirstandthenthe“RECORD”&“PLAY”keystogetheratcassetteDeck1controls.The
recordingfunctionisnowinstandby.
4. Startplayback(22)oftheUSBmode,andthenPressthe“PAUSEKEY”atDeck1tostartrecording.
5. Tostoprecording,Pressthe“STOP”button(19)inUSBmodefirst,thenPressthe“PAUSE”keyatDeck1andthen
thecassette“STOP/EJECT”key.
CASSETTECARE
Twocommoncausesoftroubleexperiencedwhenusingcassettesare:
- Tapejamming,leadingtounevenspeedduringplayback.
- Tapeentangling,whenthetapewrapsitselfaroundvitalpartsofthemechanism.
Toavoidtheseproblemsoccurring,takethefollowingprecautions:
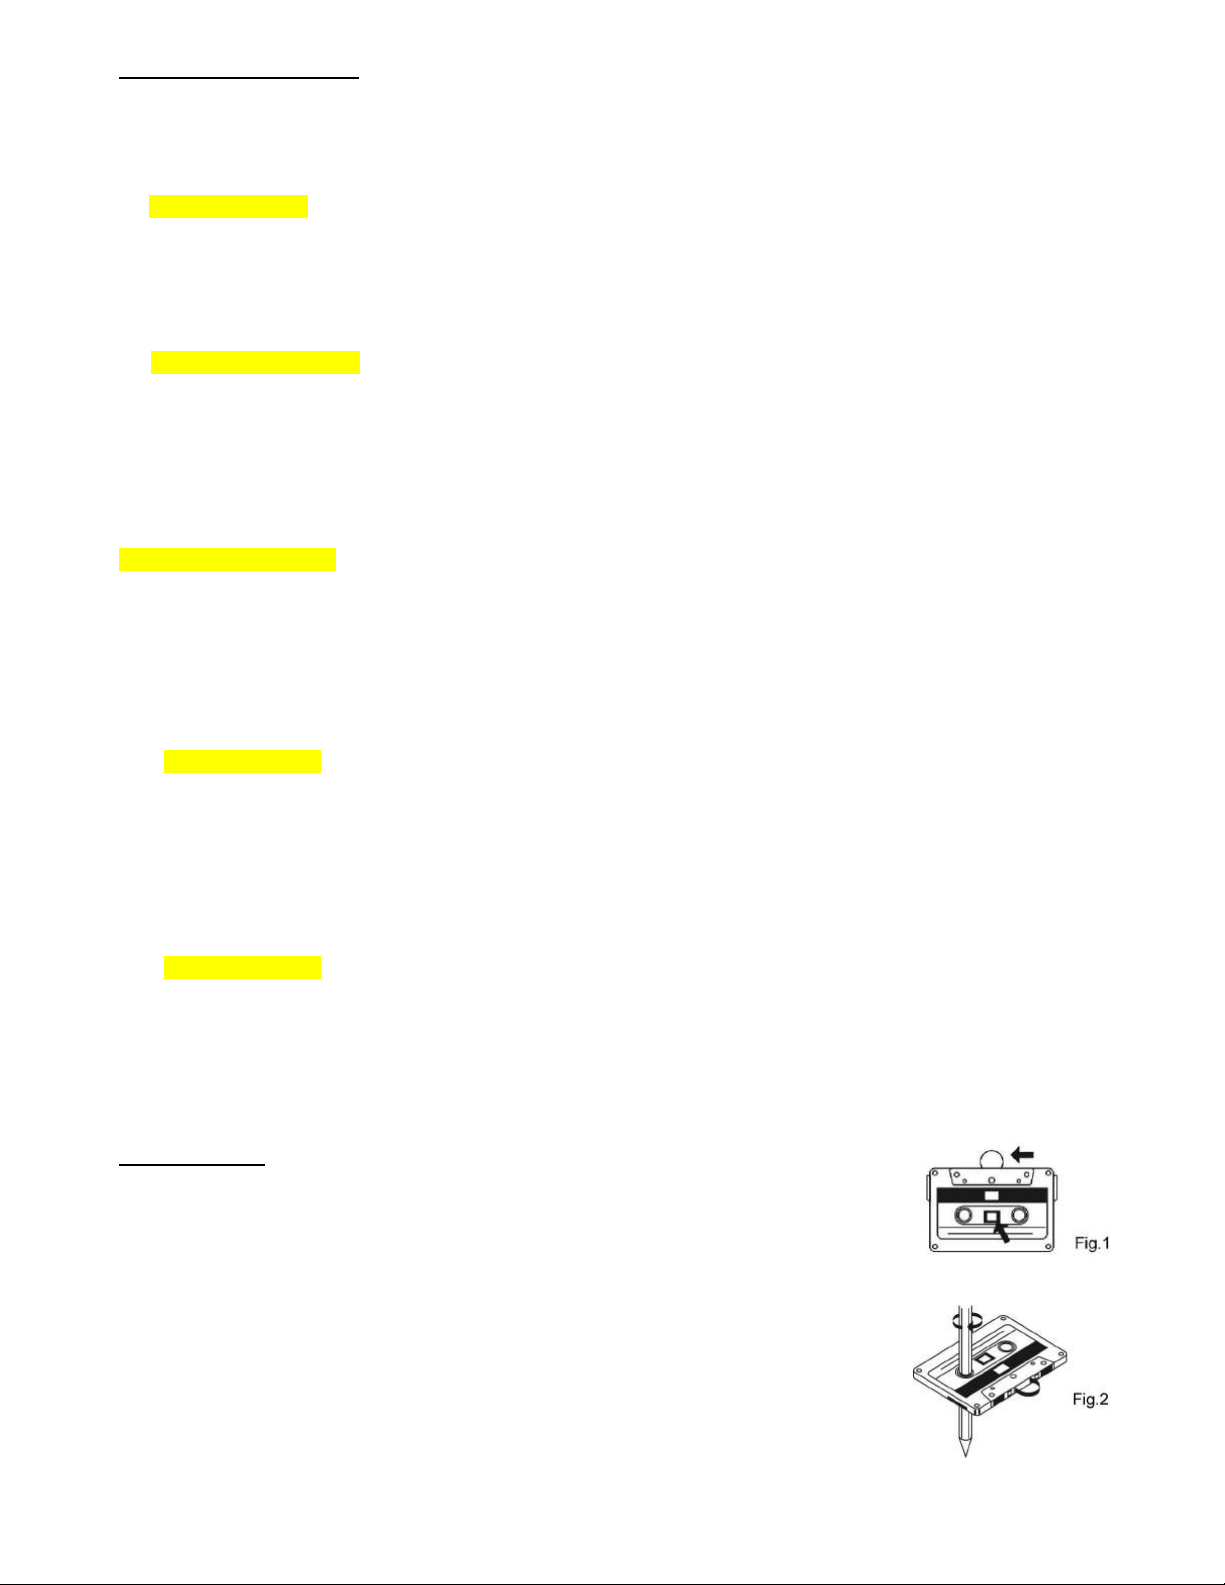
a) Checkthattherearenolooselayersoftapevisiblethroughthecassettecentrewindow(seefig.
1).
b) Takeupanylooselayers(usingapencilorballpointpenwithhexagonalbarrell)beforeinserting
thecassette(seefig.2)intothemechanism.
Notes:Ifthecassettefeelstightwhilstperformingthisoperation(seefig.2),thetapemaybe
jammingduetoridgesformedinthewindingofthetape(visiblethroughthecentrewindow).In
mostcases,thesemayberemovedbyfastrewindingofthecassettefromoneendtotheother,
turningitoverandrepeatingthisactionagain.
Donotexposecassettestodirectsunlight,dustoroil,anddonottouchthetapesurfaces.

16
CD2‐CDRECORDER
CDRECORDINGFUNCTION
ApartfromtheCDplaybackfunction,thissystem’sCD2mechanismcanalsorecordfromCD/Phono/Aux/Tape/USB/Bluetooth
RecivermodestoCD.
Importantnotes:
– Allrecordedtrackswillbestoredin“AUDIO‐CD“format.
– A“CD‐R”disccanberecordedononlyonceandcannotbeerasedorre‐recordedonto.ThiscanonlybedoneonaCD‐RW
(Re‐Writable)disc.Also,aDVDdisccannotbeusedwiththissystem.
– TheplaybackqualityofeitheraCD‐RorCD‐RWdiscvarieswhenplayedbackondifferenttypesofaudioCDplayers.
– TherevolvingspeedofaCDBurnerishigherthanthatofanormalCDmechanism,therefore,somemechanicalnoiseand
vibrationoftheunit’scabinetmayoccurduringoperation.Thisisnotamalfunctionofthesystem.
– DuetothevarietyinthequalityandcompatibilityofCD‐R(W)discsavailableinthemarketplace,pleasechangetoanother
brandofrecordablediscifyoufinditisnotpossibletorecordontheoneusedoritsperformanceisnotstable.
RECORDINGTOCD
IMPORTANTNOTE:Beforestartingthisprocess,TAPtheCD2/USBfunctionbutton(25)to
selecttheCD2function.theCD2OPEN/CLOSEbutton(27)toopentheCDdrawer(34)
andplaceablankCD‐RorCD‐RWdiscinthetray–printedsidefacingupwards.
Note:ThedisccanonlybeusedforrecordingiftheLCDdisplayshows“NOTOC“(i.e.‘NoTableofContents’),whichmeansitis
ablankandrecordabledisc.
WhenRecordingVinylorCassetteswerecommendusingmanualTS(TrackSeparation)asAutomaynot
sensethetrackgaps
A)CDRECORDINGFROMPHONOORAUX‐IN
1. TAPthePHONO/AUXfunctionbutton(24)toselectPHONO(recordplayer)mode.
‐ForPhono:PlacethevinylrecordyouwishtorecordtoCDontheturntableandgetitreadyforplayback.
‐ForAux‐in:Connectanexternalaudiodevice(suchasanMP3player,CDplayer,DABRadio,etc)viaitstheheadphone
orotheroutputsockettothe3.5mmdia.Aux‐injack(17)onthisunit(aconnectingcablewith3.5mmdia.stereoinput
plugwillberequired–notsupplied).
2. TAPtheREC“button(21)repeatedlyandtheLCDdisplaywillshow“CD”–“USb”insuccession.
3. Select“CD”andthenTAPtheGO/PLAY/PAUSE”button(22)tostartrecording‐theLCDwillshowandthe“CD”
iconwillbeflashing–indicatingthesystemisrecordingnow.
4. Nowstartplaybackoftherecord(Phono),orthemusicontheexternaldevice(Aux‐in),separatingthetracksduringrecording
ifrequired.
5. Whentherecordinghasfinished,TAPtheSTOPbutton(19)‐thenstopplaybackofthevinylrecordorthemusicofthe
audioplayerconnectedtoAux‐inandremovetherecordorunplugtheexternaldevice’scable.
6. “Finalize”therecordeddisc,asdescribedelsewhereinthismanual.
B)CDRECORDINGFROMTAPEORBLUETOOTHRECEIVER(BT)
1. TAPtheCD1/BT/TAPEfunctionbutton(20)andTAPtheHOMEbutton(13)toselectTapeorBTmode.
‐ForCassette:Placeapre‐recordedcassettetapeintheCASSETTECOMPARTMENT(29or32),readytoplaybackthetracks
youwishtorecord.
‐ForBluetoothreceiver:ConnecttheBluetoothdevicefollowingtheBluetoothConnectionandPlaybackinstructionand
readytoplaybackthetracksyouwishtorecord.
2. TAPtheRECbutton(21)repeatedlyandtheLCDdisplaywillshow“CD”–“USb”insuccession.
3. Select“CD”andthentheGO/PLAY/PAUSEbutton(22)tostartrecording.
4. Atthispoint,TAPtheplaybackcassettekeyorTAPtheplaybackbuttonoftheBluetoothdevicetostartplaybackofthetracks
youwishtorecord.
5. Afterrecordinghasfinished,TAPtheSTOP”button(19)andthenstopplaybackofthetapeortheBluetoothdevice.
6. EjectandremovetheCassettetapefromtheplayerordisconnecttheBluetoothdevicewhenfinished.
7. “Finalize”therecordeddisc,asdescribedelsewhereinthismanual.
C)CDRECORDINGFROMFMRADIOORDAB
1. TAPtheDAB/FMfunctionbutton(26)andTAPtheHOMEbutton(13)toselectDABorFMmode.
2. Selectthestationthatyouwishtorecord.
3. TAPtheRECbutton(21)repeatedlyandtheLCDdisplaywillshow“CD”–“USb”insuccession.
4. Select“CD”andthentheGO/PLAY/PAUSEbutton(22)tostartrecording.
5. Afterrecordinghasfinished,TAPtheSTOP”button(19).
6. “Finalize”therecordeddisc,asdescribedelsewhereinthismanual.

17
D)CDRECORDINGFROMUSB
1. InsertaUSBdevice(refertothe“PlaybackofMP3songsonUSBstoragedevice”sectionelsewhereinthismanual).
2. TAPtheCD2/USBfunctionbutton(25)repeatedlytoselectUSBmode.
3. Select(Skipup/Downbutton(16))thetrackyouwishtorecordandTAPtheGO/PLAY/PAUSEbutton(22)to
startplayback.TAPtheRECbutton(21)tostartrecording.Then,theunitwillstartrecordthetracktotheCD
automatically
4. Afterrecordinghasfinished,TAPtheSTOP”button(19)tostoptherecordingandTAPitagaintostopplaybackoftheUSB.
5. “Finalize”therecordeddisc,asdescribedelsewhereinthismanual.
Notes:
– Therecordingspeedis1:1andaccordingtotheactualplayingtimeoftheplayingsource.
– ThemaximumminutesofmusicthatcanberecordedonablankCDisapproximately65‐70minutes.Whenthecapacityof
theCD‐Rdiscisfull,onthedisplay“FULL”willappear‐TAPtheSTOPbutton(19)andchangetoanotheremptyCD‐Rdisc
tocontinuerecording.
E)CDCOPYING&RECORDINGOFANAUDIOCD
i)CDRecordinfromandaudioCDINCDI
1. TAPtheCD1/BT/TAPEfunctionbutton(20)andTAPtheHOMEbutton(13)toselectCDmode.
2. TAPtheCDIopen/closebutton”(7)toopenthedrawerandinsertthepre‐recordedAudioCDyouwishtorecordtoCD.
3. TAPtheCDI/USBStopbutton(5)tostoptheplayback.
4. NowTAPtheCDISkipupbutton(9)tochoosethetrackyouwishtorecord.Remainedinstopmode.
5. TAPtheRECbutton(21)repeatedlyandtheLCDdisplaywillshow“CD”–“USb”insuccession.
6. Select“CD”andthentheGO/PLAY/PAUSE
button(22)tostartrecording.
7. ThenTAPtheCDIPlay/Pausebutton(6)tostartplaybackofthetracktoberecorded.
8. IfrecordingthecompleteCD,separatethetracksifrequired.
9. Afterrecordinghasfinished,TAPtheCDIStopbutton(5)tostoptheCDplaying,andthentheCD2Stopbutton(19)to
stoprecording.
10. “Finalize”therecordeddiscintheCD2drawerifyouwishittoplayitinanotherCDPlayer.
ii)RecordingaSelectedTrackfromaCDDiscbyPROGRAMfunction
1. TAPtheCD1/BT/TAPEfunctionbutton(20)andTAPtheHOMEbutton(13)toselectCDmode.
2. TAPtheCDIopen/closebutton”(7)toopenthedrawerandinsertthepre‐recordedAudioCDyouwishtorecordtoCD.
3. TAPtheCDI/USBStopbutton(5)tostoptheplayback.
4. Selectthedesiredtracksbyfollowingtheprevious“CDDiscProgramming“procedures.
5. TAPtheRECbutton(21)repeatedlyandtheLCDdisplaywillshow“CD”–“USb”insuccession.
6. Select“CD”andthentheGO/PLAY/PAUSEbutton(22)tostartrecording.
7. NowTAPtheCDIPlay/Pausebutton(6)tostartplaybackoftheprogrammedtrackstoberecorded.
8. Followprocedures8‐10asabovetocompletetherecording.
Notes:
– Therecordingspeedis1:1andthesameastheactualplayingtimeoftheplayingsource.
– Tosuspendtherecordingprocess,TAPtheCD2GO/Play/Pausebutton(22),“bUSY“willflashforasecondontheLCDdisplay‐a
newrecordingtracknumberwillbegeneratedandtherecordingwillbepaused.Tore‐starttherecording,TAPtheCD2
GO/Play/Pausebutton(22)again,theplayindicator willshowontheLCDdisplay.
– WhenthecapacityofthediscCD‐Risfull,theword“FULL”willappearonthedisplay–TAPtheCD2Stopbutton(19)andchange
toanotherempty/blankCD‐Rdisctocontinuerecording.
F)RECORDINGSETTING(onremotecontrolonly)
i)Recordinglevel
Duringrecording,theRecordinglevelcanbeadjustedbyTAPingtheRECLEVEL‐/+buttons(from‐3,‐1,0dB,+1,+3,+5,+6,+8
respectively)toavoiddistortioniftherecordingsourcelevelistoohigh.
ii)TRACKSEPARATIONDURINGRECORDING(ONTHEREMOTECONTROL)
Youcandividetherecordingmusictrack‐by‐trackduringrecordingbyselectingeithertheAUTOorMANUALmode:
a)Automode
TAPtheTSAUTO/MANUALbuttonontheremotecontrolwhenpreparingfortherecordingfunction,theLCDDisplaywillshow:
‐20db,‐30db,‐40db,the“AUTOTRACK”iconwillappearontheLCDdisplay.
Whentherecordingsoundlevelhasdroppedbelowthe‐20/‐30/‐40dB(recordingsignal)respectively,thecurrentlyrecording
trackwillfinishandanewtrackwillbegenerated–thesystemwillautomaticallycontinuerecordingthenexttrack.
Itisrecommendedtosetalowerrecordinglevelforthemusicsourcewithclearperformance,suchasfromUSB,andtoseta
higherrecordinglevelforahighernoisemusicsource‐suchasavinylrecord:

18
“–20dbor–30db“–forrecordingofUSBorAux‐inwithdigitalmusicsource
“–30dbor–40db“–forrecordingofTapeorPhonomode
“‐‐‐‐‐‐‐“–automodeoff
Note:
Theaboveisjustarecommendation,theactualperformanceisvariableanddependsondifferentmusicsources,soifthecut‐off
pointisalwaysmisjudgedforcertainmusicfiles,pleaseusethemanualmodeinstead.
b)Manualmode
TAPthetrackseparationbutton(28)onceatanytimeduringrecordinginanymode,andthesystemwillgenerateanew
trackandcontinuetherecording.
Theword“busy“willbrieflyshowontheLCDdisplaywhentheunitissuccessfullycreatinganewtrack.
G)FINALIZINGACD‐R(W)DISC
YoumustconverttheCD‐R(W)discintoastandardAudioCDbeforeyoucanplayitbackinanyotherAudioCDplayer.This
processisknownas“FINALIZING”‐atableofcontents(TOC)willbewrittenontheCDatthesametime.
Theprocedureisasfollows:
1. TAPtheCD2/USBfunctionbutton(25)repeatedlytoselecttheCD2functionfirst–thenopen(27)theCDdrawerandplace
theCD‐R(W)discyouaregoingtofinalizeintheCDtray(34)–ifnotalreadyinthetray.
2. TAPtheFINALIZEbutton(14)inCDSTOPmode.“Fin‐dIC“appearsontheLCDdisplay.
3. TAPtheGO/PLAY/PAUSEbutton(22)tostartfinalizingandtheLCDdisplaywillshow“BUSY“duringtheprocess.
4. Afterthedischasbeenfinalized,theCDtraywillopenautomaticallyand“OPEN“willappearontheLCDdisplay.
Notes:
– Thetimeittakestofinalizeadiscdependsonthecontentsoftherecordeddisc‐thismaytakeupto15mins,butusuallyless.
– Nobuttonswillbeworkingduringthefinalizingprocess.
– Neverturnthepowerofforunplugthepowercordduringthefinalizingprocess.
– Oncerecordedonandafterfinalizingadiscyoucannotrecordagainona“CD‐R”discoreraseanytracks.
– Althoughafinalized“CD‐R”discmayplayonotherCDPlayers,rememberthatafinalized“CD‐RW”discisnot
guaranteedtoplayonallotherCDPlayers.
– DuetodifferencesincompatibilitywiththeunitofCD‐RorCD‐RWdiscs,pleasechangetoanotherbrand,orevenanother
oneinthepack,ifyoufindtheperformanceoftherecordingnotsatisfactory.Thisisnotamalfunctionofthesystem.
F)UN‐FINALIZINGandERASINGACD‐RWDISC
Itispossibletoerasethelastrecordedtrackorerasealltracksrecordedona“CD‐RW”(re‐writeable)disc.
Notes:Itisnotpossibletoun‐finalizeordeletetracksfroma“CD‐R”disc.
Ifyouwishtoerasethelasttrackofa‘finalized’CD‐RW,youmust‘un‐finalize’thewholeCD‐RWfirst.
i)UN‐FINALIZINGACD‐RWDISC(OnlyontheRemoteControl)
1. SelecttheCD2function,opentheCDdrawerandplacetherecordedCD‐RWdiscyouwouldliketoun‐finalizeinthe
tray.
2. WiththeCDplayerstopped
(19)
,
TAPtheERASEbutton(FoundontheremoteOnly)–thedisplaywillshow“UNF‐dIC”.
3. ThenTAPthePLAY/PAUSEbutton(22)tostarterasing‐“bUSY“willappearonthedisplayduringerasing.
4. Whentheunithasfinishedun‐finalizingtherecordeddisc,thedisplaywillshowthetotalnumberoftracknumbersandtotal
playingtimeofthediscandthe“NOTOC”indicatorwillappearonthedisplay.
ii)ERASINGTHELASTTRACK
1. SelectCD2
function(25),opentheCDdrawerandplacetheun‐finalizedCD‐RWyouwishtodeletejustlasttrackfrominthe
CDtray.
2. WithCDstopped
(19),TAPandholdtheERASEbuttonontheRemoteControlfor2‐3second,“ErSALL”willshowon
thedisplay.
3. TAPtheERASEbuttonagainandthedisplaywillchangeto“ErSXXX”whichisthelasttracknumber.
4. TAPtheGO/PLAY/PAUSEbutton(22)toerasethelasttrackontheCD‐RWdisc–“bUSY“willshowontheLCDdisplay
duringerasing.
5. Whenfinishederasing,thedisplaywillshowthetotaltracknumbersandthetotalplayingtimeofthediscandthe“NOTOC”
indicatorwillappearonthedisplay.
6. Repeatsteps2to4tocontinueerasingmoretracks.
iii)ERASINGALLTRACKS
1. SelectCD2function(26),opentheCDdrawerandplacetheun‐finalizedCD‐RWyouwishtoerasealltracksfrominthetray.
2. WithCDstopped(19),TAPandholdtheERASEbuttonontheremotefor2‐3seconds‐“ErSALL“willappearontheLCD
display.
3. TAPtheGO/PLAY/PAUSEbutton(22)tostarterasingallthetracksontheCD‐RWdisc‐“bUSY”willshowonthedisplay
duringerasing.
4. Onceerasinghasfinished,theLCDdisplaywillshow“000:00“toconfirmtheerasingprocessiscomplete.

19
35.CDTRAY
MANUALEJECTHOLE
Notes:
– Oncethetracksareerased,thiscannotbeundone.
– ItisnotpossibletoeraseonetrackatatimeonthisunitfromacopiedCD‐RWdiscthatwasrecordedonanothersystem,
butitmaybepossibletoerasealltracks.
AUX‐INCONNECTION&PLAYBACK
Connectanotheraudiodevice,e.g.a(portable)CDorCassettePlayer,orothertapeplayer,MP3playerorRadiotothissystem
viaacordwith3.5mmdia.plugs(notsupplied).Connectoneendofthiscordtothe3.5mmdia.HeadphoneJackonthe
externaldeviceandtheotherendtotheAUX‐INjack(17)onthefrontpanelofthisunit.
Whenconnectedinthiswayitispossibletoeitherplaybackorrecordthemusicontheconnecteddevice:
1. TAPthePHONO/AUXfunctionbutton(24)toselectPHONOmode.
2. Plugtheexternaldevice’sconnectionlead(notsupplied)intotheAUX‐INjack(17)ofthisunit.
3. Startplayingbackthemusiconyourexternaldeviceandadjustthevolumebyturningthe
VOLUME
knob(23)orTAPtheVOL
‐/+buttonsontheRemoteControl.
Notes:
– Ifyouexperienceanysounddistortion,reducethevolumelevelonyourauxiliarydevice.
– Remembertounplugtheexternaldeviceifyouwishtoplayarecordorelsetheturntablewillnotbeabletorotate.
LINEOUTCONNECTION
YoucanconnectthissystemtoanotherHi‐FisystemandplaythemusicthroughtheAmplifierandspeakersofthatunit.
ConnectthetwoplugsofanRCAcable(notsupplied)fromtheLineOutsocketontherear(40)totheAuxiliaryInputsocketof
theotherunit.
HEADPHONECONNECTION
Connectyourheadphones(notincluded)tothe3.5mmdia.HeadphoneJack(18)forprivatelistening.
Withheadphonesconnected,thesoundfromtheunit’sspeakerswillbemuted.
CAUTIONS:
– Beforelistening,makesurethevolumeisadjustedtoasafeandcomfortablelevel.
– Avoidextendedplayataveryhighvolumeasitmayimpairyourhearing.
– Ifyouexperienceringinginyourears,reducethevolumeorshutoffyourunit.
– Keepthevolumeatareasonableandsafelevel‐evenifyourheadsetisanopen‐airtypedesignedtoallowyoutohear
outsidesounds.Pleasenotethatexcessivelyhighvolumemaystillnotblockoutsidesounds.
SUBWOOFERJACK
ConnectapoweredoractiveSubwoofer(notsupplied)totheSubwooferJack(47)ontherearofthisunittoaddextraBASS
sound.ThesoundoftheSubwoofercanonlybeadjustedbyitsowncontrols.
*Contactyoursupplier,orSteepletoneUKLtd,forasuitablesubwoofersystemtousewiththisunit.
X‐BASSBUTTON
ForenhancedBasssound,TAPtheX‐BASSbutton(51)into‘ON’–TAPitagaintoswitchthisfeatureoff.
HOWTOMANUALLYEJECTTHECDDRAWER
IfthepowerisinterruptedorifyounoticeaproblemoccursduringtheCDburningprocess,theCDtraymaynotejectwhenthe
ejectbuttonisTAPPED.Ifthathappens,youwillneedtomanuallyejecttheCDtraytoretrievetheCD,dothefollowing:
1. TurnthepowertotheunitOFFfirst–DONOTmanuallyopenthetraywhenthereispowertothedrive!
2. Locatethe
MANUALEJECTHOLE
(35)onthefrontoftheCDtrayasshownbelow.
3. Gentlyinsertastiffwire,suchasastraightenedpaperclip,intotheCDTRAY
MANUALEJECTHOLE
.
4. Whenresistanceisfelt,gentlyTAPharderuntilthedrivetrayopensslightly.
5. GentlypullthetrayouttherestofthewaybyhandtoexposetheCD.
6. Restartthesystemandrepeattheburningprocessagain.
Table of contents
Other Steepletone Stereo System manuals


