Steinbach Solar Collector Deluxe User manual

Speedsolar Solarcollector Deluxe
2011_V2 page 1 of 11
OWNER’S MANUAL
Solar Collector DELUXE

Speedsolar Solarcollector Deluxe
2011_V2 page 2 of 11
Basic safety precautions are always observed. Errors caused by not following the instructions below could result
in serious injury or serious accidents.
Read all instructions before assembling and using this product. Failure to follow instructions can cause severe
and/or fatal injury.
Read all instructions and all CAUTION and NOTE notices located throughout this manual before assembling and
using this product.
Do NOT allow children to operate this product.
Always turn off the filter system when installing or working on the solar collector.
Install the unit out of reach of children.
Install product away from the pool to prevent children from using the collector as a way to access the pool
(enough safety distance).
Do not use any petroleum based lubricant. Petroleum based products will destroy plastic parts.
Important Note: If the solar collector is not used (i.e. the filter pump was turned off) it must be covered
with the cloth cover (included), otherwise the wires overheat in strong sunlight and are damaged by this!
Security Advice:
These safety warnings are not a guarantee of absence of potential problems or claims. The swimming pool owner
should always handle the purchased unit with care.
Your Solar Collector has been engineered and manufactured to our highest standard for dependability, ease of
operation and safety. With proper care, it will give you years of durable, trouble-free performance.
ADVICE
IMPORTANT
CAUTION

Speedsolar Solarcollector Deluxe
2011_V2 page 3 of 11
Table of Contents:
1Safety Warnings............................................................................................................................................ 4
2General Information...................................................................................................................................... 4
2.1.1 Requirements for the installation of a solar collector ......................................................................... 4
2.1.2 How It Works ..................................................................................................................................... 4
2.1.3 Unpacking Your Solar Collector......................................................................................................... 4
2.1.4 Tools & Equipment Required............................................................................................................. 4
2.1.5 Know Your Pool................................................................................................................................. 4
2.1.6 Solar Collector Location..................................................................................................................... 5
2.1.7 Connecting Multiple Units.................................................................................................................. 5
2.1.8 Maintenance...................................................................................................................................... 5
2.1.9 Cloth Cover........................................................................................................................................ 5
2.1.10 Winterizing..................................................................................................................................... 5
3Technical Data .............................................................................................................................................. 6
3.1.1 Technical Data................................................................................................................................... 6
3.1.2 Heating Power................................................................................................................................... 6
4Parts List/Reference..................................................................................................................................... 7
4.1.1 Primary Components......................................................................................................................... 7
5Installation Instructions ............................................................................................................................... 7
5.1.1 Assembly Instruction.......................................................................................................................... 7
5.1.2 Initial Operation................................................................................................................................ 10
6Troubleshooting ......................................................................................................................................... 10
7Limited Warranty Statement ...................................................................................................................... 10
8Service Processing..................................................................................................................................... 10

Speedsolar Solarcollector Deluxe
2011_V2 page 4 of 11
1 Safety Warnings
Read all instructions BEFORE assembling and using this product.
Caution: Failure to follow instructions can cause severe and/or fatal injury.
Carefully read this manual and all CAUTION and NOTE notices located throughout this manual.
Do NOT allow children to operate this product.
Always turn off the filter system when installing or working on the solar collector.
Install product away from the pool to prevent children from using the collector as a way to access the
pool (enough safety distance).
Do not use any petroleum based lubricant. Petroleum based products will destroy plastic parts.
These CAUTION warnings are not intended to incorporate all possible instances for risk and/or severe injury.
The pool owner should always exercise caution and common sense when utilizing their swimming pool and op-
erating equipment.
2 General Information
2.1.1 Requirements for the installation of a solar collector
The solar collector you just purchased for your above ground pool is simple to install and effortless to operate
once connected. The installation instructions included in this manual are based on a few assumptions:
1) You have an existing above ground pool that is completely set up and filled with water.
2) Your above ground pool is equipped with a pump-operated water filtering system.
3) You have the necessary hoses needed to feed water in and out of your pool and filter system (32 mm Ø or 38
mm Ø).
These assumptions are necessary as the solar collector, once installed, will be completely dependent upon your
pool’s filter pump to push water in and through the heater’s solar coils.
2.1.2 How It Works
When properly installed, the solar collector will be connected to your filter and your pool by two hose connections:
One hose will feed cold, filtered pool water from your pump into one port of the solar collector. The other hose will
feed sun warmed water from the other port of the solar collector to your pool via the pool return inlet in your pool.
As cold water is fed into the solar collector, it travels through the solar coils where it is heated by the sun before it
is delivered back into your swimming pool.
2.1.3 Unpacking Your Solar Collector
Carefully remove the product and all component parts from the box. Make certain all parts are present before be-
ginning assembly. (see Section 4, Parts List/Reference).
2.1.4 Tools & Equipment Required
The following items are not included with your new solar collector, but will be required for proper installation and
operation:
#2 Phillips screwdriver
¼" Flat head screwdriver
Silicone based lubricant
2.1.5 Know Your Pool
Before you begin installation it is a good idea to know certain specifications about your pool:
How big is your pool?
What size hose does it use between pool and filter pump (i.e. 32 mm Ø or 38 mm Ø)?
What kind of hose connection does your pool use? (i.e. threaded/unthreaded)
What location will position the collector for maximum sun exposure?
ADVICE

Speedsolar Solarcollector Deluxe
2011_V2 page 5 of 11
2.1.6 Solar Collector Location
Your solar collector needs a place with maximum possible sunlight.
You will need to position the collector lower than the pool’s water level.
There has to be a safe distance away from the pool (safety distance).
The solar collector has to be set up in a way which enables maximum possible sunlight. Also consider an
optimal angle to the sun, but this angle should be not more than 30 °.
NOTE: The solar collector is to be installed between the filter system (after the water is filtered) and the pool wa-
ter inlet, AFTER the water is
filtered. The collector must come after the filter to prevent buildup in the tubing.
Before installing the solar collector, make sure that the suction and pressure hoses on the filter are closed or
blocked to prevent water flow.
2.1.7 Connecting Multiple Units
DO NOT install multiple units directly into the return line. Doing so may damage the product and will void the war-
ranty.
To install multiple units, you MUST use a bypass valve and “T” connector with pressure gauge (not included, but
optionally available under the Article No. 00-60045 Bypass Set). The hose for a multiple unit installation MUST be
at least 32 or 38 mm diameter.
For further information regarding the installation of the solar collector please contact our customer service or ask
your local swimming pool specialty retailer
2.1.8 Maintenance
To prevent damage, the solar coils should always be covered with the clear acrylic dome included in the package.
The solar collector should not be exposed to cold weather. Prior to the first frost, or at the end of your swim sea-
son, the solar collector should be removed from its connections to the pool and stored in a frost free location.
2.1.9 Cloth Cover
A dome cover is included which can be used to cover the solar collector during the hottest days when your pool
water does not need
additional heating assistance.
Important Note: If the solar collector is not used (i.e. the filter pump was turned off) it must be covered with the
cloth cover (included), otherwise the wires overheat in strong sunlight and are damaged by this!
2.1.10 Winterizing
Drain all the water from the solar collector by disconnecting the tubes. Store in a location protected from frost.
Reconnect the pool return tubes.

Speedsolar Solarcollector Deluxe
2011_V2 page 6 of 11
Do NOT allow standing water inside the solar collector to freeze. Water expands as it freezes and can rupture the
solar coils on the heater.
3 Technical Data
3.1.1 Technical Data
Dimensions: L 780mm x W 780mm x H 420mm
External dome: 780mm
Hose diameter: Inside 25mm –Outside 30mm
Weight: 10.50 Kilogram
Water capacity: 10 Liter
Max. pressure: 3 bar at 20°C
water passage: min. 2.000 l/h; max. 10.000 l/h
3.1.2 Heating Power
Pool Volume
Days required to increase pool water temperature by 3°C *
1 Heater
2 Heaters
3 Heaters
4 Heaters
7000 Liter
1,3
0,7
0,4
0,3
14000 Liter
2,8
1,4
0,9
0,7
27000 Liter
5,3
2,6
1,8
1,3
48000 Liter
9,5
4,7
3,2
2,4
61000 Liter
12,3
6,1
4,1
3,1
*Results based on 10 hours of direct sunshine per day and may vary with changes in weather.
The Pool has been covered with a solar plane. Outside temperature 20°C.
NOTE: Connecting 2 or more Pool heaters requires use of a Bypass-Kit (sold separately).

Speedsolar Solarcollector Deluxe
2011_V2 page 7 of 11
4 Parts List/Reference
4.1.1 Primary Components
Note: Some parts may be pre-installed at the factory. Parts not shown to scale.
5 Installation Instructions
5.1.1 Assembly Instruction
The system layouts below will help you install the solar collector(s) to your above ground pool:
Place the collector in a location where it will receive the greatest amount of sunlight, but keep a sufficient mini-
mum distance from pool. NOTE: Hose connectors may come preinstalled.
1x LONG FILTER HOSE Ø 38 mm - length approx. 100 cm
2 x HOSE REDUCER 38/32 mm
1x MAIN BASE WITH STAND
1 x INTEX SPECIAL ADAPTER WITH O-RING
Only used, if you connect the
solar collector to an INTEX-
Pool with a filter pump power
starting from 5.700 l/h.
2 x HOSE CLAMP
1x SHORT HOSE Ø 38 mm - length approx. 40 cm
Only used, if you connect
multiple units.
1x CLEAR DOME with CLOTH COVER
OWNER’S MANUAL
NOTE:
not shown to scale.

Speedsolar Solarcollector Deluxe
2011_V2 page 8 of 11
When put the product out, at the bottom there have one con-
nector which is not screwed.
Put the connector at the correct location and
use plastic part and screws to fix it.
After you fix the connector, please continue with
the next steps.

Speedsolar Solarcollector Deluxe
2011_V2 page 9 of 11
1) Collector - Filter Pump Connection
a) Turn off filter pump.
b) Block water flow at both the pool return inlet and the filter pump outlet
to prevent water from flowing through the hoses.
c) Detach the pool return hose from your filter system and set aside.
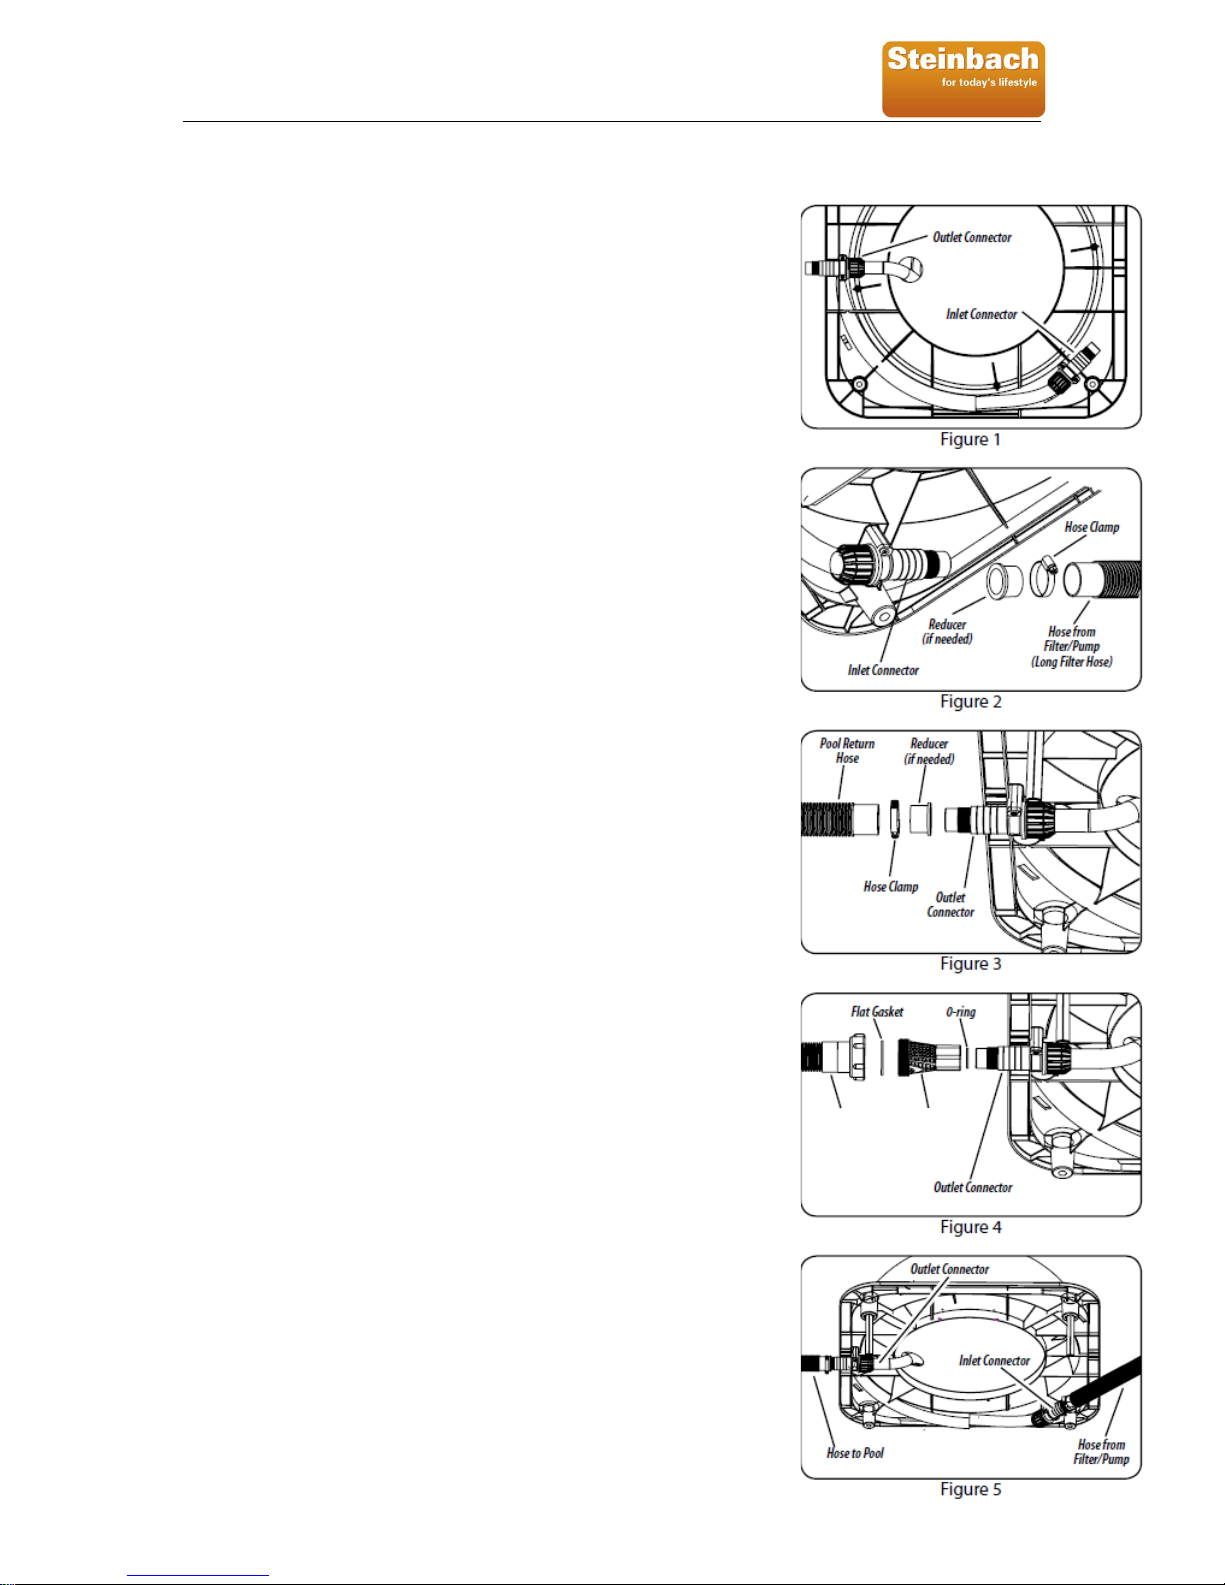
d) Locate the inlet connector and the long filter hose. Attach the long filter hose
(included) between filter outlet (the port where the pool return hose was previ-
ously
connected) and the inlet connector (located at corner of heater) using the
included hose clamps (see figure 2).
NOTE: depending on the size of your hose, the 38/32 reducer may need
to be used. Insert the reducer inside of the long filter hose and attach using
hose clamp. Apply a small amount of silicon based lubricant to the outside
of the side connector to allow an easy fit (see figure 2).
2) Collector –Pool Connections
For Pools with Ø 32 mm or Ø 38 mm unthreaded hoses GO TO Step A
For INTEX-Pools with a filter pump power starting from 5.700 l/h GO TO Step B
A. Pools with Ø 32 mm or Ø 38 mm Unthreaded Hoses
Locate the outlet connector on the underside of the solar collector.
Using a hose clamp, secure the loose end of your existing pool return
hose to the outlet connector (see figure 3).
SKIP B and GO TO 3
1 x INTEX SPECIAL ADAPTER WITH O-RING
B. INTEX-Pools with a filter pump power starting from 5.700 l/h
Attach the INTEX special adapter with O-ring to the outlet connector.
Make sure the O-ring is in the INTEX special adapter prior to attachment
(see figure 4).
Screw existing pool return hose onto the INTEX special adapter. Be
sure to place the thick connector gasket between the hose and the
INTEX special adapter for a tight seal.
CONTINUE ON TO 3
3) Solar Collector Placement
Extend the two legs on the underside of the collector and face the collector in
the direction of the sun’s natural path. Your solar collector needs to be located
on a hard level surface.
4) Solar Collector System
The basic solar collector assembly should resemble the set in figure 5.
NOTE: If solar collector needs to be further from the filter than the hoses allow,
you may need to purchase a longer hose with the 38 mm diameter openings. A
38 mm coupler (38 mm hose connector) and 2 hose clamps are needed to
connect the hoses if necessary (not included).
Ensure ALL hose connections are tight and the hoses are NOT kinked or bent
at severe angles.
If the hoses are leaking, check to make sure ALL of the parts that have O-
Rings have them attached and are screwed on tightly. DO NOT over tighten
hose clamps (15 kg max torque).
NOTE: The short hose is only used to connect multiple solar collector together.
INTEX
special
hose to
pool
INTEX
special
adapter

Speedsolar Solarcollector Deluxe
2011_V2 page 10 of 11
5.1.2 Initial Operation
Once the solar collector has been assembled and the hoses are connected to the filter pump and pool return, un-
block the flow of water into the pool return hose and turn on the pump and filter system. Bubbles will shoot out of
the return nozzle into the pool initially while air is pushed out of the solar collector. If this persists for longer than 2
or 3 minutes, check for and repair any leaks in the hoses or connections.
NOTE: Be sure to place your pool cover on at night to prevent heat loss.
6 Troubleshooting
Problem
Possibilities/Solutions
The pool water is not heated.
Check to make sure that water is flowing through the tubes.
Has it been sunny?
Use the maximum possible solar radiation and increase the
running time of the filter pump
Put your pool cover on at night to prevent heat loss.
Additional heaters may be necessary.
No initial bubbling after collector is connected
and pump is on.
Check the setting of the filter system to make sure it is re-
turning water to the pool through the filter pump, then
through the solar collector and afterwards through the
connection hose back to the pool.
Bubbles continue to flow out of the pool water
inlet well after the pump has been turned on.
Check the connection hoses for possible damages.
Check if the hose clamps have been tightened enough.
Leaking heater.
Check the connector seals in the pipeline system.
Check if the hose clamps have been tightened enough.
Check the connection hoses for cracks.
7 Limited Warranty Statement
The manufacturer provides the warranty and reliability only under the following conditions:
The solar collector was set up correctly, connected and put into operation according to instruction.
Only original parts have been used.
Consumable parts are not covered by warranty!
8 Service Processing
For technical information, missing parts or in the case of a complaint, please contact our customer service:
Steinbach VertriebsgmbH
Aistingerstrasse 2
4311 Schwertberg
Tel. Austria: (0820) 200 100 103 (0,145€ per minute from all networks)
Tel. Germany: (0180) 5 405 100 103 (0,14€ per minute from landline, mobile radio max. 0,42€ / minute)
FR/IT/CZ/HU/HR/SK/SLO/RO/BG/TR: +43 (0) 7262 / 61431-0
www.steinbach.at

Speedsolar Solarcollector Deluxe
2011_V2 page 11 of 11
Table of contents
Popular Water Heater manuals by other brands

Caleffi solar
Caleffi solar NAS20053 Installation, commissioning and servicing instructions

Radiant
Radiant S 14 Installation, use and maintenance manual

GE
GE GG28T06AXK Energy guide

Rheem
Rheem 115 Specification sheet

Kenmore
Kenmore THE ECONOMIZER 153.332861 owner's manual

ATI Technologies
ATI Technologies WHC500 Manual of installation, use and maintenance