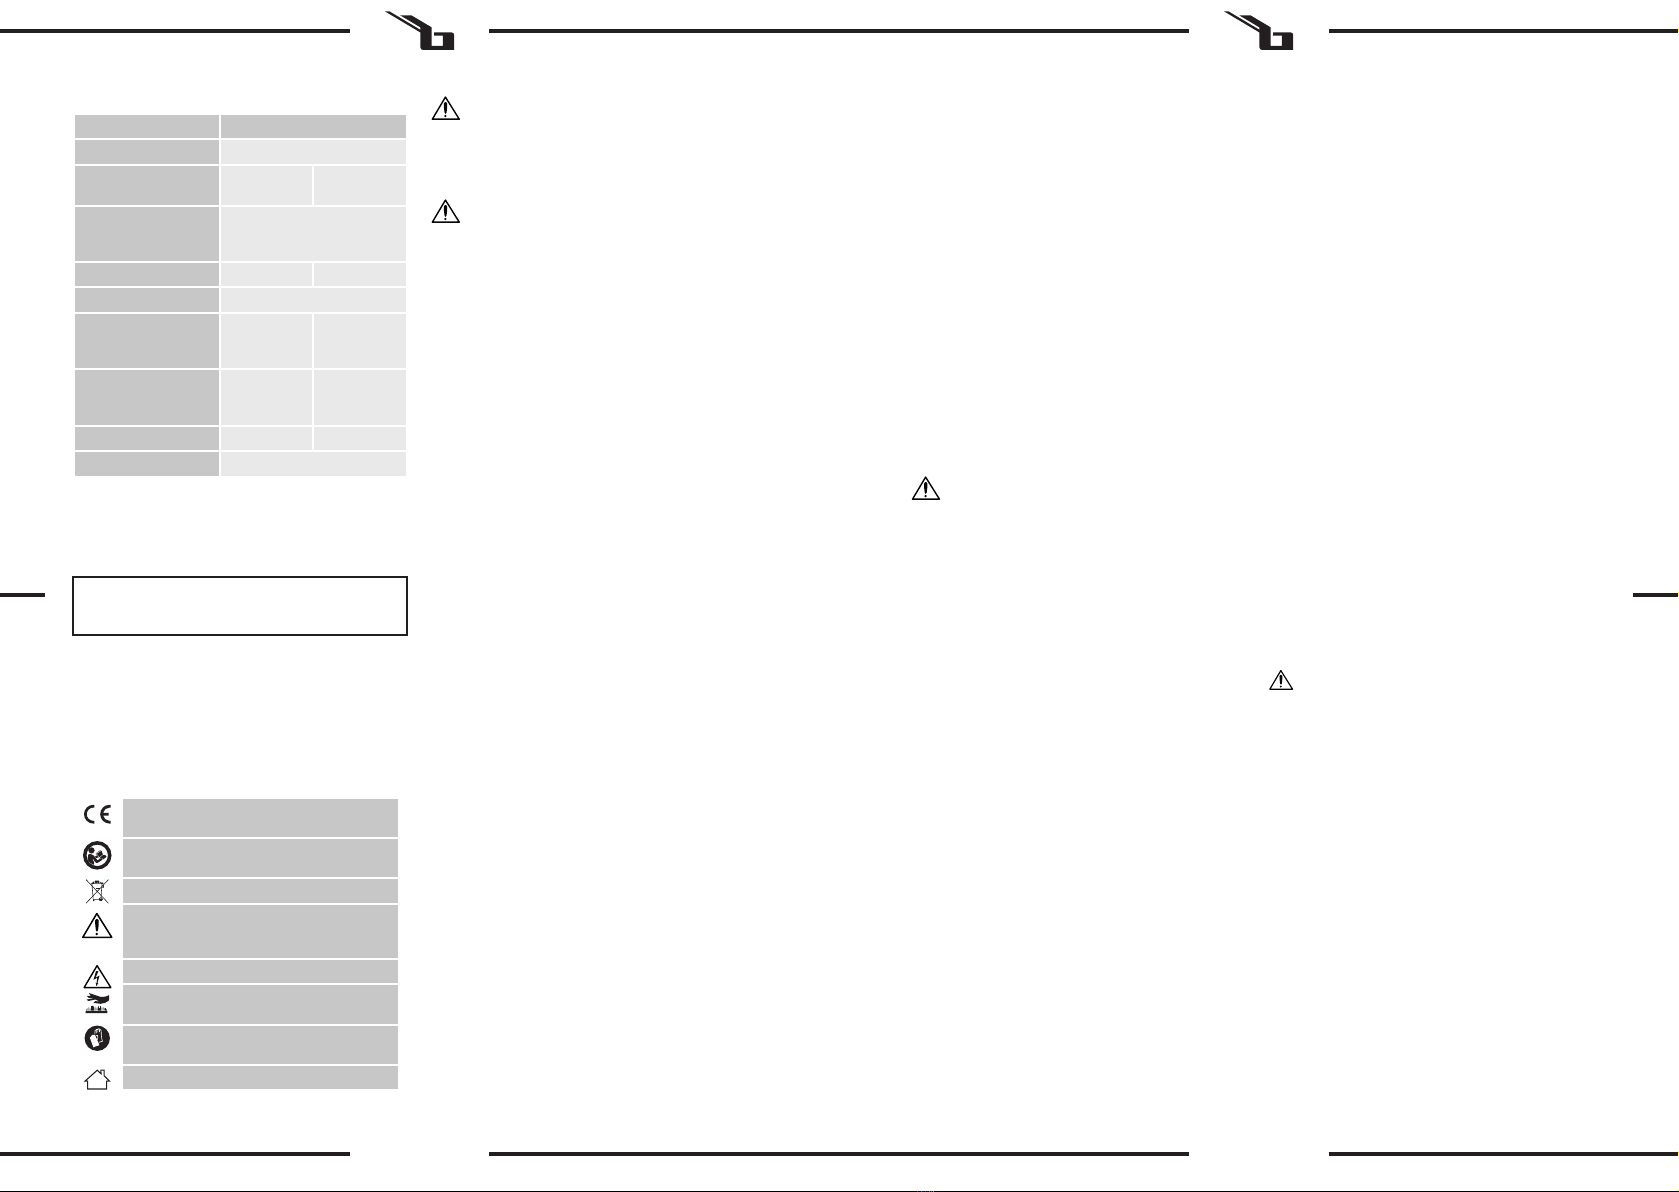
Steinberg Systems SBS-ADO-1000 User manual

SBS-ADO-1000 | SBS-ADO-2000
BEDIENUNGSANLEITUNG
LABOR TROCKENOFEN
USER MANUAL
ELECTRO THERMOSTATIC AIR DRYING OVEN
INSTRUKCJA OBSŁUGI
SUSZARKA LABORATORYJNA
NÁVOD K POUŽITÍ
LABORATORNÍ SUŠÁRNA
MANUEL D´UTILISATION
ÉTUVE DE LABORATOIRE
ISTRUZIONI PER L’USO
ESSICCATORE DA LABORATORIO
MANUAL DE INSTRUCCIONES
ESTUFA DE LABORATORIO
DE | EN | PL | CZ | FR | IT | ES

2 3
12.03.2022
INHALT | CONTENT | TREŚĆ | OBSAH | CONTENU | CONTENUTO | CONTENIDO
PRODUKTNAME LABOR TROCKENOFEN
PRODUCT NAME ELECTRO THERMOSTATIC AIR DRYING OVEN
NAZWA PRODUKTU SUSZARKA LABORATORYJNA
NÁZEV VÝROBKU LABORATORNÍ SUŠÁRNA
NOM DU PRODUIT ÉTUVE DE LABORATOIRE
NOME DEL PRODOTTO ESSICCATORE DA LABORATORIO
NOMBRE DEL PRODUCTO ESTUFA DE LABORATORIO
MODELL
SBS-ADO-1000
SBS-ADO-2000
PRODUCT MODEL
MODEL PRODUKTU
MODEL VÝROBKU
MODÈLE
MODELLO
MODELO
IMPORTEUR
EXPONDO POLSKA SP. Z O.O. SP. K.
IMPORTER
IMPORTER
DOVOZCE
IMPORTATEUR
IMPORTATORE
IMPORTADOR
ADRESSE VON IMPORTEUR
UL. NOWY KISIELIN-INNOWACYJNA 7, 66-002 ZIELONA GÓRA | POLAND, EU
IMPORTER ADDRESS
ADRES IMPORTERA
ADRESA DOVOZCE
ADRESSE DE L'IMPORTATEUR
INDIRIZZO DELL'IMPORTATORE
DIRECCIÓN DEL IMPORTADOR
BEDIENUNGSANLEITUNG
2.1. ELEKTRISCHE SICHERHEIT
a) Der Gerätestecker muss mit der Steckdose kompatibel
sein. Ändern Sie den Stecker in keiner Weise.
Originalstecker und passende Steckdosen vermindern
das Risiko eines elektrischen Schlags.
b) Vermeiden Sie das Berühren von geerdeten
Bauteilen wie Rohrleitungen, Heizkörpern, Öfen und
Kühlschränken. Es besteht das erhöhte Risiko eines
elektrischen Schlags, wenn Ihr Körper durch nasse
Oberächen und in feuchter Umgebung geerdet ist.
Wasser, das in das Gerät eintritt, erhöht das Risiko von
Beschädigungen und elektrischen Schlägen.
c) Berühren Sie das Gerät nicht mit nassen oder feuchten
Händen.
d) Verwenden Sie das Kabel nicht in unsachgemäßer
Weise. Verwenden Sie es niemals zum Tragen des
Geräts oder zum Herausziehen des Steckers. Halten
Sie das Kabel von Hitze, Öl, scharfen Kanten oder
beweglichen Teilen fern. Beschädigte oder geschweißte
Kabel erhöhen das Risiko eines elektrischen Schlags.
e) Wenn sich die Verwendung des Geräts in feuchter
Umgebung nicht verhindern lässt, verwenden Sie
einen Fehlerstromschutzschalter (RCD). Mit einem
RCD verringert sich das Risiko eines elektrischen
Schlags.
f) Es ist verboten, das Gerät zu verwenden, wenn
das Netzkabel beschädigt ist oder oensichtliche
Gebrauchsspuren aufweist. Ein beschädigtes Netzkabel
sollte von einem qualizierten Elektriker oder vom
Kundendienst des Herstellers ersetzt werden.
g) Tauchen Sie Kabel, Stecker bzw. das Gerät nicht
in Wasser oder andere Flüssigkeiten, um einen
Stromschlag zu vermeiden. Verwenden Sie das Gerät
nicht auf nassen Oberächen.
h) ACHTUNG LEBENSGEFAHR! Tauchen und Halten Sie
das Gerät während des Reinigens oder des Betriebes
nie in Wasser oder andere Flüssigkeiten.
i) Lassen Sie das Gerät nicht nass werden. Gefahr eines
elektrischen Schlags!
2.2. SICHERHEIT AM ARBEITSPLATZ
a) Halten Sie Ihren Arbeitsplatz sauber und gut
beleuchtet. Unordnung oder schlechte Beleuchtung
kann zu Unfällen führen. Handeln Sie vorausschauend,
beobachten Sie, was getan wird, und nutzen Sie Ihren
gesunden Menschenverstand bei der Verwendung des
Gerätes.
DE
Parameter Werte
Produktname LABOR TROCKENOFEN
Modell SBS-
ADO-1000
SBS-
ADO-2000
Nennspannung [V~]/
Frequenz [Hz] 230/50
Nennleistung [W] 1670 2170
Schutzart IP I
Externe Abmessungen
(Breite x Tiefe x Länge)
[mm]
736x575x627 835x580x700
Interne Abmessungen
(Breite x Tiefe x Länge)
[mm]
440x324x448 550x450x550
Gewicht [kg] 42 53
Temperaturbereich [oC] 50 - 300
1. ALLGEMEINE BESCHREIBUNG
Diese Anleitung ist als Hilfe für eine sichere und
zuverlässige Nutzung gedacht. Das Produkt wurde strikt
nach den technischen Vorgaben und unter Verwendung
modernster Technologien und Komponenten sowie unter
Wahrung der höchsten Qualitätsstandards entworfen und
angefertigt.
Die originale Anweisung ist die deutschsprachige Fassung.
Sonstige Sprachfassungen sind Übersetzungen aus der
deutschen Sprache.
Die Begrie „Gerät“ oder „Produkt“ in den Warnungen und
Beschreibung des Handbuchs beziehen sich auf LABOR
TROCKENOFEN.
Für einen langen und zuverlässigen Betrieb des Geräts
muss auf die richtige Handhabung und Wartung
entsprechend den in dieser Anleitung angeführten
Vorgaben geachtet werden. Die in dieser Anleitung
angegebenen technischen Daten und die Spezikation
sind aktuell. Der Hersteller behält sich das Recht vor, im
Rahmen der Verbesserung der Qualität Änderungen
vorzunehmen. Unter Berücksichtigung des technischen
Fortschritts und der Geräuschreduzierung wurde das
Gerät so entworfen und produziert, dass das infolge der
Geräuschemission entstehende Risiko auf dem niedrigsten
Niveau gehalten wird.
VOR INBETRIEBNAHME MUSS DIE ANLEITUNG
GENAU DURCHGELESEN UND VERSTANDEN
WERDEN.
ERLÄUTERUNG DER SYMBOLE
HINWEIS! In der vorliegenden Anleitung sind
Beispielbilder vorhanden, die vom tatsächlichen
Aussehen das Produkt abweichen können.
ACHTUNG! Lesen Sie alle Sicherheitshinweise und
alle Anweisungen durch. Die Nichtbeachtung der
Warnungen und Anweisungen kann zu elektrischen
Schlägen, Feuer und/oder schweren Verletzungen
bis hin zum Tod führen.
2. NUTZUNGSSICHERHEIT
TECHNISCHE DATEN
Das Produkt erfüllt die geltenden
Sicherheitsnormen.
Gebrauchsanweisung beachten.
Recyclingprodukt.
ACHTUNG!, WARNUNG! oder HINWEIS!, um
auf bestimmte Umstände aufmerksam zu
machen (allgemeines Warnzeichen).
Handschutz benutzen.
ACHTUNG! Warnung vor elektrischer
Spannung!
ACHTUNG! Heiße Fläche. Verbrennungsgefahr!
Nur zur Verwendung in geschlossenen
Räumen.
Deutsch
English
Polski
Česky
Français
Italiano
Español
3
8
13
18
23
28
33

4 5
12.03.2022
HINWEIS!Kinder und Unbeteiligte müssen bei der
Arbeit mit diesem Gerät gesichert werden.
DE DE
b) Benutzen Sie das Gerät nicht in explosionsgefährdeten
Bereichen, zum Beispiel in Gegenwart von brennbaren
Flüssigkeiten, Gasen oder Staub. Geräte können unter
Umständen Funken erzeugen, welche Staub oder
Dämpfe entzünden können.
c) Im Falle eines Schadens oder einer Störung sollte das
Gerät sofort ausgeschaltet und dies einer autorisierten
Person gemeldet werden.
d) Wenn Sie nicht sicher sind, ob das Gerät
ordnungsgemäß funktioniert, wenden Sie sich an den
Service des Herstellers.
e) Reparaturen dürfen nur vom Service des Herstellers
durchgeführt werden. Führen Sie keine Reparaturen
auf eigene Faust durch!
f) Zum Löschen des Gerätes bei Brand oder Feuer, nur
Pulverfeuerlöscher oder Kohlendioxidlöscher (CO2)
verwenden.
g) Halten Sie Kinder und Unbefugte fern; Unachtsamkeit
kann zum Verlust der Kontrolle über das Gerät führen.
h) Bewahren Sie die Gebrauchsanleitung für den
weiteren Gebrauch auf. Sollte das Gerät an Dritte
weitergegeben werden, muss die Gebrauchsanleitung
mit ausgehändigt werden.
i) Verpackungselemente und kleine Montageteile
außerhalb der Reichweite von Kindern aufbewahren.
j) Halten Sie das Gerät von Kindern und Tieren fern.
k) Im Laufe der Nutzung dieses Werkzeugs einschlieβlich
anderer Werkzeuge soll man sich nach übrigen
Betriebsanweisungen richten.
2.3. PERSÖNLICHE SICHERHEIT
a) Es ist nicht gestattet, das Gerät im Zustand der
Ermüdung, Krankheit, unter Einuss von Alkohol,
Drogen oder Medikamenten zu betreiben, wenn das
die Fähigkeit das Gerät zu bedienen, einschränkt.
b) Das Gerät darf nicht von Kindern oder Personen
mit eingeschränkten physischen, sensorischen und
geistigen Fähigkeiten oder ohne entsprechende
Erfahrung und entsprechendes Wissen bedient
werden. Dies ist nur unter Aufsicht einer für die
Sicherheit zuständigen Person und nach einer
Einweisung in die Bedienung der Maschine gestattet.
c) Das Gerät darf nur von körperlich geeigneten
Personen bedient werden, die zu ihrem Benutzen
fähig und entsprechend geschult sind und die
diese Bedienungsanleitung gelesen und verstanden
haben und im Rahmen der Sicherheit und des
Gesundheitsschutzes am Arbeitsplatz geschult
wurden.
d) Seien Sie aufmerksam und verwenden Sie Ihren
gesunden Menschenverstand beim Betreiben des
Gerätes. Ein Moment der Unaufmerksamkeit während
der Arbeit kann zu schweren Verletzungen führen.
e) Benutzen Sie eine persönliche Schutzausrüstung,
die den in Punkt 1 der Symbolerläuterungen
vorgegebenen Maßgaben entspricht. Die Verwendung
einer geeigneten und zertizierten Schutzausrüstung
verringert das Verletzungsrisiko.
f) Vergewissern Sie sich vor dem Anschließen des Geräts
an eine Stromquelle, dass der Schalter ausgeschaltet
ist.
g) Das Gerät ist kein Spielzeug. Kinder sollten in der
Nähe des Geräts unter Aufsicht stehen, um Unfälle zu
vermeiden.
2.4. SICHERE ANWENDUNG DES GERÄTS
a) Benutzen Sie das Gerät nicht, wenn der EIN-/AUS-
Schalter nicht ordnungsgemäß funktioniert. Geräte,
die nicht über den Schalter gesteuert werden können,
sind gefährlich und müssen repariert werden.
b) Trennen Sie das Gerät vom Stromnetz, bevor Sie
Zubehör einstellen, auswechseln oder wenn Sie das
Gerät nicht mehr verwenden. Dies verringert das
Risiko einer versehentlichen Inbetriebnahme.
c) Nicht verwendete Werkzeuge sind außerhalb
der Reichweite von Kindern sowie von Personen
aufzubewahren, welche weder das Gerät noch die
Anleitung kennen. In den Händen unerfahrener
Personen können diese Geräte eine Gefahr darstellen.
d) Halten Sie das Gerät stets in einem einwandfreien
Zustand. Prüfen Sie vor jeder Inbetriebnahme, ob
am Gerät und seinen beweglichen Teilen Schäden
vorliegen (defekte Komponenten oder andere
Faktoren, die den sicheren Betrieb der Maschine
beeinträchtigen könnten). Im Falle eines Schadens
muss das Gerät vor Gebrauch in Reparatur gegeben
werden.
e) Halten Sie das Gerät außerhalb der Reichweite von
Kindern.
f) Reparatur und Wartung von Geräten dürfen
nur von qualiziertem Fachpersonal und mit
Originalersatzteilen durchgeführt werden. Nur so wird
die Sicherheit während der Nutzung gewährleistet.
g) Um die Funktionsfähigkeit des Gerätes zu
gewährleisten, dürfen die werksmäßig montierten
Abdeckungen oder Schrauben nicht entfernt werden.
h) Beachten Sie bei Transport zwischen Lager und
Bestimmungsort und Handhabung des Gerätes die
Grundsätze für Gesundheits- und Arbeitsschutz des
Landes, in dem das Gerät verwendet wird. .
i) Es ist verboten, das Gerät während des Betriebs zu
schieben, umzustellen oder zu drehen.
j) Lassen Sie dieses Gerät während des Betriebs nicht
unbeaufsichtigt.
k) Das Gerät muss regelmäßig gereinigt werden, damit
sich nicht dauerhaft Schmutz festsetzt.
l) Das Gerät ist kein Spielzeug. Reinigung und Wartung
dürfen nicht von Kindern ohne Aufsicht durch eine
erwachsene Person durchgeführt werden..
m) Es ist untersagt, in den Aufbau des Geräts einzugreifen,
um seine Parameter oder Konstruktion zu ändern.
n) Geräte von Feuer – und Wärmequellen fernhalten.
o) Überlasten Sie das Gerät nicht.
p) Die Ventilationsönungen dürfen nicht verdeckt
werden!
q) Leicht brennbare Gegenstände dürfen nicht in das
Gerät gelangen.
r) Gegenstände im Gerät sollten nicht zu nahe
beieinander platziert werden. Es sollte ausreichend
Platz gelassen werden, um die Zirkulation der heißen
Luft zu erleichtern.
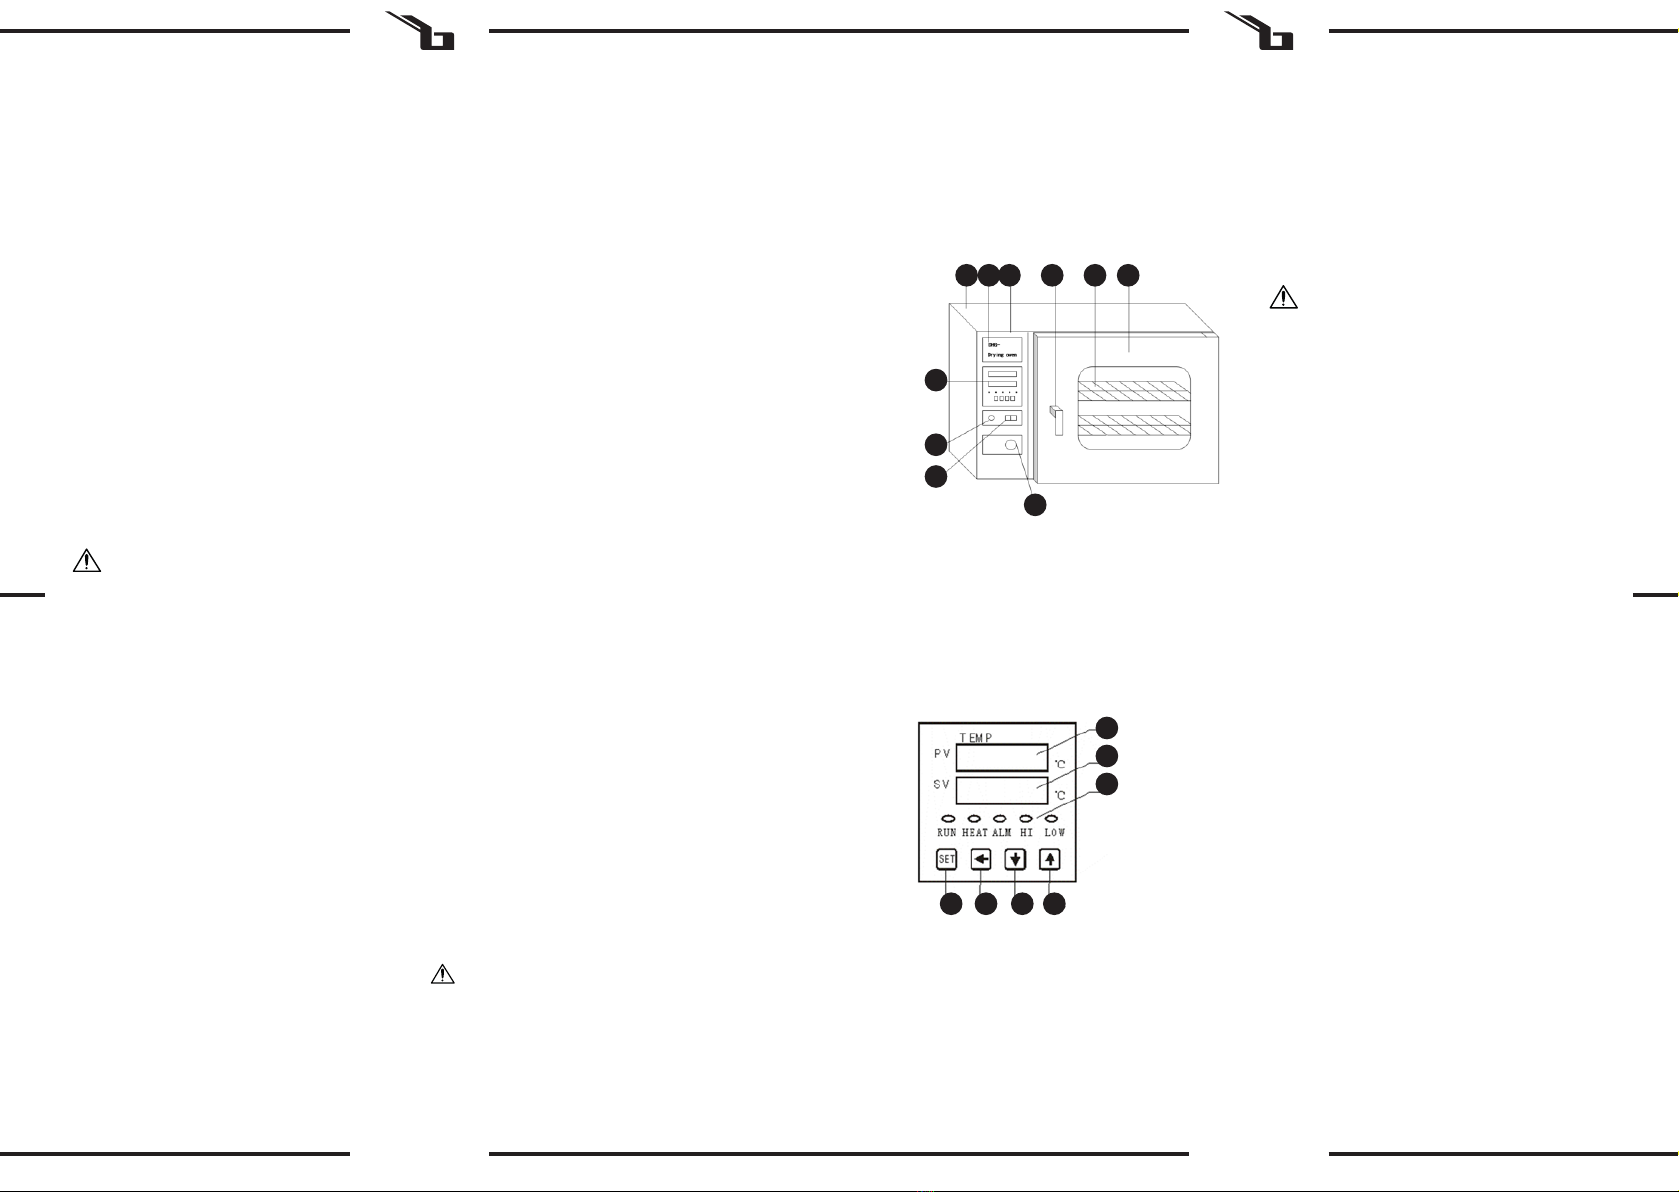
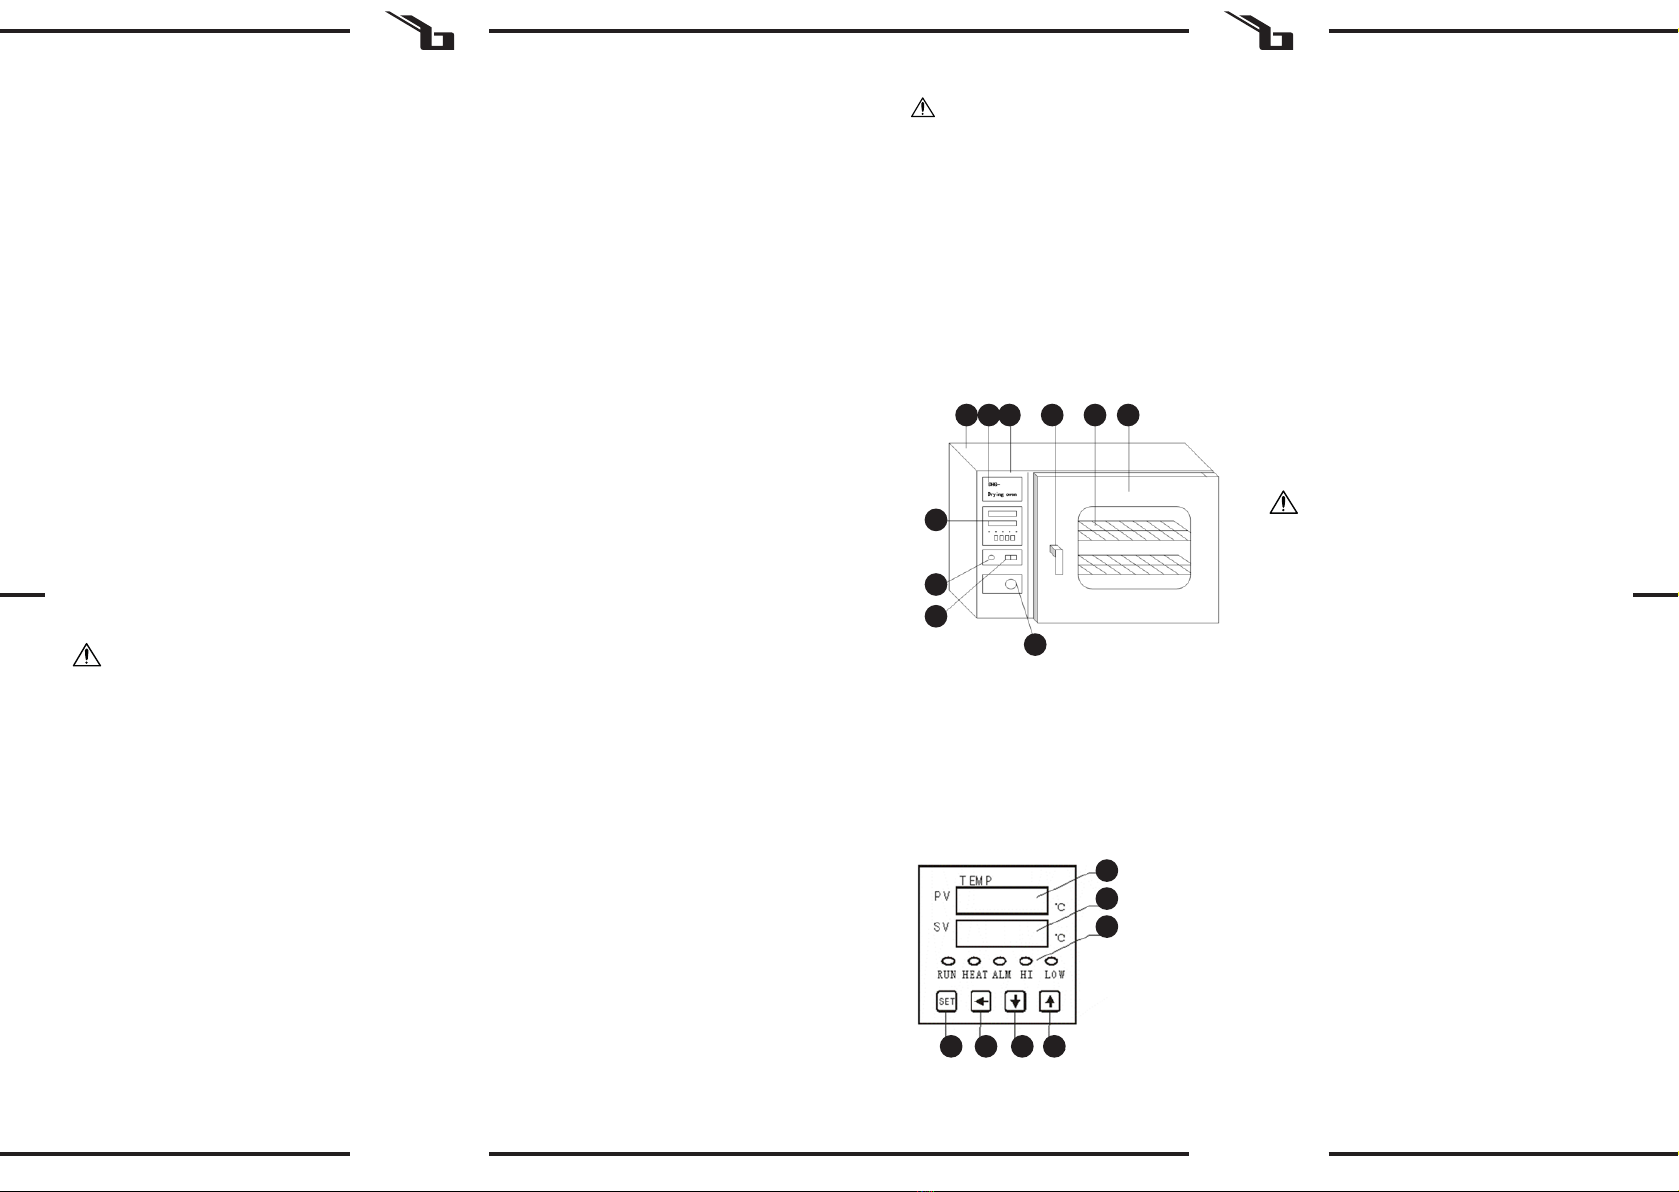
1. Gehäuse
2. Typenschild
3. Steuerpaneel
4. Türgri
5. Regal
6. Tür
7. Temperaturregelung
8. Power Kontrollleuchte
9. EIN/AUS-Schalter
10. Luftmengenregler
Paneel der Temperaturregelung:
Das Gerät verfügt über folgende Funktionen:
• präzise Temperaturregelung: Die Temperatur kann alle
1 ° C eingestellt werden.
• Display mit der eingestellten Temperatur und der
Temperatur im Gerät,
• akustischer und optischer Alarm, um eine höhere
Temperatur im Gerät als die auf dem Steuerpaneel
eingestellte anzuzeigen. Das Gerät schaltet die
Heizung automatisch aus und aktiviert einen Alarm.
Luftregler (mit dem Einstellknopf können Sie den
Luftzuuss und -austritt aus dem Inneren des Geräts
regeln).
3.3. ARBEIT MIT DEM GERÄT
GRUNDREGELN - INBETRIEBNAHME
1. Legen Sie die zu trocknenden Gegenstände in das
Gerät und schließen Sie die Tür sicher.
2. Stellen Sie den Netzschalter auf ON. Die
Betriebsanzeige leuchtet auf und die Zahlen
erscheinen auf dem Temperaturregler.
3. Stellen Sie die Temperatur ein. Das Display zeigt
die vom Benutzer eingestellte Temperatur und
die Temperatur im Gerät an. Die Kontrollleuchte
für das Einschalten der Heizung leuchtet auf. Dies
bedeutet, dass das Gerät heizt und die Temperatur
erhöht. Nach einer Weile beginnt die Anzeigelampe
zu blinken, wenn die eingestellte Temperatur nahe
an der Temperatur im Gerät liegt. Unter normalen
Bedingungen behält das Gerät nach 90-minütigem
Erhitzen nur die eingestellte Temperatur bei.
4. Wenn die erforderliche Betriebstemperatur niedrig
ist, z.B. 80 ° C, verwenden Sie die zweistuge
Temperatureinstellmethode. Diese Methode
verhindert das Absinken der Temperatur und
ermöglicht es dem Gerät, schneller eine konstante
Temperatur zu erreichen. Wenn die gewünschte
Temperatur beispielsweise 80 ° C beträgt, stellen Sie
die Temperatur zuerst auf 70 ° C ein. Stellen Sie nach
dem Erhitzen der Vorrichtung auf die eingestellte
Temperatur die Zieltemperatur ein, d.h. 80 ° C.
Der Labortrockenofen SBS-ADO-1000, SBS-ADO-2000
ist ein Gerät zum schonenden und gründlichen Trocknen
verschiedener Materialien.
Die Labortrockner SBS-ADO-1000, SBS-ADO-2000 sind
Produkte, die nicht in den Geltungsbereich der MDD 93/42
/ EWG-Vorschriften für Medizinprodukte fallen.
Für alle Schäden bei nicht sachgemäßer Verwendung
haftet allein der Betreiber.
3.2. VORBEREITUNG ZUR VERWENDUNG
ARBEITSPLATZ DES GERÄTES:
Verwenden Sie das Gerät nicht bei Umgebungstemperaturen
über 35°C sein und einer relativen Luftfeuchtigkeit über 85%.
Stellen Sie das Gerät so auf, dass eine gute Luftzirkulation
gewährleistet ist. Der Mindestabstand des Gerätes von der
Rückwand muss mindestens 20 cm betragen, 15 cm auf
beiden Seiten des Gerätes und 35cm von der Decke. Halten
Sie das Gerät von heißen Flächen fern. Das Gerät sollte
immer auf einer ebenen, stabilen, sauberen, feuerfesten
und trockenen Oberäche und außerhalb der Reichweite
von Kindern und Personen mit eingeschränkten geistigen,
sensorischen und psychischen Fähigkeiten verwendet
werden. Stellen Sie sicher, dass der Netzstecker jederzeit
zugänglich und nicht verdeckt ist. Achten Sie darauf, dass
die Stromversorgung des Gerätes den Angaben auf dem
Produktschild entspricht.
Vor der ersten Anwendung sind das Gerät und alle
Bestandteile auseinanderzubauen und zu reinigen.
3. NUTZUNGSBEDINGUNGEN
3.1. GERÄTEBESCHREIBUNG
5 64321
7
8
9
10
1
2
3
4 5 6 7
ACHTUNG! Das Gerät ist mit einem
Temperatursicherungsschalter ausgestattet.
Er schaltet die Stromzufuhr ab, nachdem die
Temperatur im Geräteinneren die auf dem
Ausschalter eingestellte Temperatur überschreitet.
Die Temperatur auf dem Ausschalter soll immer
um 10°C höher eingestellt sein, als die auf dem
Hauptkontrollpanel eingestellte Arbeitstemperatur.
ACHTUNG!ObwohldasGerätinHinblickaufSicherheit
entworfen wurde und über Schutzmechanismen
sowie zusätzlicher Sicherheitselemente verfügt,
besteht bei der Bedienung eine geringe Unfall-
oder Verletzungsgefahr. Es wird empfohlen, bei der
Nutzung Vorsicht und Vernunft walten zu lassen.
1. Temperaturwert im Gerät
2. Temperaturwert einstellen
3. Kontrollanzeigen:
• RUN - Betriebsanzeige
• HEAT - Heizungsanzeige
• ALM - Alarmanzeige
• HI - Hochgeschwindigkeitsanzeige
• LOW - Anzeige für niedrige Geschwindigkeit
4. SET-Funktionstaste
5. UMSCHALTTASTE SHIFT
6. Einstelltaste „Ab“ „-“
7. Einstelltaste „Nach oben“ „+“

6 7
12.03.2022
DE DE
5. Die Trocknungszeit sollte entsprechend dem
Feuchtigkeitsgehalt der verschiedenen Gegenstände
angepasst werden. Wenn die zu trocknenden
Gegenstände sehr feucht sind, drehen Sie den
Luftmengenregler in die Position „三”. Dann wird die
feuchte Luft im Gerät abgesaugt.
6. Lassen Sie nach Abschluss des Trocknungsvorgangs
die Luftzufuhr oen, stellen Sie den Netzschalter auf
OFF und önen Sie dann die Gerätetür. Achten Sie
darauf, sich nicht zu verbrennen! Wenn der Benutzer
die Artikel nach Abschluss des Trocknungsvorgangs
nicht aus dem Kleiderschrank nehmen möchte,
schalten Sie einfach die Luftzufuhr aus und lassen Sie
die Artikel so lange wie nötig im Gerät, damit sich die
Artikel im Gerät in einem sicheren Zustand benden
PROZEDUR ZUM VERLAUF ZWISCHEN FUNKTIONEN:
STEUERUNG
Wenn der Temperaturregler eingeschaltet ist, zeigt die
digitale Anzeige PV den Messwert und die digitale Anzeige
SV – den Sollwert.
GRUNDEINSTELLUNGEN:
Temperatureinstellung: drücken Sie die Funktionstaste SET.
Auf der digitalen Anzeige PV erscheinen die Buchstaben „SP”.
Auf der digitalen Anzeige SV erscheint ein Temperaturwert,
den man einstellen kann. Die letzte Zier blinkt. Mit Hilfe
der Funktionstasten ▲und ▼. kann man den gewünschten
Wert einstellen. Mit Hilfe der Funktionstaste ◄wechseln
Sie in das nächste Ziernfeld. Den Wert der nächsten Zier
kann man mit Hilfe der Funktionstasten ▲und ▼einstellen.
Drücken Sie die Funktionstaste SET nach abgeschlossener
Temperatureinstellung, um zur Zeiteinstellung zu gelangen.
Zeiteinstellung: drücken Sie die Funktionstaste SET. Auf der
digitalen Anzeige PV erscheinen die Buchstaben „SΓ”. Auf
der digitalen Anzeige SV erscheint der Zeitwert, den man
einstellen kann. Mit Hilfe der Funktionstasten ▲und ▼
kann man den Wert einstellen. Mit Hilfe der Funktionstaste
◄ wechseln Sie in das nächste Ziernfeld. Den Wert der
nächsten Zier kann man mit Hilfe Funktionstasten ▲
und ▼einstellen. Drücken Sie die Funktionstaste SET nach
abgeschlossener Zeiteinstellung, damit das Gerät unter den
eingestellten Parametern läuft.
ERWEITERTE EINSTELLUNGEN:
ACHTUNG: Alle Steuergeräte wurden präzisen Tests
unterzogen und die Betriebs. Parameter wurden
voreingestellt. Wenn alle Betriebsparameter des
Vakuumtrockners Ihre Wünsche und Erwartungen erfüllen
und wenn das Gerät einwandfrei funktioniert, brauchen Sie
diese Parameter nicht zu ändern.
Wechsel in die erweiterten Einstellungen:
Drücken Sie die Funktionstaste und halten Sie die Taste
gedrückt ▲. Drücken Sie danach die Funktionstaste SET. Auf
dem Display erscheinen die Buchstaben „LCK”. Lassen Sie die
Funktionstaste SET los (halten Sie die Funktionstaste weiter
gedrückt ▲). Stellen Sie den Wert der blinkenden Zier
auf „7” ein. Lassen Sie die Funktionstaste los ▲. Drücken
Sie die Funktionstaste SET. Auf dem Display erscheinen die
Buchstaben „AL1”.
AL1 - Temperaturabweichungsalarm - Stellen Sie den
gewünschten Wert mit den Tasten ▲und ▼ein.
Einstellbare Werte: Bereich zwischen -99,9 ° C und
999,9 ° C. Das Gerät löst einen Alarm aus, wenn die
Summe aus eingestellter Temperatur und eingestellter
Temperaturabweichung den tatsächlichen
Temperaturwert überschreitet. Drücken Sie nach
dem Einstellen des Temperaturabweichungswerts
SET, um die Einstellung „FAN“ für hohe/niedrige
Geschwindigkeit einzugeben.
FAN – Hoch-/Niedriggeschwindigkeitsregelung. Einstellba-
re Werte: Bereich zwischen -99,9 ° C und 999,9 ° C.
Drücken Sie nach dem Einstellen die SET-Taste, um
zu den Einstellungen zur Korrektur des gemessenen
Temperaturwertes „SC“ zu gelangen. Drücken Sie die
Funktionstaste SET nach abgeschlossener Einstellung
vom Alarm des unteren Temperaturlimits, um zur Än-
derung vom Temperatur-Messwert „SC” zu gelangen.
SC – Änderung des Temperatur-Messwertes –
auf der digitalen Anzeige PV erscheint der
geänderte Temperaturwert. Der Einstellbereich
der Temperaturwerte beträgt von -99,9°C bis
+100°C. Drücken Sie die Funktionstaste SET nach
abgeschlossener Einstellung von der Änderung des
Temperatur-Messwertes, um zur Einstellungen der
Autoregelung PID zu gelangen. Auf dem Display
erscheinen die Buchstaben „ATU”.
ATU – Ein-/Ausschalten der Autoregelung PID. Werte, die
man einstellen kann, sind: „0” – die Autoregelung
PID ist ausgeschaltet; „1” – die Autoregelung PID
ist eingeschaltet. Stellen Sie den Parameter auf „1”,
läuft das Gerät im Modus Autoregelung. Man kann
diesen Modus auch im normalen Betrieb einschalten.
Verlassen Sie dafür die erweiterten Einstellungen.
Drücken Sie die Funktionstaste ▼im normalen Betrieb
und halten Sie diese 5 Sekunden lang gedrückt. Die
digitale Anzeige SV blinkt und auf der Anzeige
erscheinen die Buchstaben „ATU”. Während dieses
Vorgangs kann die tatsächliche Temperatur von der
eingestellten Temperatur abweichen. Dieses Ergebnis
ist normal. Die Arbeitszeit der Autoregelung beträgt
3 bis 5 Minuten. Nach dieser Zeit passt der PID-
Regler seine Einstellungen an, damit er noch genauer
arbeiten kann. Drücken Sie die Funktionstaste SET nach
abgeschlossener Einstellung, um zur Einstellungen des
Proportionalitätsbereiches „P” zu gelangen.
P – Proportionalitätsbereich – Regulierung von
Erhitzungsprüfung. Werte, die man einstellen kann,
benden sich im Bereich von 0 bis 100,0. Drücken
Sie die Funktionstaste SET nach abgeschlossener
Einstellung, um zur Einstellungen der Integrations-
Zeitkonstante „I” zu gelangen.
I – Integrations-Zeitkonstante. Werte, die man
einstellen kann, benden sich im Bereich von 1
bis 4320. Drücken Sie die Funktionstaste SET nach
abgeschlossener Einstellung, um zur Einstellungen der
Dierentiation -Zeitkonstante „d” zu gelangen.
d – Dierentiation-Zeitkonstante. Werte, die man
einstellen kann, benden sich im Bereich von 0
bis 1200. Drücken Sie die Funktionstaste SET nach
abgeschlossener Einstellung, um zur Einstellungen der
Erhitzungszeit „T” zu gelangen.
T – Erhitzungszeit. Werte, die man einstellen kann,
benden sich im Bereich von 1 bis 60. Drücken Sie die
Funktionstaste SET nach abgeschlossener Einstellung,
um Sie zum Einstellungsbereich der Hitzegenauigkeit
„HL” zu gelangen.
HL – Einstellungsbereich der Hitzegenauigkeit. Werte,
die man einstellen kann, benden sich im Bereich von
0,500 bis 1,500. Drücken Sie nach dem Einstellen die
SET-Taste, um zur Ausgangsleistung des Heizgeräts
„OUT“ zu wechseln.
OUT - Ausgangsleistung des Heizkörpers. Die Werte
sind von 0 bis 100 einstellbar Halten Sie die
Funktionstaste SET nach abgeschlossener Einstellung
ungefähr 5 Sekunden lang gedrückt, damit Sie die
erweiterten Einstellungen verlassen können und die
durchgeführten Änderungen speichern können.
3.4. REINIGUNG UND WARTUNG
a) Vor jeder Reinigung und Einstellung, dem Austausch
von Zubehör oder wenn das Gerät nicht benutzt wird,
muss der Netzstecker gezogen werden und das Gerät
vollständig abkühlen.
b) Zur Reinigung des Geräts dürfen nur milde
Reinigungsmittel verwendet werden, die für
Oberächen, mit denen Lebensmittel in Kontakt
kommen, bestimmt sind.
c) Lassen Sie nach jeder Reinigung alle Teile gut
trocknen, bevor das Gerät erneut verwendet wird.
d) Bewahren Sie das Gerät an einem trockenen, kühlen,
vor Feuchtigkeit und direkter Sonneneinstrahlung
geschütztem Ort auf.
e) Es ist verboten, das Gerät mit einem Wasserstrahl zu
besprühen oder in Wasser zu tauchen.
f) Es darf kein Wasser über die Belüftungsönungen am
Gehäuse ins Innere des Geräts gelangen.
g) Die Belüftungsönungen sind mit Pinsel und Druckluft
zu reinigen.
h) In Hinblick auf technische Ezienz und zur
Vorbeugung vor Schäden sollte das Gerät regelmäßig
überprüft werden.
i) Zum Reinigen ist ein weicher, feuchter Lappen zu
verwenden.
j) Zum Reinigen darf man keine scharfen und/
oder Metallgegenstände (z.B. Drahtbürste oder
Metallspachtel) benutzen, weil diese die Oberäche
des Materials, aus dem das Gerät hergestellt ist,
beschädigen können.
k) Reinigen Sie das Gerät nicht mit säurehaltigen
Substanzen. Medizinische Geräte, Verdünner,
Kraftsto, Öle oder andere Chemikalien können das
Gerät beschädigen.
ENTSORGUNG GEBRAUCHTER GERÄTE
Dieses Produkt darf nicht über den normalen Hausmüll
entsorgt werden. Geben Sie das Gerät bei entsprechenden
Sammel- und Recyclinghöfen für Elektro- und
Elektronikgeräte ab. Überprüfen Sie das Symbol auf dem
Produkt, der Bedienungsanleitung und der Verpackung. Die
bei der Konstruktion des Gerätes verwendeten Kunststoe
können entsprechend ihrer Kennzeichnung recycelt werden.
Mit der Entscheidung für das Recycling leisten Sie einen
wesentlichen Beitrag zum Schutz unserer Umwelt. Wenden
Sie sich an die örtlichen Behörden, um Informationen über
Ihre lokale Recyclinganlagen zu erhalten.
PROBLEMLÖSUNGEN
Problem Mögliche Ursache Lösung
Keine Ener-
gieversor-
gung
Der Stecker ist
falsch eingesteckt
oder das Kabel ist
abgezogen.
Stecken Sie den
Stecker- / Verbin-
dungskabel ein.
Durchgebrannte
Sicherung
Ersetzen Sie die
Sicherung.
Die
Temperatur
im Gerät
steigt nicht an
Die eingestellte
Temperatur ist zu
niedrig.
Regulieren Sie
die eingestellte
Temperatur.
Die elektrische
Heizung bzw.
Tauchsieder
funktioniert nicht.
Ersetzen Sie
die elektrische
Heizung.
Der
Temperaturregler
funktioniert nicht.
Temperaturregler
ersetzen.
Zykluslüfter
funktioniert nicht.
Tauschen Sie den
Lüfter aus.
Die
eingestellte
Temperatur
unterscheidet
sich erheblich
von der
Temperatur
im Gerät
Der
Temperatursensor
funktioniert nicht.
Ersetzen Sie den
Temperatursen-
sor.
Das Feinabstim-
mungspoten-
tiometer zum
Einstellen der
Temperatur ist
nicht gut einge-
stellt.
Stellen Sie das
Potentiometer
ein.
Übertempe-
raturalarm ist
ungültig.
Die eingestellte
Temperatur ist zu
niedrig.
Regulieren Sie
die eingestellte
Temperatur.
Der
Temperaturregler
funktioniert nicht.
Temperaturregler
ersetzen.
ACHTUNG! Die Zeichnung von diesem
Produkt bendet sich auf der letzte Seite der
Bedienungsanleitung S. 38.

8 9
12.03.2022
USER MANUAL
2.1. ELECTRICAL SAFETY
a) The plug must t the socket. Do not modify the plug
in any way. Using original plugs and matching sockets
reduces the risk of electric shock.
b) Avoid touching earthed elements such as pipes,
heaters, boilers and refrigerators. There is an increased
risk of electric shock if the earthed device is exposed to
rain, comes into direct contact with a wet surface or is
operating in a damp environment. Water getting into
the device increases the risk of damage to the device
and of electric shock.
c) Do not touch the device with wet or damp hands.
d) Use the cable only for its designated use. Never use it
to carry the device or to pull the plug out of a socket.
Keep the cable away from heat sources, oil, sharp
edges or moving parts. Damaged or tangled cables
increase the risk of electric shock.
e) If using the device in a damp environment cannot be
avoided, a residual current device (RCD) should be
applied. The use of an RCD reduces the risk of electric
shock.
f) Do not use the device if the power cord is damaged or
shows obvious signs of wear. A damaged power cord
should be replaced by a qualied electrician or the
manufacturer‘s service centre.
g) To avoid electric shock, do not immerse the cord, plug
or device in water or other liquids. Do not use the
device on wet surfaces.
h) ATTENTION! DANGER TO LIFE! While cleaning, never
immerse the device in water or other liquids.
i) Prevent the device from getting wet. Risk of electric
shock!
2.2. SAFETY IN THE WORKPLACE
a) Make sure the workplace is clean and well lit. A messy
or poorly lit workplace may lead to accidents. Try
to think ahead, observe what is going on and use
common sense when working with the device.
b) Do not use the device in a potentially explosive
environment, for example in the presence of
ammable liquids, gases or dust. The device generates
sparks which may ignite dust or fumes.
c) If you discover damage or irregular operation,
immediately switch the device o and report it to a
supervisor without delay.
d) If there are any doubts as to the correct operation of
the device, contact the manufacturer‘s support service.
e) Only the manufacturer‘s service point may repair the
device. Do not attempt any repairs independently!
f) In case of re, use a powder or carbon dioxide (CO2)
re extinguisher (one intended for use on live electrical
devices) to put it out.
EN
Parameter description Parameter value
Product name ELECTRO THERMOSTATIC AIR
DRYING OVEN
Model SBS-
ADO-1000
SBS-
ADO-2000
Rated voltage [V~]/
Frequency [Hz] 230/50
Rated power [W] 1670 2170
Protection class I
External dimensions
(Width x Depth x
Height) [mm]
736x575x627 835x580x700
Internal dimensions
(Width x Depth x
Height) [mm]
440x324x448 550x450x550
Weight [kg] 42 53
Temperature range [oC] 50 - 300
1. GENERAL DESCRIPTION
The user manual is designed to assist in the safe and
trouble-free use of the device. The product is designed
and manufactured in accordance with strict technical
guidelines, using state-of-the-art technologies and
components. Additionally, it is produced in compliance
with the most stringent quality standards.
The original operation manual is written in German. Other
language versions are translations from the German.
The terms „device“ or „product“ are used in the warnings
and instructions to refer to ELECTRO THERMOSTATIC AIR
DRYING OVEN.
To increase the product life of the device and to ensure
trouble-free operation, use it in accordance with this user
manual and regularly perform maintenance tasks. The
technical data and specications in this user manual are
up to date. The manufacturer reserves the right to make
changes associated with quality improvement. The device
is designed to reduce noise emission risks to a minimum,
taking into account technological progress and noise
reduction opportunities.
DO NOT USE THE DEVICE UNLESS YOU HAVE
THOROUGHLY READ AND UNDERSTOOD THIS
USER MANUAL.
LEGEND
PLEASE NOTE! Drawings in this manual are for
illustration purposes only and in some details may
dier from the actual product.
ATTENTION! Read all safety warnings and all
instructions. Failure to follow the warnings and
instructions may result in electric shock, re and/or
serious injury or even death.
2. USAGE SAFETY
TECHNICAL DATA
The product satises the relevant safety
standards.
Read instructions before use.
The product must be recycled.
WARNING! or CAUTION! or REMEMBER!
Applicable to the given situation. (general
warning sign)
Wear protective gloves.
ATTENTION! Electric shock warning!
ATTENTION! Hot surface, risk of burns!
Only use indoors.
REMEMBER!When using the device, protect
children and other bystanders.
EN
g) Children or unauthorised persons are forbidden to
enter a work station. (A distraction may result in loss
of control over the device).
h) Please keep this manual available for future reference.
If this device is passed on to a third party, the manual
must be passed on with it.
i) Keep packaging elements and small assembly parts in
a place not available to children.
j) Keep the device away from children and animals.
k) If this device is used together with another equipment,
the remaining instructions for use shall also be
followed.
2.3. PERSONAL SAFETY
a) Do not use the device when tired, ill or under the
inuence of alcohol, narcotics or medication which
can signicantly impair the ability to operate the
device.
b) The device is not designed to be handled by persons
(including children) with limited mental and sensory
functions or persons lacking relevant experience and/
or knowledge unless they are supervised by a person
responsible for their safety or they have received
instruction on how to operate the device.
c) The device can be handled only by physically t
persons who are capable of handling it, properly
trained, familiar with this manual and trained within
the scope of occupational health and safety.
d) When working with the device, use common sense
and stay alert. Temporary loss of concentration while
using the device may lead to serious injuries.
e) Use personal protective equipment as required
for working with the device, specied in section 1
(Legend).
The use of correct and approved personal protective
equipment reduces the risk of injury.
f) To prevent the device from accidentally switching on,
make sure the switch is on the OFF position before
connecting to a power source.
g) The device is not a toy. Children must be supervised to
ensure that they do not play with the device.
2.4. SAFE DEVICE USE
a) Do not use the device if the ON/OFF switch does not
function properly (does not switch the device on and
o). Devices which cannot be switched on and o
using the ON/OFF switch are hazardous, should not
be operated and must be repaired.
b) Make sure the plug is disconnected from the socket
before attempting any adjustments, accessory
replacements or before putting the device aside.
Such precautions will reduce the risk of accidentally
activating the device.
c) When not in use, store in a safe place, away from
children and people not familiar with the device who
have not read the user manual. The device may pose a
hazard in the hands of inexperienced users.
d) Keep the device in perfect technical condition. Before
each use check for general damage and especially
check for cracked parts or elements and for any other
conditions which may impact the safe operation of the
device. If damage is discovered, hand over the device
for repair before use.
e) Keep the device out of the reach of children.
f) Device repair or maintenance should be carried out by
qualied persons, only using original spare parts. This
will ensure safe use.
g) To ensure the operational integrity of the device, do
not remove factory-tted guards and do not loosen
any screws.
h) When transporting and handling the device between
the warehouse and the destination, observe the
occupational health and safety principles for manual
transport operations which apply in the country where
the device will be used.
i) Do not move, adjust or rotate the device in the course
of work.
j) Do not leave this appliance unattended while it is in
use.
k) Clean the device regularly to prevent stubborn grime
from accumulating.
l) The device is not a toy. Cleaning and maintenance
may not be carried out by children without supervision
by an adult person.
m) It is forbidden to interfere with the structure of
the device in order to change its parameters or
construction.
n) Keep the device away from sources of re and heat.
o) Do not overload the device.
p) Do not cover the ventilation openings!
q) Flammable objects must not be put into the device.
r) Objects inside the device should not be placed too
close to each other. Adequate space should be left to
facilitate circulation of the hot air.
ATTENTION! Despite the safe design of the device
and its protective features, and despite the use of
additional elements protecting the operator, there is
still a slight risk of accident or injury when using the
device. Stay alert and use common sense when using
the device.
The SBS-ADO-1000, SBS-ADO-2000 drying oven is a device
used for gentle and thorough drying of various materials.
The SBS-ADO-1000, SBS-ADO-2000 drying oven are
products outside the scope of MDD 93/42 / EEC regulations
for medical devices.
The user is liable for any damage resulting from
unintended use of the device.
3. USE GUIDELINES
3.1. DEVICE DESCRIPTION
5 64321
7
8
9
10

10 11
12.03.2022
EN
PROCEDURE SHOWING THE COURSE BETWEEN THE
FUNCTIONS
CONTROLLER OPERATION
When the temperature controller is on, the PV display shows
the value of measured temperature, and the SV display
shows the preset temperature value.
BASIC SETTINGS:
Temperature setting: Press the SET button, the PV display
shows „SP” the SV displays shows the adjustable temperature
value. When last digit blinks, set its value with the ▲and ▼
buttons. Use the button ◄to switch to the next digit and set
its value using ▲and ▼. After setting the temperature, press
the SET button to set the timer.
Timer setting: Press the SET button, the PV display shows „SI”
the SV displays shows the adjustable timer value. When last
digit blinks, set its value with the ▲and ▼buttons. Use the
◄button to switch to the next digit and set its value using
▲and ▼. After setting the time, press the SET button for
the device to start operation with the dened parameters.
ADVANCED SETTINGS:
CAUTION: All the controllers and parameters have been
thoroughly tested and set by the manufacturer. If the
functional parameters of the vacuum dryer meet your
expectations and if the vacuum dryer runs properly, there is
no need to modify these parameters.
How to open the advanced settings: Press and hold ▲,
then press SET. The display will show „LCK”. Release the SET
button (while pressing ▲) and set the value of the blinking
digit to „7”. Release ▲and press SET. The display will show
„AL1”.
AL1 – temperature deviation alarm – set the required value
with the ▲and ▼buttons. Adjustable values: range
between -99,9°C and 999,9°C. The device will trigger
an alarm when the sum of the set temperature and
the set temperature deviation exceeds the actual
temperature value. After setting the temperature
deviation value, press SET to enter the high/low speed
„FAN” setting.
FAN – high/low speed control. Adjustable values: range
between -99,9°C and 999,9°C. After setting, press the
SET button to go to the settings for correction of the
measured temperature value „SC”. After setting, press
SET in order to adjust the measured temperature
value “SC”.
SC – measured temperature value adjustment – the
PV display shows the adjusted temperature value.
Available values: -99,9°C to +100°C. After setting the
measured temperature adjustment value, press SET in
order to adjust the PID controller self-regulation – the
display shows “ATU”.
ATU – enable or disable self-regulation of the PID
controller – available values: „0” – PID self-regulation
disabled; „1” – PID self-regulation enabled. When
this parameter is set to „1”, the device can be started
in self-regulation mode. In order to start the self-
regulation mode, leave the advanced settings and,
in the normal operation mode, press and hold ▼
for about 5 seconds. When this mode is on, the SV
displays blinks and shows „ATU”. During this process
the actual temperature may dier from the preset one
– this is normal. The duration of the self-regulation
function is about 3 to 5 minutes. After this time the
PID controller will adjust its settings, in order to work
more precisely. After setting, press SET in order to
adjust the proportionality range “P”.
P – proportionality range – heating control adjustment.
Available values: from 0 to 100.0 After setting, press
SET in order to adjust the integration time constant
“P”.
I – integration time constant. Available values: from 1
to 4320 After setting, press SET in order to adjust the
dierentiation time constant “d”.
d – dierentiation time constant. Available values: from
0 to 1200 After setting, press SET in order to adjust the
heating period “P”.
T – heating time. Available values: from 1 to 60 After
setting, press SET in order to adjust the thermal
accuracy control range “HL”.
HL – thermal accuracy control range. Available values:
from 500 to 1.500 After setting, press the SET button
to enter the „OUT” setting of the heater output power.
OUT – output power of the heating body. The values are
adjustable from 0 up to 100. After setting, press and
hold SET for about 5 seconds in order to leave the
advanced settings and save the changes.
3.4. CLEANING AND MAINTENANCE
a) Unplug the mains plug and allow the device to cool
completely before each cleaning, adjustment or
replacement of accessories, or if the device is not
being used.
b) Use only mild, food-safe detergents to wash the
device.
c) After cleaning the device, all parts should be dried
completely before using it again.
d) Store the unit in a dry, cool place, free from moisture
and direct exposure to sunlight.
e) Do not spray the device with a water jet or submerge
it in water.
f) Do not allow water to get inside the device through
vents in the housing of the device.
g) Clean the vents with a brush and compressed air.
h) The device must be regularly inspected to check its
technical eciency and spot any damage.
i) Use a soft, damp cloth for cleaning.
j) Do not use sharp and/or metal objects for cleaning
(e.g. a wire brush or a metal spatula) because they may
damage the surface material of the appliance.
k) Do not clean the device with an acidic substance,
agents of medical purposes, thinners, fuel, oils or
other chemical substances because it may damage
the device.
DISPOSING OF USED DEVICES
Do not dispose of this device in municipal waste systems.
Hand it over to an electric and electrical device recycling and
collection point. Check the symbol on the product, instruction
manual and packaging. The plastics used to construct the
device can be recycled in accordance with their markings. By
choosing to recycle you are making a signicant contribution
to the protection of our environment.
Contact local authorities for information on your local
recycling facility.
EN
1. Housing
2. Nameplate
3. Control panel
4. Door handle
5. Shelf
6. Door
7. Temperature regulation
8. Power light
9. ON/OFF switch
10. Air vacuum valve
Temperature control panel:
1. Temperature inside the device
2. Set temperature
3. Indicators:
• RUN – operation indicator
• HEAT – heating indicator
• ALM – alarm indicator
• HI – high speed indicator
• LOW – low speed indicator
4. SET function button
5. SHIFT button
6. „Down” „-” setting button
7. „Up” „+” setting button
Devices have:
• precise temperature control: the temperature can be
set every 1oC,
• a display showing the set temperature and the
temperature inside the device,
• an audible and visual alarm to indicate a higher
temperature inside the device than that set on the
control panel. The device will automatically turn o
the heater and activate an alarm,
• an air vacuum valve (with an adjustment knob you can
regulate the inow and outow of air from inside the
device).
3.3. DEVICE USE
BASIC PRINCIPLES
1. Place the items to be dried inside the device and close
the door securely.
2. Set the power switch to the ON position. The power
indicator light will illuminate and the numbers will
appear on the temperature controller.
3. Set the temperature. The display will show the
temperature set by the user and the temperature
inside the device. The heating ON indicator light
will come on. This means that the device is heating
and raising the temperature. After a while, when the
set temperature is close to the temperature inside
the device, the indicator light starts blinking. Under
normal conditions, after heating for 90 minutes, the
device will only maintain the set temperature.
4. If the required operating temperature is low, e.g. 80oC,
the two-step temperature setting method should be
used. This method will prevent the temperature from
dropping and allow the device to reach a constant
temperature faster. For example, if the desired
temperature is 80oC, set the temperature to 70oC rst.
After heating the device to the set temperature, set
the target temperature, i.e. 80oC.
5. The drying time should be adjusted according to the
moisture content of dierent items. If the items to be
dried are very humid, turn the air volume control to
the „三” position. Then the humid air inside the device
will be exhausted.
6. After completing the drying process, leave the air
supply open, set the power switch to the OFF position,
and then open the door. Be careful not to burn
yourself! If the user does not want to take the items
out after the drying process is nished, just shut o
the air supply and items inside the device will be kept
in safe conditions.
3.2. PREPARING FOR USE
APPLIANCE LOCATION
The temperature of environment must not be higher than
35°C and the relative humidity should be less than 85%.
Ensure good ventilation in the room in which the device is
being used. A minimum distance of 20 cm to the rear wall,
15 cm to the sides and 35 cm upwards must be maintained.
The device should always be used when positioned on an
even, stable, clean, reproof and dry surface, and be out
of the reach of children and persons with limited mental
and sensory functions. Position the device such that you
always have access to the power plug. The power cord
connected to the appliance must be properly grounded and
correspond to the technical details on the product label.
Disassemble the device and all its components and clean
them before the rst use.
1
2
3
4 5 6 7
PLEASE NOTE! Device is equipped with temperature
safety switch – it turns o power when temperature
inside device exceeds temperature value set on
the switch. In each case switch should be set to a
temperature value of 10°C higher than temperature
set on main control panel. ATTENTION! This product‘s view can be found on the
last pages of the operating instructions (pp. 39).

12 13
12.03.2022
EN
TROUBLESHOOTING
Problem Possible cause Solution
No power
The plug
is inserted
incorrectly or
the cord is
disconnected.
Insert the plug/
connect the cord.
Blown fuse. Replace the fuse.
The
temperature
in the device
does not rise
The set
temperature is
too low.
Adjust set
temperature.
The electric
heater is not
working.
Replace the
electric heater.
The temperature
controller is not
working.
Replace the
temperature
controller.
Cycle fan does
not work. Replace the fan.
The set
temperature
diers
signicantly
from the
temperature
in the device
The temperature
sensor is not
working.
Replace the
temperature
sensor.
Fine tuning
potentiometer
for setting the
temperature is
not well adjusted.
Adjust the
potentiometer.
Overtempera-
ture alarm is
invalid.
The set
temperature is
too low.
Adjust set
temperature.
The temperature
controller is not
working.
Replace the
temperature
controller.
INSTRUKCJA OBSŁUGI
2.1. BEZPIECZEŃSTWO ELEKTRYCZNE
a) Wtyczka urządzenia musi pasować do gniazda.
Nie modykować wtyczki w jakikolwiek sposób.
Oryginalne wtyczki i pasujące gniazda zmniejszają
ryzyko porażenia prądem.
b) Unikać dotykania uziemionych elementów, takich jak
rury, grzejniki, piece i lodówki. Istnieje zwiększone
ryzyko porażenia prądem, jeśli ciało jest uziemione
i dotyka urządzenia narażonego na bezpośrednie
działanie deszczu, mokrej nawierzchni i pracy w
wilgotnym otoczeniu. Przedostanie się wody do
urządzenia zwiększa ryzyko jego uszkodzenia oraz
porażenia prądem.
c) Nie wolno dotykać urządzenia mokrymi lub wilgotnymi
rękoma.
d) Nie należy używać przewodu w sposób niewłaściwy.
Nigdy nie używać go do przenoszenia urządzenia lub
do wyciągania wtyczki z gniazda. Trzymać przewód
z dala od źródeł ciepła, oleju, ostrych krawędzi
lub ruchomych części. Uszkodzone lub poplątane
przewody zwiększają ryzyko porażenia prądem.
e) Jeśli nie można uniknąć używania urządzenia w
środowisku wilgotnym, należy stosować wyłącznik
różnicowo-prądowy (RCD). Używanie RCD zmniejsza
ryzyko porażenia prądem.
f) Zabrania się używania urządzenia, jeśli przewód
zasilający jest uszkodzony lub nosi wyraźne oznaki
zużycia. Uszkodzony przewód zasilający powinien być
wymieniony przez wykwalikowanego elektryka lub
serwis producenta
g) Aby uniknąć porażenia prądem elektrycznym, nie
należy zanurzać kabla, wtyczki ani samego urządzenia
w wodzie lub innym płynie. Nie wolno używać
urządzenia na mokrych powierzchniach.
h) UWAGA – ZAGROŻENIE ŻYCIA! Podczas czyszczenia
lub użytkowania urządzenia nigdy nie wolno zanurzać
go w wodzie lub innych cieczach.
i) Nie wolno dopuszczać do zamoczenia urządzenia.
Ryzyko porażenia prądem!
Opisparametru Wartość parametru
Nazwa produktu SUSZARKA LABORATORYJNA
Model SBS-
ADO-1000
SBS-
ADO-2000
Napięcie zasilania
[V~]/Częstotliwość
[Hz]
230/50
Moc znamionowa [W] 1670 2170
Klasa ochronności IP I
Wymiary zewnętrzne
(Szerokość x
Głębokość x
Wysokość) [mm]
736x575x627 835x580x700
Wymiary wewnętrzne
(Szerokość x
Głębokość x
Wysokość) [mm]
440x324x448 550x450x550
Ciężar [kg] 42 53
Zakres temperatury [°C] 50 - 300
1. OGÓLNY OPIS
Instrukcja przeznaczona jest do pomocy w bezpiecznym i
niezawodnym użytkowaniu. Produkt jest zaprojektowany
i wykonany ściśle według wskazań technicznych przy
użyciu najnowszych technologii i komponentów oraz przy
zachowaniu najwyższych standardów jakości.
Instrukcją oryginalną jest niemiecka wersja instrukcji.
Pozostałe wersje językowe są tłumaczeniami z języka
niemieckiego.
Termin „urządzenie” lub „produkt” w ostrzeżeniach i w
opisie instrukcji odnosi się do SUSZARKA LABORATORYJNA.
Dla zapewnienia długiej i niezawodnej pracy urządzenia
należy dbać o jego prawidłową obsługę oraz konserwację
zgodnie ze wskazówkami zawartymi w tej instrukcji. Dane
techniczne i specykacje zawarte w tej instrukcji obsługi są
aktualne. Producent zastrzega sobie prawo dokonywania
zmian związanych z podwyższeniem jakości. Uwzględniając
postęp techniczny i możliwość ograniczenia hałasu,
urządzenie zaprojektowano i zbudowano tak, aby ryzyko
jakie wynika z emisji hałasu ograniczyć do najniższego
poziomu.
PRZED PRZYSTĄPIENIEM DO PRACY NALEŻY
DOKŁADNIE PRZECZYTAĆ I ZROZUMIEĆ NINIEJSZĄ
INSTRUKCJĘ.
OBJAŚNIENIE SYMBOLI
UWAGA! Ilustracje w niniejszej instrukcji obsługi
mają charakter poglądowy i w niektórych
szczegółach mogą różnić się od rzeczywistego
wyglądu produktu.
UWAGA! Przeczytać wszystkie ostrzeżenia
dotyczące bezpieczeństwa oraz wszystkie instrukcje.
Niezastosowanie się do ostrzeżeń i instrukcji może
spowodować porażenie prądem, pożar i/lub ciężkie
obrażenia ciała lub śmierć.
2. BEZPIECZEŃSTWO UŻYTKOWANIA
Produkt spełnia wymagania odpowiednich
norm bezpieczeństwa.
Przed użyciem należy zapoznać się
z instrukcją.
Produkt podlegający recyklingowi.
UWAGA! lub OSTRZEŻENIE! lub PAMIĘTAJ!
opisująca daną sytuację (ogólny znak
ostrzegawczy).
UWAGA! Ostrzeżenie przed porażeniem
prądem elektrycznym!
UWAGA! Gorąca powierzchnia może
spowodować oparzenia!
Stosować rękawice ochronne.
Do użytku tylko wewnątrz pomieszczeń.
PL

14 15
12.03.2022
PL
1. Obudowa
2. Tabliczka znamionowa
3. Panel sterowania
4. Uchwyt drzwi
5. Półka
6. Drzwi
7. Regulacja temperatury
8. Kontrolka zasilania
9. Przełącznik zasilania ON/OFF
10. Regulator powietrza
Panel regulacji temperatury:
1. Wartość temperatury wewnątrz urządzenia
2. Wartość ustawionej temperatury
3. Wskaźniki:
• RUN – wskaźnik pracy
• HEAT – wskaźnik nagrzewania
• ALM – wskaźnik alarmu
• HI – wskaźnik wysokiej prędkości
• LOW – wskaźnik niskiej prędkości
4. Przycisk funkcyjny SET
5. Przycisk SHIFT
6. Przycisk ustawiania „w dół” „-„
7. Przycisk ustawiania „w górꔄ+”
Urządzenia posiada :
• precyzyjną kontrolę temperatury: możliwość
ustawienia temperatury co 1oC,
• wyświetlacz wskazujący temperaturę ustawioną oraz
temperaturę wewnątrz urządzenia,
• alarm dźwiękowy i świetlny sygnalizujący wyższą
temperaturę wewnątrz urządzenia, niż ustawiona na
panelu sterowania. Urządzenie automatycznie wyłączy
nagrzewnicę i uruchomi alarm,
• regulator powietrza (za pomocą pokrętła
regulacyjnego można regulować dopływ i odpływ
powietrza z wnętrza urządzenia).
3.3. PRACA Z URZĄDZENIEM
PODSTAWOWE ZASADY
1. Umieścić artykuły przeznaczone do suszenia wewnątrz
urządzenia i dokładnie zamknąć drzwi.
2. Ustawić przełącznik zasilania w pozycji ON. Zapali
się lampka kontrolna zasilania, a na przyrządzie do
regulacji temperatury pojawią się cyfry.
UWAGA! Pomimo iż urządzenie zostało
zaprojektowane tak aby było bezpieczne, posiadało
odpowiednie środki ochrony oraz pomimo użycia
dodatkowych elementów zabezpieczających
użytkownika, nadal istnieje niewielkie ryzyko
wypadku lub odniesienia obrażeń w trakcie pracy z
urządzeniem. Zaleca się zachowanie ostrożności i
rozsądku podczas jego użytkowania.
Suszarka laboratoryjna SBS-ADO-1000, SBS-ADO-2000
to urządzenie stosowane do łagodnego i dokładnego
suszenia różnych materiałów.
Suszarka laboratoryjna SBS-ADO-1000, SBS-ADO-2000 to
produkty poza zakresem przepisów MDD 93/42/EEC dla
wyrobów medycznych.
Odpowiedzialność za wszelkie szkody powstałe w
wyniku użytkowania niezgodnego z przeznaczeniem
ponosi użytkownik.
3.2. PRZYGOTOWANIE DO PRACY
UMIEJSCOWIENIE URZĄDZENIA
Temperatura otoczenia nie może przekraczać 35°C a
wilgotność względna nie powinna przekraczać 85%.
Urządzenie należy ustawić w sposób zapewniający
dobrą cyrkulację powietrza. Należy utrzymać minimalny
odstęp 20 cm do ściany tylnej, 15 cm po bokach i 35 cm
do góry. Urządzenie należy trzymać z dala od wszelkich
gorących powierzchni. Urządzenie należy zawsze
użytkować na równej, stabilnej, czystej, ognioodpornej
i suchej powierzchni i poza zasięgiem dzieci oraz osób
ograniczonych funkcjach psychicznych, sensorycznych i
umysłowych. Urządzenie należy umiejscowić w taki sposób,
by w dowolnej chwili można się było dostać do wtyczki
sieciowej. Należy pamiętać o tym, by zasilanie urządzenia
energią odpowiadało danym podanym na tabliczce
znamionowej!
Przed pierwszym użyciem zdemontować wszystkie
elementy i umyć je jak również umyć całe urządzenie.
3. ZASADY UŻYTKOWANIA
3.1. OPIS URZĄDZENIA
5 64321
7
8
9
10
1
2
3
4 5 6 7
UWAGA! Urządzenie jest wyposażone w
temperaturowy wyłącznik bezpieczeństwa, który
odłączy zasilanie w momencie gdy temperatura
wewnątrz urządzenia przekroczy wartość ustawioną
na wyłączniku. Każdorazowo wyłącznik powinien
być ustawiony na wartość temperatury o 10°C
wyższą niż wartość temperatury pracy ustawionej
na głównym panelu kontrolnym.
PL
PAMIĘTAĆ! Należy chronić dzieci i inne osoby
postronne podczas pracy urządzeniem.
2.2. BEZPIECZEŃSTWO W MIEJSCU PRACY
a) Utrzymywać porządek w miejscu pracy i dobre
oświetlenie. Nieporządek lub złe oświetlenie może
prowadzić do wypadków. Należy być przewidującym,
obserwować co się robi i zachowywać rozsądek
podczas używania urządzenia.
b) Nie używać urządzenia w stree zagrożenia
wybuchem, na przykład w obecności łatwopalnych
cieczy, gazów lub pyłów. Urządzenie wytwarzają iskry,
mogące zapalić pył lub opary.
c) W razie stwierdzenia uszkodzenia lub nieprawidłowości
w pracy urządzenia należy je bezzwłocznie wyłączyć i
zgłosić to do osoby uprawnionej.
d) W razie wątpliwości czy urządzenia działa poprawnie,
należy skontaktować się z serwisem producenta.
e) Naprawy urządzenia może wykonać wyłącznie
serwis producenta. Nie wolno dokonywać napraw
samodzielnie!
f) W przypadku zaprószenia ognia lub pożaru, do
gaszenia urządzenia pod napięciem należy używać
wyłącznie gaśnic proszkowych lub śniegowych (CO2).
g) Na stanowisku pracy nie mogą przebywać dzieci
ani osoby nieupoważnione. (Nieuwaga może
spowodować utratę kontroli nad urządzeniem.)
h) Zachować instrukcję użytkowania w celu jej
późniejszego użycia. W razie, gdyby urządzenie miało
zostać przekazane osobom trzecim, to wraz z nim
należy przekazać również instrukcję użytkowania.
i) Elementy opakowania oraz drobne elementy
montażowe należy przechowywać w miejscu
niedostępnym dla dzieci.
j) Urządzenie trzymać z dala od dzieci i zwierząt.
k) W trakcie użytkowania tego urządzenia wraz z innymi
urządzeniami należy zastosować się również do
pozostałych instrukcji użytkowania.
2.3. BEZPIECZEŃSTWO OSOBISTE
a) Niedozwolone jest obsługiwanie urządzenia w
stanie zmęczenia, choroby, pod wpływem alkoholu,
narkotyków lub leków, które ograniczają w istotnym
stopniu zdolności obsługi urządzenia.
b) Urządzenie nie jest przeznaczone do tego, by
było użytkowane przez osoby (w tym dzieci) o
ograniczonych funkcjach psychicznych, sensorycznych
i umysłowych lub nieposiadające odpowiedniego
doświadczenia i/lub wiedzy, chyba że są one
nadzorowane przez osobę odpowiedzialną za ich
bezpieczeństwo lub otrzymały od niej wskazówki
dotyczące tego, jak należy obsługiwać urządzenie.
c) Urządzenie mogą obsługiwać osoby sprawne
zycznie, zdolne do jego obsługi i odpowiednio
wyszkolone, które zapoznały się z niniejszą instrukcją
oraz zostały przeszkolone w zakresie bezpieczeństwa i
higieny pracy.
d) Należy być uważnym, kierować się zdrowym
rozsądkiem podczas pracy urządzeniem. Chwila
nieuwagi podczas pracy, może doprowadzić do
poważnych obrażeń ciała.
e) Należy używać środków ochrony osobistej
wymaganych przy pracy urządzeniem
wyszczególnionych w punkcie 1 objaśnienia symboli.
Stosowanie odpowiednich, atestowanych środków
ochrony osobistej zmniejsza ryzyko doznania urazu.
f) Aby zapobiegać przypadkowemu uruchomieniu
upewnij się, że przełącznik jest w pozycji wyłączonej
przed podłączeniem do źródła zasilania.
g) Urządzenie nie jest zabawką. Dzieci powinny być
pilnowane, aby nie bawiły się urządzeniem.
2.4. BEZPIECZNE STOSOWANIE URZĄDZENIA
a) Nie należy używać urządzenia, jeśli przełącznik ON/
OFF nie działa sprawnie (nie załącza i nie wyłącza
się). Urządzenia, które nie mogą być kontrolowane
za pomocą przełącznika są niebezpieczne, nie mogą
pracować i muszą zostać naprawione.
b) Przed przystąpieniem do regulacji, wymiany osprzętu
lub odłożeniem narzędzia należy wyciągnąć wtyczkę z
gniazda. Taki środek zapobiegawczy zmniejsza ryzyko
przypadkowego uruchomienia.
c) Nieużywane urządzenia należy przechowywać
w miejscu niedostępnym dla dzieci oraz osób
nieznających urządzenia lub tej instrukcji
obsługi. Urządzenia są niebezpieczne w rękach
niedoświadczonych użytkowników.
d) Utrzymywać urządzenie w dobrym stanie technicznym.
Sprawdzać przed każdą pracą czy nie posiada
uszkodzeń ogólnych lub związanych z elementami
ruchomymi (pęknięcia części i elementów lub wszelkie
inne warunki, które mogą mieć wpływ na bezpieczne
działanie urządzenia). W przypadku uszkodzenia,
oddać urządzenie do naprawy przed użyciem.
e) Urządzenie należy chronić przed dziećmi.
f) Naprawa oraz konserwacja urządzeń powinna być
wykonywana przez wykwalikowane osoby przy
użyciu wyłącznie oryginalnych części zamiennych.
Zapewni to bezpieczeństwo użytkowania.
g) Aby zapewnić zaprojektowaną integralność operacyjną
urządzenia, nie należy usuwać zainstalowanych
fabrycznie osłon lub odkręcać śrub.
h) Przy transportowaniu i przenoszeniu urządzenia z
miejsca magazynowania do miejsca użytkowania
należy uwzględnić zasady bezpieczeństwa i higieny
pracy przy ręcznych pracach transportowych
obowiązujących w kraju, w którym urządzenia są
użytkowane.
i) Zabrania się przesuwania, przestawiania i obracania
urządzenia będącego w trakcie pracy.
j) Nie należy pozostawiać włączonego urządzenia bez
nadzoru.
k) Należy regularnie czyścić urządzenie, aby nie dopuścić
do trwałego osadzenia się zanieczyszczeń.
l) Urządzenie nie jest zabawką. Czyszczenie i konserwacja
nie mogą być wykonywane przez dzieci bez nadzoru
osoby dorosłej.
m) Zabrania się ingerowania w konstrukcję urządzenia
celem zmiany jego parametrów lub budowy.
n) Trzymać urządzenia z dala od źródeł ognia i ciepła.
o) Nie należy przeciążać urządzenia.
p) Nie wolno zasłaniać otworów wentylacyjnych
urządzenia!
q) Do urządzenia nie wolno wkładać przedmiotów
łatwopalnych.
r) Przedmioty we wnętrzu urządzenia nie powinny
być ułożone zbyt blisko siebie. Należy zostawić
odpowiednią przestrzeń, aby ułatwić cyrkulację
gorącego powietrza.

16 17
12.03.2022
PL
OUT – moc wyjściowa korpusu grzewczego. Wartości
możliwe do ustawienia od 0 do 100. Po ustawieniu
należy nacisnąć i przytrzymać przycisk SET przez około
5 sekund, aby wyjść z ustawień zaawansowanych oraz
by zapisać wprowadzone zmiany.
3.4. CZYSZCZENIE I KONSERWACJA
a) Przed każdym czyszczeniem, regulacją, wymianą
osprzętu, a także jeżeli urządzenie nie jest używane,
należy wyciągnąć wtyczkę sieciową i całkowicie
ochłodzić urządzenie.
b) Do czyszczenia urządzenia wolno stosować tylko
łagodne środki czyszczące przeznaczone do
czyszczenia powierzchni mających styczność z
żywnością.
c) Po każdym czyszczeniu wszystkie elementy należy
dobrze wysuszyć, zanim urządzenie zostanie
ponownie użyte.
d) Urządzenie należy przechowywać w suchym i
chłodnym miejscu chronionym przed wilgocią i
bezpośrednim promieniowaniem słonecznym.
e) Zabrania się spryskiwania urządzenia strumieniem
wody lub zanurzania urządzenia w wodzie.
f) Należy pamiętać, aby przez otwory wentylacyjne
znajdujące się w obudowie nie dostała się woda.
g) Otwory wentylacyjne należy czyścić pędzelkiem i
sprężonym powietrzem.
h) Należy wykonywać regularne przeglądy urządzenia
pod kątem jego sprawności technicznej oraz wszelkich
uszkodzeń.
i) Do czyszczenia należy używać miękkiej, wilgotnej
ściereczki.
j) Do czyszczenia nie wolno używać ostrych i/lub
metalowych przedmiotów (np. drucianej szczotki lub
metalowej łopatki) ponieważ mogą one uszkodzić
powierzchnię materiału, z którego wykonane jest
urządzenie.
k) Nie czyścić urządzenia substancja o odczynie
kwasowym, środkami przeznaczenia medycznego,
rozcieńczalnikami, paliwem, olejami lub innymi
substancjami chemicznymi może to spowodować
uszkodzenie urządzenia.
USUWANIE ZUŻYTYCH URZĄDZEŃ.
Po zakończeniu okresu użytkowania nie wolno usuwać
niniejszego produktu poprzez normalne odpady komunalne,
lecz należy go oddać do punktu zbiórki i recyklingu
urządzeń elektrycznych i elektronicznych. Informuje o tym
symbol, umieszczony na produkcie, instrukcji obsługi lub
opakowaniu. Zastosowane w urządzeniu tworzywa nadają
się do powtórnego użycia zgodnie z ich oznaczeniem. Dzięki
powtórnemu użyciu, wykorzystaniu materiałów lub innym
formom wykorzystania zużytych urządzeń wnoszą Państwo
istotny wkład w ochronę naszego środowiska.
Informacji o właściwym punkcie usuwania zużytych urządzeń
udzieli Państwu lokalna administracja.
ROZWIĄZYWANIE PROBLEMÓW
Problem Możliwa
przyczyna Działanie
Brak zasilania
Wtyczka jest
źle włożona lub
przewód jest
odłączony.
Włożyć wtyczkę/
podłączyć
przewód.
Przepalony
bezpiecznik.
Wymienić
bezpiecznik.
Temperatura
w urządzeniu
nie wzrasta
Ustawiona
temperatura jest
zbyt niska.
Wyregulować
ustawioną
temperaturę.
Grzałka
elektryczna nie
działa.
Wymienić grzałkę
elektryczną.
Regulator
temperatury nie
działa.
Wymienić
regulator
temperatury.
Nie działa
wentylator
cykliczny.
Wymienić
wentylator.
Nastawiona
temperatura
znacznie
różni się od
temperatury
w urządzeniu
Czujnik
temperatury nie
działa.
Wymienić czujnik
temperatury.
Potencjometr
precyzyjnego
dostrajania
do ustawiania
temperatury
nie jest dobrze
wyregulowany.
Wyregulować
potencjometr.
Alarm
przekroczenia
temperatury
jest nieprawi-
dłowy.
Ustawiona
temperatura jest
zbyt niska.
Wyregulować
ustawioną
temperaturę.
Regulator
temperatury nie
działa.
Wymienić
regulator
temperatury.
3. Ustawić temperaturę. Na wyświetlaczu pokaże się
temperatura ustawiona przez użytkownika oraz
temperatura wewnątrz urządzenia. Zaświeci się
kontrolka włączonego ogrzewania. Oznacza to, że
urządzenie jest w trakcie ogrzewania i podnoszenia
temperatury. Po pewnym czasie, gdy ustawiona
temperatura będzie zbliżona do temperatury
wewnątrz urządzenia, kontrolka zacznie migać. W
normalnych warunkach, po ogrzewaniu przez 90
minut, urządzenie będzie już tylko utrzymywać
zadaną temperaturę.
4. Jeśli wymagana temperatura pracy jest niska, np.
80oC, należy przyjąć metodę dwustopniowego
ustawiania temperatury. Metoda ta zapobiegnie
zjawisku spadania temperatury i umożliwi szybsze
osiągnięcie stałej temperatury wewnątrz urządzenia.
Przykładowo, jeśli wymagana temperatura wynosi
80oC, należy najpierw ustawić temperaturę 70oC. Po
nagrzaniu urządzenia do zadanej temperatury, należy
ustawić docelową temperaturę, tj. 80oC.
5. Należy dostosować czas suszenia w zależności od
wilgotności różnych artykułów. Jeśli artykuły, które
mają być suszone, są bardzo wilgotne, należy ustawić
pokrętło regulujące ilość powietrza w pozycji „三”.
Wówczas wilgotne powietrze wewnątrz urządzenia
zostanie odprowadzone.
6. Po zakończeniu procesu suszenia należy zostawić
otwarty dopływ powietrza, ustawić przełącznik
zasilania w pozycji OFF, a następnie otworzyć drzwi
urządzenia. Należy uważać żeby się nie oparzyć! Jeśli
użytkownik nie chce wyciągać artykułów z szafy po
zakończonym procesie suszenia, wystarczy zamknąć
dopływ powietrza i zostawić artykuły w urządzenia na
tak długo, jak jest to potrzebne.
PROCEDURA POKAZUJĄCA PRZEBIEG MIĘDZY FUNKCJAMI
UWAGA: Rysunek produktu znajduje się na końcu
instrukcji na stronie: 40.
PRACA STEROWNIKA
Gdy regulator temperatury jest włączony, wyświetlacz PV
pokazuje wartość temperatury mierzonej, wyświetlacz SV
pokazuje wartość temperatury zadanej.
USTAWIENIA PODSTAWOWE:
Ustawienie temperatury: wcisnąć przycisk SET, wyświetlacz
PV pokaże „SP”, wyświetlacz SV pokaże wartość temperatury
którą można ustawić. Ostatnia cyfra będzie migać, jej wartość
można ustawić przyciskami ▲oraz ▼. Przyciskiem ◄ należy
przełączyć na kolejną cyfrę, której wartość należy ustawić
przyciskami ▲oraz ▼. Po ustawieniu temperatury należy
przycisnąć przycisk SET aby przejść do ustawienia czasu.
Ustawienie czasu: wcisnąć przycisk SET, wyświetlacz PV
pokaże „SΓ”, wyświetlacz SV pokaże wartość czasu który
można ustawić. Ostatnia cyfra będzie migać, jej wartość
można ustawić przyciskami ▲oraz ▼. Przyciskiem ◄
należy przełączyć na kolejną cyfrę, której wartość należy
ustawić przyciskami ▲ oraz ▼. Po ustawieniu czasu należy
przycisnąć przycisk SET, aby urządzenie zaczęło pracę z
ustawionymi parametrami.
USTAWIENIA ZAAWANSOWANE:
UWAGA!: Wszystkie sterowniki i parametry przeszły ścisłe
testy oraz zostały ustawione fabrycznie. Jeśli parametry
techniczne pracy suszarki próżniowej są zgodne z
oczekiwaniami, oraz jeśli suszarka próżniowa pracuje bez
zarzutu, nie ma potrzeby modykacji tych parametrów.
Wejście do trybu ustawień zaawansowanych:
Nacisnąć i przytrzymać przycisk ▲, następnie nacisnąć
przycisk SET. Na wyświetlaczu pokaże się „LCK”. Zwolnić
przycisk SET (przycisk ▲pozostaje wciśnięty), następnie
ustawić wartość migającej cyfry na „7”. Zwolnić przycisk ▲
i nacisnąć przycisk SET. Na wyświetlaczu pokaże się „AL1”.
AL1 – alarm odchylenia temperatury – ustawić żądaną
wartość przyciskami ▲ i ▼. Wartości możliwe
do ustawienia: zakres między -99,9°C a 999,9°C.
Urządzenie uruchomi alarm w momencie, gdy suma
temperatury zadanej oraz ustawionego odchylenia
temperatury przekroczy wartość temperatury
rzeczywistej. Po ustawieniu wartości odchylenia
temperatury należy nacisnąć SET, aby przejść do
ustawienia wysokiej/niskiej prędkości „FAN”.
FAN – regulacja wysokiej/niskiej prędkości. Wartości
możliwe do ustawienia: zakres między -99,9°C a
999,9°C. Po ustawieniu należy nacisnąć przycisk
SET, aby przejść do ustawienia korekty wartości
temperatury „SC”.
SC – korekta wartości temperatury mierzonej –
wyświetlacz PV pokazuje skorygowaną wartość
temperatury. Wartości możliwe do ustawienia: od
-99,9°C do +100°C. Po ustawieniu należy nacisnąć
przycisk SET, aby przejść do ustawienia autoregulacji
sterownika PID – na wyświetlaczu pokaże się „ATU”.
ATU – włączenie lub wyłączenie możliwości uruchomienia
autoregulacji sterownika PID – wartości możliwe
od ustawienia: „0” – możliwość autoregulacji PID
wyłączona; „1” – możliwość autoregulacji PID włączona.
Przy ustawieniu tego parametru do wartości „1”
urządzenie można uruchomić w trybie autoregulacji.
Aby uruchomić tryb autoregulacji, po wyjściu z
ustawień zaawansowanych, w trybie normalnej
pracy należy nacisnąć i przytrzymać przycisk ▼ przez
czas około 5 sekund. Po uruchomieniu tego trybu
wyświetlacz SV będzie migał pokazując informację
„ATU”. W trakcie trwania tego procesu rzeczywista
temperatura może się różnić od ustawionej – jest
to zjawisko normalne. Czas trwania pracy funkcji
autoregulacji wynosi około 3 do 5 minut. Po tym
czasie sterownik PID dostosuje swoje ustawienia aby
móc pracować z większą dokładnością. Po ustawieniu
należy nacisnąć przycisk SET, aby przejść do ustawienia
zakresu proporcjonalności „P”.
P – zakres proporcjonalności – regulacja kontroli
grzania. Wartości możliwe do ustawienia: od 0 do
100.0. Po ustawieniu należy nacisnąć przycisk SET, aby
przejść do ustawienia stałej czasu całkowania „I”.
I – stała czasu całkowania. Wartości możliwe do
ustawienia: od 1 do 4320. Po ustawieniu należy
nacisnąć przycisk SET, aby przejść do ustawienia stałej
czasu różniczkowania „d”.
d – stała czasu różniczkowania. Wartości możliwe
do ustawienia: od 0 do 1200. Po ustawieniu należy
nacisnąć przycisk SET, aby przejść do ustawienia
okresu grzania „T”.
T – okres grzania. Wartości możliwe do ustawienia: od
1 do 60. Po ustawieniu należy nacisnąć przycisk SET,
aby przejść do ustawień zakresu regulacji dokładności
cieplnej „HL”.
HL – zakres regulacji dokładności cieplnej. Wartości
możliwe do ustawienia od 0.500 do 1.500. Po
ustawieniu należy nacisnąć przycisk SET, aby przejść
do ustawienia mocy wyjściowej korpusu grzewczego
„OUT”.
PL

18 19
12.03.2022
NÁVOD K OBSLUZE
2.1. ELEKTRICKÁ BEZPEČNOST
a) Daná zásuvka musí být se zástrčkou zařízení
kompatibilní. Zástrčku žádným způsobem
neupravujte. Originální zástrčky a příslušné zásuvky
snižují nebezpečí úrazu elektrickým proudem.
b) Nedotýkejte se uzemněných předmětů jako jsou
trubky, topidla, kamna a chladničky. Pokud je
zařízení uzemněno, existuje zvýšené nebezpečí
úrazu elektrickým proudem v následku působení
deště, mokrého povrchu a práce se zařízením ve
vlhkém prostředí. Proniknutí vody do zařízení zvyšuje
nebezpečí jeho poškození a úrazu elektrickým
proudem.
c) Zařízení se nedotýkejte mokrýma nebo vlhkýma
rukama.
d) Napájecí kabel nepoužívejte na jiné účely, než na které
je určen. Nikdy jej nepoužívejte k přenášení zařízení
nebo k vytahování zástrčky ze síťové zásuvky. Držte jej
mimo dosah tepla, oleje, ostrých hran nebo rotujících
dílů. Poškozené nebo zamotané elektrické napájecí
kabely zvyšují nebezpečí úrazu elektrickým proudem.
e) Pokud není možné vyhnout se práci se zařízením
ve vlhkém prostředí, používejte při tom proudový
chránič (RCD). Používání RCD snižuje nebezpečí úrazu
elektrickým proudem.
f) Je zakázáno používat zařízení, pokud je napájecí
kabel poškozený nebo má zjevné známky opotřebení.
Poškozený napájecí kabel musí být vyměněn
kvalikovaným elektrikářem nebo v servisním středisku
výrobce.
g) Aby nedošlo k zasažení elektrickým proudem, nesmíte
kabel, zástrčku ani samotné zařízení ponořovat do
vody nebo jiné tekutiny. Je zakázáno používat zařízení
na mokrém povrchu.
h) POZOR – OHROŽENÍ ŽIVOTA! Během čistění nebo
používání zařízení nikdy nesmí být ponořováno ve
vodě nebo jiných kapalinách.
i) Zařízení nenořte do vody. Hrozí nebezpečí úrazu
elektrickým proudem!
2.2. BEZPEČNOST NA PRACOVIŠTI
a) Na pracovišti udržujte pořádek a mějte dobré
osvětlení. Nepořádek nebo špatné osvětlení mohou
vést k úrazům. Buďte předvídaví a sledujte, co se
během práce kolem vás děje. Při práci se zařízením
vždy zachovávejte zdravý rozum.
b) Se zařízením nepracujte ve výbušném prostředí,
například v přítomnosti hořlavých kapalin, plynů nebo
prachu. Zařízení vytváří jiskření, skrze které může dojít
ke vznícení prachu nebo výparů.
Popis parametru Hodnota parametru
Název výrobku LABORATORNÍ SUŠÁRNA
Model SBS-
ADO-1000
SBS-
ADO-2000
Jmenovité napětí
napájení [V~] /
Frekvence [Hz]
230/50
Jmenovitý výkon [W] 1670 2170
Stupeň ochrany IP I
Vnější rozměry (Šířka
x Hloubka x Výška)
[mm]
736x575x627 835x580x700
Vnitřní rozměry (Šířka
x Hloubka x Výška)
[mm]
440x324x448 550x450x550
Hmotnost [kg] 42 53
Teplotní rozsah [oC] 50 - 300
1. VŠEOBECNÝ POPIS
Návod slouží jako nápověda pro bezpečné a spolehlivé
používání výrobku. Výrobek je navržen a vyroben přesně
podle technických údajů za použití nejnovějších technologií
a komponentů a za dodržení nejvyšších jakostních norem.
Originálním návodem je německá verze návodu. Ostatní
jazykové verze jsou překladem z německého jazyka.
Pojem „zařízení“ nebo „výrobek“ v bezpečnostních
pokynech a návodu se vztahuje na LABORATORNÍ
SUŠÁRNA.
Pro zajištění dlouhého a spolehlivého fungování zařízení
pravidelně provádějte revize a údržbu v souladu s pokyny
uvedenými v tomto návodu. Technické údaje a specikace
uvedené v návodu jsou aktuální. Výrobce si vyhrazuje
právo provádět změny za účelem zvýšení kvality. Vzhledem
k technickému pokroku a možnosti omezení hluku bylo
zařízení navrženo a vyrobeno tak, aby nebezpečí vyplývající
z emise hluku bylo omezeno na nejnižší úroveň.
PŘED ZAHÁJENÍM PRÁCE SI DŮKLADNĚ PŘEČTĚTE
TENTO NÁVOD A UJISTĚTE SE, ŽE JSTE POCHOPILI
VŠECHNY POKYNY.
VYSVĚTLENÍ SYMBOLŮ
POZOR! Obrázky v tomto návodu jsou pouze
ilustrační a v některých detailech se od skutečného
vzhledu výrobku mohou lišit.
POZNÁMKA! Přečtěte si tento návod včetně všech
bezpečnostních pokynů. Nedodržování návodu a
pokynů může vést k úrazu elektrickým proudem,
požáru anebo těžkému úrazu či smrti.
2. BEZPEČNOST POUŽÍVÁNÍ
TECHNICKÉ ÚDAJE
Výrobek splňuje požadavky příslušných
bezpečnostních norem.
Před použitím výrobku se seznamte s
návodem.
Recyklovatelný výrobek.
UPOZORNĚNÍ! nebo VAROVÁNÍ! nebo
PAMATUJTE! popisující danou situaci.
(všeobecná výstražná značka)
Používejte ochranné rukavice.
VAROVÁNÍ! Nebezpečí úrazu elektrickým
proudem!
VAROVÁNÍ! Horký povrch může způsobit
popálení!
Pouze k použití ve vnitřních prostorech.
CZ CZ
PAMATUJTE! Při práci se zařízením chraňte děti a
jiné nepovolané osoby.
c) Pokud zjistíte, že zařízení nepracuje správně, nebo
je poškozeno, ihned jej vypněte a poruchu nahlaste
autorizované osobě.
d) Pokud máte pochybnosti o tom, zda zařízení funguje
správně, kontaktujte servis výrobce.
e) Opravy zařízení může provádět pouze servis výrobce.
Opravy neprovádějte sami!
f) V případě vzniku požáru k hašení zařízení pod napětím
používejte pouze práškové nebo sněhové hasicí
přístroje (CO2).
g) Na pracovišti se nesmí zdržovat děti a nepovolané
osoby. (Nepozornost může způsobit ztrátu kontroly
nad zařízením.)
h) Návod k obsluze uschovejte za účelem jeho pozdějšího
použití. V případě předánání zařízení třetím osobám
musí být spolu se zařízením předán rovněž návod k
obsluze.
i) Obalový materiál a drobné montážní prvky
uchovávejte na místě nedostupném pro děti.
j) Zařízení mějte v dostatečné vzdálenosti od dětí a
zvířat.
k) Pokud společně s tímto nástrojem používáte nějaké
další nářadí, pak musíte dodržovat také jeho návod k
použití.
2.3. OSOBNÍ BEZPEČNOST
a) Zařízení nepoužívejte, jste-li unaveni nebo pod vlivem
drog, alkoholu nebo léků, které významně snižují
schopnost zařízení ovládat.
b) Zařízení není určen k tomu, aby jej používaly osoby
(včetně dětí) s omezenými psychickými, smyslovými
nebo duševními schopnostmi nebo osoby bez
příslušných zkušeností a/nebo znalostí, ledaže
jsou pod dohledem osoby zodpovědné za jejich
bezpečnost nebo od ní obdržely pokyny, jak zařízení
obsluhovat.
c) S výrobkem mohou pracovat pouze fyzicky zdravé
osoby, které jsou schopné ho obsluhovat. Musejí být
náležitě proškolené z hlediska bezpečnosti a ochrany
zdraví při práci a seznámené s tímto návodem.
d) Při práci se zařízením buďte pozorní, řiďte se zdravým
rozumem. Chvilka nepozornosti při práci může vést k
vážnému úrazu.
e) Používejte osobní ochranné pomůcky vyžadované pro
práci se zařízením, specikované v bodě 1 vysvětlením
symbolů. Používání vhodných, atestovaných osobních
ochranných prostředků snižuje nebezpečí úrazu.
f) Zabraňte náhodnému spuštění. Ujistěte se, že je
spínač ve vypnuté poloze před připojením zařízení k
napájecímu zdroji.
g) Zařízení není hračka. Dohlížejte na děti, aby si nehrály
se zařízením.
2.4. BEZPEČNÉ POUŽÍVÁNÍ ZAŘÍZENÍ
a) Zařízení nepoužívejte, pokud spínač pro zapnutí a
vypnutí zařízení nefunguje správně. Zařízení, které
nelze ovládat spínačem, je nebezpečné a musí být
opraveno.
b) Vytáhněte zástrčku ze zásuvky před jakýmkoliv
seřízením, výměnou příslušenství nebo odložením
zařízení. Toto opatření snižuje riziko náhodného
zapnutí.
c) Nepoužívaná zařízení uchovávejte mimo dosah dětí
a osob, které nejsou seznámeny se zařízením nebo
návodem k obsluze. Zařízení jsou nebezpečná v rukou
nezkušených uživatelů.
d) Zařízení udržujte v dobrém technickém stavu.
Kontrolujte před každou prací jeho celkový stav i
jednotlivé díly a ujistěte se, že je vše v dobrém stavu,
a uživateli tak při práci se zařízením nehrozí žádné
nebezpečí. V případě, že zjistíte poškození, nechte
zařízení opravit.
e) Udržujte zařízení mimo dosah dětí.
f) Opravu a údržbu zařízení by měly provádět pouze
kvalikované osoby za výhradního použití originálních
náhradních dílů. Zajistí to bezpečné používání zařízení.
g) Pro zachování navržené mechanické integrity zařízení
neodstraňujte předem namontované kryty nebo
neuvolňujte šrouby.
h) Při přemisťování zařízení z místa skladování na místo
používání berte v úvahu pracovní zásady bezpečnosti
a ochrany zdraví v rámci přenášení břemena platné v
zemi, ve které se zařízení používá.
i) Nepřesouvejte, nepřenášejte a neotáčejte zařízení v
provozu.
j) Zapnuté zařízení nenechávejte bez dozoru.
k) Pravidelně čistěte zařízení, aby nedošlo k trvalému
usazovaní nečistot.
l) Zařízení není hračka. Čištění a údržbu nesmí provádět
děti bez dohledu dospělé osoby.
m) Nezasahujte do zařízení s cílem změnit jeho parametry
nebo konstrukci.
n) Udržujte zařízení mimo zdroje ohně a tepla.
o) Zařízení nepřetěžujte.
p) Nezakrývejte větrací otvory!
q) Do zařízení se nesmí vkládat hořlavé předměty.
r) Předměty uvnitř zařízení nesmí být umístěny příliš
blízko u sebe. Pro usnadnění cirkulace horkého
vzduchu musí být ponechán dostatečný prostor.
POZNÁMKA! I když zařízení bylo navrženo tak, aby
bylo bezpečné, tedy má vhodné bezpečnostní prvky,
tak i přes použití dodatečné ochrany uživatelem při
práci se zařízením nadále existuje malé riziko úrazu
nebo poranění. Doporučuje se zachovat opatrnost a
zdravý rozum při jeho používání.
Laboratorní sušárna SBS-ADO-1000, SBS-ADO-2000 je
zařízení používané k jemnému a důkladnému sušení
různých materiálů.
Laboratorní sušárna SBS-ADO-1000, SBS-ADO-2000 patří
mezi výrobky, na které se nevztahují předpisy MDD 93/42/
EEC pro zdravotnické prostředky.
Odpovědnost za veškeré škody vzniklé v důsledku
použití zařízení v rozporu s určením nese uživatel.
3. ZÁSADY POUŽÍVÁNÍ

20 21
12.03.2022
3.1. POPIS ZAŘÍZENÍ
5 64321
7
8
9
10
ČINNOST REGULÁTORU
Je-li regulátor teploty zapnutý, displej PV zobrazuje hodnotu
měřené teploty, displej SV zobrazuje hodnotu zadané
teploty.
ZÁKLADNÍ NASTAVENÍ:
Nastavení teploty: stlačit tlačítko SET, na displeji PV se
zobrazí „SP”, na displeji SV se zobrazí hodnota teploty,
kterou lze nastavit. Poslední číslice bude blikat, její hodnotu
je možné nastavit tlačítky ▲a ▼. Tlačítkem ◄ přejděte na
další číslici, jejíž hodnotu je třeba nastavit tlačítky ▲a ▼. Po
nastavení teploty je třeba stlačit tlačítko SET pro přechod do
nastavení doby.
Nastavení doby: stiskněte tlačítko SET, na displeji PV se
zobrazí „SΓ”, na displeji SV se zobrazí hodnota doby, kterou
lze nastavit. Poslední číslice bude blikat, jej hodnotu lze
nastavit tlačítky ▲a ▼ . Tlačítkem ◄ je třeba přejít na další
číslici, jejíž hodnotu je třeba nastavit tlačítky ▲a ▼. Po
nastavení doby je třeba stlačit tlačítko SET, tak aby zařízení
zahájilo činnost s nastavenými parametry.
POKROČILÉ NASTAVENÍ:
UPOZORNĚNÍ: Všechny regulátory a parametry byly
podrobeny přísným zkouškám a byly nastaveny ve výrobě.
Pokud jsou technické provozní parametry podtlakové sušičky
v souladu s předpoklady a pokud podtlaková sušička pracuje
bez problémů, není nutné tyto parametry modikovat.
Přechod do režimu pokročilých nastavení:
Stlačit a podržet tlačítko ▲, poté stlačit tlačítko SET. Na
displeji se zobrazí „LCK”. Uvolnit
tlačítko SET (tlačítko ▲ zůstává stlačené), poté nastavit
hodnotu blikající číslice na „7”.
Uvolnit tlačítko ▲ a stlačit tlačítko SET. Na displeji se zobrazí
„AL1”.
AL1 – alarm odchylky teploty – nastavte požadovanou
hodnotu pomocí tlačítek ▲a ▼. Hodnoty, které
je možno nastavit: rozsah mezi -99,9 °C a 999,9 °C.
Zařízení spustí alarm ve chvíli, když součet nastavené
teploty a nastavené odchylky teploty přesáhne
hodnotu skutečné teploty. Po nastavení hodnoty
odchylky stiskněte tlačítko SET pro přechod do
nastavení vysoké/nízké rychlosti „FAN“.
FAN – nastavení vysoké/nízké rychlosti. Hodnoty, které
je možno nastavit: rozsah mezi -99,9 °C a 999,9 °C.
Po nastavení stiskněte tlačítko SET pro přechod do
nastavení korekce hodnoty měřené teploty „SC“.
SC – korekce hodnoty měřené teploty – na displeji PV se
zobrazuje korigovaná hodnota teploty. Hodnoty, které
lze nastavovat: od -99,9°C do +100°C. Po nastavení
hodnoty korekce měřené teploty je třeba stlačit
tlačítko SET pro přechod do nastavení autoregulace
regulátoru PID – na displeji se zobrazí „ATU”.
ATU – zapnutí nebo vypnutí možnosti autoregulace
regulátoru PID – hodnoty, které lze nastavovat: „0”
– možnost autoregulace PID vypnutá; „1” – možnost
autoregulace PID zapnutá. Při nastavení tohoto
parametru na hodnotu „1” je možné zařízení uvést
do provozu v režimu autoregulace. Pro spuštění
režimu autoregulace, po výstupu z pokročilých
nastavení, v režimu normálního provozu je třeba
stlačit a podržet tlačítko ▼po dobu cca 5 sekund. Po
spuštění tohoto režimu bude displej SV blikat a bude
na něm zobrazena informace „ATU”. Během tohoto
procesu se skutečná teplota může lišit od nastavené
teploty – je to normální jev. Doba trvání činnosti
funkce autoregulace činí cca 3 až 5 minut. Po této
době regulátor PID přizpůsobí své nastavení tak, aby
mohl pracovat s vyšší přesností. Po nastavení je třeba
stlačit tlačítko SET pro přechod do nastavení rozsahu
proporcionality „P”.
P – rozsah proporcionality – regulace kontroly ohřevu.
Hodnoty, které lze nastavovat: od 0 do 100.0. Po
nastavení je třeba stlačit tlačítko SET pro přechod do
nastavení integrační časové konstanty „I”.
I – integrační časová konstanta. Hodnoty, které lze
nastavovat: od 1 do 4320. Po nastavení je třeba stlačit
tlačítko SET pro přechod do nastavení derivační
časové konstanty „d”.
d – derivační časová konstanta. Hodnoty, které lze
nastavovat: od 0 do 1200. Po nastavení je třeba stlačit
tlačítko SET pro přechod do nastavení doby ohřevu
„T”.
T – doba ohřevu. Hodnoty, které lze nastavovat: od 1
do 60. Po nastavení je třeba stlačit tlačítko SET pro
přechod do nastavení rozsahu regulace tepelné
přesnosti „HL”.
HL – Rozsah regulace tepelné přesnosti. Hodnoty, které
lze nastavovat od 0.500 do 1.500. Po nastavení
stiskněte tlačítko SET pro přechod do nastavení
výstupního výkonu topného tělesa „OUT“.
OUT – výstupní výkon topného tělesa. Hodnoty je možno
nastavit od 0 do 100. Po nastavení je třeba stlačit a
podržet tlačítko SET po dobu cca 5 sekund pro výstup
z pokročilých nastavení a pro zápis zadaných změn.
3.4. ČIŠTĚNÍ A ÚDRŽBA
a) Před každým čištěním, seřizováním, výměnou
příslušenství a také vždy, když zařízení nepoužíváte,
vytáhněte síťovou zástrčku a nechte zařízení úplně
vychladnout.
b) K čištění zařízení používejte pouze jemné čisticí
prostředky, určené pro čištění povrchů přicházejících
do styku s potravinami.
c) Po každém čištění je nutno všechny prvky dobře
osušit, než bude zařízení opět použito.
d) Zařízení skladujte na suchém a chladném místě,
chráněném proti vlhkosti a přímému slunečnímu svitu.
e) Je zakázáno zařízení polévat vodou nebo je do vody
ponořovat.
f) Dávejte pozor, aby se ventilačními otvory nacházejícími
se na krytu zařízení nedostala dovnitř voda.
g) Ventilační otvory čistěte pomocí štětečku a stlačeného
vzduchu.
h) Pravidelně provádějte revize zařízení a kontrolujte, zda
je technicky způsobilé a není poškozeno.
i) K čištění používejte měkký, vlhký hadřík.
j) K čištění nepoužívejte ostré ani kovové předměty
(například drátěný kartáč nebo kovovou obracečku),
protože mohou poškodit povrch materiálu, z něhož je
zařízení vyrobeno.
k) Zařízení nečistěte přípravky s kyselým pH,
dezinfekčními prostředky, ředidly, palivem, oleji nebo
jinými chemickými látkami, může to poškodit zařízení.
CZCZ
1. Kryt
2. Výrobní štítek
3. Ovládací panel
4. Dveřní klika
5. Police
6. Dvířka
7. Nastavení teploty
8. Kontrolka napájení
9. Vypínač ON/OFF
10. Regulátor množství vzduchu
Panel nastavení teploty:
1. Hodnota teploty uvnitř zařízení
2. Hodnota nastavené teploty
3. Indikátory:
• RUN – indikátor provozu
• HEAT – indikátor ohřevu
• ALM – indikátor alarmu
• HI – indikátor vysoké rychlosti
• LOW – indikátor nízké rychlosti
4. Tlačítko funkce SET
5. Tlačítko SHIFT
6. Tlačítko nastavení „dolů“ „-”
7. Tlačítko nastavení „nahoru“ „+“
Zařízení je vybaveno:
• přesnou regulací teploty: teplotu lze nastavit vždy o 1
°C ,
• displejem se zobrazením nastavené teploty a teploty
uvnitř zařízení,
• zvukovým a světelným alarmem, který signalizuje
vyšší teplotu uvnitř zařízení, než jaká je nastavená na
ovládacím panelu. Zařízení automaticky vypne ohřev a
spustí alarm,
3.3. PRÁCE SE ZAŘÍZENÍM
ZÁKLADNÍ PRAVIDLA
1. Předměty, které jsou určeny k vysušení, umístěte
uvnitř zařízení a důkladně zavřete dvířka.
2. Vypínač nastavte do polohy ON. Kontrolka napájení se
rozsvítí a na přístroji pro nastavení teploty se objeví
čísla.
3. Nastavte teplotu. Na displeji se zobrazí teplota
nastavená uživatelem a teplota uvnitř zařízení. Rozsvítí
se kontrolka spuštěného ohřevu. To znamená, že
zařízení se zahřívá a zvyšuje se jeho teplota. Po určité
době, když se nastavená teplota bude blížit teplotě
uvnitř zařízení, začne blikat kontrolka. Za normálních
podmínek bude zařízení po 90 minutovém ohřevu už
pouze udržovat nastavenou teplotu.
4. Pokud je požadovaná nízká provozní teplota, např. 80
°C, je třeba použít dvoustupňovou metodu nastavení
teploty. Tato metoda zabrání poklesu teploty a umožní
rychleji dosáhnout konstantní teploty uvnitř zařízení.
Pokud je například požadovaná teplota 80 °C, je třeba
nejdříve nastavit teplotu na 70 °C. Po ohřátí zařízení na
nastavenou teplotu, je třeba nastavit cílovou teplotu,
tj. 80 °C.
5. Dobu sušení je třeba upravit v závislosti na vlhkosti
různých předmětů. Pokud předměty, které jsou určeny
k sušení, jsou velmi vlhké, je třeba nastavit otočný
regulátor množství vzduchu do polohy „三”. Vlhký
vzduch bude poté odváděn ze zařízení.
6. Po dokončení procesu sušení je třeba přívod vzduchu
nechat otevřený, vypínač nastavit do polohy OFF a
poté otevřít dvířka zařízení. Dávejte pozor, aby nedošlo
k popálení! Pokud uživatel po ukončení procesu sušení
nechce předměty vytahovat ze skříňky, stačí vypnout
přívod vzduchu a ponechat předměty v zařízení tak
dlouho, jak je potřeba.
3.2. PŘÍPRAVA K PRÁCI
UMÍSTĚNÍ ZAŘÍZENÍ
Teplota okolí nesmí být vyšší než 35 °C a relativní vlhkost
nesmí být vyšší než 85 %. Zařízení postavte takovým
způsobem, aby byla zajištěna dobrá cirkulace vzduchu.
Je třeba zachovat minimální vzdálenost 20 cm od zadní
stěny, 15 cm na bocích a 35 cm na horní stranu.. Zařízení
se musí nacházet daleko od jakéhokoli horkého povrchu.
Zařízení vždy používejte na rovnoměrném, stabilním,
čistém a ohnivzdorném povrchu, mimo dosah dětí a
osob s omezenými psychickými, smyslovými a duševními
funkcemi. Zařízení umístěte takovým způsobem, abyste
v každém okamžiku měli ničím nezatarasený přístup k
elektrické zásuvce. Ujistěte se, aby hodnoty proudu, kterým
je zařízení napájeno, byly shodné s údaji uvedenými na
technickém štítku zařízení!
Před prvním použitím demontujte všechny díly a umyjte je,
a také umyjte celé zařízení.
1
2
3
4 5 6 7
POZOR! Přístroj je vybaven teplotním pojistkovým
spínačem. Přívod proudu vypíná v momentě, kdy
teplota uvnitř zařízení překročí hodnotu nastavenou
na spínači. Teplota na spínači by měla být vždy
nastavena o 10⁰C výš, než je pracovní teplota
nastavená na hlavním ovládacím panelu.
• regulátorem vzduchu (pomocí otočného regulátoru
můžete nastavit přívod a odvod vzduchu z vnitřku
zařízení).
POSTUP UKAZUJÍCÍ PRŮBĚH FUNKCÍ:
POZNÁMKA! Nákres tohoto produktu naleznete na
konci návodu na str. 41.

22 23
12.03.2022
CZ
ŘEŠENÍ PROBLÉMŮ
Problém Možná příčina Řešení
Bez napájení
Vidlice je špatně
umístěna v
zásuvce nebo je
odpojen kabel.
Zapojte vidlici /
připojte kabel.
Vyhořelá pojistka. Vyměňte pojistku.
Teplota v
zařízení se
nezvyšuje
Nastavená
teplota je příliš
nízká.
Upravte
nastavenou
teplotu.
Topné těleso
nefunguje.
Vyměňte topné
těleso.
Nefunguje
regulátor teploty.
Vyměňte
regulátor teploty.
Nefunguje
cyklický
ventilátor.
Vyměňte
ventilátor.
Nastavená
teplota se
výrazně liší
od teploty v
zařízení
Teplotní čidlo
nefunguje.
Vyměňte teplotní
čidlo.
Potenciometr pro
precizní doladění
teploty není
dobře nastaven.
Nastavte
potenciometr.
Alarm
překročení
teploty je
nesprávný
Nastavená
teplota je příliš
nízká.
Upravte
nastavenou
teplotu.
Regulátor teploty
nefunguje.
Vyměňte
regulátor teploty.
LIKVIDACE OPOTŘEBENÝCH ZAŘÍZENÍ
Po ukončení doby používání nevyhazujte tento výrobek
společně s komunálním odpadem, ale odevzdejte jej k
recyklaci do sběrny elektrických a elektronických zařízení.
O tom informuje symbol umístěný na zařízení, v návodě
k obsluze nebo na obalu. Komponenty použité v zařízení
jsou vhodné pro zužitkování v souladu s jejich označením.
Díky zužitkování, recyklaci nebo jiným způsobům využití
opotřebených zařízení významně přispíváte k ochraně
životního prostředí. Informace o příslušné sběrně
opotřebených zařízení poskytne místní obecný nebo městský
úřad.
MANUEL D‘UTILISATION
2.1. SÉCURITÉ ÉLECTRIQUE
a) La che de l’appareil doit être compatible avec la
prise électrique. Ne modiez d‘aucune façon la che
électrique. L‘utilisation de la che originale et d‘une
prise électrique adaptée diminue les risques de chocs
électriques.
b) Évitez de toucher aux composants mis à la terre
comme les tuyaux, les radiateurs, les fours et
les réfrigérateurs. Le risque de chocs électriques
augmente lorsque votre corps est mis à la terre par
le biais de surfaces trempées et d‘un environnement
humide. La pénétration d‘eau dans l‘appareil accroît le
risque de dommages et de chocs électriques.
c) Ne touchez pas l‘appareil lorsque vos mains sont
humides ou mouillées.
d) N‘utilisez pas le câble d‘une manière diérant de son
usage prévu. Ne vous en servez jamais pour porter
l‘appareil. Ne tirez pas sur le câble pour débrancher
l‘appareil. Tenez le câble à l‘écart de la chaleur, de
l‘huile, des arêtes vives et des pièces mobiles. Les
câbles endommagés ou soudés augmentent le risque
de chocs électriques.
e) Si vous n‘avez d‘autre choix que de vous servir de
l’appareil dans un environnement humide, utilisez un
dispositif diérentiel à courant résiduel (DDR). Un DDR
réduit le risque de chocs électriques.
f) Il est interdit d‘utiliser l‘appareil si le câble
d‘alimentation est endommagé ou s‘il présente
des signes visibles d‘usure. Le câble d‘alimentation
endommagé doit être remplacé par un électricien
qualié ou le centre de service du fabricant.
g) Pour éviter tout risque d‘électrocution, n‘immergez
pas le câble, la prise ou l‘appareil dans l‘eau ou tout
autre liquide. N‘utilisez pas l‘appareil sur des surfaces
humides.
h) ATTENTION DANGER DE MORT ! Ne trempez et
n’immergez jamais l’appareil dans l’eau ou dans
d’autres liquides pendant le nettoyage ou le
fonctionnement.
i) Ne mouillez pas l‘appareil. Risque de chocs électriques!
Description des
paramètres Valeur des paramètres
Nom du produit ÉTUVE DE LABORATOIRE
Modèle SBS-
ADO-1000
SBS-
ADO-2000
Tension nominale [V~]/
Fréquence [Hz] 230/50
Puissance nominale
[W] 1670 2170
Classe de protection IP I
Dimensions extérieures
(Largeur x Profondeur
x Hauteur) [mm]
736x575x627 835x580x700
Dimensions intérieures
(Largeur x Profondeur
x Hauteur) [mm]
440x324x448 550x450x550
Poids [kg] 42 53
Plage de température
[oC] 50 - 300
1. DESCRIPTION GÉNÉRALE
L‘objectif du présent manuel est de favoriser une utilisation
sécuritaire et able de l‘appareil. Le produit a été conçu
et fabriqué en respectant étroitement les directives
techniques applicables et en utilisant les technologies et
composants les plus modernes. Il est conforme aux normes
de qualité les plus élevées.
La version originale de ce manuel a été rédigée en
allemand. Toutes les autres versions sont des traductions
de l‘allemand.
Les notions d‘« appareil », de « machine » et de « produit
» gurant dans les descriptions et les consignes du manuel
se rapportent à/au ÉTUVE DE LABORATOIRE.
An de garantir le fonctionnement able et durable de
l‘appareil, il est nécessaire d‘utiliser et d‘entretenir ce
dernier conformément aux consignes gurant dans le
présent manuel. Les caractéristiques et les spécications
contenues dans ce document sont à jour. Le fabricant se
réserve le droit de procéder à des modications à des ns
d’amélioration du produit. L‘appareil a été mis au point et
fabriqué en tenant compte des progrès techniques et de la
réduction de bruit an de réduire au maximum les risques
liés aux émissions sonores.
LISEZ ATTENTIVEMENT LE PRÉSENT MANUEL ET
ASSUREZ-VOUS DE BIEN LE COMPRENDRE AVANT
LA PREMIÈRE UTILISATION.
SYMBOLES
REMARQUE ! Les illustrations contenues dans le
présent manuel sont fournies à titre explicatif. Votre
appareil peut ne pas être identique.
ATTENTION ! Veuillez lire attentivement toutes les
consignes de sécurité et toutes les instructions. Le
non-respect des avertissements et des consignes
de sécurité peut entraîner des chocs électriques, un
incendie, des blessures graves ou la mort.
2. CONSIGNES DE SÉCURITÉ
DÉTAILS TECHNIQUES
Le produit est conforme aux normes de
sécurité en vigueur.
Respectez les consignes du manuel.
Collecte séparée.
ATTENTION ! , AVERTISSEMENT ! et
REMARQUE attirent l'attention sur des
circonstances spéciques (symboles
d'avertissement généraux).
ATTENTION ! Mise en garde liée à la tension
électrique !
ATTENTION ! Surfaces chaudes. Risque de
brûlures !
Portez des protections pour les mains.
Pour l’utilisation intérieure uniquement.
FR

24 25
12.03.2022
1. Boîtier
2. Plaque signalétique
3. Panneau de commande
4. Poignée de porte
5. Étagère
6. Porte
7. Réglage de température
8. Voyant d‘alimentation
9. Interrupteur d‘alimentation ON/OFF
10. Régulateur de volume d‘air
Panneau de contrôle de la température :
1. Valeur de température à l‘intérieur de l‘appareil
2. Valeur de la température réglée
3. Indicateurs :
• RUN - indicateur de fonctionnement
• HEAT - indicateur de chauage
• ALM - indicateur d‘alarme
• HI - indicateur de vitesse haute
4. Touche de fonction SET
5. Bouton SHIFT
6. Bouton du réglage «en bas» «-»
7. Bouton du réglage «en haut» «+»
L‘appareil possède :
• le contrôle précis de la température : la température
peut être réglée tous les 1oC,
• l‘achage indiquant la température réglée et la
température à l‘intérieur de l‘appareil,
• l‘alarme sonore et visuelle pour indiquer que a
température à l‘intérieur de l‘appareil est plus élevée
que celle réglée sur le panneau de commande.
L‘appareil éteindra automatiquement le chauage et
activera l‘alarme,
• régulateur d‘air (avec le bouton de réglage, vous
pouvez régler l‘entrée et la sortie d‘air de l‘intérieur de
l‘appareil).
3.3. UTILISATION DE L‘APPAREIL
PRINCIPES DE BASE
1. Placez les articles à sécher à l‘intérieur de l‘appareil et
fermez soigneusement la porte.
2. Mettez l‘interrupteur d‘alimentation en position ON.
Le voyant d‘alimentation s‘allumera et les chires
apparaîtront sur le contrôleur de température.
ATTENTION ! Bien que l‘appareil ait été conçu en
accordant une attention spéciale à la sécurité et qu‘il
comporte des dispositifs de protection, ainsi que des
caractéristiques de sécurité supplémentaires, il n’est
pas possible d’exclure entièrement tout risque de
blessure lors de son utilisation. Nous recommandons
de faire preuve de prudence et de bon sens lorsque
vous utilisez l’appareil.
L‘étuve de laboratoire SBS-ADO-1000, SBS-ADO-2000 est
un appareil utilisé pour le séchage délicat et complet de
divers matériaux.
Les étuves de laboratoire SBS-ADO-1000, SBS-ADO-2000
sont des produits hors du champ d‘application de la
réglementation MDD 93/42 / CEE pour les dispositifs
médicaux.
L’utilisateur porte l’entière responsabilité pour
l’ensemble des dommages attribuables à un usage
inapproprié.
3.2. PRÉPARATION À L‘UTILISATION
CHOIX DE L’EMPLACEMENT DE L’APPAREIL :
La température ambiante ne doit pas dépasser 35°C
et le taux d‘humidité relative ne doit pas être de plus
de 85%. Positionnez l’appareil de sorte qu’une bonne
circulation d’air soit assurée. Vous devez vous assurer de
laisser des distances minimales de 20 cm à l‘arrière, 15
cm latéralement et 35 cm sur le haut. Tenez l’appareil à
l’écart des surfaces chaudes. Utilisé toujours l’appareil sur
une surface plane, stable, propre, ininammable et sèche,
hors de portée des enfants et des personnes présentant
des capacités physiques, sensorielles ou mentales
diminuées. Placez l’appareil de sorte que la che soit
accessible en permanence et non couverte. Assurez-vous
que l’alimentation électrique correspond aux indications
gurant sur la plaque signalétique du produit.
Avant la première utilisation, l‘appareil et l‘ensemble de ses
composants doivent être démontés et nettoyés.
3. CONDITIONS D’UTILISATION
3.1. DESCRIPTION DE L‘APPAREIL
5 64321
7
8
9
10
1
2
3
4 5 6 7
ATTENTION ! L‘appareil est équipé d‘un
interrupteur fusible de température. Il coupe
l‘alimentation électrique lorsque la température
à l‘intérieur de l‘appareil dépasse la température
réglée sur le disjoncteur. La température du
disjoncteur doit toujours être supérieure de 10°C
à la température de fonctionnement réglée sur le
panneau de commande principal.
FRFR
REMARQUE !Veillez à ce que les enfants et les
personnes qui n‘utilisent pas l‘appareil soient en
sécurité durant le travail.
2.2. SÉCURITÉ AU POSTE DE TRAVAIL
a) Veillez à ce que votre poste de travail soit toujours
propre et bien éclairé. Le désordre ou un éclairage
insusant peuvent entraîner des accidents. Soyez
prévoyant, observez les opérations et faites preuve de
bon sens lorsque vous utilisez l’appareil.
b) N‘utilisez pas l‘appareil dans les zones à risque
d‘explosion, par exemple à proximité de liquides,
de gaz ou de poussières inammables. Certains
appareils peuvent produire des étincelles susceptibles
d’enammer la poussière et les vapeurs.
c) En cas de dommages ou de mauvais fonctionnement,
l’appareil doit être mis hors tension immédiatement
et la situation doit être rapportée à une personne
compétente.
d) En cas d’incertitude quant au fonctionnement correct
de l’appareil, contactez le service client du fabricant.
e) Seul le service du fabricant peut eectuer des
réparations. Ne tentez aucune réparation par vous-
même !
f) En cas de feu ou d’incendie, utilisez uniquement des
extincteurs à poudre ou au dioxyde de carbone (CO2)
pour étouer les ammes sur l’appareil.
g) Aucun enfant ni personne non autorisée ne doit se
trouver sur les lieux de travail. (Le non-respect de
cette consigne peut entraîner la perte de contrôle sur
l‘appareil).
h) Conservez le manuel d’utilisation an de pouvoir
le consulter ultérieurement. En cas de cession de
l’appareil à un tiers, l’appareil doit impérativement être
accompagné du manuel d’utilisation.
i) Tenez les éléments d’emballage et les pièces de
xation de petit format hors de portée des enfants.
j) Tenez l’appareil hors de portée des enfants et des
animaux.
k) Lors de l’utilisation combinée de cet appareil avec
d’autres outils, respectez également les consignes se
rapportant à ces outils.
2.3. SÉCURITÉ DES PERSONNES
a) N‘utilisez pas l‘appareil lorsque vous êtes fatigué,
malade, sous l‘eet de drogues ou de médicaments
et que cela pourrait altérer votre capacité à utiliser
l‘appareil.
b) Cet appareil n‘est pas conçu pour être utilisé par les
personnes dont les facultés physiques, sensorielles
ou mentales sont limitées (enfants y compris), ni par
des personnes sans expérience ou connaissances
adéquates, à moins qu‘elles se trouvent sous
la supervision et la protection d‘une personne
responsable ou qu‘une telle personne leur ait transmis
des consignes appropriées en lien avec l‘utilisation de
l’appareil.
c) Seules des personnes aptes physiquement à se servir
de l‘appareil, qui ont suivi une formation appropriée
et ont lu ce manuel d‘utilisation peuvent utiliser le
produit. En outre, ces personnes doivent connaître les
exigences liées à la santé et à la sécurité au travail.
d) Soyez attentif et faites preuve de bon sens lors que
vous utilisez l’appareil. Un moment d‘inattention
pendant le travail peut entraîner des blessures graves.
e) Utilisez l‘équipement de protection individuel
approprié pour l‘utilisation de l‘appareil,
conformément aux indications faites dans le tableau
des symboles, au point 1.
L‘utilisation de l‘équipement de protection individuel
adéquat certié réduit le risque de blessures.
f) An de prévenir la mise en marche accidentelle de
l‘appareil, assurez-vous que celui-ci est éteint et que
l‘interrupteur se trouve sur arrêt avant de procéder au
branchement.
g) Cet appareil n‘est pas un jouet. Les enfants doivent
demeurer sous la supervision d’un adulte an qu’ils ne
jouent pas avec l’appareil.
2.4. UTILISATION SÉCURITAIRE DE L‘APPAREIL
a) N’utilisez pas l’appareil si l’interrupteur MARCHE/
ARRÊT ne fonctionne pas correctement. Les appareils
qui ne peuvent pas être contrôlés à l‘aide d‘un
interrupteur sont dangereux et doivent être réparés.
b) Débranchez l‘appareil avant de procéder à tout
réglage, changement d‘accessoire, ou mise de côté
d‘outils. Cette mesure préventive réduit le risque de
mise en marche accidentelle.
c) Les outils qui ne sont pas en cours d‘utilisation
doivent être mis hors de portée des enfants et des
personnes qui ne connaissent ni l‘appareil, ni le
manuel d‘utilisation s‘y rapportant. Entre les mains de
personnes inexpérimentées, ce genre d‘appareils peut
représenter un danger.
d) Maintenez l‘appareil en parfait état de marche. Avant
chaque utilisation, vériez l’absence de dommages en
général et au niveau des pièces mobiles (assurez-vous
qu’aucune pièce ni composant n’est cassé et vériez
que rien ne compromet le fonctionnement sécuritaire
de l’appareil). En cas de dommages, l’appareil doit
impérativement être envoyé en réparation avant
d’être utilisé de nouveau.
e) Tenez l‘appareil hors de portée des enfants.
f) La réparation et l‘entretien des appareils doivent être
eectués uniquement par un personnel qualié, à
l‘aide de pièces de rechange d‘origine. Cela garantit la
sécurité d’utilisation.
g) Pour garantir l‘intégrité opérationnelle de l‘appareil,
les couvercles et les vis posés à l‘usine ne doivent pas
être retirés.
h) Lors du transport, de l’installation et de l’utilisation de
l’appareil, respectez les dispositions d‘hygiène et de
sécurité en vigueur dans le pays d‘utilisation.
i) Il est défendu de pousser, de déplacer ou de tourner
l’appareil pendant son fonctionnement.
j) Ne laissez pas l’appareil fonctionner sans surveillance.
k) Nettoyez régulièrement l‘appareil pour en prévenir
l’encrassement.
l) Cet appareil n‘est pas un jouet. Le nettoyage et
l’entretien ne doivent pas être eectués par des
enfants, à moins qu’ils se trouvent sous la supervision
d’un adulte responsable.
m) Il est défendu de modier l’appareil pour en changer
les paramètres ou la construction.
n) Gardez le produit à l’écart des sources de feu et de
chaleur.
o) Ne surchargez pas l’appareil.
p) Ne couvrez pas les orices de ventilation !
q) Aucun objet inammable ne doit être introduit dans
l‘appareil.
r) Les objets à l‘intérieur de l‘appareil ne doivent pas être
placés trop près l‘un des autre. Un espace susant
doit être laissé pour faciliter la circulation de l‘air
chaud.

26 27
12.03.2022
FR
d – Diérenciation de la constante de temps. Les valeurs
- pouvant être réglées – se situent dans une plage
allant de 0 à 1200. Appuyez sur la touche SET une fois
le réglage achevé pour aller dans les paramètres de
durée du chauage „T“. Nettoyage et entretien
T – durée du chauage. Les valeurs - pouvant être
réglées – se situent dans une plage allant de 1 à 60.
Appuyez sur la touche SET une fois le réglage achevé
pour vous rendre au paramétrage de l’exactitude de
chauage „HL“.
HL – Plage de réglage de l‘exactitude de chauage.
Les valeurs - pouvant être réglées – se situent dans
une plage allant de 0,500 à 1,500. Après le réglage,
appuyez sur le bouton SET pour entrer dans le réglage
«OUT» de la puissance de sortie du corps de chaue.
OUT - puissance de sortie du corps de chaue. Les valeurs
sont réglables de 0 à 100. Appuyez et maintenez la
touche SET enfoncée pendant environ 5 secondes une
fois le réglage achevé an de quitter les paramètres
avancés et d‘enregistrer les modications apportées.
3.4. NETTOYAGE ET ENTRETIEN
a) Avant chaque nettoyage ou réglage, avant tout
changement d’accessoire et lorsque vous ne
comptez pas utiliser l‘appareil pour une période
prolongée, débranchez l’appareil et laissez-le refroidir
complètement.
b) Pour nettoyer l‘appareil, n‘utilisez que des détergents
doux qui conviennent à l‘entretien des surfaces en
contact avec des produits alimentaires.
c) Laissez bien sécher tous les composants après chaque
nettoyage avant de réutiliser l’appareil.
d) Conservez l‘appareil dans un endroit propre, frais et
sec, à l‘abri de l‘humidité et des rayons directs du
soleil.
e) Il est interdit d’asperger l‘appareil d‘eau ou de
l‘immerger dans l‘eau.
f) Évitez que de l’eau ne pénètre à l’intérieur de
l’appareil par l’intermédiaire des orices de ventilation
du boîtier.
g) Nettoyez les orices de ventilation à l‘aide d‘un
pinceau et d‘air comprimé.
h) Contrôlez régulièrement l‘appareil pour vous assurer
qu‘il fonctionne correctement et ne présente aucun
dommage.
i) Il est conseillé de laver l’appareil uniquement avec un
chion mou et humide.
j) N’utilisez aucun objet présentant des arêtes
tranchantes, ni objet métallique (tels qu’une brosse
ou une spatule en métal) pour le nettoyage car ils
pourraient endommager la surface de l’appareil.
k) Ne nettoyez pas l’appareil pas avec des substances
acides. L’équipement médical, les solvants, les
carburants, les huiles et les produits chimiques
peuvent endommager l’appareil.
DÉPANNAGE
Problème Cause possible Solution
Pas
d'alimentation
La che n'est
pas insérée
correctement
ou le câble est
débranché.
Insérez la che/
connectez le
câble.
Fusible grillé. Remplacez le
fusible.
La
température
dans l'appareil
n'augmente
pas
La température
réglée est trop
basse.
Ajustez la
température
réglée.
Le réchaueur
électrique ne
fonctionne pas.
Remplacez le
réchaueur
électrique.
Le régulateur de
température ne
fonctionne pas.
Remplacez le
régulateur de la
température.
Le ventilateur
cyclique ne
fonctionne pas.
Remplacez le
ventilateur.
La tem-
pérature
réglée dière
considérable-
ment de la
température
de l'appareil
Le capteur de
température ne
fonctionne pas.
Remplacez le
capteur de la
température.
Le potentiomètre
de réglage n
pour régler la
température n'est
pas bien réglé.
Ajustez le
potentiomètre.
L'alarme de
surchaue est
incorrecte.
La température
réglée est trop
basse.
Ajustez la
température
réglée.
Le régulateur de
température ne
fonctionne pas.
Remplacez le
régulateur de la
température.
3. Réglez la température. L‘écran achera la température
réglée par l‘utilisateur et la température à l‘intérieur
de l‘appareil. Le voyant de chauage ON s‘allume.
Cela signie que l‘appareil chaue et augmente
la température. Après un certain temps, lorsque la
température réglée est proche de la température
à l‘intérieur de l‘appareil, le voyant commence à
clignoter. Dans des conditions normales, après un
chauage de 90 minutes, l‘appareil ne maintiendra
que la température réglée.
4. Si la température de fonctionnement requise est
basse, par exemple 80 ° C, il faut utiliser la méthode
de réglage de la température en deux étapes. Cette
méthode empêchera la température de chuter et
permettra à l‘appareil d‘atteindre une température
constante plus rapidement. Par exemple, si la
température souhaitée est de 80 ° C, réglez d‘abord la
température sur 70 ° C. Après avoir chaué l‘appareil à
la température préréglée, réglez la température cible,
c‘est-à-dire 80oC.
5. Le temps de séchage doit être ajusté en fonction de la
teneur en humidité des diérents articles. Si les articles
à sécher sont très humides, tournez la commande de
volume d‘air sur la position «三». Ensuite, l‘air humide
à l‘intérieur de l‘appareil sera évacué.
6. Une fois le processus de séchage terminé, laissez
l‘alimentation en air ouverte, réglez l‘interrupteur
d‘alimentation sur la position OFF, puis ouvrez la
porte de l‘appareil. Faites attention de ne pas vous
brûler! Si l‘utilisateur ne souhaite pas sortir les articles
de l‘armoire une fois le processus de séchage terminé,
il sut de couper l‘alimentation en air et de laisser
les articles dans l‘appareil aussi longtemps que
nécessaire.
PROCEDURE POUR LE DEROULEMENT ENTRE LES
FONCTIONS:
COMMANDE DE L’APPAREIL
Si le thermostat est allumé, l‘écran PV indique la valeur
mesurée et l‘écran SV, la valeur de consigne.
PARAMETRES PAR DEFAUT:
Réglage de la température: appuyez sur la touche SET. Sur
l‘écran PV, les lettres „SP“ apparaissent. Sur l‘écran SV, une
valeur de température – pouvant être réglée – apparaît.
Le dernier chire clignote. En utilisant les touches ▲et ▼
vous pouvez dénir la valeur souhaitée. Grâce à la touche ◄
vous pouvez passer au champ suivant. Vous pouvez utiliser
les touches ▲et ▼ pour ajuster la valeur du chire suivant.
Appuyez sur la touche SET après avoir réglé la température
pour passer au réglage de l‘heure.
Réglage de l‘heure: appuyez sur la touche SET. Sur l‘écran PV,
les lettres „SΓ“ apparaissent. Sur l‘écran apparait une heure
pouvant être réglée. En utilisant les touches ▲et ▼vous
pouvez régler cette valeur. Grâce à la touche ◄vous pouvez
passer au champ suivant. La valeur du chire suivant peut
être réglée en utilisant les touches ▲et ▼. Appuyez sur la
touche SET une fois la synchronisation achevée an que le
dispositif fonctionne selon les paramètres établis.
PARAMETRES AVANCES:
ATTENTION: Toutes les unités de contrôle ont été soumises
à des tests précis et des paramètres de fonctionnement ont
été prédénis. Si tous les paramètres de fonctionnement
du sécheur sous vide répondent à vos besoins et attentes
et si l‘appareil fonctionne correctement, vous ne devez pas
modier ces paramètres.
Changement des paramètres avancés:
Appuyez sur la touche ▲, et maintenez la touche enfoncée.
Ensuite, appuyez sur la touche SET. Les lettres „LCK“
apparaissent sur l‘écran. Lâchez la touche SET (appuyez et
maintenez la touche ▲ enfoncée).Réglez la valeur du chire
clignotant sur „7“. Relâchez la touche ▲Appuyez sur la
touche SET. Sur l‘écran, les lettres „AL1“ s‘achent.
AL1 - alarme d‘écart de température - régler la valeur
souhaitée avec les boutons ▲et ▼. Valeurs
réglables: plage entre -99,9 ° C et 999,9 ° C. L‘appareil
déclenchera une alarme lorsque la somme de la
température réglée et de l‘écart de température réglé
dépassera la valeur de température réelle. Après avoir
réglé la valeur de l‘écart de température, appuyez
sur SET pour entrer dans le réglage «FAN» de vitesse
haute / basse.
FAN – contrôle de vitesse haute / basse. Valeurs réglables:
plage entre -99,9 ° C et 999,9 ° C. Après le réglage,
appuyez sur le bouton SET pour accéder aux réglages
de correction de la valeur de température mesurée
«SC».
Appuyez sur la touche SET basse pour passer au
réglage de la valeur de la température „SC“.
SC – changement de la valeur de la température - sur
l‘écran PV apparaît la nouvelle valeur de température.
Le réglage de la température se situe entre -99,9 °C
et jusqu‘à + 100 °C. Appuyez sur la touche SET après
avoir changé la valeur de la température et pour
dénir les paramètres d‘autorégulation PID. Les lettres
„ATU“ apparaissent sur l‘écran.
ATU – Activer / désactiver l‘autorégulation PID. Les valeurs
suivantes peuvent être choisies : „0“ - l‘autorégulation
PID est éteinte ; „1“ - l‘autorégulation PID est activée. Si
vous choisissez le paramètre „1“, l‘appareil fonctionne
en autorégulation. Vous pouvez aussi choisir ce mode
pendant le fonctionnement normal. Pour cela, quittez
les paramètres avancés. Appuyez sur la touche ▼ en
fonctionnement normal et maintenez-la enfoncée
pendant 5 secondes. L‘achage SV clignote et l‘écran
ache les lettres „ATU“. Pendant cette opération,
la température réelle peut être diérente de la
température souhaitée. Ce résultat est normal. La mise
en place de l‘autorégulation prend entre 3 à 5 minutes.
Après ce délai, le régulateur PID ajuste ses réglages
an de travailler plus en détail. Appuyez sur la touche
SET une fois le réglage achevé pour aller dans les
paramètres de plage de proportionnalité „P“.
P – plage de proportionnalité - réglementation des
essais thermiques. Les valeurs – pouvant être réglées
– se situent dans une plage comprise de 0 à 100,0.
Appuyez sur la touche SET après avoir fait le réglage
pour passer aux réglages d‘intégration de la constante
temps „I“.
I – Intégration de la constante temps. Les valeurs -
pouvant être réglées - se situent dans une plage allant
de 1 jusqu‘à 4320. Appuyez sur la touche SET une fois
le réglage achevé pour aller dans les paramètres de
diérenciation de la constante de temps „d“.
FR
MISE AU REBUT DES APPAREILS USAGÉS
À la n de sa vie, ce produit ne doit pas être jeté dans les
ordures ménagères ; il doit impérativement être remis
dans un point de collecte et de recyclage pour appareils
électroniques et électroménagers. Un symbole à cet
eet gure sur le produit, l‘emballage ou dans le manuel
d‘utilisation. Les matériaux utilisés lors de la fabrication de
l‘appareil sont recyclables conformément à leur désignation.
En recyclant ces matériaux, en les réutilisant ou en utilisant
les appareils usagés d’une autre manière, vous contribuez
grandement à protéger notre environnement. Pour obtenir
de plus amples informations sur les points de collecte
appropriés, adressez-vous à vos autorités locales.
ATTENTION! Le plan de ce produit se trouve à la
dernière page du manuel d‘utilisation, p. 42.

28 29
12.03.2022
ISTRUZIONI PER L’USO
2.1. SICUREZZA ELETTRICA
a) La spina del dispositivo deve essere compatibile con
la presa. Non cambiare la spina per alcun motivo. Le
spine e le prese originali riducono il rischio di scosse
elettriche.
b) Evitare che il dispositivo tocchi componenti collegati
a terra come tubi, radiatori, forni e frigoriferi. Il rischio
di scosse elettriche aumenta se il corpo viene messo
a terra su superci umide o in un ambiente umido.
L‘acqua che entra nel dispositivo aumenta il rischio di
danni e scosse elettriche.
c) Non toccare l‘apparecchio con mani umide o bagnate.
d) Non utilizzare il cavo in modo improprio. Non
utilizzarlo mai per trasportare l‘apparecchio o
rimuovere la spina. Tenere il cavo lontano da fonti di
calore, oli, bordi appuntiti e da parti in movimento.
I cavi danneggiati o saldati aumentano il rischio di
scosse elettriche.
e) Se non è possibile evitare che il dispositivo venga
utilizzato in un ambiente umido, utilizzare un
interruttore dierenziale. Un interruttore dierenziale
riduce il rischio di scosse elettriche.
f) Si sconsiglia l‘uso dell‘ apparecchio qualora il cavo
di alimentazione sia danneggiato o presenti segni
di usura. Il cavo di alimentazione danneggiato deve
essere sostituito da un elettricista qualicato o dal
servizio di assistenza del fabbricante.
g) Per evitare scosse elettriche, non immergere il cavo,
la spina o il dispositivo in acqua o altri liquidi. Non
utilizzare il dispositivo su superci bagnate.
h) ATTENZIONE: PERICOLO DI MORTE! Non immergere il
dispositivo in acqua o altri liquidi durante la pulizia o la
messa in funzione.
i) Non bagnare il dispositivo. Rischio di scossa elettrica!
2.2. SICUREZZA SUL LAVORO
a) Mantenere il posto di lavoro pulito e ben illuminato. Il
disordine o una scarsa illuminazione possono portare
a incidenti. Essere sempre prudenti, osservare che
cosa si sta facendo e utilizzare il buon senso quando si
adopera il dispositivo.
b) Non usare il dispositivo all‘interno di luoghi altamente
combustibili, per esempio in presenza di liquidi, gas
o polveri inammabili. Il dispositivo può produrre
scintille in presenza di polvere o vapore inammabili.
c) In presenza di un danno o un difetto, il dispositivo
deve subito essere spento e bisogna avvisare una
persona autorizzata.
Parametri
- Descrizione Parametri - Valore
Nome del prodotto ESSICCATORE DA
LABORATORIO
Modello SBS-
ADO-1000
SBS-
ADO-2000
Tensione nominale
[V~]/Frequenza [Hz] 230/50
Potenza nominale [W] 1670 2170
Classe di protezione IP I
Dimensioni esterne
[Larghezza x
Profondità x Altezza)
[mm]
736x575x627 835x580x700
Dimensioni interne
[Larghezza x
Profondità x Altezza)
[mm]
440x324x448 550x450x550
Peso [kg] 42 53
Gamma di temperatura
[oC] 50 - 300
1. DESCRIZIONE GENERALE
Queste istruzioni sono intese come ausilio per un uso
sicuro e adabile. Il prodotto è stato rigorosamente
progettato e realizzato secondo le direttive tecniche e
l‘utilizzo delle tecnologie e componenti più moderne e
seguendo gli standard di qualità più elevati.
Il manuale originale è stato scritto in tedesco. Le versioni in
altre lingue sono traduzioni dalla lingua tedesca.
Il termine „apparecchio“ o „prodotto“ nelle avvertenze
e descrizioni contenute nel manuale si riferisce alla/al
ESSICCATORE DA LABORATORIO.
Per un funzionamento duraturo e adabile del dispositivo
assicurarsi di maneggiarlo e curarne la manutenzione
secondo le disposizioni presentate in questo manuale.
I dati e le speciche tecniche indicati in questo manuale
sono attuali. Il fornitore si riserva il diritto di apportare
delle migliorie nel contesto del miglioramento dei
propri prodotti. L‘apparecchiatura è stata progettata e
realizzata tenendo in considerazione il progresso tecnico
e la riduzione di rumore, in maniera tale da mantenere al
minimo i possibili rischi derivanti dalle emissioni di rumore.
PRIMA DELLA MESSA IN FUNZIONE È NECESSARIO
AVER LETTO E COMPRESO LE ISTRUZIONI D‘USO
VYSVĚTLENÍ SYMBOLŮ
AVVERTENZA! Le immagini contenute in questo
manuale sono puramente indicative e potrebbero
dierire dal prodotto.
ATTENZIONE! Leggere le istruzioni d‘uso e di
sicurezza. Non prestare attenzione alle avvertenze
e alle istruzioni può condurre a shock elettrici,
incendi, gravi lesioni o addirittura al decesso.
2. SICUREZZA NELL‘IMPIEGO
DATI TECNICI
Il prodotto soddisfa le attuali norme di
sicurezza.
Leggere attentamente le istruzioni.
Prodotto riciclabile.
ATTENZIONE o AVVERTENZA! o NOTA!
per richiamare l'attenzione su determinate
circostanze (indicazioni generali di
avvertenza).
Utilizzare dei guanti protettivi.
ATTENZIONE! Pericolo di tensione elettrica!
IT IT
AVVERTENZA!Quando si lavora con questo
dispositivo, i bambini e le persone non coinvolte
devono essere protetti.
d) Se non si è sicuri del corretto funzionamento del
dispositivo, rivolgersi al servizio assistenza del
fornitore.
e) Le riparazioni devono essere eseguite esclusivamente
dal servizio assistenza del produttore. Non eseguire le
riparazioni da soli!
f) In caso di incendio, utilizzare solo estintori a polvere o
ad anidride carbonica (CO2).
g) I bambini e le persone non autorizzate non devono
essere presenti sul posto di lavoro. (La disattenzione
può causare la perdita del controllo sul dispositivo).
h) Conservare le istruzioni d‘uso per uso futuro. Nel caso
in cui il dispositivo venisse adato a terzi, consegnare
anche queste istruzioni.
i) Tenere gli elementi di imballaggio e le piccole parti di
assemblaggio fuori dalla portata dei bambini.
j) Tenere il dispositivo fuori dalla portata dei bambini e
degli animali.
k) Durante l’impiego del dispositivo in contemporanea
con altri dispositivi, è consigliabile rispettare le altre
istruzioni d’uso.
2.3. SICUREZZA PERSONALE
a) Non è consentito l‘uso del dispositivo in uno stato
di aaticamento, malattia, sotto l‘inuenza di alcol,
droghe o farmaci, se questi limitano la capacità di
utilizzare il dispositivo.
b) Questo dispositivo non è adatto per essere utilizzato
da persone, bambini compresi, con ridotte capacità
siche, sensoriali o mentali, così come da privi di
adeguata esperienza e/o conoscenze. Si fa eccezione
per coloro i quali siano sorvegliati da un responsabile
qualicato che si prenda carico della loro sicurezza e
abbia ricevuto istruzioni dettagliate al riguardo.
c) Il dispositivo può essere usato solo da persone
con capacità siche adeguate che sono state
adeguatamente istruite e che hanno letto queste
istruzioni, le hanno capite e hanno appreso le norme
di sicurezza e di protezione sul posto di lavoro.
d) Prestare attenzione e usare il buon senso quando si
utilizza il dispositivo. Un momento di disattenzione
durante il lavoro può causare gravi lesioni.
e) Utilizzare dispositivi di protezione individuale adeguati
quando si utilizza il dispositivo, conformemente alle
speciche indicate nella spiegazione dei simboli al
punto 1.
L‘uso di dispositivi di protezione individuale adeguati
e certicati riduce il rischio di lesioni.
f) Per evitare avviamenti accidentali, prima di collegare
il dispositivo a una fonte di alimentazione assicurarsi
che questo sia spento.
g) Questo dispositivo non è un giocattolo. I bambini
devono essere sorvegliati anché non giochino con
il prodotto.
2.4. USO SICURO DEL DISPOSITIVO
a) Non utilizzare il dispositivo se l‘interruttore ON/
OFF non funziona correttamente (non accendere o
spegnere il dispositivo). I dispositivi con interruttore
difettoso sono pericolosi quindi devono essere
riparati.
b) Prima della regolazione, della sostituzione degli
accessori o dello stoccaggio, estrarre la spina dalla
presa. Tali misure preventive riducono il rischio di
avviamento accidentale.
c) Gli strumenti inutilizzati devono essere tenuti fuori
dalla portata dei bambini e delle persone che non
hanno familiarità con il dispositivo e le istruzioni d’uso.
Nelle mani di persone inesperte, questo dispositivo
può rappresentare un pericolo.
d) Mantenere il dispositivo in perfette condizioni. Prima di
ogni utilizzo, vericare che non vi siano danni generali
o danni alle parti mobili (frattura di parti e componenti
o altre condizioni che potrebbero compromettere il
funzionamento sicuro del prodotto). In caso di danni,
l‘unità deve essere riparata prima dell‘uso.
e) Tenere il dispositivo fuori dalla portata dei bambini.
f) La riparazione e la manutenzione dell‘attrezzatura
devono essere eseguite esclusivamente da personale
specializzato qualicato e con pezzi di ricambio
originali. Ciò garantisce la sicurezza durante l‘uso.
g) Per garantire l‘integrità di funzionamento
dell‘apparecchio, i coperchi o le viti installati in
fabbrica non devono essere rimossi.
h) Quando si trasporta e si sposta l‘apparecchiatura
dal luogo di deposito al luogo di utilizzo, i requisiti
di sicurezza e di igiene per la movimentazione
manuale devono essere rispettati per il paese in cui
l‘apparecchiatura viene utilizzata.
i) È vietato spostare o ruotare il dispositivo durante il
funzionamento.
j) Non lasciare il dispositivo incustodito mentre è in uso.
k) Pulire regolarmente l‘apparecchio in modo da evitare
l‘accumulo di sporcizia.
l) Questo apparecchio non è un giocattolo! La pulizia
e la manutenzione non devono essere eseguite da
bambini a meno che non siano sotto la supervisione
di un adulto.
m) È vietato intervenire sulla costruzione del dispositivo
per modicare i suoi parametri o la sua costruzione.
n) Tenere dispositivi lontano da fonti di fuoco e calore.
o) Non sovraccaricare il dispositivo.
p) Le aperture di ventilazione non devono essere
coperte!
q) Non inserire oggetti inammabili nel dispositivo
r) Gli oggetti all‘interno dell‘apparecchio non devono
essere posizionati troppo vicini tra loro. Lasciare
spazio suciente per facilitare la circolazione dell‘aria
calda.
ATTENZIONE! Anche se l‘apparecchiatura è
stata progettata per essere sicura, sono presenti
degli ulteriori meccanismi di sicurezza. Malgrado
l‘applicazione di queste misure supplementari di
sicurezza sussiste comunque il rischio di ferirsi. Si
raccomanda inoltre di usare cautela e buon senso.
Gli essiccatori da laboratorio SBS-ADO-1000, SBS-
ADO-2000 permettono un’essiccazione delicata e precisa
di diversi materiali.
Gli essiccatori da laboratorio SBS-ADO-1000, SBS-
ADO-2000 sono prodotti che non soddisfano i requisiti
della MDD 93/42/CEE sui dispositivi medici.
L‘operatore è responsabile di tutti i danni derivanti da
un uso improprio.
3. CONDIZIONI D‘USO
ATTENZIONE! Supercie calda. Pericolo di
ustione!
Usare solo in ambienti chiusi.

30 31
12.03.2022
6. Terminata l’essiccazione, lasciare aperto l’ausso
dell’aria, portare l’interruttore su OFF, quindi aprire lo
sportello.Fareattenzione a nonbruciarsi!Non dovendo
estrarre gli articoli subito dopo il completamento del
processo di essiccazione, chiudere l’ausso dell’aria
e lasciare gli articoli all’interno dell’apparecchio per il
tempo necessario.
CONTROLLO
Quando il regolatore di temperatura è acceso, il display
digitale PV il valore corrente e il display digitale SV il valore
impostato.
IMPOSTAZIONI DI BASE:
Impostazione della temperatura: premere il pulsante SET.
Sul display digitale PV appaiono le lettere „SP“. Sul display
digitale SV appare un valore di temperatura che può essere
impostato. L‘ultima cifra lampeggia. Con l‘aiuto dei tasti ▲e
▼ si può impostare il valore desiderato. Con l‘aiuto del tasto
funzione ◄ si può cambiare la cifra da modicare. Il valore
della cifra successiva può essere impostato con l‘aiuto dei
tasti funzione ▲e ▼. Premere il tasto SET dopo aver scelto
la temperatura desiderata per poter impostare il timer.
Impostazione del timer: premere il tasto SET. Sul display
digitale PV appaiono le lettere „SP“. Sul display digitale SV
compare il valore del tempo che può essere impostato. Con
l‘aiuto dei tasti funzione ▲e ▼ si può impostare il valore
desiderato. Con l‘aiuto del tasto ◄ si può cambiare la cifra
da modicare. Il valore della cifra successiva può essere
impostato con l‘aiuto dei tasti funzione ▲e ▼. Premere
il tasto SET dopo aver impostato la durata in modo che
l‘apparecchio funzioni secondo le nuove impostazioni.
ULTERIORI IMPOSTAZIONI:
ATTENZIONE: Tutte le unità di controllo sono state
sottoposte a test precisi e i parametri di funzionamento
sono preimpostati. Se tutti i parametri di utilizzazione
dell‘essiccatore sottovuoto soddisfano le vostre esigenze e
se il dispositivo funziona perfettamente non è necessario
modicare questi parametri.
Cambio delle impostazioni aggiuntive:
Premere il tasto funzione ▲, e tenerlo premuto. Premere
poi il tasto SET. Sul dispositore compaiono le lettere „LCK“.
Rilasciare il tasto SET (tenere premuto il tasto ▲). Impostare
il valore della cifra lampeggiante sul 7. Rilasciare il tasto
funzione ▲Premere il tasto SET. Sul display compaiono le
lettere „AL1“.
AL1 – allarme di superamento della temperatura –
impostare il valore desiderato con i tasti ▲e ▼. I valori
che si possono impostare si trovano nell’intervallo tra
-99,9°C e 999,9°C. L’apparechio attiva l’allarme non
appena la somma della temperatura impostata e
dello scostamento impostato di temperatura supera
il valore della temperatura eettiva. A impostazione
completata, premere il tasto SET per passare alle
impostazioni di alta/bassa velocità „FAN”.
FAN – regolazione di alta/bassa velocità nell’intervallo
tra -99,9°C e 999,9°C. A impostazione completata,
premere il tasto SET per passare alle impostazioni di
correzione della temperatura misurata „SC”. Premere
il tasto SET dopo aver terminato per cambiare il valore
misurato di temperatura „SC“
IT
3.1. DESCRIZIONE DEL DISPOSITIVO
5 64321
7
8
9
10
IT
1. Corpo
2. Targhetta dati
3. Pannello di controllo
4. Maniglia
5. Ripiano
6. Sportello
7. Regolazione di temperatura
8. Spia di alimentazione
9. Interruttore ON/OFF
10. Regolatore di aria
Pannello di regolazione della temperatura:
1. Temperatura all’interno dell’apparecchio
2. Valore della temperatura impostata
3. Indicatori:
• RUN – indicatore di funzionamento
• HEAT – indicatore di riscaldamento
• ALM – indicatore di allarme
• HI – indicatore di alta velocità
• LOW – indicatore di bassa velocità
4. Tasto di funzione SET
5. Tasto SHIFT
6. Tasto „giù” „-„
7. Tasto „su”„+”
L’apparecchio è dotato di:
• controllo preciso della temperatura: possibilità di
impostazione della temperatura con risoluzione di
1oC,
• display della temperatura impostata e della
temperatura all’interno dell’apparecchio,
• allarme acustico e luminoso che segnala la
temperatura all’interno dell’apparecchio superiore
a quella impostata sul pannello di controllo.
L’apparecchio spegne automaticamente l’elemento
riscaldante e attiva l’allarme,
3.3. LAVORARE CON IL DISPOSITIVO
REGOLE GENERALI
1. Collocare gli articoli da essiccare all’interno
dell’apparecchio e chiudere bene lo sportello.
2. Portare l’interruttore su ON. Si accende la spia
di alimentazione e sul display della temperatura
appaiono le cifre.
3. Impostare la temperatura. Sul display viene
visualizzata la temperatura impostata dall’utente e la
temperatura all’interno dell’apparecchio. Si accende
la spia di riscaldamento che indica che l’apparecchio
si sta riscaldando e la temperatura sta aumentando.
Quando la temperatura impostata è vicina alla
temperatura all’interno dell’apparecchio, la spia
inizia a lampeggiare. In normali condizioni, dopo il
riscaldamento per 90 minuti, l’apparecchio mantiene
la temperatura impostata.
4. Quando la temperatura di funzionamento richiesta è
bassa, p.es. 80oC, adottare il metodo di impostazione
della temperatura graduale per prevenire
l’abbassamento della temperatura e raggiungere
più velocemente la temperatura costante all’interno
dell’apparecchio. A titolo d’esempio, se la temperatura
richiesta è di 80oC, impostare prima la temperatura di
70oC. Raggiunta la temperatura impostata, impostare
la temperatura target, cioè 80oC.
5. Regolare il tempo di essiccazione in funzione
dell’umidità degli articoli. Nel caso di articoli con
l’umidità elevata, portare la manopola di regolazione
di aria su „三”. L’aria umida viene evacuata dall’interno
dell’apparecchio.
3.2. PREPARAZIONE AL FUNZIONAMENTO
POSIZIONAMENTO DEL DISPOSITIVO:
La temperatura ambiente non deve superare i 35°C e
l‘umidità relativa non deve superare l‘85%. Posizionare
l‘apparecchio in modo da garantire una buona circolazione
dell‘aria. Bisogna mantenere una distanza minima di
sicurezza pari a 20 cm dalla parete dietro all‘apparecchio,
15 cm dai lati e 30 cm dal sotto o da armadi. Tenere il
dispositivo lontano da fonti di calore. Il dispositivo va
sempre utilizzato su una supercie piana, stabile, pulita,
ignifuga e asciutta, lontano dalla portata dei bambini e
di persone con capacità psichiche, sensoriali e mentali
ridotte. Posizionare il dispositivo in modo che la spina sia
facilmente accessibile e non risulti ostruita. Assicurarsi che
l‘alimentazione corrisponda a quella indicata sul quadro
tecnico del prodotto.
Prima del primo utilizzo si consiglia di smontare tutte le
parti e pulirne le superci.
1
2
3
4 5 6 7
ATTENZIONE! Il dispositivo è dotato di un
termofusibile. Questo interrompe l‘apporto di
corrente elettrica quando la temperatura interna del
dispositivo è superiore alla temperatura impostata
sul termofusibile. La temperatura impostata sul
termofusibile deve essere regolata in modo che
sia superiore di 10°C rispetto alla temperatura
impostata sul pannello di controllo principale.
panelu.
• regolatore di aria (è possibile regolare con l’apposita
manopola l’ausso e il deusso dell’aria dall’interno
dell’apparecchio).
PROCEDURA DEL PASSAGGIO TRA LE FUNZIONI:
SC – Modica del valore eettivo della temperatura - sul
display digitale PV compare il valore di temperatura
modicato. La gamma d‘impostazione dei livelli di
temperatura si estende da -99,9°C a +100°C. Premere
il tasto SET dopo l‘impostazione della modica
del valore misurato di temperatura per impostare
l‘autoregolamento PID. Sul display compaiono le
lettere „ATU“.
ATU – Accensione e spegnimento dell‘autoregolazione
PID. I valori che possono essere impostati sono:
„0“ - l‘autoregolamento PID è spento; „1„ -
l‘autoregolamento PID è inserito. Impostando il
parametro su „1„, l‘apparecchiatura funziona in
modalità autoregolamento. È possibile utilizzare
l‘apparecchio in questa modalità anche durante il
normale funzionamento. Lasciare pertanto il menù
delle ulteriori impostazioni. Premere il tasto durante
il funzionamento normale ▼e tenerlo premuto
per 5 secondi. Il display digitale SV lampeggia e
appaiono le lettere „ATU“. Durante questa procedura
la temperatura eettiva può variare rispetto alla
temperatura impostata. Questo risultato è normale. Il
periodo di autoregolamento si aggira attorno ai 3-5
minuti. Dopo questo tempo, il regolatore automatico
PID applica le sue impostazioni in modo da poter
lavorare più precisamente. Premere il tasto SET dopo
aver concluso la modica delle impostazioni, per
modicare il campo di proporzionalità „P“.
P – gamma di proporzionalità - regolazione del controllo
di surriscaldamento. I valori che si possono impostare
si trovano all‘interno della gamma tra 0 e 100,0
Premere il tasto SET dopo aver scelto la temperatura
desiderata per poter impostare la costante del tempo
di integrazione „I“.
I – valori della costante del tempo d’integrazione
modicabili si trovano all‘interno della gamma tra
1 e 4320. Premere il tasto SET dopo aver scelto
la temperatura desiderata per poter impostare la
costante del tempo dierenziale „d“.
d – Costante di tempo dierenziale. I valori che si
possono impostare si trovano all‘interno della gamma
tra 0 e 1200. Premere il tasto SET dopo aver concluso
l‘impostazione per poter passare all‘impostazione del
tempo di riscaldamento „T“.
T – Tempo di riscaldamento. I valori che si possono
impostare si trovano all‘interno della gamma tra 1 e 60.
Premere il tasto SET dopo aver terminato le modiche
per poter passare all‘impostazione dell‘esattezza del
calore „HL“.
HL – Impostazione della gamma di esattezza del calore. I
valori che si possono impostare si trovano all‘interno
della gamma tra 0,500 e 1,500. A impostazione
completata, premere il tasto SET per passare alle
impostazioni della potenza di uscita dell’elemento
riscaldante „OUT”.
OUT – potenza di uscita dell’elemento riscaldante. I valori
che si possono impostare si trovano nell’intervallo
tra 0 e 100. Tenere premuto il tasto SET dopo aver
concluso la procedura di modica delle impostazioni
per 5 secondi in modo da poter terminare la modica
delle impostazioni ulteriori e salvare le modiche
eettuate.
ATTENZIONE: L´esploso di questo prodotto si trova
nell´ultima pagina del manuale d´uso, p. 43.

32 33
12.03.2022
IT
RISOLUZIONE DEI PROBLEMI
Problema Possibile causa Soluzione
Mancanza di
alimentazione
La spina è inserita
male o il cavo di
alimentazione è
scollegato.
Inserire bene la
spina / collegare
il cavo.
Fusibile bruciato. Sostituire il
fusibile.
La temperatu-
ra all’interno
dell’appa-
recchio non
aumenta
La temperatura
impostata è
troppo bassa.
Regolare la
temperatura
impostata.
L’elemento
riscaldante non
funziona.
Sostituire
l’elemento
riscaldante.
Il regolatore di
temperatura non
funziona.
Sostituire il
regolatore di
temperatura.
Il ventilatore
ciclico non
funziona.
Sostituire il
ventilatore.
La temperatu-
ra impostata
è diversa dalla
temperatura
all’interno
dell’apparec-
chio
Il sensore di
temperatura non
funziona.
Sostituire il
sensore di
temperatura.
Il potenziometro
per impostazione
precisa della
temperatura non
è ben regolato.
Regolare il
potenziometro.
Allarme di
superamento
della tempe-
ratura non è
corretto.
La temperatura
impostata è
troppo bassa.
Regolare la
temperatura
impostata.
Il regolatore di
temperatura non
funziona.
Sostituire il
regolatore di
temperatura.
3.4. PULIZIA E MANUTENZIONE
a. Prima di pulire o regolare il dispositivo, prima di
sostituire gli accessori o quando il dispositivo non
viene utilizzato, staccare la spina e lasciarlo rareddare
completamente.
b. Utilizzare solo detergenti delicati destinati alla pulizia
delle superci a contatto con gli alimenti.
c. Dopo la pulizia, prima di riutilizzare l‘apparecchio,
asciugare tutte le parti.
d. Tenere l‘apparecchio in un luogo asciutto, fresco,
protetto dall‘umidità e dalla luce diretta del sole.
e. È vietato spruzzare il dispositivo con un getto d‘acqua
o immergere il dispositivo in acqua.
f. Evitare che l‘acqua entri nell‘alloggiamento attraverso
le aperture di ventilazione.
g. Le aperture di ventilazione devono essere pulite con
una spazzola e aria compressa.
h. Non lasciare la batteria nel dispositivo se il
funzionamento viene interrotto per un lungo periodo
di tempo.
i. Per la pulizia utilizzare un panno morbido e umido.
j. Non utilizzare oggetti appuntiti o / e metallici (come
una spazzola o una spatola metallica) per la pulizia,
poiché potrebbero danneggiare la supercie del
materiale con cui è fatto il dispositivo.
k. Non pulire il dispositivo con sostanze acide.
Attrezzature mediche, diluente per vernici, carburante,
olio o altre sostanze chimiche possono danneggiare
l‘unità.
SMALTIMENTO DELLE ATTREZZATURE USATE
Questo prodotto, se non più funzionante, non deve
essere smaltito insieme ai normali riuti, ma deve essere
consegnato ad un’organizzazione competente per lo
smaltimento dei dispositivi elettrici e elettronici. Maggiori
informazioni sono reperibili sull‘etichetta sul prodotto, sul
manuale di istruzioni o sull‘imballaggio. I materiali utilizzati
nel dispositivo possono essere riciclati secondo indicazioni.
Riutilizzando i materiali o i dispositivi, si contribuisce a
tutelare l‘ambiente circostante. Le informazioni sui rispettivi
punti di smaltimento sono reperibili presso le autorità locali.
MANUAL DE INSTRUCCIONES
2.1. SEGURIDAD ELÉCTRICA
a) La clavija del aparato debe ser compatible con el
enchufe. No cambie la clavija bajo ningún concepto.
Las clavijas originales y los enchufes apropiados
disminuyen el riesgo de descarga eléctrica.
b) Evite tocar componentes conectados a tierra como
tuberías, radiadores, hornos y refrigeradores. Existe un
mayor riesgo de descarga eléctrica si su cuerpo está
conectado a tierra mediante supercies mojadas o
en ambientes húmedos. Si entrara agua en el aparato
aumentaría el riesgo de daños y descargas eléctricas.
c) No toque el dispositivo con las manos mojadas o
húmedas.
d) No utilice el cable de manera inadecuada. Nunca tire
de él para desplazar el aparato o para desconectarlo
del enchufe. Por favor, mantenga el cable alejado
de bordes alados, aceite, calor o aparatos en
movimiento. Los cables dañados o soldados aumentan
el riesgo de descargas eléctricas.
e) En caso de no poder evitar que el aparato se emplee
en un entorno húmedo, utilice un interruptor de
corriente residual (RCD). Con este RCD reduce el
peligro de descargas eléctricas.
f) No utilice el dispositivo si el cable de alimentación
se encuentra dañado o presenta signos evidentes de
desgaste. Los cables dañados deben ser reemplazados
por un electricista o por el servicio del fabricante.
g) Para evitar electrocutarse, no se debe sumergir el
cable, los enchufes ni el propio aparato en agua o
en cualquier otro uido. No utilizar el aparato en
supercies mojadas.
h) ¡ATENCIÓN, PELIGRO DE MUERTE! Nunca sumerja el
equipo en agua u otros líquidos durante su limpieza o
funcionamiento.
i) ¡No permita que el aparato se moje! ¡Peligro de
electrocución!
2.2. SEGURIDAD EN EL PUESTO DE TRABAJO
a) Mantenga el lugar de trabajo limpio y bien iluminado.
El desorden o la mala iluminación pueden provocar
accidentes. Tenga cuidado, preste atención al trabajo
que está realizando y use el sentido común cuando
utilice el dispositivo.
b) No utilice el aparato en atmósferas potencialmente
explosivas, p. ej., en la cercanía de líquidos, gases o
polvo inamables. Bajo determinadas circunstancias
los aparatos generan chispas que pueden inamar
polvo o vapores circundantes.
Parámetro - Descripción Parámetro - Valor
Nombre del producto ESTUFA DE LABORATORIO
Modelo SBS-
ADO-1000
SBS-
ADO-2000
Voltaje [V ~]/
Frecuencia [Hz] 230/50
Potencia nominal [W] 1670 2170
Clase de protección IP I
Dimensiones externas
(Ancho x Profundidad x
Altura) [mm]
736x575x627 835x580x700
Dimensiones internas
(Ancho x Profundidad x
Altura) [mm]
440x324x448 550x450x550
Peso [kg] 42 53
Rango de temperaturas
[oC] 50 - 300
1. DESCRIPCIÓN GENERAL
Este manual ha sido elaborado para favorecer un empleo
seguro y able. El producto ha sido estrictamente diseñado
y fabricado conforme a las especicaciones técnicas y para
ello se han utilizado las últimas tecnologías y componentes,
manteniendo los más altos estándares de calidad.
El texto en alemán corresponde a la versión original. Los
textos en otras lenguas son traducciones del original en
alemán.
Conceptos como „aparato“ o „producto“ en las
advertencias y descripciones de este manual se reeren a
ESTUFA DE LABORATORIO.
Para garantizar un funcionamiento duradero y able del
aparato, el manejo y mantenimiento deben llevarse a
cabo de acuerdo con las instrucciones de este manual. Los
datos técnicos y las especicaciones de este manual están
actualizados. El fabricante se reserva el derecho de realizar
modicaciones para mejorar la calidad. Teniendo en cuenta
los avances técnicos en materia de reducción del ruido, el
equipo ha sido diseñado y fabricado para mantener el
riesgo de emisiones sonoras al nivel más bajo posible.
ANTES DE LA PUESTA EN FUNCIONAMIENTO,
LEA LAS INSTRUCCIONES MINUCIOSAMENTE Y
ASEGÚRESE DE COMPRENDERLAS.
EXPLICACIÓN DE LOS SÍMBOLOS
¡ADVERTENCIA! En este manual se incluyen fotos
ilustrativas que podrían no coincidir exactamente
con la apariencia real del dispositivo.
¡ATENCIÓN! Lea todas las instrucciones e
indicaciones de seguridad. La inobservancia de
las advertencias e instrucciones al respecto puede
provocar descargas eléctricas, incendios, lesiones
graves e incluso la muerte.
2. SEGURIDAD
DATOS TÉCNICOS
El producto cumple con las normas de
seguridad vigentes.
Respetar las instrucciones de uso.
Producto reciclable.
¡ATENCIÓN!, ¡ADVERTENCIA! o ¡NOTA! para
llamar la atención sobre ciertas circunstancias
(señal general de advertencia).
Utilizar guantes de protección.
¡ATENCIÓN! ¡Advertencia de tensión eléctrica!
¡Atención! ¡Supercie caliente! ¡Peligro de
quemaduras!
Uso exclusivo en áreas cerradas.
ES

34 35
12.03.2022
1. Carcasa
2. Placa de características
3. Panel de control
4. Manilla de la puerta
5. Estante
6. Puerta
7. Ajuste de temperatura
8. Testigo de alimentación
9. Conmutador de alimentación ON/OFF
10. Regulador de cantidad de aire
Panel de ajuste de la temperatura:
1. Temperatura interior del aparato
2. Temperatura ajustada
3. Indicadores:
• RUN – indicador de funcionamiento
• HEAT – indicador de calentamiento
• ALM – indicador de alarma
• HI – indicador de velocidad alta
• LOW – indicador de velocidad baja
4. Botón de función SET
5. Botón SHIFT
6. Botón de ajuste hacia abajo „-“
7. Botón de ajuste hacia arriba „+”
Los aparatos poseen:
• un control preciso de temperatura que permite ajustar
la temperatura cada 1oC,
• una pantalla que muestra la temperatura ajustada y la
temperatura del interior del aparato,
• una alarma acústica y luminosa que avisa de que
la temperatura dentro del aparato es superior a la
ajustada en el panel de control. El aparato apaga
automáticamente el calefactor y activa la alarma,
• un regulador de aire (se puede regular la entrada y la
salida de aire del aparato por medio de la perilla de
regulación).
3.3. MANEJO DEL APARATO
PRINCIPIOS BÁSICOS
1. Coloque los artículos que desee secar dentro del
aparato y cierre bien la puerta.
2. Coloque el conmutador de alimentación en posición
ON. El testigo de alimentación se iluminará y
aparecerán cifras en la herramienta de regulación de
temperatura.
¡ATENCIÓN! Aunque en la fabricación de este
aparato se ha prestado gran importancia a la
seguridad, dispone de ciertos mecanismos de
protección extras. A pesar del uso de elementos de
seguridad adicionales, existe el riesgo de lesiones
durante el funcionamiento, por lo que se recomienda
proceder con precaución y sentido común.
Las estufas de laboratorio SBS-ADO-1000 y SBS-ADO-2000
son aparatos utilizados para secar distintos materiales de
forma suave y precisa.
Las estufas de laboratorio SBS-ADO-1000 y SBS-ADO-2000
son productos ajenos a las normativas MDD 93/42/EEC
sobre productos médicos.
El usuario es responsable de los daños derivados de un
uso inadecuado del aparato.
3.2. PREPARACIÓN PARA LA PUESTA EN MARCHA
LUGAR DE TRABAJO:
La temperatura ambiente no debe superar los 35°C y la
humedad relativa no debe exceder el 85%. Instale el equipo
teniendo en cuenta que debe garantizarse una buena
ventilación. Debe mantener una distancia mínima de 20 cm
con la pared posterior, de 15 cm con los laterales y de 35 cm
con el techo o los armarios. Mantenga el aparato alejado
de supercies calientes. El aparato se debe usar siempre
en una supercie plana, estable, limpia, ignífuga y seca,
fuera del alcance de los niños y de personas con funciones
psíquicas, mentales y sensoriales limitadas. Ubique el
aparato de modo que el enchufe esté siempre accesible
y donde nada pueda cubrirlo. Asegúrese de que las
características del suministro eléctrico se corresponden con
las indicaciones que aparecen en la placa de características
del artículo.
Antes del primer uso, desmonte el aparato y limpie todas
sus piezas.
3. INSTRUCCIONES DE USO
3.1. DESCRIPCIÓN DEL APARATO
5 64321
7
8
9
10
1
2
3
4 5 6 7
¡NOTA! El dispositivo está equipado con un
seguro de temperatura. Este apaga la fuente
de alimentación cuando la temperatura en el
interior de la unidad excede de la temperatura
seleccionada. En cualquier caso, se debe ajustar la
temperatura de seguridad 10ºC por encima de la
temperatura de trabajo seleccionada en el panel de
control principal.
ESES
¡ADVERTENCIA! Los niños y las personas no
autorizadas deben estar asegurados cuando
trabajen con esta unidad.
c) En caso de avería o mal funcionamiento, apague el
aparato y contacte con el servicio técnico autorizado.
d) Si no está seguro de que la unidad funcione
correctamente, póngase en contacto con el servicio
técnico del fabricante.
e) Las reparaciones solo pueden ser realizadas por el
servicio técnico del fabricante. ¡No realice reparaciones
por su cuenta!
f) En caso de incendio, utilice únicamente extintores
de polvo o dióxido de carbono (CO2) para apagar el
aparato.
g) Se prohíbe la presencia de niños y personas no
autorizadas en el lugar de trabajo (la falta de atención
puede llevar a la pérdida de control del equipo).
h) Conserve el manual de instrucciones para futuras
consultas. Este manual debe ser entregado a toda
persona que vaya a hacer uso del dispositivo.
i) Los elementos de embalaje y pequeñas piezas de
montaje deben mantenerse alejados del alcance de
los niños.
j) Mantenga el equipo alejado de niños y animales.
k) Al utilizar este equipo junto con otros, también deben
observarse otras instrucciones de uso.
2.3. SEGURIDAD PERSONAL
a) No está permitido utilizar el aparato en estado de
fatiga, enfermedad, bajo la inuencia del alcohol,
drogas o medicamentos, ya que estos limitan la
capacidad de manejo del aparato.
b) Este aparato no debe ser utilizado por personas
(entre ellas niños) con capacidades físicas, sensoriales
o mentales reducidas, o con falta de la experiencia
y/o los conocimientos necesarios, a menos que
sean supervisadas por una persona responsable de
su seguridad o que hayan recibido de esta persona
responsable las indicaciones pertinentes en relación al
manejo del aparato.
c) El producto solamente puede utilizarse por personas
con la forma física adecuada para el trabajo, con el
equipo de protección personal apropiado, que hayan
leído atentamente y comprendido este manual
de instrucciones y que cumplan con la normativa
en materia de seguridad y salud para el trabajo
correspondiente.
d) Actúe con precaución y use el sentido común cuando
maneje este producto. La más breve falta de atención
durante el trabajo puede causar lesiones graves.
e) Utilice el equipo de protección personal necesario
para el empleo de este dispositivo, de acuerdo con las
especicaciones del punto 1 de las explicaciones de
los símbolos.
f) El uso de un equipo de protección personal apropiado
y certicado reduce el riesgo de lesiones.
g) Para evitar una puesta en marcha accidental, asegúrese
de que el interruptor esté apagado antes de conectar
la clavija a una fuente de alimentación.
h) Este aparato no es un juguete. Debe controlar que los
niños no jueguen con él.
2.4. MANEJO SEGURO DEL APARATO
a) No utilice la unidad si el interruptor ON/OFF no
funcionara correctamente (no enciende o apaga).
Los aparatos que no pueden ser controlados por
interruptores son peligrosos. Estos pueden y deben
ser reparados.
b) Antes de ajustar o cambiar accesorios o desmontar
herramientas, desconecte el enchufe de la toma de
corriente. Estas medidas preventivas reducen el riesgo
de una puesta en marcha accidental.
c) Mantenga las herramientas fuera del alcance de los
niños y de las personas que no estén familiarizadas
con el equipo en sí o no hayan recibido las
instrucciones pertinentes al respecto. En manos de
personas inexpertas este equipo puede representar
un peligro.
d) Mantenga el aparato en perfecto estado de
funcionamiento. Antes de cada trabajo, compruébelo
en busca de daños generales o de piezas móviles
(fractura de piezas y componentes u otras condiciones
que puedan perjudicar el funcionamiento seguro de
la máquina). En caso de daños, el aparato debe ser
reparado antes de volver a ponerse en funcionamiento.
e) Mantenga la unidad fuera del alcance de los niños.
f) La reparación y el mantenimiento de los equipos
solo pueden ser realizados por personal cualicado
y siempre empleando piezas de repuesto originales.
Esto garantiza la seguridad durante el uso.
g) A n de asegurar la integridad operativa del
dispositivo, no se deben retirar las cubiertas o los
tornillos instalados de fábrica.
h) Al transportar o trasladar el equipo desde su lugar
de almacenamiento hasta su lugar de utilización, se
observarán los requisitos de seguridad e higiene para
la manipulación manual en el país en que se utilice el
equipo.
i) Está prohibido mover, cambiar o girar el aparato
durante su funcionamiento.
j) No deje este equipo sin supervisión mientras esté en
funcionamiento.
k) Limpie regularmente el dispositivo para evitar que la
suciedad se incruste permanentemente.
l) Este aparato no es un juguete. La limpieza y el
mantenimiento no deben ser llevados a cabo por
niños que no estén bajo la supervisión de adultos.
m) Se prohíbe realizar cambios en la construcción del
dispositivo para modicar sus parámetros o diseño.
n) Mantenga el dispositivo alejado de fuentes de fuego o
calor.
o) No permita que el aparato se sobrecargue.
p) ¡Los oricios de ventilación no deben cubrirse!
q) No ponga objetos inamables en el dispositivo.
r) Los objetos dentro del dispositivo no deben colocarse
demasiado cerca unos de otros. Debe dejarse un
espacio suciente para facilitar la circulación del aire
caliente.

36 37
12.03.2022
ES
d – Constante del tiempo de diferenciación. Los valores
que se pueden ajustar se encuentran entre 0 y 1200.
Pulse el botón de función SET, después de completar
el ajuste, para acceder a los ajustes del tiempo de
calentamiento “T”.
T – Tiempo de calentamiento. Los valores que se
pueden ajustar se encuentran entre 1 y 60. Pulse el
botón de función SET, después de completar el ajuste,
para acceder al área de ajustes de la precisión de
calentamiento “HL”.
HL – Área de ajustes de la precisión de calentamiento.
Los valores que se pueden ajustar se encuentran entre
0,500 y 1,500. Después de realizar los ajustes, pulse el
botón SET para pasar al ajuste de la potencia de salida
del calefactor „OUT“.
OUT - potencia de salida del calefactor. Valores ajustables
entre 0 y 100. Mantenga pulsado el botón SET durante
unos 5 segundos, después de los ajustes, para poder
abandonar los ajustes avanzados y guardar los
cambios realizados.
3.4. LIMPIEZA Y MANTENIMIENTO
a) Antes de limpiar y ajustar, sustituir accesorios
o cuando no tenga previsto utilizar el equipo,
desenchufe el cable de alimentación y deje que la
unidad se enfríe completamente.
b) Utilizar únicamente detergentes suaves destinados a
la limpieza de supercies en contacto con alimentos.
c) Después de cada limpieza, deje secar bien todas las
piezas antes de volver a utilizar el aparato.
d) Guarde el aparato en un lugar seco, fresco y protegido
de la humedad y la radiación solar directa.
e) Prohibido rociar agua sobre el dispositivo o
sumergirlo en agua.
f) Evite que el agua se introduzca por los oricios de
ventilación de la carcasa.
g) Las aberturas de ventilación deben limpiarse con un
pincel y aire comprimido.
h) En lo que respecta a la eciencia técnica y posibles
daños, el dispositivo debe ser revisado regularmente.
i) Para su limpieza utilizar un paño húmedo y suave.
j) No utilizar para la limpieza objetos de metal
puntiagudos y/o alados (p.ej. cepillos metálicos o
espátulas de metal), ya que podrían dañar la supercie
del material del que está hecho el aparato.
k) No limpie el aparato con limpiadores que puedan
contener sustancias ácidas. Los aparatos médicos,
disolventes, carburantes, aceites y otros químicos
podrían dañar el producto.
ELIMINACIÓN DE DISPOSITIVOS USADOS
Tras su vida útil, este producto no debe tirarse al contenedor
de basura doméstico, sino que ha de entregarse en el
punto limpio correspondiente para recolección y reciclaje
de aparatos eléctricos. Al respecto informa el símbolo
situado sobre el producto, las instrucciones de uso o el
embalaje. Los materiales utilizados en este aparato son
reciclables, conforme a su designación. Con la reutilización,
aprovechamiento de materiales u otras formas de uso de
los aparatos utilizados, contribuirás a proteger el medio
ambiente. Para obtener información sobre los puntos de
recogida y reciclaje contacte con las autoridades locales
competentes.
SOLUCIONES DE PROBLEMAS
Problema Posible causa Solución
Falta de ali-
mentación
No se ha
enchufado bien
o el cable está
desconectado.
Enchufe / conecte
el cable.
Fusible quemado. Recambie el
fusible.
La
temperatura
del aparato
no aumenta
La temperatura
ajustada es
demasiado baja.
Regule la
temperatura.
El radiador
eléctrico no
funciona.
Recambie el
radiador eléctrico.
El regulador de
temperatura no
funciona.
Recambie el
regulador de
temperatura.
El ventilador
cíclico no
funciona.
Recambie el
ventilador.
La tempera-
tura ajustada
diere
signicativa-
mente de la
temperatura
del aparato
El sensor de
temperatura no
funciona.
Recambie
el sensor de
temperatura.
El potenciómetro
para ajustar la
temperatura de
forma precisa
no está bien
regulado.
Regule el
potenciómetro.
La alarma de
exceso de
temperatura
funciona de
forma incor-
recta.
La temperatura
ajustada es
demasiado baja.
Regule la
temperatura.
El regulador de
temperatura no
funciona.
Recambie el
regulador de
temperatura.
3. Ajuste la temperatura. La pantalla mostrará la
temperatura ajustada por el usuario y la temperatura
interior del aparato. El testigo de calentamiento
activado se iluminará. Esto signica que el aparato
está calentando y aumentando la temperatura.
Después de un tiempo, cuando la temperatura
ajustada se acerque a la temperatura interior
del aparato, el testigo empezará a parpadear. En
condiciones normales, tras un calentamiento de 90
minutos, el aparato solo tendrá que mantener la
temperatura marcada.
4. Si la temperatura de trabajo es baja, p. ej. 80 oC, se
debe aplicar el método de ajuste de temperatura
en dos pasos. Este método previene que disminuya
la temperatura y permite alcanzar una temperatura
constante dentro del aparato de forma más rápida.
Por ejemplo, si la temperatura que desea ajustar es
de 80 oC, primero ajuste una temperatura de 70 oC.
Después de que el aparato alcance dicha temperatura,
ajuste la temperatura objetivo, es decir, 80 oC.
5. Adapte el tiempo de secado a la humedad de cada
artículo. Si los artículos que quiere secar son muy
húmedos, ajuste la perilla de regulación de cantidad
de aire en la posición 三. Entonces, el aire húmedo del
interior del aparato se extraerá.
6. Después de nalizar el proceso de secado, deje
la entrada de aire abierta, coloque el conmutador
de alimentación en posición OFF y abra la puerta
del aparato. ¡Tenga cuidado para no quemarse!
Si no quiere sacar los artículos del armario una vez
nalizado el proceso de secado, puede cerrar la
entrada de aire y dejar los artículos dentro del aparato
tanto tiempo como sea necesario.
PROCESO DE FUNCIONAMIENTO
MANEJO
Cuando el controlador de temperatura está encendido, el
indicador digital PV muestra el valor registrado y el indicador
digital SV, el valor programado.
AJUSTES BÁSICOS:
Ajuste de temperatura: pulse el botón de función SET. En el
indicador digital PV aparecen las letras „SP“. En el indicador
digital SV aparece un valor de temperatura que se puede
ajustar. El último número parpadea. Utilizando los botones
de función ▲y ▼se puede establecer el valor deseado.
Utilizando el botón de función ◄cambia al siguiente campo
de dígitos. El valor del número siguiente se puede ajustar
utilizando los botones de función ▲y ▼ . Pulse el botón
de función SET, después de la nalización del ajuste de
temperatura, para acceder al ajuste de tiempo.
Ajuste de tiempo: pulse el botón de función SET. En el
indicador digital PV aparecen las letras „SΓ“. En el indicador
digital SV aparece el tiempo, valor que se puede ajustar
utilizando los botones de función ▲y ▼Utilizando el
botón de función ◄cambia al siguiente campo de dígitos.
El valor del número siguiente se puede ajustar utilizando los
botones de función ▲y ▼. Pulse el botón de función SET,
después de la nalización del ajuste de tiempo, para que el
aparato funcione con los parámetros ajustados.
AJUSTES AVANZADOS:
ATENCIÓN: todos los aparatos de control han sido
sometidos a pruebas precisas y los parámetros de
funcionamiento se han establecido previamente. Si todos
los parámetros de funcionamiento de la estufa al vacío
cumplen sus necesidades y expectativas y si el dispositivo
está funcionando correctamente, no necesita cambiar estos
parámetros.
Cambio en los ajustes avanzados:
Pulse el botón de función ▲,y mantenga el botón pulsado.
A continuación, pulse el botón SET. Aparecen las letras
„LCK“ en la pantalla digital. Suelte el botón SET (continúe
pulsando el botón de función ▲) Ajuste el valor del dígito
que parpadea en „7“. Suelte el botón de función ▲. Pulse
el botón de función SET. En la pantalla aparecen las letras
„AL1“.
AL1 - alarma de desviación de temperatura – ajuste el
valor deseado mediante los botones ▲y ▼. Valores
ajustables entre -99,9 °C y 999,9°C. El aparato
activará la alarma cuando la suma de la temperatura
establecida y la desviación de temperatura ajustada
supere el valor de la temperatura real. Después de
ajustar el valor de la desviación de temperatura, pulse
SET para pasar al ajuste de velocidad alta/baja „FAN“.
FAN – regulación de velocidad alta/baja. Valores ajustables
entre -99,9 °C y 999,9 °C. Después de realizar los
ajustes, pulse el botón SET para pasar a los ajustes de
corrección de la temperatura medida SC.
Pulse el botón de función SET, después de completar
el ajuste, para acceder al cambio de la temperatura de
seguridad “SC”.
SC – Cambio de la temperatura de seguridad – En el
indicador digital PV aparece el valor de temperatura
cambiado. El rango de ajuste de los valores de
temperatura es de -99,9 °C a + 100 °C. Pulse el botón
de función SET, después de completar el ajuste del
cambio de la temperatura de seguridad, para acceder
al ajuste de la regulación automática PID. En la pantalla
aparecen las letras „ATU“.
ATU – Encender-/apagar la regulación automática PID. Los
valores que se pueden ajustar son: “0” - la regulación
automática está apagada; “1” – la regulación
automática está encendida. Si ajusta el parámetro a
“1”, el dispositivo funciona en el modo de regulación
automática. Este modo también se puede activar
durante el funcionamiento normal. Para ello, abandone
los ajustes avanzados. Pulse el botón de función ▼
en el funcionamiento normal y manténgalo pulsado
durante 5 segundos. El indicador digital SV parpadea
y aparecen en la pantalla las letras „ATU“. Durante
esta operación, la temperatura real puede variar de
la temperatura ajustada. Este resultado es normal. El
tiempo que emplea la regulación automática es de
3 a 5 minutos. Después de este tiempo, el regulador
PID ajusta su conguración para que pueda trabajar
aún con más precisión. Pulse el botón de función SET,
después de completar el ajuste, para acceder al ajuste
del área de proporcionalidades “P”.
P – Área de proporcionalidades – Regulación de la
revisión de calentamiento. Los valores que se pueden
ajustar se encuentran entre 0 y 100,0. Pulse el botón
de función SET, después de completar el ajuste, para
acceder a los ajustes de la constante del tiempo de
integración “I”.
I – Constante del tiempo de integración. Los valores
que se pueden ajustar se encuentran entre 1 y 4320.
Pulse el botón de función SET, después de completar
el ajuste, para acceder a los ajustes de la constante del
tiempo de diferenciación “d”.
ES
¡ATENCIÓN! La ilustración de este producto se
encuentra en la última página de las instrucciones p.
44.

38 39
12.03.2022
PROCEDURE SHOWING THE COURSE BETWEEN THE FUNCTIONSPROZEDUR ZUM VERLAUF ZWISCHEN FUNKTIONEN
This manual suits for next models
1
Table of contents
Languages: