Steiner MIDI EVI User manual

Version 1.12 - 6/30/2023
Original manual by Nyle Steiner / Revised by Matt Traum
This version is copyright © 2005-2023 Nyle Steiner / Patchman Music. All rights reserved.
What's Included
The following items are included with the MIDI EVI:
•
The MIDI EVI Brass Style MIDI Wind Controller
•
AC adaptor. 9 Volt DC. Tip/Center is Positive (+). 1/8" male plug
MIDI EVI Description
Congratulations and thank you for purchasing a Nyle Steiner MIDI EVI. This EVI, or "Electronic Valve
Instrument, is a brass style MIDI wind controller developed by trumpet player, inventor, studio musician,
Nyle Steiner. The concept of a "brass-type synthesizer" was first conceived in the late 1960s when Nyle
Steiner wanted to give brass players the ability to control synthesizers. The first units were hand made, as is
this one, by Nyle Steiner in the early 1970's. The MIDI EVI is the latest in what has turned out to be decades
of development and refinements.
What is a MIDI EVI?
The MIDI EVI is a "MIDI controller". That is- it does not make a sound on its own. It sends MIDI data from
its MIDI OUT jack which is then connected to the MIDI IN jack on a MIDI synth. The connected synth is the
source of all the sound. The MIDI EVI simply converts the players' performance gestures into appropriate

MIDI data. This MIDI data can then be responded to in a connected synth to do an almost unlimited number
of things depending on the abilities of the connected synth(s) and how the patch is programmed in the
responding synth(s).
What Else is Needed to Play the MIDI EVI?
The MIDI EVI is a MIDI controller- that is, it generates a MIDI signal that is used to control a MIDI sound
source. It must be connected to a MIDI sound source to create sound. There are numerous MIDI sound
modules, keyboards, and computer soft synths that will work with the MIDI EVI.
You will also need a quality amplifier or pair of headphones. It is best to avoid guitar or bass guitar amps
since they are EQ'd for guitar and lack a full frequency response range. A much better choice is a full range
keyboard or PA type amplifier. Companies such as Yamaha, Roland, Mackie, Peavey, Bose make excellent
amps.
Also, it is strongly recommended that you load some patches into your sound source that are programmed
specifically for use with wind controllers (or program them yourself).
HOLDING THE EVI
The proper left hand position is shown below.
Notice how the thumb points almost straight up.
This position is very important because it
creates well defined octave positions (between
any two rollers), and it keeps the hand and arm
in a position that is directly in line with the
canister rotation axis. All octave positions can
be easily reached with a simple and easy arm
rotation. If you try wrapping the thumb around
the canister, you will notice how much
awkward wrist bending it takes to reach all of
the octave positions. It is important that the left
thumb also be on top of the small ground tab on
the side of the canister. This is how the body
gets grounded to complete the current path that
activates the keys and octave rollers.
Each octave position of the thumb is defined by
resting the thumb between two rollers. Do not
try to touch just one roller at a time; it is very
awkward. The instrument responds only to the
highest octave roller touched. The lowest octave
position is played by not touching any of the
rollers at all. Since the thumb rests on the
canister, a roller is not necessary for all octave
positions. Having no rollers on the bottom
octave and a non moving roller on the top octave helps give more uniqueness to each octave position. This
helps to eliminate the necessity of looking at the rollers every time one starts to play.

The Electronic Woodwind Instruments have two more rollers since the thumb needs something to rest on in
the bottom octave. The pitch range is the same as the EVI. The AKAI EVI's have an extra roller on the
bottom but it is a dummy and has the same pitch range.
The mouthpiece end of the instrument is supported by the front teeth biting lightly on the soft rubbery
mouthpiece.
OCTAVE ROLLERS
The octave rollers slide on and off five of the screws on the underside of the instrument. On most
instruments, the top octave roller is screwed on tight because it does not need to rotate. The only thing that
keeps the rollers from falling off is the fact that the canister is beneath them. The canister is also easily
removable simply by unscrewing it. This makes cleaning and oiling of the rollers and canister shaft very easy.
The proper adjustment of the canister is to screw it on all the way until it starts to tighten against the rollers.
Then back it off one or two turns until it turns freely and the ground tab is facing you. The rollers will be
hanging down a fraction of an inch as they rest on the top of the canister. The rollers should turn easily as the
thumb slides across them.
Air Flow and Embouchure
The EVI uses a closed air path. That is; it is unprecedented in being the first wind instrument ever, that does
not actually have air flow through it when blown into. The player allows air to leak around the side of the
mouthpiece, creating the same feel as though air is actually flowing through the instrument. The internal
sensor responds only to the pressure created as air is blown past the mouthpiece. Sounds weird - doesn't it!
High jumping backwards over the bar seemed weird at first too. Playing a closed air path is a very
comfortable, effective and effortless way to go once you have the hang of it.
The proper embouchure for playing the EVI is like biting the middle of your fingernail with the front teeth
and blowing. The lips are allowed to relax and let air flow around the side of the finger. By proper tightening
of the lips, just the right amount of air can be allowed to pass to give the same feel as air flowing through the
instrument. Tonguing is facilitated against the roof of the mouth. Double and triple tonguing work very well.
If the lips are too tight (as is the case at first for many players), no air will escape and the notes will not
release. If they are too loose, you will work extra hard blowing more air than you need to be.
Practice blowing on your finger and listening to the hiss of air flowing past the sides of your finger. When you
can articulate the hiss sound on and off the way you would want your notes to articulate on and off, then you
have got the technique. Just apply the same technique to the mouthpiece of the instrument.
Why would anyone make a wind instrument that does not have air flow through it? No wind instrument in
history has ever been made that plays just from air pressure and not air flow.
The reason is simple- a closed
air path is a better way to go. Traditional wind instruments physically require moving air in order to operate.
A reed needs moving air to vibrate, a vibrating lip needs moving air to operate etc. With the EVI being
electronic, air pressure alone is all that is necessary to make it operate. The very first EVI was designed to
have air flow through it but it was very soon discovered that it was more comfortable to play with a closed air
path and that it allowed a greater degree of expression and breath control. When a person is playing the EVI,
they feel the impression that air is flowing through it, as the air actually flows past the sides of the
mouthpiece through the lips.

The main advantages for having a closed air path are:
1. The resistance feel of playing is under player control at all times by varying the lip tightness;
much like the way a bird can control its aerodynamics during flight. Some styles of playing feel
better with different amounts of resistance.
2. Tightening the lips around the mouthpiece and sealing it off makes circular breathing and
exotic phrase sustaining routine.
3. Consistency and reliability; having air flow through the instrument means moisture also flows
through. This means having to incorporate a complicated mechanical labyrinth capable of
keeping the moisture separate from the air flow path to the sensor inside. In addition to being a
threat to the sensor and circuit components inside, moisture in the air path causes droplets and
water plugs that cause erratic and "gurgle-y" breath response (listening to a trumpet being played
with its spit valve use long overdue is a good example). The EVI does away with all of this by
using a closed air path.
There are many who understandably find this concept hard to accept because of precedence set by acoustic
wind instruments, but all who scorn the electronic closed air path, are inexperienced in playing a closed air
path. Once you get the hang of it, you'll never look back.
Portamento (Glide)
Biting harder on the mouthpiece controls portamento rate between notes. The harder the bite, the slower the
portamento. The technique of gliding between two notes is to play the first one and then bite and hold the
pressure while playing the second. The second note is then arrived at by releasing the bite pressure on the
mouthpiece. How much you let off determines how fast you will arrive at the second note. The ability to play
portamento must of course be implemented into whatever sound module is being played. Many sound
modules do not have portamento capability. Portamento is controlled by MIDI controller #5. Note: Many
sound modules do not support the use of MIDI portamento control.
FINGERING
The fingering on the EVI is exactly like that of a trumpet playing the octave between C, just above A 440 or
third space treble clef, down to C one octave lower. That is:
All D's are played 1 and 3
All C#'s are played 1, 2, and 3
All E's are played 1 and 2, et
c
What makes it different from a trumpet is that all notes between and including G down to C# require that the
left index finger be touching the metallic ring around the front of the instrument. The octave being played is
determined by the position of the left thumb on the rollers. Do not try to touch just one roller at a time; the
instrument is designed so that the thumb can always rest comfortably between two rollers. This gives a good
feel of definition and stability to each octave position; see drawing. The instrument responds only to the
highest roller touched.
The instrument has almost the same range as a piano, using seven octave positions (the lowest one not

touching any rollers at all). You will discover that going between any C and C# or C to D crosses over the
break between octave positions. Going across this octave break and using the left hand to control the octave
and side ring is what makes the EVI at first seem difficult to even the most experienced valve brass players.
The difficulty is only because the left hand technique has never been required and thus acquired in the past. It
is very easy though (except for trilling across it), much easier than the lip technique that it replaces. The EVI
is much easier to play than a trumpet; but at first, you will have much difficulty believing it. The EVI is based
on a trumpet, not a copy of it. It was intended to be different than a trumpet. This is what makes it so
powerful and versatile. To exactly copy the playing technique of a trumpet would have imposed the
limitations of a trumpet. These limitations are what we enjoy getting away from. The EVI resembles a
trumpet about as closely as a movie usually resembles the book that it was based upon.
The valves and octave rollers all operate by conducting a tiny amount of current through the skin to ground.
This is why it is important to keep the left thumb in contact with the metal button on the side of the canister.
Playing without proper contact with this canister button, will usually cause the pitches to be erratic.
Sometimes a person can have dry enough skin to create too high of a resistance in the fingers to make reliable
contact with the valves and octave rollers. If this is the case, a couple of drops of glycerin (available from
most drugstores), applied to the tips of the fingers, like a lotion, will make them conductive for reliable
contact with the valves and octave rollers. Glycerin is a thick clear harmless liquid that is water soluble.
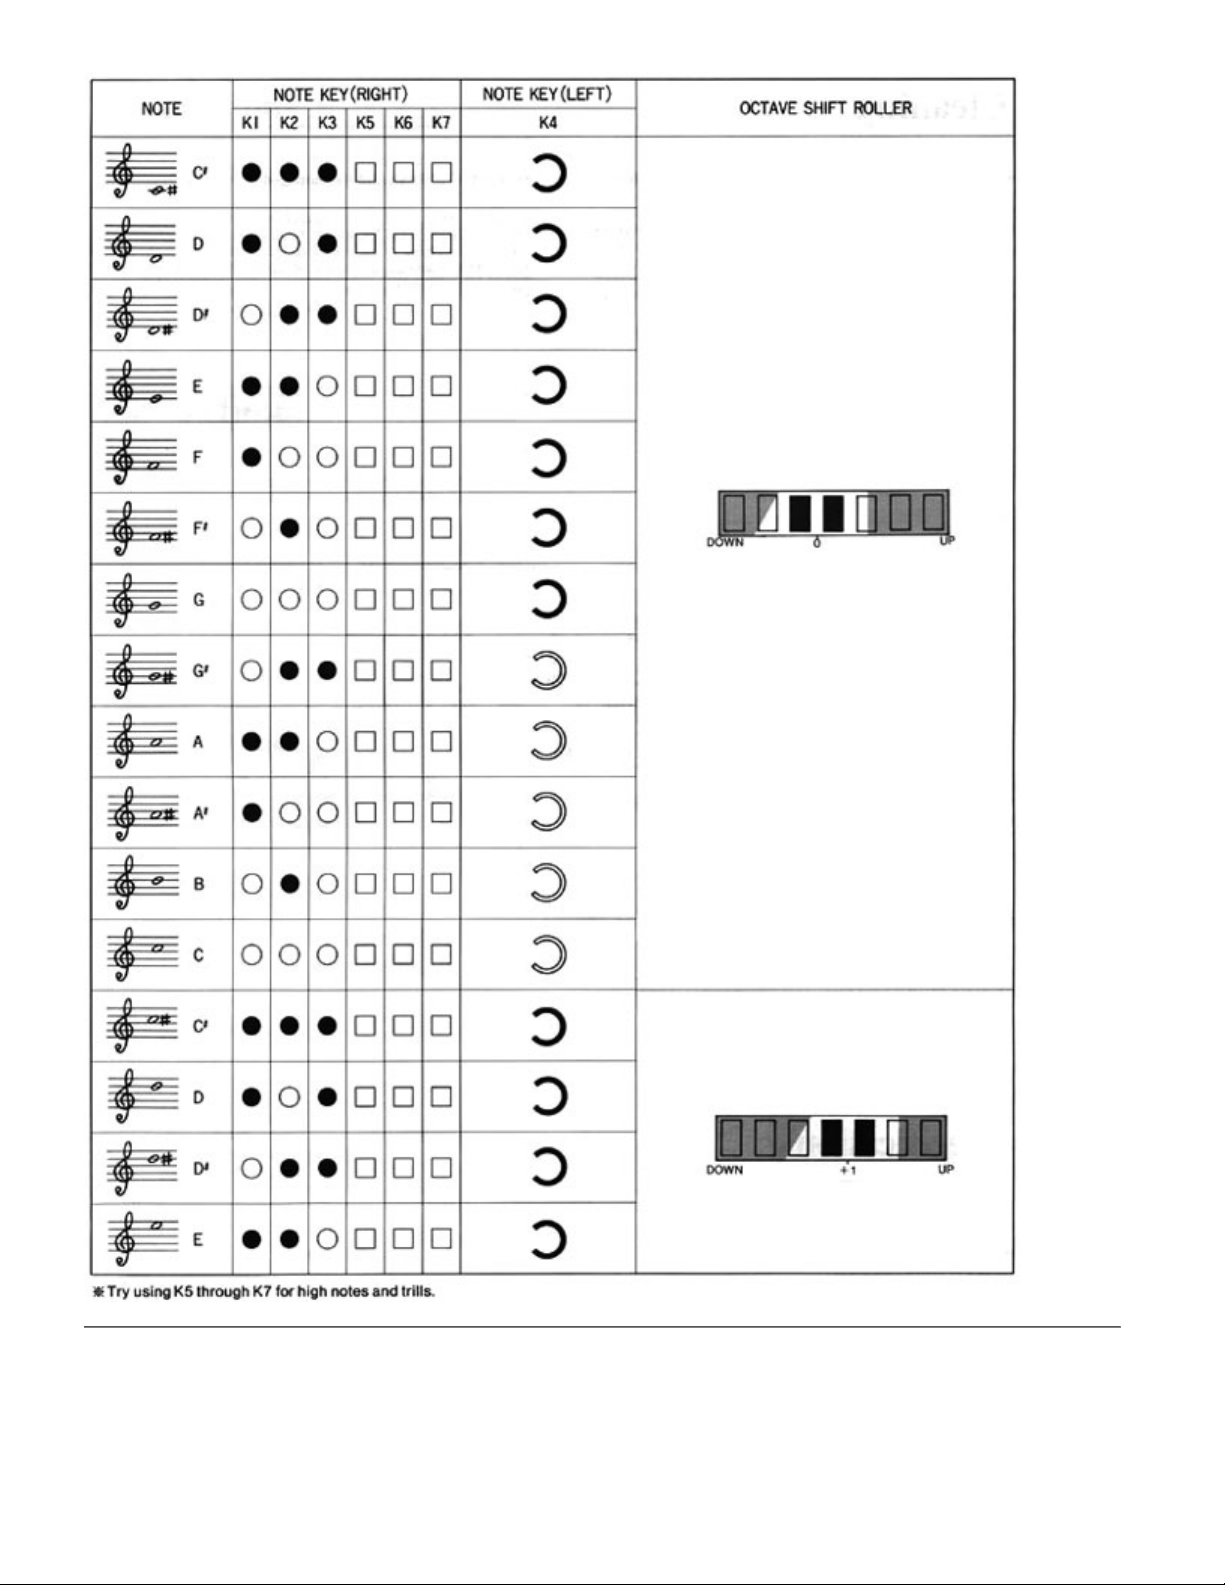
FINGERING CHART
Here is a Fingering Chart for the Akai EVI1000. These fingerings apply to the MIDI EVI as well...

Trill Keys
Beside each valve on top of the instrument is an extra key. These make certain alternate fingerings and trills
possible that would otherwise be difficult. You will easily discover your own uses for them. The one beside
1st valve raises the pitch 1 whole tone. The one beside 2nd valve raises the pitch 1 semitone and the one

beside 3rd valve raises the pitch a major third (not exactly the min. 3rd mirror image of its 3rd valve
counterpart that one might expect). One of their biggest uses is for trilling between C and D, C and C#, B and
C# etc.
Vibrato and Pitch Bending
The EVI uses two separate mechanisms to facilitate vibrato and pitch bending. On the bottom of the EVI are
the pitchbend tabs that are mounted at a 45 degree angle. In between them is a soft pad where the right thumb
is placed while playing. Midway between the two benders, you will feel a lump under the pad. This is the
Vibrato sensor.
Vibrato is done on the EVI much in the same way as is done on a violin. It is done with human hand motion
through the right thumb to the vibrato sensor. Sterile sounding LFO modulation can be left to the keyboard
players, as is normally done with synthesizers.
The reason that a separate sensor is used for vibrato is to be able to make it respond only to motion and not to
steady pressure. This makes it so that one can enjoy a lot of vibrato sensitivity and freedom without having to
hold the sensor in exactly the right place to stay in tune. Putting a steady pressure on the vibrato sensor and
holding it, only moves the pitch momentarily and the pitch will return to center.
Pitch bending can be done easily by rolling the thumb on to one of the 45 degree angle bend tabs. One tab
bends the pitch up and one tab bends the pitch down. They are also very useful for making slight pitch
adjustments while playing with other instruments. See the drawing for clarification on use of pitchbend
usage. Unlike the vibrato sensor, the pitch benders will hold a pitchbend steadily as long as the thumb is in
contact with them. It is possible to do a vibrato using only the benders but the difference between doing it on
a pitchbend mechanism and a vibrato sensor will be immediately obvious after trying it both ways.
The effect of vibrato and pitchbend are combined and converted into MIDI pitchbend information.
Turning On and Power Sources
The MIDI EVI can be powered from any one of three sources of power:
•
9 volt battery
•
9 volt DC wall wart plugged into the1/8" power jack.
•
Through one of the unused pins of the MIDI jack, from a bigger system that I have designed (If and
when I ever produce it for sale).
The POWER SWITCH determines which power source (battery or wall wart) the instrument runs from.
When it is forward (toward the end opposite the mouthpiece), the 9 volt battery powers the instrument. When
the switch is to the rear (mouthpiece end), the wall wart powers the instrument.
When using the battery, the switch therefore can act as an on off switch (important for battery life). When the
switch is forward. The instrument is on; when to the rear, the instrument is off. The battery voltage can be
checked when the instrument is on by putting the leads of a volt meter on the canister bolt (ground) and the
front screw that holds the top of the instrument on. When the voltage gets down to 7.5 volts or below, it is
time to think about replacing the battery. It is likely however that you will still get several more hours of
operation.

The battery can be replaced by removing the top of the instrument. It is held by three nuts called top removal
nuts. You will notice that the middle top removal nut nut is also the Special Button, located between the
second and third trill keys. These nuts should be snug but only finger tight when put back on. It is a good idea
to set the instrument on a flat surface when taking the top off to prevent it from flopping around and straining
the wire connections.
SPECIAL NOTE:
Always keep a battery in the instrument even if it is dead or not being used. This will
prevent the battery clip from flopping around inside the instrument and shorting its terminals to some circuit
element.
When using the wall wart, the POWER SWITCH should be left in the rear (battery off) position. The
instrument is turned on or off by pulling the wall wart plug from the instrument. If the instrument is being
powered through the MIDI jack, the switch should also be toward the rear; the instrument turned on and off
by pulling the MIDI plug.
Turn on Default Settings
The MIDI EVI has default settings when switched on. At first you may find it easiest to use the default power
up settings. The closer you can come to having all of your sound modules set up to use this default setting,
the easier and quicker things will be when you turn it on. The default settings are as follows:
1. Note On velocity is fixed at 127 and does not change with any kind of playing. Note off
velocity is always 64.
2. Breath pressure is assigned to be sent as MIDI Volume (MIDI Continuous Controller #7).
3. Vibrato and pitch benders are set to be sent as MIDI pitchbend. It is adjusted to be centered at
64(middle pitch).
4. Instrument plays in concert pitch (fingered C = concert C)
.
5. Biting on the mouthpiece sends MIDI portamento rate and MIDI portamento switch.
6. MIDI Channel is 1.
The instrument does NOT remember any changes of parameters when turned off. The most likely things that
you will want to change are things such as the use of breath controller instead of MIDI volume or similar
things that can be changed in a couple of seconds.
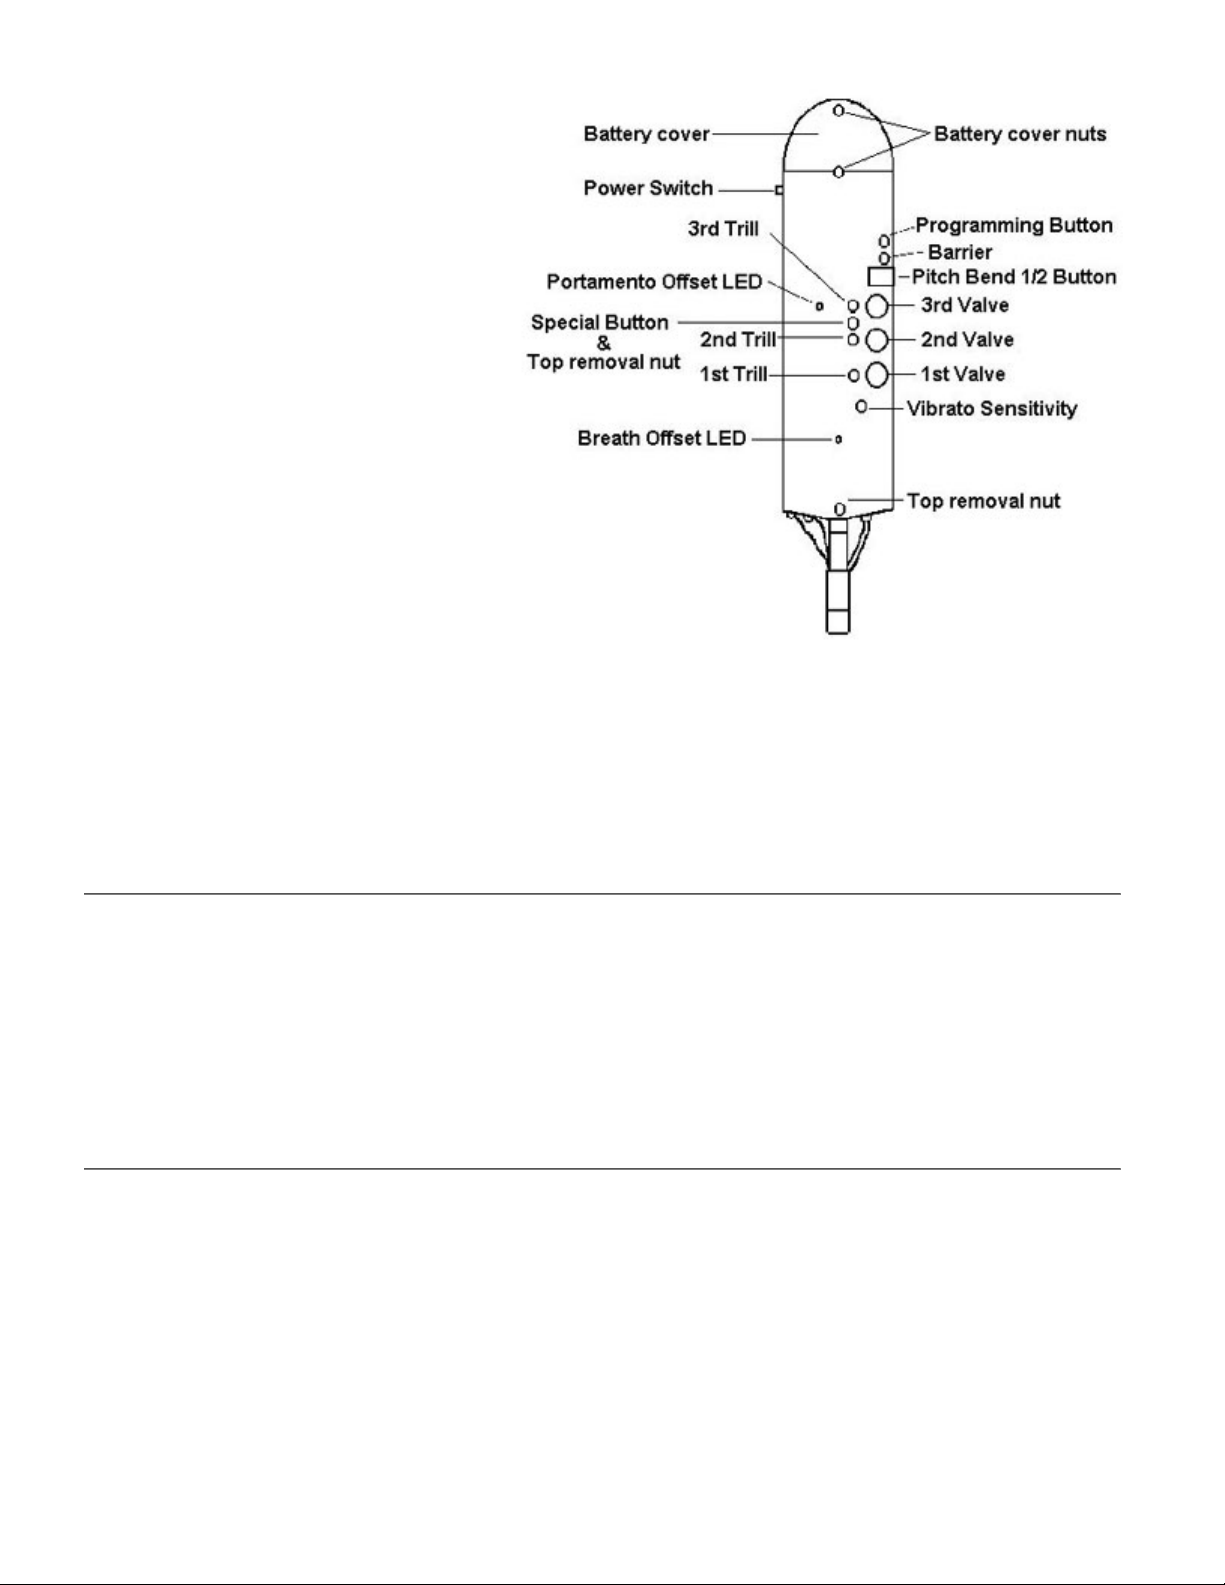
Programming
Most of the instruments parameters and features are turned on and off or varied by touching the
PROGRAMMING BUTTON while not blowing. The PROGRAMMING BUTTON is activated by reaching
over the PITCHBEND 1/2 BUTTON and touching with the right little finger. The idea is to touch the
PROGRAMMING BUTTON as certain key and octave positions are held. There is a BARRIER (dummy
post) between the PITCHBEND 1/2 BUTTON and the PROGRAMMING button to prevent unintentional
touching of the PROGRAMMING button.
There are 7 octave positions. B, -2, -1, C, +1, +2, and T. The B stands for the Bottom octave position (not
touching any octave rollers). C stands for the Center octave position and T stands for the top octave position.
B, C, and T each have a uniqueness of
their own that makes each of them easy to
identify without looking at the rollers. B
has the quality of not touching any rollers
at all. The C has the quality of touching
the roller that makes the thumb exactly in
the middle of the instrument. T is
identifiable because the top roller does not
spin. The other four positions can be
easily extrapolated from these positions.
So, from C (center position) we have,
going down, -1 -2 and B. From the center
position going up, we have +1 +2 and T.
This is how we will refer to octave
positions in this set of instructions. With
no keys down or side button down, -1 will
play the traditional "middle" C (MIDI
note 60). B will play the low C (MIDI
note 36) two lines below the bass clef. +1
will play a traditional hi C. etc.
The PITCHBEND 1/2 BUTTON has the function of cutting the range of the MIDI pitch benders in half. This
means that if your sound module is set to bend up or down a max of 1 full step, it will bend up or down one
half step while the PITCHBEND 1/2 BUTTON is held.
The PITCHBEND 1/2 BUTTON also serves the purpose of latching any fingered note into a memory
register. This is used for programming numerical valued parameters such as transposition. The reference note
that represents zero is Center C.
Instrument Transposition
The default transposition when turned on is concert pitch. Instrument Transposition is accomplished by
touching the PROGRAMMING BUTTON while keying an open C of the top octave. The last note relative to
C72 (center position) that was latched using the PITCHBEND 1/2 BUTTON will be the new instrument key.
To transpose the instrument to be a B-flat instrument for example, you hit the PITCHBEND 1/2 BUTTON
while holding the fingering for Bb (center octave) (middle line of the treble clef). This latches the Bb into the
latch memory. Then you hit the PROGRAMMING BUTTON while holding the highest C "T".
Breath and Dynamics
Breath and dynamic settings are set using the "C" (Center) octave position. The default setting at power up is
MIDI volume (controller 7). This can also be turned on by touching and releasing the PROGRAMMING
BUTTON while the finger is on 1st valve.
Touching the PROGRAMMING BUTTON with no keys down turns off all breath and velocity control and
sends a control number of 127 to MIDI volume #7, and MIDI expression #11.
THIS IS A GOOD WAY TO
GET A SOUND IN A PANIC SITUATION WHEN NOTHING PLAYS
. See the section on PANIC.
Touching the PROGRAMMING BUTTON momentarily while holding a particular key or combination of

keys will turn on various dynamic breath controls as follows:
1st valve - MIDI Volume (MIDI Controller # 7)
2nd valve - Aftertouch
3rd valve - MIDI Breath Control ( MIDI Controller # 2)
Side button - MIDI Expression Controller ( MIDI Controller # 11)
1st trill - Breath to variable MIDI Velocity
2nd trill - Extra Controller to variable MIDI Velocity
No keys at all - All dynamic controllers off and Velocity at fixed value
More than one controller can be made to send at the same time by holding two or more keys while hitting the
PROGRAMMING BUTTON.
All Notes Off
An All Notes Off command can be sent by hitting the PROGRAMMING BUTTON with no keys down in the
bottom octave.
Patch Change Increment and Decrement.
A patch change increment can be sent by hitting the PROGRAMMING BUTTON in the bottom octave while
touching the side ring. A patch change decrement can be sent in the same octave by hitting the
PROGRAMMING BUTTON while touching the side ring and 1st valve (as in playing F).
Velocity
When velocity is turned off, each note on is sent with a default value of 127. Each octave can be used to
program the fixed velocity value by using the PITCHBEND 1/2 BUTTON and then hitting the
PROGRAMMING BUTTON in -2 octave position while holding 2nd trill.
Extra Controller Mod Wheel
The Extra Controller can be assigned to Mod Wheel by hitting the PROGRAMMING BUTTON in the -2
octave position while holding 2nd valve. This can be turned off by doing the same thing with no key down.
Portamento
Glide or Portamento is on by default. It can be turned on by hitting the PROGRAMMING BUTTON in the
+2 octave position while holding 1st valve. It can be turned off by doing the same thing with no key down.
MIDI Channel
MIDI Channel is #1 by default. It can be set by hitting PITCHBEND 1/2 BUTTON on C Center (for MIDI
channel 1, C# +1 for MIDI channel 2 etc,) and then hitting the PROGRAMMING BUTTON in the Top
octave position while holding 1st valve.
Key Deglitch Time

Key Deglitch Time is a built in delay in response to your fingering changes. Some amount of Key Deglitch
Time is necessary to allow all your fingers to "settle" before the change is actually sent by the MIDIEVI. All
wind controllers require some amount of Key Deglitch Time so that they can be played with a minimum
amount of glitching between notes. The default Key Deglitch Time on the MIDI EVI when turned on is
approximately 40 milliseconds (ms). This can be changed to values ranging from OFF (0 ms) to well above
the range of playability. If you set this parameter too high and the MIDI EVI becomes unplayable, simply
turn off the MIDI EVI and try again.
The default value of 40ms Key Deglitch Time is generally acceptable for most players, but if desired it can
easily be changed. Key Deglitch Time is set by touching the PROGRAMMING BUTTON while keying the
middle valve of the top octave. But before doing this you must "latch in" the desired value by using the
PITCHBEND 1/2 BUTTON according to this chart:
0ms : Middle C (Off- No deglitch time added)
10ms : C# above middle C
20ms : D above middle C
30ms : Eb above middle C
40ms : E above middle C (Default)
50ms : F above middle C
60ms : F# above middle C etc...
The procedure to set the Key Deglitch Time to 30ms is as follows:
Finger and blow Eb above middle C, and while blowing, touch the PITCHBEND 1/2 BUTTON
to "record" this value into the MIDI EVI's buffer. Stop blowing. Next, roll your left hand thumb
up so that it is between the top two rollers, and also finger the middle valve. While doing this,
touch the PROGRAMMING BUTTON to make the change final.
Sending MIDI Patch Changes
When you are not blowing, you can send any of 127 MIDI patch change numbers by hitting the PATCH
CHANGE BUTTON on the bottom of the instrument. It is activated by reaching over the upper pitch bender
and touching it with the right thumb. The patch change number sent is determined by the note and octave that
you are fingering when you touch the PATCH CHANGE BUTTON. For example, if you are fingering C
center, it will correspond to MIDI note 72 and will send patch change number 72.
By now you are wondering how you can send all 127 numbers when there are not that many notes in the
scale. The extreme low numbers and the extreme high numbers are sent by holding the PITCHBEND 1/2
BUTTON while sending a patch change. Having both the low and high numbers requiring the use of the
PITCHBEND 1/2 BUTTON, makes the most frequently used patches of the General MIDI set accessible
from the middle of the instrument range.
Special Button
The SPECIAL BUTTON puts several powerful features at instant on-off availability. To use the SPECIAL
BUTTON, you must hit and release it while holding a particular valve or trill key. The SPECIAL BUTTON
is not octave dependent. It will do its thing the same, no matter what octave it is activated from.
The features that it can call instantly are:

Slur Sustain
. Hit and release while holding side button.
What is Slur Sustain? When it is on, a tongued note attack also sends a MIDI sustain pedal on
command. This stays on during all slurred notes until the breath is stopped; at which time a
MIDI sustain pedal off command is sent. All notes played in between by slurring are held on by
the sustain command. A C major chord, for example, can be played by tonguing a C and then
slurring down to G, E, C, G, C etc. The chord will hold until the breath is released. A new chord
can now be started by attacking another note.
In addition, whenever a chord is played in the slur sustain mode, the notes are stored in a special
memory buffer for use in setting up the parallel chord or interval mode (described below). Each
new chord played overwrites the previous chord in the memory buffer so that the last chord
played is the one used as a chord or interval.
Parallel Chord or Interval
. (turn on default perfect 5th below played note). Hit and release while holding
1st trill and the last set of slur sustained notes played (up to ten) will be set to play as a parallel cord. The
parallel chord feature can be turned on and off. The notes in the chord will remain the same as long as you
don't play in the slur sustain mode again.
If the Sub Octave mode or Interval mode is on at the same time as Slur Sustain, the slurred notes are not
written into the parallel chord memory buffer. The parallel chord or interval stays the same.
The Slur Sustain and Parallel Chord modes are very effective with strings and pad sounds.
Sub Octave Double
. (Always available regardless of interval or chord setting above). Hit and release while
holding first valve.
Combinations of above
. Example: Hit and release while holding both 1st valve and side button to play rich
octave doubled slur sustained chords. The chord memory buffer is not overwritten when sub octave mode and
slur sustain mode are on at the same time.
All of the SPECIAL BUTTON features are automatically turned off whenever a new patch change command
is sent. When parallel chord or interval is turned off, the presently used chord or interval is remembered in
memory and will be the same when turned on again with the 1st trill and SPECIAL BUTTON.
MIDI Cables and Things You Should Know
To send a MIDI signal, only two conductors are necessary. It has been done many times. The standard MIDI
cable however, usually includes a third conductor that is a shield and connected to ground. Of the five pins in
the standard MIDI plug, only three are used. Some MIDI cables have all five pins connected from one end to
the other and work perfectly fine. The extra two conductors and pins are simply not doing anything. The pin
in the middle is the ground shield and the two pins adjacent to the middle one carry the MIDI signal and
return path. The two pins farthest from the center are the unused ones.
Some manufactures have found uses for these extra two pins since they are a very handy means to carry extra
signals or power in one cable. The use of these two pins is not defined in Standard MIDI Implementation and
will usually be used for different functions depending on the manufacturer. This EVI has the two extra MIDI
pins implemented to give the user the options of being powered from a possible future add-on system and or
sending the breath voltage to the add-on system (If and when I get around to producing it). If you use a
standard three wire MIDI cable, you will never have to be concerned over any interaction with any piece of
equipment that may have implementation on the two extra MIDI pins.
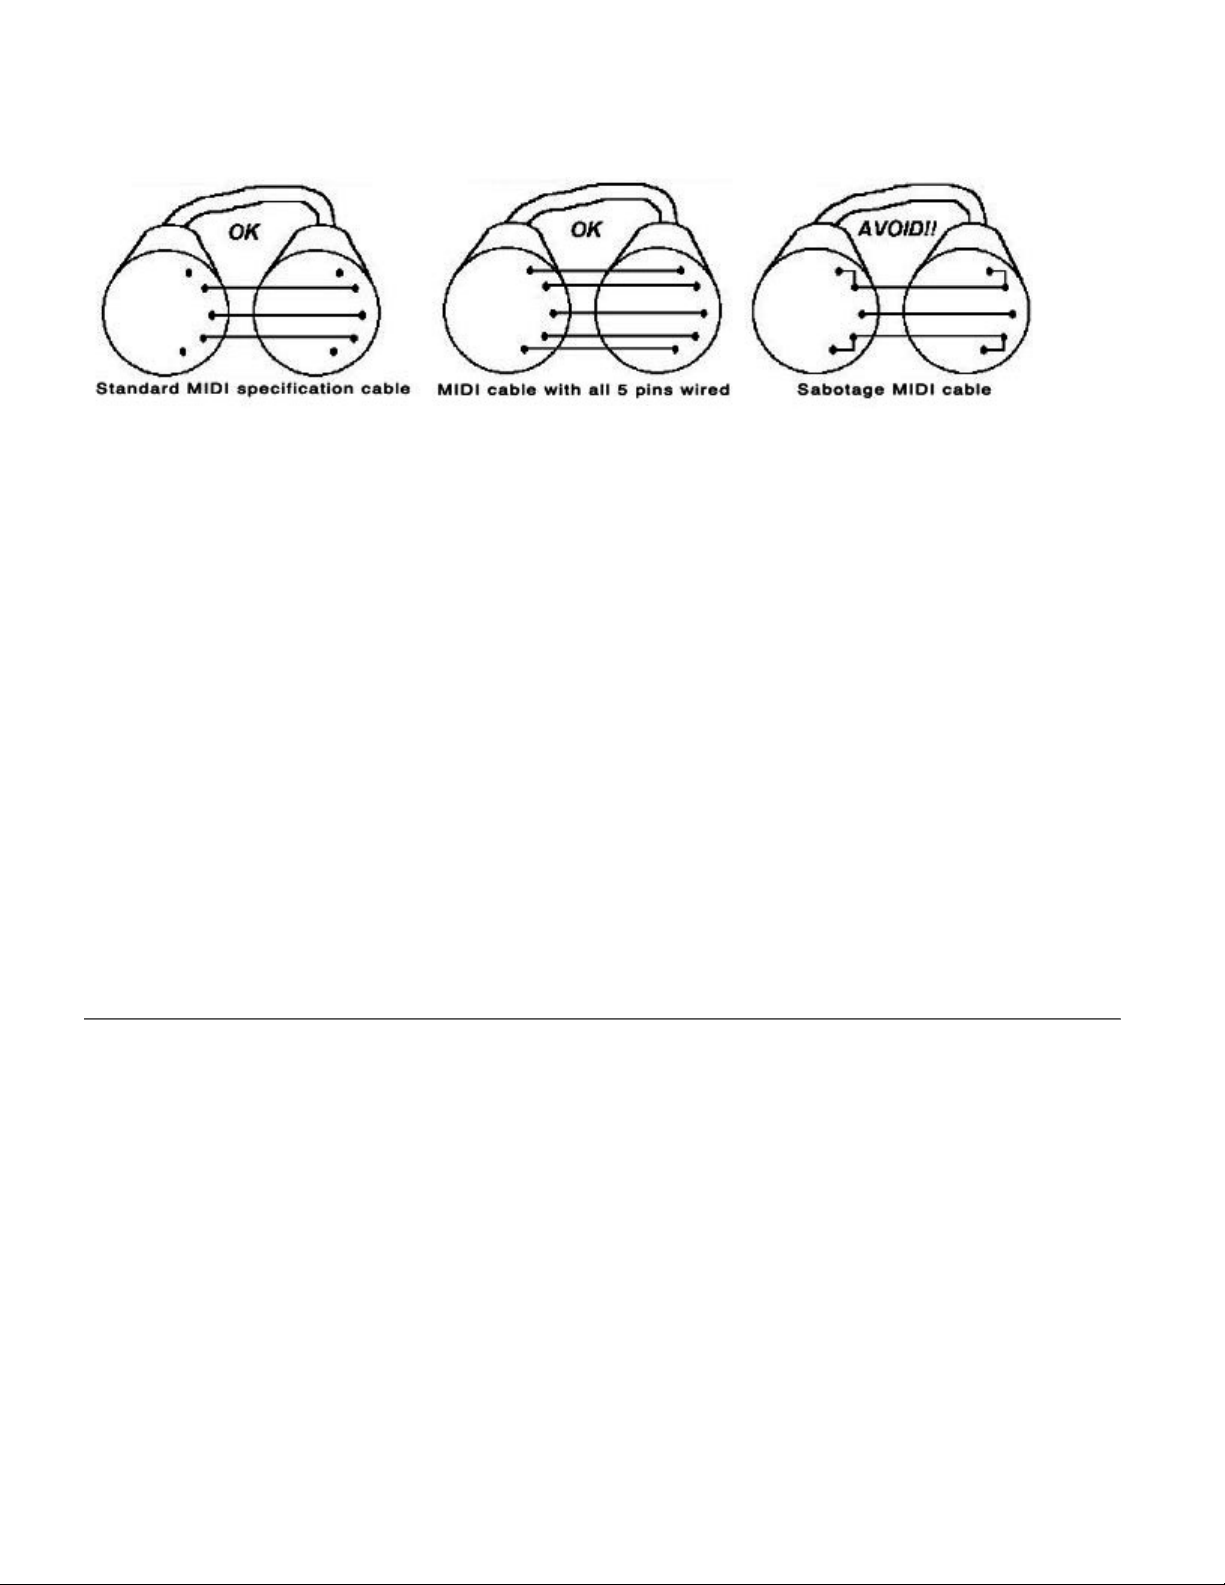
There are three kinds of MIDI cables that I have found in my collection...
1. Standard three wire MIDI cable as described above. Best kind to use if EVI is being powered from battery
or wall wart.
2. Five wire cable, where all five pins are connected from end to end. It seems that about half of the MIDI
cables in the industry are of this type. The add on system that I may produce in the future will probably
require the use of this type of cable. The five wire cable works fine on every sound module that I have tried
and there has been no interaction with them. The use of these two extra pins by manufacturers appears to be
in the minority.
3. Sabotage cable!!! Avoid it! A few of these were found in my collection. I call the cable the sabotage cable
because it gives the appearance of some idiot decision, somewhere in the music industry, to sabotage creative
uses of the unused MIDI pins. The sabotage cable offers no capability advantage over the standard five wire
cable. The five wire cable will work in any situation where a Sabotage cable works. The sabotage cable,
however, will always cause a short between the MIDI signal and whatever is connected to the two extra pins.
It is easy to find out what kind of MIDI cable you have by using a volt-ohm meter to check continuity
between the two ends and between pins. If you don't have a volt-ohm meter then NOW is a good time to get
one. A volt-ohm meter is to an electronic musician what a flashlight is to a camper. It is also useful for
checking the battery voltage as described elsewhere in this manual. A simple inexpensive volt-ohm meter
will do fine for most things that you would be dealing with.
Panic!!!!!
Few situations have more panic potential than blowing and hearing no sound. There are several situations
where this can happen. The quickest and almost always effective fix is to do a two step process. 1. Turn off
the instrument and turn it on again. 2. Hit the PROGRAMMING BUTTON in the Center octave position with
not keys down. This will send a full value MIDI signal to MIDI volume and MIDI expression. If your sound
module or sound is set to respond to a dynamic controller such as aftertouch, other than MIDI volume, you
will also have to set the EVI to send that controller.
Things to consider when nothing plays...
1. Are you playing on the right MIDI channel?
2. Has the fixed velocity value been set to a very low value?
3. Has some dynamic MIDI signal such as MIDI volume or MIDI expression been sent with a
value of zero and is no longer being used.
No. 3 above can really throw you. Many sound modules now automatically respond to MIDI volume and
MIDI expression. Suppose that you are playing on MIDI channel 1 with MIDI expression; you then set the
EVI to MIDI channel 2. You then change the EVI to send MIDI volume and you play for a while. If you
change back to MIDI channel 1 and leave the EVI set to MIDI volume, you will get nothing because the last
time you played on channel 1, a low value of MIDI expression was sent as the breath was released. If you
decide you want to continue playing with MIDI volume on channel 1, you can set the EVI to MIDI volume
again. This will cause a MIDI expression level of 127 to be sent, making the sound module respond whenever
the breath sends MIDI volume.
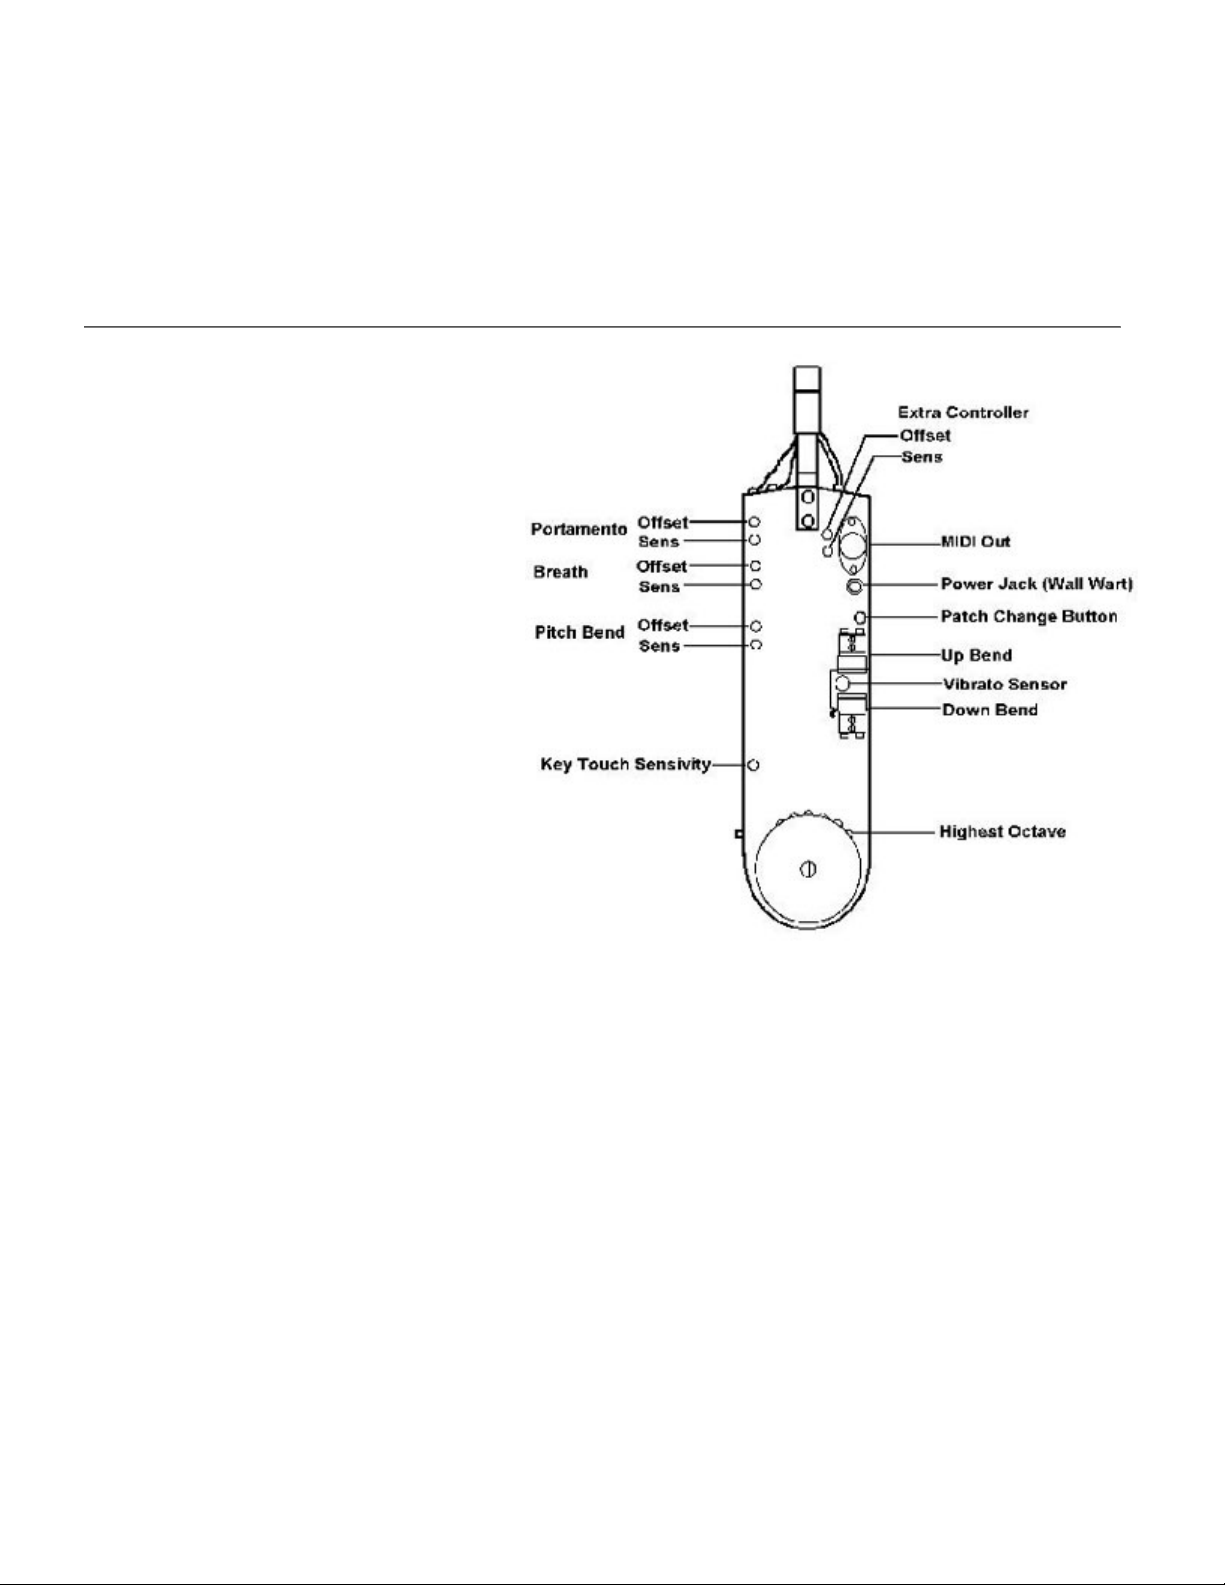
Adjustments
This diagram shows the bottom of the
instrument where all of the trimpot
adjustments are. The idea is to keep
adjustment making to an absolute minimum.
Most adjustments can be accomplished by
slightly altering the respective OFFSET
trimmer. The sensitivity trimmers should be
adjusted on rare occasions. The overall
sensitivity of the breath, for example should
be set. Changes in sensitivity can then be
accomplished by programming in the sound
module.
It is extremely important that any
adjustments be made with a sound module
patch that you are familiar with and that you
know how to recognize a full MIDI
controller value. If you use a patch that has
just a little aftertouch added in to adjust
breath, for example, you could keep turning
up the sensitivity and get nowhere. A MIDI monitor program on a computer is also a good way to make
adjustments.
As you can see, the parameter trimmers are in pairs and consist of a SENS (sensitivity) trimmer and an
OFFSET trimmer. Of each pair, the OFFSET trimmer is always closest to the mouthpiece end. It is good to
get this planted firmly in your mind so that you stay away from accidentally changing a Sensitivity trimmer.
If you have a good understanding of the concept of offset and sensitivity, then you should not have much
difficulty in making adjustments to any of the trimmers.
To adjust BREATH, turn the OFFSET trimmer clockwise until the LED is on always. Now turn it
counterclockwise just slightly beyond the point where the LED turns off. The proper adjustment is the point
just counterclockwise enough that the led does not come on when you don't want it to. If you blow real hard
and you can't get a full value of say, MIDI volume, then you can turn the SENS trimmer clockwise to
increase the sensitivity. A readjustment of the OFFSET may be necessary after changing the SENS.
To adjust PORTAMENTO, turn the OFFSET trimmer clockwise until the LED is on always. Now turn it
counterclockwise just slightly beyond the point where the LED turns off. The proper adjustment is the point
just counterclockwise enough that the led does not come on when you don't want it to. If you bite real hard
and you can't get a full value of MIDI portamento, then you can turn the SENS trimmer clockwise to increase
the sensitivity. A readjustment of the OFFSET may be necessary after changing the SENS.
The PITCHBEND OFFSET can be quickly adjusted by turning the OFFSET trimmer back and forth and
observing the two extremes in pitchbend. It should then be set to the point exactly in between, where the
pitch is right on. If you go to the +1 octave and hit the PROGRAMMING BUTTON while holding 1st trill,
you will get a pitchbend programming mode. You will get only full pitchbend down, center or full bend up.
The center tone is very easy to pass over and you may have trouble getting it to stay there all the time. This is
normal; the idea is to get it to stay there most of the time. To get it back into the normal pitchbend mode, go
to +1 octave again and hit the PROGRAMMING BUTTON while holding 1st valve.
The EXTRA CONTROLLER has no LED and the OFFSET should be set below the point where no extra
controller effect is noticed when not in use. The default of the EVI is with all EXTRA CONTROLLER
effects turned off. IT IS EXPERIMENTAL AT THIS TIME. The instrument comes with the mouthpiece
holder sensitized. The best way of using it that I prefer so far is to attach small plate about 1/4 by 3/4 inch so
that it is near the chin. It is activated by touching against the chin with a downward angle of the instrument.
The plate should be insulated with tape or thick lacquer. At present, it is up to the user to determine how to
attach a sensor to the mouthpiece bracket (extra controller) and use it.
The KEY TOUCH SENSITIVITY should not need adjustment. If a key doesn't work, you might try setting
the trimmer slightly counterclockwise. The safest position is all the way counterclockwise (least sensitive but
usually adequate). It should never be, in the most extreme case, more than half way clockwise.
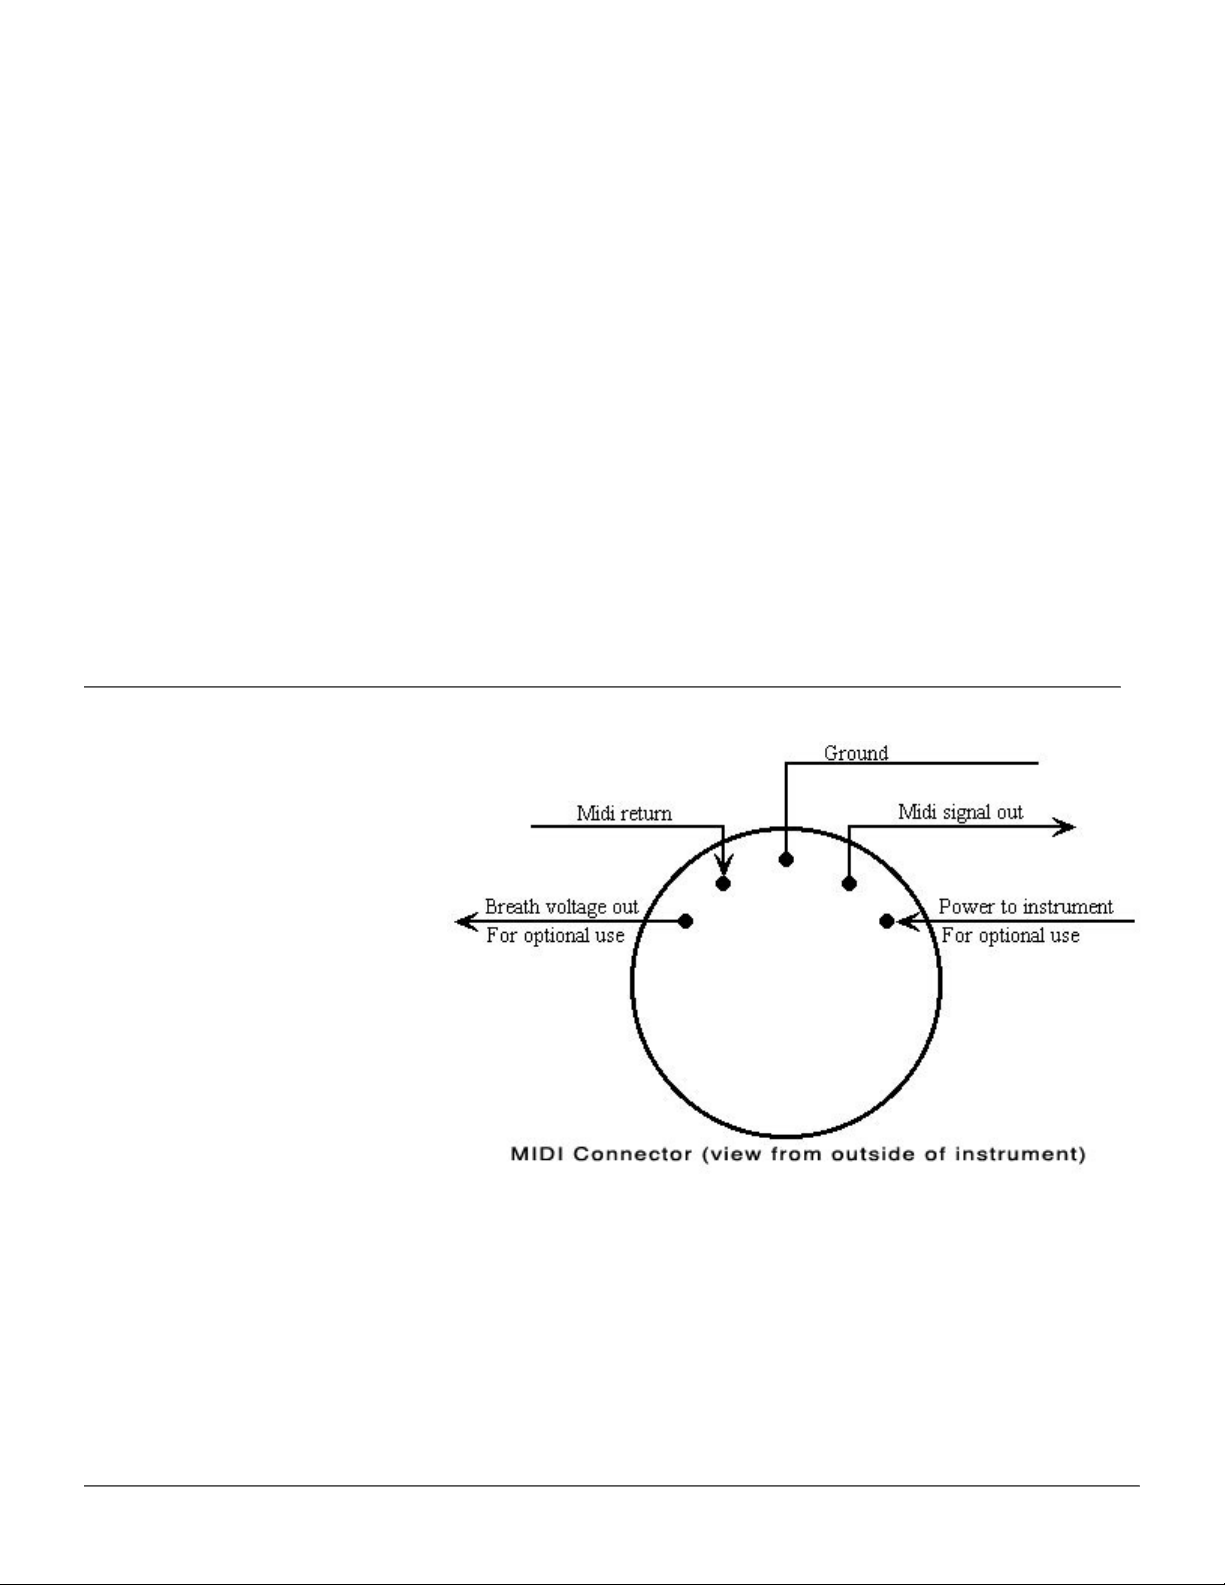
Extra Pins on The MIDI Connector
MIDI only needs two conductors
plus ground to function. So the MIDI
EVI makes use of the two unused
connections for additional uses.
The two unused pins in the MIDI
connector have optional uses
according to the drawing shown at
right.
The "unused" pins in the connector
are used to remotely (phantom)
power the MIDI EVI and also to
provide a true ANALOG CV
(control voltage) signal from the
breath sensor.
The power applied to the power input pin can be anywhere between +7.5 and +12 volts DC and must supply
at least 15ma.
On the Breath Out CV signal, the breath voltage outputted will range from approximately zero volts to +3.5
volts DC.
Experimenting with these connectors is not for the novice. Please contact a qualified technician for any
modifications.

What Synth Can I Use With the MIDI EVI?
Pretty much any MIDI synth should work- but with widely varying results. It is important to note that for best
results the receiving synth should be programmed to respond appropriately to the data the MIDI EVI sends.
Without properly programmed breath-sensitive patches it is highly possible that you will think the MIDI EVI
is not working. The MIDI EVI defaults to sending MIDI Volume data (CC#7) and a fixed Velocity. This will
allow you to control most synths. But this is not generally an optimum solution since MIDI Volume data
generally only controls volume. For best results, you want to control filter cutoff mostly and varying degrees
of volume. So sending MIDI Volume has its limits. It is better to use something like breath controller data
(CC#2) and program the receiving patch to respond to it by opening up a lowpass filter and perhaps
increasing the volume as well. See below for more information.
What Is the difference between using MIDI Volume data (CC#11) and MIDI Breath Controller data
(CC#2)?
MIDI Volume control (MIDI Continuous Controller #7) works in a very different manner to Breath
Controller (MIDI Continuous Controller #2) on most receiving synths. MIDI Volume control is generally
only used when using a sound module that is not able to be or is not set up to respond to breath data. Using
this controller usually will allow basic continuous volume control of any sound source but it also has several
disadvantages. One drawback is that it will often set all the layers in a multi-layered patch to the same
volume which eliminates any balance the layer may have had pre-programmed into it. Also MIDI Volume
sometimes controls the entire synth and all its multi-timbral parts on other MIDI channels including reverb
levels and other effects levels.
For best results, it is recommended to either set up your module to respond to breath data or obtain breath
control patches. If the patches are not set up right, then you will have very little control over the sound
source. Well programmed wind controller sounds will respond to your breath naturally just like an acoustic
instrument- i.e. the sound gets louder and brighter as you blow harder. When everything is set up right in your
patches, it will feel very natural to play the MIDI EVI. You will be able to blow softer, harder, crescendo, and
decrescendo, just like on an acoustic instrument. When using sounds designed to be controlled with a
keyboard, as found on most synthesizers, it will feel like you have no control over the sound. Patchman
Music offers numerous breath controlled patches for sound modules and softsynths. For details, visit:
https://www.patchmanmusic.com/WindControllerBanks.html
How to set up patches for Wind Control?
Very few synths, past or present, work well right out of the box being controlled by a wind controller. Pretty
much the only synths made to work with a wind controller as they come from the factory are the VL1, VL1-
m, VL70-m, the PLG-VL cards, WT11, WindJamm'r, and the AKAI EWV2000, EWI3000m, EWI3020m,
and EWI3030m modules. Most other synths require that you either program them to respond to the wind
controller, or load in patches that have been specially designed to respond to a wind controller. The patches
on most synths are usually pre-programmed to be controlled from a keyboard via MIDI velocity and
sometimes a few controllers such as aftertouch, mod wheel, and pitchbend. Velocity is very much a
keyboard/percussion notion. It's completely appropriate for controlling the loudness of patches where you
bonk something right at the beginning and the overall loudness is dependent on the strength of that bonk and
then control is taken over by the envelope generators in the patch. Wind controller players are generally not
too concerned with, or happy about, having the envelopes "hijack" control of this. Wind controller players
generally want to be in control of the envelope with their breath- essentially creating their own complex

envelope in real time as they vary their breath pressure on the wind controller. Programming a patch for this
is quite different and requires a whole different patch programming paradigm. The overall loudness of a wind
player's note is NOT determined by some bonk or other event right at the beginning; it's determined
continuously by your changing breath control through the whole duration of the note. You might start a note
very softly, crescendo, waver up and down, and cut off the note at full volume. The volume envelope of each
note that is played is usually always different- the player becomes the real-time, flexible envelope generator.
When programming for straightforward wind control, the basics are:
1. Ignore velocity values. They have to be there, to make valid Note-On messages.
2. Set the envelope generators that control the final amplifier(s) to the "square" or neutral shape.
Such envelope generators are usually wired in, but setting them to the neutral square shape
causes them to tell the amplifier to play at full volume all the time.
3. Set the amplifiers and filters to be controlled by Breath Control- or whatever MIDI controller
you set the MIDI EVI to send from its breath sensor. Sometimes this can be done directly and
completely. Other times, such modulation effectively acts as a valve between the envelope
generator and the amplifier, letting anywhere from all or none of the value from the envelope
generator get through to the amplifiers/filters. It is possible to keep using the Velocity value in
wind patches to control the strength of the initial "chiff" of tonguing (rather than the overall
loudness of a note). This makes sense since a tonguing chiff occurs only at the beginning of a
note.
Tips On Emulative Playing
A great way to improve your emulative playing is to play along with recordings of well known instrumental
artists. Try to copy their phrasing, tonguing, and pitch inflections as closely as possible. Remember that for
quality emulations you must make a conscious mental switch to THINK like a player who plays that
instrument.
For example, when you play a guitar sound, it is essential to keep in mind how a guitarist plays. That is, they
pluck almost every note. You wouldn't see a guitarist pluck, in our case tongue, ONLY the first note then play
a 4 bar bebop melody by wiggling JUST their left hand. A guitarist is constantly plucking notes with their
right hand while occasionally sliding into or out of notes. But the slide generally encompasses only 2 or 3
notes before the vibration of the string dies away. A long legato line (a single pluck with multiple notes after
it) just doesn't happen commonly on a guitar. So when playing guitar/plucked patches you need to adjust your
playing technique to tongue much more often.
For effective sax emulation, try to not tongue as much as you would on a trumpet. Slur more notes and your
sax emulations will sound a more authentic.
For most effective flute emulations, you might try using a diaphragm-based tremolo instead of a pitchbend-
type vibrato. Tremolo (amplitude/volume-based repetitive modulation) often sounds better with flute sounds.
To learn more about wind controllers, visit the Wind Controller FAQ here:
https://www.patchmanmusic.com/WindControllerFAQ.html
Practice, practice, practice!
Table of contents


