Ude GD-36 User manual

DIGITAL RECORDER AND PLAYER
OF MESSAGES AND BGM
GD-36
BACKGROUND
MUSIC
10 IN
REMOTE
CONTROLS
10 OUT
REMOTE
CONTROLS
MARKETING
SOLUTIONS
SCHEDULED
ANNOUNCEMENTS
IP
CONTROL
2 EN54
MESSAGES
REG
OPTIONS
MP3
PLAYER
230 VAC
POWER SUPPLY
GD-36
OK
MUSIC MESSAGE REC MIC
FAULT USB
GD-3 6
MENU
ON
INPUT TL
GND
INH
FAULT POWER
24 VDC
ON
FUS DC
F 1A
OFF
10 10
OUTPUT TL
0 dB OUTPUT
LR
SD CARD
9 98 87 76 65 54 43 32 21 1
GND
TM
24VDC
24VDC
MADE IN
SPA IN 230 VAC
50/60 Hz
FUS
T 0,5A
¡ATENCION! DESCONECTAR LA RED ANTES DE ABRIR¡CAUTION! DISCONNECT FROM POWER SUPPLY BEFORE OPENING
281
610.396C
rev.1
EQUIPOS Y SISTEMAS MEGAFONÍA / INTERCOM PUBLIC ADDRESS SYSTEMS
Tel.: +34 934 772 854 / +34 609 914 787

BASIC SETUP
Message list
Music list
Program list
Language selection
Adjustments
Contrast adjustment
Volume adjustment
SUMMARY
FRONT AND BACK VIEWS
DESCRIPTION1.-
2.-
3.-
4.-
4.1.-
4.2.-
4.3.-
4.4.-
4.5.-
5.-
6.-
6.1.-
6.2.-
6.3.-
6.4.-
6.4.1.-
6.4.2.-
6.4.3.-
6.4.4.-
6.4.5.-
6.4.6.-
7.-
6.4.1.1.-
5.1.-
5.2.-
5.3.-
5.4.-
5.5.-
5.5.1.-
5.5.2.-
TECHNICAL SPECIFICATIONS
BASIC OPERATIONS
Digital audio storage
Screen information
Keyboard
Operating indicator lights (LED)
Turn ON / OFF the unit
5
6
6
7
8
8
8
8
9
9
10
10
11
11
11
12
12
13
13
13
14
15
16
17
17
18
19
20
4
3
WEBSERVER
ADVANCED SETUP
Supervisor setup
Supervised messages
Inhibition input
System adjustments
Ethernet setup (remote access)
Recording messages
Clock and Date setup
Message setup (remote input activation)
Remote input messages setup
Calendar events setup
Local Network setup (IP mode)
PAGE
GD-36
282
610.396A
rev.1
8.-
7.1.-
7.2.-
7.3.-
7.4.-
7.5.-
7.6.-
7.7.-
7.8.-
30
21
23
24
25
27
28
29
29
FTPSERVER
System Status
System Network
System Time/Date
Calendar Events
Remote Events
Change password
Restore to default
Supervisor Menu

GD-36
The GD-36 is suitable for commercial and for security sound uses in rooms with large crowds, which
requires the diffusion of automatic reminders (ads), emergency, evacuation, and so on, due to the
basic features detailed below: The GD-36 digital recorder can digitally record and play an unlimited
number of ads, the limitation is the size of external memory available. GD-36 can record and
playback messages to or from the SD Card (SDHC type), available on the rear panel, but also allows
to play background music (BGM) from SD card or from a USB flash memory, connected on the front
USB socket.
The messages can be scheduled by an internal calendar by creating a series of events, called
"Programs" which records the characteristics associated with the related message, such as: Start
Time, End Time, Cadence, Loop, Activation remote outputs, etc ... and once achieved all the criteria,
GD-36 activates the message automatically. Also, turn allows manual issuance of any message
sender in the system memory.
Additions, GD-36 allows the remote activation of messages through remote control inputs, which
you can associate a particular digital voice file, a priority factor, the activation type (open or closed
contact) and if should respond to momentary or continuous pulse (switch).
To comply with current security regulations, GD-36 allows monitoring of up to two pre-recorded
messages, which are checked periodically to ensure its content, and degradation if any of them, let
us know in a maximum of 100 seconds by activation of an LED light in the front panel, and by opening
the FAULT contact located on the rear panel.
The device is ready to be powered from AC line (230Vac) and from DC line (24Vdc, Battery Backup),
so that it can keep operating even during AC power drops; also has a clock / calendar with
independent power supply, which ensures that any scheduled event can be activated at the preset
time.
If required by the client, GD-36 enables remote monitoring of equipment status using the
ETHERNET LAN connector, as well as allows the activation of pre-recorded messages or warnings,
the scheduling of calendar events and the remote audio files update. To use this function some
equipment and extra wiring is required, as well as the correct configuration of equipment related to
the computer network will be connected to which GD-36 (see section Remote Management for
details).
1.- DESCRIPTION
283
610.396A
rev.1

GD-36
OK
MUSIC MESSAGE REC MIC
FAULT USB
GD-3 6
MENU
ON
INPUT TL
GND
INH
FAULT POWER
24 VDC
ON
FUS DC
F 1A
OFF
10 10
OUTPUT TL
0 dB OUTPUT
LR
SD CARD
9 98 87 76 65 54 43 32 21 1
GND
TM
24VDC
24VDC
MADE IN
SPA IN 230 VAC
50/60 Hz
FUS
T 0,5A
¡ATENCION! DESCONECTAR LA RED ANTES DE ABRIR¡CAUTION! DISCONNECT FROM POWER SUPPLY BEFORE OPENING
1. STANDBY / ON indicator lamp.
15. RJ-45 socket.
16. SD CARD socket.
17. Balanced mono audio output (XLR).
18. Stereo audio output (RCA).
19. Output remote controls.
20. Input remote controls.
21. Fire alarm interface.
22. 24 Vdc secondary power supply system.
24. 230 Vac main power supply.
23. DC Fuse (1A).
25. AC Fuse (0,5A).
26. ON / OFF switcher.
2. FAULT indicator lamp.
3. MUSIC indicator lamp.
4. MESSAGE indicator lamp.
5. REC indicator lamp.
6. Microphone.
7. Headphones plug.
8. USB receptacle.
9. LCD screen.
10. NAVIGATOR.
11. MENU button.
12. BACK button.
13. PLAY / PAUSE button.
14. STOP button.
21
15
3
16
4 5
17
6
18
7 8
19 20 21 22 23 24 25 26
9 10 12 14
1311
2.- FRONT AND BACK VIEWS
284
610.396A
rev.1

1
Output level 0dBu (0,8Vrms/600 Ω)
Output type XLR (Balanced: MONO), RCA (L,R: STEREO)
2
Message recording Electret microphone built-in, AGC active, Gain max: x16
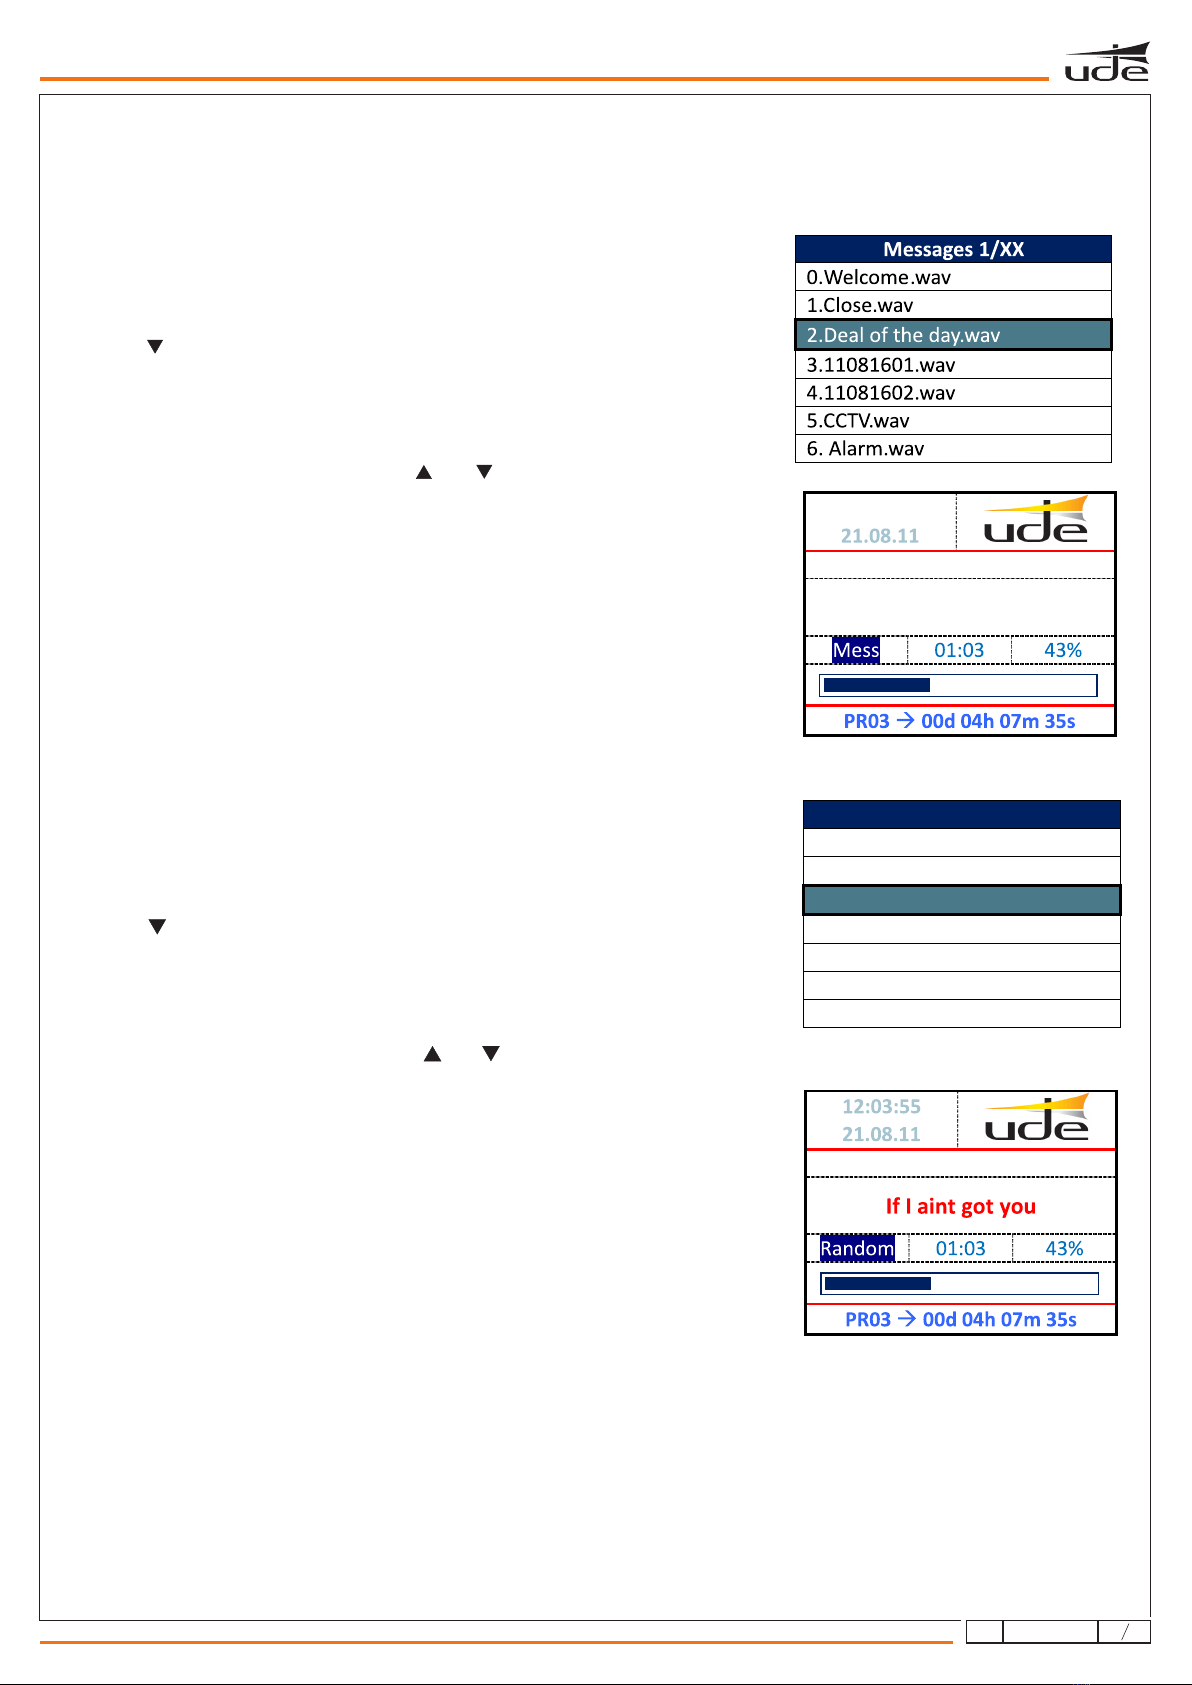
Message list 100
Program event list (Calendar) 100
Music track list 150
Real time clock and calendar battery Lithium 3V cell 3V CR2025 (No rechargeable type)
Supported file type • Voice: WAV (PCM/ADPCM/OGG)
• Music: MP3.
Audio format (recording) Codec: Vorbis Ogg, Hi-Fi Voice Profile, Sampling Frequency: 44.1KHz, MONO, 16 bits,
typical bitrate: 36kbps
Formato Audio (Reproductor) Mp3 Files:
MPEG 1.0 Sample rate (Hz): 48.000, 44.100, 32.000 Bitrate (kbit/s):
32, 40, 48, 56, 64, 80, 96, 112, 128, 160, 192, 224, 256, 320.
MPEG 2.0 Sample rate (Hz): 24.000, 22.050, 16.000 Bitrate (kbit/s):
32, 40, 48, 56, 64, 80, 96, 112, 128, 160, 192, 224, 256, 320.
MPEG 2.5 Sample rate (Hz): 12.000, 11.025, 8.000 Bitrate (kbit/s):
32, 40, 48, 56, 64, 80, 96, 112, 128, 160, 192, 224, 256, 320.
RIFF WAV Files (1 o 2 canales)
Formato 0x01: PCM, 8 o 16 bits, Sample rate <= 48.000Hz.
Formato 0x11: IMA ADPCM, 8 bits, Sample rate <= 48.000Hz
Orbis OGG Files (1 o 2 canales) Block size: between 64 and 4096 bytes.
Quality: 8 y 16 bits.
Sample rate <= 48.000Hz.
Bit rate <= 500 kbit/s
Max recording time: SDCARD size limit (typically: 66 hours / 1GB card)
Message activation Momentary (pushbutton) o Continuous (Switch)
3
Activation mode Contact: N.O. (Normally open) o N.C. (Normally closed)
Priority hierarchy Geographical (IN1 > IN2 >…> IN10) or Numeric Priority (independentby any input).
Screen type LCD black-type LED backlight (4096 colors, 132 x 132 dots)
4
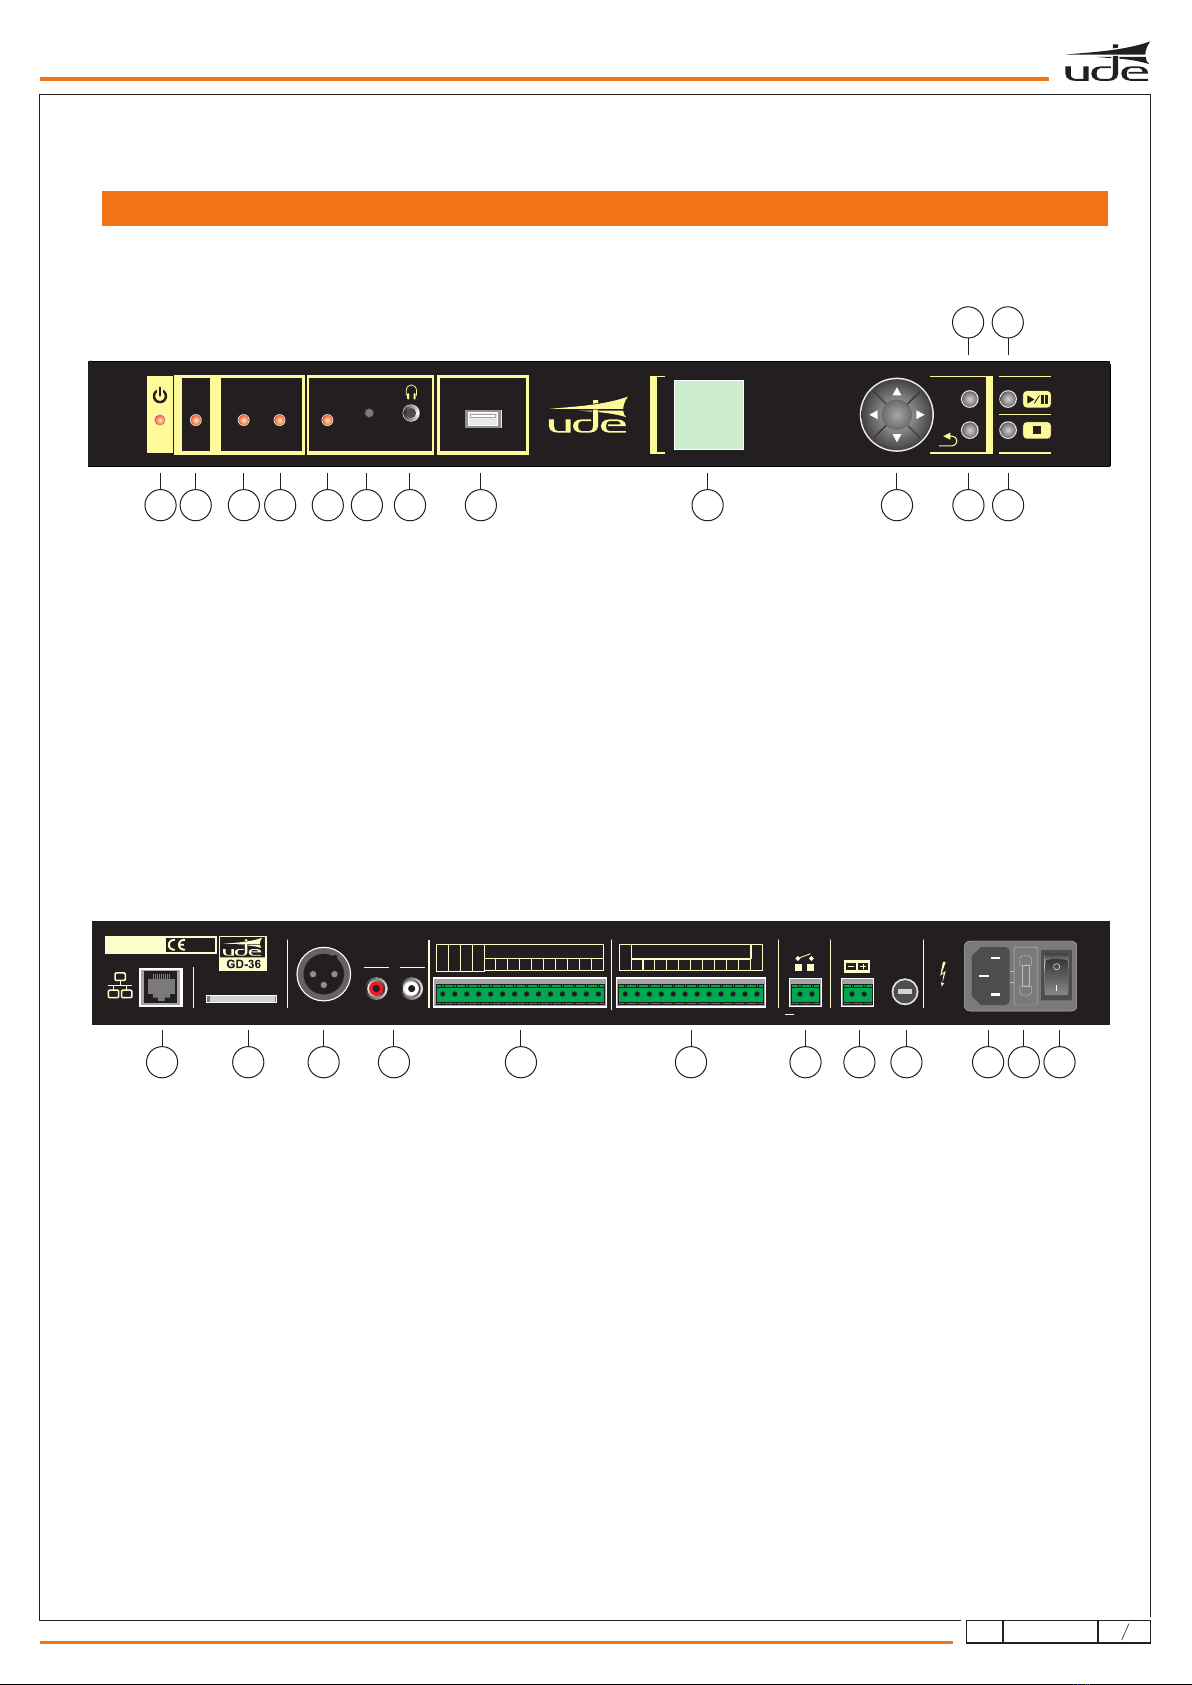
Auxiliary utputo Up to 11 N.O. outputs (TL1 a TL10, TM)
Monitor audio output Headphones: dim: 3,5 mm, 32 Ω, Front panel
Keyboard built-in Navigation on menus: 5 keys (cursors + OK).
Direct access: 4 functions (MENU, PLAY/PAUSE, STOP, BACK)
Media connectors • SDCARD (Messages & BGM): Rear panel.
• USB 2.0 A-Type (BGM): Front panell.
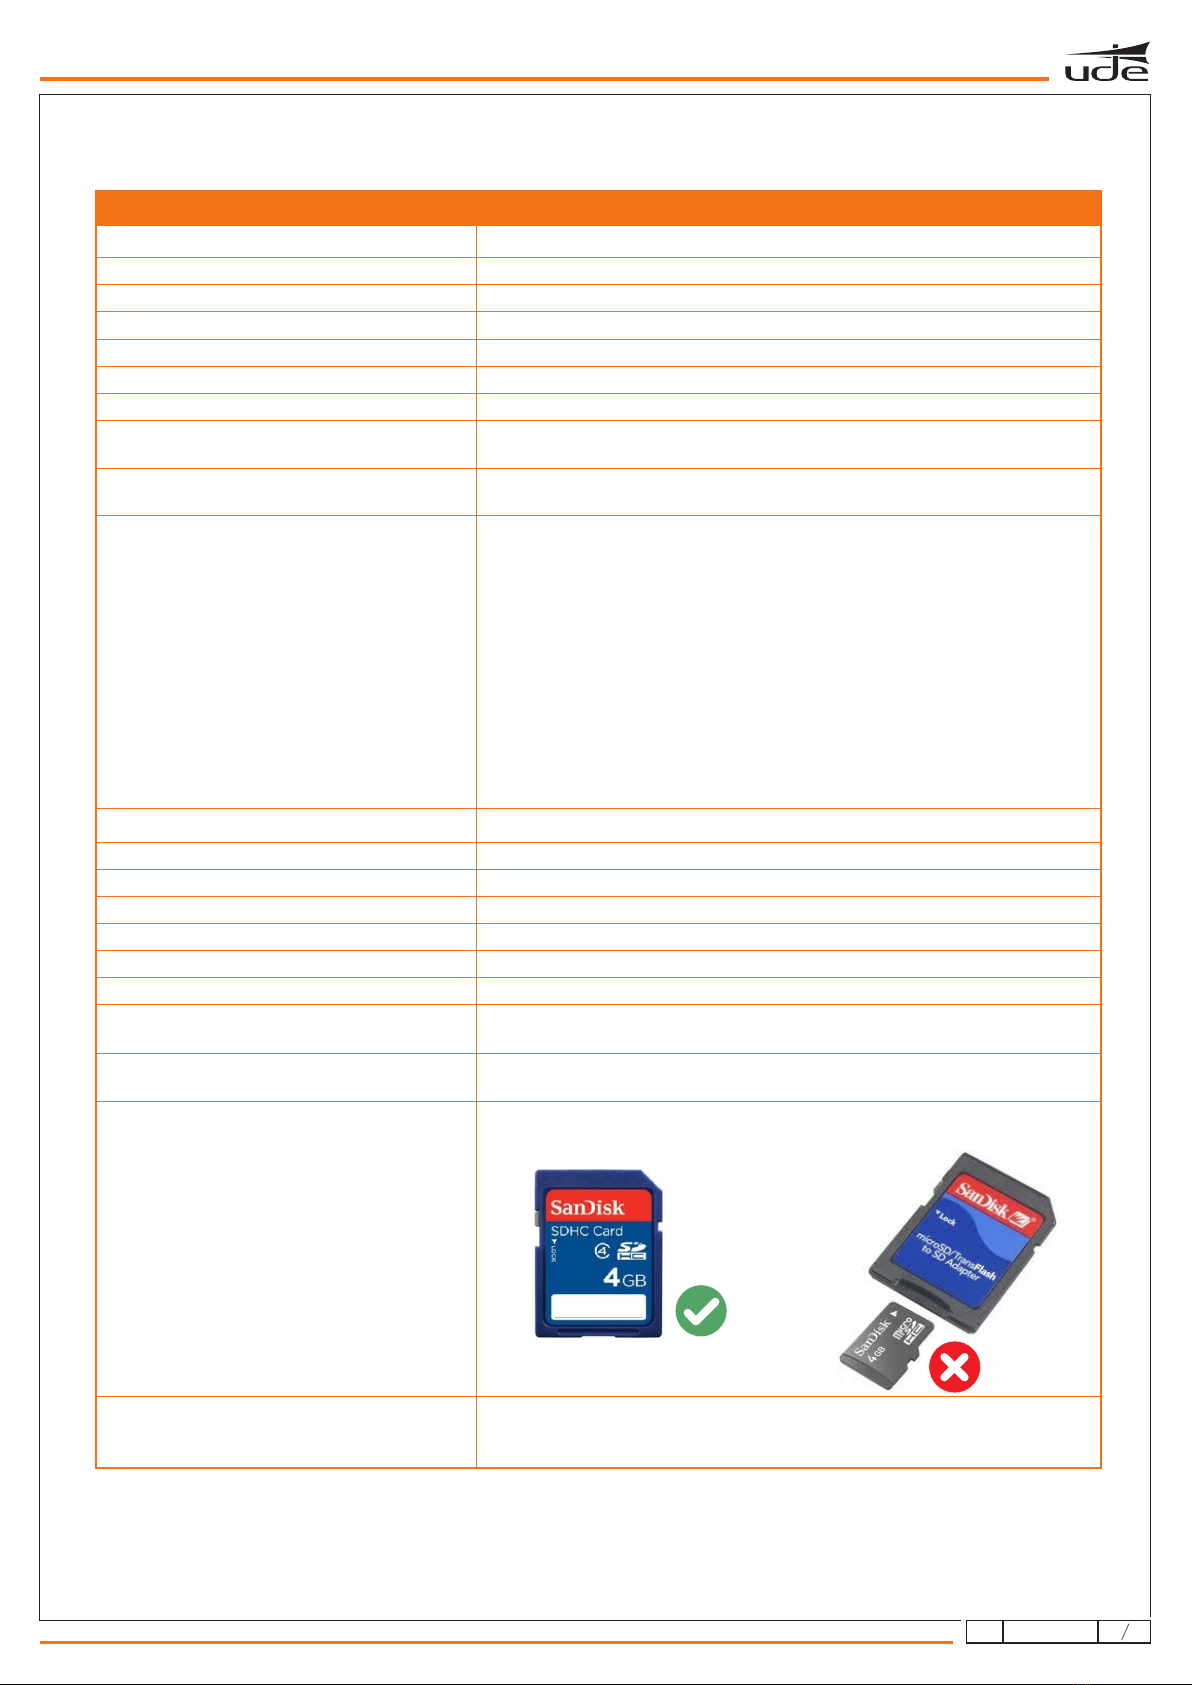
Media support • SDHC Card (High Capacity): 4GB o upper, FAT32 formatted.
GD-36 not compatible with microSDHC type cards, or even using a size adaptor.
• USB Flash Memory: 2.0 type, FAT32 formatted.
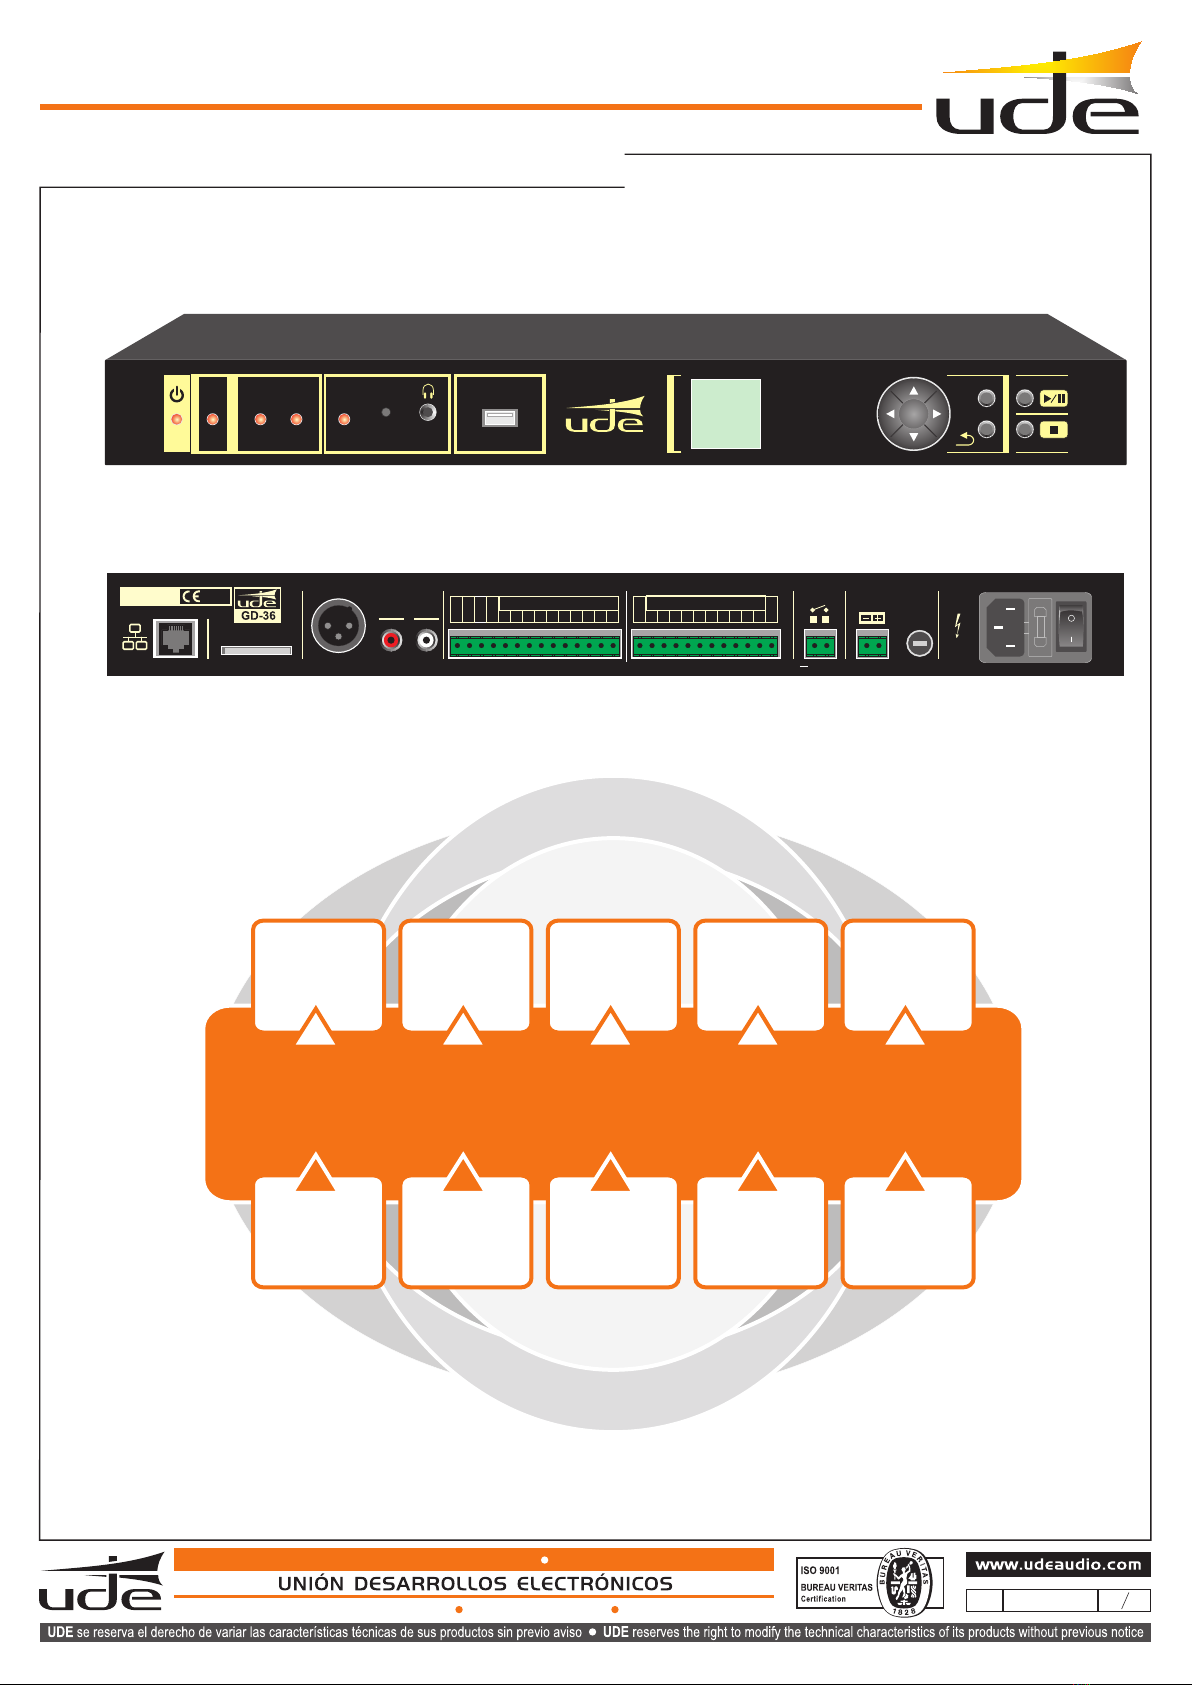
GD-36
3.- TECHNICAL SPECIFICATIONS
5
RemoteLAN Connection Ethernet type, RJ-45 connector (8 pins)
• 10/100 Mbps (compatible)
• IP Auto (DHCP) or Manual
1
Selectable from Menu.
2
Managed from Menu.
3
Selectable from Menu, but this option is common for all external input (IN1 a IN10).
4
Assignable to any message or external input from Menu.
5
Selectable from Menu.
285
610.396A
rev.1

Remote operations Through Webserve installed on the device, following operations are allowed:
• Full Status monitoring.
• Play or Stop audio messages, music tracks and programs remotely.
• Scheduling Calendar events.
• Programming remote events.
• Remote Setup (Date and Time, Volume, IP Mode, ON/OFF,…)
Through FTPServer installed on the device is available the remote update of audio (MP3 &
WAV) and settings (SETTINGS.BIN) files.
r
Security Up to 2 level of 4-digits Security Password.
• Maintenance (Level 1).
• Supervisor (Level 2).
Failure indicator (FAULT) By LED: FAULT RED led becomes ON on Front panel in Failure Condition.
By Contact: FAULT Open Contact on Rear panel in Failure Condition.
Supervised messages 2 (maximum failure or degradation detection time 100 seconds)
Power supply system Mainl 230Vac (50/60Hz),1A fused.
Secondary (tampon method): 24Vdc, 1A fused.
Auxiliary supply output 24Vdc / 100mA maximum (0.3A fused).
Operation temperature -5 a +45ºC (+5 a +35ºC, recommended)
Storage temperature -15 a +60ºC
Humidity 5% a 95%, without condensation.
Dimensions 428 x 57 x 330 mm (1 U)
Weigth 4,25 Kg
Color Black.
4. BASIC OPERATIONS
GD-36 basically acts as a music player (BGM), but lets stop the broadcasting of music to issue a warning, pre-recorded message
or sound activated either manually from the local keyboard, or automatically from a remote control input or as programmed entry
using a calendar event. Additionally, and only as advanced method, can be performed remote message activation, requiring only
the connection to a local area network or LAN (Ethernet).
4.1. Digital Audio Storage.
The audio content (music or messages / alerts / sounds) that the device plays is located by default in a SDCARD HC type (high
capacity) on the rear panel. This card must be formatted with FAT32 file system and must include the following directory structure:
• MUSIC. It included music tracks or songs in MP3 format (ID3 info will be appreciated).
• SOUND. This folder should include the sounds, alarms, etc. …, in WAV format.
• VOICE. Included in this folder, voice messages in WAV format.
• SETTINGS. It's a system folder that should be no modified by the user, due to
include the settings.bin file, base of all programming and configuration of GD-36.
To facilitate user to change the background music which content is most sensitive to changes,
has enabled a USB 2.0 port on the front of GD-36. Just insert a USB flash memory, formatted
under the FAT32 file system, and copy the music in a folder called MUSIC hanging from the tree
root directory of the related drive. It is required to turning off the GD-36 before inserting the
USB memory; once turn on again, the USB memory contents will be examined and if they are
music files, these will be selected to be played when the user wishes.
NOTAS:
It is highly recommended not to connect or disconnect the USB sticks with the GD36 device in operation, to prevent failure and
damage it.
GD-36 required for a proper operation that the audio directories containt at least a correct file, ie a “.mp3” track on the “MUSIC”
folder, a “.wav” file on the “VOICE” folder and a “.wav” file on the “SOUND” folder.
It's recommended to format the SD Cards with the SDFormatter V3 or upper tool, freely available on
https://www.sdcard.org/downloads/formatter_4/index.html, instead of included in most common OS in order to assure the compatibility with all
market cards.
GD-36
The FTPServer installed on Gd36 requires of an standard ftp client working prompt the prompt system. This kind of client is included on
the more usual OS (Windows includes ftp.exe).
6
7
286
610.396A
rev.1
6
7

1.Clock/Calendar.
Always shows the current time and date. Remember that you must set it before you start using any timer function if it malfunctions
can occur, and revise it periodically.
2. Logo. Advertising logo of Unión de Desarrollos Electrónicos, S.A.
3. Status Line.
This line displays information related to the operation of the device at all times, as may be: STTOPING…, PAUSE, PLAYING
MUSIC, PLAYING MESSAGE, PLAYING CALENDAR, SUPERVISED, etc.
4. Track or Message title or filename.
In this area will be displayed the title of the song (get from the ID3 tag included in the majority of the MP3 files, if this information is
included in the file), or the filename MP3 or WAV. If the filename or title is longer than the screen, the information will be displayed in
roll mode.
5. Playing mode.
The playing mode is always set as REPEAT, but can be set as: NORMAL or RANDOM. The first is a sequential playback of the
songs found in the "MUSIC" folder on the SDCARD or USB drive, while the second one will play the songs in random order, in order
not to repeat songs and make the most entertaining and diverse listen to the customer.
To switch from one mode or another, simply press the " " while is playing a music file. Additionally, if you press the " “, GD-36 will
change to the next song. The other navigator keys have no function assigned on the media player.
But, additionally in this area can be show other information as "Mess" (Message activate from MENU), "ExtM" (Message activated
externally) or "CalM" (Message activated from Calendar).
6. Playing time.
In this area will be displayed the playing time of the current track or message, in the reduced time format (mm:ss).
7. Percentage progress.
In this area will be displayed numerically the percentage (%) of the current track or message played.
8. Graphic progress bar.
In this area will be displayed graphically the percentage of the current tack or message played.
9. Time to next Calendar Event.
In case of scheduled events planned with an activation of less than 1 year from the current date, they will be added to a list and
displayed in this area will be given the time remaining until the next scheduled event and its associated program number .
4.2. Screen information.
The basic screen we find in the GD-36 is detailed below.
1.- Clock / Calendar.
2.- Logo.
3.- Status line.
4.- Track or Message title.
5.- Playing Mode.
6.- Playing Time.
7.- Percentage progress.
8.- Graphic progress bar.
9.- Time to next Calendar event.
12:03:55
GD-36
12
6
7
9
3
4
5
8
PLAYING MUSIQUE
287
610.396A
rev.1

4.4. Operating indicator lights (LED).
The unit has in the front panel just a few lights that give us the following information:
1. STANDBY/ON.
It indicates if unit is operating (GREEN) or off (RED).
2. FAULT.
When lit (RED) indicates general failure condition of the unit or degradation of the audio files supervised (Security
installations). This indication is related to the FAULT open contact condition on the rear side.
3. MUSIC ON.
When lit (RED) indicates active music playback mode.
4. MESSAGE ON.
When lit (RED) indicates active message/calendar playback mode.
5. REC ON.
When lit (RED) indicates the recording mode is active and the user can record a new message.
4.5. Turn ON/OFF the unit.
The equipment has been designed to support the continued operation, but in certain situations may require disconnection. This
should be kept the "OK" button down for few seconds and then released it; just at this moment the unit will shut down to low power
mode. At that time the STANDBY LED (RED) lights indicating that the unit has gone to standby mode.
To turn on the unit again just hold down the "OK" several seconds and then release it. At that point the STANDBY LED turns off
and the ON LED lights ON (GREEN) and the display shows the starting process information. After few initialization seconds, the
unit is fully operative.
NOTE: The display automatically goes into shutdown mode after several minutes of inactivity (no user operation), but the unit is in
a fully operational state. In this condition the ON LED remains lit. Pressing any key on the front panel, or if is detected any external
or scheduled event, the display is automatically turn on to show the new device state.
5. BASIC SETUP.
To enter in the setup mode is necessary that player was paused or stopped, then press
MENU to enter in the MAIN MENU.
Within the MAIN MENU there are functions that can be executed by any user, but there
are other that request a Password to access to advance features. These latter are
accessed after selecting the "Service Menu".
Use the cursor keys to select the desired option and confirm with OK, or at any time
using the BACK key can return to the main screen.
Use the cursor kys to select the desired option and OK to confirm, but using the BACK
key to come back to the main screen.
4.3. Keyboard.
To manage the behavior of the device, it features a navigator keypad comprising 4 arrow keys (up, down, left and right) plus a
validation key (OK), and additionally to use the basic functions, have been provided to the GD -36 of 4 shortcut keys (MENU,
BACK, PLAY / PAUSE, STOP), all in the front panel.
IMPORTANT:
The PLAY/PAUSE shortcut key affects only the music playback function, while the STOP button affects to all playback functions.
In the case of supervised messages, pressing the STOP button during the playing time, the system will require cancellation
confirmation before stopping it, by the introduction of the supervisor password (Level 2). After entering it, the supervised message
will be canceled immediately, without waiting to reach the end.
For more details please go to 6.2. Supervised Messages.
GD-36
MAIN MENU
Message List >
Music List >
Program List >
Language >
Adjustments >
Service menu >
288
610.396A
rev.1

1. Press "MENU" to enter in the "MAIN MENU".
2. Press " " to select the "Message List" option.
3. Press "OK" to open the message selection screens.
4. The 1/XX screen appears (where XX is total number of available pages).
5. Select the desired message using the " " o " " keys. Pressing these keys in the
most extreme positions forward or back one page.
6. Press "OK" to play the message selected on the screen or press "BACK" to come
back at "MAIN MENU".
7. The display switches to playback mode and the MESSAGE ON LED becomes ON.
8. The message will be played repeatedly until you press "STOP". In that case, the
message will continue until the end of it, being at that time off, returning to the previous
state of the music player.
5.1. Message list.
At any time the user can select one of the existing messages in the SDCARD and activate it. These include the TM output is closed
for the duration of any message, to indicate message priority issue and manage external public address (PA) system.
Follow these steps to understand how to select a message from the list.
5.2. Music List.
In the BGM or Music Player mode, the next track can be selected from a music track list
following the next steps.
1. Press "MENU" to enter in the "MAIN MENU".
2. Press " " to select the "Music List" option.
3. Press "OK" to open the music track selection screens.
4. The 1/XX screen appears (where XX is total number of available pages).
5. Select the desired music track using the " " o " " keys. Pressing these keys in the
most extreme positions forward or back one page.
6. Press "OK" to play the music track selected on the screen, or press "BACK" to come
back at "MAIN MENU".
7. The display switches to playback mode and the MUSIC ON LED becomes ON.
8. The song plays up to its end, at which selects the next track if the player is working on
NORMAL mode, or is selected on aletoria form if the player is working in RANDOM
mode.
9. At any time the player can be stopped by pressing STOP or PAUSE.
NOTE:
Both the list of songs and while playing them on the screen will be use the name included on the ID3 Tag Song Title, if available,
otherwise it will select the disk filename. If the filename or title is longer than the screen, the information will be displayed in roll
mode. For more details about playing modes or keyboard, see paragraph 2.2.5 Playing Mode.
GD-36
Songs 1/XX
0.Yeah
1.Burn
2.If I aint got you
3.This love
4.The Way You M ov
5.My bre~1.mp3
6.Last song Home.mp3
12:03:55
PLAY MESSAGE
Deal of the day.wav
PLAYING MUSIC
289
610.396A
rev.1

5.3. Program List.
At any time the user can select one of the 100 programs in the SDCARD and activate it. This feature allows you to verify any
program created independently of the condition of predetermined schedule, but also lets you run programs that have not been
linked to calendar events, and can provide voice output with preset remote control outputs. Also include external contact TM, will
also be closed auxiliary contacts for remote (TL1 to TL10) if you previously had been included in the program (see section 6.4.6.
Calendar Events Setup).
This feature allows you to verify any program created independently of the condition of predetermined schedule, but also lets you
run programs that have not been linked to calendar events, and can provide voice output with preset remote control outputs.
Finally comment that the programs do not support repetition, after finishing the program automatically goes to the music player
mode.
Follow these steps to understand how to select a program from the list.
5.4. Language selection.
The user can select the language of the text that appears on the screen from the "MAIN MENU" following the next sequence.
22:00:00
1. Press "MENU" to enter in the "MAIN MENU".
2. Press " " to select the "Program List" option.
3. Press "OK" to open the Program selection screens.
4. The 1/XX screen appears (where XX is total number of available pages).
5. Select the desired message using the " " o " " keys. Pressing these keys in
the most extreme positions forward or back one page.
6. Press "OK" to execute the program selected on the screen or press "BACK" to
come back at "MAIN MENU".
7. The display switches to playback mode and the MESSAGE ON LED becomes
ON. The message will be played only one time, returning to the previous state of the
music player once finished it.
8. The program can not be cancel once has been activated.
1. Press "MENU" to enter in the "MAIN MENU".
2. Press " " to select the "Language" option.
3. Press "OK" to open the Language selection screens.
4. Select the desired language using the " " o " " keys.
5. Press "OK" to select the language marked on the screen. Notice how the text
labels have changed to display on the selected language.
6. Press "BACK" key to come back at "MAIN MENU".
GD-36
Programs 1/XX
Program 0
Program 1
Program 2
Program 3
Program 4
Program 5
Program 6
Idioma
English
Francais
Espanol V
Calendar
Closing store.wav
2810
610.396A
rev.1

5.5.1. Contrast Adjustment.
The user must select the contrast of the LCD screen to improve readability of the
characters depending on the ambient lighting on the work environment. To adjust
the contrast should follow the following sequence.
1. Press "MENU" to enter in the "MAIN MENU".
2. Press " " to select the "Adjustments" option.
3. Press "OK" to open the Adjustments selection screens.
4. Press " " to select the "Contrast" option.
5. Press "OK" to open the Contrast adjustment screen.
6. Select the desired contrast level using the " " o " " keys, in order to see as
clearly as possible and with vivid colors, both the text and the bar graph.
7. Press "OK" to fix the selected contrast, or press, "BACK" to cancel the
adjustment and come back at "MAIN MENU" holding the original contrast setting.
1. Press "MENU" to enter in the "MAIN MENU".
2. Press " " to select the "Adjustments" option.
3. Press "OK" to open the Adjustments selection screens.
4. Press " " to select the "Volume" option.
5. Press "OK" to open the Volume adjustment screen.
6. “ “ or “ “
7. Press "OK" to fix the selected volume, or press, "BACK" to cancel the
adjustment and come back at "MAIN MENU" holding the original volume setting.
Select the desired level using .
5.5.2. Volume Adjustment.
The user must select the volume level according to the existing installation using the following sequence.
5.5. Adjustments.
The user can select some basic adjustments, as Sound (Volume) or Screen (Contrast).
GD-36
Adjustments
Contrast
Volume
Adjustments
Contrast
Volume
Screen settings
Audio settings
2811
610.396A
rev.1

6.1. Supervisor Setup.
Within the "Service Menu" select "Supervisor" and enter the Access Code Level 2,
designed to enable advanced security features.
NOTA:
The default Supervisor Access is "1111". This password can be changed executing the
tool "New Password" on the Supervisor menu. Note that this password will be restored
to the default whenever you run the utility restore "Factory Reset" in the Supervisor
menu.
4. To change to other digits, please use the " " o " " keys. To validate the
password press "OK".
5. If the password is correct, then the "Service Menu" appears.
6. If the screen shows the "Wrong password", please enter the password again.
NOTES:
• The default password is "1234". This password can be changed from the utility
"New password", following the same steps used with "ENTER PASSWORD".
• Note that this key will be restored to the default whenever you run the utility restore
"Factory defaults".
6. ADVANCED SETUP.
To access the advance settings you must enter a Level 1 access PASSWORD from the "MAIN MENU".
1. Press " " to select the input data line.
2. Press "OK" to activate the input password mode.
3. The "[0]***" will appear on the screen, indicating that the first digit can be selected
with the " " o " " keys.
GD-36
How restore the Factory Values (or default):
1. Press " " to select the option line.
2. Press "OK" to activate the input mode.
3. The "[No]" will appear on the screen, indicating that this option can be changed.
4. Select "[Yes]", using the " " o " " keys, and press "OK" to execute the
restoring to factory default.
5. After pressing OK, the device reset itself automatically to get new data.
Service menu
Enter Password
****
Wrong password
Service menu
New password
Adjustments >
Supervisor >
Factory Reset >
Menu de servicio
Nueva Clave
****
Factory Reset
All settings will
be lost.
Are you sure?
No
Supervisor
New Password >
Messages >
Inhibition input
Disabled
Factory Reset >
2812
610.396A
rev.1

6.3. Inhibition input.
The selection of the Supervised Messages will be deleted if you run the utility "Factory Reset" on the Supervisor Menu only,
but will not be altered or disabled, if you run the same utility "Factory Reset" from the Service Menu.
To enable the "INHibition" function follows the next steps.
1. Press " " to select the Inhibition input selection box.
2. Press "OK" to activate the edit mode.
3. It will appear "[Disabled]" indicating you can change this option.
4. Select "[Enabled]", using the " " o " " keys, and press "OK" to fix the new value.
NOTE:
The activation mode of the Inhibition input can be by open contact or by closed contact.
This selecton is common to the selected for the rest of the external inputs (IN1 to IN10).
For more details see paragraph "6.4.4 Messages Setup".
6.2. Supervised Messages.
It is possible to select up to 2 messages to be constantly monitored to detect degradation and alert the security system by
activating the FAULT signal, opening the FAULT contact in the rear panel. The monitoring function works continuously in the
background after activation.
For activation select "Messages" and click "OK" in the Supervisor menu. Then the following screen message selection
appears. Follow the next steps to select some Supervisor message.
1. Press " " or " " to select the desired supervised message, 1 or 2.
2. Press "OK" to activate the audio filename selection list.
3. Press " " or " " to select the audio message from the list.
4. Press "OK" to fix the audio message.
5. The system will take time to analyze the contents of the selected file and enable file
supervision, during which time the MESSAGE LED on the front panel keep blinking and
the keyboard is not operational. Please wait until the LED turns off and the system
resumes normal operation mode.
6. Press "BACK" to come back to the Supervisor menu.
NOTES:
• The selection of monitored messages will be deleted if you run the utility "Factory Settings" Supervisor Menu only within, but not
be altered or disabled, if you run the same utility "Factory Settings" from the Service Menu.
6.4. System Adjustments.
To set some system parameters, select "Adjustments" option on the Service Menu and
press "OK".
Then, the System Adjustments screen will appear.
GD-36
Messages
Supervised 1
1.[evacuation.wav]
Supervised 2
Disabled
Adjustments
Ethernet >
Rec >
Time and Date >
Remote Events >
Calendar Events >
• To stop the playback of a supervised message must be press the "STOP" button on
the front panel and then enter the "Supervisor Password" (Password Level 2) using
the navigation keyboard (" " or " " to change value, " " or " “ to change the digit,
and "OK" to validate). Just in case the password was accepted the playback of the
supervised message will be canceled. In case the password was not accepted, type
the password again and repeat the process. If you don't know the right password, click
on "BACK" to abort the cancelation and return to the normal screen mode.
22:00:00
Enter Password
2813
610.396A
rev.1

2. RJ-45 cross-type or "Crossover Cable". It's used to connect the GD-36 directly to any computer with a free Ethernet
RJ-45 socket, from the GD-36 ( ) connector. This wire can be shielded.
4.4.1. Ethernet Setup (Remote Access).
The GD-36 can be connected to the local network (LAN) using two kinds of cables, depending of the device which you link it,
viz.
1. RJ-45 or "Patch Cable". It's used when the GD-36 is connected to a router/switch/hub or to a DSL modem/router, already
installed and that are working as Gateways.
This cable will be inserted on the connector ( ), available on the rear panel of GD-36. The other cable side, to any free
Ethernet port socket on the router.
OK
MUSIC MESSAGE REC MIC
FAULT USB
GD - 36
MENU
ON
OK
MUSIC MESSAGE REC MIC
FAULT USB
GD - 36
MENU
ON
12345678
CONECTOR
RJ45
1
2
3
4
5
6
7
8
1
2
3
4
5
6
7
8
12345678
CONECTOR
RJ45
BLUE
BLUE-WHITE
BLUE
BLUE-WHITE
BROWN
BROWN-WHITE
BROWN
BROWN-WHITE
GREEN-WHITE
GREEN
GREEN
GREEN-WHITE
ORANGE
ORANGE-WHITE
ORANGE-WHITE
ORANGE
Cable RJ-45 (Patch cable)
12345678
CONECTOR
RJ45
1
2
3
4
5
6
7
8
1
2
3
4
5
6
7
8
12345678
CONECTOR
RJ45
BLUE
BLUE-WHITE
BLUE
BLUE-WHITE BROWN
BROWN-WHITE
BROWN
BROWN-WHITE
GREEN
GREEN-WHITE
GREEN
GREEN-WHITE
ORANGE
ORANGE-WHITE
ORANGE-WHITE
ORANGE
Cable RJ-45 cruzado (Crossover cable)
Cable RJ-45
Cable RJ-45 cruzado
GD-36
2814
610.396A
rev.1

6.4.1.1. Local Network Setup (IP Mode).
When the GD-36 is connected to a router (Gateway), the default Local Network (IP) must be AUTO. This configuration is based on
the allocation of network address automatically, following the standard protocol DHCP, each time a new item you want to connect
to the network. This is the easy way configuration (valid for most installations) and does not need to consult with your local
network administrator. Always can be verified the linking parameters with the router by pressing "OK" on the "AutoIP Data" option
on IP Mode menu.
In complex systems, the network administrator can force to use a specific IP address, landline calls, for each of the teams that
want to connect to it. In this case, the GD-36 should be set in "MANUAL". You should also use the "manual" mode, when you want
GD-36 connect directly to a computer using a crossover cable or "CrossOver Type" (See Section 6.4.1 Ethernet Setup).
To activate the MANUAL mode, please follow the next steps:
1. Press " " to select the IP Mode option.
2. Press "OK" to enter in the IP Mode edit mode.
3. The "[Auto]" will appear on the screen, indicating this option can be changed.
4. Select "[Manual]", using the " " or " " keys, and press "OK" to fix it.
5. Select "Configure" option and press "OK".
6. Then, the "Manual IP 1/2" menu will appear.
7. Select the parameter to set using the " " or " ", and press "OK" to activate the
edit mode.
8. Change data values using the " " or " " keys and move to the next parameter
using the " " o " " keys.
9. Finally fix the desired values with the "OK".
10. Pressing " " or " " keys in the most extreme positions forward or back one
page.
11. When all parameters have been set properly, press BACK to come back to the
IP Mode menu. Sometimes is required to reboot the device (GD-36) and the router
in order that changes will take effect.
GD-36
2815
610.396A
rev.1

6.4.2. Recording Messages.
The GD-36 can record messages using the integrated microphone on the front panel. The recording menu is included on the
"Service Menu". To access it press "OK" over the "Rec" option.
The filename is create automatically every time the REC utility is called. The used auto format match with the "YYMMDDXX.wav"
mask, where:
YY: Year (short format).
MM: Month.
DD: Day.
XX: Order number (Valid from 00 to 99).
To start a recording session, please follow the next steps.
1. Press " " to select the "Rec" option.
2. Press "OK" to start the recording session.
3. The recording session starts when change "Rec" to "Stop". At the same time the
REC LED on the front panel and the Rec timer become ON.
4. To stop the recording session, simply press "OK" on the "Stop" line. At that time the
REC LED will turn off and the REC timer will stop, so the "Stop" will be changed to
"Play".
5. To check the recording quality the "OK" should be press on the "Play" line and wait
until the message ends.
6. Press "BACK" key to exit from the Rec menu discarding the current audio data
captured and erasing the data file.
7. Press "OK" over the "Save" line to validate the recording session and save the data
file on the "VOICE" folder of the SDCARD. After complete this action, the system exits
from the Rec mode automatically.
NOTE:
It's not allowed the message recording while the system (GD-36) is in the "Fault"
condition.
GD-36
Rec
File name
11081100.wav
Rec Time
00:00
Rec
Rec
File name
11081100.wav
Rec Time
00:00
Stop
Rec
File name
11081100.wav
Rec Time
00:00
Play
Save
2816
610.396A
rev.1

6.4.3. Clock and Date Setup.
The clock/calendar must be adjusted on some occasions, eg, after changing the lithium battery that power it, or when during the
initial installation, and keeps on time when mains and secondary power supplies fail.
To adjust time/date, please follow the next steps.
1. Press " " to select the Time option.
2. Press "OK" to activate the Time edit mode.
3. The "[2]3:10:00" appears indicating that the first digit of the hours can be set
using the " " or " " keys.
4. To change to other digits, please use the " " o " " keys. To validate the Time
press "OK".
5. Press " " to select the Date option.
6. The "[0]8/03/12" appears indicating that the first digit of the day of month can be
selected using the " " or " " keys.
7. To change to other digits, please use the " " o " " keys. To validate the Date
press "OK". After validate the date, automatically the weekday will be updated.
8. Press " “ to go to the selection of the Daylight Saving mode (See section
5.2.1 for details).
9. Press "OK" to activate edit mode Daylight Savings Time (Summertime).
10. In the screen will appear "[2AM<->3AM]" indicating that you can change the
default option.
11. Select the desired value using " " o " “ from the options below and click
"OK" to exit of the edit mode.
If you select "Others" and press "OK" will display more options in the menu to
specify the parameters "Start Date" and "Start Time", "End Date" and "End
Time" using the keys and the usual process.
OFF 2AM3AM 1AM2AM OTHERS
6.4.4. Messages Setup (remote input activation).
The messages setup has as options the next ones:
• Activation Mode. It's selected how the external inputs will be attendant (IN1 to IN10
and INHibition), if by Open or Close contact.
• Priority Type. It's selected how the system will manage the priorities between all
inputs, by geographical mode (IN1 > IN2 >…> IN10), or by numerical type (1 to 10,
where 1 is more prioritary than 2, 2 more than 3 and so on, and 0 is disabled).
For every remote in (IN1 a IN10) is possible to set some parameters as follows:
- Audio file name (.wav).
- Priority Level.
- Activation by EDGE (push-button) or by LEVEL (switch). In EDGE mode, the
message will be broadcasted only once, whereas in LEVEL mode, the message will
be repeated continuously as long as activated the associated remote input.
- Auxiliary Outputs that will be turn on meanwhile the audio file is played. Note that,
* X : Enabled Output.
* 0 : Disabled Output
GD-36
Messages
Activation Mode
Close Contact
Priority Type
Geographical
Remote In >
2817
610.396A
rev.1

6.4.5. Setup of Remote Input Messages
1. Press " " to select the Activation Mode.
2. Press "OK" to enter in edit mode.
3. The "[Close Contact]" will appear indicating the Activation Mode option can be
changed using the " " or " "
keys.
4. Press "OK" to fix the activation mode.
5. Press " " to select the priority type.
6. Press "OK" to activate the edit mode.
7. The "[Geographical]" will appear indicating the Priority
Type option can be changed using the " " or " " keys.
8. Press "OK" to fix the Priority Type.
9. Press " " to select the Remote IN setup menu.
10. Press "OK" to enter in the Remote IN 1/2 setup menu.
11. Select the parameter to set using the " " or " " keys, and press "OK" to
activate the edit mode.
12. Use again the " " or " " keys to change the option of each adjustment, and
finally fix them with "OK".
13. During the setup of the Auxiliary Control Outputs, please select the line that
includes the desired output, using the " " or " " keys. Then press "OK" to enter
in the edit mode.
13.1. The output that can be modified appears between clasps "[" and "]",
as [X] or [0].
13.2. To change value, press " " or " ".
13.3. To select other output, press " " or " ".
13.4. To fix the selected values for the output includes in this selection line,
press "OK".
13.5. To modify the state of other outputs, please repeat from item 13.
14. Press "BACK" to exit of the Remote In menu.
GD-36
Remote In 1/2
Remote In
1
File name
Alarma.wav
Priority Level
1
Remote In 2/2
Edge/Level
Edge
Aux. Control Output
1->[X] 2->0 3->0 4->0
5->0 6->X 7->0
8->0 9->0 10->X
2818
610.396A
rev.1

6.4.6. Calendar Events Setup.
GD-36 supports management of up to 100 different programs, based on events related to the calendar. For each program it is
possible to control auxiliary outputs will be activated during playback, when it automatically switched to the message and the
repeat cadence in fractions of 5 minutes.
To program an event, please follow the next steps:
1. Select the "Calendar" option on the "Adjustment" menu and press "OK" to
activate it.
2. Press " " to select the program number to edit.
3. Press "OK" to enter in the Program number edit mode.
4. The "[0]0" will appear indicating that the first digit can be changed using the
" " or " " keys.
5. To change to other digits, please use the " " or " " keys. To validate the
Program press "OK".
6. Press " " or " " to select the auxiliary control output line to edit.
7. During the setup of the Auxiliary Control Outputs, once the edit mode has been activated by pressing "OK", should be
use the " " or " " keys to move from one output to the next one, and "OK" over the desired output. With the " " or " “
keys will be selected the desired state and will be fixed with "OK". To validate the changes on every line must be press
"OK".
8. Press " " to move at next page (2/3).
9. Press "OK" to activate the selection of the Voice or Sound Audio File name
from a list of files.
10. Press " " or " " to select the desired message from the list.
11. Press "OK" to fix the current message (file name).
12. Press " " to select the Activation Mode option and "OK" to activate the
edit mode.
13. Press " " or " " to select one of the following Calendar modes, and then
press "OK" to fix it.
Off Once Daily Weekly MonFri Weekend DirectPlay Days Date to date.
The calendar is used to select the start and end of the event, and the repetition period of the message in units of 5 minutes.
The difference between modes is that calendar day or days are associated with the event, namely:
• Once. In this mode you specify a particular date.
• Daily. Are set every day, ie Monday through Sunday.
• Weekly. You select a single day of the week, between Monday and Sunday.
• Mon-Fri. You select a weekday, between Monday and Friday.
• Weekend. Saturday and Sunday is selected, and exclude the other days of the week.
• Days. In this mode you can choose any combination of days a week. Selected will remain on marked "X", and
excluding the days marked with a "0".
• DirectPlay. This mode is special and can associate a program number with a voice file and some auxiliary control
outputs, without specifying an actual event calendar, ie a day and time of activation. This will appear on the list of
programs and can be run from it, so always manual.
• Date-to-Date. This mode allows you to specify the message playback between two specific dates (Start Date -
Start time and End Date-End Time) and a repetition rate in fractions of 5 minutes.
GD-36
Calendar 1/3
Program
00
Aux. Control Output
1->X 2->0 3->0 4->0
5->0 6->X 7->0
8->0 9->0 10->X
2819
610.396A
rev.1

Depending of the selected mode some of the options can be not necessary to set.
14. Press " " or " " to select an option: Day, Start Time, Stop Time o Repeat
Period of the selected message.
15. Press "BACK" to exit from Calendar menu.
The system takes several seconds to update all the parameters of the remote
computer, and during this time waiting a screen similar to that shown below.
NOTES:
To erase any Program, it's only necessary to select the Program by their number on the "Calendar 1/3" screen, and change
the "Activation Mode" to "OFF". Automatically this program will disappear from the "Program List".
Try to be active and always consecutive messages starting with the first (PROGRAM 0).
It's very convenient to create backup copies of the "settings.bin" file, available on the
(\\SETTINGS) folder of the SD CARD. This file stores all the calendar and external input
configuration. This file should be use after formatting the SD Card or install a new one (damage,
loss, etc…) and allow us to recover easily all the correct event programs.
GD-36
2820
610.396A
rev.1
7. WEBSERVER.
If you have purchased your GD-36 before February 2021, unless it has been upgraded, the Webserver you have installed on your
GD-36 is based on Adobe Flash, which is no longer accessible from a computer with the Windows operating system, as Windows
no longer supports Adobe Flash. If you are interested in upgrading the Webserver of your GD-36, please contact your usual UDE
product supplier, or directly to our e-mail address .
If you have purchased your GD-36 after February 2021, please continue with this instruction manual.
It is possible to manage and control the GD-36 remotely thanks to the WEBSERVER that the GD-36 incorporates, which is
accessible via an Internet browser, from the customer's computer. The computer and the GD-36 are connected as described in
point 6.4.1 of this manual.
Se conectan el ordenador y el GD-36 de acuerdo con lo expuesto en el punto 6.4.1 del presente manual.
To access the WEBSERVER, simply open your computer's web browser and enter http://gd36 or the IP address associated
with your GD-36 device (which by default is http://192.168.0.200 ) in the address bar of your computer. After a few seconds, the
"HOME" screen will appear:
Other manuals for GD-36
1
Table of contents
Other Ude Recording Equipment manuals