stellar labs 555-19520 User manual

GAIN
HIGH
-dB +d B
MID
-dB +d B
LOW
-dB +d B
EQ
FADER STAR T
RELAY
010
PITCH
0
1 4 5
23
67 8 9 0
LOOP IN LOOP O UT RE LOO P
CUE
PITCH
SOURCE
USB
CH1
LINE 1
/PHO NE 1
CD 1
CH2
LINE 2
/PHO NE 2
/iPod
CD 2
CH2CH1
CUE
CUE
PITCH
1 4 5
23
67 8 9 0
LOOP IN LOOP O UT RE LOO P
X-FADER
MAST ER VOL
MIXI NG
CUE PG M
GAIN
HIGH
-dB +d B
MID
-dB +d B
LOW
-dB +d B
EQ
010
VU METER
3
0
-3
-8
-10
-13
CH2CH1
EJECT
EJECT
CD USB
PITCH
0
SOURCE
USB
CD USB
iPod DOCK
MIDI MI DI
CUE 1 CUE 2 CU E 3 LOAD A
MAST ER
TEMP O
PLAYON
SYNC
PGM
REPEAT
SINGLE
TIME
FOLDER
BRAK E REVERSE
PITC H BEND
SEAR CH
SCRAT CH
EFFECT SELECT
SCRAT CH
EFFECT ON
SEAR CH
FOLDER OUT
BPM
FOLDER IN
LOOP ADJ+
FOLDER/SKIP +
PGM
REPEAT
SINGLE
TIME
FOLDER
BRAK E REVERSE
PITCH BE ND
SEARCH
SCRATCH
EFFECT SELECT
SCRAT CH
EFFECT ON
SEAR CH
FOLDER OUT
BPM
FOLDER IN
LOOP ADJ+
FOLDER/SKIP +
CUE 1 CUE 2 CU E 3 LOAD B
MAST ER
TEMP O
PLAYON
SYNC
USER’S MANUAL
PROFESSIONAL COMBO CD/iPod/MP /MIDI
PLAYER WITH MIXER &USB
3
MODEL 555-19520
www.mcmelectronics.com

2

3
MASTER
TEMPO
PLAYON
SYNC
EFFECT SELECT
SCRAT CH
EFFECT ON
FOLDER/SKIP +
SEAR CH
FOLDER OUT
BPM
LOOP ADJ+
FOLDER IN
EFFECT SELECT
SCRAT CH
EFFECT ON
FOLDER/SKIP +
SEAR CH
FOLDER OUT
BPM
LOOP ADJ+
FOLDER IN
MASTER
TEMPO
PLAYON
SYNC
Quick Start Guide
Quick Start Guide
Achieving maximum benefit of the vast features of this product requires review
of the supplied manual and may take considerable time. However we realize
that you are likely eager to put this device to use immediately. For that reason,
we have assembled this brief Quick Start page. You won’t even need an external
system. A pair of headphones is fine!
(1) Make sure the rear power switch is in
the OFF position, and connect the unit to
AC power.
(2) Set all rotary controls in the center of the
console to the mid position.
(3) Make sure all slide controls are in the
center position.
(4) Set the CH1 and CH2 toggles (just below
the iPod™ dock) to the CD1 and CD2 positions.
(5) On the front of the unit, next to the headphone
jack, set the CUE VOL to the minimum position.
(6) Plug in a set of headphones into the
HEADPHONES jack.
(7) Turn the rear power switch to the ON position.
(8) Both blue displays will light and blink
READING. After a few seconds will read NO DISC.
(9) Press both red EJECT buttons, cd trays will open.
(10) Place a CD in each tray and press the buttons again.
(11) Press the white play button on both the CD1
and CD2 side.
(12) Slowly adjust the CUE volume on the front
panel, you will hear both CD's playing simulataneously
(13) Adjust the CUE/PGM Mixing control
(directly above MASTER VOL in center)
to the full PGM position
(14) Slide the X-Fader (crossfader) to
the left and right, you will belnd from one
CD to the other.
(15) Press both SCRATCH buttons twice
so they blink red.
(16) Slide the PITCH controls up and down
to see the full pitch-bend effect
(17) quickly rotate the scratch wheels
back and forth to achieve simulated
scratch effects on the CD.
(18) Press the LOOP IN, wait a few seconds
and press LOOP OUT. Notice the sample
loop that is repeated. Press LOOP OUT
again to resume.
(19) Insert USB thumb drives into both
the CH1 and CH2 side, then press the
white play button on both sides to pause
each CD.
(20) Press each SOURCE button under
each USB thumb drive to switch from
CD to USB mode.
(21) Press both white play buttons, you
will have the same functions on MP3
files as you did with CD's.
(22) Set the MASTER VOL control to the
minimum position (center of panel).
(23) Using either the XLR or RCA type
MASTER outputs, connect to your external
sound system.
(24) Adjust MASTER VOL to desired level.

4
MASTER
TEMPO
PLAYON
SYNC
EFFECT SELECT
SCRAT CH
EFFECT ON
FOLDER/SKIP +
SEAR CH
FOLDER OUT
BPM
LOOP ADJ+
FOLDER IN
EFFECT SELECT
SCRAT CH
EFFECT ON
FOLDER/SKIP +
SEAR CH
FOLDER OUT
BPM
LOOP ADJ+
FOLDER IN
MASTER
TEMPO
PLAYON
SYNC
Mixer Deck Functions
1) Eject Button
Press to load or eject disk. Each press will open
or close the tray. Note: The Disk tray will not
open unless PAUSE is first pressed.
2) Time Button
Use this button to toggle between the three
time modes. ELAPSED, REMAINING or TOTAL
REMAINING. This works for CD’s as well as MP3
files on the USB drive.
3) Single Button
Press this button to switch between the SINGLE
or CONTINUOUS play modes. The selected
mode will be indicated on the LCD display. In
SINGLE mode, after each track, the unit stops
reading the disk. In continuous mode the unit
plays all tracks and stops. This works for CD’s as
well as MP3 files on the USB drive
4) Repeat Button
Use this button to repeat one track or all tracks
on a CD or USB drive.
5) PGM Button
This is for programming a playlist of up to 20
tracks from a CD or the USB drive. Press the
PAUSE button, then press the PGM button to
enter the Program mode. Use the SKIP+ and
SKIP- buttons to select a desired track. After
track is selected press PGM. Repeat this until
all desired tracks are selected. Then press PLAY
to begin sequence. Program will not be
retained if CD or USB drive is changed.
6) Folder Button
This allows you to navigate through multiple
folders, especially useful on USB thumb drives
with tracks divided into alums or genres of
music.
7) Search << or >> Buttons
These allows you to search forward or
backwards through the track you are playing.
This essentially mimics fast-forward and rewind
functions.
8) Track Select Buttons
These allow you to select previous or next
tracks. They are also used in programming
playlists as described in #5 above.
9) Brake Button
While in play mode, press the BRAKE button,
the button will light red. When this mode is
active, pressing the PAUSE button will cause the
music to slow to a stop, simulating the brake
effect on a vinyl LP. Pressing Play will cause the
music to advance from stop to normal speed.
This works for CD’s as well as MP3 files on the
USB drive.
10) Reverse Button
While in the play mode, press the REVERSE
button, the button will light red. This will
reverse the track currently being played,
causing it to play backwards. Pressing again will
revert back to normal play.
11) Scratch Button
This button toggles the JOG/SHUTTLE wheel
between the Pitch Bend, Scratch and Search
modes.
Press the button, it lights solid red, and you are
in the Search mode. Rotating the Jog/Shuttle
wheel will advance you forward or reverse
within the track you are playing.
Press the button again, it blinks on/off red, you
are in the Scratch mode. Rotating the
Jog/Shuttle wheel will provide a scratch effect,
very similar to that with vinyl DJ turntables.
Fortunately, this is fully electronic and will
cause no additional wear or harm to disks.
Press the button again, the red light goes off,
you are in the Pitch Bend mode. Rotating the
Jog/Shuttle wheel will either increase or
decrease the pitch of the track playing. Release
the wheel and the track will revert back to
normal speed/pitch.

5
Mixer Deck Functions
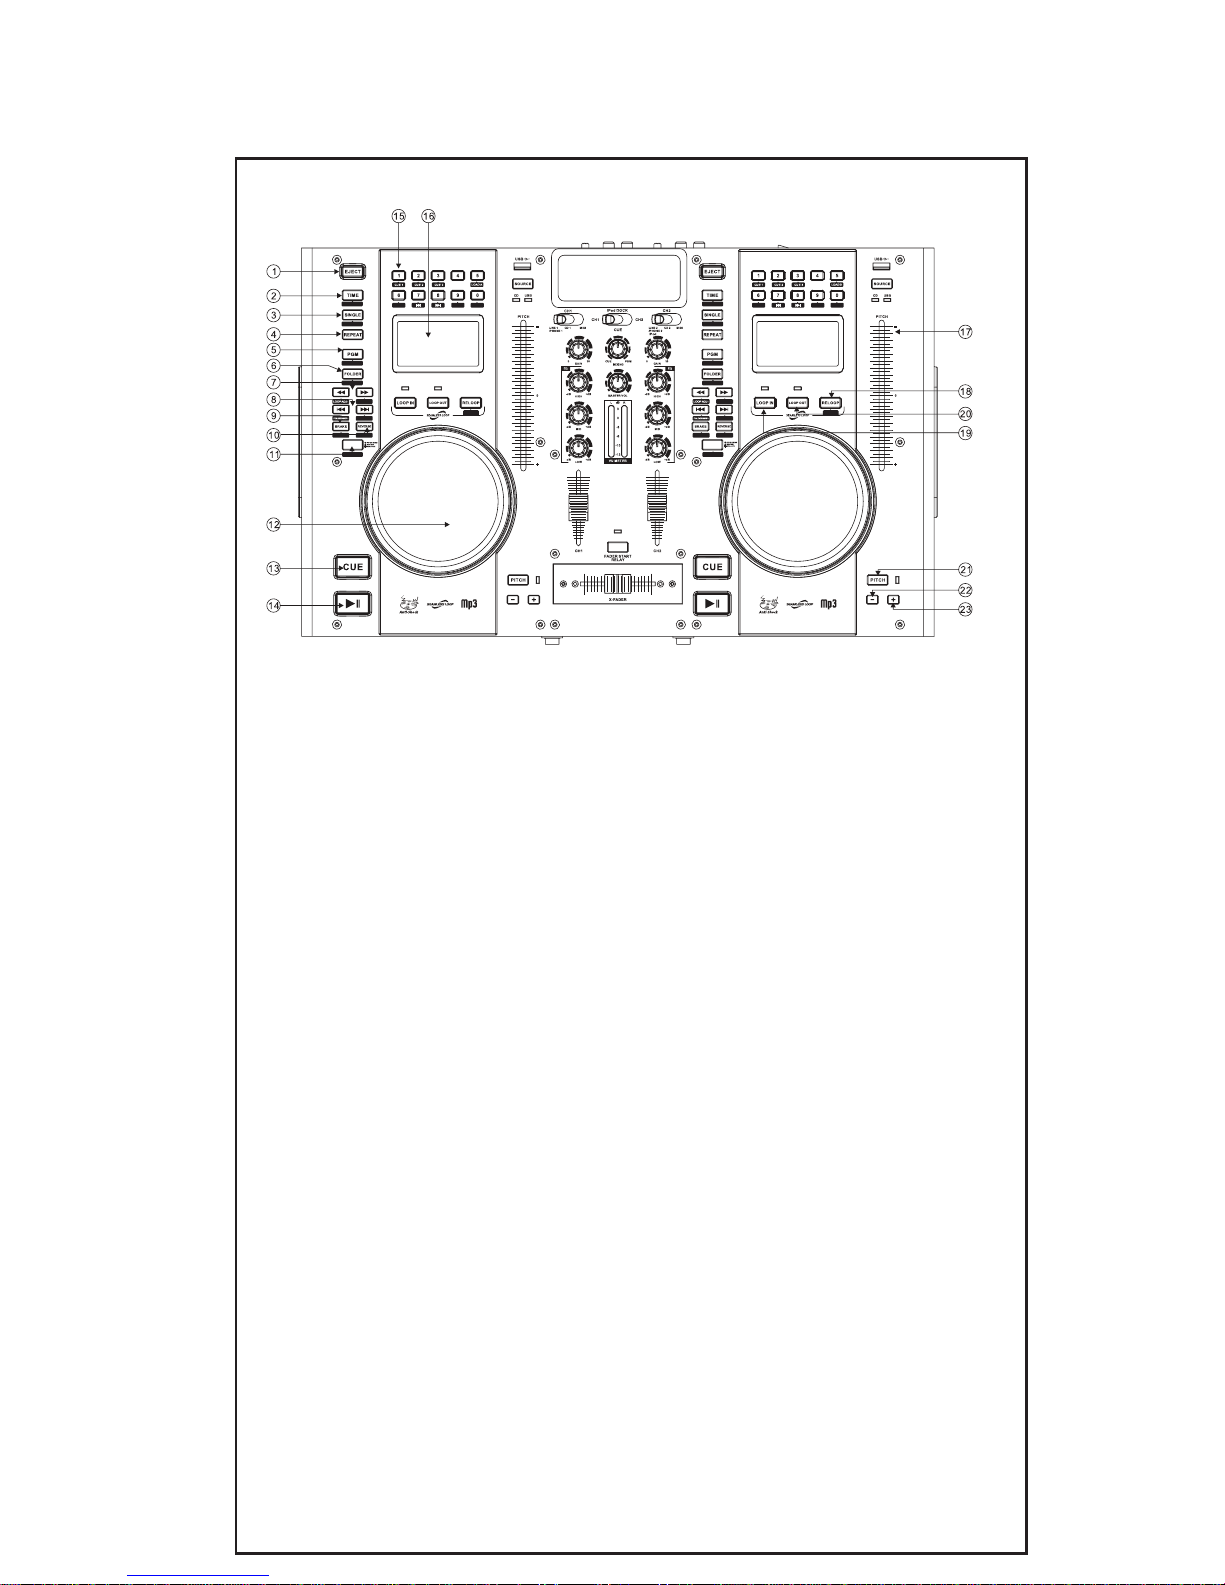
12) Jog/Shuttle Wheel
This wheel is used in conjunction with the
SCRATCH button described in #11. In
Jog/Shuttle mode, rotating the wheel clockwise
advances the track, counterclockwise reverses
the track. In Pitch/Bend mode, clockwise
increases the pitch, counterclockwise slows the
pitch. In scratch mode, quickly alternating
back/forth simulates the vinyl scratch action on
DJ turntables. This function works with CD’s as
well as MP3 files.
13) Cue Button
Pressing the CUE button will cause the playing
track to revert back to the position in which
play was started.
14) Play/Pause >II Button
Pressing this button will toggle between play
and pause modes on the CD and USB drive.
When in PLAY mode, the button lights blue,
when in PAUSE, it blinks blue on/off.
15) Direct Access Buttons 0-9
These can be used to directly select a track to
play, or to record on a playlist. This is especially
useful when using USB drives with a large
number of tracks stored.
16) LCD Display
Blue backlit display provides a wealth of
information on the tracks being played. When a
playlist is active, It displays the 1~20 track
number in the lower left corner. While playing
CD’s or MP3’s it displays the overall track
number in the upper left corner. The top right
corner shows track time, with selectable played,
elapsed or total time modes. Immediately
beneath this time display is a bargraph showing
relative time remaining in the track being
played. This enables the DJ to have a visual idea
of how far into the track they are. The bargraph
will blink when less than 30 seconds remain on
the track. Middle right shows the +/-
percentage of the pitch bend. In normal mode,
the display will read 0.0. Front View
17) Slide Pitch Control
Sliding this control down and up either
increases or decreases the pitch and speed of
the track being played. The range of this slide
control is selectable from +/-4%, 8% or 16%, see
item #21. The actual pitch amount is displayed
on the middle right of the LCD display.
18) Re-Loop Button
See #18 and #19 for better understanding of
this function. When the Loop-Out button is
pressed a second time, the loop stops playing
and regular play resumes, however the loop
remains stored. Pressing the Re-Loop button
will restart the same loop, from any other point
in the track. Once the track ends, or if you skip
to another track, the loop will be erased.
19) Loop-In Button
Pressing this button sets the start point of a
sample loop, from the playing track.
20) Loop-Out Button
Pressing this button sets the end point of a
sample loop, from the playing track. Once this is
pressed the unit will continually repeat the
loop. Pressing the Loop-Out button will resume
normal play, but the loop starting point remains
stored. Pressing the Loop-Out button again will
set a new end point.
21) Pitch Bend Select
Pressing the PITCH button will toggle the Slide
Pitch Control between the three pitch/bend
ranges, +/-4%, 8% or 16%.
22) Pitch Bend (-) Button
Pressing and holding this button will decrease
the speed and pitch of the track playing. Once
released, the pitch will return to a normal rate.
23) Pitch Bend (+) Button
Pressing and holding this button will increase
the speed and pitch of the track playing. Once
released, the pitch will return to a normal rate.
24) CD Tray
For loading standard CD, CD-R and CD-RW discs.
The tray is opened by pressing the red EJECT
button on the top of console. Note that if the
CD in the tray is playing, it must be paused prior
to ejecting. While playing, the EJECT button is
inoperative. Pressing the EJECT button again
will close the drawer. Also, this button only
operated while the CH1 or CH2 Input Toggle
Switch (see next page) are in the CD position.
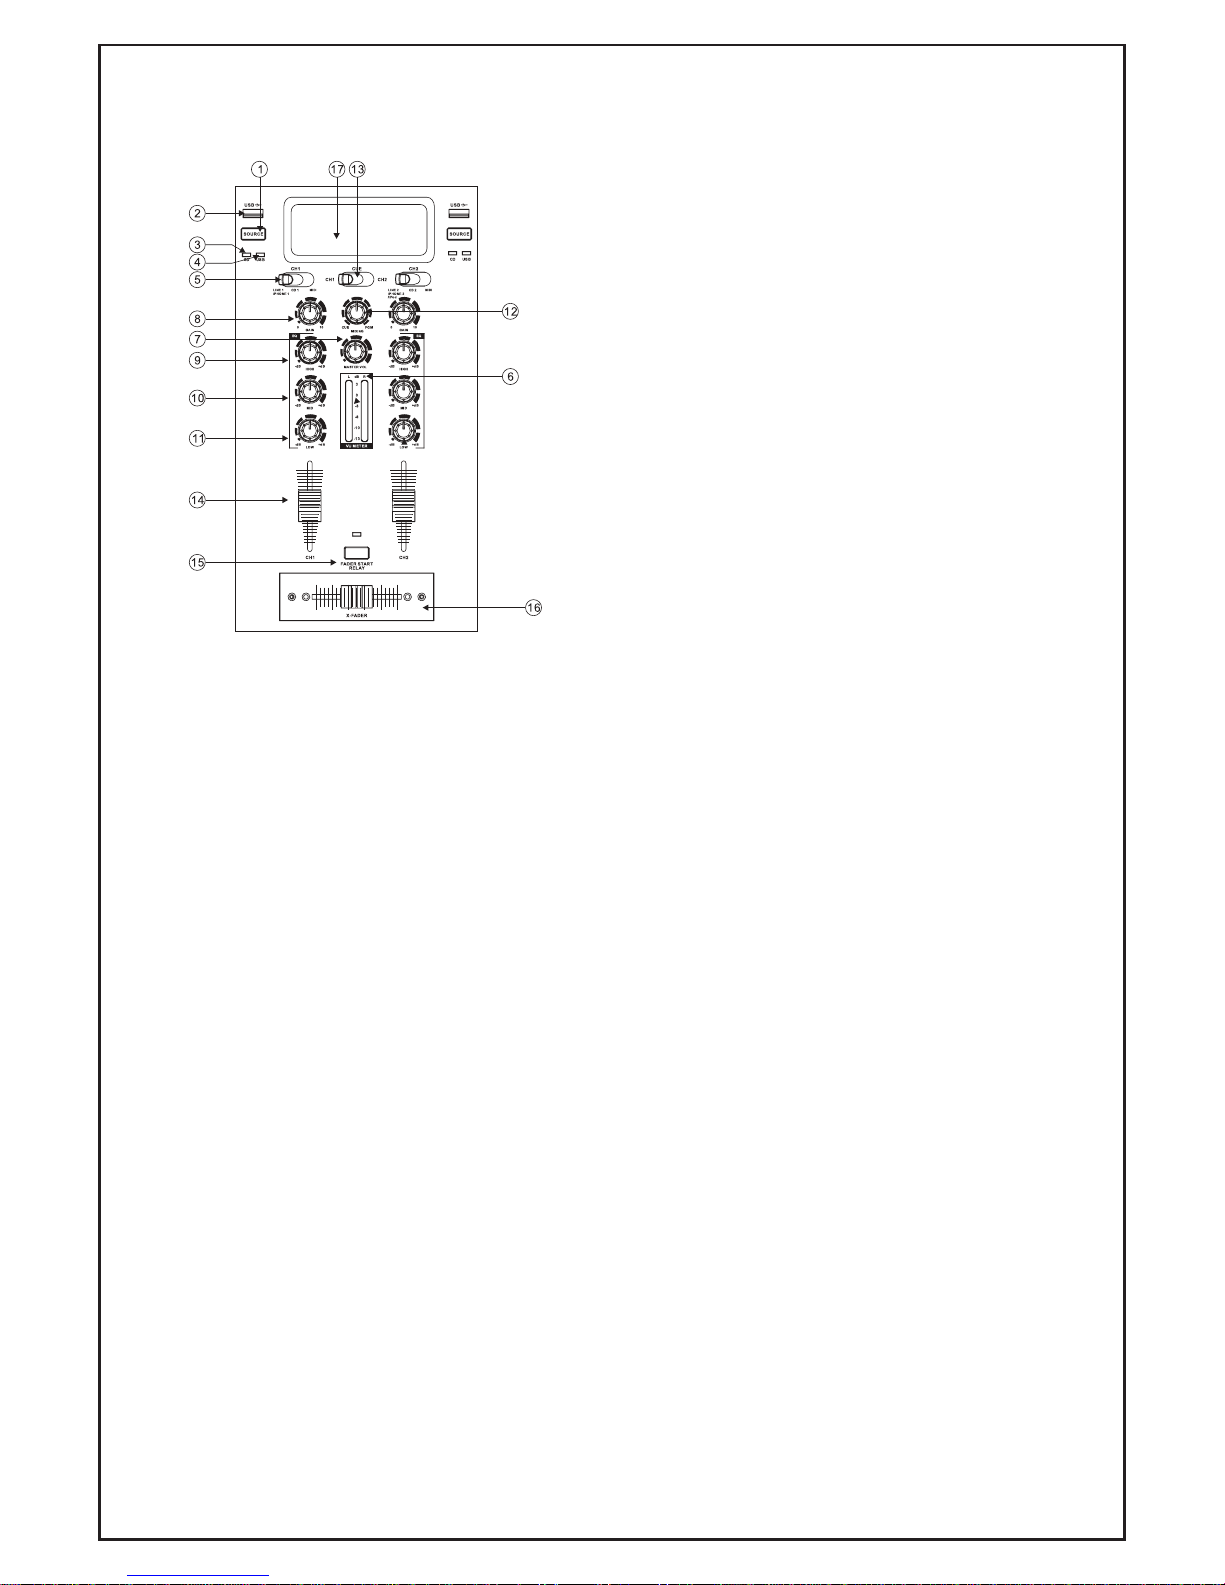
25) DJ Microphone Input
The MIC IN jack accepts standard dynamic
unbalanced microphones with ¼” plug.
26) Mic Level Control
Adjusts the microphone level, relative to the
music mix.
27) Cue Level Control
This adjusts the CUE level of the headphones.
More explanation of this can be found on the
next page under the CUE/PGM mixing control
28) Headphone Output
For connection of standard stereo headphones
with ¼” plug.

6
1) Source Select
For Deck 1 and Deck 2, this button select
between the CD player and USB drive sources.
Note that the source can only be changed while
the track is in PAUSE/STOP mode. It will not
change sources while a track is playing.
2) USB Input
This port reads MP3 files directly from thumb
drives. Note it will not read WMA or WAV files,
plus it will not support external HDD drives.
Flash drives only.
3) CD Indicator
Indicates that you are in CD Mode.
4) USB Indicator
Indicates that you are in USB Mode for reading
MP3 files from thumb drives.
5) Input Toggle Switch
Selects from multiple sources. CD1 allows play
from the CD tray or the USB drive. MIDI allows
external interface with an external computer or
laptop. Line/Phono input allows audio to be
played from an external line level device or
turntable.
6) LED VU Meter
Shows relative output level of all music sources
being fed to the MASTER OUTPUT and XLR
OUTPUT connections on the rear panel.
7) Master VOL Control
Adjusts overall output level of all music sources
being fed to the MASTER OUTPUT and XLR
OUTPUT connections on the rear panel.
8) CH1 and CH2 GAIN Control
Adjusts relative level between CH1 and CH2.
Ideally this is adjusted so full left/right
adjustment of the cross fader yields the same
output level. Typically this is set up prior to a
performance, fine adjustments are made at the
CH1 and CH2 slide controls (#14)
9) CH1 and CH2 HIGH Control
Adjusts high frequencies for each channel (treble)
10) CH1 and CH2 MID Control
Adjusts mid frequencies for each channel (midrange)
11) CH1 and CH2 LOW Control
Adjusts low frequencies for each channel (bass)
12) CUE/PGM Mixing
Allows the headphones to simultaneously listen
to the material being cued up, as well as the
program being sent to the main outputs. The
user can tailor this mix to suit individual
situations and taste.
13) CUE Selector
Sets which channel is sent to the headphone
output for cuing. While heard through the
headphones, CUE audio is not sent to the main
outputs.
14) CH1 and CH2 Input Level Control
Very similar to input gain control functions (#8),
these controls allow quick and precise level
adjustments for each channel during the
performance.
15) Fader Start Relay
When activated, this function allows the cross
fader (#16) to control the start and stop of CH1
and CH2.
16) Cross Fader
Allows fading and blending from CH1 material
to CH2. As use of this control tends to be heavy
when combined with scratch and other effects,
it is subject to wear and is designed to be easily
replaced by the user.
17) iPod™ Dock
Allows program material to be delivered
directly from iPod™, iPod Touch™ iPhones and
similar devices and played through CH2.
Note that DJ effects are not available on material
from the iPod.
Main Console Functions

7
-Note the USB port will only read MP3 fils and is unable to read WMA, WAV
or other types.
Rear Panel Functions
18) AC Power Input – This unit will accept
standard IEC type power cords, commonly used
on many types of electronic equipment, and
may be powered from any AC power source
from 100~240VAC, 50~60Hz, in virtually any
country around the globe.
19) Power Button – Turns master power ON/OFF
20) Balanced XLR output – For connection to an
external sound system. 3-Pin XLR connectors
are commonly used on most types of commercial
sound gear
21) Unbalanced RCA output – For connection to
an external sound system. This is for
connection to standard home audio/home
theater sound systems, amplifiers and
receivers. MASTER is controlled by the MASTER
VOL level on the main panel. REC are at fixed
level, normally intended for recording.
22) PHONO/LINE selectors – Sets sensitivity
level for the LINE1 and LINE2 inputs.
The PHONO position is for use ONLY with vinyl
turntables having a magnetic cartridge and no
preamplifier. The LINE position is for all other
types of gear including external laptops,
CD/DVD/Tape players, tuners and similar items.
23) LINE1 and LINE2 inputs – For connection of
external sound sources. When using with
turntables, there may be a separate ground line
that will need to be connected to #25 GND lug.
24) USB Interface – This is for connection to
external personal computers or laptops,
running software such as Virtual DJ (included)
or other popular DJ software. For operation
you should consult the decimation included
with your separately available software.
26) DJ MIC – Input is for commonly available
professional microphone that utilize balanced
XLR connection. Function of this input mirrors
that of the front panel ¼” jack.
Virtual DJ LE Software
Included with this unit is a CD containing Virtual DJ LE software. This software provides an industry standard
platform that allows this Stellar Labs unit to control files that exist on your PC or laptop. By installing the
software on your PC, and providing the supplied key code (may be serial number from the rear of your unit),
you will now be able to control music files from your computer’s hard drive, in much the same manner as you
would CD’s.
Load and install the software on your pc, input the key code. Using a standard USB cable, connect the rear
panel USB port on this unit (beneath the ground lug) to any USB port on your PC. Run the software an you
will see immediate access to all music files it the MY MUSIC folder on your computer. In addition to the many
features found on this media player, the software offers a host of additional digital effects for you to take
advantage of. For more information on this software, as well as available upgrades, see www.virtualdj.com.

8
Warranty
This device is covered against manufacturer defects for a period of one year,
from the original date of purchase. If the unit should fail, it will be replaced or
repaired at the decision of the dealer from which it was purchased. It is the
owner’s responsibility to establish the date and place in which the item was
purchased by acceptable documentation should warranty service be required.
Note the X-Fader (cross fader) is user replaceable and is an item of normal
wear. This component is only warranted for a period of 90 days.
For warranty service, contact the retailer in which this Stellar Labs product
was purchased. They will advise the best means to secure service for your
item. Should this not be practical, you may contact MCM Electronics, the
exclusive master distributer for Stellar Labs products in North America.
See www.mcmelectronics.com for contact information.
This warranty is void if the serial number has been altered or removed, if
the unit has been opened or serviced by unauthorized parties, or if there
are clear sighs of physical mishandling or abuse.
This warranty, whether expressed or implied, is made only with regards
to the actual unit, and not to connected equipment or accessories. No
other warranties, expressed or implied, exist with regards to product
application, usefulness, loss of revenue or other disadvantage that may
be considered from this product.
Stellar Labs is
Distributed Exclusively by:
MCM Electronics
www.mcmelectronics.com
Table of contents
Popular Dj Equipment manuals by other brands

American DJ
American DJ Snow Flurry User instructions

EuroLite
EuroLite AKKU MBT-3 Spot MK2 user manual

Acclaim Lighting
Acclaim Lighting Flood One EO Color user guide

Stairville
Stairville LED PAR Can 10mm user manual

Chauvet DJ
Chauvet DJ SlimPAR Q12 ILS user manual

Elumen8
Elumen8 MP 15 LED Fresnel DTW user manual