Stephen SVX8004 User manual
SVX8004 IP PBX System User Guide
陈泽科技有限公司
- 1 -
www.stephen-tele.com
SVX8004 IP PBX YSTEM
User Guide
SVX8004 IP PBX System User Guide
陈泽科技有限公司
- 2 -
www.stephen-tele.com
1. Introduction
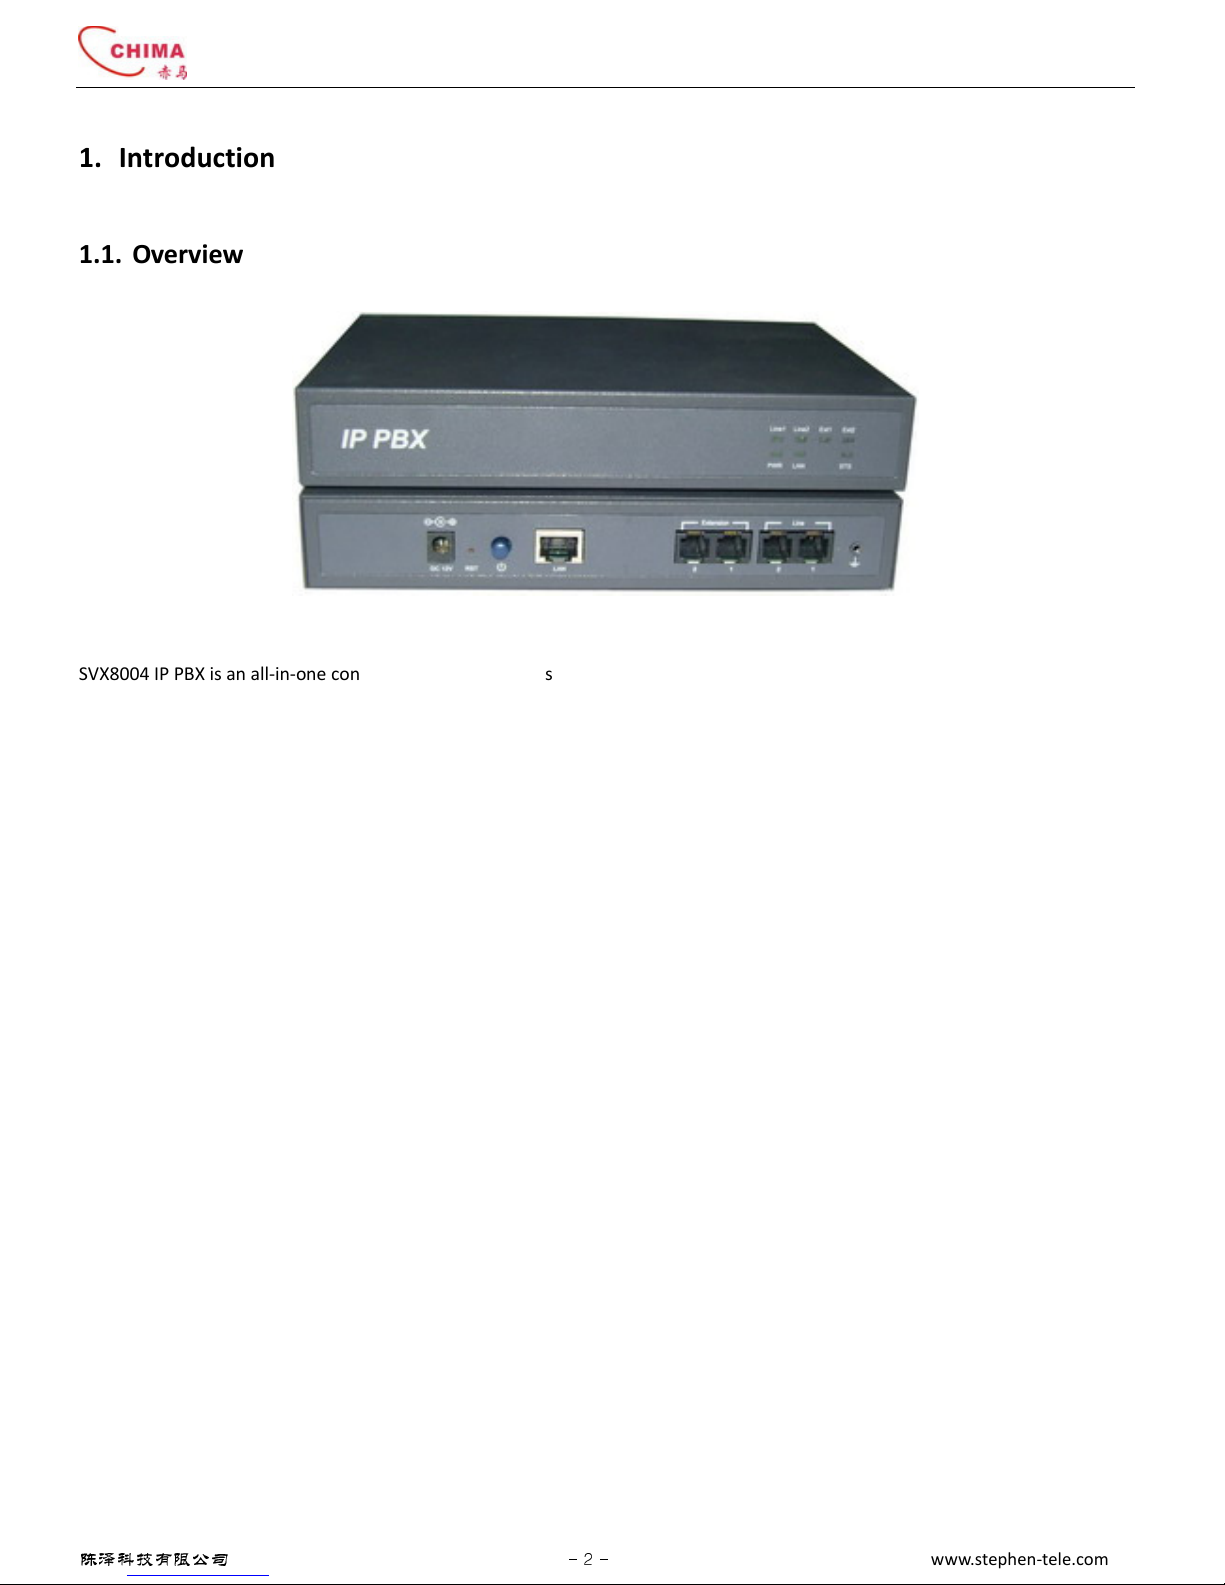
1.1. Overview
SVX8004 IP PBX is an all-in-one con erged communications solution ideal for small businesses. The product offers full PBX
functionality, including VoiceMail, Auto Attendant, Hunt Group, Ring Group, Call Transfer, Call Forward and much more, which
help businesses reduce communications costs and stay connected e erywhere.
SVX8004 IP PBX is a hybrid telephone system capable of handling both traditional telephone and Voice o er IP calls. Using VoIP
allows calls from one location to be routed o er the Internet to another location, eliminating long distance charges. SVX8004 IP
PBX can also directly integrate with VoIP ser ice pro ider networks.
SVX8000 is ery easy to understand, configure, and deploy. The web interface is designed to pro ide a clean and user-friendly
configuration window so that users won’t get lost in complicated menus and maintenance. A fully working system can be set up
quickly and be ready to communicate.
1. . Capacity
The system has the following capacity:
4 Analog ports in the 3 possible configurations:
2 analog lines + 2 analog extensions
4 analog extensions
4 analog lines
4 VoIP lines
12 VoIP extensions
1.3. Features
Full Range of PBX Features
SVX8004 IP PBX offers a full range of traditional PBX features like Call ID, Call Forward, Call Transfer, Call Pickup, Call Waiting and
SVX8004 IP PBX System User Guide
陈泽科技有限公司
- 3 -
www.stephen-tele.com
more. All such features are a ailable to both analog and VoIP extensions.
Auto Attendant
SVX8004 IP PBX handles inbound calls with an auto attendant. Auto attendants answer all incoming calls, play a recorded message
and route callers to their requested extensions. All oice prompts are fully customizable.
Call Queue
Call Queue holds incoming calls when all members are busy assisting other callers. Calls wait in the call queue for the next a ailable
member. While calls are waiting, callers hear music-on-hold. Calls are distributed out of the call queue on a first in, first out basis,
as members become a ailable.
Voicemail
The oice mail feature allows messages to be recorded when a particular extension can not be answered. It is also possible to send
particular calls to a oice mail box directly. Voice mail messages are recorded in wa format and stored in the user’s mailbox and
optionally forwarded by email to the user.
Automatic Route Selection
SVX8004 IP PBX gi es you complete control o er your phone lines and extensions. You can automatically place specific types of
calls on specific lines.
Line Hunt Group
Line Hunt Group consists of analog or VoIP lines that are associated so that calls to any line in the group are rolled o er to the next
a ailable line in the group when the line is busy. You can mo e lines within a line group to set the hunt order.
Extension Ring Group
Extension Ring Group is a collection of users, for example a group to handle all sales related calls. An incoming caller wishing to
speak to sales can be directed to that group, where the call can be answered by any member of the group who is a ailable.
1.4. Software specifications
Protocol SIP RFC3261
SDP RFC2327
RTP/RTCP
Codec G.711/G.729
Extension Analog Extension
IP Extension
Line PSTN Line
FXO Gateway
SIP Register
SIP Trunk
SVX8004 IP PBX System User Guide
陈泽科技有限公司
- 4 -
www.stephen-tele.com
Configuration WEB browser
IVR
Keypad
Firmware Upgrade HTTP / FTP
1.5. Hardware specifications
Network Interface 1 LAN, 10/100Mbps Auto-Negotiation RJ45 port
Analog Interface 4 RJ11 analog ports in following 3 configurations
:
2FXO+ 2 FXS with power failure pass-through
4FXO
4FXS
Power AC adapter Input: 100~240V AC, 50/60Hz
Output: DC 12V/1A
Environmental Conditions Operational temperature: 0~40
℃
Storage temperature: -10
℃
~60
℃
Humidity: 10~90%, no coagulation
Dimensions Size: 178(W) x 130(D) x 35(H) mm
. Installation
.1. Safety Precautions
Before using SVX8004 IP PBX, please re iew and ensure the following safety instructions are adhered to:
1) Read, follow and retain instructions — All safety and operating instructions should be read, followed and retained for future
reference before operating the equipment.
2) Heed warnings — All warnings on the equipment and in the operating instructions should be adhered to.
3) Temperature — Do not operate in en ironments where the temperature is below 0°C or 32°F. If the product was shipped in
cold weather, please let the system warm up at room temperature for at least two hours before plugging it in to a power
outlet.
4) Moisture — Do not place SVX8004 IP PBX in a high-humidity en ironment.
5) Heat — Ne er place SVX8004 IP PBX near heat sources such as radiators, floor registers or in direct sunlight. Do not stack units
on top of each other.
6) Power supply — The equipment should only be connected to an appro ed power supply of the type described in the operating
instructions or marked on the equipment. Use only the power adapter supplied with SVX8004 IP PBX.
7) Damage requiring ser ice — Do not attempt to ser ice the SVX8004 IP PBX yourself. Unplug SVX8004 IP PBX and refer
ser icing to a licensed technician when:
The plug or power cord has been damaged.
SVX8004 IP PBX has been exposed to moisture.
. . Check package contents
Each SVX8004 IP PBX package should include the following:
Name Quantity
SVX8004 IP PBX unit 1

SVX8004 IP PBX System User Guide
陈泽科技有限公司
- 5 -
www.stephen-tele.com
RJ-11 telephone cable 1 for each phone port
RJ-45 Ethernet cable 1
AC adapter 1
Quick installation guide 1
.3. Ensure you have the following
One computer with Ethernet network interface
One analog telephone
.4. Front & Back Panel
SVX8004 IP PBX Front & Back
The front panel consists of eight lights:
PWR Indicates the power status. The power is on when PWR light is lit.
LAN Indicates the LAN port connection status, The LAN is connected correctly if the LAN light is lit.
STS Indicates the system status. The light will flash for a few moments during boot-up, and then remain lit, indicating the
de ice is on.
Line Indicates the usage of the onboard lines. A Line is occupied if the indicator light is lit.
Ext Indicates the usage of the onboard extensions. The light is lit when the extension is ringing or off-hook.
.5. Back Panel
SVX8004 IP PBX with 2 Extensions and 2 Lines
SVX8004 IP PBX System User Guide
陈泽科技有限公司
- 6 -
www.stephen-tele.com
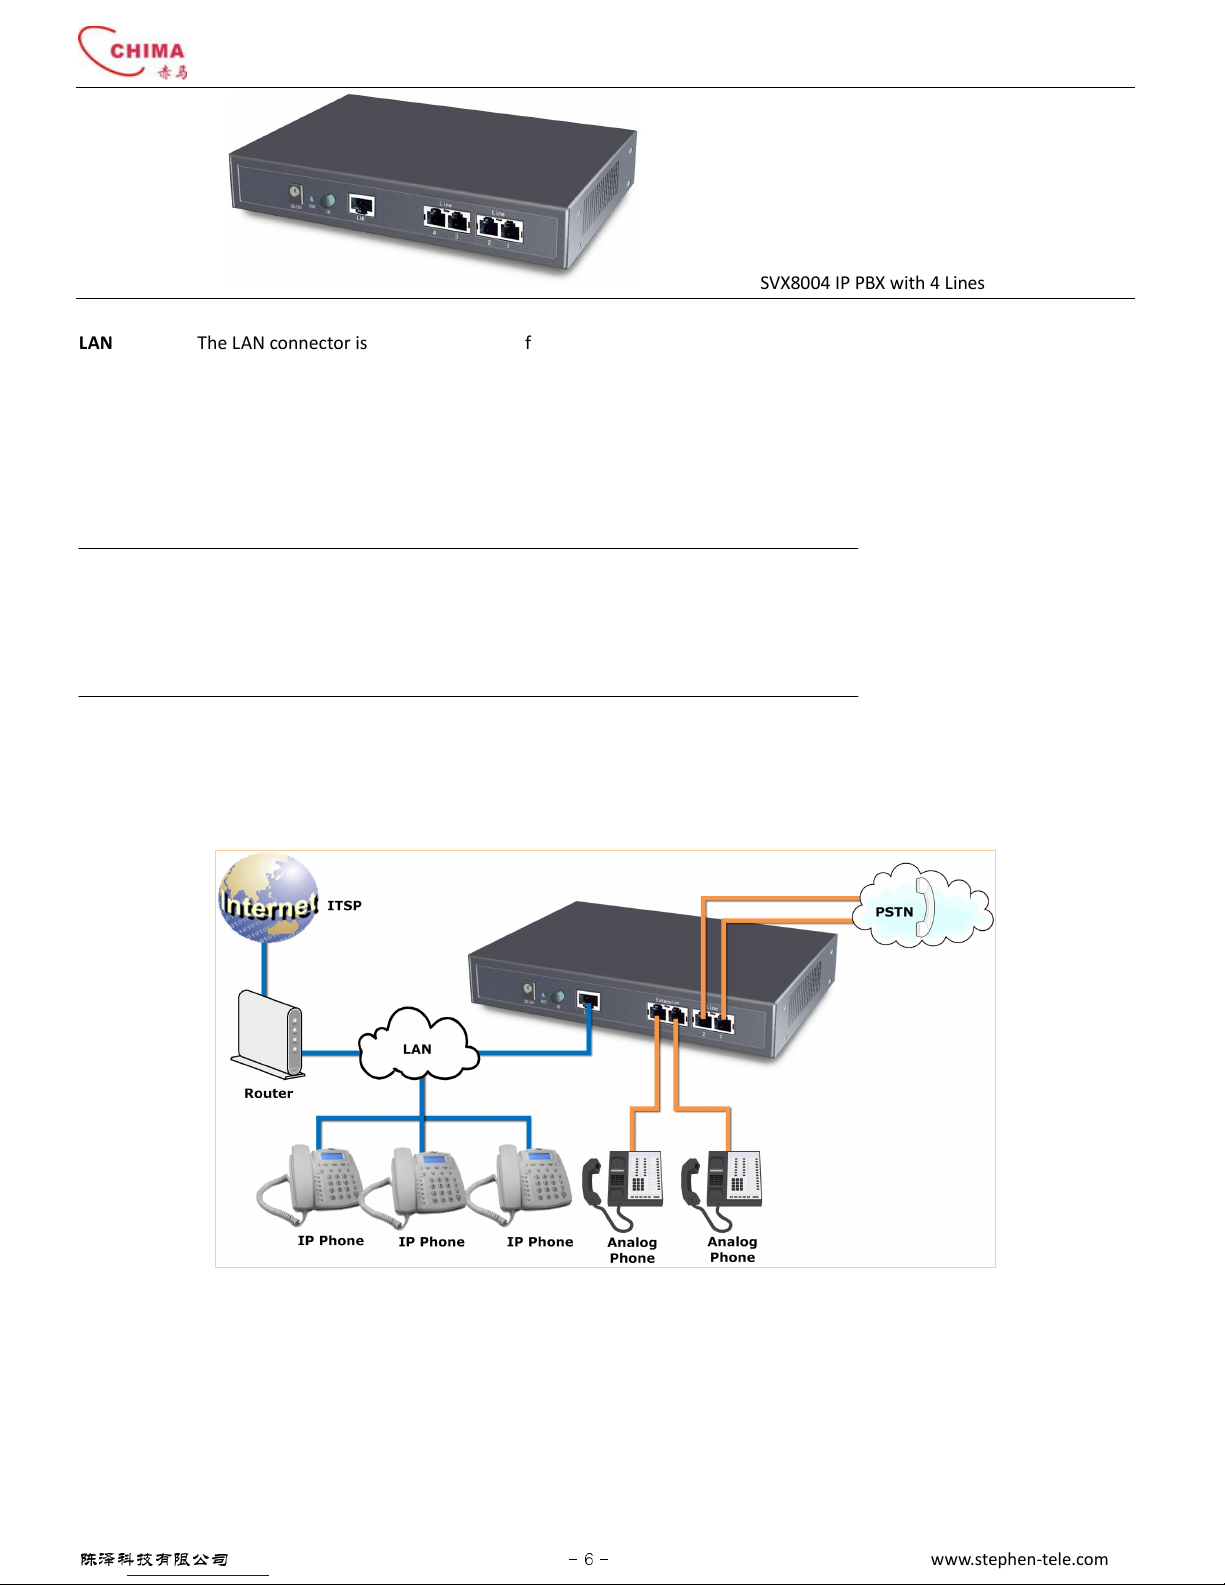
SVX8004 IP PBX with 4 Lines
LAN The LAN connector is an RJ-45 port used for unit configuration ia the PC, unit LAN networking, and VoIP capability.
Extension The “Extension” connectors are RJ-11 ports used for connecting phones and other analog de ices.
Line The “Line” connectors are RJ-11 ports used for connecting incoming telephone lines.
Power The power connector is a receptacle rated at 12VAC/1.5A for connecting the supplied AC adapter input line, with a
power switch beside.
RESET The reset button is used to reset all parameters to the factory default.
NOTE:
The SVX8004 IP PBX with 2 extensions and 2 lines supports power failure pass-through. In the e ent of a power failure or loss
of power, the extension ports are able to recei e and make calls through the line ports directly.
.6. Connect the device
.6.1. Connect diagram
Typical scenario A: Connect with PSTN
(Suitable for SVX8004 IP PBX with 2 extensions and 2 lines)
SVX8004 IP PBX System User Guide
陈泽科技有限公司
- 7 -
www.stephen-tele.com
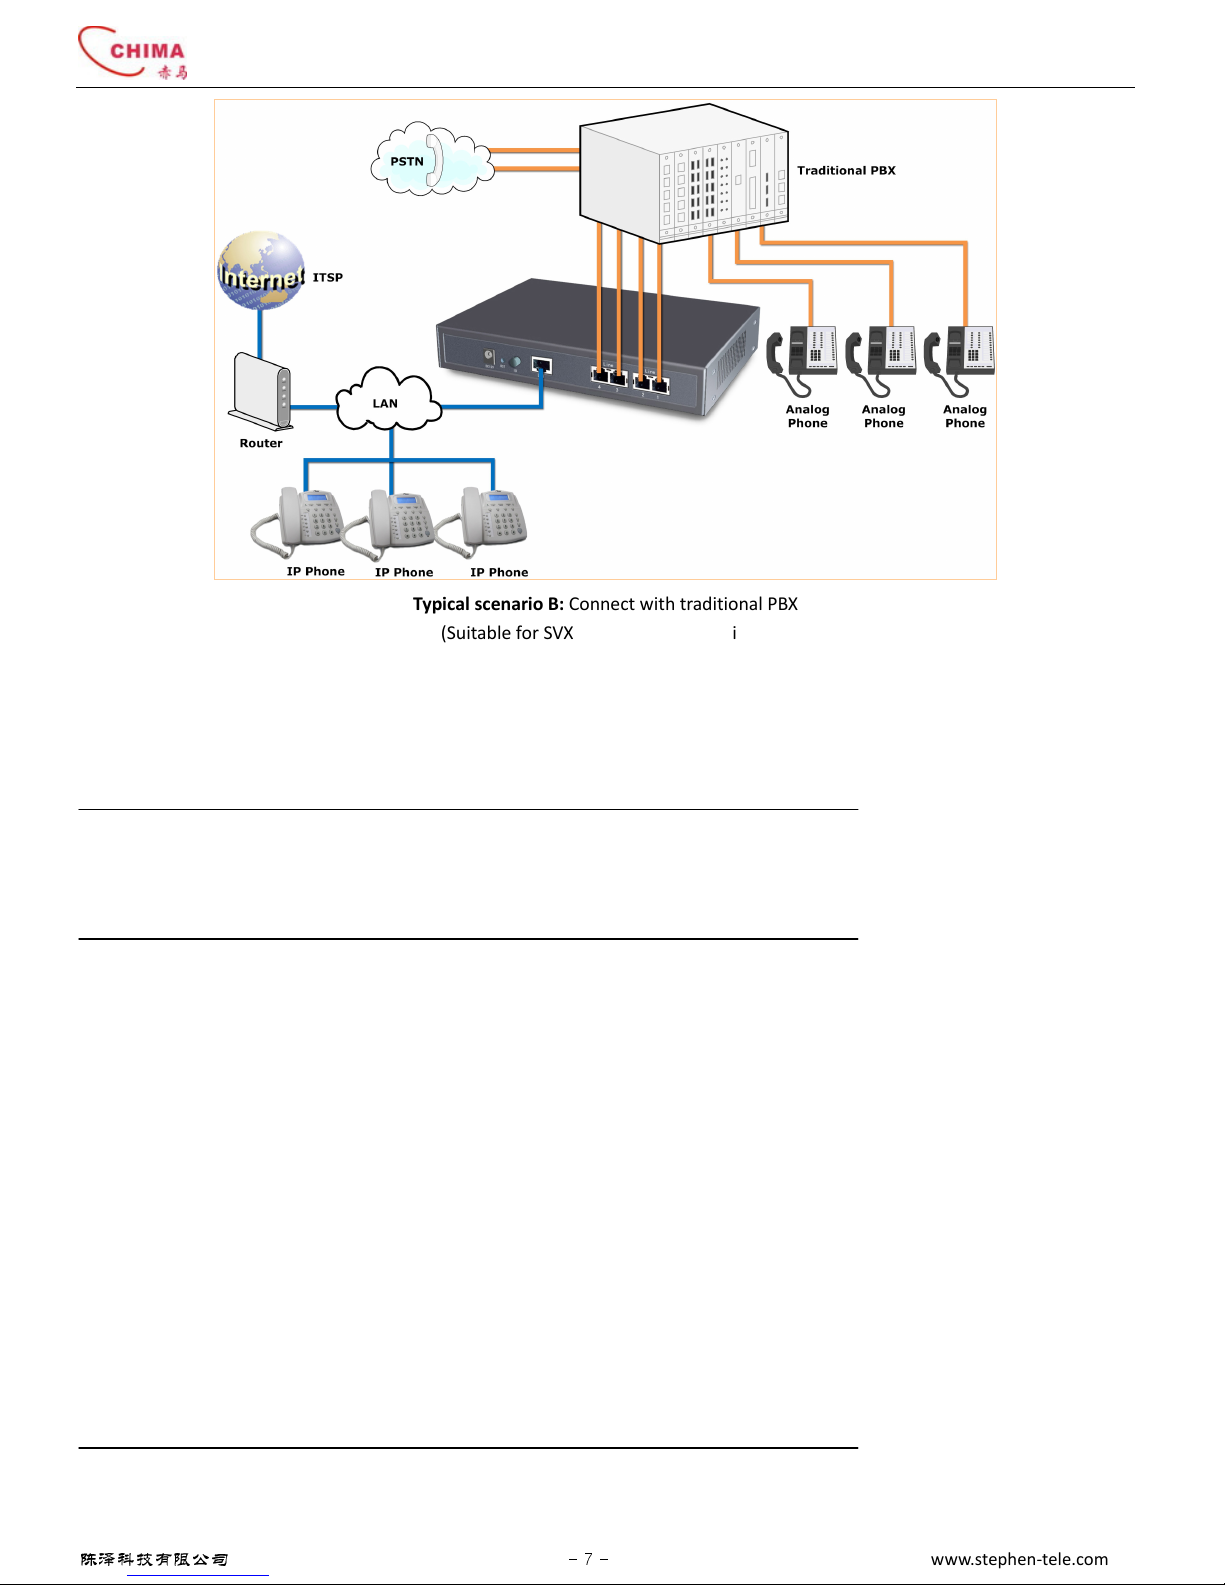
Typical scenario B: Connect with traditional PBX
(Suitable for SVX8004 IP PBX with 4 lines)
.6. . Connect the power
Plug the DC end of the power adapter to the power socket on the de ice and the other end to an a ailable power outlet. Press the
power switch ON at the back of the de ice to start the de ice. The PWR indicator light will be lit if power is connected correctly.
WARNING!
Ne er use a power adapter other than the one pro ided with SVX8004 IP PBX
.
.6.3. System Startup
The STS light on the front panel will flash for a few moments during boot-up, and then remain lit, indicating the de ice is on.
.6.4. Connect the network
Connect the LAN port on the de ice to a Router/Switch by cable. The LAN indicator will lit if connected correctly.
.6.5. Connect the computer
Connect a computer to the same Switch or Router as SVX8004 IP PBX, so the SVX8004 IP PBX can be accessed through the network.
.6.6. Connect the telephone
Connect one end of the pro ided RJ-11 telephone cable to the Phone jack and the other end to your phone. You can hear some
signal tone from the earpiece when you pick up the telephone handset.
NOTE:
SVX8004 IP PBX System User Guide
陈泽科技有限公司
- 8 -
www.stephen-tele.com
The signal tone cannot be heard from the handset before the booting process is completed. The STS light on the front panel
will flash for a few moments during boot-up, and then remain lit, indicating the de ice is on.
.6.7. Connect the PSTN line
Connect one end of the RJ-11 telephone cable to wall phone jack of an incoming phone line and the other end to the Line jack at
the back of the SVX8004 IP PBX.
WARNING!
Ne er connect the line to the Phone jack
.
Otherwise, the de ice may be damaged.
3. Configuration
3.1. Initial Configuration
3.1.1. Get the device IP address
Pickup the phone connected on the Ext port, dial *100#, and then follow the oice instruction. Press “0” key to listen for the IP
address of the de ice.
NOTE:
You may not hear the oice from the phone if the de ice is still in booting process. The STS light on the front panel will flash
during boot-up, then remain lit, indicating the de ice is on.
3.1. . Login into the Web interface
Make sure your computer is in the same subnet with the de ice by modifying your computer’s IP address to match the
de ice’s IP address.
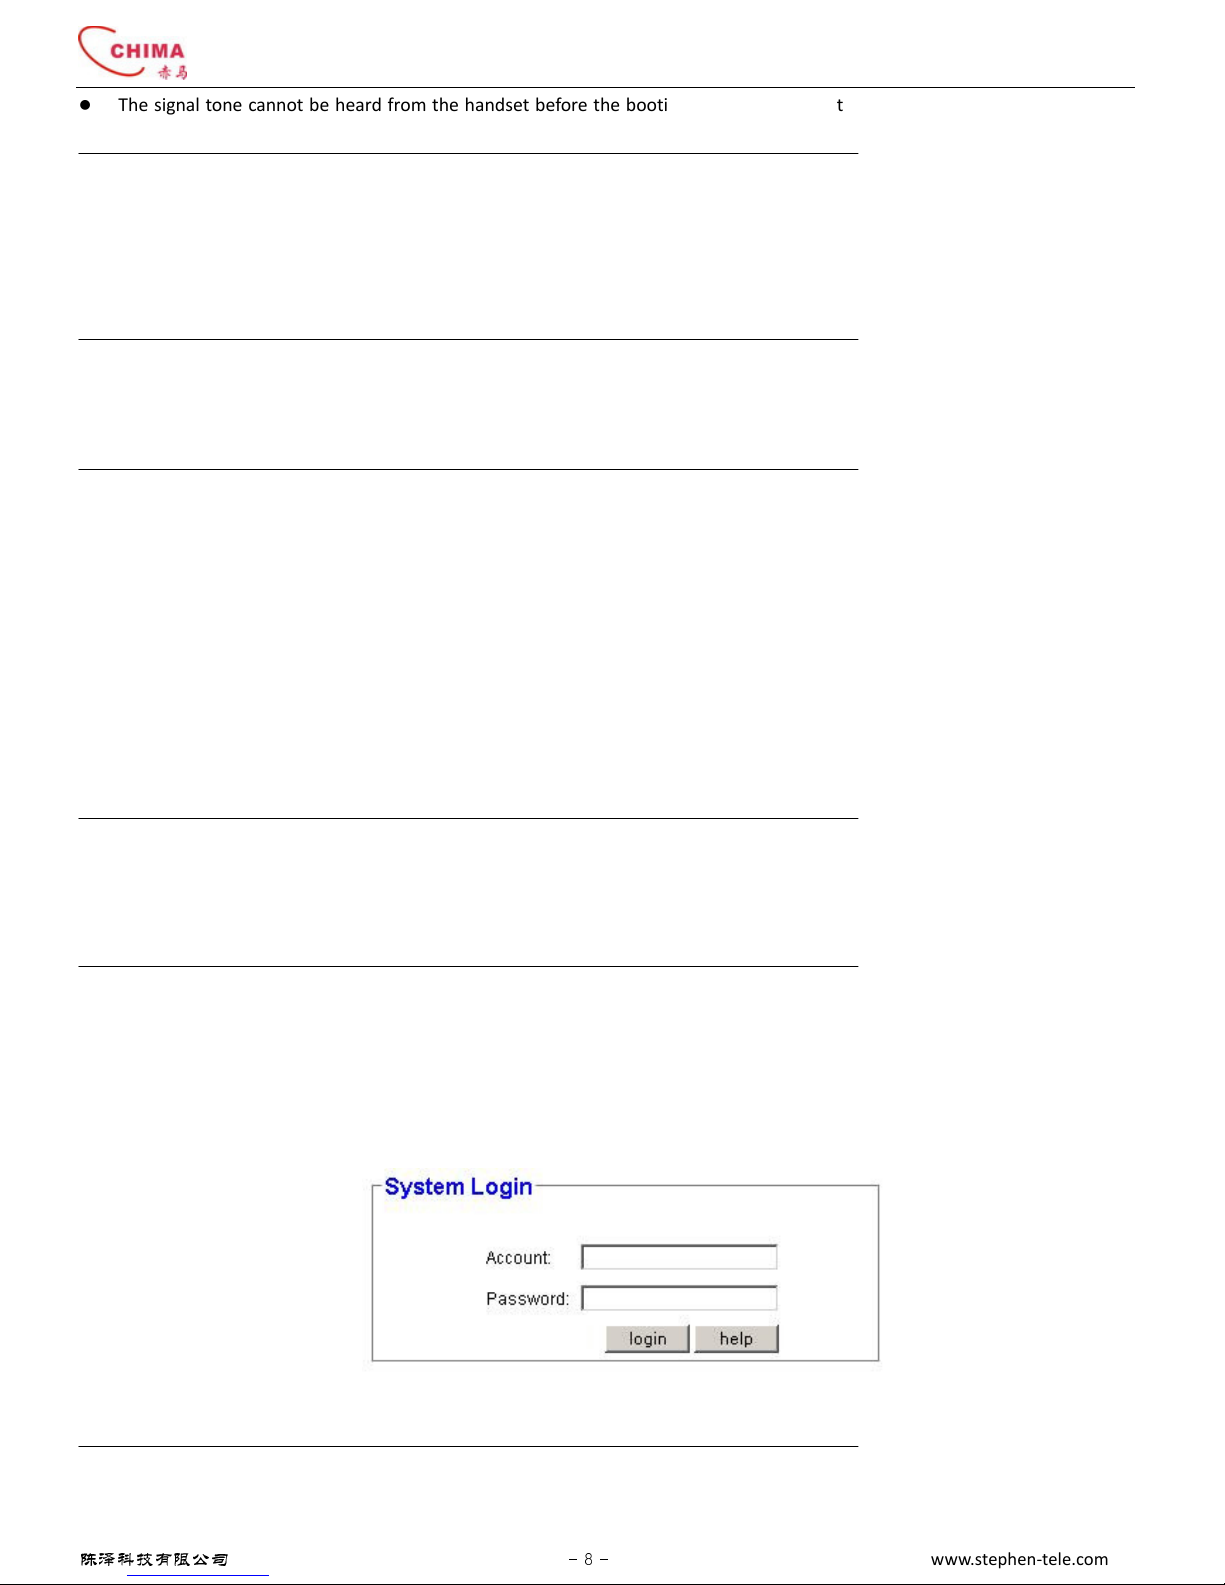
Start web browser, enter the IP address of the de ice into the address bar. The login page will appear:
Enter the user name and password to login. The default user name is “admin”, and the password is “admin”.
NOTE:
SVX8004 IP PBX System User Guide
陈泽科技有限公司
- 9 -
www.stephen-tele.com
We strongly ad ice you to change your password when you first login to a oid any unnecessary loss. You can press and hold
the “Reset” button on the back panel for a few seconds to reset to factory default if you ha e forgotten or lost the password.
Be aware that all the parameters you set before will be lost if you do so.
3.1.3. Web interface overview
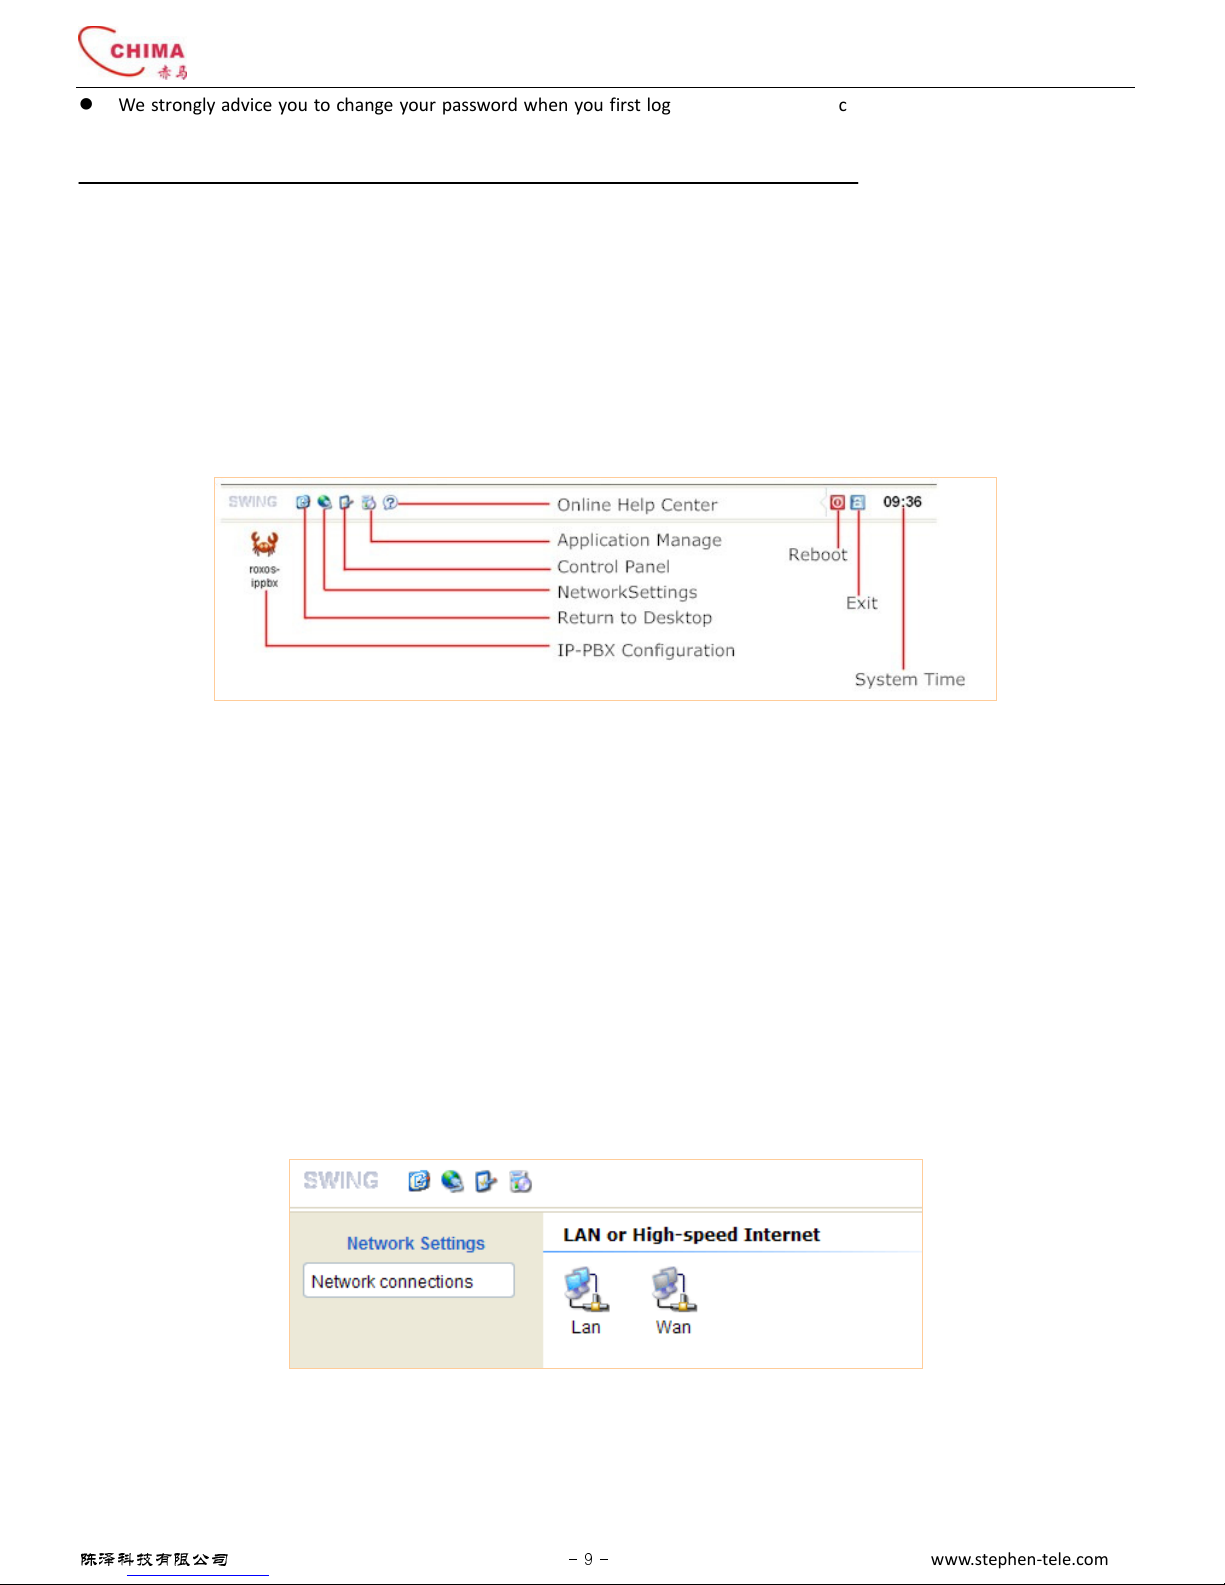
After successful login, the desktop screen will appear.
Online Help center - Click this icon to enter the online help center of SVX8004 IP PBX
Application Manage - Add, remo e or update the application or software.
Control Panel - Change the password for the login account, modify system time and check the system information.
Network Settings - Get the IP address and DNS ser er address of the system.
Return to desktop - Click this button to return to the desktop at any time.
IP-PBX Configuration - Click this icon to enter the IP-PBX configuration interface.
Reboot - Reboot the de ice.
Exit - Logout from the desktop
System Time - Shows the current time of the system.
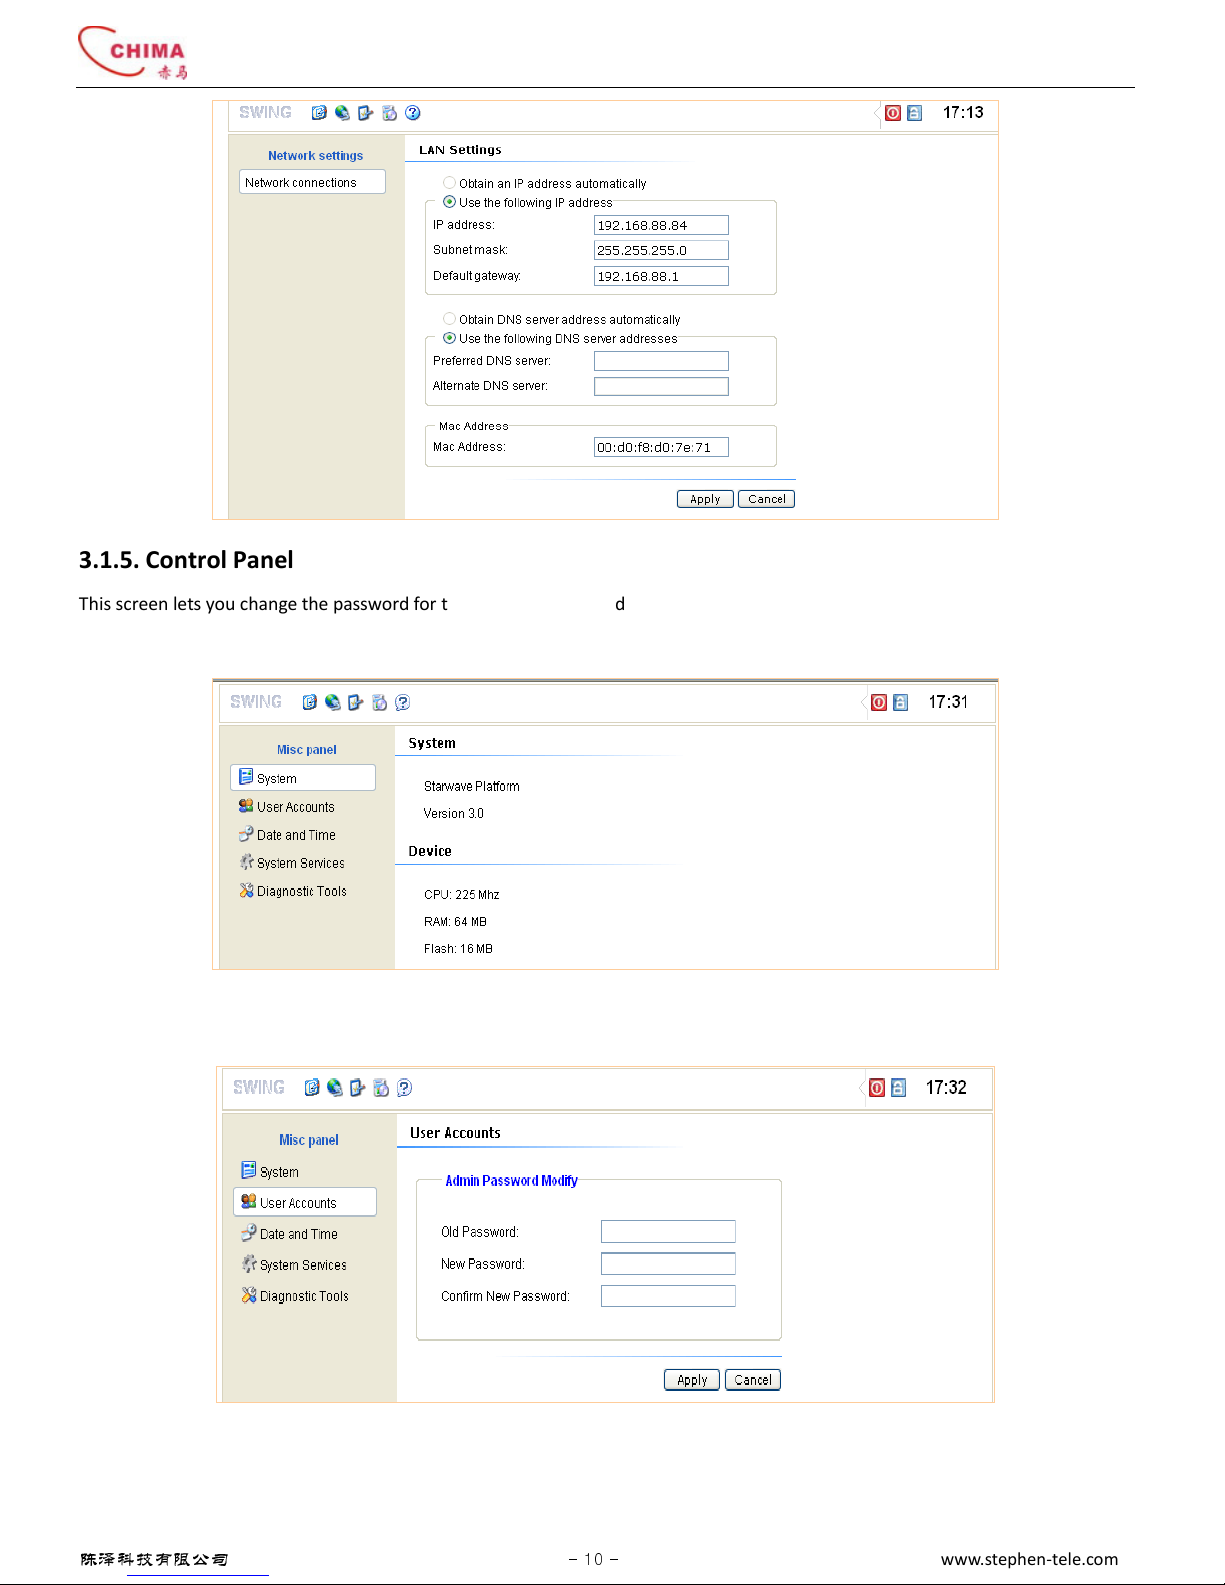
3.1.4. Network Settings
This screen lets you configure the network connections.
The grey color on the WAN icon shows that WAN interface is una ailable.
Click the LAN icon, the LAN Settings screen will appear, you can change the IP address and DNS ser er address for the LAN port
here. De ice’s MAC address is showed in the Mac Address section.
SVX8004 IP PBX System User Guide
陈泽科技有限公司
- 10 -
www.stephen-tele.com
3.1.5. Control Panel
This screen lets you change the password for the login account, modify system time and check the system information.
To check system information:
To change the login password:
To set the system Time:
There are two ways to set the system time:

SVX8004 IP PBX System User Guide
陈泽科技有限公司
- 11 -
www.stephen-tele.com
Set as PC Time: Click this button. The de ice will synchronize time with your PC immediately.
Through NTP Server: Tick the option “Auto Synchronize with Internet NTP Ser er”, The de ice will automatically synchronize time
with the NTP ser er periodically. You should select the time zone where the de ice resides and input the address of the NTP ser er.
The button “synchronize Now!” will let the de ice synchronize time with the ser er immediately.
Edit system service parameters
In the “System Ser ices” section, you can edit the HTTPD ser ice parameters
Click the link “thttpd”. The following screen will appear. You can change the listen port and the login timeout of the HTTPD ser er. If
there is no action performed after the timeout specified here, the Web screen will return to the login page.
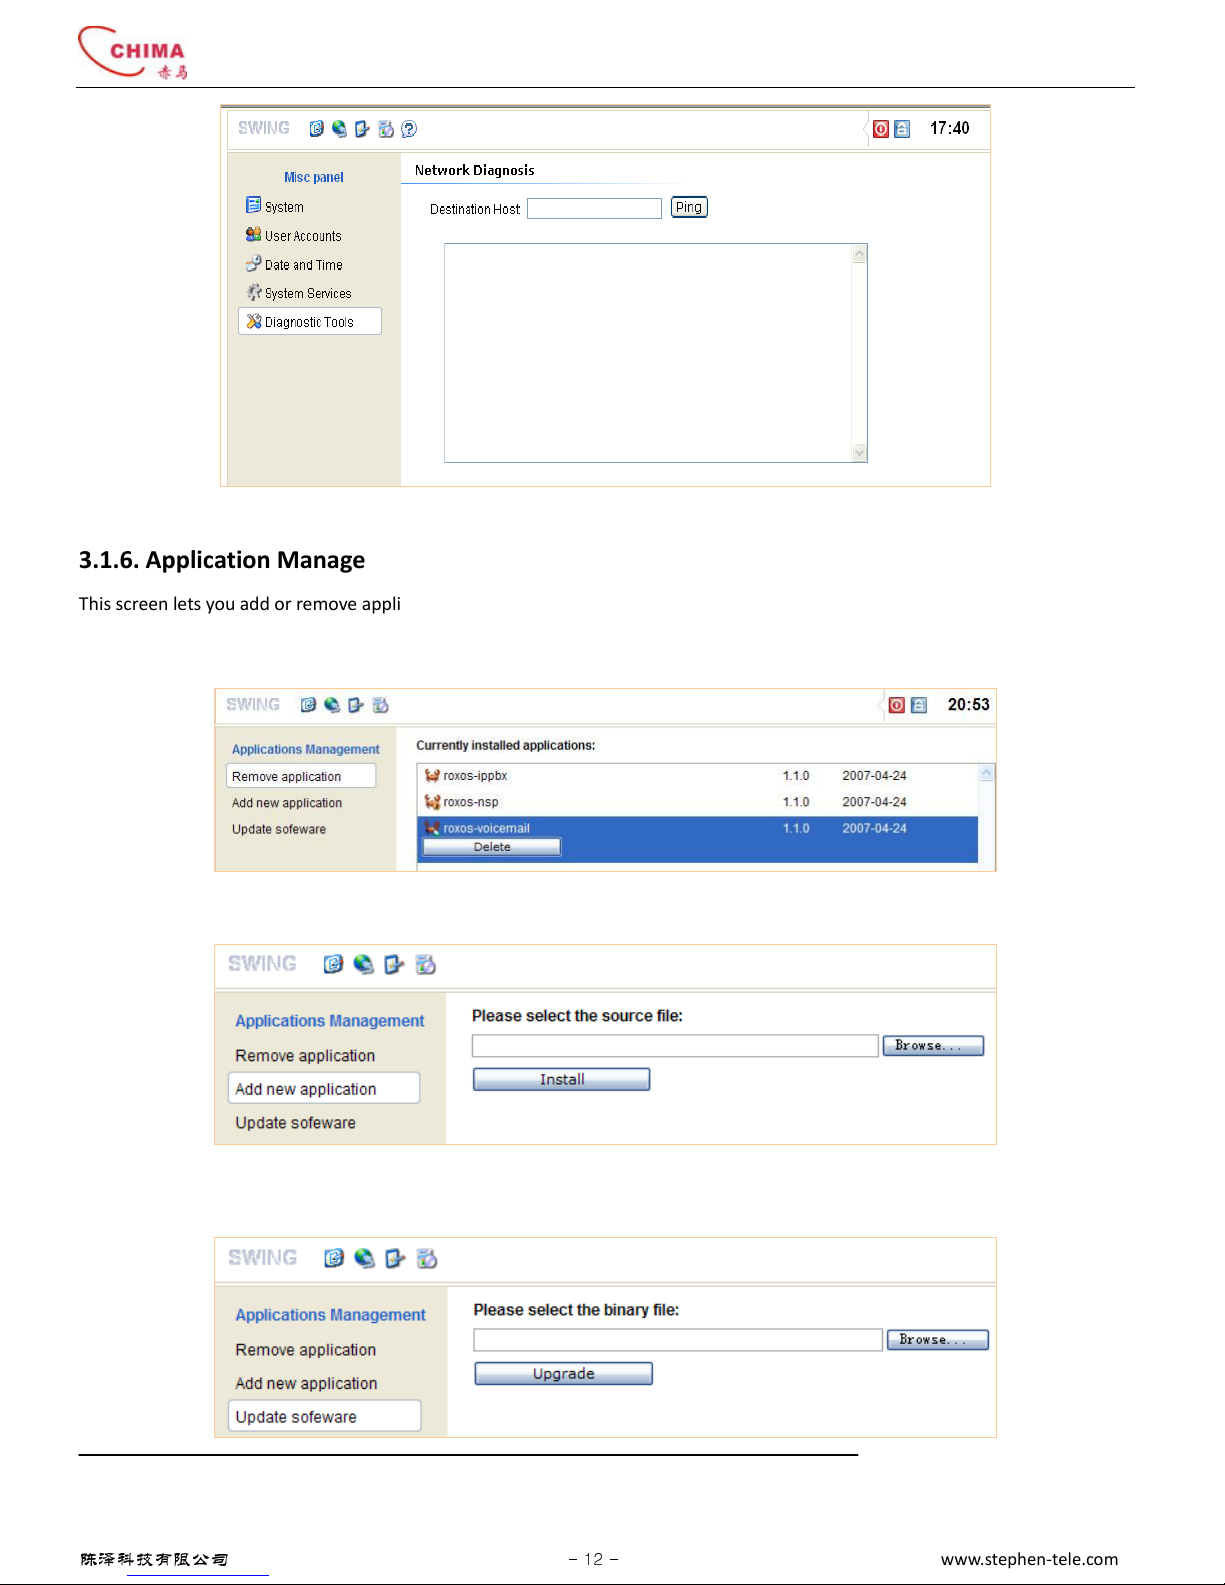
Diagnostic
Enter a destination host’s IP address or domain name into the text area next to Ping button and click the Ping button, de ice will try
to ping that address and print the returned message in screen.
SVX8004 IP PBX System User Guide
陈泽科技有限公司
- 12 -
www.stephen-tele.com
3.1.6. Application Manage
This screen lets you add or remo e application(s) and update the system software.
To remo e an application, just click the “Delete” button under the application name which you want to remo e.
A new application can be added to the system by installing from an installation package file.
The whole system, including the embedded Linux operation system, can be updated by reprogramming the flash. Just select the
appropriate binary file and click “Upgrade” to start.
WARNING!

SVX8004 IP PBX System User Guide
陈泽科技有限公司
- 13 -
www.stephen-tele.com
The updating process may take some time. Ne er power off the de ice during the updating, otherwise the de ice might be
damaged permanently.
3.1.7. IP-PBX Configuration Interface
Click the “ROXos-ippbx” icon on the desktop. The IP-PBX configuration interface will appear. In this interface, you can do all
configurations related to the IP-PBX functions.
In the IP-PBX configuration interface, if you want to return to desktop screen or logout, just click the link at the top right of the
screen at any time.
You can click the button “Reload ROXos” to restart the IP-PBX ser ice without rebooting the de ice.
NOTE:
Only one CODEC type is supported by SVX8004 IP PBX at a time. If you want to change to other CODEC type, you should
update the firmware to corresponding ersion.
3. . Configure Extensions
SVX8004 IP PBX supports up to 14 extensions including 2 onboard analog extensions and 12 IP extensions.
3. .1. Configure Onboard Extensions
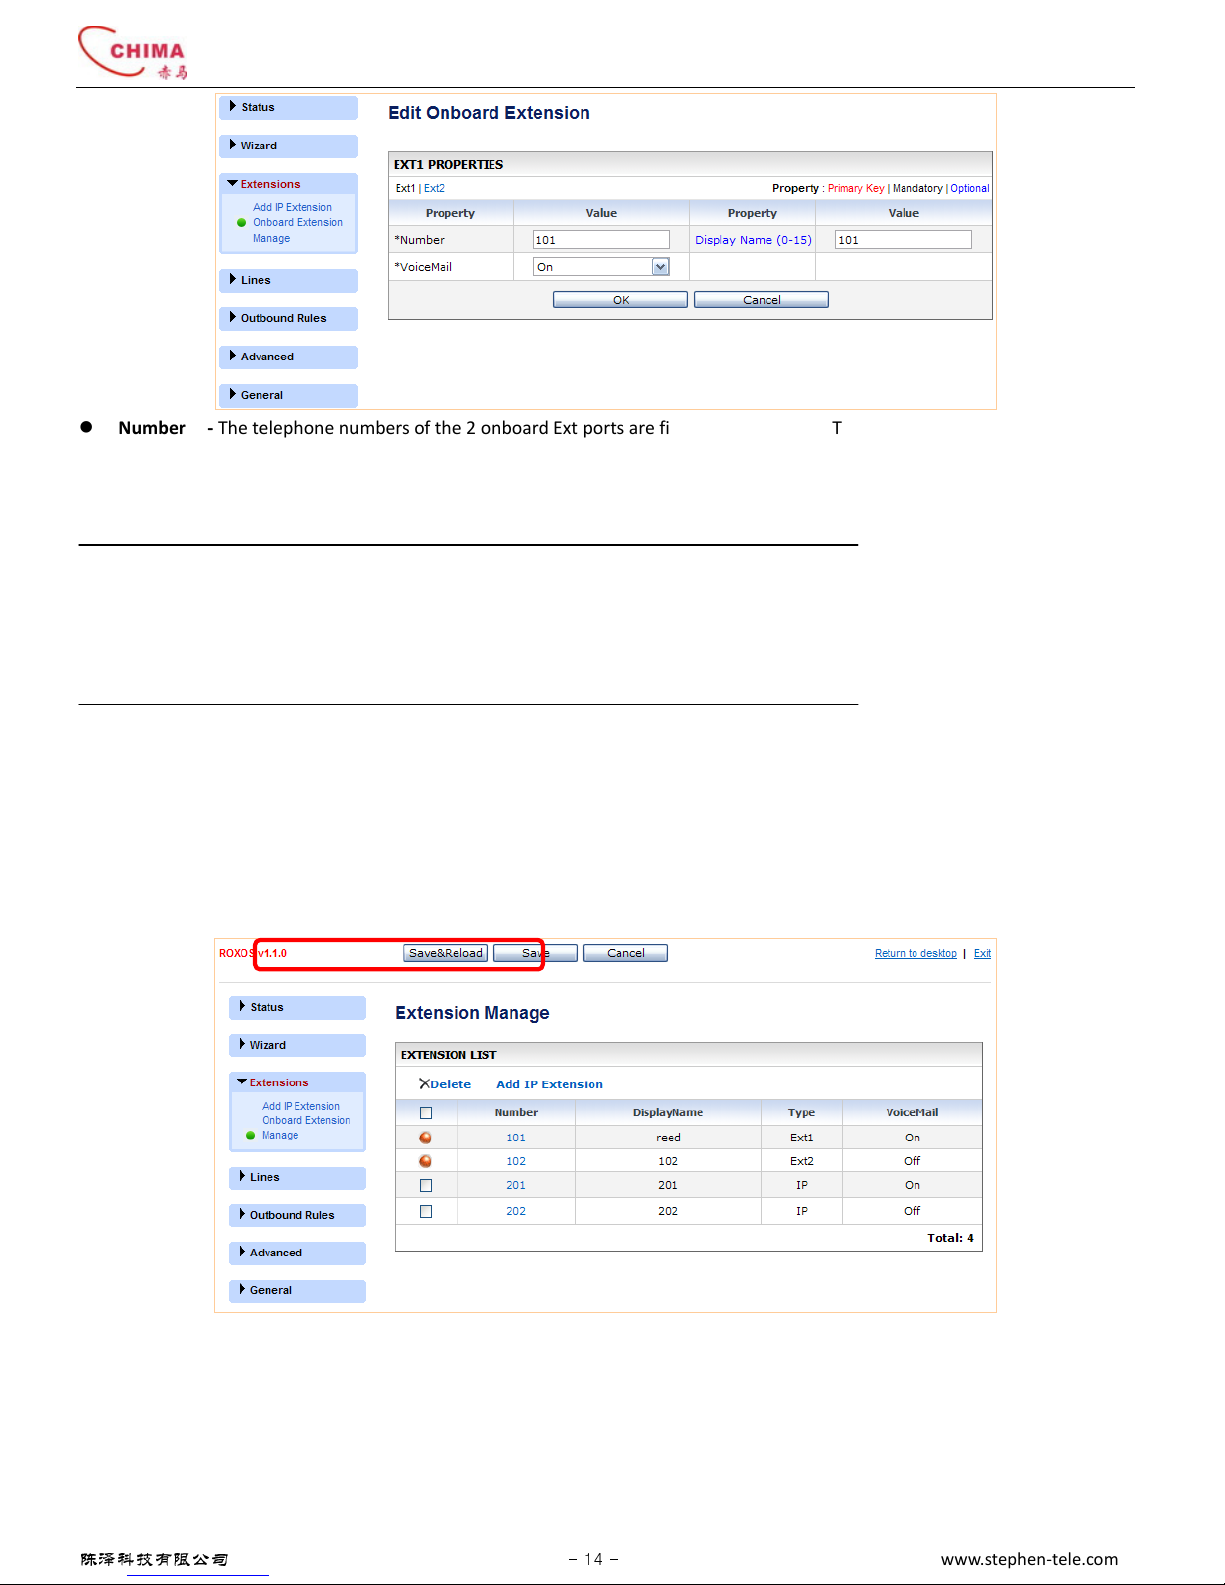
Click the “Extensions” menu, and “Onboard Extension” submenu. The Onboard Extension table will appear. You can edit the
parameters of each Ext port by selecting “Ext1” or “Ext2”
SVX8004 IP PBX System User Guide
陈泽科技有限公司
- 14 -
www.stephen-tele.com
Number - The telephone numbers of the 2 onboard Ext ports are fixed to 101 and 102. The user can not change these.
Display Name - A description name for memorization. When calling from this extension to another IP phone, the name will be
displayed on the LCD screen of the phone as the caller name.
Voicemail - Select “On” to acti ate the oicemail box for the extension or “Off” to deacti ate it.
NOTE:
Parameters with a “*” mark are mandatory. A alue must be specified before submitting.
Parameters with a blue color are optional. The alue can be specified or not.
Click “OK” to submit or “Cancel” to abort the change.
If any parameter is changed in the IP-PBX, three buttons will appear on the top of the screen. Click “Save & Reload” to sa e the
changed parameter to flash and restart the IP-PBX ser ice to make the changed parameter take effect immediately.
Click “Save” to sa e the changed parameter only to flash. It will not take effect until the next restart.
Click “Cancel” to abort all the parameter changes since the last sa ing.
3. . . Configure IP Extensions
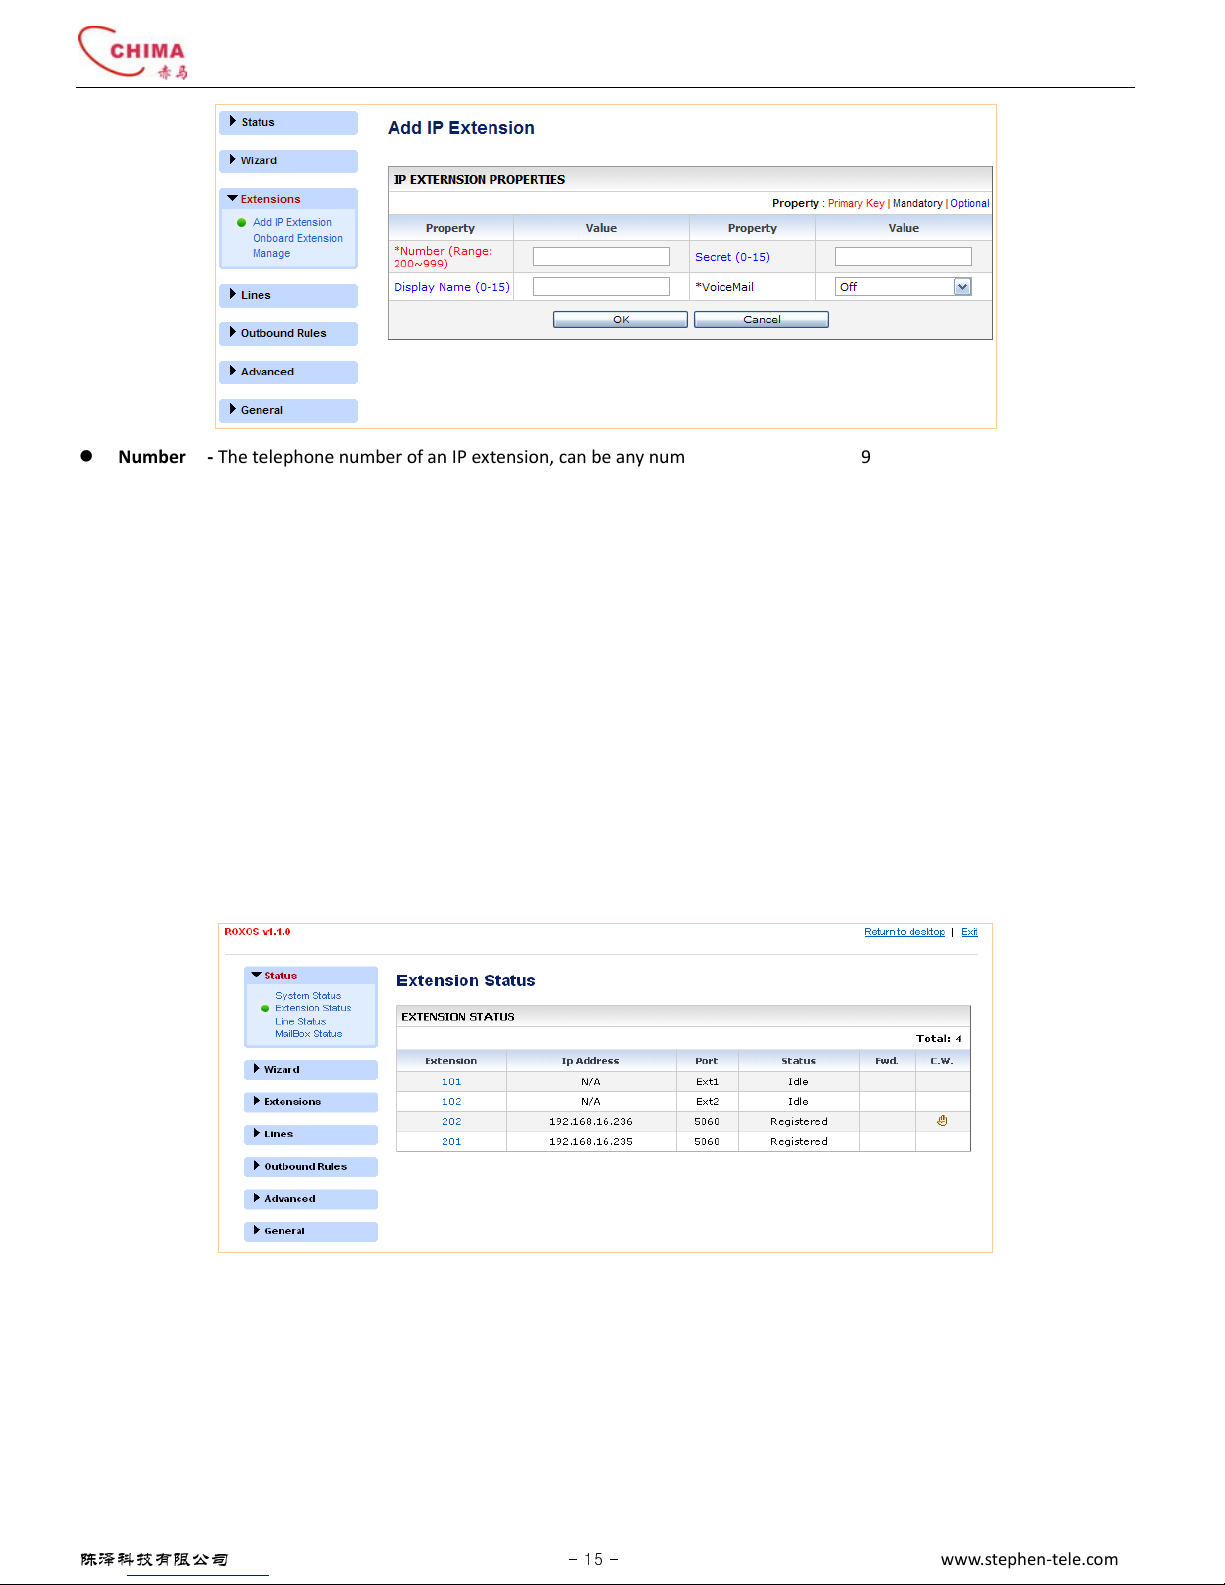
Click the “Extensions” menu, and “Add IP Extension” submenu. The Add IP Extension screen will appear. You can create an SIP
account here.
SVX8004 IP PBX System User Guide
陈泽科技有限公司
- 15 -
www.stephen-tele.com
Number - The telephone number of an IP extension, can be any number between 200 and 999.
Secret - The password associated with the number which will be used by the IP extension to register to the IP-PBX.
Display Name - A description name for memorization. When calling from this Extension to another IP phone, the name will be
displayed on the LCD screen of the phone as the caller name.
Voicemail - Select “On” to acti ate the oicemail box for the extension or “Off” to deacti ate it.
Click “OK” to submit and click “Sa e & Reload” to take immediate effect.
After adding an IP extension, the created SIP account can be configured to an IP phone, ATA, oice gateway or any other SIP
compliant de ice and then registered to SVX8004 IP PBX as IP extensions.
3. .3. Extension Status
Click the “Status” menu, and “Extension Status” submenu. The Extension Status table will appear. The status of all the added
extensions is listed here, including the 2 onboard analog extensions. You can click the “Extension Status” submenu again to refresh
the information.
IP Address - The IP address from which the IP extension is registered to SVX8004 IP PBX.
Port - The port associated with the IP address for registration.
Status - Shows the calling state for onboard analog extensions and shows the registration state for IP extensions.
Fwd. - Shows whether the call forwarding is acti ated or deacti ated for the extension.
C.W. - Shows whether the call waiting is acti ated or deacti ated for the extension.
SVX8004 IP PBX System User Guide
陈泽科技有限公司
- 16 -
www.stephen-tele.com
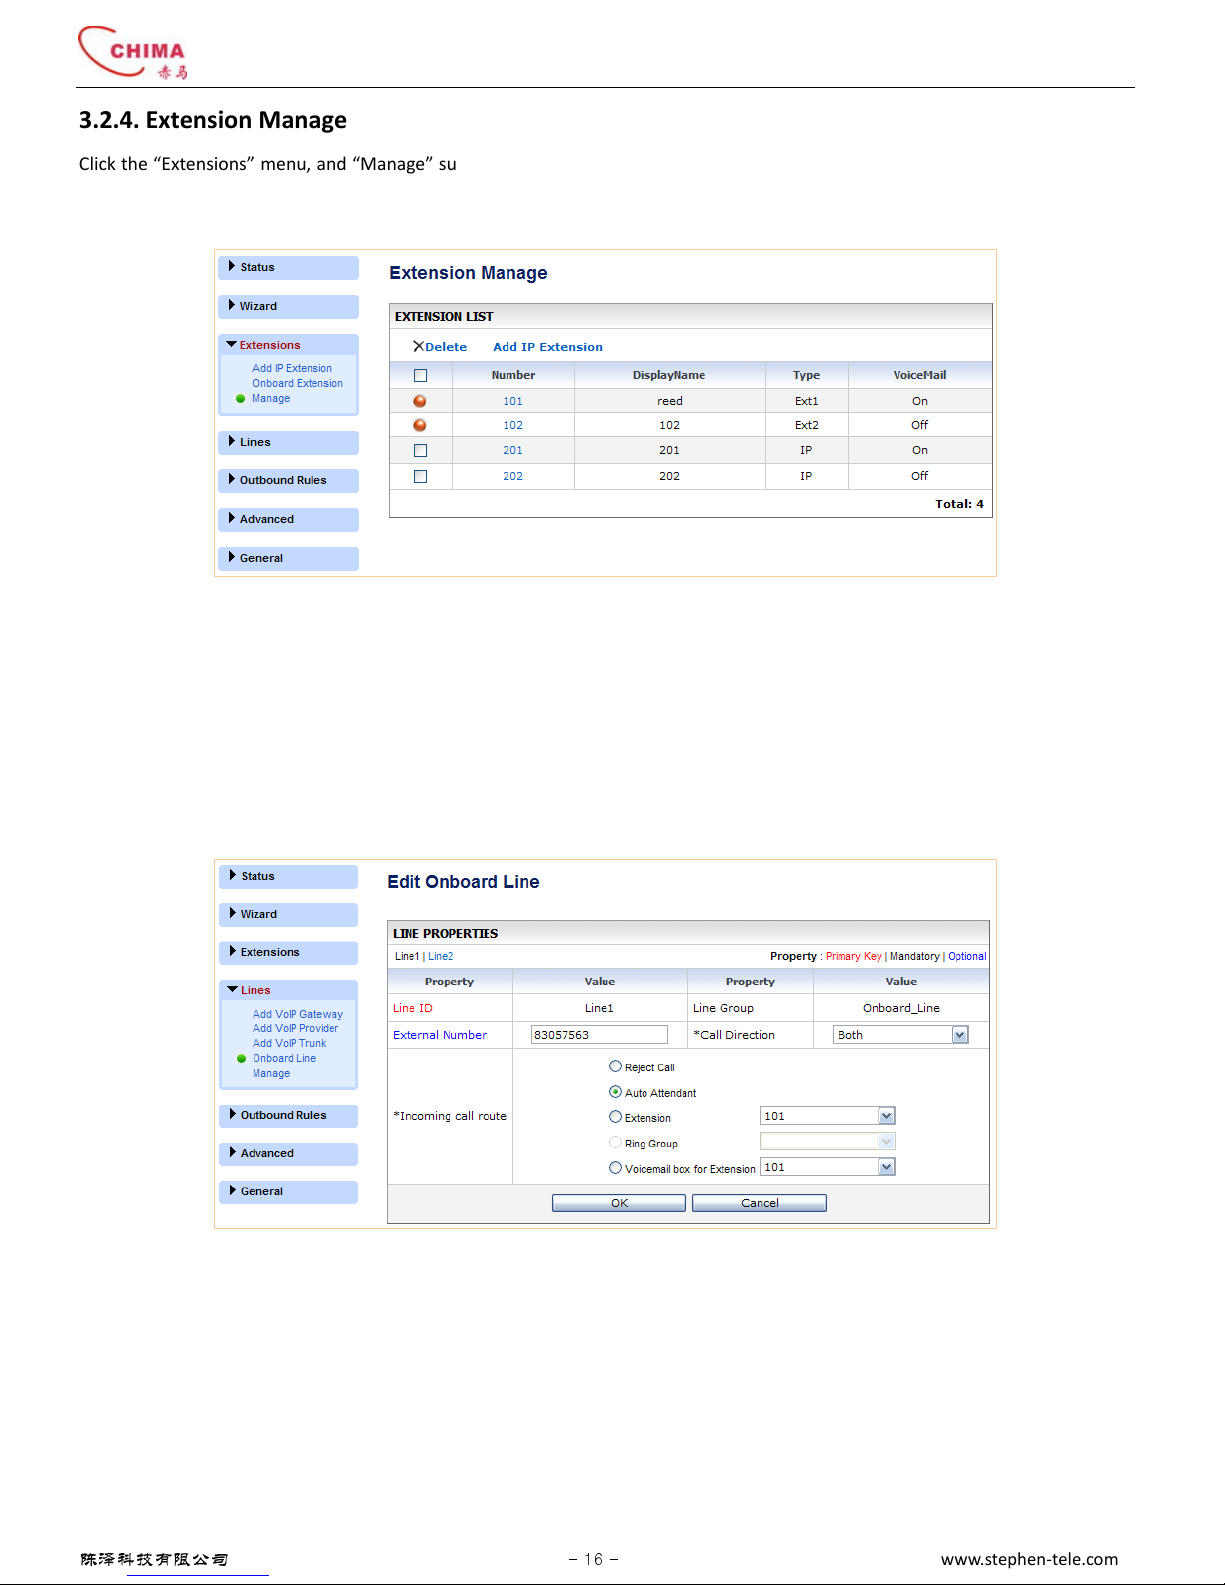
3. .4. Extension Manage
Click the “Extensions” menu, and “Manage” submenu. The Extension Manage table will appear. All the added extensions are listed
in this table. You can delete an IP extension by ticking the box corresponding to the number and clicking the “Delete” button on the
top left of the table. Just click on the number to enter the “Edit Extension” screen if a parameter change is needed.
3.3. Configure PSTN Lines
SVX8004 IP PBX has 2 onboard line ports which can be connected with 2 PSTN lines. The system can be extended to up to 6 PSTN
lines ia FXO Gateway if more PSTN lines needed.
3.3.1. Configure Onboard PSTN lines
Click the “Lines” menu, and “Onboard Line” submenu. The Onboard Line table will appear. You can edit the parameters of each Line
port by selecting “Line1” or “Line2”.
Line ID - The Line ID is a read-only alue. It is generated by the system automatically and is used to identify each line in the
system.
Line Group - Line Group consists of analog or VoIP lines that are associated so that calls to any line in the group are rolled o er
to the next a ailable line in the group when the line is busy. The 2 onboard lines belong to the “Onboard_Line” group.
External Number - The PSTN number of the PSTN line connected to the Line port.
Call Direction - Only incoming calls are allowed on the line if “Incoming” is selected; only outgoing calls are allowed on the line
if “Outgoing” is selected; both incoming and outgoing calls are allowed on the line if “Both” is selected.
Incoming call route - Select the destination where the incoming call will be routed.
Reject call - The call will be rejected immediately and the caller will hear a busy tone.
Auto Attendant - The call will be answered by the auto attendant and the caller will hear a oice prompt.
SVX8004 IP PBX System User Guide
陈泽科技有限公司
- 17 -
www.stephen-tele.com
Extension - The specified extension will ring immediately when the call comes in.
Ring Group - The Ring Group will ring immediately when a call comes in. This option is grey if no ring group has been
added yet.
Voicemail Box for Extension - The call will be directed to the oicemail box of the specified extension and the caller will
hear the greeting of the mailbox.
Click “OK” to submit the changes, and then click “Sa e & Reload” to reload the system to take immediate effect.
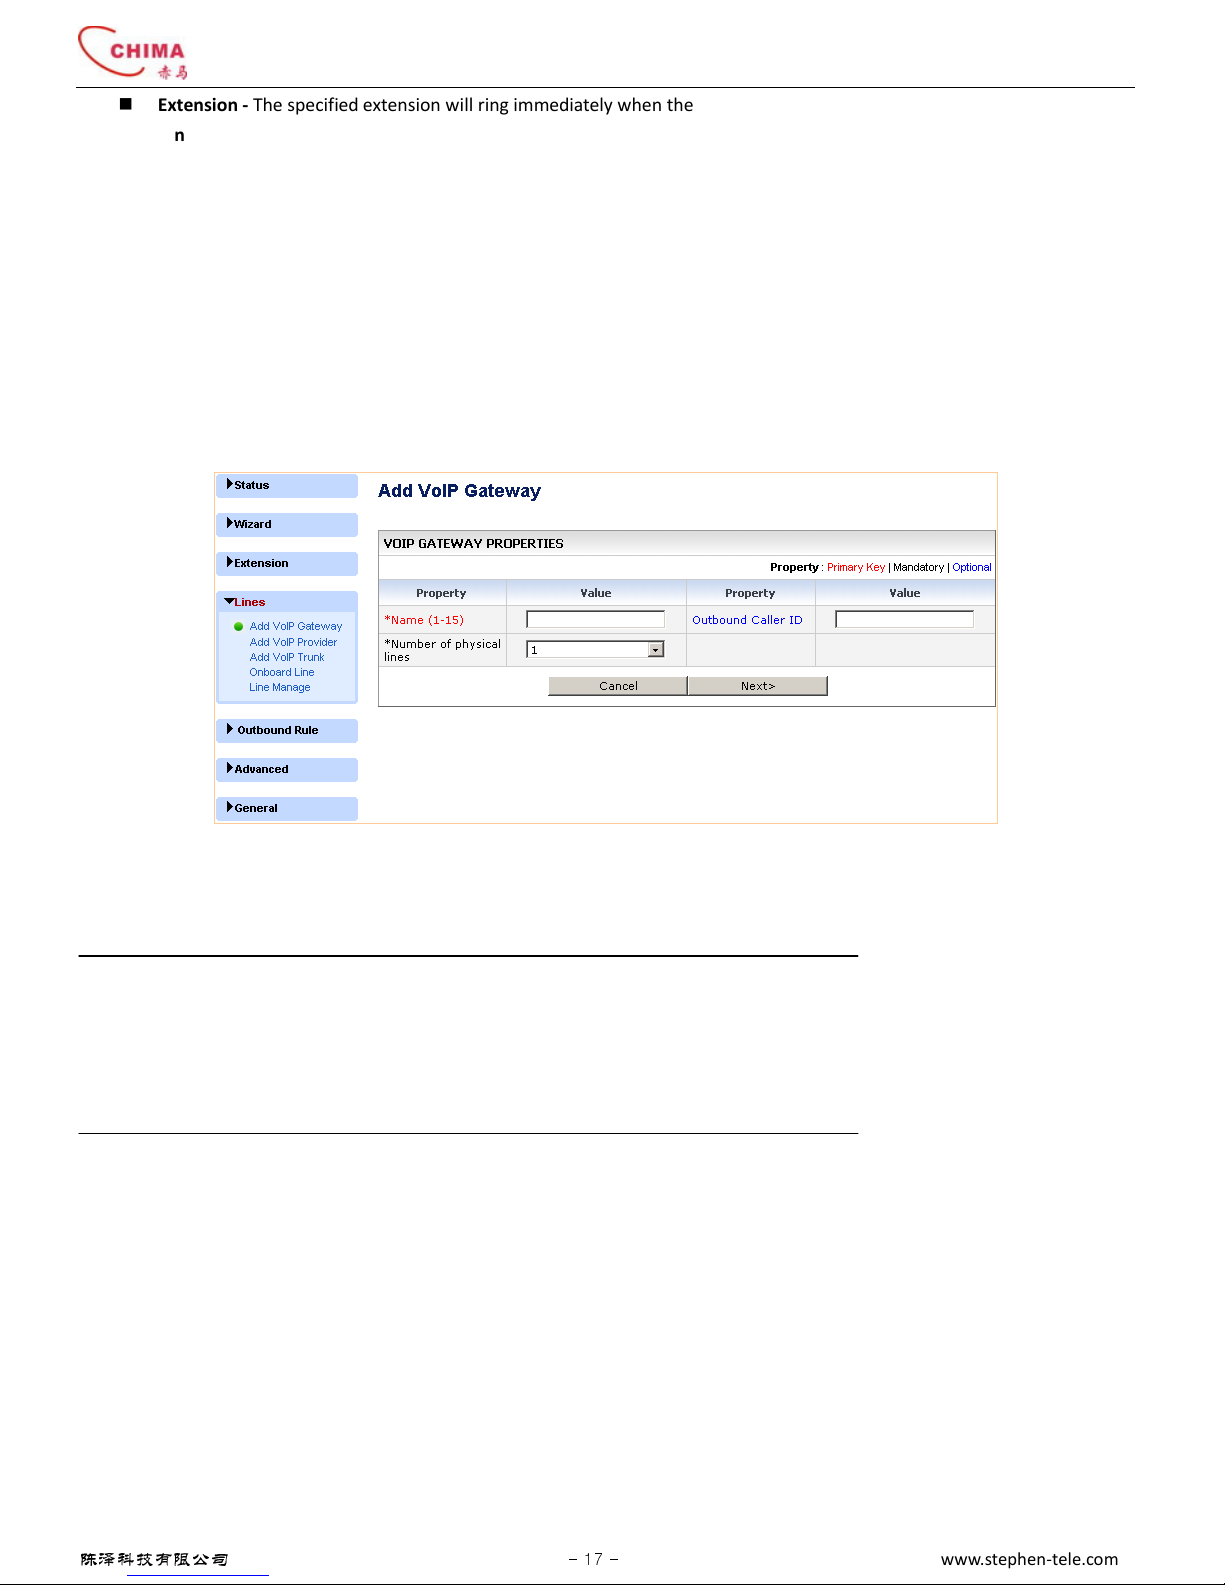
3.3. . Configure lines via VoIP Gateway
Click the “Lines” menu, and “Add VoIP Gateway” submenu. The Add VoIP Gateway screen will appear. You can add a gateway line
group and create SIP accounts for the VoIP gateway here.
Name - A description name for memorization. The name will be automatically added by the system with the prefix “gw_” by
the system to clearly indicate it is a gateway line group.
Number of physical lines - Select the number of physical PSTN lines that the gateway supports and that you are using.
NOTE:
The total number of the lines is 4, including lines added ia VoIP gateway, VoIP pro ider and VoIP trunk, excluding the 2
onboard lines. So the a ailable number in the list of the “Number of physical lines” may change according to how many lines
ha e been added and how many lines remain a ailable to be added.
Outbound Caller ID - An optional parameter which fills into the Caller ID field on an outgoing call.
Click the “Next” button. I
ndi idual lines will be created and displayed in a columnar format. SIP accounts will be
generated for each line with default Line ID, Authen ID and password. Only the password can be modified.
SVX8004 IP PBX System User Guide
陈泽科技有限公司
- 18 -
www.stephen-tele.com
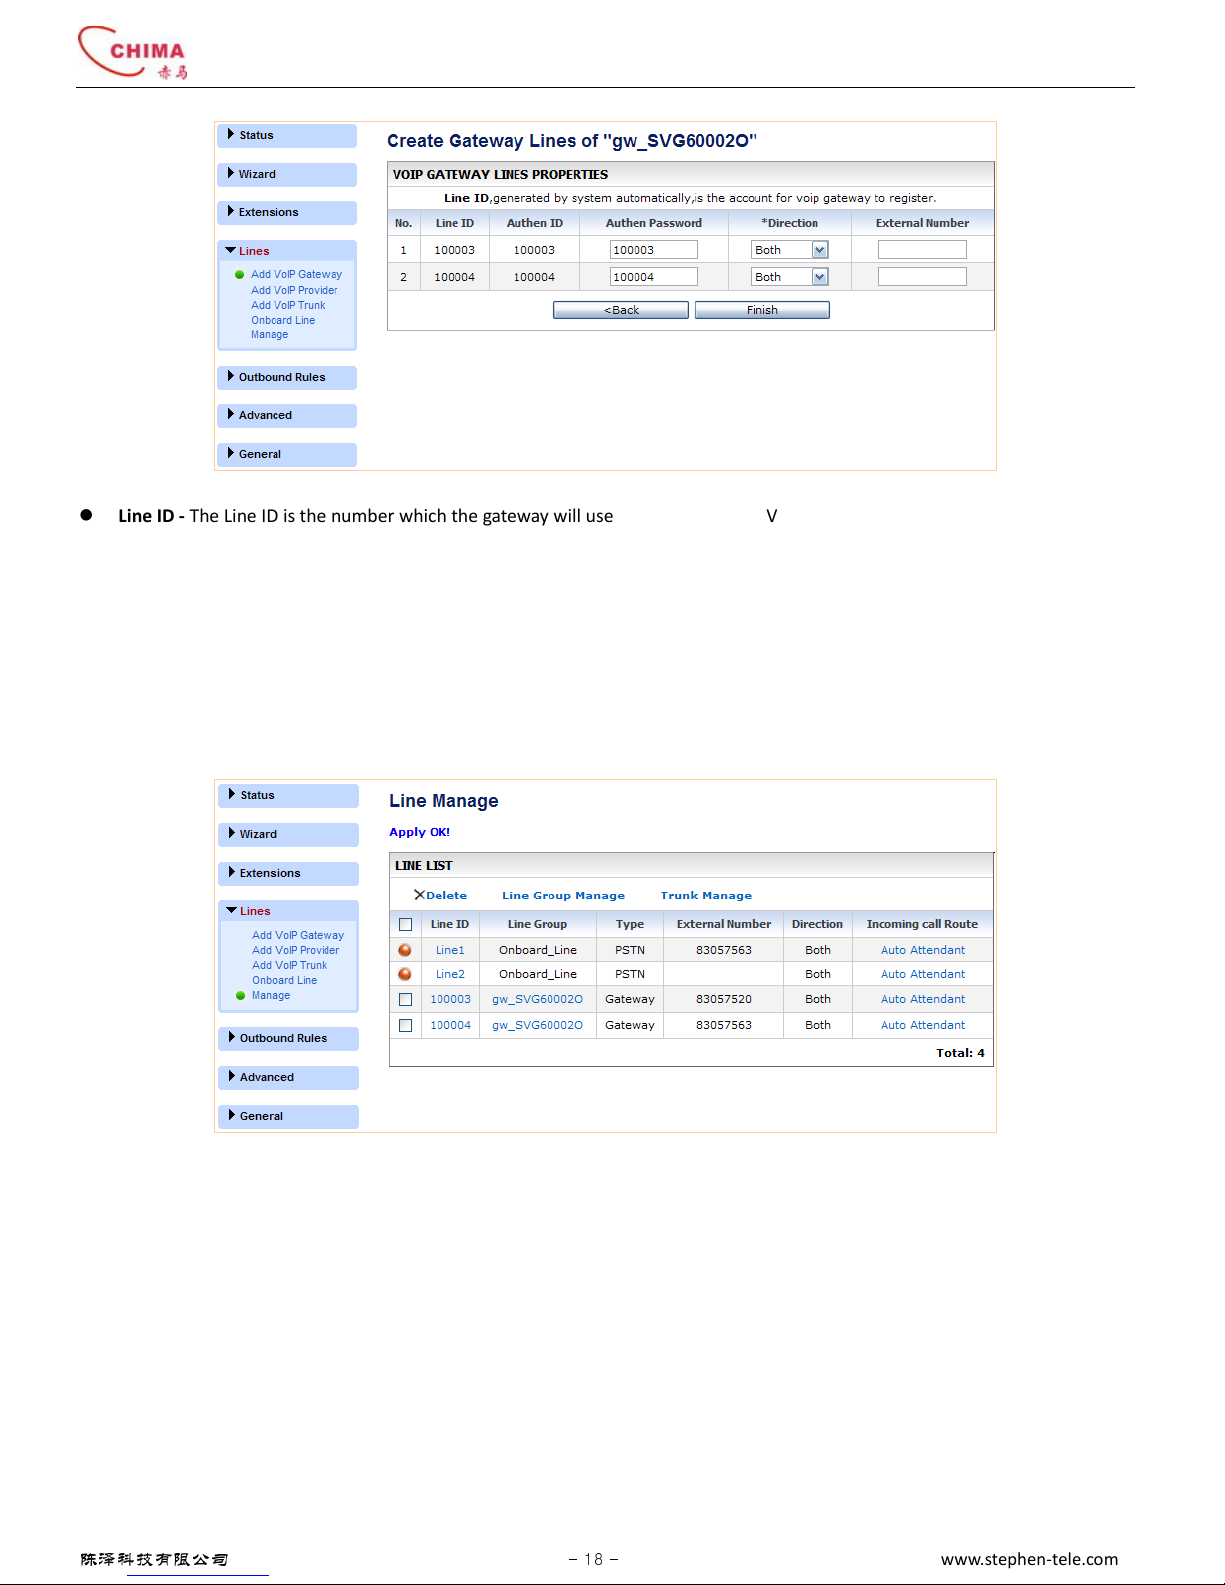
Line ID - The Line ID is the number which the gateway will use to register to the SVX8004 IP PBX.
Authen ID - The authentication ID when registered to the SVX8004 IP PBX.
Authen Password - The authentication password when registered to the SVX8004 IP PBX.
Call Direction - Only incoming calls are allowed on the line if “Incoming” selected; only outgoing calls are allowed on the line if
“Outgoing” is selected; both incoming and outgoing calls are allowed on the line if “Both” is selected.
External Number - The PSTN number of the PSTN line connected to the Line port of the gateway.
Click the “Finish” button. The system will bring up the line manage page which shows all the lines including the 2 onboard lines and
the lines added ia the gateway.
Click the corresponding line ID to enter the line edit screen. You can modify the property of the line as described abo e.
SVX8004 IP PBX System User Guide
陈泽科技有限公司
- 19 -
www.stephen-tele.com
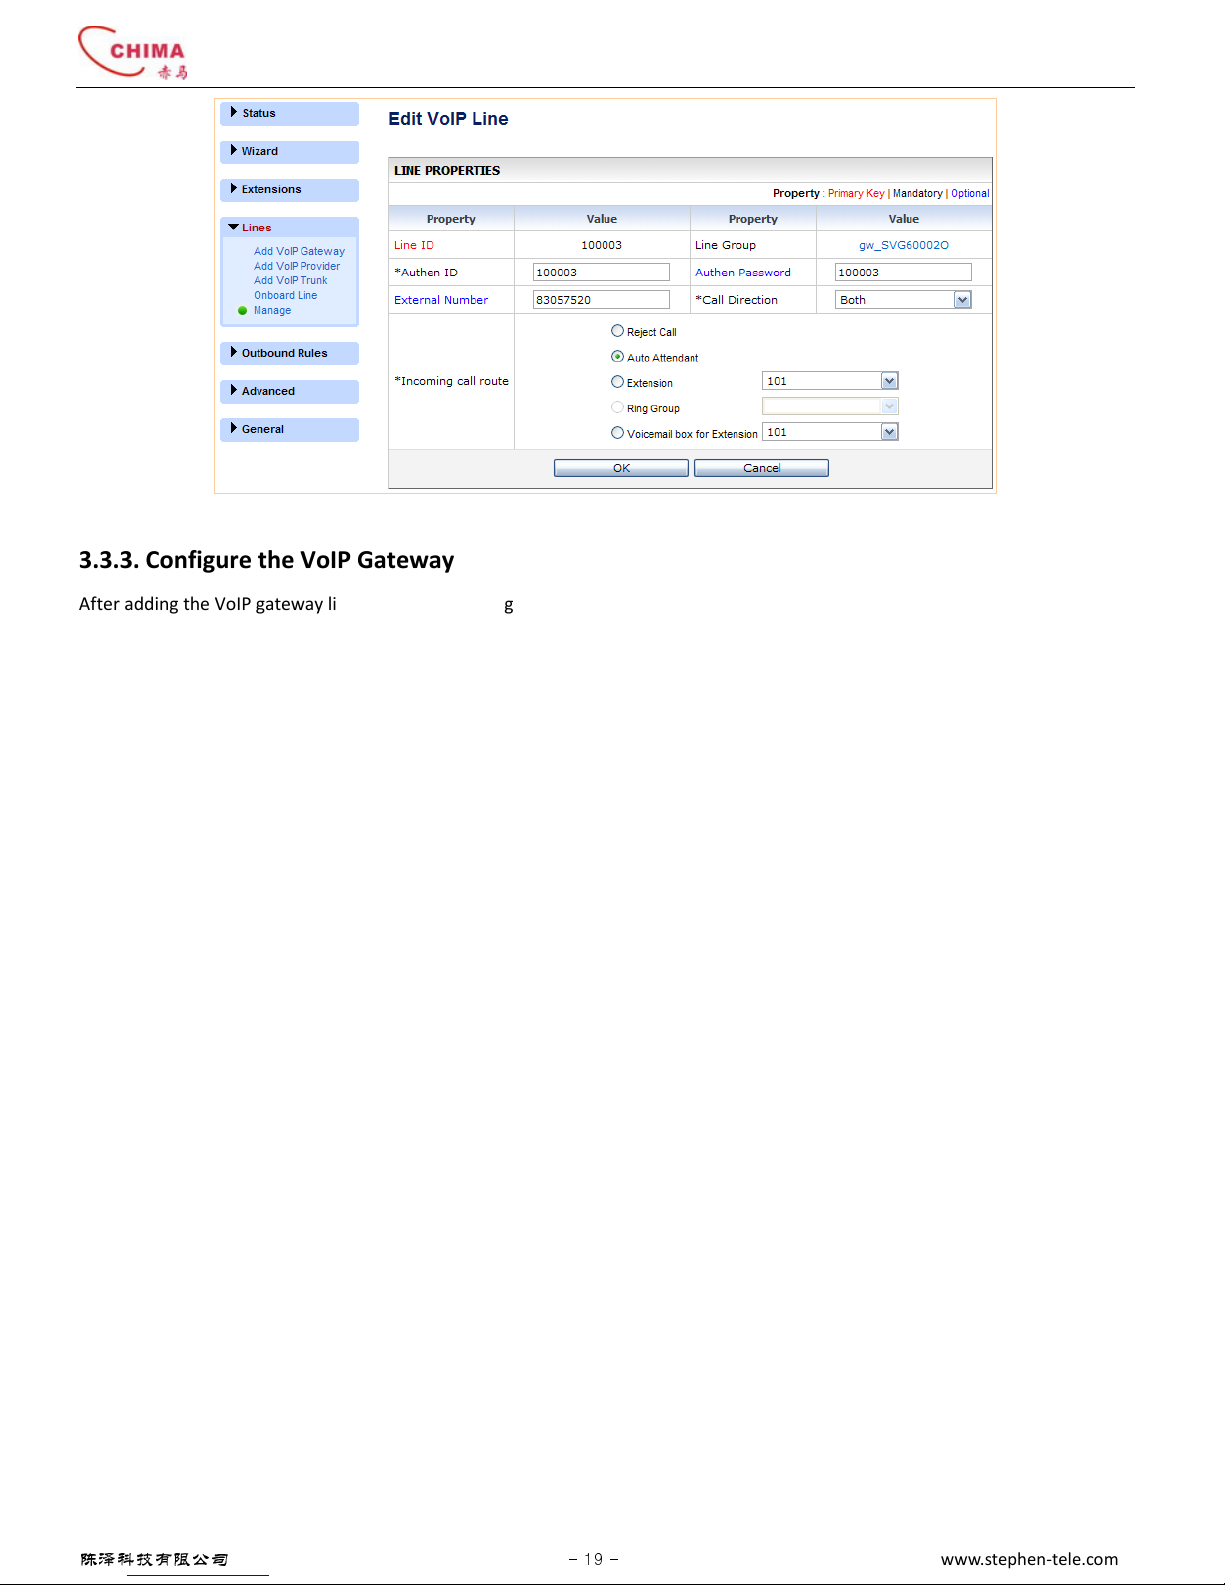
3.3.3. Configure the VoIP Gateway
After adding the VoIP gateway line group and creating the SIP accounts for each line, you should configure the VoIP gateway to
register its lines to the SVX8004 IP PBX system.
Configure the VoIP registration
Each line created for the VoIP gateway in the SVX8004 IP PBX System has to be configured in the VoIP gateway’s “SIP” or “VoIP”
settings section. Each line has to be configured with a SIP account including Line ID (line number), Authentication ID and
Authentication Password. These must match the alues you entered in the corresponding fields of the lines you created in the
SVX8004 IP PBX.
Configure the Routing
Once your gateway has been configured and its “SIP” or “VoIP” lines are registered with
the SVX8004 IP PBX System ser er, the gateway must be configured to forward incoming calls from the PSTN to the line
numbers(Line ID) of the PSTN lines created in the SVX8004 IP PBX.
Many VoIP gateways can be configured to work with SVX8004 IP PBX. We recommend the following:
CHIMA - SVG6000B
CHIMA - SVG6116
Grandstream - GXW-4104
D-Link - DVG-3004S
Micronet - SP 5050
Linksys - SPA3000
Tainet - Bodhicom 3404/3408
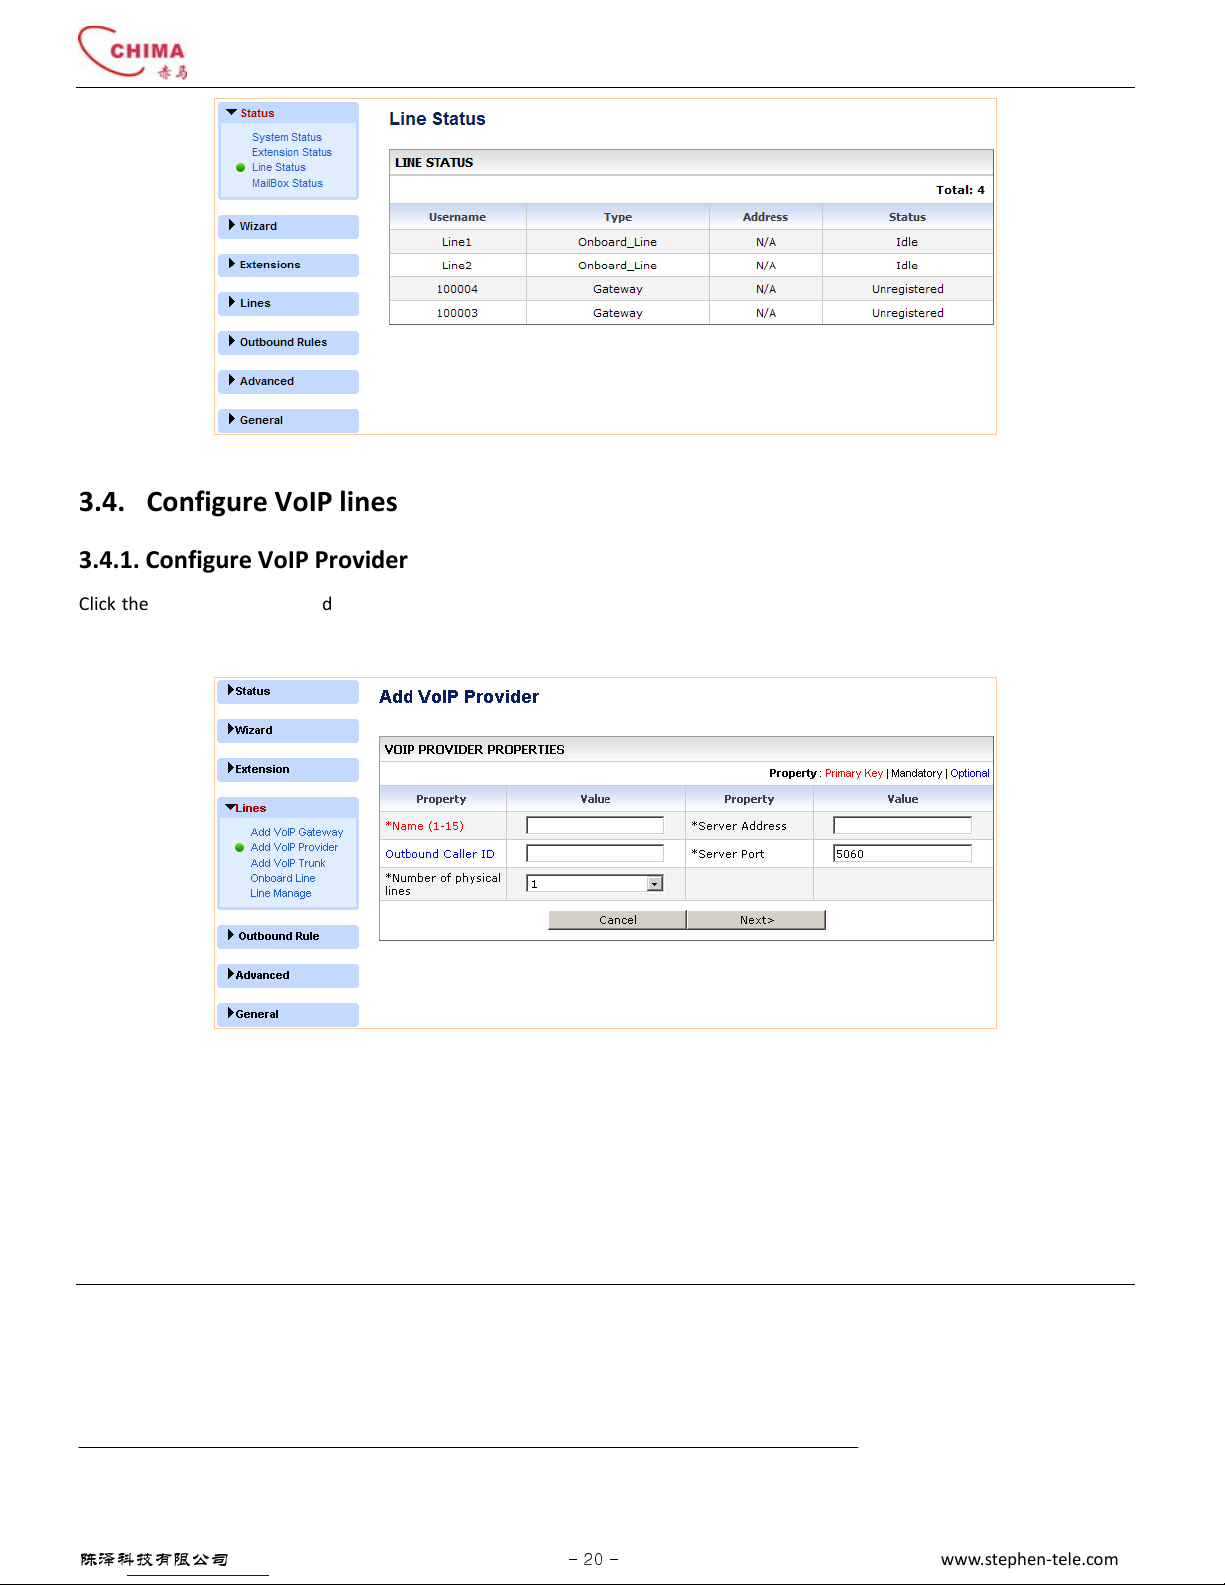
3.3.4. Line Status
Click the “Status” menu, and “Line Status” submenu. The Line Status screen will appear. Here you can see whether each line of the
gateway is registered or not.
SVX8004 IP PBX System User Guide
陈泽科技有限公司
- 20 -
www.stephen-tele.com
3.4. Configure VoIP lines
3.4.1. Configure VoIP Provider
Click the“Lines” menu, and “Add VoIP Pro ider” submenu. The Add VoIP Pro ider screen will appear. You can add a VoIP pro ider
line group and add the SIP accounts acquired from the VoIP pro ider.
Name - A description name for memorization. The name will be automatically added by the system with the prefix “p _” by
the system to clearly indicate it is a pro ider line group.
Server Address - The IP address or Domain name of the pro ider’s SIP ser er.
Server Port - The SIP port on which the SIP ser er is operating. Default is 5060.
Outbound Caller ID - An optional parameter which fills into the Caller ID field on outgoing calls.
Number of VoIP lines - Select the number of VoIP lines supplied by the VoIP pro ider and that you are actually using.
NOTE:
The total number of the lines is 4, including lines added ia VoIP gateway, VoIP pro ider and VoIP trunk, excluding the 2
onboard lines. So the a ailable number in the list of the “Number of VoIP lines” may change according to how many lines ha e
been added and how many lines remain a ailable to be added.
Click the “Next” button,
Indi idual lines will be created and displayed in a columnar format. You should fill the SIP
accounts information acquired from the pro ider into the fields of each line.
Table of contents
Popular PBX manuals by other brands

NEC
NEC SL1000 Programming manual

Grandstream Networks
Grandstream Networks UCM6100 Series user manual

Planet
Planet Internet Telephony PBX System IPX-300 Series user manual

Zycoo
Zycoo CooVox-U20 Series user manual

Yeastar Technology
Yeastar Technology S50 installation guide

Everlea
Everlea MUC1004 installation guide


