Sterling MX3 User manual

Input
OWNER’S MANUAL

2
MX3 POWERED STUDIO MONITOR PAIR
INTRODUCTION:
Congratulations on your Sterling MX Series studio monitor
purchase. We are proud to bring our wealth of experience
and sound innovation to this new product line. The MX Series
combines years of our transducer technology R&D with sleek
and purposeful industrial design. The carefully balanced voicing
of each monitor allows for critical mixing and monitoring as well
as playback. To get the most of your purchase, read this manual
carefully and store it for future reference.
FEATURES:
• Unique vertical-and-horizontal waveguide design for wide
frequency dispersion and superior stereo imaging
• Low frequency drivers with multi-fiber paper cone design for
improved damping and frequency response
• ¾” silk dome tweeter for clear transients and superior
audio definition
• High-efficiency, low-distortion, stereo class A/B amplifier for
accurate sound reproduction
• Rear panel porting offers superior bass response
and accuracy
• Elegant, polished ebony front baffle and backlit volume and
on/off knob
• Front-mounted stereo mini input and headphone out for easy
use of headphones and connection to mobile audio devices
IMPORTANT SAFETY INSTRUCTIONS
1. Read these instructions.
2. Keep these instructions.
3. Heed all warnings.
4. Follow all instructions.
5. Do not use this apparatus near water.
6. Clean only with dry cloth.
7. Do not block any ventilation openings. Install in accordance
with the manufacturer’s instructions.
8. Do not install near any heat sources such as radiators, heat
registers, stoves, or other apparatus (including amplifiers)
that produce heat.
9. Do not defeat the safety purpose of the polarized or grounding-
type plug. A polarized plug has two blades with one wider
than the other. A grounding-type plug has two blades and
a third grounding prong. The wide blade or the third prong
are provided for your safety. If the provided plug does not fit
into your outlet, consult an electrician for replacement of the
obsolete outlet.
10. Protect the power cord from being walked on or pinched
particularly at plugs, convenience receptacles, and the point
where they exit from the apparatus.
11. Only use the attachments/accessories specified by the
manufacturer.
12. Use only with the cart, stand, tripod, bracket, or table
specified by the manufacturer, or sold with the apparatus.
When a cart is used, use caution when moving the cart/
apparatus combination to avoid injury from tip-over.
13. Unplug this apparatus during lightning storms or when
unused for long periods of time.
14. Refer all servicing to qualified service personnel. Servicing
is required when the apparatus has been damaged in any
way, such as power-supply cord or plug is damaged, liquid
has been spilled or objects have fallen into the apparatus,
the apparatus has been exposed to rain or moisture, does
not operate normally, or has been dropped.
15. WARNING: To reduce the risk of fire or electric shock, do not
expose this apparatus to rain or moisture.
16. When the MAINS plug, or an appliance coupler is used as
the disconnect device, the disconnect device shall remain
readily operable.
HANDLING AND MAINTENANCE
• Using a cell phone near the speaker system can induce
noise. If this occurs, move the cell phone further away from
the speaker system.
• Air blowing out of the rear bass reflex ports is normal, and
often occurs when the speaker is handling program material
with heavy bass content.
• Always turn the power off when the device is not in use.
• Avoid touching or allowing objects to come in contact with the
speaker diaphragms.
• These speakers should be used vertically, not laid on their side.
• Keep these speakers away from magnets other electronic
devices containing magnets, such as Cathode Ray Tube
(CRT) monitors.

3
MX3 POWERED STUDIO MONITOR PAIR
CONNECTIONS
1. Turn off power on all devices. Set all volumes to minimum.
Now it is safe to connect all devices and power up.
2. The MX3 uses a stereo amplifier and the right speaker is
passive. Connect the included speaker cable from the jack
labeled “output to right speaker” on the left speaker to the jack
labeled “input from left speaker” on the right speaker.
3. Turn on the power to all connected devices such as
computers, outboard gear and audio interfaces.
4. Turn on the power to your MX studio monitors by turning the
knob on the front of the active MX3 clockwise. The backlit
LED will light up to indicate it is on.
5. Play music or sound through your audio system and then
slowly increase the volume of the monitors to the desired
level.
6. When turning off your audio system, make sure to follow
these steps in reverse. You can choose to leave your volume
levels where you set them originally, so long as the output on
your mixer, audio interface or sound system outputs remains
the same as well.
FRONT PANEL
SPEAKER INPUT AND RESPONSE CONTROL
1LEVEL CONTROL
Adjusts the output level of the speaker. When fully
counterclockwise, the speakers will be off. When turned to
the right, the speakers will be on and the backlit LED will light.
CAUTION
• Turning the power switch ON and OFF in rapid succession
can cause the device’s electronics to malfunction. Please
wait for 3 seconds or more after turning the power OFF
before turning it ON again.
• Even when the power switch is turned off, electricity is still
flowing to the product at a minimum level. When you are
not using the product for a long time, make sure to unplug
the power cord from the wall AC outlet.
2STEREO MINI CONNECTOR
This connector is a 3.5mm stereo input that allows quick
connection of mobile devices such as computers, tablets
and phones. When this input is used, the input signal will
supersede the inputs plugged into the RCA connectors on
the rear panel.
3HEADPHONE CONNECTOR
This connector is a 3.5mm stereo output used to connect
headphones when a quiet listening environment is needed.
When headphones are connected to this input, the sound
will be routed directly to the headphones and will not play
through the speakers.
NOTE: Refer to “Connection and Cable Types” on page 4 and 5
for more connector details.
4RCA INPUTS
These unbalanced stereo RCA inputs are the main inputs
and accept RCA connectors found on the included stereo
1/8” to dual RCA cables. These inputs accept the signal for
both the left and right speakers.
5OUTPUT TO RIGHT SPEAKER
This is a mono output of the stereo amp located in the left
speaker that connects to the right speaker by use of the
included speaker cable.
6INPUT FROM LEFT SPEAKER
This is a mono mini input on the right speaker that connects
to the output of the stereo amp on the left speaker.
7AC IN CONNECTOR
Connect the supplied power cable here. First connect the
power cord to the speaker, then insert the power cord plug
into the AC outlet.
1
2
3
6
5
7
4

4
MX3 POWERED STUDIO MONITOR PAIR
SETUP
In this section we’ll look at the general procedure for connecting
and setting up a monitor speaker system. This is just an example
though, so feel free to set up your own system in the way that
best serves your personal listening needs.
CABLES
All the cables needed to connect your MX3 are included in the box.
CONNECTIONS
1. Plug the supplied AC power cord into the corresponding
socket on the speaker. Plug the power cord into the speaker
first, and then insert the AC plug end into an appropriate AC
wall outlet.
2. Use the supplied mini speaker cable to connect the amplifier
output on the left speaker labeled “output to right speaker”
to the input on the right speaker labeled “input from left
speaker”.
3. Use the supplied stereo 1/8” to dual RCA cable to connect
the stereo RCA inputs of your left speaker to the stereo 1/8”
output of your computer or audio system. Your computer’s
headphone output can work for this purpose. Some examples
of typical connections are shown in the following sections.
CONNECTING TO AN AUDIO INTERFACE
When connecting an audio interface to MX series speakers,
connect the audio interface output connectors directly to the
desired input connectors. Normally you’ll connect to the LINE
OUT 1 and 2 , although that might depend on the specific audio
interface and DAW (Digital Audio Workstation) settings used.
NOTE:You may need a type of cable to connect specifically to your
audio interface, which is sold separately.
PDIF
PHONES LINE OUTPUT
5/L
INOUT 3/L 1/L 3
2 1
6/R2 1 4/R 2/R 4
LINE INPUT MIC

5
MX3 POWERED STUDIO MONITOR PAIR
CONNECTING TO A MIXER
When connecting a mixer to MX series speakers, connect the
mixer’s MONITOR OUT or C-R OUT (Control Room) connectors
directly to the speakers’ input connectors. This makes it possible
to control the monitor level independently from the mixer’s main
bus level.
CONNECTING TO A SYNTHESIZER OR OTHER
ELECTRONIC MUSICAL INSTRUMENT
When connecting an electronic musical instrument such as a
digital piano or synthesizer to the MX series speakers, connect
the instrument’s L/MONO and R outputs to the MX speaker inputs.
MONITOR OUT
OR C-R OUT OUTPUT R
OUTPUT L
RL

6
MX3 POWERED STUDIO MONITOR PAIR
SETTING UP YOUR LISTENING ENVIRONMENT
A number of points should be observed when laying out a monitor
speaker system.
POINT 1
Ideally, the speakers should be located at least 1.5 meters away
from walls or corners. In situations where it is not possible to
position the speakers a sufficient distance from walls or corners,
the LOW FREQ switch can be used compensate for excessive
bass. As you move the speaker closer to walls or corners, setting
the low frequency filter to the -3dB position may be required to
achieve a neutral sounding frequency response.
POINT 2
The left and right speakers should be positioned as symmetrically
as possible in relation to the room. In other words, the left and
right speakers should be the same distance from the rear wall
and the respective left and right walls.
POINT 3
For the most accurate sound and balance, position yourself at
the apex of an equilateral triangle formed by the left and right
speakers and yourself, with the speakers angled inward so that
they’re facing you.
POINT 4
High frequencies are quite directional, so for the most accurate
monitoring the speakers should be set up so that the tweeters
are at approximately the same height as your ears when you’re
seated at the listening position.
POINT 5
If possible, it is best to position your speakers on individual
speaker stands outfitted with adhesive foam bases or separate
monitor isolation pads.This approach helps to decouple speakers
from the stands or other hardware such as furniture which may
place reflective and/or resonant surfaces between you and the
speakers.You can also use the included isolation feet to decouple
the speakers from your stand or desktop.
POINT 6
Be aware of your room’s physical properties to ensure the best
positioning of your speakers. Ideal listening environments consist
of non-parallel walls with an appropriate amount and positioning
of acoustic treatment such as absorptive fiberglass, fabric or
foam panels and bass “traps” to help prevent build-up of low
frequency energy in corners. Small changes in the positioning
of your speakers can make a big difference in the final sound
of your listening environment. Reference commonly available
material about acoustic design or consult an expert if you are
unsure.
TROUBLESHOOTING
If you’re having trouble, check out these tips...
If there is no power, check to see if...
• The power cord is plugged into both the IEC socket on the
rear panel of the monitor and into the AC mains. The Sterling
logo on the front face plate will illuminate when the monitor is
powered on.
• The AC main voltage is matched to the operating voltage
requirements. If the AC mains voltage is higher than the
selected voltage on the monitor, it is possible that the fuse
needs to be replaced.
• The Sterling logo is illuminated on the faceplate of the
monitor. If not, turn the power switch off and check the AC
mains fuse(s). NEVER USE A LARGER AMPERAGE FUSE
THAN IS SPECIFIED! Turn the power switch back on. The
power light should illuminate.
• Note: If a fuse change is required, please check that the
AC mains voltage is set correctly. If the fuse(s) blows again
when the monitor is turned on, please contact the dealer you
purchased it from, or Sterling Customer Service (1-888-621-
1.5 meters
or more
1.5 meters
or more

7
MX3 POWERED STUDIO MONITOR PAIR
If you can’t hear any sound...
• Repeat the steps in the Troubleshooting section above before
continuing to the next steps.
• Check to see if all other audio devices using the same AC
outlet are still operating.
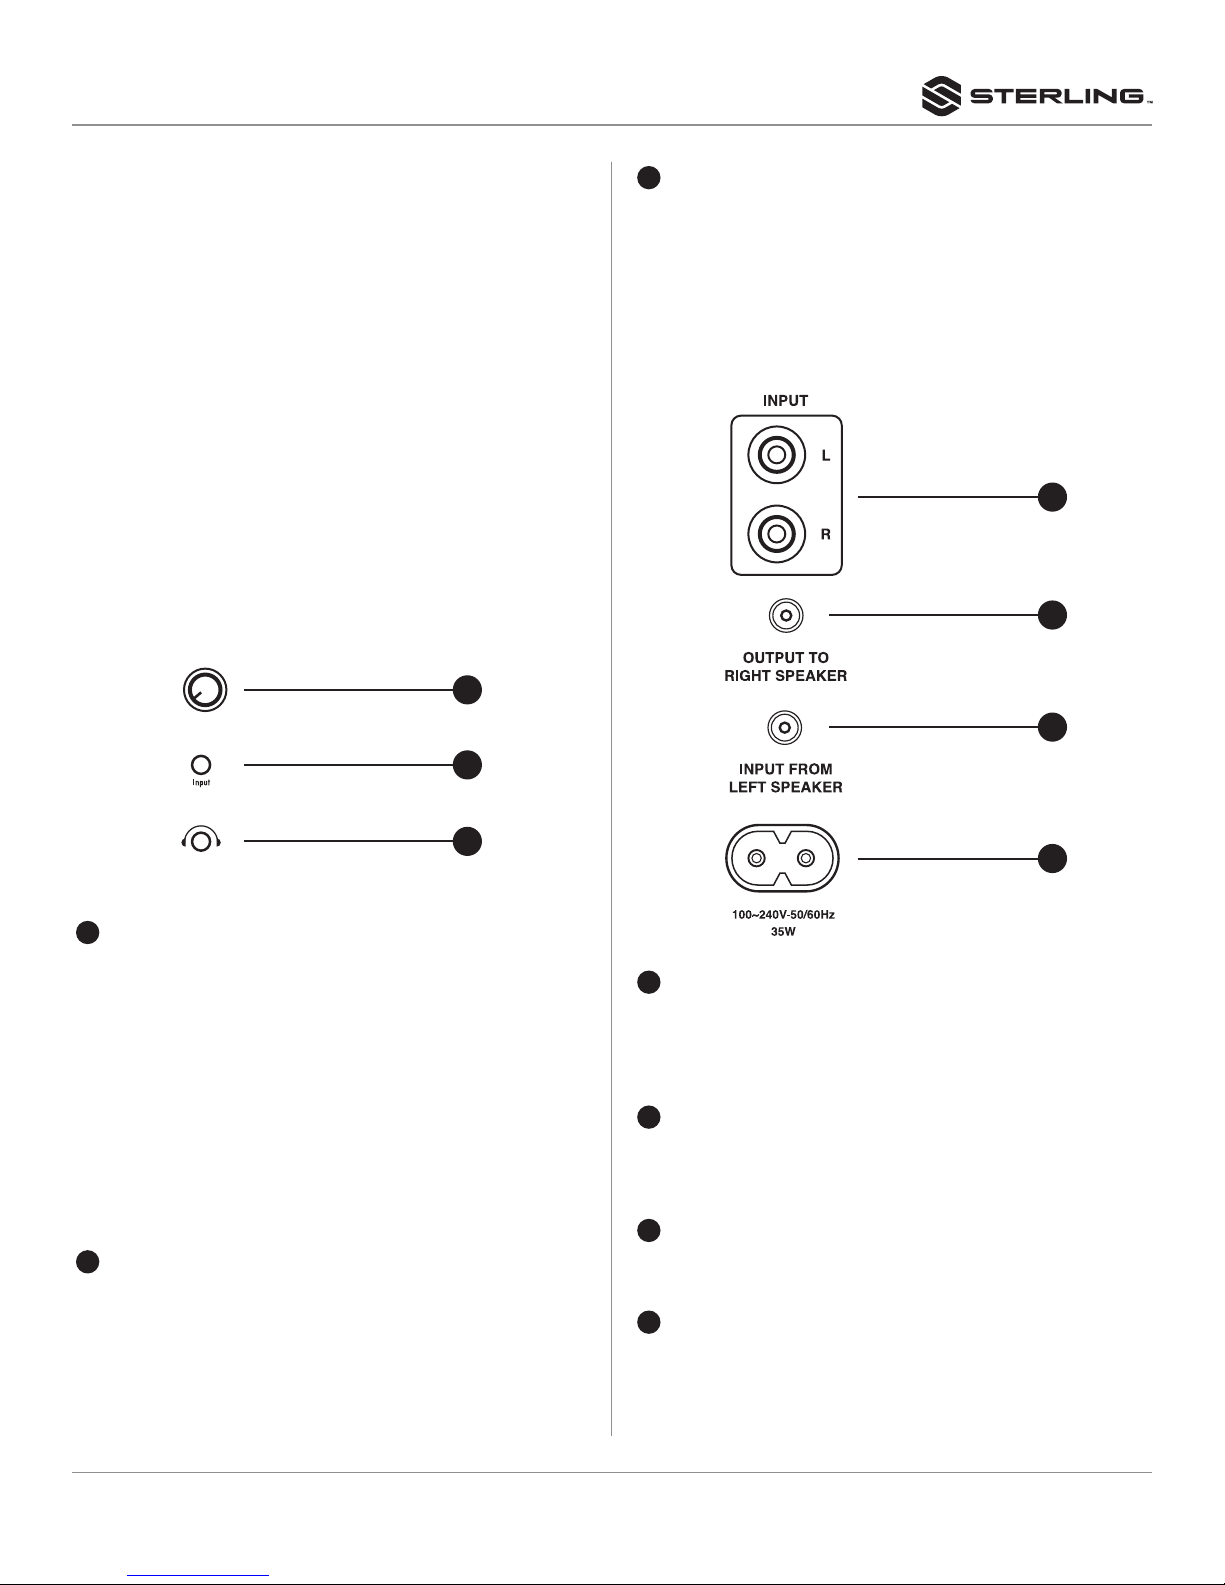
• Make sure that:
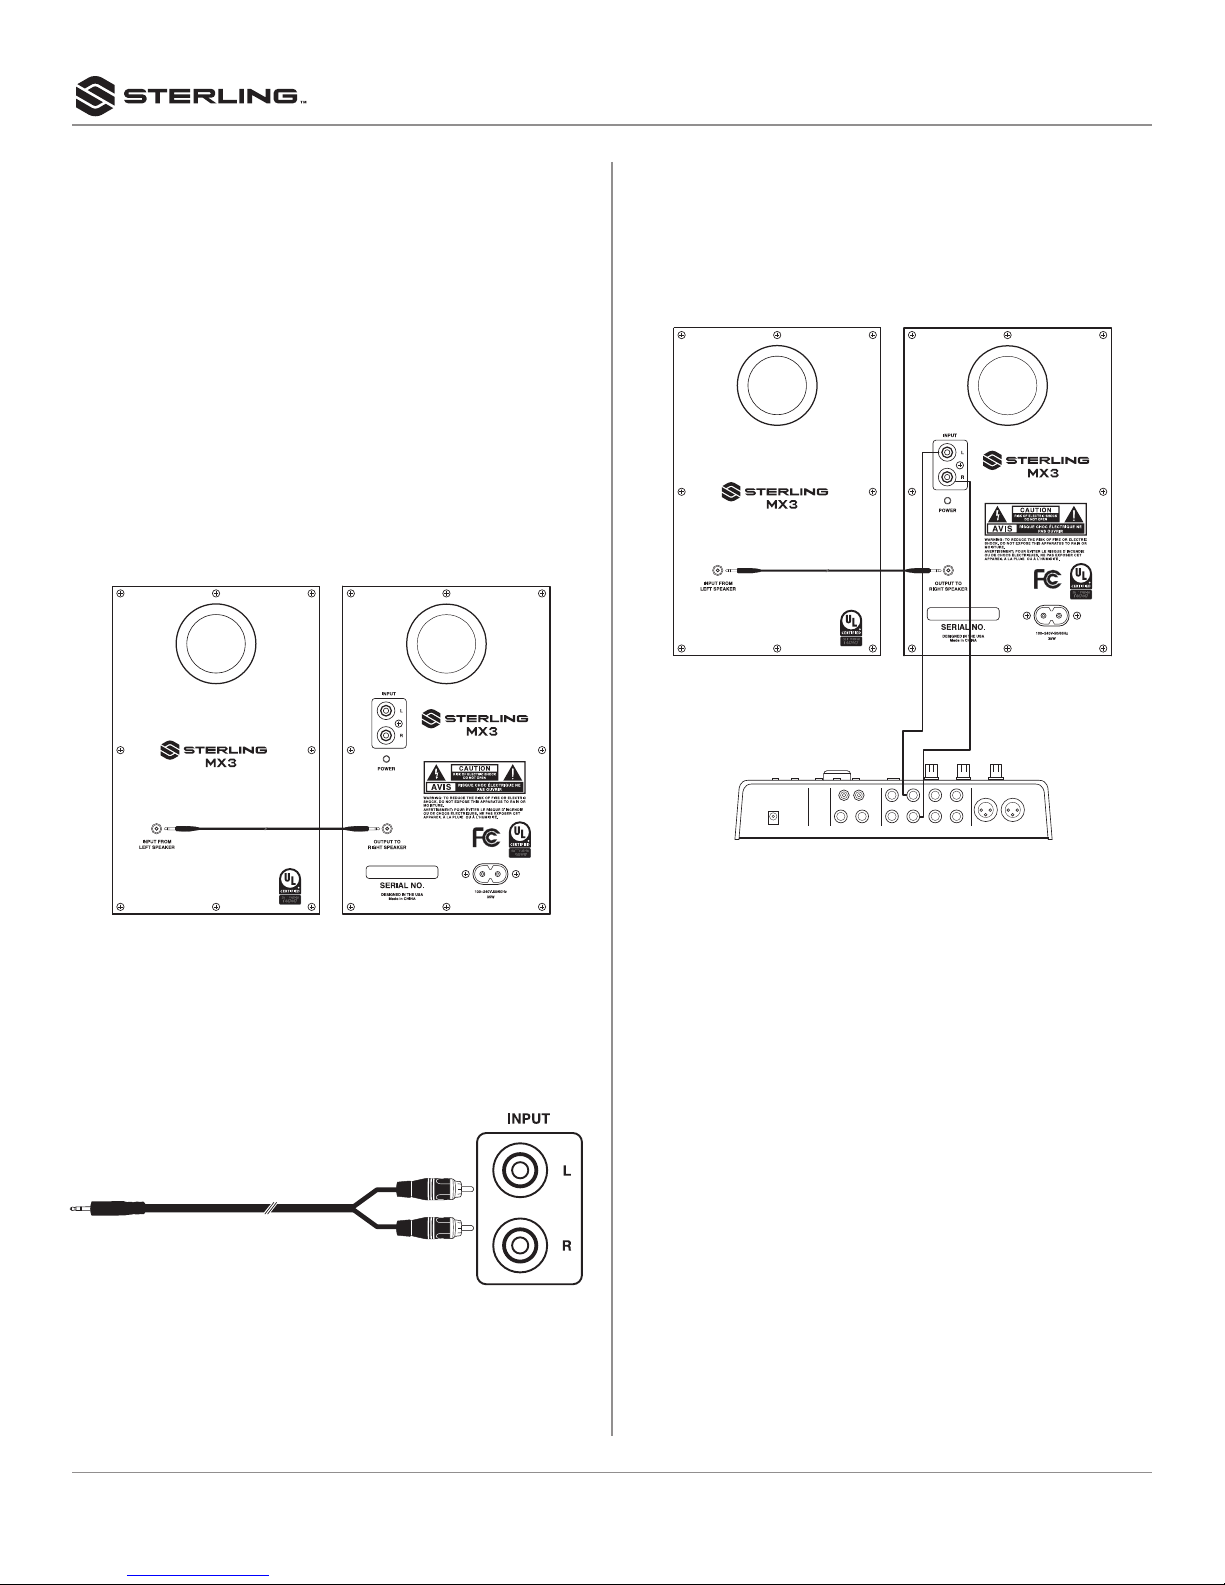
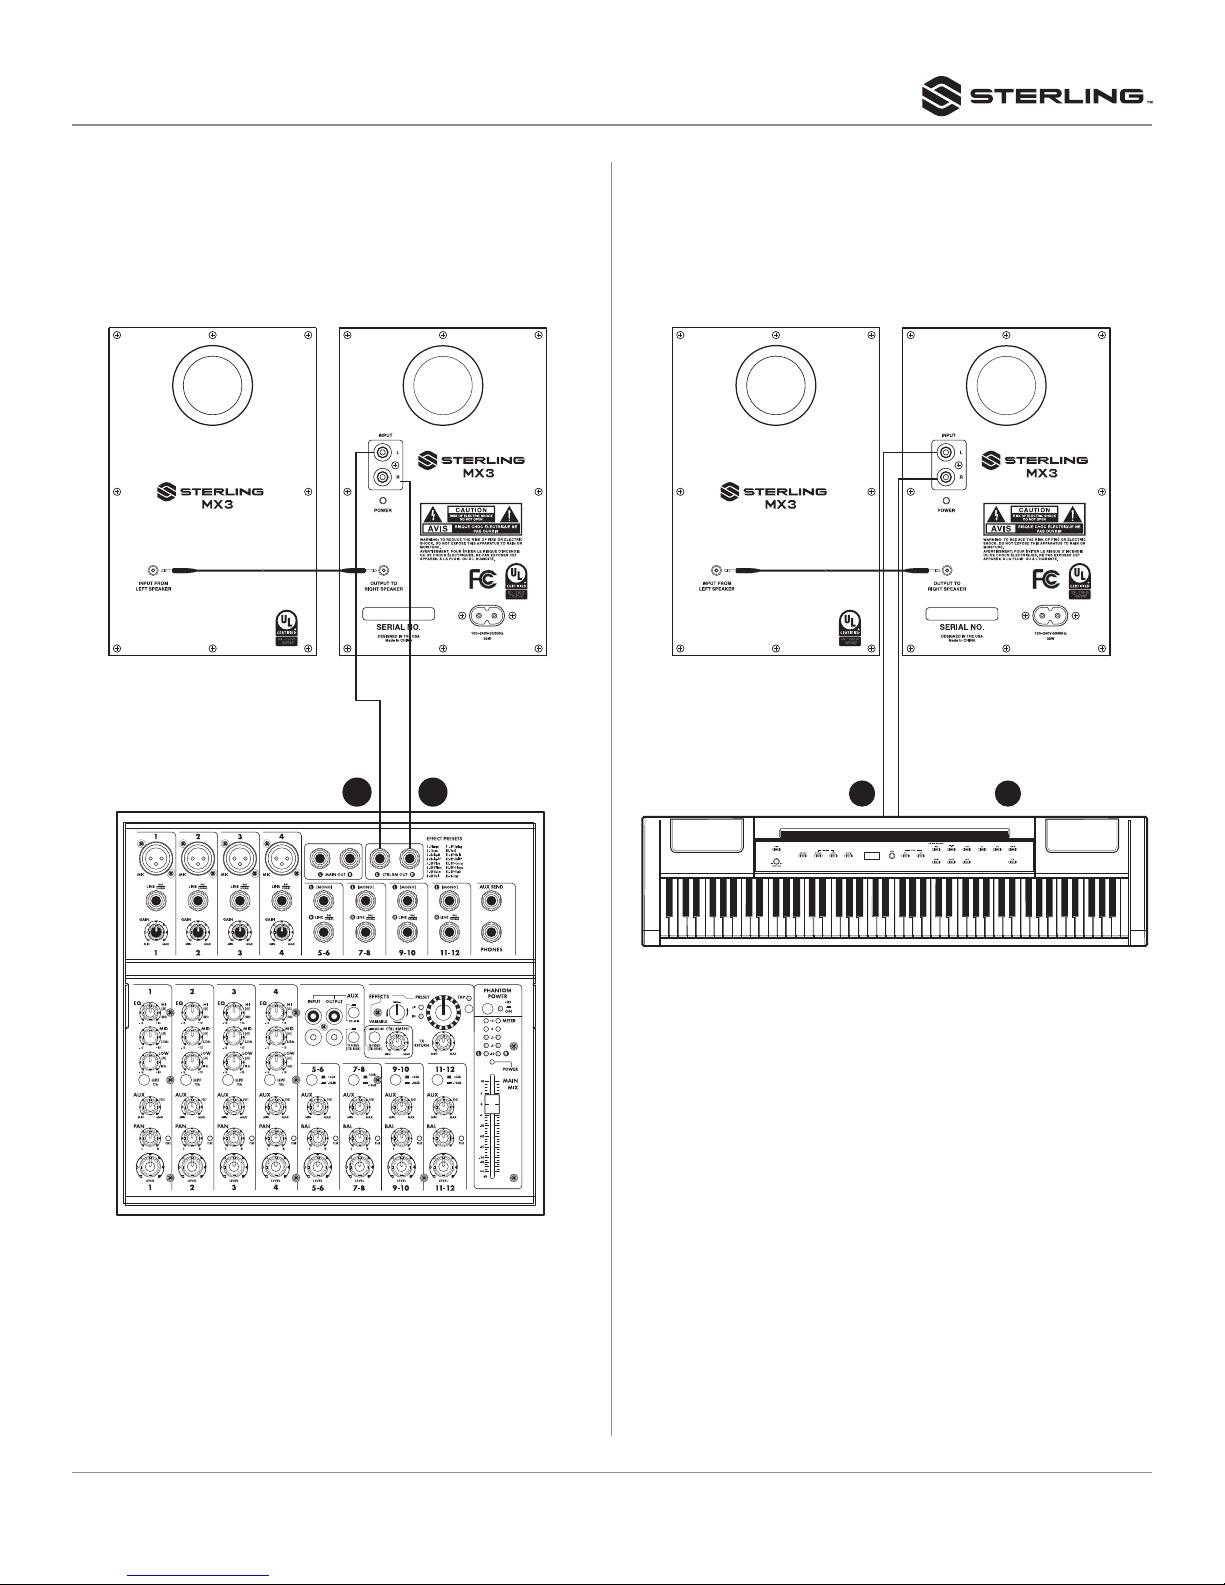
• The audio source cable is plugged into both the source
output and the monitor input.
• The volume knobs of the monitors are turned up.
• The signal source (e.g. mixing console, work station, CD
player, etc.) is turned up to a level that can properly send a
signal to the monitors.
• Check to see if one of the monitors is working. Exchange
the audio input cable from the non-working monitor to the
working unit. This will determine whether it’s really the
monitor, a faulty cable, or some other glitch in the audio chain.
• If the monitor is still not responding, it should be returned
to the dealer that you purchased it from, or to Sterling, for
servicing.
If the monitor suddenly stops working...
• Turn the outputs of your sound system down or off.
• Repeat the steps in the Troubleshooting sections above
before continuing to the next steps.
• Carefully check to see if the amplifier’s back plate is hot. If the
monitor has been running at its highest power output for an
extended period of time, it could be that the unit has become
overheated and the protection circuitry has shut the system
down momentarily. Your Sterling MX5 and MX8 monitors
provide maximum circuitry protection against AC power
surges, amplifier overdrive, and overheating of the amplifiers.
Turn the monitor off then wait 30 minutes to allow the back
plate to cool down. Turn the power switch back on.
• Increase the volume to check for normal operation.
• If the monitor is still not responding, please contact the
dealer you purchased it from or Sterling Customer Service
The sound quality changes...
• Repeat the steps in the Troubleshooting section above before
continuing to the next steps.
• Disconnect the signal cable at the input of the monitor. With
power on, place your ear close to each driver (tweeter/
woofer) and listen for noise (i.e. a slight hiss or hum). If there’s
absolutely no sound whatsoever, it could be that one or more
of the drivers (woofer, tweeter or both) is at fault. It’s also
possible that the problem lies somewhere in the electronics.
• Play some non-distorted source material at a low volume.
Carefully cover the tweeter (to block the sound) without
touching the diaphragm. Is the woofer producing a clean
sound? If there is not a clear tonal quality, or any sound at all,
then the woofer probably needs to be replaced.
• Cover the woofer so you can hear mostly the tweeter. Is the
tweeter producing a clear sound? If there is not a clear tonal
quality, or any sound at all, then the tweeter probably needs
to be replaced.
• Once you have a better idea of what may be at fault
please call our customer service department. We will help
you determine the best solution to correct your monitors.
Sterling Customer Service can be reached at 1-888-621-
The monitor hisses, hums or makes other loud noises...
• Here are some suggestions that will help you eliminate these
undesirables from your system:
• Ensure that the AC power is matched to the operating
voltage requirements.
• Make sure that the power cord is plugged snugly into the
IEC socket on the rear of the monitor.
• Check the connections between the signal source and
the monitor. The Sterling MX5 and MX8’s XLR and TRS
connectors offer completely balanced connectivity. Make
sure the output of your audio system is balanced and that
you are using balanced cables. While unbalanced RCA
connections are also available, this connection format is
more susceptible to noise.
• All audio equipment should use the same ground point. If
parts of your audio system are connected to different AC
outlets in your room, this may result in an audible hum as
a result of small differences in voltage between different
connected circuits. Check all other devices using the same
AC output in the building such as dimmers, neon signs, TV
screens, and computer monitors. These devices should
not be using the same circuit.

8
MX3 POWERED STUDIO MONITOR PAIR
MX3
PRODUCT SPECIFICATION
Description: Active monitor speaker
AMPLIFIER
Frequency Response: ......................55 Hz-22 kHz
Power Output: ......................20W@1%THD-1KHz
Sensitivity: ..................300mV@1KHz to rated power
Signal Noise Ratio with A-Weight:....................85dB
Total Harmonic Distortion: ................ 0.3%@1W-1KHz
Crossover Frequency: ............................ 5KHz
CONTROL
Power Switch/Level .............Rotary VR with plastic knob
Input: ..............................RCA X 2 (balanced)
3.5mm TRS (stereo)
Output:..............3.5mm TRS (stereo headphone output)
ENCLOSURE
Dimension:....................W 5.13” x H 7.82” x D 7.00”
Weight:.......................Active (L) speaker 3.53 lbs.
Passive (R) speaker 2.93 lbs.
Material:...................... Wood box with plastic front
Acoustic Mode: .............................Vented box
Tweeter: .................................. 3/4” / 6 ohm
Tweeter Magnetic Type ......................Neodymium
Woofer: ....................................3” / 8 ohm
Woofer Magnetic Type: ...........................Ferrite
MAINS POWER
Line Voltage: ...................... 90~240VAC/50~60Hz
Fuse: ................................... 800mA/250V
Line Cord Receptacle:........................IEC320 C8
ACCESSORY
Line cord:............................UL817 2 pins / 5 ft
FCC STATEMENTS
1. Caution: Changes or modifications to this unit not expressly approved by the
party responsible for compliance could void the user’s authority to operate the
equipment.
2. Note: This equipment has been tested and found to comply with the limits for
a Class B digital device, pursuant to Part 15 of the FCC Rules. These limits
are designed to provide reasonable protection against harmful interference
in a residential installation. This equipment generate, uses, and can radiate
radio frequency energy and, if not installed and used in accordance with
the instructions, may cause harmful interference to radio communications.
However, there is no guarantee that interference will not occur in a particular
installation. If this equipment does cause harmful interference to radio or
television reception, which can be determined by turning the equipment off
and on, the user is encouraged to try to correct the interference by one or more
of the following measures:
• Reorient or relocate the receiving antenna
• Increase the separation between the equipment and receiver
• Connect the equipment into an outlet on a circuit different from that to
which the receiver is connected
• Consult the dealer or an experienced radio/TV technician for help
TWO (2) YEAR LIMITED WARRANTY:
Subject to the limitations set forth below, Sterling Audio® hereby represents and
warrants that the components of this product shall be free from defects in materials
and workmanship, including implied warranties of merchantability or fitness for
a particular purpose, subject to normal use and service, for two (2) years to the
original owner from the date of purchase.
Retailer and manufacturer shall not be liable for damages based upon inconvenience,
loss of use of product, loss of time, interrupted operation or commercial loss or any
other incidental or consequential damages including but not limited to lost profits,
downtime, goodwill, damage to or replacement of equipment and property, and any
costs of recovering, reprogramming, or reproducing any program or data stored in
equipment that is used with Sterling Audio® products. This guarantee gives you
specific legal rights. You may have other legal rights which vary from state to state.
Some states do not allow limitations on how long an implied warranty lasts, so the
above limitation may not apply to you.
Sterling Audio
P.O. Box 5111, Thousand Oaks, CA 91359-5111
sterlingaudio.net
All trademarks and registered trademarks mentioned herein are recognized as the
property of their respective holders.
1512-1546862
Table of contents
Other Sterling Speakers manuals