Stewart MacDonald 5348 User manual
Tenor Ukulele Kit
#5348 Assembly Instructions
www.stewmac.com

Tenor Ukulele Kit Assembly Instructions
Table of contents
Welcome to ukulele building!
Getting started .....................................1
Kit parts list.........................................1
Recommended tools and supplies ..................2
Assemble the body
Body assembly jig ..................................3
Attach the neck block...............................4
Attach the tailblock.................................5
Attach the linings...................................5
Transfer body template lines . . . . . . . . . . . . . . . . . . . . . . . .5
Install the soundhole purfling .......................6
Bracing the top and back ...........................6
Glue the top onto the sides .........................7
Trim the top ........................................8
Glue the back onto the sides ........................8
Fret and neck installation
Install the side dots in the fretboard .................9
Seating frets........................................9
Attach the fingerboard to the neck..................10
Level and polish the frets ...........................10
Dress the fret ends..................................11
Preparations for attaching the neck to the body .....11
Attach the neck to the body.........................12
Finishing your ukulele
Locate and mask the bridge.........................13
Final sanding and masking..........................13
Apply the finish .....................................14
Final setup
Glue on the bridge..................................15
Install the tuning machines .........................15
Install the nut.......................................15
Install the strings and tune ..........................16
Set the string action ................................16
The uke you’re about to build is an easy kit; we’ve designed
it so that you can create a quality ukulele with a minimum of
tools.You don’t need experience,either:the ukulele is a great
way to get your start in instrument building. When you’re
done, you’ll be happy to find that it sounds great, too!
Welcome to ukulele building!
Getting started
1. Review these instructions before starting so you’re sure
you have everything you need, and you’re familiar with
the processes involved.
2. Some photos in these instructions use a Soprano uku-
lele as a model, though the technique is the same for
either Soprano or Tenor uke.
3. If you’re new to building, here’s a tip that every instru-
ment builder knows (or finds out the hard way!): Test
the fit of any parts before you glue them. Dry-clamp
to see that everything fits, then use glue.
4. Be safe when using tools, glues, and chemicals.Wear eye
protection and gloves when needed, and always use
proper ventilation.
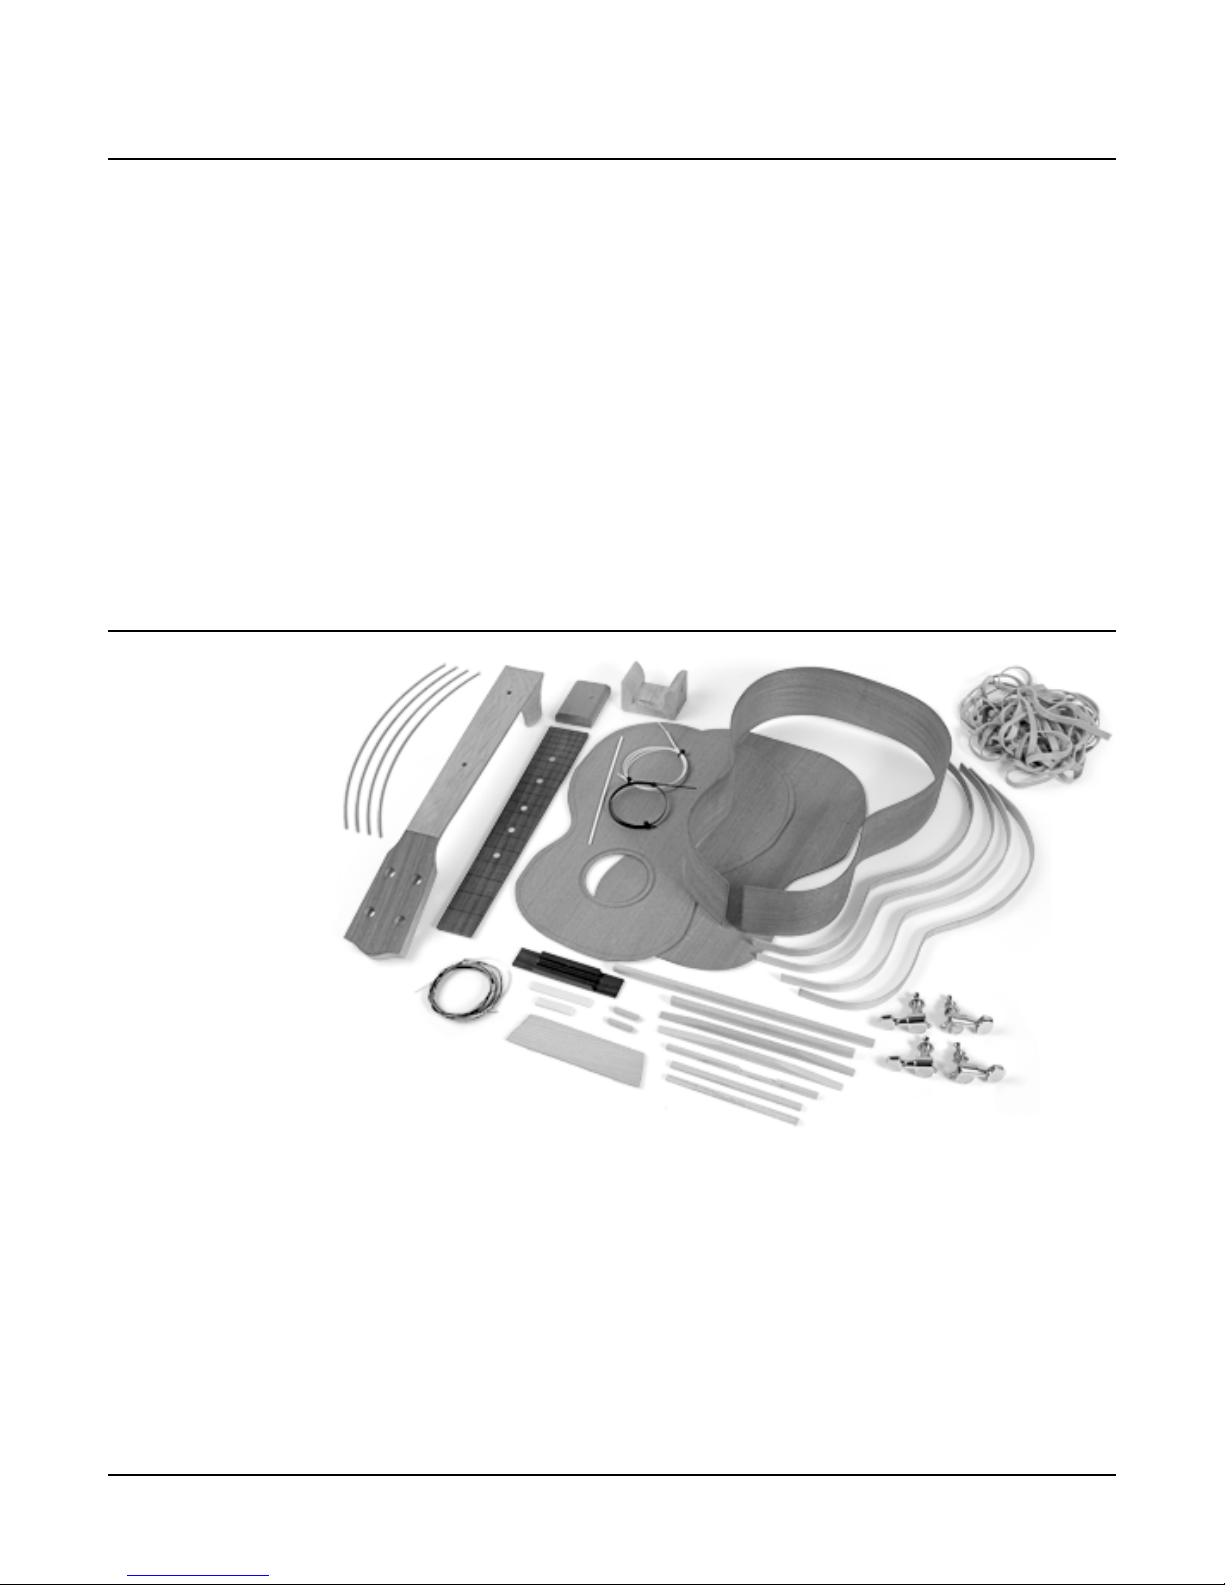
• Fretwire
• Neck
• Tailblock
• Neck block
• Fretboard
• Strings
• Fretboard side
dot material
• Soundhole purfling
• Top plate
• Back plate
• Bridge
• Saddle
• Nut
• 1/4" dowel pegs
• Bridge plate
• Bent sides
• Linings
• Top bracing
• Back bracing
• Tuning machines
• Rubber bands
Kit parts list
1

stewmac.com
Supplies
• Titebond wood glue #0620
• Stewart-MacDonald #10-Thin Super Glue
• Plywood 8" x 48" x 3/4"
• 1/2" MDF (medium density fiberboard, or anything that
is flat) 9" x 30"
• 1-1/2" finishing nails (24)
• 1-1/4" drywall screws (4)
• 2" angle brackets (2)
• 1/2" screws to fit angle brackets (4)
• Turnbuckle (1)
• Masking/binding tape #0677
• Pencil
• Waxed paper
• Sandpaper #5562 (80, 150, 220, 400, 600, and 1000-grit)
• Scraps of wood for spacers, cauls and sanding blocks
Finishing supplies
• ColorTone Aerosol Guitar Lacquer #3881
• Naphtha solvent #0775
The following tools and supplies are recommended to as-
semble your kit. Though all of these tools aren’t necessary
to build your kit, they make many assembly steps easier.
Where applicable,item numbers for ordering from Stewart-
MacDonald are included.
Tools
• Clamps: cam, C, bar, clothespins and spring clamps
• Laminate trimmer with flush trim bit (or chisels, hand
plane and sandpaper)
• Hand plane (or sharp utility knife and files)
• Mill file, wood rasp and/or Microplane
• Half-round bastard file (or sanding block)
• X-Acto hobby knife (sharp utility knife)
• .032" nut slotting file #0831 (or fine tooth hacksaw
blade)
• Fret hammer #4895 (or light weight hammer with
smooth head)
• Fret cutters #0619 (or wire cutters)
• Hand plane (or sharp utility knife and files)
• Drill and drill bits (1/16", 1/4")
• 18" steel rule (or 18" straightedge and tape measure)
• Square
• Ruler (very accurate)
• Phillips screwdriver
• 10mm nutdriver #5890 (or wrench, for installing tuners)
Recommended tools and supplies
Stewart-MacDonald’s DVD recommendation
How To Build a Ukulele Kit Item #5196
Easy step-by-step DVD guide produced especially for our soprano and tenor ukulele
kits.Gordon and Char Mayer of Mya-Moé Ukuleles demonstrate the complete assembly
process. Excellent guidance and helpful tips from pro luthiers!
2
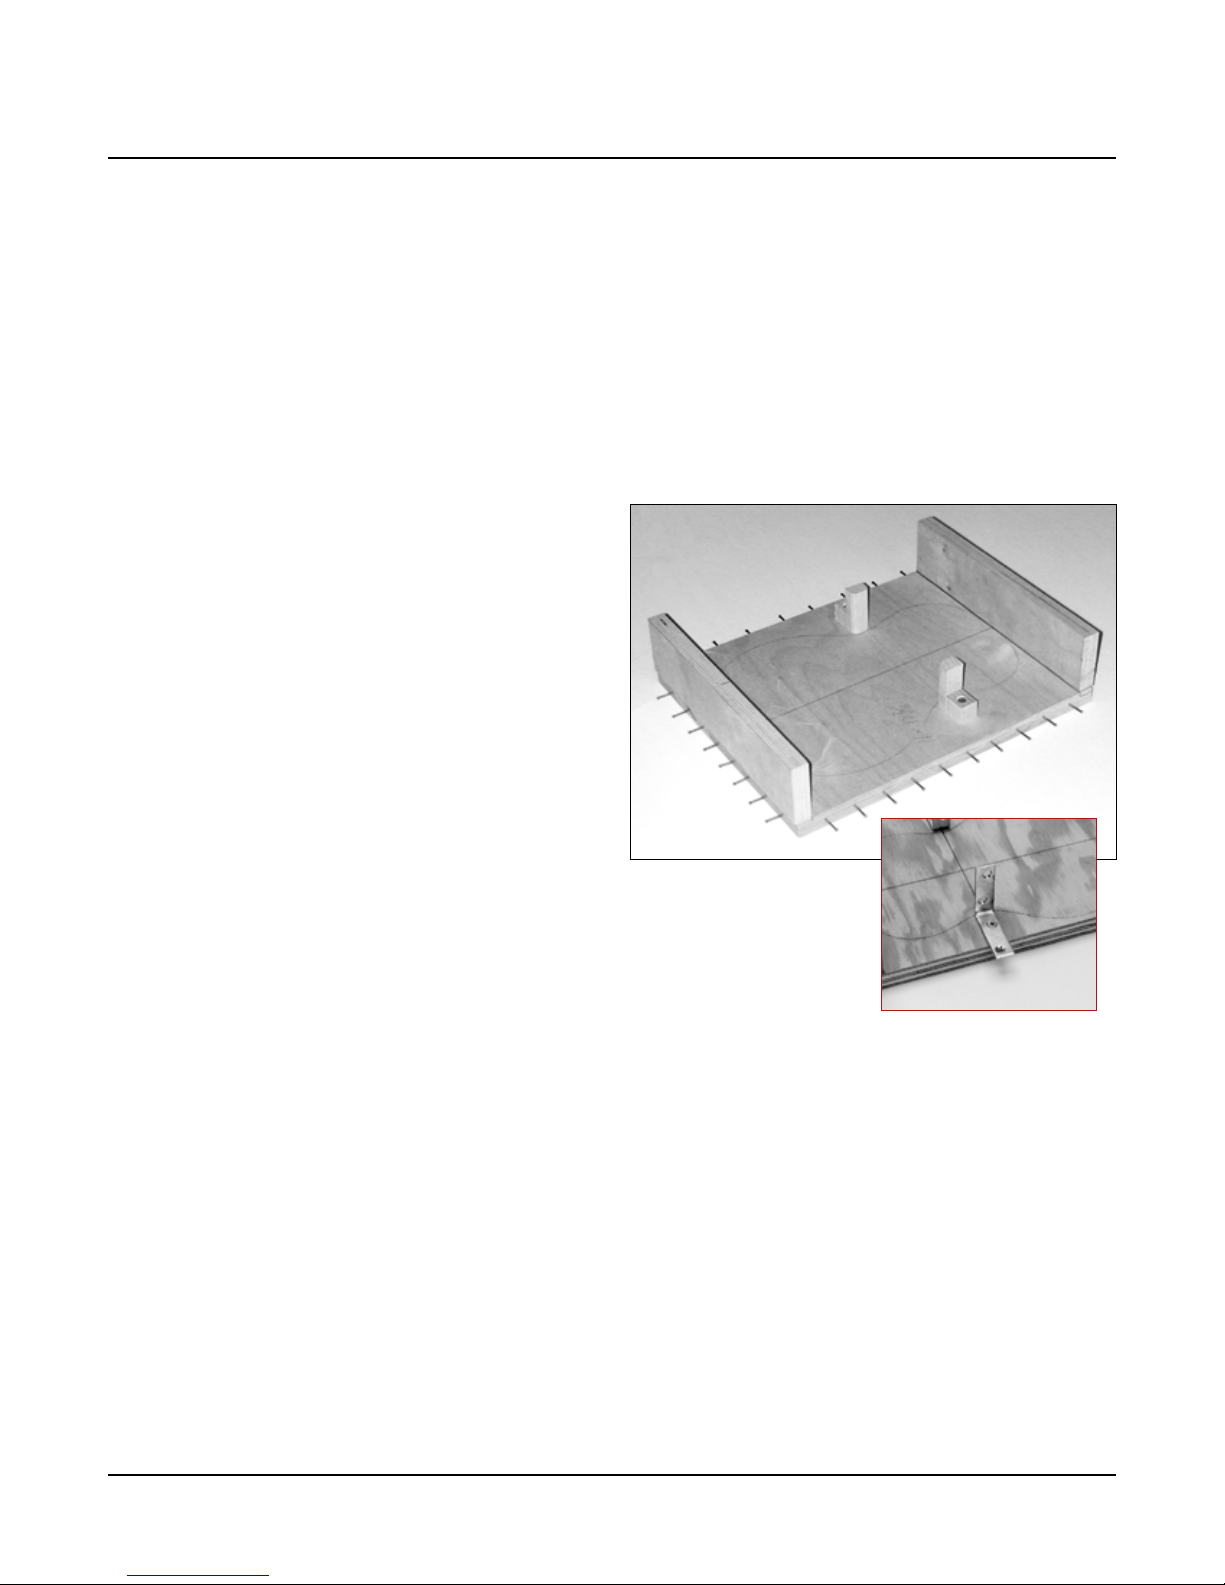
A line on the body shape template marks the ukulele’s waist-
line,4-1/2" from the neck end.Transfer this line to your body
assembly jig,keeping it perpendicular to the centerline.On
this line,attach two angle brackets to support the sides and
hold the waist in position. Use 1/2" screws to attach these
brackets in position to just touch the waistline.
Small finishing nails around the base can be added now or
later when gluing the top. During that step, rubber bands
wrap around the nails and over the body in the jig, adding
uniform clamping pressure while gluing.
This simple jig holds the ukulele for gluing,and ensures that
the sides are properly squared up with the top and back.
From 3/4" plywood, cut pieces for your jig:
body jig base: 11" x 13-7/16"
neck end side wall: 11" x 2-3/8"
tail end side wall: 11" x 2-1/2"
The size difference of the side walls is because this ukulele
kit is designed with a tapered profile: the body’s tail end is
slightly deeper than the neck end.
Draw a centerline down the length of the body jig base.
Measure accurately, because you’ll use this line to guide
you in building.
Assemble the two side walls on the neck and tail end of
the base so the interior walls will be 12" apart (pictured).
Use a square to be sure the sides are perpendicular to the
centerline.Glue and fasten each wall with two drywall screws
(from the underside of the base), and let dry for 3 hours.
When the glue has dried,draw the centerline onto the ends
of the jig, continuing it from the base onto the walls and
tops of the side walls.Keep the lines square—you’ll use this
centerline for aligning pieces during construction.
Included in these instructions is the body shape template
and bracing pattern (center page of this book). Carefully
remove this page and cut out the body shape.Save the body
shape template; you will be using it again later. Trace the
body shape onto the base, aligning it with your centerline.
The ends of this body shape should touch the two side
walls.
Assemble the body
Body assembly jig
Two angle brackets support
the sides and hold the waist in
position (right). Wooden cauls
can be crafted for the same
purpose (above).
3
stewmac.com
Locate the tailblock, draw a centerline on each end, and
notice that one end has a bevel on what will be the inside
of the instrument.This beveled end will go against the top
of the ukulele.
With the sides still sitting flat on your bench, dry-clamp
the tailblock in place on the centerline of the sides. Reuse
Attach the tailblock
Mark the centerlines:Place the ukulele sides into the body
assembly jig. The split in the sides goes at the neck end,
aligning with the centerline.Adjust the sides so they follow
the pencil outline that you drew earlier.
When the sides are properly positioned, use the centerline
on the mold to draw a centerline on the inside of the tail
end of the sides.Take the sides out of the jig and extend the
centerline to the outside of the sides.
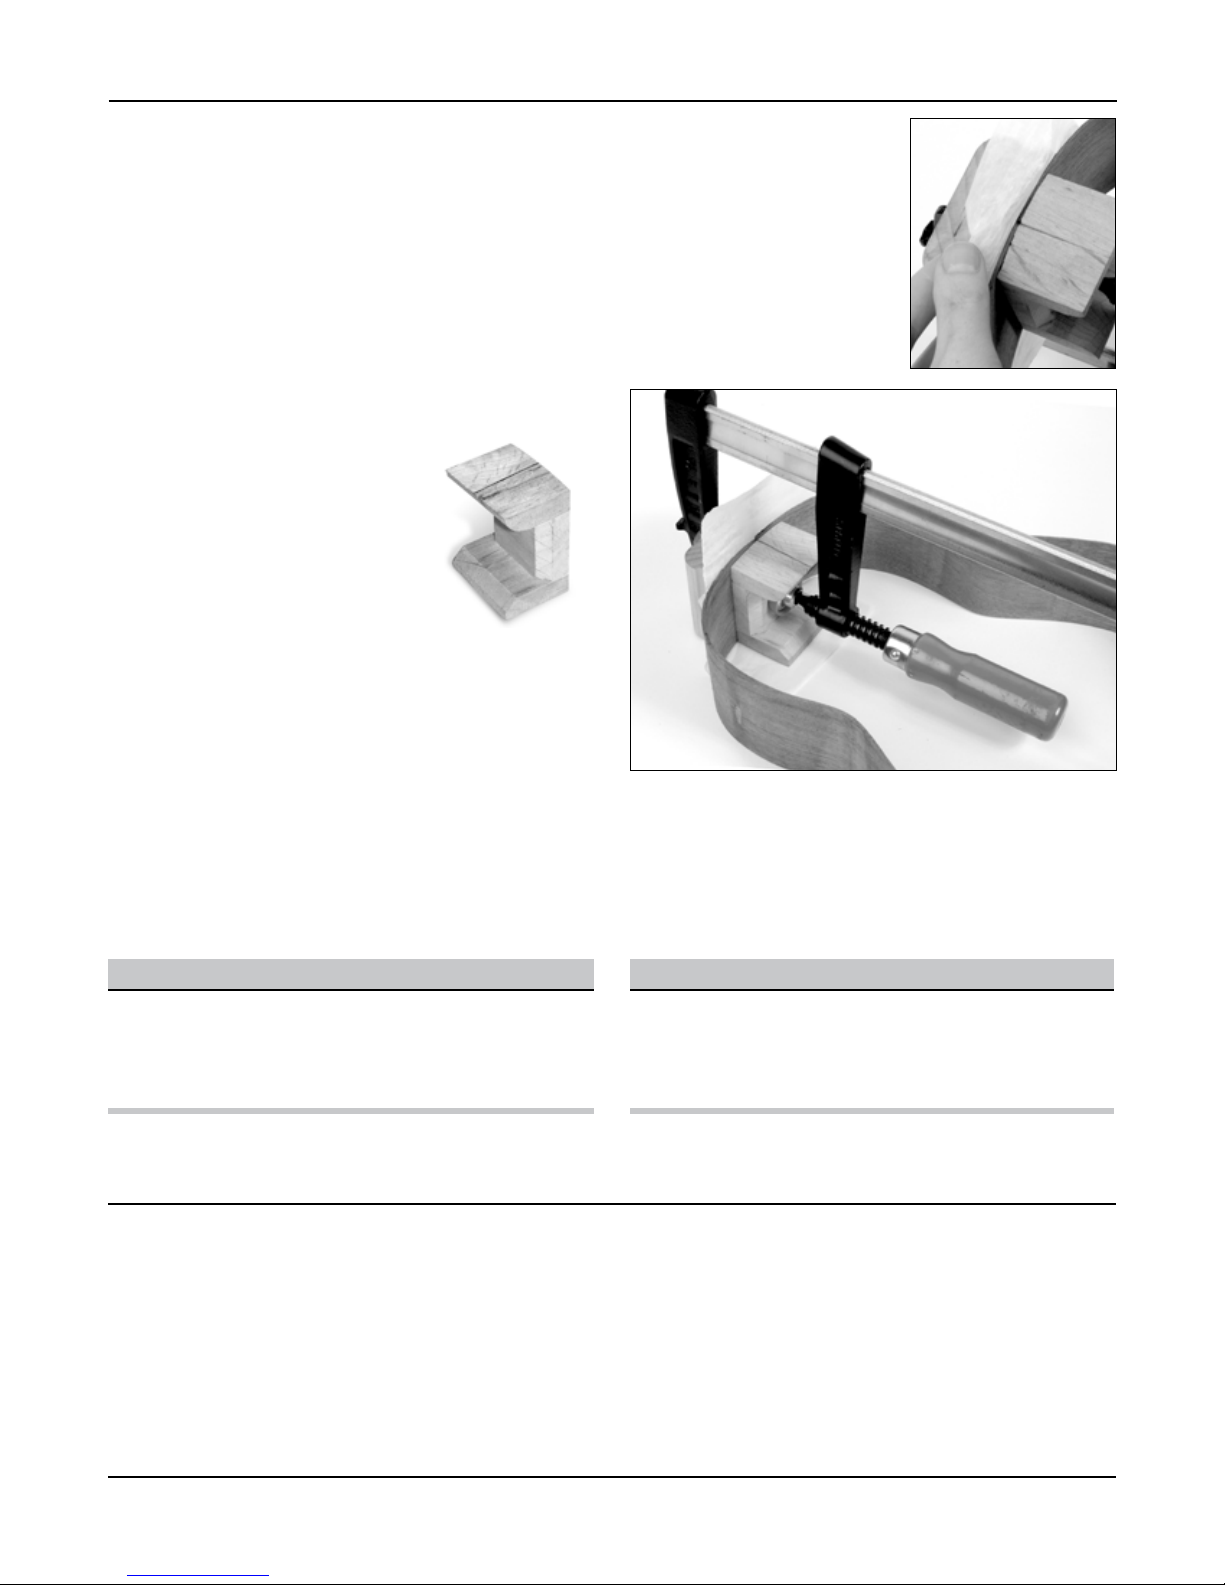
Locate the neck block (it's U-shaped). Measure to find the
center, and mark it on the top and bottom of the block
(pictured).
The side of the neck block that
touches the ukulele’s sides is curved.
A clamping caul with matching cur-
vature should be made from scrap
wood to use when gluing. Save this
caul for when you glue the tailblock,
It will fit both the neck block and
tailblock areas.
Dry clamp the neck block: The side of the uke that is placed
down on the bench will become the top of the instrument.
Write “top” and “back” on the respective sides of the neck
block, for reference in future steps.
Use a small piece of wax paper between the neck joint
and your bench, wrapping it up the outside, so that it goes
between the sides and the caul.The wax paper will protect
your bench and caul from the glue.
Using clamps of your choice (bar clamps work best), dry
clamp the neck block in place.
Attach the neck block
It’s now critical that the uke’s
sides and neck block are flush
to the bench. The centerline on
the neck block should line up
with the split in the uke’s sides
(pictured).
The sides will extend above the
neck block slightly, and will be
trimmed down later).
When you’re satisfied with the dry clamp,take it apart,apply
Titebond glue, and spread it out evenly on the neck block.
Clamp and clean up any squeeze-out with a scraper and/or
damp paper towel.Let the glue dry for 3 hours.
the radiused caul from the previous step. Use wax paper to
protect your bench and caul.When the assembly is lined up
and square,take off the clamps and glue it up, and reclamp.
Clean up squeeze-out, and let the glue dry for 3 hours.
BUILDING TIP: Cauls
You’ll need scrap wood to make cauls that will be
used throughout assembly.Cauls are used to apply
uniform pressure while the glue dries,and to protect
the instrument’s surface from the clamps.
BUILDING TIP: Dry clamping
It’s important to try fitting and clamping the kit
pieces before you use glue. Practice a “dry run” to
make sure you have all the clamps and cauls needed
before glue is applied.
4

Top linings: Remove the clothespins and clamps, and flip
the side assembly over in the jig, top side up.
Now trim and dry-fit the remaining two pieces of lining to
the front side of the body, flush with the top edge of the as-
sembly. When satisfied, glue up, clean up any squeeze-out,
and let the glue dry for 3 hours.
The linings are the thin strips that follow the contour of the
sides They add greater gluing surface where the sides meet
the back and the top.
Back linings: Place the side assembly into the body form,top
down. Get the curves and waist as symmetrical as possible,
using the angle brackets at the waistline to force the form.
Clamps holding the neck and tail bocks at the centerline
can be helpful.
Notice the neck block is not as tall as the tailblock.This uke is
designed with a tapered profile:the body’s tail end is slightly
deeper than the neck end.As a result,the back linings will run
at an angle from the tailblock down to the neck block.
Working with the back of the side assembly, trim the lin-
ings so the ends fit against the neck and tailblocks, and dry
clamp them with clothespins or 1" spring clamps.Adjust the
linings to taper gradually from the tail to neck block, at the
same angle on both sides. When you’re satisfied with their
position, make some pencil marks along the sides to help
you reposition the linings when gluing.
Glue the linings with Titebond and secure with lots of
clothespins or clamps. Clean up glue squeeze-out, and let
the glue dry for 3 hours.
Attach the linings
Transfer the lines from the body template (center page in
this book) to the inside of the top and back of your ukulele
(you can decide which side of the back is the inside).Include
the bracing, bridge plate, centerline, and the outline of the
body.
On the front side of the top,very lightly mark the centerline
near the top of the soundhole.
Transfer the body template lines
5

stewmac.com
Referring to the body template and your transfered lines,
dry-clamp the braces and bridge plate into position.Using a
combination of clothespins, spring clamps or cam clamps.
Note, the two back braces have a slight arc from end to
end.This curve will create a gentle arch to the back of your
ukulele.
Add a label
You may want to put a label inside your uke with
your name and the date you built it.There are lots
of options, from a handwritten signature and date
right on the wood, to something created on your
computer and printed onto sticky-back label paper.
The body shape template shows the location of the
soundhole for positioning your label.
When you’re happy with your clamping setup, apply
Titebond glue to the braces,clamp them in place,and clean
up any glue squeeze-out.Allow 3 hours to dry.
Bracing the top and back
Hold the purfling strips in a stack, alternating white-black-
white-black-white.With a sharp X-Acto knife, trim one end
flush and square. Carefully set the strips into the channel,
with the squared end at the centerline at the top of the
soundhole.
When you complete the circle, carefully trim the purfling
with the X-Acto knife.Take care to trim the ends as perfectly
as possible.The fingerboard will not cover this butt-joint in
the purfling (as when building a guitar). Better to cut the
purfling a little too long, then recut, than to create a gap by
trimming them too short.
Press the purfling into the rosette channel.Wick thin super
glue around the inside and outside of the plastic purfling.
You’ll see the glue soak into the mahogany, but it will blend
in later during finishing.
Install the soundhole purfling
6

First, the sides and braces need to be trimmed so they will
be flush when gluing.
Put the sides into the body assembly jig with the top facing
up. Make sure the sides are centered, using a turnbuckle to
hold it into place (pictured).Using aggressive sandpaper (80-
grit), sand the sides and lining so that they’re flat and level.
Insure even, flat sides by taping sandpaper to your bench.
With a chisel and sandpaper,
trim and taper the ends of
the braces that extend to the
body edge.
With the sides still in the jig,
dry-fit the top onto the sides.
Be sure it will glue flush, and
the braces don’t interfere with
the sides.
Dry run: Clamp the top to the sides using a cam clamp at
each end of the assembly. Carefully line up the centerline
on the top with the centerline of the sides. Use the rubber
bands to apply even clamping pressure to the top.
Caution
Before gluing, be sure you can get your fingers
through the soundhole to release the turnbuckle,
so you can get the assembled sides and top out of
the body mold.
When you’re satisfied with the fit, unclamp. Clean off dust
and shavings, and apply Titebond glue to the edges of the
sides, spreading it evenly. Reclamp each end, lining up the
centerlines, followed by the rubber bands. Allow 3 hours
to dry.
Glue the top onto the sides
The large self-adhesive
Sanding Disc (#6085)
shown here is part
of StewMac’s Go-bar
Clamping System, and
has many uses around
the shop!
7
stewmac.com
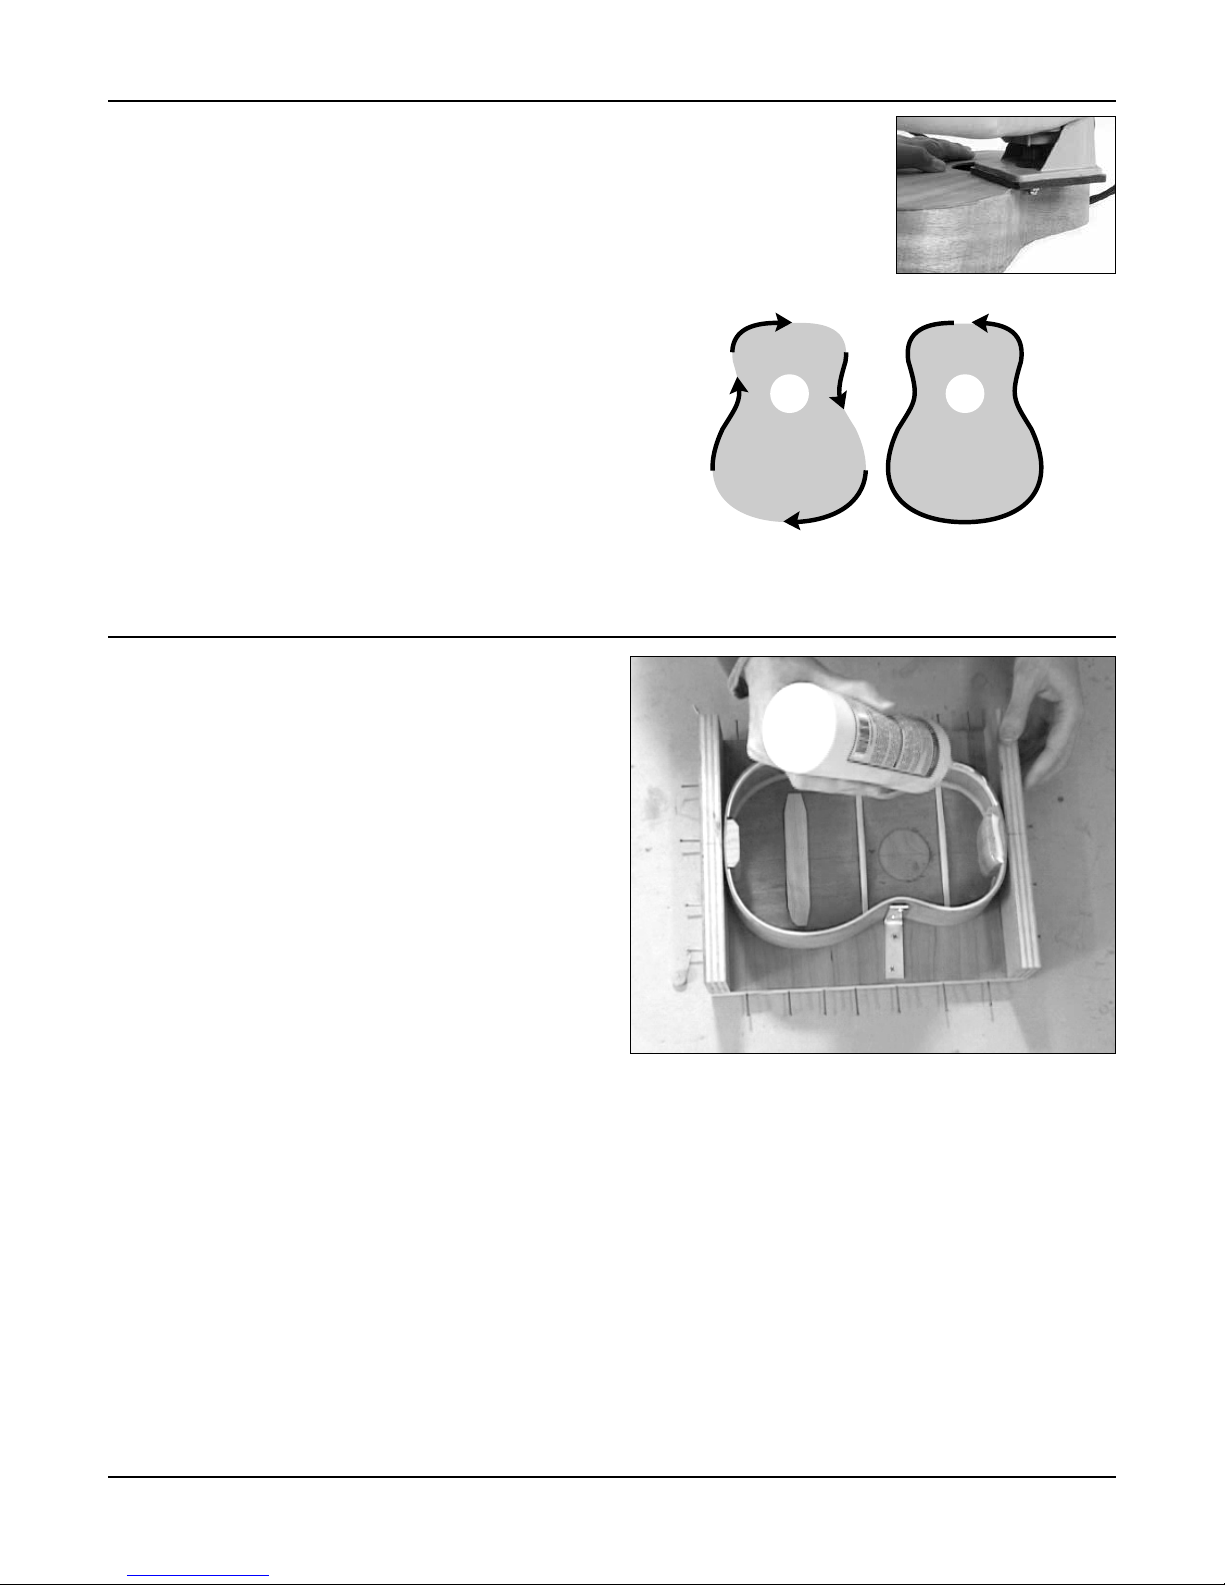
than climbing (illustrated).
Make one continuous pass
around the instrument. When
you reach the areas that were
already climb-cut, the router
will pass without tear-out.
Release the turnbuckle, and remove the side and top as-
sembly from the mold.
Trim off the overhang with a sharp knife and a file, or get in
close with those hand tools and flush-cut with a laminate
trimmer and ball-bearing router bit.
When using a laminate trimmer: avoid wood tear-out by
starting with four“climb-cuts,”so-called because the router is
climbing, or being pulled along as the bit grabs the wood.
Begin at the centers of the top and lower bouts on both the
treble and bass sides (illustrated),with the router base mov-
ing in the direction of the rotating cutter (clockwise).Rout up
to the areas indicated by the arrows.When all four climb-cuts
have been made, you can move the router in the opposite
direction (counterclockwise) cutting into the wood rather
Trim the top
A B
Put the assembly back into the mold,top down and on center.
Now, using your hand plane, plane the edges of the sides
down to the linings.Make sure you plane“downhill”so that
you don’t get tearout.When you get close to the linings,use
a piece of sandpaper taped to your bench to finish off the
leveling of the sides.
As you did for the top,shape and trim the braces on the back
so they don’t interfere with the sides.
Do a dry fit,clean off the edges,use a cam clamp at each end
to ensure that the bottom is glued on-center, and then use
the two rubber bands to get uniform clamping pressure.
When the glue is dry (3 hours), take the assembly out of the
mold and trim the edges of the bottom flush to the sides.
Glue the back onto the sides
Soprano kit shown.
8

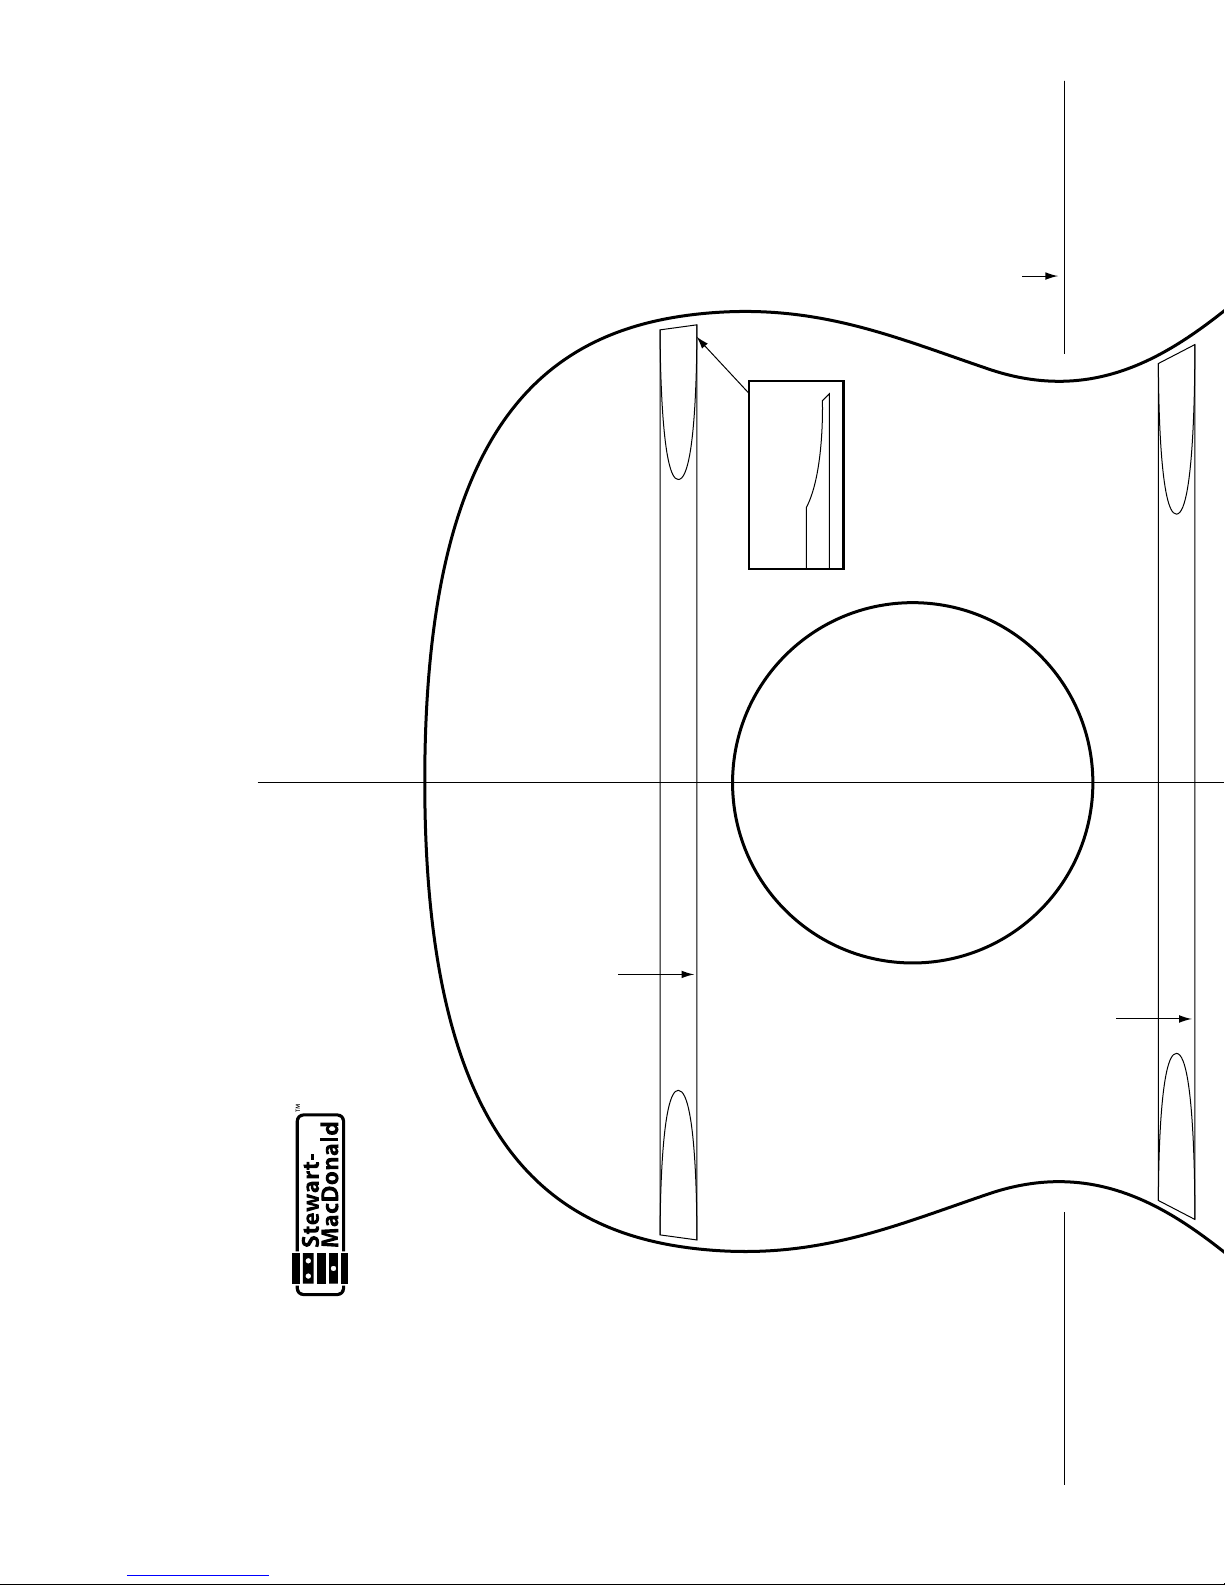
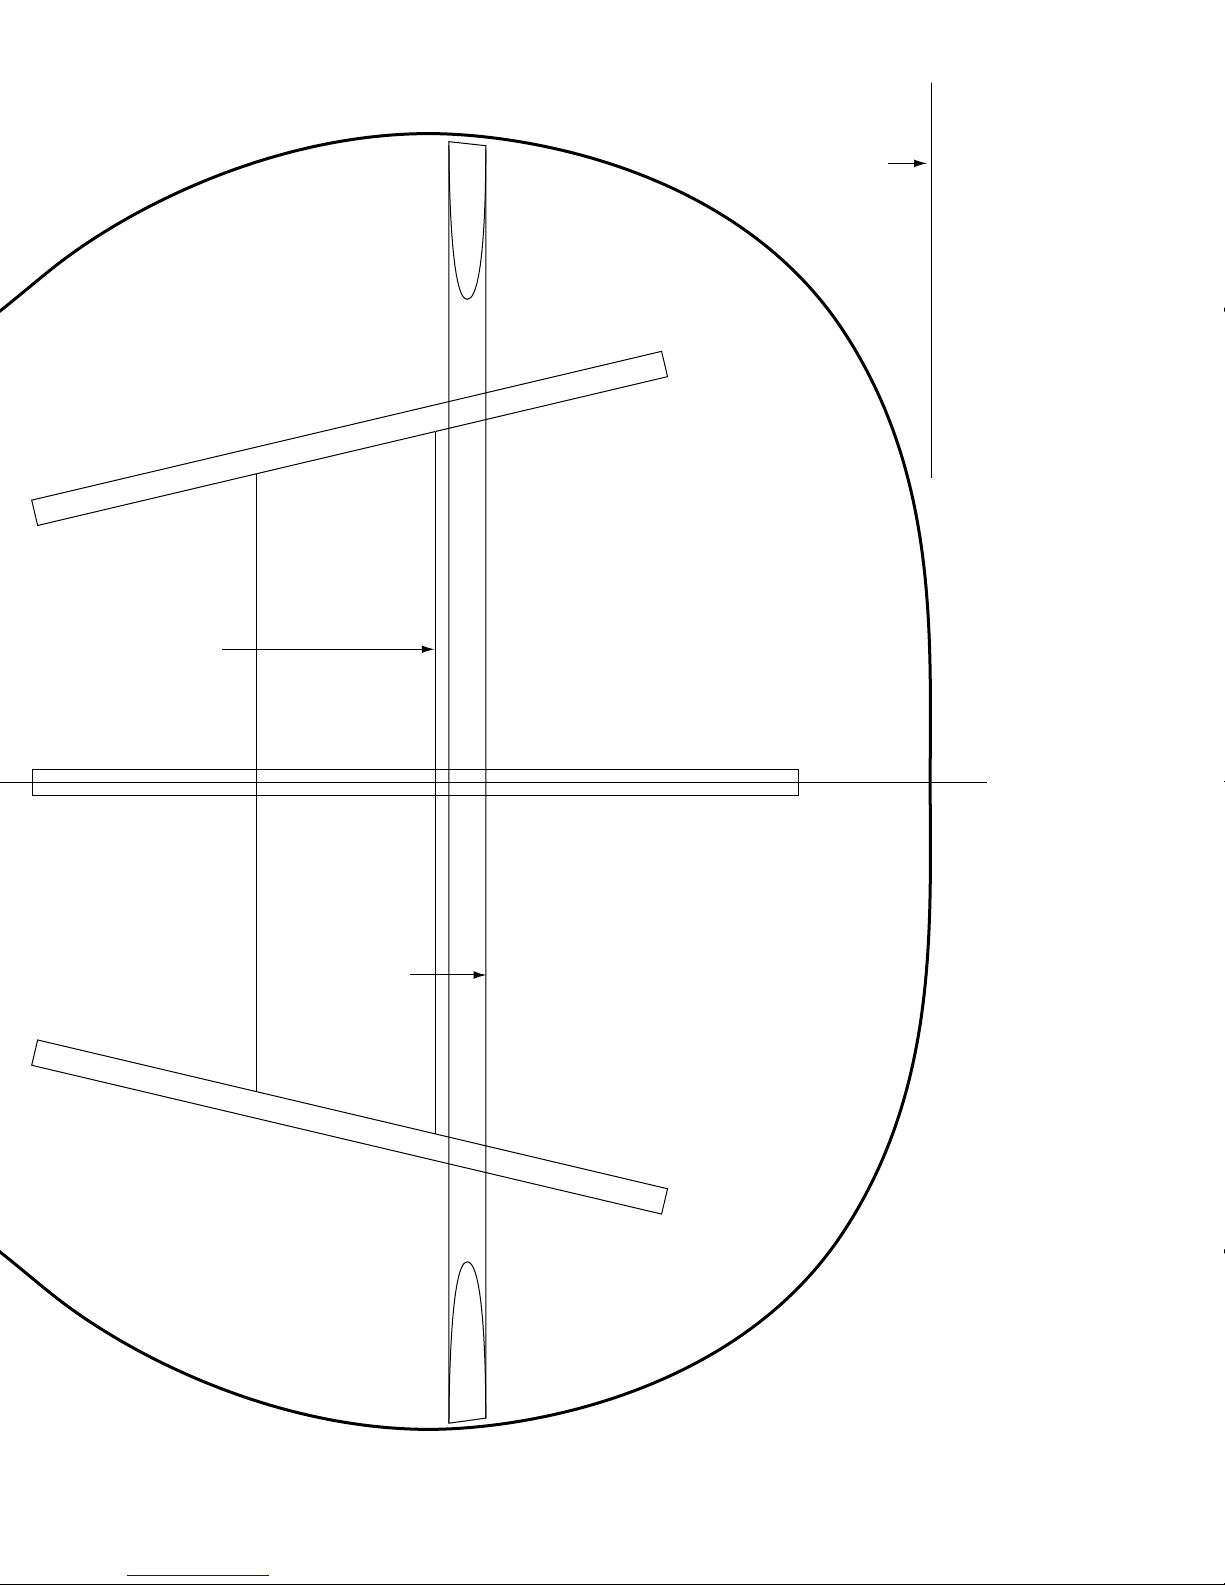
Tenor ukulele body shape template
and bracing pattern
Waist: 4 1/2"
from neck end
Top brace and
Back brace: 5 5/16"
from neck end
Top brace: 17/8"
from neck end
Back brace: 815/16"
from neck end
Body length: 12"
Bridge plate: 89/16"
from neck end
Taper the brace ends
with a sharp chisel.
Tenor ukulele body shape template
and bracing pattern
Waist: 4 1/2"
from neck end
Top brace and
Back brace: 5 5/16"
from neck end
Top brace: 17/8"
from neck end
Back brace: 815/16"
from neck end
Body length: 12"
Bridge plate: 89/16"
from neck end
Taper the brace ends
with a sharp chisel.


Carefully drill holes about 1/8" deep with a 1/16" drill bit on
the edge of the fretboard. Align the holes with the position
dots that are already inlaid in the top of the fretboard.Using
your side dot material and #10 thin super glue, glue a piece
of material into each hole and trim it off with diagonal cut-
ters.When all the side dots are glued in,sand the side of the
fretboard flush.
Fret and neck installation
Install the side dots in the fretboard
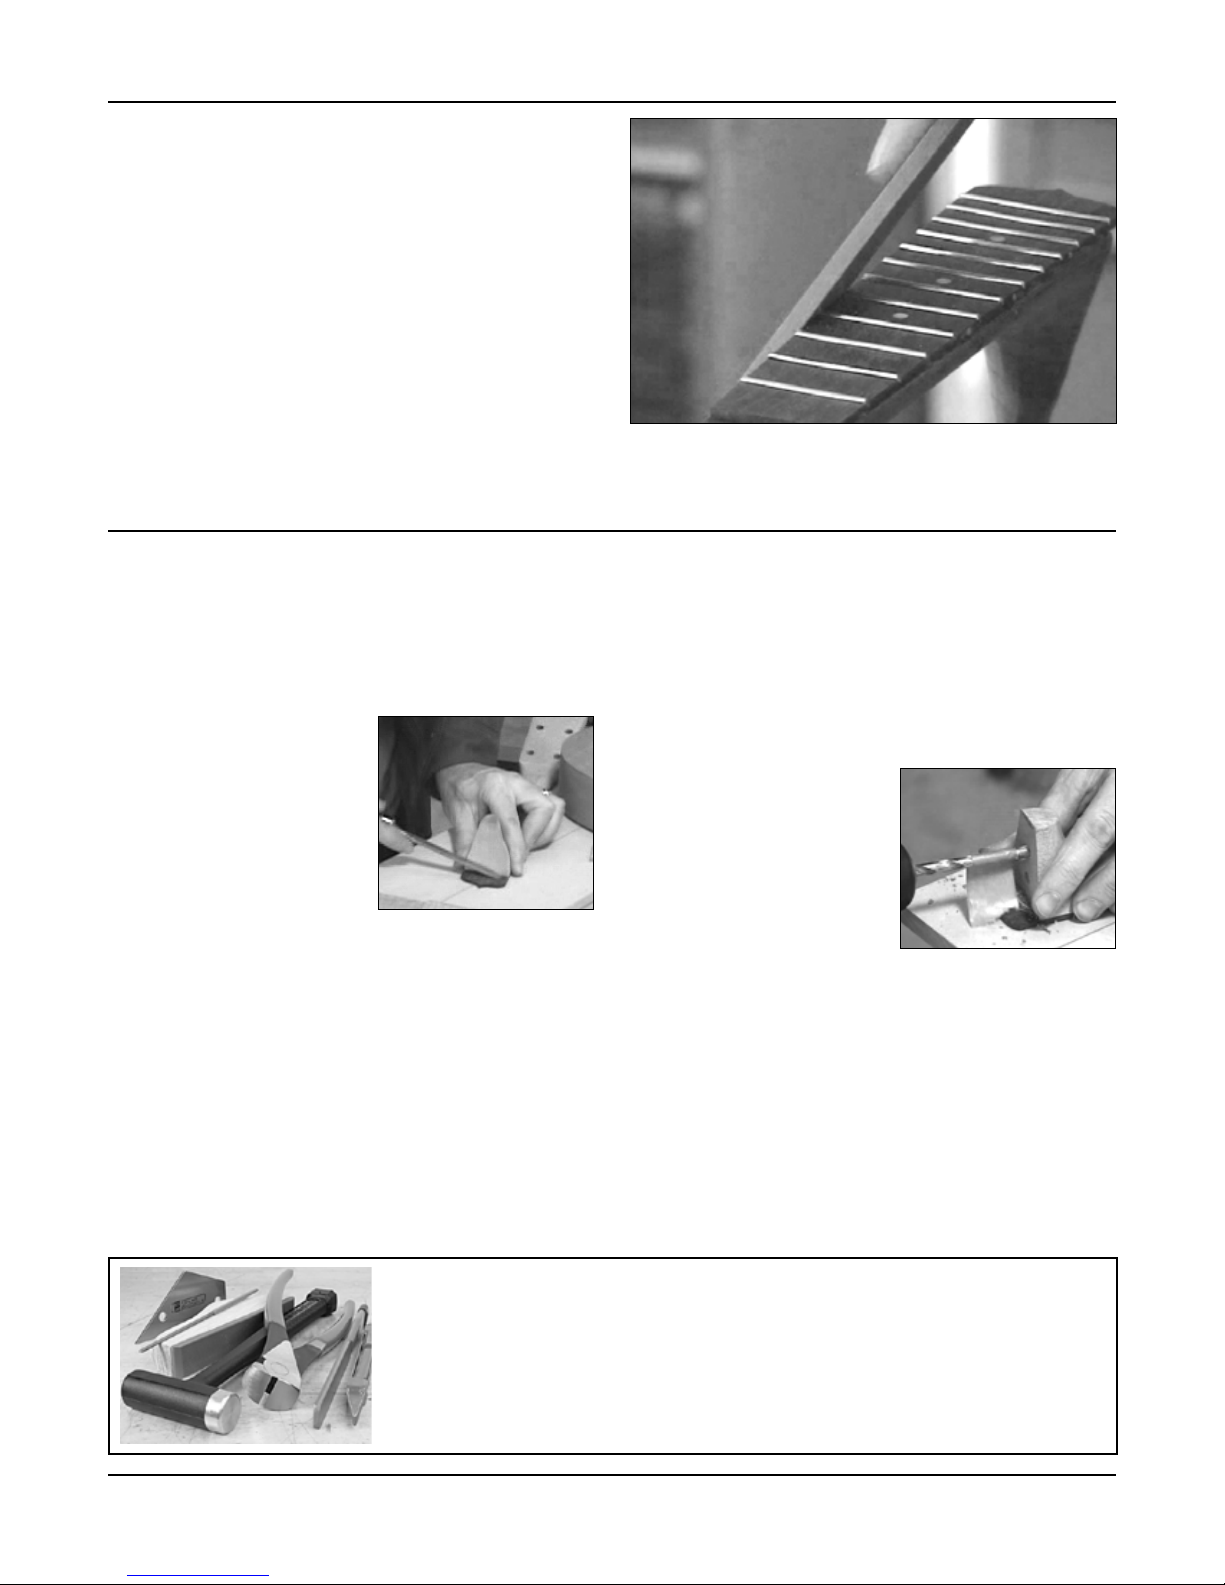
For hammering the frets, you’ll need a work surface that’s
flat and hard. A fret hammer is recommended, because it’s
gentler on the frets than a carpenter’s hammer. If you use
the latter, be carefull and be sure it has a clean, smooth
striking surface.
Work on one fret at a time. Seat the ends of the fret in the
slots by tapping them down at each edge of the fretboard.
This leaves the center curved up above the fret slot.Next,tap
the fret from end to end, seating it into the slot.
As each fret is seated, nip the overhanging ends close to
the sides of the fretboard (approximately 1/64"). Leaving a
little overhand helps you avoid marring the wood. You can
use wire cutters, but fret cutters are ideal for this job, and
provide a clean, flush cut.
After all the frets are installed, place a flat hardwood block
on top of the frets and hammer on the block to further seat
the frets.
The fretboard will now have a slight backbow from the pres-
sure of the metal fret tangs in the slots.Remove this bow by
Seating frets
gently massaging the fretboard, curving it in the opposite
direction.Place a shim beneath one end of the fretboard and
press the board down against the table top. This seats the
frets more securely as the fretboard flattens out.Press gently:
too much force can crack the fretboard at one of the slots.
Stewart-MacDonald’s free information online
How to Hammer Frets by Gene Imbody
A fret hammer is the most basic tool for installing frets, but there’s a definite technique
to using it.It’s not like hammering a nail! Gene Imbody is a skilled guitar repairman, and
his advice on hammering will get you off to a good start:
Search "how to hammer frets" at stewmac.com
9

stewmac.com
In this step it is helpful to have the neck held firmly either by
clamping the peghead to the edge of your workbench,or in
a vise.Use a caul to protect the peghead from clamp marks.
Position the fretboard on the neck, with the 14th fret at the
heel edge.Put the nut in place,to be sure you have room for
it to sit on the flat neck before it tapers off to the headstock.
Don’t glue it in yet—you might find it necessary to thin your
nut so it sits on the flat of the neck and still have the 14th
fret line up with the heel edge.
There are several ways to clamp the fretboard to the neck:
use the rubber bands included in the kit, use some screw
clamps and a caul, or you can use our #3109 Fingerboard
Band Clamps with or without a caul.
To clamp with the rubber band:
wrap the rubber band around
the full length, starting at
the nut line (pictured).
Make sure the
first wrap goes
over the end
to keep it from
unraveling.
Attach the fingerboard to the neck
After the dry run, un-
wind the band and
apply Titebond glue.
Spread the glue evenly
on the neck, and posi-
tion the fretboard. It is
important to have the
14th fret right at the
edge of the heel of
the neck.
Reclamp, clean up
squeeze-out at the
nut area, and let dry
for at least 3 hours.
Final sand the neck: Remove the clamps from the previous
step. Secure the peghead to the workbench or in a vise.
Using a combination of micro file or finish rasp and sand-
paper, file the neck and fretboard sides flush. Clean up the
dried glue,but avoid touching the frets.Finish with 220-grit
sandpaper.
Level frets are important. Use a long straightedge to see
how level they are.Mark the tops of each fret with a marker
pen.
Lightly smooth the
frets with a smooth mill
file, a carborundum
stone, or a hard block
with 400-grit sand-
paper. A few gentle
strokes should be all it
takes.When the marks
are removed from each fret, they are all level. Check with a
straightedge to see that the frets are level, and use a hard-
wood block with 600-grit sandpaper to remove any filing
marks.
Level and polish the frets
If the frets have be-
come flattened, round
them again with a fret
crowning file. Finally,
smooth the frets with
1000-grit sandpaper
wrapped around two
fingers. The action of
your fingers over the
frets will round them a little while it burnishes and polishes
the tops.Roll over the fret ends to polish them and remove
any burrs.
10
Stewart-MacDonald’s tool recommendation
Essential Fretting Tool Kit Item #3125
Our fretting experts compiled this kit of tools you’ll need for the fundamentals of fret work:
installation, removal and dressing.We've included our photo-illustrated book, Fretwork
Step By Step, the most complete work ever published on the subject!
Optional heel cap decoration
With the neck against the body,mark the bottom of the heel
about 1/8" below the sides. Saw and sand off the excess
heel and, holding the neck against the body in final posi-
tion, check to make sure it is square to the body. Glue on
a small piece of 1/16" thick wood as a decorative touch on
the neck heel.When the super glue has dried, file and sand
off the excess.
Insert dowel pins
Take the two 1/4" dowel pins
and cut them down to 1" long.
Using a 1/4" bit, drill two 1/2"
deep holes into the body along
the seam where the sides align
(the centerline). Drill one of
them approximately 1/2" from
the top edge, and the other
1-1/4" from the top edge.
Final sand the body
Clamp the peghead to the workbench. Using a micro file or
finish rasp, file the neck flush to the fretboard sides. Finish
with 220-grit sandpaper. Sand the body down to 220-grit
sandpaper.
Clean up the neck heel
Check for glue squeeze out
between the fretboard and the
neck heel. If necessary, remove
it with a chisel. Now hold the
neck assembly up against the
body and check its fit against
the body.If necessary,sand the
body slightly (or sand/chisel
the neck heel) so the neck fits
flush against the body.
Preparations for attaching the neck to the body
With a smooth mill file or 150-grit sandpaper taped to a
flat surface, remove the sharp overhanging fret ends. They
should be smooth and flush to the fretboard.
Next,add a uniform bevel to the edges of the frets.Hold the
file at an angle and put a beveled shape onto the fret ends.
An angle of 30-degrees is about right, but the steepness of
this bevel is a matter of personal preference.
You can then shape each fret end, rounding and buffing so
they will be comfortable to the ukulele player!
Dress the fret ends
11

stewmac.com
Final assembly jig: This one is simple—take your 9" x 30"
MDF and draw a centerline all the way down the.
You’ll need to make two spacers. Each of them is approxi-
mately 1" x 6" and they need to be exactly 1/4" thick.These
are used to hold the body off the MDF at exactly the same
height as the fretted fretboard.
Place the fretboard and paper body template on the MDF.
The 14th fret should line up with the neck end of the body,
and both should be fully on the MDF.When they are correctly
aligned, draw their outline onto the MDF (pictured).
Using a cam clamp,clamp the neck/fretboard assembly onto
the MDF assembly fixture where you drew its outline.Put the
two spacers on the body outline;put two 1/4" dowel center-
ing pins into the holes you drilled;and carefully put the body
onto the MDF fixture and slide it up against the clamped neck
in order to mark the centers of the two holes.
Alignment is critical! Remove the neck and drill 1/2" deep x
1/4" holes at the markings.Put the dowel pins into the body
and check the fit with the neck. Adjust as necessary.
Now dry clamp everything into place. First, clamp the neck
down with a cam clamp. Then slide the body on the two
Attach the neck to the body
spacers (with dowels) into place. Cam clamp both ends of
the body lightly onto the fixture and use a 12" single-hand
bar clamp to squeeze the neck into the body (the clamp will
span from the heel of the neck to the tailblock.When you’re
satisfied, apply glue and re-clamp. Carefully clean up the
squeeze-out. Let dry overnight.
12

Sand all the wood surfaces with 320-grit, gently rounding
any sharp edges (including the lip of the soundhole and the
sharp edges of the peghead).
Damp-sand all surfaces to raise the grain. Do this by dip-
ping a rag in warm water,then squeeze out the excess.Wipe
the wood with the damp rag to raise the wood fibers. Let
the wood dry for an hour or so, then sand away the raised
fibers with 320-grit. Repeat this damp-sanding process a
second time. Damp-sanding prevents the grain from rising
later during finishing,which would result in a rough surface
when finished.
Apply masking tape to the areas that won’t be stained or
finished.This includes the bridge, fretboard playing surface
and the sides (pictured).
Stuff newspaper into the body.Be sure to tuck it completely
into the soundhole.
Final sanding and masking
The bridge should be glued to bare, unfinished top wood
for strong adhesion. In this step, you will locate the bridge
position and mask that area off with tape to keep the wood
bare during finishing.The bridge will be glued on later, after
the finish has been applied to the instrument.
Place the bridge on the top of the body in approximately the
correct place:17-3/32" from the nut-end of the fretboard to
the center of the saddle on the bridge. Now place a piece
of 1-1/2" wide masking tape on the top of the body under
the bridge.
Finishing your ukulele
Locate and mask the bridge
Location of the bridge is very important for accurate tuning.
Repeat these steps using an accurate ruler,until you get the
position right:
1. Bridge on the tape, saddle is toward the fretboard.
2. Center of the saddle is exactly 17-3/32" from the nut-
end of the fretboard.
3. Bridge is perfectly centered relative to the centerline of
the fretboard.
4. Bridge isn’t tilted at all.
When you’ve achieved this,carefully (and lightly—you want
to see it on the tape but be careful not to dent the mahogany)
draw a pencil line around the bridge onto the tape.
Remove the bridge and use an X-Acto knife to cut the out-
line of the bridge approximately 1/16" inside the pencil line.
Remove the excess tape.
Soprano kit shown.
13
stewmac.com
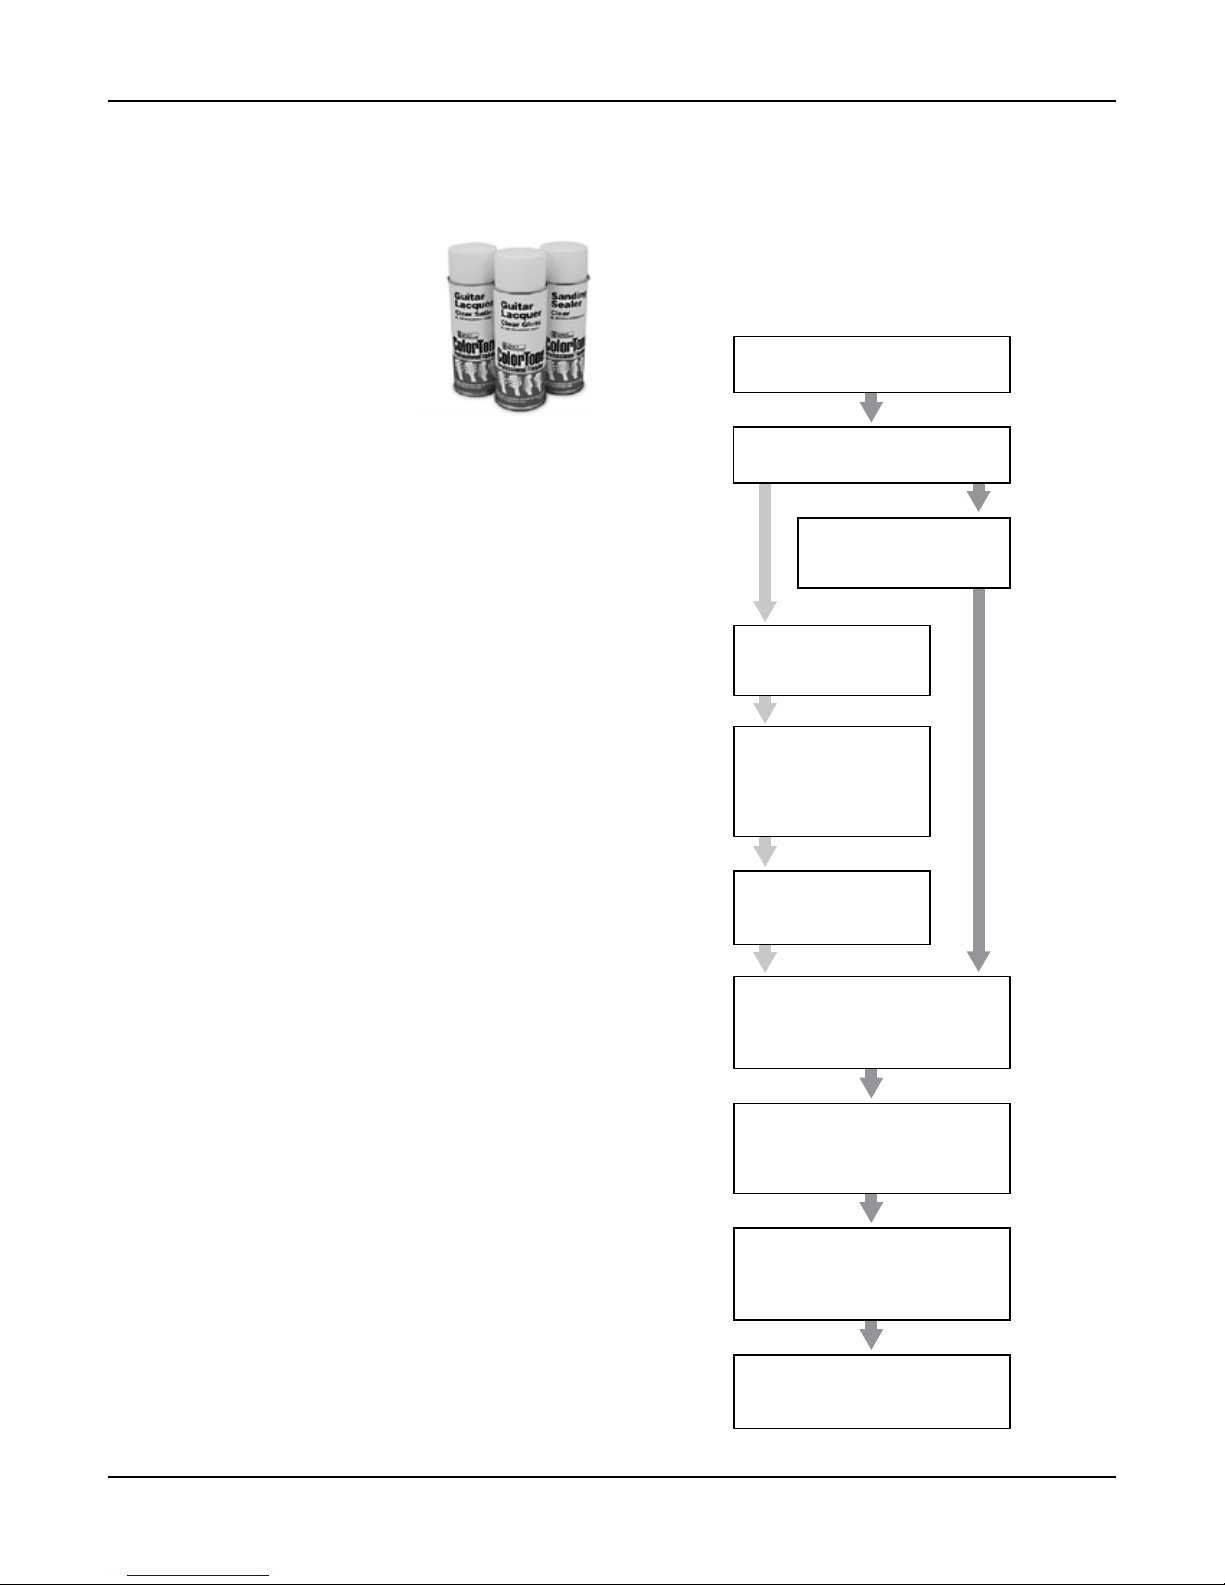
So maybe you’re ready to try the full instrument finish-
ing process? This flow chart (below) covers the traditional
nitrocellulose finishing steps,in a nutshell.It’s a process that
can take over a week and requires a fair amount of equip-
ment and experience. If you are ready to experiment with
this complete schedule, we recommend getting more info
in our book, Guitar Finishing Step-By-Step.
For a simple and durable finish for your uke, we recom-
mend ColorTone Aerosol Guitar Lacquer. It’s an economical
way for the beginner to apply a nitrocellulose finish without
elaborate setup or equipment. Only a few cans are needed
to completely finish your ukulele.
ColorTone is a nitrocellulose lacquer
that can be applied on smooth bare
wood. It can also be applied over
sanded basecoats of paste wood fillers,
ColorTone Sanding Sealer, and over
ColorTone Wood Stains.
1. Be sure your surface is sanded
smooth and dust free. Use a tack cloth and vacuum to re-
move every speck.
2. Shake the can for at least one minute after agitator balls
rattle. Spray the surface from 8-10 inches away. Apply thin
coats in steady uniform strokes to achieve the desired finish.
Tip: Pro shops spray heated lacquer because cold lacquer
spatters,requiring extra sanding.You should warm up your
aerosol lacquer too, simply soak them in a sink of warm tap
water.
3. Allow at least four hours between coats,and wait 24 hours
before level-sanding.
Let the finish cure for 10-14 days before final sanding and
buffing.
Apply a clear finish
Wet sand and buff
Wet sand with 1200-grit and finer, buff
to high-gloss
Grain filler
Natural for light woods,
medium-brown for dark
Porous wood
Rosewood, mahogany, ash,
koa, walnut, etc.
Non-porous wood
Maple, spruce, basswood,
alder, poplar, ebony, etc.
Wash coat (optional)
1-2 coats • 1-2 hours apart
Very thin coats of thinned
finish lacquer, sanding
sealer, or shellac
Sealer/primer (optional)
Build level surface with lacquer, sanding
sealer, or shellac • 3-4 coats • 2-3 coats
per day • 1-2 hours apart
Color coats (optional)
Tinted clear lacquer, shaded lacquers or
opaque colors • 1-3 coats • 2-3 coats per
day • 1-2 hours apart
Stain (optional)
Liquid stain dissolved in water or alcohol
Clear coats
Lacquer: 4-10 coats (4-to-8 coats for
thin“vintage”finish) • 2-3 coats per day
• 1-2 hours apart
Wood preparation
Clean surface and sand to 220-grit
14
Table of contents
Other Stewart MacDonald Musical Instrument manuals


