Stihl MSA 120 C User manual

Contents
1 Introduction................................................. 2
2 Guide to Using this Manual.........................2
3 Overview..................................................... 3
4 Safety Precautions......................................4
5 Preparing the Saw for Operation.............. 13
6 Charging the Battery, LEDs...................... 13
7 Assembling the Saw................................. 14
8 Engaging and Disengaging the Chain Brake
.................................................................. 16
9 Removing and Fitting the Battery..............17
10 Switching the Saw On/Off......................... 17
11 Testing the Chain Saw and Battery.......... 17
12 Operating the Saw.................................... 19
13 After Finishing Work..................................23
14 Transporting..............................................23
15 Storing.......................................................23
16 Cleaning....................................................24
17 Maintenance............................................. 24
18 Repairing...................................................25
19 Troubleshooting........................................ 25
20 Specifications............................................26
21 Bar and Chain Combinations.................... 27
22 Spare Parts and Accessories....................28
23 Disposal.................................................... 28
24 EC Declaration of Conformity................... 28
25 General Power Tool Safety Warnings.......28
1 Introduction
Dear Customer,
Thank you for choosing STIHL. We develop and
manufacture our quality products to meet our
customers’ requirements. The products are
designed for reliability even under extreme con‐
ditions.
STIHL also stands for premium service quality.
Our dealers guarantee competent advice and
instruction as well as comprehensive service
support.
STIHL expressly commit themselves to a sus‐
tainable and responsible handling of natural
resources. This user manual is intended to help
you use your STIHL product safely and in an
environmentally friendly manner over a long
service life.
We thank you for your confidence in us and hope
you will enjoy working with your STIHL product.
Dr. Nikolas Stihl
IMPORTANT! READ BEFORE USING AND
KEEP IN A SAFE PLACE FOR REFERENCE.
2 Guide to Using this Manual
2.1 Applicable Documentation
Local safety regulations apply.
► Read, understand and save the following
documents in addition to this instruction man‐
ual:
–Safety notes and precautions for STIHL AK
battery.
–Safety information for STIHL batteries and
products with built in batteries:
www.stihl.com/safety-data-sheets
2.2 Warning Notices in Text
DANGER
■ This notice refers to risks which result in seri‐
ous or fatal injury.
► Serious or fatal injuries can be avoided by
taking the precautions mentioned.
WARNING
■ This notice refers to risks which can result in
serious or fatal injury.
► Serious or fatal injuries can be avoided by
taking the precautions mentioned.
NOTICE
■ This notice refers to risks which can result in
damage to property.
► Damage to property can be avoided by tak‐
ing the precautions mentioned.
2.3 Symbols in Text
This symbol refers to a chapter in this
instruction manual.
English
2 0458-716-0121-D
© ANDREAS STIHL AG & Co. KG 2021
0458-716-0121-D. VA0.B21.
Printed on chlorine-free paper
Printing inks contain vegetable oils, paper can be recycled.
Translation of Original Instruction Manual
0000008051_012_GB

3 Overview
3.1 Chainsaw, Battery and Charger
19
9
25
18
17
16
15
14
13
3
2
8
6
21
20
23
24
0000-GXX-1198-A5
22
1
4
10
11
5
26
12
#
#
1 Rear Hand Guard
Protects operator’s right hand from contact
with the chain if it comes off the bar or
breaks.
2 Front Hand Guard
Helps protect operator’s left hand from con‐
tact with the saw chain, serves to engage the
chain brake and activates the chain brake by
inertia in certain kickback situations.
3 Chain sprocket
Toothed wheel that drives the chain.
4 Tensioning Gear
Moves guide bar to increase or reduce chain
tension.
5 Spiked Bumper
Toothed stop for holding saw steady against
wood while cutting.
6 Saw Chain
Cuts the wood.
7 Guide bar
Supports and guides the saw chain.
8 Chain Sprocket Cover
Covers the chain sprocket and secures the
guide bar to the chainsaw.
9 Adjusting Wheel
Permits precise adjustment of chain tension.
10 Wingnut
Secures chain sprocket cover to chainsaw.
11 Chain catcher
Reduces risk of operator contact with the
chain if it comes off the bar or breaks.
12 Control handle
For operating, holding and controlling the
chainsaw.
13 Locking Lever
Secures the battery in the battery compart‐
ment.
14 Battery Compartment
Accommodates the battery.
15 Handlebar
For holding, controlling and carrying the
chainsaw.
16 Oil Tank Cap
Closes the oil tank.
17 Lockout Button
Unlocks the trigger.
18 Trigger
Switches the chainsaw on and off.
19 Battery
Supplies power to the chainsaw.
20 LEDs
Indicate battery’s state of charge and mal‐
functions.
21 Button
Activates the LEDs on the battery.
22 Charger
Charges the battery.
23 LED
The LED indicates the operating status of the
charger.
24 Connecting Cable
Connects charger to appliance plug.
25 Appliance Plug
Connects cable to wall outlet.
26 Chain Scabbard
Helps protect user from contact with saw
chain.
# Rating Label with Serial Number
3.2 Symbols
Meanings of symbols that may be on the chain‐
saw, battery and charger:
This symbol shows the direction of
rotation of the chain.
Turn in this direction to tension the saw
chain.
3 Overview English
0458-716-0121-D 3

This symbol marks the chain oil tank.
The chain brake is engaged in this direc‐
tion.
The chain brake is disengaged in this
direction.
1 LED glows red. Battery too hot or too
cold.
4 LEDs flash red. There is a malfunc‐
tion in the battery.
LED glows green and LEDs on battery
glow or flash green. Battery is being
charged.
LED flashes red. No electrical contact
between battery and charger or mal‐
function in battery or charger.
Length of guide bar that may be used.
L
W
A
Guaranteed sound power level accord‐
ing to directive 2000/14/EC in dB(A) in
order to make sound emissions of
products comparable.
The data next to this symbol indicates the
energy content of the battery according to
the cell manufacturer’s specification. The
energy content available during operation
is lower.
Operate the electric appliance in a dry
place, indoors only.
Do not dispose of the product with your
household waste.
4 Safety Precautions
4.1 Warning Symbols
Meanings of warning signs and labels on the
saw, battery or charger:
Observe safety notices and take the
necessary precautions.
Read, understand and keep the User
Manual.
Wear safety glasses and a hard hat.
Observe the safety notices on kickback
and take the necessary precautions.
Remove the battery during work stop‐
pages, transport, storage, maintenance
or repair.
Protect saw and charger from rain and
dampness.
Protect battery from heat and fire.
Protect the battery from rain and mois‐
ture and do not immerse it in liquids.
Observe the permitted battery temper‐
ature range.
4.2 Intended Use
The STIHL MSA 120 C and MSA 140 C chain‐
saws are designed for cutting wood, limbing and
felling small diameter trees and maintaining gar‐
den trees.
Do not use the chainsaw in the rain.
The STIHL AK battery supplies power to the
saw.
The STIHL AL 101 charger recharges the STIHL
AK battery.
WARNING
■Batteries and chargers not explicitly approved
for the saw by STIHL may cause a fire or
explosion. This can result in serious or fatal
injuries and damage to property.
►Use the saw with a STIHL AK battery.
►Recharge the STIHL AK bat‐
tery with a STIHL AL 101, AL
300 or AL 500 charger.
■Using the saw, battery or the charger for pur‐
poses for which they were not designed may
result in serious or fatal injuries, and damage
to property may occur.
►Use the saw, battery and charger as descri‐
bed in this instruction manual.
English 4 Safety Precautions
4 0458-716-0121-D

4.3 The Operator
WARNING
■Users without adequate training or instruction
cannot recognize or assess the risks involved
in using the chainsaw, battery and charger.
The user or other persons may sustain serious
or fatal injuries.
► Read, understand and save the
instruction manual.
► If you pass the saw, battery and charger on
to another person: Always give them the
instruction manual.
►Make sure the user meets the following
requirements:
–The user must be rested.
–The user must be in good
physical condition and
mental health to operate
and work with the saw,
battery and charger. If the
user’s physical, sensory or
mental ability is restricted,
he or she may work only
under the supervision of or
as instructed by a respon‐
sible person.
–The user is able to recognize and
assess the risks involved in using the
chainsaw, battery and charger.
–The user must be of legal
age or is being trained in a
trade under supervision in
accordance with national
rules and regulations.
–The user has received
instruction from a STIHL
servicing dealer or other
experienced user before
working with the chainsaw
and using the charger for
the first time.
–The user must not be under the influ‐
ence of alcohol, medication or drugs.
►If the user is working with a chainsaw for
the first time: Practice cutting logs on a
sawhorse or other support.
►If you have any queries: Contact a STIHL
servicing dealer for assistance.
4.4 Clothing and equipment
WARNING
■ Long hair may be pulled into the chainsaw
while working. This may result in serious injury
to the user.
►Tie up and confine long hair above your
shoulders.
■ Objects can be thrown at high speed during
operation. This may result in injury to the user.
► Wear close-fitting safety glasses.
Suitable safety glasses are tested in
accordance with EN 166 or national
regulations and available commer‐
cially with the corresponding mark‐
ing.
►STIHL recommends wearing a face mask.
► Wear a long-sleeved, close fitting top.
■ Falling objects can cause head injuries.
► If objects are likely to fall while work‐
ing: wear a hard hat.
■ Dust can be whipped up during operation:
Whipped up dust can damage the respiratory
passages and cause allergic reactions.
►If dust is whipped up or forms a cloud:
Wear a dust respirator mask.
■ Unsuitable clothing can snag on wood or
scrub and may become caught in the chain
saw. Users not wearing suitable clothing are at
risk of serious injury.
►Wear close-fitting clothing.
► Remove scarves and jewelry.
■ The user may come into contact with the mov‐
ing saw chain while working. This may result
in serious injury to the user.
►Wear long trousers with cut protection.
■ The user may cut himself or herself on wood
while working. The user may come into con‐
tact with the saw chain during cleaning or
servicing. This may result in injury to the user.
►Wear work gloves made from resistant
material.
4 Safety Precautions English
0458-716-0121-D 5

■ Wearing unsuitable footwear may cause the
user to slip. If the user comes into contact with
the moving saw chain, he or she may suffer
cuts. This may result in injury to the user.
►Wear chainsaw boots with cut protection.
4.5 Work Area and Surroundings
4.5.1 Chainsaw
WARNING
■ Bystanders, children and animals are not
aware of the dangers of the chainsaw or
thrown objects. Innocent bystanders, children
and animals may be seriously injured and
damage to property may occur.
►Keep bystanders, children and animals
away from the work area.
► Do not leave the chainsaw unattended.
► Make sure that children cannot play with
the chainsaw.
■ The saw is not waterproof. Working in the rain
or a damp location may result in an electric
shock. This can result in injuries to the user
and may damage the chainsaw.
► Do not work in the rain or a damp
location.
■ Electrical components of the chainsaw can
produce sparks. Sparks may cause a fire or an
explosion in an easily combustible or explo‐
sive environment. This can result in serious or
fatal injuries and damage to property.
►Do not work in an easily combustible or
explosive environment.
4.5.2 Battery
WARNING
■Bystanders, children and animals cannot rec‐
ognize or assess the dangers of the battery.
Bystanders, children and animals may be seri‐
ously injured.
►Keep bystanders, children and animals
away from the work area.
► Do not leave the battery unattended.
► Make sure that children cannot play with
the battery.
■ The battery is not protected against all ambi‐
ent conditions. If the battery is exposed to cer‐
tain ambient conditions, it may catch fire or
explode. This can result in serious injuries and
damage to property.
► Protect battery from heat and fire.
► Do not throw the battery into a fire.
► Use and store the battery at temper‐
atures between ‑ 10 °C and + 50 °C.
► Protect the battery from rain and
damp – do not immerse it in fluids.
► Keep battery away from metallic objects.
► Do not expose battery to high pressure.
► Do not expose battery to microwaves.
► Protect battery from chemicals and salts.
4.5.3 Charger
WARNING
■ Bystanders, children and animals are not
aware of and cannot assess the dangers of a
charger or electric current. Bystanders, chil‐
dren and animals may be seriously or fatally
injured.
►Keep bystanders, children and animals
away from the work area.
►Make sure that children can‐
not play with the charger.
■The charger is not waterproof. If you work in
the rain or in a damp environment, an electric
shock may occur. The user may be injured
and the charger may be damaged.
► Do not operate it in the rain or in a
damp environment.
■ The charger is not protected against all ambi‐
ent conditions. If the charger is exposed to
certain ambient conditions, it may catch fire or
explode. This may result in serious injury to
people and damage to property.
►Operate the charger in an enclosed, dry
room.
► Do not operate the charger in a flammable
environment or in an explosive environ‐
ment.
►Do not operate the charger on a readily
combustible surface.
► Use and store the charger at temperatures
between + 5 °C and + 40 °C.
■ The connecting cable is a trip hazard. People
may be injured and the charger may be dam‐
aged.
►Lay the connecting cable flat on the floor.
English 4 Safety Precautions
6 0458-716-0121-D

4.6 Safe Condition
4.6.1 Chainsaw
The chainsaw is in a safe condition if the follow‐
ing points are observed:
–The chainsaw is not damaged.
–The saw is clean and dry.
–The chain catcher is not damaged.
–The chain brake is operating properly.
–The controls function properly and have not
been modified.
–The chain lubrication is operating properly.
–Wear marks on the chain sprocket are not
deeper than 0.5 mm.
–A combination of guide bar and saw chain rec‐
ommended in this User Manual is mounted.
–The guide bar and saw chain are properly
mounted.
–The saw chain is properly tensioned.
–Only original STIHL accessories designed for
this chainsaw model are fitted.
–The accessories are correctly attached.
–The oil tank cap is closed.
WARNING
■ If not in safe condition, components may no
longer operate correctly and safety devices
may be disabled. This may result in serous or
fatal injury to people.
►Work only with an undamaged chainsaw.
► If the saw is dirty or wet: Clean the saw and
allow it to dry.
► Work only with an undamaged chain
catcher.
► Never modify your chainsaw. Exception:
Mounting a combination of guide bar and
saw chain recommended in this User Man‐
ual.
►If the controls do not function properly: Do
not use your chainsaw.
► Only fit original STIHL accessories
designed for this chainsaw model.
► Mount the guide bar and saw chain as
described in this User Manual.
► Attach accessories as described in this
User Manual or in the User Manual for the
accessories.
►Never insert objects in the chainsaw’s
openings.
► Replace worn or damaged labels.
► If you have any doubts, be sure to consult a
STIHL dealer.
4.6.2 Guide Bar
The guide bar is in a safe condition if the follow‐
ing points are observed:
–Guide bar is not damaged.
–Guide bar is not deformed.
–The minimum groove depth is maintained,
20.3.
–Bar rails are free from burrs.
–Bar groove is not pinched or splayed.
WARNING
■ If the guide bar is not in a safe condition, it can
no longer support and guide the saw chain
properly. The rotating saw chain can jump off
the guide bar. This can result in serious or
fatal injuries.
►Work only with an undamaged guide bar.
► If the groove depth is less than the mini‐
mum depth: Mount a new guide bar.
► Deburr the guide bar every week.
► If you have any queries: Contact your
STIHL servicing dealer.
4.6.3 Saw Chain
The saw chain is in a safe condition if the follow‐
ing points are observed:
–Chain is not damaged.
–Chain is properly sharpened.
–The service marks on the cutters are still visi‐
ble.
WARNING
■If components do not comply with safety
requirements, they will no longer function
properly and safety devices may be rendered
inoperative. This can result in serious or fatal
injuries.
►Work only with an undamaged saw chain.
► Sharpen the chain properly.
► If you have any queries: Contact your
STIHL servicing dealer for assistance.
4.6.4 Battery
The battery is in safe condition when the follow‐
ing conditions are met:
–The battery is not damaged.
–The battery is clean and dry.
–The battery is working and has not been modi‐
fied.
WARNING
■The battery cannot function safely if it is not in
safe condition. There is a risk of serious injury
to persons.
►Use an undamaged and functioning battery.
4 Safety Precautions English
0458-716-0121-D 7

► Do not charge a damaged or defective bat‐
tery.
► If the battery is dirty or wet: clean the bat‐
tery and allow it to dry.
► Do not modify the battery.
► Do not insert objects into the apertures in
the battery.
► Never connect the battery terminals to met‐
allic objects and cause a short circuit.
► Do not open the battery.
► Replace worn or damaged warning signs.
■ Fluid may leak from a damaged battery. If the
fluid contacts the skin or eyes, this may cause
irritation.
►Avoid contact with the fluid.
► In the event of contact with the skin: wash
the affected areas with plenty of soap and
water.
►In the event of contact with the eyes: rinse
the eyes with plenty of water for at least 15
minutes and seek medical attention.
■A damaged or defective battery may emit an
unusual odour, smoke or catch fire. This may
result in serious or fatal injury to people and
damage to property.
►If the battery emits an unusual odour or
smoke: do not use the battery and keep it
away from flammable materials.
►If the battery catches fire: try to extinguish
the battery using a fire extinguisher or
water.
4.6.5 Charger
The charger is in a safe condition if the following
points are observed:
–Charger is undamaged.
–Charger is clean and dry.
WARNING
■If components do not comply with safety
requirements, they will no longer function
properly and safety devices may be rendered
inoperative. This can result in serious or fatal
injuries.
►Do not use a damaged charger.
► If the charger is dirty or wet: Clean the
charger and allow it to dry.
► Never attempt to modify the charger.
► Never insert objects in the charger’s open‐
ings.
► Never bridge the charger's contacts with
metallic objects (short circuit).
► Do not open the charger.
4.7 Working
4.7.1 Cutting
WARNING
■Always work within calling distance of others
in case help is needed.
► Make sure than persons outside the work
area are within calling distance.
■ The user cannot concentrate on the work in
certain situations. The user can lose control of
the saw, stumble or fall and be seriously
injured.
►Work calmly and carefully.
► If light and visibility are poor: Do not use
your saw.
► Operate the chainsaw alone.
► Do not work above shoulder height.
► Watch out for obstacles.
► Stand on the ground while working and
keep a good balance. If it is necessary to
work at heights: Use a lift bucket or a safe
platform.
►If you begin to feel tired: Take a break.
■ The rotating saw chain can cut the operator.
This can result in serious injuries.
► Do not touch the rotating saw chain.
► If the saw chain is blocked by an object:
Switch off the chainsaw, engage the chain
brake and remove the battery. Then
remove the object causing the blockage.
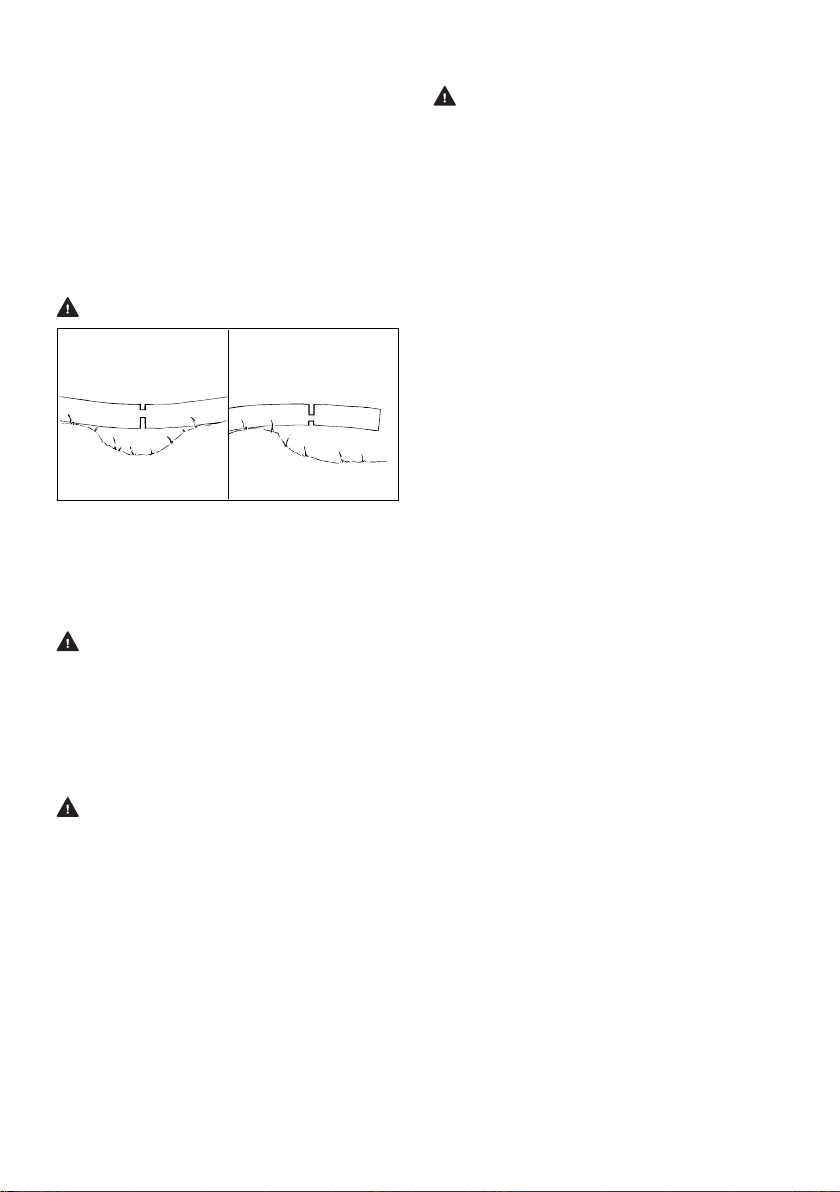
■The rotating chain becomes hot and expands.
If the chain is not lubricated sufficiently or not
re-tensioned at regular intervals, it may come
off the guide bar or break. This can result in
serious injuries and damage to property.
►Use special chain oil.
► Check oil level in tank regularly during cut‐
ting work. Before the oil tank runs empty:
Fill up with chain oil.
►Check chain tension regularly during cutting
work. If chain tension is insufficient: Ten‐
sion the chain.
■If the behavior of the saw changes during
operation or feels unusual, it may no longer be
in a safe condition. This can result in serious
injuries and damage to property.
►Stop work, remove the battery and contact
your STIHL servicing dealer for assistance.
■ Saw vibrations may occur during operation.
► Wear gloves.
► Take regular breaks.
► If signs of circulation problems occur: Seek
medical advice.
English 4 Safety Precautions
8 0458-716-0121-D

■ Sparks may occur if the rotating chain makes
contact with a hard object. Sparks may cause
a fire in an easily combustible location. This
can result in serious or fatal injuries and dam‐
age to property.
►Do not work in an easily combustible loca‐
tion.
■ Note that the saw chain continues to rotate for
a short period after you release the trigger.
The rotating saw chain can cut the user. This
can result in serious injuries.
►Wait for the chain to come to a standstill.
WARNING
0000-GXX-1245-A0
1
21
2
■The guide bar can be pinched when cutting
wood that is under tension. The user can lose
control of the saw and be seriously injured.
►Make a relieving cut in the compression
side (1) first, then perform bucking cut at
the tension side (2).
DANGER
■Working near live electric cables can result in
accidental contact with the chain and damage
the cables. This can result in serious or fatal
injuries.
►Do not work near live electric cables.
4.7.2 Limbing
WARNING
■If the underside of the felled tree is limbed
first, it will no longer be supported on the
ground by branches. The tree can move dur‐
ing cutting work. This can result in serious or
fatal injuries.
►Cut through large limbs on the underside of
the tree only after it has been bucked.
► Do not stand on the log while limbing it.
■ A branch may fall to the ground during limbing.
The user may trip, fall or be seriously injured.
► Limb from the base to the crown of the tree.
4.7.3 Felling
WARNING
■Inexperienced users cannot assess the dan‐
gers of felling a tree. This can result in serious
or fatal injuries and damage to property.
►If you have any queries: Do not fell the tree
yourself.
■ A tree and branches can fall on bystanders or
objects during the felling operation. This can
result in serious or fatal injuries and damage
to property.
►Determine direction of fall so that the area
in which the tree falls is clear.
► Do not allow bystanders, children or ani‐
mals within 2.5 tree lengths of the felling
site.
►Remove broken or dead branches from the
tree crown before felling.
► If broken or dead branches cannot be
removed from the crown: Do not fell the
tree.
►Observe tree crown and crowns of neigh‐
boring trees and keep clear of falling
branches.
■When the tree falls the trunk can break or
spring back in the direction of the user. This
can result in serious or fatal injuries.
►Plan an escape path sideways behind the
tree.
► Walk backwards along the escape path and
observe the falling tree.
► Do not walk backwards down slopes.
■ Obstacles in the work area and on the escape
path can hinder the user. The user may trip
and fall. This can result in serious or fatal inju‐
ries.
►Remove all obstacles from the work area
and escape path.
■ If you cut into or through the hinge, stabilizing
strap or holding strap too soon, the intended
direction of fall cannot be controlled or the tree
can fall prematurely. This can result in serious
or fatal injuries and damage to property.
►Do not cut into or through the hinge.
► Cut through the stabilizing strap or holding
strap last.
► If the tree begins to fall too soon: Abandon
the felling cut and retreat along the escape.
■ Kickback can occur if the rotating chain in the
upper quadrant of the bar nose makes contact
with a hard felling wedge and is suddenly
braked. This can result in serious or fatal inju‐
ries.
►Use aluminum or plastic felling wedges.
4 Safety Precautions English
0458-716-0121-D 9

■ If the tree does not fall all the way to the
ground or gets caught on another tree, the
operator cannot finish the operation in a con‐
trolled manner.
►Stop the felling operation and use a cable
winch or suitable vehicle to pull the tree to
the ground.
4.8 Reactive Forces
4.8.1 Kickback
0000-GXX-1347-A0
Kickback can be caused for the following rea‐
sons:
–The rotating saw chain in the upper quadrant
of the bar nose makes contact with a hard
object and is suddenly braked.
–The rotating saw chain is pinched at the bar
nose.
The chain brake cannot prevent kickback.
WARNING
0000-GXX-1888-A1
■If kickback occurs, the saw can be thrown up
in the direction of the operator. The operator
can lose control of the saw and be seriously or
fatally injured.
►Hold the saw firmly with both hands.
► Always keep your body out of the plane of
the cutting attachment.
► Operate the saw as described in this
instruction manual.
► Do not cut with the upper quadrant of the
bar nose.
► Always cut with a properly sharpened and
tensioned saw chain.
► Use a reduced kickback saw chain.
► Use a guide bar with a narrow radius nose.
► Always cut with the chain running at full
speed.
4.8.2 Pull-in
0000-GXX-1348-A0
The saw is pulled away from the operator when
the bottom of the bar is used for cutting.
WARNING
■ If the rotating chain makes contact with a hard
object and is suddenly pinched, the saw is
abruptly jerked away from the operator. The
operator can lose control of the saw and be
seriously or fatally injured.
►Hold the saw firmly with both hands.
► Operate the saw as described in this
instruction manual.
► Keep the guide bar straight in the cut.
► Apply the spiked bumper properly.
► Always cut with the chain running at full
speed.
4.8.3 Pushback
0000-GXX-1349-A0
The saw is pushed back toward the operator
when the top of the bar is used for cutting.
WARNING
■If the rotating chain makes contact with a hard
object and is suddenly pinched, the saw can
be abruptly pushed back toward the operator.
The operator can lose control of the saw and
be seriously or fatally injured.
►Hold the saw firmly with both hands.
► Operate the saw as described in this
instruction manual.
► Keep the guide bar straight in the cut.
English 4 Safety Precautions
10 0458-716-0121-D

► Always cut with the chain running at full
speed.
4.9 Charging
WARNING
■A damaged or defective charger may produce
an unusual smell or emit smoke during the
charging process. This may result in personal
injuries and damage to property.
►Disconnect the plug from the wall outlet.
■ The charger can overheat and cause a fire if
heat dissipation is inadequate. This can result
in serious or fatal injuries and damage to prop‐
erty.
►Do not cover the charger.
4.10 Connecting to Power Supply
Contact with live components may occur for the
following reasons:
–The connecting cable or extension cable is
damaged.
–Connecting cable plug or extension cable is
damaged.
–Wall outlet is not properly installed.
DANGER
■ Contact with live components can result in an
electric shock. This can result in serious or
fatal injuries.
►Check that the connecting cable, extension
cable and their plugs are not damaged.
If the connecting cable or extension
cable is damaged:
► Do not touch damaged areas.
► Disconnect the plug from the wall
outlet.
►Never touch the connecting cable, exten‐
sion cable or their plugs with wet hands.
► Insert the plug of the connecting cable or
extension cable in a properly installed fused
wall outlet with ground contact.
►Install the charger with a ground fault circuit
interrupter (30 mA, 30 ms).
■ A damaged or unsuitable extension cable can
cause an electric shock. This can result in
serious or fatal injuries.
►Use an extension cable with the correct
wire gauge, 20.6.
WARNING
■Overvoltage can occur in the charger if the line
voltage or frequency are incorrect during
charging. The charger may be damaged.
►Make sure the line voltage and frequency
agree with the data on the charger’s rating
plate.
■A carelessly laid connecting or extension
cable can be damaged and cause others to
trip or fall. This can result in injuries and may
damage the connecting cable or extension
cable.
►Position and mark connecting cable and
extension cable so they do not represent a
trip hazard.
►Position the connecting and extension
cables so that they are not under tension or
entangled.
►Position the connecting and extension
cables so that they cannot be damaged,
kinked, pinched or chafed.
►Protect the connecting cable and extension
cable from heat, oil and chemicals.
► Lay the connecting and extension cables on
a dry surface.
■ The extension cable becomes hot during oper‐
ation. If the heat cannot dissipate, it may
cause a fire.
►If you use a cable drum: Unwind the exten‐
sion cable to its full length.
■ If electric cables or pipes are embedded in the
wall, they may be damaged when the charger
is mounted on a wall. Contact with electric
cables can result in an electric shock. This can
result in serious injuries and damage to prop‐
erty.
►Check that there are no electric cables or
pipes embedded in the wall.
■ If the charger is not mounted on the wall as
described in this instruction manual, the
charger or the battery may fall down or the
charger may overheat. This may result in per‐
sonal injuries and damage to property.
►Mount the charger on the wall as described
in this instruction manual.
■ If the charger is mounted on a wall with the
battery inserted, the battery may fall out and
be damaged. This may result in personal inju‐
ries and damage to property.
►Mount the charger on the wall first and then
insert the battery.
4.11 Transporting
4.11.1 Chainsaw
WARNING
■The saw may turn over or shift during trans‐
port. This may result in personal injuries and
damage to property.
4 Safety Precautions English
0458-716-0121-D 11

► Remove the battery.
► Engage the chain brake.
► Fit the scabbard so that it completely cov‐
ers the guide bar.
► Secure the chainsaw with lashing straps or
a net to prevent it turning over and moving.
4.11.2 Battery
WARNING
■ The battery is not protected against all ambi‐
ent conditions. The battery may be damaged if
it is exposed to certain ambient conditions and
damage to property may occur.
►Never transport a damaged battery.
► Store the battery in non-conductive packag‐
ing.
■ The battery may turn over or shift during trans‐
port. This may result in personal injuries and
damage to property.
►Pack the battery in packaging in such a way
that it cannot move.
► Secure the packaging so that it cannot
move.
4.11.3 Charger
WARNING
■The charger may turn over or move while
being transported. This may result in personal
injuries and damage to property.
►Disconnect the plug from the wall outlet.
► Remove the battery.
► Secure the charger with lashing straps,
belts or a net to prevent it turning over and
moving.
■The connecting cable must not be used for
carrying the charger. The connecting cable
and the charger may be damaged.
►Wind up the connecting cable and attach it
to the charger.
4.12 Storing
4.12.1 Chainsaw
WARNING
■Children are not aware of and cannot assess
the dangers of a chainsaw and can be seri‐
ously injured.
► Remove the battery.
► Engage the chain brake.
► Fit the scabbard so that it completely cov‐
ers the guide bar.
► Store the saw out of the reach of children.
■ Dampness can corrode the electrical contacts
on the saw and metal components. This can
damage the saw.
► Remove the battery.
► Store the saw in a clean and dry condition.
4.12.2 Battery
WARNING
■ Children are not aware of and cannot assess
the dangers of the battery and can be seri‐
ously injured.
►Store the battery out of the reach of chil‐
dren.
■ The battery is not protected against all ambi‐
ent conditions. The battery may be damaged if
it is exposed to certain ambient conditions.
►Store the battery in a clean and dry condi‐
tion.
► Store the battery in an enclosed location.
► Store the battery separately from the chain
saw and charger.
► Store the battery in non-conductive packag‐
ing.
► Store the battery at temperatures
between -10°C and +50°C.
4.12.3 Charger
WARNING
■Children are not aware of and cannot assess
the dangers of a charger. Children may sus‐
tain serious or fatal injuries.
►Remove the battery.
► Store the charger out of the reach of chil‐
dren.
■ The charger is not protected against all ambi‐
ent conditions. The charger may be damaged
if it is exposed to certain ambient conditions.
►Remove the battery.
► If the charger is hot: Allow charger to cool
down.
► Store the charger in a clean and dry condi‐
tion.
► Store the charger in an enclosed location.
► Store the charger at a temperature between
+5°C and +40°C.
■ The connecting cable must not be used for
carrying or hanging up the charger. The con‐
English 4 Safety Precautions
12 0458-716-0121-D

necting cable and the charger may be dam‐
aged.
► Hold the charger by the housing. A
recessed handle is provided on the back of
the charger.
►Hang the charger on the wall bracket.
4.13 Cleaning, Maintenance and
Repair
WARNING
■ The saw may start unintentionally if the battery
is left in place during cleaning, maintenance or
repair operations. This may result in serious
injury to people and damage to property.
► Remove the battery.
► Engage the chain brake.
■ Aggressive cleaning agents, a water jet or
pointed objects can damage the chainsaw,
guide bar, the saw chain. the battery and the
charger. If the saw, guide bar, saw chain, bat‐
tery or charger are not cleaned correctly, com‐
ponents may no longer function properly or
safety devices may be rendered inoperative.
They may cause serious injury to persons.
► Clean the saw, guide bar, saw chain, bat‐
tery and charger as described in this
instruction manual.
■If the saw, guide bar, saw chain, battery or
charger are not properly serviced, components
may no longer function properly or safety devi‐
ces may be rendered inoperative. This may
result in serous or fatal injury to people.
►Do not attempt to service or repair the saw,
battery or charger.
► If the saw, battery or the charger require
servicing or repairs: Contact your STIHL
servicing dealer for assistance.
►Service or repair the guide bar and saw
chain as described in this User Manual.
■ The user may be cut by the sharp cutters
while cleaning or servicing the saw chain. This
may result in injury to the user.
►Wear work gloves made from resistant
material.
5 Preparing the Saw for
Operation
5.1 Preparing the Saw for Opera‐
tion
Perform the following steps before starting work:
► Make sure the following components are in a
safe condition:
–Chain saw, 4.6.1.
–Guide bar, 4.6.2.
–Saw chain, 4.6.3.
–Battery, 4.6.4.
–Charger, 4.6.5.
►Check the battery, 11.7.
►Fully charge the battery, 6.2.
►Clean the saw, 16.1.
►Mount the bar and chain, 7.1.1.
►Tension the saw chain, 7.2.
►Fill up with chain oil, 7.3.
►Check the chain brake, 11.4.
►Check the controls, 11.5.
►Check chain lubrication, 11.6.
► If you cannot carry out this work: Do not use
your chain saw and contact your STIHL servic‐
ing dealer.
6 Charging the Battery, LEDs
6.1 Mounting the Charger on a
Wall
The charger can be mounted on a wall.
d
a
12
0000-GXX-0609-A0
a
e
e
b
3
►Check the following points
when mounting the charger on
a wall:
–Suitable fixing materials.
–The charger is level.
The following dimensions are maintained:
–a = at least 100 mm
–b (for AL 101) = 75 mm
–b (for AL 300 and AL 500) = 120 mm
–c = 4.5 mm
–d = 9 mm
–e = 2.5 mm
6.2 Charging the Battery
The charging time depends on several factors,
e.g. temperature of the battery or the ambient
temperature. The actual charging time may differ
from the specified charging time. For specified
5 Preparing the Saw for Operation English
0458-716-0121-D 13

charging times see www.stihl.com/charging-
times.
The charging process starts
automatically when the plug is
inserted in a wall outlet and the
battery is fitted in the charger.
The charger switches itself off
automatically when the battery is
fully charged.
The battery and charger become hot during the
charging process.
7
6
5
3
2
4
1
0000-GXX-0628-A0
► Insert the plug (6) in a convenient wall outlet
(7).
The charger (3) runs a self test. The LED (4)
glows green for about 1 second and then red
for about 1 second.
► Fit the connecting cable (5).
► Insert the battery (2) in the guides in the
charger (3) and press it home as far as stop.
The LED (4) glows green. The LEDs (1) glow
green and the battery (2) is being charged.
► If the LED (4) and the LEDs (1) stop glowing:
The battery (2) is fully charged and can be
taken out of the charger (3).
► If the charger (3) is no longer required. Dis‐
connect the plug (6) from the wall outlet (7).
6.3 State of Charge
1
0000-GXX-0629-A0
20-40%
40-60%
60-80%
80-100%
0-20%
► Press the button (1).
The LEDs (5) glow green for about 5 seconds
and indicate the state of charge.
► If the LED on the right flashes green: Charge
the battery.
6.4 LEDs on Battery
The LEDs can show the state of charge or mal‐
functions. The LEDs can glow or flash green or
red.
The state of charge is indicated when the LEDs
glow or flash green.
► If the LEDs glow or flash red: Troubleshooting,
19.
Malfunction in chainsaw or battery.
6.5 LED on Charger
The LED indicates the operating status of the
charger.
If the LED glows green, the battery is being
charged.
► If the LED flashes red: Rectify the malfunction.
Malfunction in charger.
7 Assembling the Saw
7.1 Mounting and Removing the
Bar and Chain
7.1.1 Mounting the Bar and Chain
The bar and chain combinations that can be
used with the chain sprocket are listed in the
specifications, 21.
► Switch off the chain saw, engage the chain
brake and remove the battery.
0000-GXX-1199-A0
1
32
► Raise the grip (1) of the wingnut (2).
► Rotate the wingnut (2) counterclockwise until
the chain sprocket cover (3) can be removed.
► Remove the chain sprocket cover (3).
English 7 Assembling the Saw
14 0458-716-0121-D

4
4
5
0000-GXX-1200-A0
5
6
► Remove the tensioning gear (4).
► Take out the screw (5).
► Place the guide bar (6) on the tensioning gear
(4) so that both pegs on the tensioning gear
(4) engage the holes in the guide bar.
The guide bar (6) may be either way round. The
logo on the guide bar may also be upside down.
► Insert and tighten down the screw (5).
4
0000-GXX-1201-A0
► Fit the chain in the bar groove so that the
arrows on the tie straps on top of the bar point
in the direction of rotation.
► Turn the tensioning gear (4) clockwise as far
as stop.
3
2
0000-GXX-1202-A0
4
6
► Fit the guide bar with tensioning gear and
chain on the saw and check the following
points:
–The tensioning gear (4) faces the user.
–Chain drive links are seated in teeth of
chain sprocket (2).
–Head of screw (3) locates in slot in guide
bar (6).
0000-GXX-1203-A0
4
► Disengage the chain brake.
► Rotate the tensioning gear (4) counterclock‐
wise until the chain fits snugly against the bar.
Make sure the drive link tangs engage the bar
groove.
The guide bar and chain are positioned
against the saw.
► Fit the sprocket cover so that it is flush with
the saw.
► If the sprocket cover is not flush with the saw:
Turn the adjusting wheel slightly and refit the
sprocket cover.
The teeth of the adjusting wheel and tension‐
ing gear must mesh.
► Rotate the wingnut clockwise until the chain
sprocket cover is firmly seated.
► Fold down the grip of the wingnut.
7.1.2 Removing the Bar and Chain
► Switch off the chain saw, engage the chain
brake and remove the battery.
► Raise the grip of the wingnut.
► Rotate the wingnut counterclockwise until the
chain sprocket cover can be removed.
► Remove the sprocket cover.
► Turn the tensioning gear clockwise as far as
stop.
The chain is now slack.
► Remove the bar and chain.
► Take out the screw in the tensioning gear.
► Remove the tensioning gear.
7.2 Tensioning the Saw Chain
The saw chain expands or contracts during cut‐
ting work. Chain tension changes as a result.
Check chain tension regularly during operation
and readjust if necessary.
► Switch off the chainsaw, engage the chain
brake and remove the battery.
7 Assembling the Saw English
0458-716-0121-D 15

2
0000-GXX-1204-A2
1a
► Raise the grip of the wingnut (1).
► Rotate the wingnut (1) two turns counterclock‐
wise.
The wingnut (1) is loose.
► Disengage the chain brake.
► Hold the bar nose up and turn the tensioning
screw (2) clockwise or counterclockwise until
the following points apply:
–Chain sag ‘a’ in the center of the bar is 1 - 2
mm.
–The chain can still be pulled easily along the
bar with two fingers.
► If a Carving guide bar is used: Turn the ten‐
sioning screw (2) clockwise or counterclock‐
wise until the drive links on the underside of
the bar are just half visible.
► While still holding the bar nose up, rotate the
wingnut (1) clockwise until the chain sprocket
cover is firmly seated.
► If chain sag ‘a’ in the center of the bar is not 1
- 2 mm: Readjust chain tension.
► If you use a Carving bar and the drive links on
the underside of the bar are less than half visi‐
ble: Readjust chain tension.
► Fold down the grip of the wingnut (1).
7.3 Filling Up with Saw Chain Oil
The saw chain oil lubricates and cools the rotat‐
ing chain.
► switch off chain saw, engage chain brake and
remove battery
► Place your chainsaw on a level surface so that
the oil tank cap faces up.
► Use a damp cloth to clean the oil tank cap and
the area around it.
0000-GXX-1205-A0
► With a suitable tool, turn the oil tank cap coun‐
terclockwise until it can be removed.
► Remove the oil tank cap.
► Fill up with saw chain oil, taking care not to
spill any oil and not to overfill the tank.
0000-GXX-1206-A0
► Place the oil tank cap on the tank opening.
► With a suitable tool, turn the oil tank cap clock‐
wise and tighten it down firmly.
The oil tank is closed.
8 Engaging and Disengaging
the Chain Brake
8.1 Engaging the Chain Brake
The saw is equipped with a chain brake.
The chain brake is activated by the inertia of the
front hand guard if the kickback force is high
enough or can be engaged by the operator.
0000-GXX-1210-A0
► Push the hand guard away from the handlebar
with your left hand.
The hand guard engages with an audible click.
The chain brake is engaged.
8.2 Disengaging the Chain Brake
0000-GXX-1211-A0
English 8 Engaging and Disengaging the Chain Brake
16 0458-716-0121-D

► Pull the hand guard toward the handlebar with
your left hand.
The hand guard engages with an audible click.
The chain brake is disengaged.
9 Removing and Fitting the
Battery
9.1 Fitting the Battery
► Engage the chain brake.
0000-GXX-1208-A0
1
2
3
► Insert the battery (1) in the battery compart‐
ment (2) and press it home until you hear a
click.
Arrows (3) on battery (1) are still visible and
battery (1) is held securely in battery compart‐
ment (2). There is no electrical contact
between the saw and battery (1).
► Push the battery (1) into the battery compart‐
ment (2) as far as stop.
The battery (1) engages with a second click
and is flush with the saw’s housing.
9.2 Removing the battery
► Stand the saw on a level surface.
0000-GXX-1209-A0
1
2
► Press the locking lever (1).
The battery (2) is unlocked and can be
removed.
10 Switching the Saw On/Off
10.1 Switching On
► Disengage the chain brake.
2
0000-GXX-1212-A1
1
3
► Hold the saw with your right hand on the grip
area (1) of the control handle – wrap your
thumb around the control handle.
► Depress the lockout button (2) with your
thumb and hold it there.
► Pull the trigger (3) with your index finger and
hold it there.
The motor is accelerated and the chain
rotates. Release the lockout button (2).
► Hold the saw with your left hand on the front
handle – wrap your thumb around the handle‐
bar.
10.2 Switching Off
► Release the trigger.
The chain stops rotating.
► If the chain continues to rotate: Engage the
chain brake, remove the battery and contact
your STIHL servicing dealer for assistance.
The saw has a malfunction.
11 Testing the Chain Saw and
Battery
11.1 Checking the Chain Sprocket
► Switch off the chain saw, engage the chain
brake and remove the battery.
► Disengage the chain brake.
► Remove the chain sprocket cover.
► Remove the bar and chain.
a
0000-GXX-1216-A0
► Use a STIHL gauge to check the wear marks
on the sprocket.
► If wear marks are deeper than a = 0.5 mm: Do
not use your chain saw and contact your
STIHL servicing dealer.
The chain sprocket must be replaced.
9 Removing and Fitting the Battery English
0458-716-0121-D 17

11.2 Checking the Guide Bar
► Switch off the chain saw, engage the chain
brake and remove the battery.
► Remove the chain and guide bar.
0000-GXX-1217-A0
► Measure depth of bar groove with scale on
STIHL filing gauge.
► Install a new guide bar if one of the following
points applies:
–Guide bar is damaged.
–Measured bar depth is less than specified
minimum depth, 20.3.
–Bar groove is pinched or splayed.
► If you have any queries: Contact your STIHL
servicing dealer.
11.3 Checking the Saw Chain
► Switch off the chainsaw, engage the chain
brake and remove the battery.
1
0000-GXX-1218-A0
2
► Use a STIHL filing gauge (2) to check the
height of the depth gauges (1). The STIHL fil‐
ing gauge must match the chain pitch.
► If a depth gauge (1) projects from the filing
gauge (2): Lower the depth gauge (1), 17.2.
0000-GXX-1372-A0
1
23
4
► Make sure the service marks (1 to 4) on the
cutters are visible.
► If one of the service marks is not visible on a
cutter: Do not use your chainsaw and contact
your STIHL servicing dealer.
► Use a STIHL filing gauge to check that a filing
angle of 30° has been maintained on all cut‐
ters. The STIHL filing gauge must match the
chain pitch.
► If a filing angle of 30° has not been main‐
tained: Resharpen the saw chain.
► If you have any queries: Contact your STIHL
servicing dealer for assistance.
11.4 Testing the Chain Brake
► Engage the chain brake and remove the bat‐
tery.
WARNING
■ The chain's cutters are very sharp. There is a
risk of cut injuries.
► Wear work gloves made of durable mate‐
rial.
► Try to pull the chain along the guide bar by
hand.
If the chain cannot be pulled along the bar by
hand, the chain brake is functioning.
► If the chain can be pulled along the bar by
hand: Do not use your chain saw and contact
your STIHL servicing dealer.
The chain brake is defective.
11.5 Checking the controls
Lockout button and trigger
► Engage chain brake and remove battery.
► Attempt to pull the trigger lever without
depressing the lockout button.
► If the trigger can be pulled: Do not use your
chainsaw and contact your STIHL servicing
dealer.
The lockout button is defective.
► Press and hold the lockout button.
► Press and release the trigger.
► If the trigger is stiff or does not spring back to
its idle position: Do not use your chainsaw and
contact your STIHL servicing dealer for assis‐
tance.
The trigger is defective.
Switching on the chainsaw
► Insert battery.
► Disengage the chain brake.
► Press and hold the lockout button.
► Press and hold the trigger.
The saw chain starts running.
► Release the trigger.
The saw chain stops running.
English 11 Testing the Chain Saw and Battery
18 0458-716-0121-D

► If the chain continues to rotate: Engage the
chain brake, remove the battery and contact
your STIHL servicing dealer.
Your saw has a malfunction.
11.6 Checking Chain Lubrication
► Fit the battery.
► Disengage the chain brake.
► Hold the guide bar over a light surface.
► Switch on the saw.
Chain oil is thrown off the chain and is visible
on the light surface. Chain lubrication is oper‐
ating properly.
11.7 Testing the Battery
► Press button on battery.
The LEDs glow or flash.
► If the LEDs do not glow or flash: Do not use
the battery and contact your STIHL servicing
dealer.
There is a malfunction in the battery.
12 Operating the Saw
12.1 Holding and Controlling the
Chainsaw
1
0000-GXX-1213-A1
► Hold and control your saw with your left hand
on the front handle and your right hand on the
grip area (1) of the control handle. Wrap
thumb of left hand around the front handle and
thumb of right handle around the control han‐
dle.
12.2 Cutting
WARNING
■ If kickback occurs, the saw can be thrown up
in the direction of the operator. This may result
in serious or fatal injuries.
►Always cut with the chain running at full
speed.
► Do not cut with the upper quadrant of the
bar nose.
► Begin the cut with the chain running at full
speed and keep the guide bar vertical.
0000-GXX-1214-A0
► Engage the bumper spike and use it as a ful‐
crum.
► Guide the full width of the bar into the wood
and reposition the bumper spike as required.
► Take the weight of the saw at the end of the
cut.
12.3 Limbing
0000-GXX-1262-A0
► Support the saw on the log.
► With the chain running a full speed, pivot the
bar upwards against the limb.
► Cut through the limb with the top of the bar.
0000-GXX-1245-A0
1
21
2
► If the limb is under tension: Make the relieving
cut (1) at the compression side and then per‐
form bucking cut (2) from the tension side.
12.4 Felling
12.4.1 Determining direction of fall and
escape path
► Determine direction of fall so that the area in
which the tree falls is clear.
12 Operating the Saw English
0458-716-0121-D 19

B
B
0000-GXX-1246-A0
► Observe the following points when planning
escape path (B):
–Escape path (B) at an angle of 45° to direc‐
tion of fall (A).
–No obstacles on the escape path (B).
–The top of the tree can be observed.
–If the escape path (B) is on a slope, it must
be parallel to the slope.
12.4.2 Preparing work area at base of tree
► Remove obstacles from work area at tree
base.
► Remove growth from tree base.
0000-GXX-1247-A0
► If the tree has large, healthy buttress roots:
Make vertical cut first and then a horizontal
cut, and remove the resulting piece.
12.4.3 Cutting the felling notch
The felling notch determines the direction in
which the tree falls. Country-specific standards
for making the felling notch must be observed.
90°
0000-GXX-4448-A0
► Position the saw so that the felling notch is an
right angles to the direction of fall and the saw
is close to the ground.
► Make the horizontal cut.
► Make the angle cut at 45° to the horizontal cut.
0000-GXX-1250-A0
► If the wood is sound and long-fibered:
Observe the following points when making
sapwood cuts:
–The cuts must be the same at both sides.
–The cuts must be at the same height as the
bottom of the felling notch.
–The width of the cuts is 1/10 of the trunk
diameter.
The trunk does not splinter when the tree falls.
12.4.4 Basic information on felling cut
Ø
1/10
0000-GXX-1251-A1
C
CE
G
C Felling notch
The felling notch determines the direction of
fall.
D Hinge
The hinge helps control the falling tree. The
width of the hinge is 1/10 of the trunk diame‐
ter.
E Felling cut
The tree is felled with the felling cut. The fell‐
ing cut is 1/10 of the trunk diameter (at least 3
cm) above the bottom of the felling notch.
F Stabilizing strap
The stabilizing strap supports the tree and
helps prevent it from falling prematurely. The
width of the stabilizing strap is 1/10 to 1/5 of
the trunk diameter.
G Holding strap
The holding strap supports the tree and helps
prevent it from falling prematurely. The width
of the holding strap is 1/10 to 1/5 of the trunk
diameter.
12.4.5 Plunge cutting
Plunge cutting is a technique required for felling.
English 12 Operating the Saw
20 0458-716-0121-D
Other manuals for MSA 120 C
9
This manual suits for next models
4
Table of contents
Other Stihl Chainsaw manuals

Stihl
Stihl 019 T User manual

Stihl
Stihl MS 200 T User manual

Stihl
Stihl MS 240 User manual

Stihl
Stihl E 140 User manual

Stihl
Stihl MS 461 Rescue User manual

Stihl
Stihl 171 User manual

Stihl
Stihl MSA 60.0 C User manual

Stihl
Stihl MS 194 T User manual

Stihl
Stihl MSA 120 C User manual

Stihl
Stihl MS 382 User manual

Stihl
Stihl MS 170 User manual

Stihl
Stihl MS 461 Rescue User manual

Stihl
Stihl MS 231 User manual

Stihl
Stihl MS 391 User manual

Stihl
Stihl 171 User manual

Stihl
Stihl MS 661 User manual

Stihl
Stihl MS 261 C-M User manual

Stihl
Stihl MS 460 User manual

Stihl
Stihl MS 271 User manual

Stihl
Stihl MSE 230 C User manual