Stihl FSB-KM User manual

STIHL FSB-KM Instruction Manual


Original Instruction ManualPrinted on chlorine-free paper
Printing inks contain vegetable oils, paper can be recycled.
© ANDREAS STIHL AG & Co. KG, 2021
0458-541-0121-C. VA0.H21.
0000007834_007_GB
FSB-KM
English
1
This instruction manual is protected by copyright. All rights reserved, especially the rights to reproduce, translate and process
with electronic systems.
Contents
Dear Customer,
Thank you for choosing a quality
engineered STIHL product.
It has been built using modern
production techniques and
comprehensive quality assurance.
Every effort has been made to ensure
your satisfaction and trouble-free use of
the product.
Please contact your dealer or our sales
company if you have any queries
concerning this product.
Your
Dr. Nikolas Stihl
KombiSystem 2
Guide to Using this Manual 2
Safety Precautions and Working
Techniques 2
Approved KombiEngines 7
Approved Combinations of Cutting
Attachment, Deflector, Handle and
Harness 8
Mounting the KombiTool 9
Mounting the Deflector 9
Mounting the Cutting Attachment 10
Fitting the Harness 12
Starting / Stopping the Engine 13
Storing the Machine 14
Maintaining the Mowing Head 14
Maintenance and Care 15
Minimize Wear and Avoid Damage 16
Main Parts 16
Specifications 17
Maintenance and Repairs 17
Disposal 18
EC Declaration of Conformity 18
UKCA Declaration of Conformity 19

FSB-KM
English
2
In the STIHL KombiSystem a number of
different KombiEngines and KombiTools
can be combined to produce a power
tool. In this instruction manual the
functional unit formed by the
KombiEngine and KombiTool is referred
to as the power tool.
Therefore, the separate instruction
manuals for the KombiEngine and
KombiTool should be used together for
the power tool.
Always read and and make sure you
understand both instruction manuals
before using your power tool for the first
time and keep them in a safe place for
future reference.
Pictograms
All the pictograms attached to the
machine are shown and explained in this
manual.
Symbols in text
WARNING
Warning where there is a risk of an
accident or personal injury or serious
damage to property.
NOTICE
Caution where there is a risk of
damaging the machine or its individual
components.
Engineering improvements
STIHL's philosophy is to continually
improve all of its products. For this
reason we may modify the design,
engineering and appearance of our
products periodically.
Therefore, some changes, modifications
and improvements may not be covered
in this manual.
The machine should only be provided or
loaned to people familiar with this model
and its operation. The KombiEngine and
KombiTool user manuals should always
be handed over with the machine.
Depending on the cutting attachment
fitted, use your trimmer only for cutting
grass, undergrowth and similar
materials.
The machine must not be used for any
other purposes – risk of accidents!
Only use cutting attachments and
accessories that are explicitly approved
for this power tool model by STIHL or
are technically identical. If you have any
questions in this respect, consult your
dealer.
Use only high-quality parts and
accessories. in order to avoid the risk of
accidents and damage to the machine.
KombiSystem Guide to Using this Manual Safety Precautions and
Working Techniques
Some special safety pre-
cautions must be
observed to reduce the
risk of personal injury
when operating this
power tool because of the
very high speed of its cut-
ting attachment.
Both user manuals (Kom-
biEngine and KombiTool)
must be read through
attentively before using
the unit for the first time
and kept in a safe place
for future reference. Non-
compliance with the user
manuals may cause seri-
ous or even fatal injury.

FSB-KM
English
3
STIHL recommends the use of genuine
STIHL tools and accessories. They are
specifically designed to match the
product and meet your performance
requirements.
The guard provided with your machine
may not protect the operator from all
foreign objects (gravel, glass, wire etc.)
ejected by the revolving cutting
attachment. Ejected objects may also
ricochet and strike the operator.
Never attempt to modify your power tool
in any way since this may increase the
risk of personal injury. STIHL excludes
all liability for personal injury and
damage to property caused while using
unauthorized attachments.
Do not use a high-pressure washer to
clean the power tool. The solid jet of
water may damage parts of the unit.
Clothing and equipment
Wear proper protective clothing and
equipment.
Do not wear clothing which could
become trapped in wood, brush or
moving parts of the machine. Do not
wear a scarf, necktie or jewelry. Tie up
and confine long hair above your
shoulders.
WARNING
Wear face protection and make sure it is
a good fit. Face protection alone is not
sufficient to protect the eyes.
Wear "personal" sound protection, e.g.
ear defenders.
STIHL can supply a comprehensive
range of personal protective equipment.
Transporting the machine
Always stop the engine.
Carry the unit properly balanced by the
shaft or loop handle.
By vehicle: When transporting in a
vehicle, properly secure your machine to
prevent tipping over, damage and fuel
spillage.
Before starting
Check that your power tool is properly
assembled and in good condition – refer
to appropriate chapters in the
KombiEngine and KombiTool user
manuals:
–Use only an approved combination
of cutting attachment, deflector,
handle and harness. All parts must
be assembled properly and
securely
–Check cutting attachment for
correct and secure assembly and
good condition
–Check safety devices (e. g.,
deflector for cutting attachments) for
damage and/or wear. Always
replace damaged parts. Never
operate the unit with a damaged
deflector
–Never attempt to modify the controls
or safety devices.
–Keep the handles dry and clean –
free from oil and dirt – this is
important for safe control of the
machine
–Adjust harness and handle to suit
your height and reach. Observe the
chapter "Fitting the Harness"
To reduce the risk of personal injury, do
not operate your power tool if it is
damaged or not properly assembled!
Clothing must be robust
but allow complete free-
dom of movement. Wear
close-fitting clothes such
as a boiler suit, not a
loose jacket.
Wear sturdy shoes with
non-slip soles.
To reduce the risk of eye
injuries, wear close-fit-
ting safety glasses in
accordance with Euro-
pean Standard EN 166.
Make sure the safety
glasses are a snug fit.
Wear sturdy protective
gloves made of a resist-
ant material (e. g.
leather).
002BA254 KN

FSB-KM
English
4
To prepare for emergencies when using
a harness: Practice setting down the
machine quickly. To avoid damage, do
not throw the machine to the ground
when practicing.
See also notes on "Before Starting" in
the user manual of the KombiEngine you
are using.
Holding and guiding the machine
Always hold the unit firmly with both
hands on the handles.
On units with a loop handle and barrier
bar, left hand on loop handle, right hand
on control handle, even if you are left-
handed.
Make sure you always have a firm and
secure footing.
While working
In the event of impending danger or in
an emergency, switch off the engine
immediately by moving the slide control
/ stop switch/button to 0or STOP.
There is a risk of accident from ejected
objects within a wide area around the
working space, so you must ensure that
there is no-one within a 15 m radius of
the machine. This distance must also be
maintained in relation to objects
(vehicles, window panes) – risk of
property damage! Even at distances
beyond 15 m, the danger cannot be
ruled out.
Check that the engine is properly idling
so that the cutting tool will not continue
rotating after you release the throttle
trigger. Check and correct the idle speed
setting at regular intervals. If the
attachment still rotates when the engine
is idling, have your dealer check your
machine and make proper adjustments
or repairs – see KombiEngine user
manual.
Take special care in slippery conditions
– damp, snow, ice, on slopes or uneven
ground!
Watch out for obstacles: tree stumps,
roots – risk of tripping or stumbling!
Make sure you always have a firm and
secure footing.
Never operate your power tool with one
hand.
Be particularly alert and cautious when
wearing hearing protection because
your ability to hear warnings (shouts,
alarms, etc.) is restricted.
Take breaks when you start getting tired
or feeling fatigue – risk of accidents!
Work calmly and carefully – in daylight
conditions and only when visibility is
good. Proceed with caution, do not put
others in danger.
If your power tool is subjected to
unusually high loads for which it was not
designed (e.g. heavy impact or a fall),
always check that it is in good condition
before continuing work – see also
"Before Starting". Make sure the safety
devices are working properly. Never use
a power tool that is no longer safe to
operate. In case of doubt, contact a
dealer.
002BA080 KN
15m (50ft)
Deflector may be
used with mowing
heads. Do not use
metal cutting
attachments – risk
of injury.
To reduce the risk
of injuryfrom
thrown objects,
never operate the
unit without the
proper deflector for
the type of cutting
attachment being
used.

FSB-KM
English
5
Be particularly careful when working on
difficult, densely grown terrain.
When cutting tall scrub, under bushes
and hedges: Keep cutting attachment at
a minimum height of 15 cm to avoid
harming small animals.
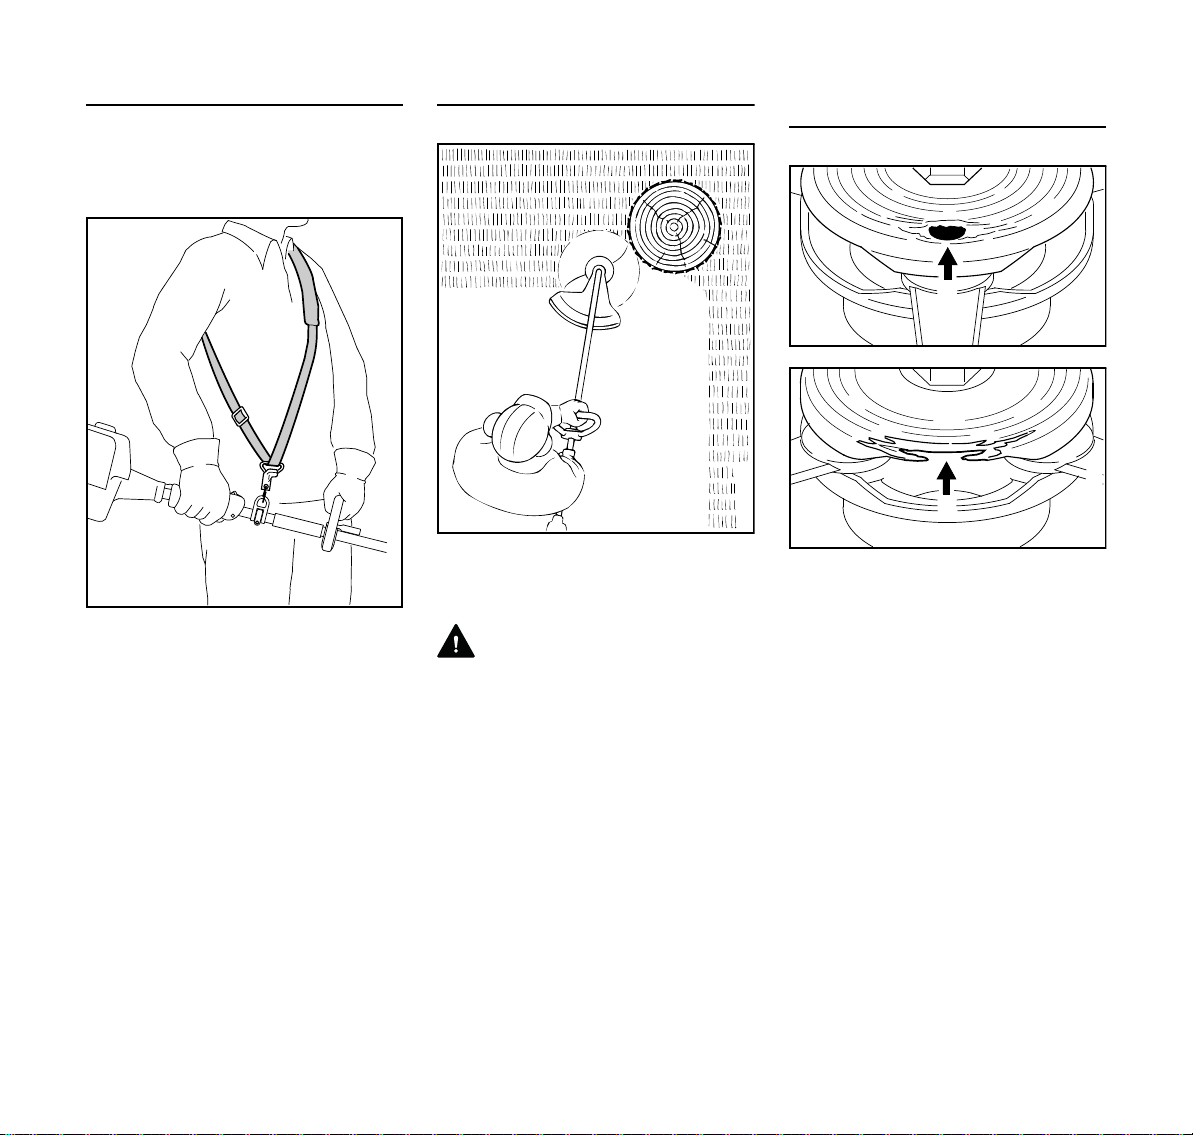
Examine the cutting attachment
periodically at short intervals and as
soon as you note any noticeable
changes:
–Turn off the engine, hold the device
securely, press the cutting
attachment against the ground to
stop it
–Check condition and secure fitting;
watch out for cracks
–Immediately replace defective
cutting tools, also in the event of
minor hairline cracks
Clean grass and plant residue off the
cutting attachment mounting at regular
intervals – remove any accumulated
material from the cutting attachment and
deflector.
To reduce the risk of injury, shut off the
engine before replacing the cutting
attachment.
After finishing work or before leaving the
power tool unattended: Shut off the
engine.
Never continue using or attempt to
repair damaged or cracked cutting
attachments.
Particles or pieces may come off and hit
the operator or a bystander at a high
speed – risk of very severe injuries!
If a rotating cutting attachment touches a
rock or another hard object, sparks may
be generated which may possibly ignite
combustible materials. Also dried-out
plants and brushwood are combustible,
above all in hot and dry weather. If there
is a risk of fire, do not use cutting
attachments in the vicinity of
combustible materials, dried-out plants
or brushwood. It is mandatory that you
ask the responsible forestry office about
current fire hazards.
Only use a deflector with a properly fitted
blade, which limits the mowing line to the
permissible length.
For manually adjustable mowing heads,
always switch off the engine before
adjusting the mowing line – risk of injury!
Misuse with mowing lines that are too
long reduces the working speed of the
engine. The constant slipping of the
clutch can cause overheating and
damage to important components (e.g.
clutch, plastic housing parts) – e.g. due
to the cutting attachment rotating during
idling – risk of injury!
Maintenance and Repairs
Service the machine regularly. Do not
attempt any maintenance or repair work
not described in the KombiTool and
KombiEngine instruction manuals. Have
all other work performed by a servicing
dealer.
STIHL recommends that you have
servicing and repair work carried out
exclusively by an authorized STIHL
servicing dealer. STIHL dealers are
regularly given the opportunity to attend
training courses and are supplied with
the necessary technical information.
Only use high-quality replacement parts
in order to avoid the risk of accidents
and damage to the machine. If you have
any questions in this respect, consult a
servicing dealer.
STIHL recommends the use of genuine
STIHL replacement parts. They are
specifically designed to match your
model and meet your performance
requirements.
To reduce the risk of injury, always shut
off the engine before carrying out any
maintenance or repairs or cleaning the
machine.
Symbols on Deflectors
An arrow on the deflector (inside and
outside) shows the correct direction of
rotation of the cutting attachments.
Check the work site –
rocks, metal objects etc.
could get caught up and
ejected – potentially
beyond a distance of
15 m – risk of injury! Such
objects can also damage
the cutting attachment
and other property (e.g.
parked vehicles,
windows).

FSB-KM
English
6
Shoulder strap
The power tool may be used without a
shoulder strap. Shoulder strap and
carrying ring are special accessories.
NWith the engine running, attach the
machine to the shoulder strap.
Mowing Head with Nylon Lines
Nylon line achieves a soft cut for edging
and trimming around fence posts, trees,
etc. – less risk of damaging tree bark.
WARNING
To reduce the risk of injury, never use
steel wire in place of the nylon cutting
line.
STIHL PolyCut 6-3 Mowing Head with
Polymer Blades
For mowing unobstructed edges of
meadows (without posts, fences, trees
or similar obstacles).
It is important to follow the maintenance
instructions for the Polycut mowing
head.
Check the wear limit marks!
Wear limit marks are integrated in the
base of the PolyCut.
Do not continue using the PolyCut 6-3 if
one of the circular holes (1; arrow)
becomes visible or if the projecting rim
(2; arrow) has worn away. Install a new
mowing head.
002BA249 KN
000BA019 KN
1
002BA073 KN
2
002BA074 KN

FSB-KM
English
7
WARNING
If the wear limit marks are ignored, there
is a risk of the cutting tool shattering and
flying parts injuring the operator or
bystanders.
To reduce the risk of accidents from
shattered blades, avoid contact with
stones, metal and similar solid objects.
Check PolyCut blades for cracks at
regular intervals. If a crack is found in
one of the blades, always replace all the
blades.
KombiEngines
Only KombiEngines supplied by STIHL
or expressly approved by STIHL for use
with the specific model are authorized.
Depending on the cutting attachment
used, always observe the chapter
“Permissible combinations of cutting
attachment, deflector, grip and
harness”.
Only use this KombiTool with the
following KombiEngines:
STIHL KM 55 R, KM 56 R, KM 85 R1),
KM 94 R
Approved KombiEngines
1) Only outside EU

FSB-KM
English
8
Permissible combinations
Choose the correct combination from
the table depending on the cutting tool!
WARNING
For safety reasons no other
combinations are permitted – risk of
accidents!
Cutting attachments
Mowing heads
1STIHL AutoCut C 6-2
2STIHL DuroCut 5-2
3STIHL PolyCut 7-3
4STIHL PolyCut 6-21)
Deflector
5Guard with blade for mowing heads
Handle
6Loop handle
7Loop handlewith
8Barrier bar
Carrying strap
9Shoulder strap can be used
Approved Combinations of Cutting Attachment, Deflector, Handle and Harness
Cutting attachment Deflector Handle Carrying strap
0000098256_001
5
6
7
8
9
12
34
1) only for KM 91 R

FSB-KM
English
9
NPush the lug (1) on the drive tube
into the slot (2) in the coupling
sleeve as far as stop.
When correctly installed, the red line (3)
(arrow point) must be flush with the end
of the coupling sleeve.
NTighten down the star knob (4)
firmly.
Removing the KombiTool
NReverse the above sequence to
remove the drive tube.
Fitting the line limiter blade
NSlide the blade (1) into the
deflector's guide.
NInsert and tighten down the
screw (2) with the combination
wrench (3) – supplied with
KombiEngine or available as
special accessory.
Mounting the deflector
NPush the clamp (1) over the lug (2)
on the deflector and hold it there.
NPush the other side of the clamp (1)
over the deflector.
Mounting the KombiTool
1
002BA326 KN
2
3
002BA327 KN
4
Mounting the Deflector
2
002BA250 KN
1
3
002BA251 KN
1
2

FSB-KM
English
10
NSlide the deflector (3) onto the drive
tube (4) so that the bead (a) on the
drive tube engages the guide (b) in
the deflector.
NPush the deflector (3) into position
until the set screw (5) engages.
NTighten down the clamp screw (6)
firmly.
Placing power tool on the ground
NSwitch off the engine.
NLay your trimmer on its back with
the loop handle and shroud pointing
down and the output shaft facing up.
Thrust Plate
The thrust plate is supplied with the
DuroCut 5-2 and is only required for this
mowing head.
Mowing head STIHL AutoCut 5-2,
mowing head STIHL AutoCut C 6-2.
STIHL PolyCut 7-3 mowing head
NRemove thrust plate (1), if present,
from shaft (2)
STIHL DuroCut 5-2 mowing head
NPush the thrust plate (1) onto the
shaft (2) by inserting the internal
hexagon (3) onto the hexagon (4)
5
002BA252 KN
3
4
6
b
Mounting the Cutting
Attachment
546BA016 KN
541BA001 KN
1
2
3
4

FSB-KM
English
11
Retaining the Shaft
NTo block the shaft, insert a suitable
tool (1) through the holes (2) in the
deflector and thrust plate – turn the
thrust plate back and forth if
necessary
STIHL AutoCut 5-2
Keep the supplement sheet for the
mowing head in a safe place!
NPush the upper part (2) onto the
shaft (5) while inserting the internal
hexagon (7) onto the hexagon (6)
NPlace the cap (8) on the upper part
NHold the upper part (2) with your
hand
NTurn the cap (8) clockwise and
tighten it firmly by hand
Removing the Mowing Head
NHold the mowing head with your
hand
NTurn the cap counterclockwise until
it can be removed
NRemove the mowing head.
STIHL AutoCut C 6-2 and
STIHL PolyCut 7-3
Keep the supplement sheet for the
mowing head in a safe place!
NPlace the mowing head (2) on the
shaft (3) while inserting the internal
hexagon (2) on the hexagon (4)
NHold the mowing head (2) with your
hand.
NTurn cap (1) clockwise and tighten it
firmly by hand.
Removing the Mowing Head
NHold the mowing head with your
hand
NTurn the cap counterclockwise until
the mowing head can be removed
NRemove the mowing head.
STIHL DuroCut 5-2
Keep the supplement sheet for the
mowing head in a safe place!
342BA021 KN
1
2
2
7
5
2
232BA053 KN
6
8
0000-GXX-3937-A0
2
1
3
4

FSB-KM
English
12
NScrew the mowing head (1)
clockwise on to the shaft (2) as far
as it will go
NBlock the shaft, see "Blocking the
shaft”
NTighten down the mowing head (1)
firmly
NOTICE
Remove the tool that was used to block
the shaft.
Removing the Mowing Head
NBlock the shaft, see "Blocking the
shaft”
NTurn the mowing head
counterclockwise
The type and style of the harness,
carrying ring and carabiner (spring hook)
depend on the market.
The use of the harness is described in
the chapter on "Approved Combinations
of Cutting Attachment, Deflector, Handle
and Harness".
Shoulder strap
NPut on the shoulder strap (1).
NAdjust the length of the strap so that
the carabiner (2) is about a hand’s
width below your right hip.
Attaching Machine to Harness
NAttach the carabiner (1) to the
carrying ring (2) on the drive tube –
hold the carrying ring steady.
Detaching Machine from Harness
NPress down the bar on the
carabiner (1) and pull the carrying
ring (2) out of the carabiner.
Throwing Off the Machine
WARNING
The machine must be quickly thrown off
in the event of imminent danger.
Practice removing and putting down the
power tool as you would in an
emergency. To avoid damage, do not
throw the power tool to the ground when
practicing.
0000-GXX-3940-A0
2
1
Fitting the Harness
1
002BA374 KN
2
1
002BA308 KN
2
1
2
1
002BA310 KN
2
1
2

FSB-KM
English
13
Practice quickly detaching the power
tool from the carabiner as described
under "Detaching Machine from
Harness".
Practice slipping the strap off your
shoulder.
Starting the Engine
Always follow the operating instructions
for the KombiEngine and basic power
tool.
NPlace the machine on the ground –
it must rest securely on the machine
support and the gearbox.
To reduce the risk of accidents, check
that the cutting attachment is not
touching the ground of any other
obstacles.
NMake sure you have a firm footing,
either standing, stooping or
kneeling.
NHold the machine with you left hand
and press it down firmly – do not
touch the controls on the control
handle – see KombiEngine or basic
power tool instruction manual.
NOTICE
Do not stand or kneel on the drive tube.
WARNING
The cutting attachment may begin to
move as soon as the engine starts. For
this reason, blip the throttle after starting
– the engine returns to idling speed.
The starting procedure is now as
described in the instruction manual of
the KombiEngine or basic power tool
you are using.
Stopping the Engine
NSee KombiEngine or basic power
tool instruction manual.
Starting / Stopping the
Engine
355BA007 KN

FSB-KM
English
14
For periods of 3 months or longer
NRemove, clean and inspect the
cutting attachment.
NIf the KombiTool is removed from
the KombiEngine and stored
separately: Fit the protective cap on
the drive tube to avoid dirt getting
into the coupling.
NStore the machine in a dry, high or
locked location – out of the reach of
children and other unauthorized
persons.
Placing power tool on the ground
NSwitch off the engine.
NLay your trimmer on its back with
the loop handle and shroud pointing
down and the output shaft facing up.
Replacing Nylon Line
Always check the mowing head for signs
of wear before replacing the nylon line.
WARNING
If there are signs of serious wear,
replace the complete mowing head.
The nylon mowing line is referred to as
"nylon line" or "line" in the following.
The mowing head is supplied with
illustrated instructions for replacing the
nylon line. Keep the instructions for the
mowing head in a safe place.
NIf necessary, remove the mowing
head.
Adjusting Nylon Line
STIHL AutoCut
NHold the rotating mowing head
above the ground – tap it on the
ground once – about 3 cm (1.2 in) of
fresh line is advanced.
NThe blade (1) on the deflector (2)
trims surplus line to the correct
length – avoid tapping the mowing
head more than once at a time.
Line feed operates only if both lines still
have a minimum length of 2.5 cm (1 in).
If the line is shorter than 2.5 cm (1 in):
WARNING
To reduce the risk of injury, always shut
off the engine before adjusting the nylon
mowing line by hand.
Storing the Machine Maintaining the Mowing
Head
546BA016 KN
1
232BA007 KN
2

FSB-KM
English
15
NTurn the machine over.
NPress down the cap on the spool as
far as stop.
NPull the ends of the lines out of the
spool.
If the spool is empty, refill with nylon line.
All other mowing heads
Refer to the leaflet supplied with the
mowing head.
WARNING
To reduce the risk of injury, always shut
off the engine before adjusting the nylon
mowing line by hand.
Replacing Nylon Line
STIHL DuroCut
WARNING
To reduce the risk of injury, always shut
off the engine before refilling the mowing
head.
NFit nylon line in the mowing head as
described in the instructions
supplied.
Replacing Cutting Blades
STIHL PolyCut
Always check the mowing head for signs
of wear before installing new cutting
blades.
WARNING
If there are signs of serious wear,
replace the complete mowing head.
The thermoplastic cutting blades are
referred to as "blades" in the following.
The mowing head is supplied with
illustrated instructions for replacing the
blades. Keep the instructions for the
mowing head in a safe place.
WARNING
To reduce the risk of injury, always shut
off the engine before installing the
blades.
NRemove the mowing head.
NReplace blades as shown in the
illustrated instructions.
NMount the mowing head on the
machine.
The following intervals apply to normal
operating conditions only. If your daily
working time is longer or operating
conditions are difficult (very dusty work
area, etc.), shorten the specified
intervals accordingly.
All accessible screws and nuts
NRetighten if necessary
Cutting attachments
NCheck condition, check tightness
before starting work and after every
fueling stop
NReplace if damaged
Safety labels
NReplace illegible safety labels
Maintenance and Care

FSB-KM
English
16
Observing the instructions in this manual
and the KombiEngine manual helps
reduce the risk of unnecessary wear and
damage to the power tool.
The power tool must be operated,
maintained and stored with the due care
and attention described in these
instruction manuals.
The user is responsible for all damage
caused by non-observance of the safety
precautions, operating and maintenance
instructions. This includes in particular:
–Alterations or modifications to the
product not approved by STIHL.
–Using tools or accessories which
are neither approved or suitable for
the product or are of a poor quality.
–Using the product for purposes for
which it was not designed.
–Using the product for sports or
competitive events.
–Consequential damage caused by
continuing to use the product with
defective components.
Maintenance Work
All the operations described in the
chapter on "Maintenance and Care"
must be performed on a regular basis. If
these maintenance operations cannot
be performed by the owner, they should
be performed by a servicing dealer.
STIHL recommends that you have
servicing and repair work carried out
exclusively by an authorized STIHL
servicing dealer. STIHL dealers are
regularly given the opportunity to attend
training courses and are supplied with
the necessary technical information.
If these maintenance operations are not
carried out as specified, the user
assumes responsibility for any damage
that may occur. Among other parts, this
includes:
–Corrosion and other consequential
damage resulting from improper
storage.
–Damage to the product resulting
from the use of poor quality
replacement parts.
Parts Subject to Wear and Tear
Some parts of the power tool are subject
to normal wear and tear even during
regular operation in accordance with
instructions and, depending on the type
and duration of use, have to be replaced
in good time. Among other parts, this
includes:
–Cutting attachments (all types)
–Mounting hardware for cutting
attachments
–Deflectors for cutting attachments
1Drive tube
2Deflector
3Mowing head
4Line limiting blade
Minimize Wear and Avoid
Damage
Main Parts
2
3
4
681BA054 KN
1

FSB-KM
English
17
Speed
Max. output shaft speed on cutting
attachment with KombiEngine:
Weight
Noise and Vibration Data
Noise and vibration data measurements
on power tools with the FSB-KM
KombiTool include idling and rated
maximum speed with the same duration
of exposure.
For further details on compliance with
Vibration Directive 2002/44/EC visit
www.stihl.com/vib.
Sound pressure level Lp to ISO 22868
Sound power level Lw to ISO 22868
Vibration level ahv,eq to ISO 22867
The K-factor in accordance with
Directive 2006/42/EC is 2.0 dB(A) for
the sound pressure level and sound
power level; the K-factor in accordance
with Directive 2006/42/EC is 2.0 m/s2
for the vibration level.
REACH
REACH is an EC regulation and stands
for the Registration, Evaluation,
Authorisation and Restriction of
Chemical substances.
For information on compliance with the
REACH regulation (EC) No. 1907/2006
see www.stihl.com/reach.
Users of this machine may only carry out
the maintenance and service work
described in this user manual. All other
repairs must be carried out by a
servicing dealer.
STIHL recommends that you have
servicing and repair work carried out
exclusively by an authorized STIHL
servicing dealer. STIHL dealers are
regularly given the opportunity to attend
training courses and are supplied with
the necessary technical information.
When repairing the machine, only use
replacement parts which have been
approved by STIHL for this power tool or
are technically identical. Only use high-
quality replacement parts in order to
avoid the risk of accidents and damage
to the machine.
STIHL recommends the use of original
STIHL replacement parts.
Original STIHL parts can be identified by
the STIHL part number, the {
logo and the STIHL parts symbol K
(the symbol may appear alone on small
parts).
Specifications
KM 55 R: 10,400 rpm
KM 56 R: 10,600 rpm
KM 85 R: 11,000 rpm
KM 94 R: 10,200 rpm
without cutting attachment
and deflector: 0.7 kg
with mowing head
KM 55 R with loop handle: 94 dB(A)
KM 56 R with loop handle: 95 dB(A)
KM 85 R with loop handle: 96 dB(A)
KM 94 R with loop handle: 91 dB(A)
with mowing head
KM 55 R with loop handle: 109 dB(A)
KM 56 R with loop handle: 109 dB(A)
KM 85 R with loop handle: 112 dB(A)
KM 94 R with loop handle: 109 dB(A)
with mowing
head
Handle,
left
Handle,
right
KM 55 R with
loop handle: 8.9 m/s28.0 m/s2
KM 56 R with
loop handle: 6.7 m/s27.0 m/s2
KM 85 R with
loop handle: 7.3 m/s27.5 m/s2
KM 94 R with
loop handle: 7.2 m/s26.4 m/s2
Maintenance and Repairs

FSB-KM
English
18
Observe all country-specific waste
disposal rules and regulations.
STIHL products must not be thrown in
the garbage can. Take the product,
accessories and packaging to an
approved disposal site for environment-
friendly recycling.
Contact your STIHL servicing dealer for
the latest information on waste disposal.
ANDREAS STIHL AG & Co. KG
Badstr. 115
D-71336 Waiblingen
Germany
declare under our sole responsibility that
conforms to the relevant provisions of
Directives 2006/42/EC and 2000/14/EC
and has been developed and
manufactured in compliance with the
following standards in the versions valid
on the date of production:
EN ISO 12100, EN ISO 11806-1 (in
conjunction with the specified KM
models).
The measured and the guaranteed
sound power level have been
determined in accordance with Directive
2000/14/EC, Annex V, and standard
ISO 10884.
Measured sound power level
Guaranteed sound power level
Technical documents deposited at:
ANDREAS STIHL AG & Co. KG
Produktzulassung
The year of manufacture is specified on
the power tool.
Waiblingen, 15.07.2021
ANDREAS STIHL AG & Co. KG
pp
Dr. Jürgen Hoffmann
Director Product Certification &
Regulatory Affairs
Disposal
000BA073 KN
EC Declaration of Conformity
Designation: Scythe
KombiTool
Make: STIHL
Series: FSB-KM
Serial identification
number: 4137
with KM 55 R: 109 dB(A)
with KM 56 R: 109 dB(A)
with KM 85 R: 112 dB(A)
with KM 94 R: 109 dB(A)
with KM 55 R: 111 dB(A)
with KM 56 R: 111 dB(A)
with KM 85 R: 114 dB(A)
with KM 94 R: 111 dB(A)
Other manuals for FSB-KM
4
Table of contents
Other Stihl Lawn Mower manuals

Stihl
Stihl RMA 765 V User manual

Stihl
Stihl iMOW 5.0 User manual

Stihl
Stihl RMA 510 V User manual

Stihl
Stihl RMA 443 User manual

Stihl
Stihl KGA 770 User manual

Stihl
Stihl RMI 422 PC-L User manual

Stihl
Stihl RLE 540 User manual

Stihl
Stihl RM 248 T User manual

Stihl
Stihl RMA 253.0 User manual

Stihl
Stihl RMA 443 User manual

Stihl
Stihl RMA 443 PC User manual

Stihl
Stihl RMA 443 C User manual

Stihl
Stihl RMA 339 User manual

Stihl
Stihl RMA 443.2 VC User manual

Stihl
Stihl FCB-KM User manual

Stihl
Stihl FS 110 User manual

Stihl
Stihl RLE 240 User manual

Stihl
Stihl RMA 460 User manual

Stihl
Stihl RMI 522.0 C User manual

Stihl
Stihl FS 510 C User manual