Stihl FCB-KM User manual

STIHL FCB-KM Instruction Manual
Notice d’emploi

Original Instruction ManualPrinted on chlorine-free paper
Printing inks contain vegetable oils, paper can be recycled.
© ANDREAS STIHL AG & Co. KG, 2020
0458-471-8221-A. VA2.J20.
0000006836_009_GB
FCB-KM
English
1
This instruction manual is protected by copyright. All rights reserved, especially the rights to reproduce, translate and process
with electronic systems.
Contents
Dear Customer,
Thank you for choosing a quality
engineered STIHL product.
It has been built using modern
production techniques and
comprehensive quality assurance.
Every effort has been made to ensure
your satisfaction and trouble-free use of
the product.
Please contact your dealer or our sales
company if you have any queries
concerning this product.
Your
Dr. Nikolas Stihl
KombiSystem 2
Guide to Using this Manual 2
Safety Precautions and Working
Techniques 2
Using the Unit 6
Approved KombiEngines 8
Assembling the Unit 9
Mounting the KombiTool 9
Mounting the Cutting Blade 10
Starting / Stopping the Engine 10
Storing the Machine 11
Replacing the Depth Wheel 11
Replacing the Skirt 12
Replacing the Cutting Blade 12
Checking and Replacing the Wear
Guard 13
Maintenance and Care 13
Main Parts 15
Specifications 16
Maintenance and Repairs 16
Disposal 17

FCB-KM
English
2
In the STIHL KombiSystem a number of
different KombiEngines and KombiTools
can be combined to produce a power
tool. In this instruction manual the
functional unit formed by the
KombiEngine and KombiTool is referred
to as the power tool.
Therefore, the separate instruction
manuals for the KombiEngine and
KombiTool should be used together for
the power tool.
Always read and and make sure you
understand both instruction manuals
before using your power tool for the first
time and keep them in a safe place for
future reference.
Pictograms
All the pictograms attached to the
machine are shown and explained in this
manual.
Symbols in text
WARNING
Warning where there is a risk of an
accident or personal injury or serious
damage to property.
NOTICE
Caution where there is a risk of
damaging the machine or its individual
components.
Engineering improvements
STIHL's philosophy is to continually
improve all of its products. For this
reason we may modify the design,
engineering and appearance of our
products periodically.
Therefore, some changes, modifications
and improvements may not be covered
in this manual.
Lend or rent your power tool only to
persons who are familiar with this model
and its operation – do not lend your
power tool without the KombiMotor and
KombiTool instruction manuals.
Use the power edger only for cutting the
edges of paths, flower beds and lawns.
Do not use your power tool for any other
purpose because of the increased risk of
accidents.
Only use blades and accessories that
are explicitly approved for this power
tool by STIHL or are technically
identical. If you have any questions in
this respect, consult a servicing dealer.
Use only high quality tools and
accessories in order to avoid the risk of
accidents and damage to the machine.
KombiSystem Guide to Using this Manual Safety Precautions and
Working Techniques
Special safety precau-
tions must be observed
when working with this
power edger because it
has a sharp cutting blade
that rotates at very high
speed.
Always read and and
make sure you under-
stand both instruction
manuals (KombiMotor
and KombiTool) before
using your power tool for
the first time and keep
them in a safe place for
future reference. Non-
observance of the safety
precautions may result in
serious or even fatal
injury.

FCB-KM
English
3
STIHL recommends the use of genuine
STIHL tools and accessories. They are
specifically designed to match the
product and meet your performance
requirements.
The deflector on this power edger
cannot protect the operator from all
objects thrown by the cutting blade
(stones, glass, wire, etc.). Such objects
may ricochet and then hit the operator.
Never attempt to modify your machine in
any way since this may increase the risk
of personal injury. STIHL excludes all
liability for personal injury and damage
to property caused while using
unauthorized attachments.
Do not use a pressure washer to clean
your power tool. The solid jet of water
may damage parts of the power tool.
Clothing and Equipment
Wear proper protective clothing and
equipment.
Avoid clothing that could get caught on
branches or brush or moving parts of the
machine. Do not wear a scarf, necktie or
jewelry. Tie up long hair so that it is
above shoulder level.
WARNING
Wear hearing protection, e.g. earplugs
or ear muffs.
Wear a face shield and make sure it is a
good fit. A face shield alone does not
provide adequate eye protection.
STIHL offers a comprehensive range of
personal protective clothing and
equipment.
Transporting the Power Tool
Always shut off the engine.
Carry the power tool properly balanced
by the drive tube – cutting blade in front
of you.
Do not touch hot parts of the machine
since burn injury will result.
Transporting by vehicle: Properly secure
your power tool to prevent turnover, fuel
spillage and damage.
Clothing must be sturdy
but allow complete free-
dom of movement. Wear
snug-fitting clothing, an
overall and jacket combi-
nation, do not wear a
work coat.
Wear steel-toed safety
boots with non-slip soles.
To reduce the risk of eye
injuries, wear close-fit-
ting safety glasses in
accordance with Euro-
pean Standard EN 166.
Make sure the safety
glasses are a comforta-
ble and snug fit.
Wear heavy-duty work
gloves made of durable
material (e.g. leather).
002BA079 KN

FCB-KM
English
4
Before Starting
Check that your power tool is properly
assembled and in good condition – refer
to appropriate chapters in the
KombiMotor and KombiTool instruction
manuals.
–Blade correctly and securely
mounted and in good condition
(clean, move freely, not warped).
–Inspect the deflectors for damage
and wear. Do not operate the
machine with a damaged deflector –
replace damaged parts.
–Never attempt to modify the controls
or safety devices – work only with a
properly mounted deflector.
–Keep the handles dry and clean –
free from oil and dirt – for safe
control of the power tool.
–Adjust the harness and handle(s) to
suit your height and reach.
To reduce the risk of accidents, operate
your power tool only if it is in a safe
condition.
If you use a shoulder strap or full
harness: Practice removing and putting
down the machine as you would in an
emergency. To avoid damage, do not
throw the machine to the ground when
practicing.
Holding and Controlling the Power Tool
Make sure you always have good
balance and secure footing.
Always hold the power tool firmly with
both hands on the handles.
Models with loop handle
On models with a loop handle and
barrier bar, left hand on loop handle,
right hand on control handle, even if you
are left-handed.
Models with bike handle
Right handle on control handle, left hand
on left handle.
During Operation
In the event of impending danger or in
an emergency, switch off the engine
immediately by moving the slide control
/ stop switch / button to 0or STOP.
The cutting attachment may catch and
fling objects a great distance and cause
injury - therefore, do not allow any other
persons within a radius of 15 meters of
your own position. To reduce the risk of
damage to property, also maintain this
distance from other objects (vehicles,
windows). Even maintaining a distance
of 15 meters or more cannot exclude the
potential danger.
The correct engine idle speed is
important to ensure that the blade stops
moving when you let go of the throttle
trigger. Check and correct the idle speed
setting regularly. If the cutting blade still
rotates when the engine is idling, have
your dealer check your machine and
make proper adjustments or repairs –
see KombiMotor instruction manual.
Take special care in slippery conditions
(ice, wet ground, snow) – on slopes or
uneven ground.
002BA080 KN
002BA055 KN
15m (50ft)
To reduce the risk of
injury, avoid contact with
the blade.
To reduce the risk
of injury from
thrown objects,
never operate the
unit without the
proper deflector for
the machine and
cutting attachment
being used.
The gearbox becomes
hot during operation. To
reduce the risk of burn
injury, do not touch the
gear housing.

FCB-KM
English
5
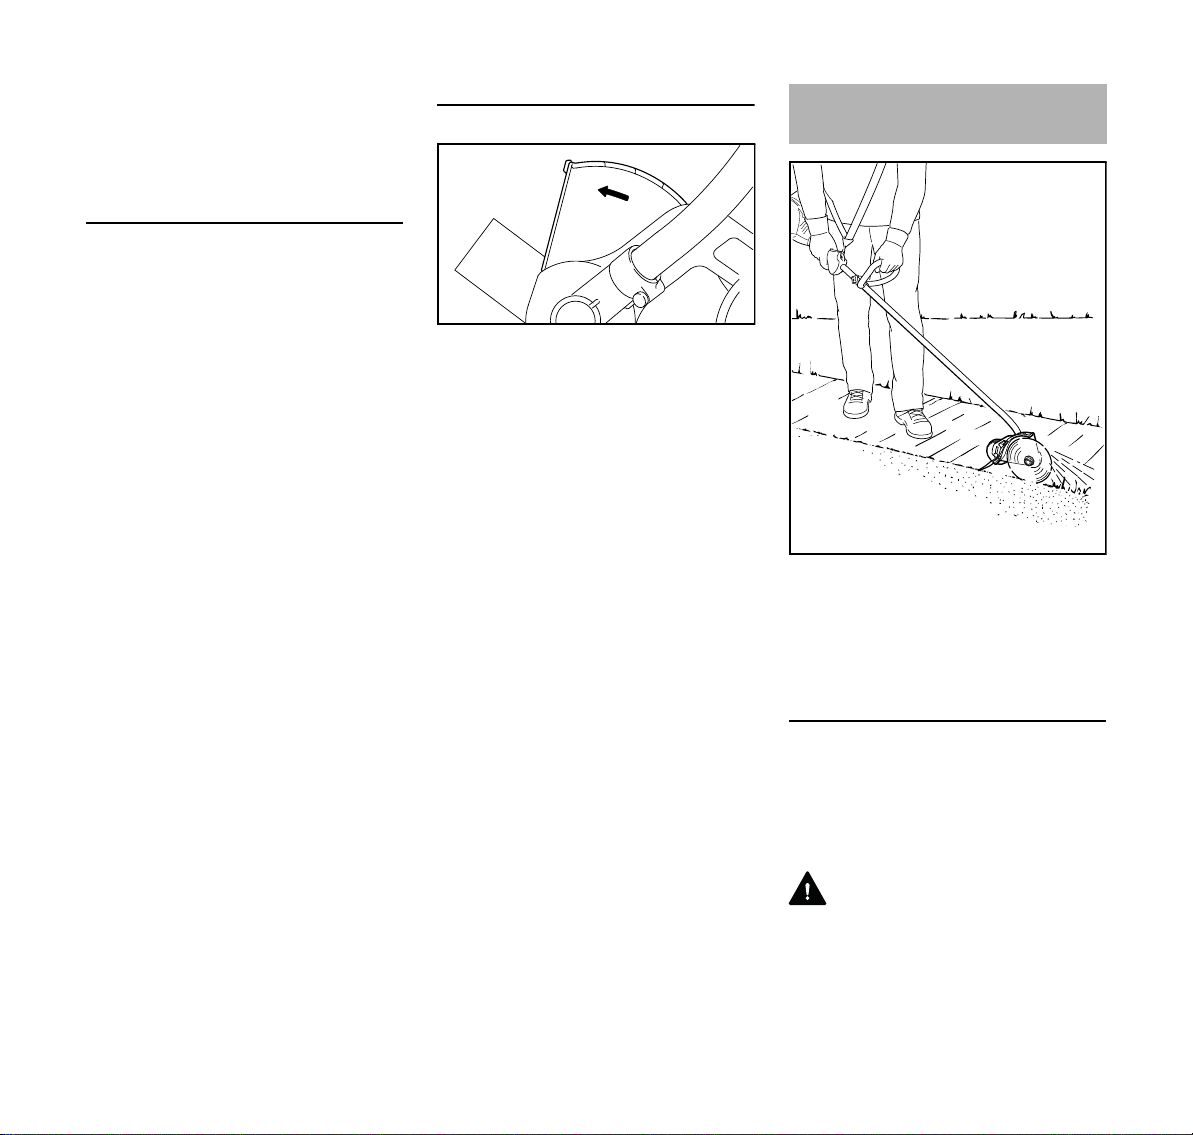
Watch out for obstacles: Roots and tree
stumps which could cause you to trip or
stumble.
Make sure you always have good
balance and secure footing.
Special care must be taken when
working in difficult, over-grown terrain.
Be particularly alert and cautious when
wearing hearing protection because
your ability to hear warnings (shouts,
alarms, etc.) is restricted.
To reduce the risk of accidents, take a
break in good time to avoid tiredness or
exhaustion.
Work calmly and carefully – in daylight
conditions and only when visibility is
good. Stay alert so as not to endanger
others.
Do not touch the cutting blade while the
engine is running. If the blade becomes
jammed by an obstruction, switch off the
engine immediately before attempting to
remove the obstruction – risk of injury.
Opening the throttle while the blade is
blocked increases the load and reduces
engine speed. The clutch then slips
continuously and this causes
overheating and damage to important
components (e.g. clutch, polymer
housing components) – and this can
increase the risk of injury from the
cutting attachment moving while the
engine is idling.
If your power tool is subjected to
unusually high loads for which it was not
designed (e.g. heavy impact or a fall),
always check that it is in good condition
before continuing work – see also
"Before Starting". Make sure the safety
devices are working properly. Do not
continue operating your power tool if it is
damaged. In case of doubt, consult your
servicing dealer.
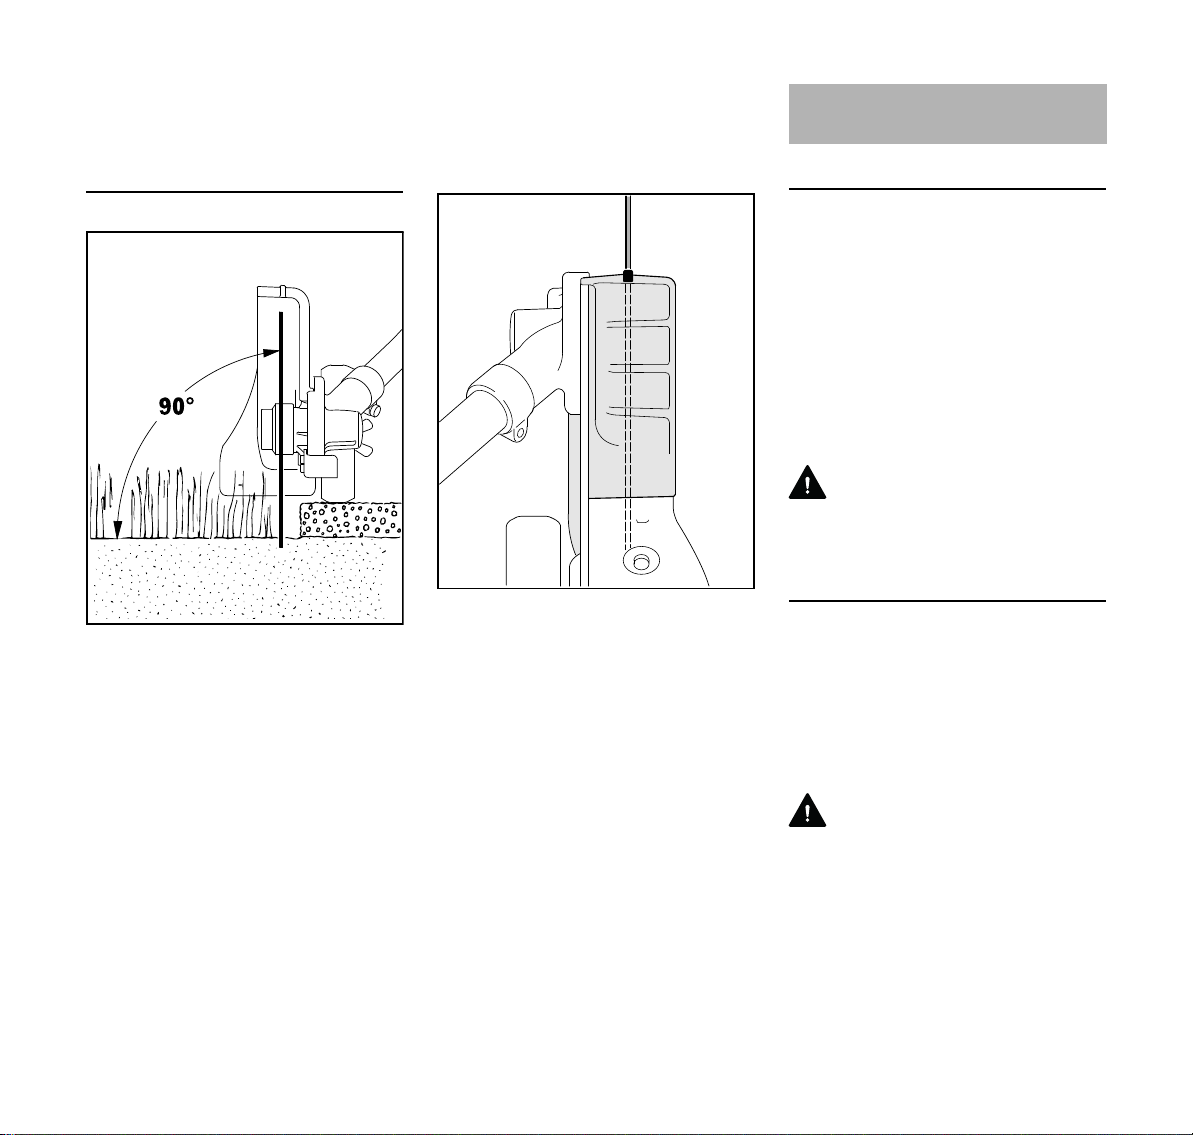
Check the cutting blade at regular short
intervals during operation or
immediately if there is a noticeable
change in cutting behavior:
–Turn off the engine. Hold the unit
firmly and press the blade into the
ground to bring it to a standstill.
–Check condition and tightness, look
for cracks.
–Replace a damaged blade
immediately, even if it has only
superficial cracks.
Clean the cutting attachment and
deflector at regular intervals during
operation.
–Shut down the engine.
–Wear gloves.
–Remove grass, weeds, clumps of
soil, etc.
To reduce the risk of injury, shut off the
engine before changing the cutting
attachment.
Do not continue using or attempt to
repair a damaged or cracked blade by
welding or straightening – risk of out of
balance.
This may cause parts of the cutting
attachment to come off and hit the
operator or bystanders at high speed
and result in serious or fatal injuries.
If a rotating metal cutting attachment
makes contact with a rock or other solid
object there is a risk of sparking which
may cause easily combustible material
to catch fire under certain
circumstances. Dry plants and scrub are
also easily combustible, especially in hot
and dry weather conditions. If there is a
risk of fire, do not use metal cutting
attachments near combustible
materials, dry plants or scrub. Always
contact your local forest authority for
information on a possible fire risk.
After Finishing Work
After finishing work or before leaving the
power tool unattended: Shut off the
engine.
After finishing work, clean dirt, soil and
plant residue off the cutting attachment –
wear gloves to reduce the risk of injury.
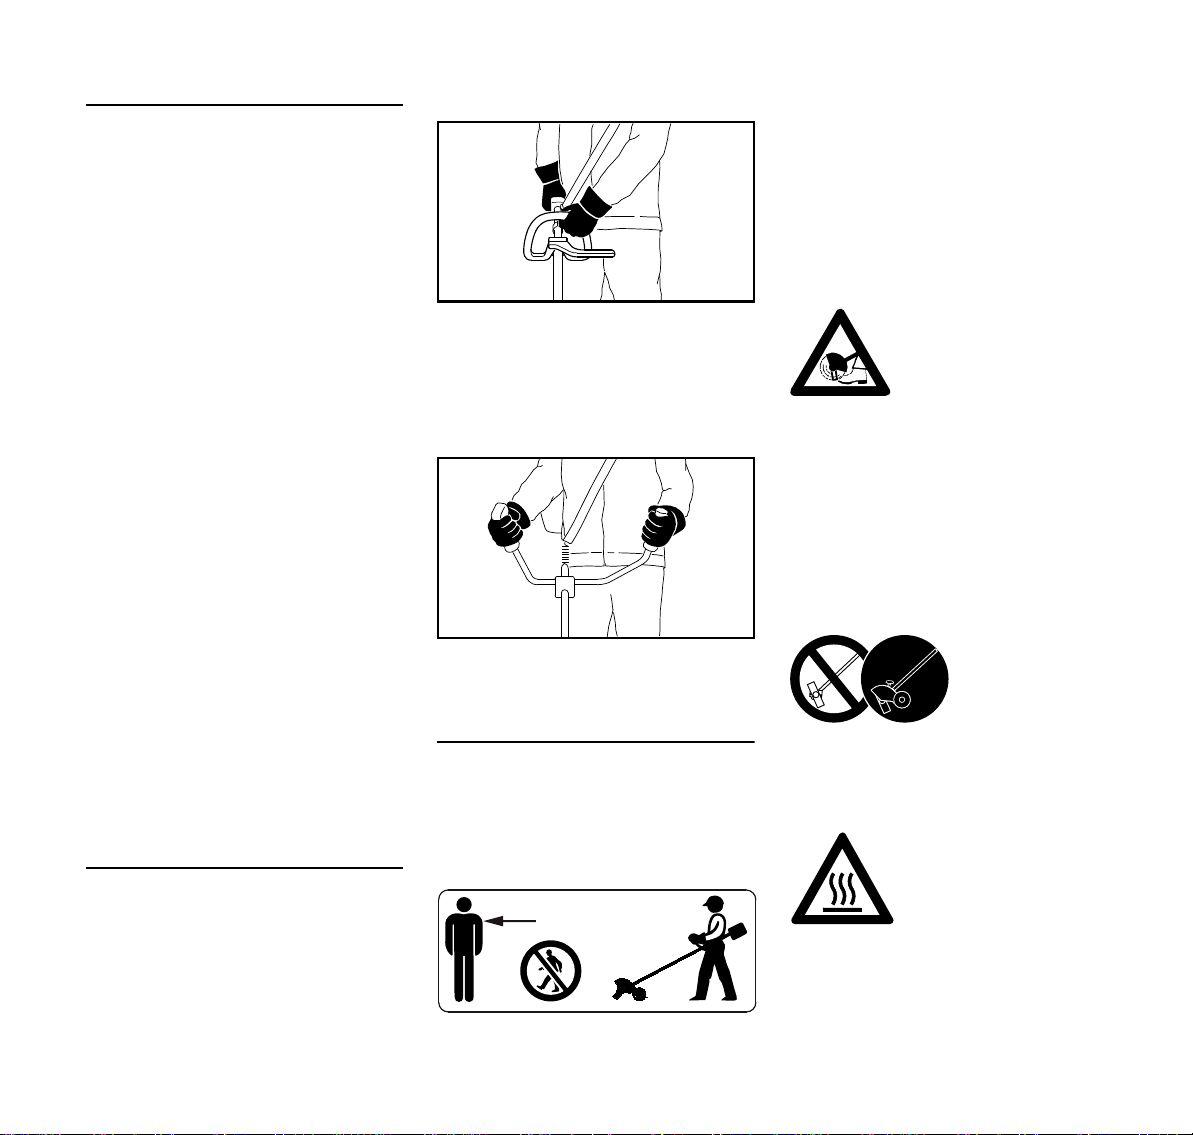
Inspect the work area:
Stones, pieces of metal
or other solid objects may
be thrown more than 15
meters and cause per-
sonal injury or damage
the cutting attachment
and property (e.g. parked
vehicles, windows).
To avoid the risk of elec-
tric shock, never use your
power tool in areas where
electrical lines are laid on
the surface or buried just
below the surface. Strik-
ing and damaging such
lines with the KombiTool
could cause serious or
even fatal injury.

FCB-KM
English
6
Do not use grease solvents for cleaning.
After thoroughly cleaning, coat surface
of metal cutting attachments with a
corrosion inhibitor.
Maintenance and Repairs
Service the machine regularly. Do not
attempt any maintenance or repair work
not described in the KombiTool and
KombiEngine instruction manuals. Have
all other work performed by a servicing
dealer.
STIHL recommends that you have
servicing and repair work carried out
exclusively by an authorized STIHL
servicing dealer. STIHL dealers are
regularly given the opportunity to attend
training courses and are supplied with
the necessary technical information.
Only use high-quality replacement parts
in order to avoid the risk of accidents
and damage to the machine. If you have
any questions in this respect, consult a
servicing dealer.
STIHL recommends the use of genuine
STIHL replacement parts. They are
specifically designed to match your
model and meet your performance
requirements.
To reduce the risk of injury, always shut
off the engine before carrying out any
maintenance or repairs or cleaning the
machine.
Cutting attachments and deflectors
The arrow on the deflector shows the
direction of rotation of the blade – see
"Use".
Operate the edger only the skirt
attached to the deflector – see
"Replacing the skirt".
Handle the blade correctly – see "Use".
Optimum cutting performance: at full
throttle and with uniform feed.
STIHL recommends the use of genuine
STIHL blades – see "Special
accessories".
Only use deflectors or attachments
which have been approved by STIHL for
this machine or which are technically
equivalent.
Your power edger is designed to
produce sharp contoured borders
around lawns and flower beds. It will cut
almost all types of grass, weeds and soft
green plants.
Preparations
If the work area is very dry, spray it
lightly with water: this softens the soil
and ensures that less dust is created.
Slightly damp green plants are easier to
cut.
WARNING
Clear away all obstacles and solid
objects from the work area.
239BA011 KN
Using the Unit
239BA015 KN

FCB-KM
English
7
NPlan the best route for edging.
Always hold and operate your edger
on the right-hand side of your body.
Adjusting Depth of Cut
NShut down the engine.
NLoosen the wingnut (1)
counterclockwise.
NPush wheel (2) upwards to increase
the depth of cut (A) or downwards to
reduce the depth of cut (A).
Adjust correctly
The depth of cut depends on the
unevenness of the ground, your height
and the way you hold the edger. Use the
following procedure:
NAdjust the depth wheel (2) so that
the blade (3) just touches the
ground or breaks the surface of the
soil by no more than 5 mm (B)
NTighten down the wingnut
clockwise.
NStanding in the normal working
position, check the depth of cut
again and correct it if necessary.
WARNING
Do not adjust the deflector.
The deflector has been set at the factory
so that the arrow on the deflector and
the open side point away from the
2
1
A
239BA012 KN
2
B
3
239BA013 KN
239BA014 KN
239BA015 KN

FCB-KM
English
8
operator. This ensures that cuttings and
other debris are directed away from the
power tool and operator.
Edging
NStart the engine
NStart the cut at no less than half
throttle and continue cutting at full
throttle.
NHold and guide your power tool so
that the blade is vertical.
NCut steadily so that the engine is not
lugged down – do not apply force.
NOperate at no more than a normal
walking pace.
NDo not push the blade into the
ground.
NAlways walk forwards when cutting,
do not pull the unit towards you.
NCut at a steady pace to avoid having
to make several passes.
NUse the gunning sight (1) to line the
blade up with the edge of the bed.
KombiEngines
Only use KombiEngines supplied or
explicitly approved by STIHL for use with
the attachment.
This KombiTool may be operated only in
combination with the following
KombiEngines:
STIHL KM 55 R, KM 56 R, KM 85 R,
KM 90, KM 90 R, KM 94 R, KM 100,
KM 100 R, KM 110, KM 110 R, KM 130,
KM 130 R, KMA 130 R, KMA 135 R
WARNING
Loop-handled machines must be
equipped with a barrier bar.
Brushcutters with split boom
The KombiTool can also be fitted to
STIHL brushcutters with a split boom (T-
models) (basic power tools).
This KombiTool can therefore also be
used on the following machine:
STIHL FR 130 T
WARNING
Refer to the user manual of the power
tool for use of the barrier bar.
239BA016 KN
1
239BA017 KN
Approved KombiEngines

FCB-KM
English
9
NPull the protective caps off of the
ends of the shaft and keep them in a
safe place for later use – see
"Storing the Machine"
Connecting drive tube to gearbox
NLoosen the clamping screw (1) on
the gearbox – do not remove
NInsert curved end of drive tube (3) in
the gearbox (2), turn the gearbox
back and forth as necessary.
NPush the shaft (3) in as far as it will
go.
NScrew in the clamping screw (1) as
far as it will go – do not tighten yet!
NAlign the gearbox (2) on the shaft so
that the rib (4) is in line with the
shaft.
NTighten the clamping screw firmly.
NPush the lug (1) on the drive tube
into the slot (2) in the coupling
sleeve as far as stop.
When correctly installed, the red line (3)
(arrow point) must be flush with the end
of the coupling sleeve.
NTighten down the star knob (4)
firmly.
Removing the KombiTool
NReverse the above sequence to
remove the drive tube.
Assembling the Unit
413BA014 KN
1
239BA018 KN
2
2
239BA019 KN
4
Mounting the KombiTool
1
002BA326 KN
2
3
002BA327 KN
4

FCB-KM
English
10
NPlace the edger so that the blade
mounting (1) faces upwards
NInsert the locking pin (2) as far as
possible into the bore (3), push
lightly and rotate back and forth a
little together with the thrust washer
(4) until the shaft is blocked.
NFit Allen wrench (5) onto nut (6).
NTurn nut clockwise (left-hand
thread) and remove it.
NRemove the thrust washer.
NPosition the blade (7) on the thrust
plate (8).
WARNING
The collar (arrow) must engage the hole
in the blade.
NFit the thrust washer (4) on the shaft
(9) and block the shaft.
NScrew nut (6) counterclockwise
onto shaft and tighten.
WARNING
If the cup spring (10) on the nut (6)
becomes fatigued, then the nut must be
replaced!
Starting the engine
To start the engine, basically follow the
instructions for use for the KombiEngine
or basic power tool!
NPlace the machine on the ground in
a secure position
The blade must not touch the ground or
any other objects – risk of accident!
NAssume a firm stance – possibilities:
standing, bending or kneeling
NPress the machine firmly against
the ground with the left hand – do
not touch the control elements on
the control handle while doing so –
see instruction manual for the
KombiEngine or basic power tool
Mounting the Cutting Blade
239BA020 KN
6
239BA021 KN
3
24
5
4
10
9
7
7
239BA022 KN
6
8
Starting / Stopping the
Engine
9926BA009 KN
9926BA010 KN

FCB-KM
English
11
NOTICE
Do not stand or kneel on the shaft!
WARNING
If the engine is started, the blade may
rotate as soon as the engine is running –
therefore blip the throttle trigger as soon
as the engine is running – the engine
begins to idle.
The other starting procedure is
described in the instruction manual for
the KombiEngine or basic power tool.
Switching off the engine
Nsee instruction manual for the
KombiEngine or basic power tool
For periods of 3 months or longer
NRemove, clean and inspect the
cutting blade.
NIf the KombiTool is removed from
the KombiEngine and stored
separately: Fit the protective cap on
the drive tube to avoid dirt getting
into the coupling.
NStore the machine in a dry, high or
locked location – out of the reach of
children and other unauthorized
persons.
Have a worn depth wheel replaced by a
servicing dealer. STIHL recommends
that you have servicing and repair work
carried out exclusively by an authorized
STIHL servicing dealer.
Depth Wheel
NThe end of the thread on the
screw (1) is peened over to ensure
that the wingnut (2) does not work
loose and be lost.
A very high torque has to be applied to
remove the wingnut from the screw. If
the parts are then reassembled, the
captive function is no longer
guaranteed. In such a case have the
screw and wingnut replaced by a
servicing dealer.
Storing the Machine Replacing the Depth Wheel
1
239BA023 KN
2

FCB-KM
English
12
Removing the skirt
NUndo and remove the screw (1).
NRemove the washer (2)
NPull the skirt (3) out of the
segment (6) and out of the gap (5) in
the deflector
Fitting the skirt
NIn order to push the skirt easily into
the gap on the deflector, apply a thin
coating of resin-free oil to the top of
the skirt
NThread the skirt (3) into the
segment (6) and push into the
gap (5) of the deflector – the bore in
the skirt must be fixed in the
arbor (4)
NPlace washer (2) onto screw (1).
NInsert and tighten the screw (1)
Do not attempt to straighten or weld a
bent or cracked blade – it may break – it
must be replaced – see "Mounting the
Cutting Blade".
STIHL recommends you use only the
following original STIHL cutting blades:
Do not resharpen the blade.
NReplace the blade (1) if its
length (A) is no longer sufficient to
maintain the necessary ground
clearance (B) and obtain the
required depth of cut (C).
Checking Out-of-Balance
To avoid out-of-balance:
NHave your dealer check the blade
for out-of-balance on a STIHL
balancer (special accessory) –
STIHL recommends an authorized
STIHL servicing dealer. If blade is
out-of-balance, fit a new one – see
"Mounting the Cutting Blade".
Replacing the Skirt
3
239BA024 KN
1
4
5
62
6
4
5
21
239BA025 KN
3
Replacing the Cutting Blade
Length Thick-
ness
Marking
200 mm 2.4 mm 4133 / 01
200 mm 3.8 mm 4133 / 02
A
CB
239BA026 KN
1

FCB-KM
English
13
Checking the protection against wear
NBefore starting up the machine,
check that the protection against
wear (1) is not damaged
NReplace the protection against wear
at the latest when the gearbox (2)
becomes visible (arrow)
NOTICE
If worn deflectors are not replaced in
time, this can cause serious damage to
the gearbox.
Replacing the protection against wear
NRemove the blade – see "Fitting the
blade"
NUnscrew screws (4)
NReplace the protection against
wear (5)
NScrew in and tighten screws (4)
NFit the blade – see "Fitting the
blade"
The following information applies in
normal operating conditions. The
specified intervals must be shortened
accordingly when working for longer
than normal or under difficult cutting
conditions (extensive dust, etc.).
All accessible screws, nuts and bolts
Ncheck and retighten if necessary
Wheel
NVisual inspection, before starting
work
NCheck that the wingnut is secure,
before starting work
NHave it replaced if necessary – see
"Replacing the wheel"
Skirt
NVisual inspection, before starting
work
NReplace if damaged – see
"Replacing the skirt"
Blade
NVisual inspection, before starting
work
NCheck that it is secure, before
starting work
NIf necessary, have it checked to see
if it is out of balance, replace if it is
out of balance – see "Replacing the
blade"
NReplace if damaged – see
"Replacing the blade"
Checking and Replacing the
Wear Guard
2
257BA017 KN
1
4
5
239BA027 KN
4
Maintenance and Care

FCB-KM
English
14
Protection against wear
NCheck before starting work
NReplace if necessary – see "Check
and replace protection against
wear"
Safety information label
NReplace illegible safety information
labels

FCB-KM
English
15
1Cutting Blade
2Deflector
3Drive Tube
4Depth Wheel
5Wingnut
6Skirt
7Wear Guard
8Gearbox
Main Parts
3
1
400BA011 KN
2
5
4
6
8
7

FCB-KM
English
16
Definitions
1 Cutting Blade
Metal cutting blade for cutting
weeds and soft green plants.
2 Deflector
Designed to reduce the risk of injury
from foreign objects flung
backwards toward the operator by
the cutting attachment and from
contact with the cutting attachment.
3 Drive Tube
Encloses and protects the drive
shaft between the coupling sleeve
and gearbox.
4 Depth Wheel
Deflector-mounted depth wheel
rolls on ground and keeps edger
cutting blade at preset height for
required depth of cut.
5 Wingnut
Must be loosened to shift the wheel
to adjust the depth of cut.
6Skirt
Designed to reduce the risk of injury
from foreign objects flung
backwards toward the operator by
the cutting blade.
7 Wear Guard
Protects the gearbox from wear.
8 Gearbox
Reduces engine speed to speed
required to drive the edger blade.
Engine speed
Max. output shaft speed on cutting
attachment with KombiEngine:
Max. output shaft speed (cutting
attachment) on STIHL brushcutters with
split shaft (T models):
Weight
Users of this machine may only carry out
the maintenance and service work
described in this user manual. All other
repairs must be carried out by a
servicing dealer.
STIHL recommends that you have
servicing and repair work carried out
exclusively by an authorized STIHL
servicing dealer. STIHL dealers are
regularly given the opportunity to attend
training courses and are supplied with
the necessary technical information.
When repairing the machine, only use
replacement parts which have been
approved by STIHL for this power tool or
are technically identical. Only use high-
quality replacement parts in order to
avoid the risk of accidents and damage
to the machine.
STIHL recommends the use of original
STIHL replacement parts.
Original STIHL parts can be identified by
the STIHL part number, the {
logo and the STIHL parts symbol K
(the symbol may appear alone on small
parts).
Specifications
KM 55 R: 7700 rpm
KM 56 R: 8100 rpm
KM 85 R: 8500 rpm
KM 90 R: 8300 rpm
KM 94 R: 8300 rpm
KM 100 R: 8300 rpm
KM 110 R: 8300 rpm
KM 130 R: 8500 rpm
KMA 130 R: 6890 rpm
KMA 135 R: 6890 rpm
FR 130 T: 8300 rpm
with deflector and blade: 2.0 kg
Maintenance and Repairs

FCB-KM
English
17
Observe all country-specific waste
disposal rules and regulations.
STIHL products must not be thrown in
the garbage can. Take the product,
accessories and packaging to an
approved disposal site for environment-
friendly recycling.
Contact your STIHL servicing dealer for
the latest information on waste disposal.
Disposal
000BA073 KN

Notice d'emploi d'origine Imprimé sur papier blanchi sans chlore
L'encre d'imprimerie contient des huiles végétales, le papier
est recyclable.
© ANDREAS STIHL AG & Co. KG, 2020
0458-471-8221-A. VA2.J20.
0000006836_009_F
FCB-KM
français
18
La présente Notice d'emploi est protégée par des droits d'auteur. Tous droits réservés, en particulier tout droit de copie, de tra-
duction et de traitement avec des systèmes électroniques quelconques.
Table des matières
Chère cliente, cher client,
nous vous félicitons d'avoir choisi un
produit de qualité de la société STIHL.
Ce produit a été fabriqué avec les
procédés les plus modernes et les
méthodes de surveillance de qualité les
plus évoluées. Nous mettons tout en
œuvre pour que cette machine vous
assure les meilleurs services, de telle
sorte que vous puissiez en être
parfaitement satisfait.
Pour toute question concernant cette
machine, veuillez vous adresser à votre
revendeur ou directement à
l'importateur de votre pays.
Dr. Nikolas Stihl
CombiSystème 19
Indications concernant la présente
Notice d'emploi 19
Prescriptions de sécurité et
techniques de travail 19
Utilisation 24
Moteurs CombiSystème autorisés 26
Assemblage 26
Montage de l'outil CombiSystème 27
Montage du couteau 27
Mise en route / arrêt du moteur 28
Rangement 29
Remplacement de la roue 29
Remplacement du tablier 30
Remplacement du couteau 30
Contrôle et remplacement du patin
anti-usure 31
Instructions pour la maintenance et
l'entretien 32
Principales pièces 33
Caractéristiques techniques 34
Instructions pour les réparations 34
Mise au rebut 35
Other manuals for FCB-KM
5
Table of contents
Languages:
Other Stihl Lawn Mower manuals

Stihl
Stihl iMOW 5.0 User manual

Stihl
Stihl RM 248 User manual

Stihl
Stihl RMI 422 P User manual

Stihl
Stihl RM 443.3 T User manual

Stihl
Stihl RMA 239.1 User manual

Stihl
Stihl RM 443 User manual

Stihl
Stihl RLA 240.0 User manual

Stihl
Stihl RM 4.0 RV User manual

Stihl
Stihl FSB-KM User manual

Stihl
Stihl RMA 510.0 V User manual

Stihl
Stihl RM 2.1 R User manual

Stihl
Stihl RM 650.0 T User manual

Stihl
Stihl FS 111 RX User manual

Stihl
Stihl RMI 632 User manual

Stihl
Stihl RMA 2 RV User manual

Stihl
Stihl AMK 097 S User manual

Stihl
Stihl FCB-KM User manual

Stihl
Stihl RMI 632 PC-L User manual

Stihl
Stihl FCB-KM User manual

Stihl
Stihl RMA 765.0 V User manual