Stillwater Designs Kicker VSS SCAMA10 User manual

1
SCAMA10
Designed for 2010 - 2015 Chevrolet® Camaro vehicles
Subwoofer Assembly
Subwoofer Harness
M6 Nut
M6 Bolts x2
Fuse Adapter
Harness
Subwoofer Bracket
Wire Ties x6
Wire Taps x2
Rubber Bumper
©2012 Stillwater Designs
SCAMA10-A3-20151028

2
Wire Routing
1. Set the parking brake.
2. Turn the key to “run” position and shift to low gear. (automatic transmission only)
3. Remove the carpet flooring in the trunk as well as the load floor and foam cover over the battery.
4. Disconnect the negative battery cable from the battery.
(For vehicles equipped with a Factory Premium Audio system, skip to step 23.)
5. Remove the shifter bezel by carefully prying loose with a plastic panel removal tool and disconnect wiring.
Fig. 1
6. Remove the four screws retaining the shifter. (Automatic transmission only!) Fig. 2
7. Remove the screw in front of the cup holder retaining the console. Fig. 3
8. Remove the console side panels using a plastic panel removal tool. Fig. 4
9. Remove the screw on each side of the front of the console. Fig. 5
10. Remove the two screws securing the rear end panel of the console on each side and pull it loose. Fig. 6
Fig. 1
Fig. 2
Fig. 3
Fig. 4
Fig. 5
Fig. 6

3
11. Remove the three screws on the top rear of the console. Fig. 7
12. Disconnect the wiring from the 12 volt accessory socket and the auxiliary input socket on the rear of the
console and remove both sockets. Fig. 8
13. Snap loose the shifter gear indicator panel and slide it up the shifter as high as it will go. Fig. 9
(automatic transmission only)
14. Lift up on the console and slide it slightly towards the rear of the vehicle..
15. Remove the two screws securing the radio bezel below the radio. Fig. 10
16. Pull the radio bezel loose and disconnect wiring. Fig. 11
17. Remove the four screws securing the radio, pull the radio from the dash and disconnect all wiring. Fig.
12
NOTE: If you are installing the optional amplifier system, route the amplifier harness from the radio opening
down to the area in front of the brake pedal at this time.
Fig. 7
Fig. 8
Fig. 9
Fig. 10
Fig. 11
Fig. 12

4
18. Snap loose the driver’s side threshold panel along the bottom of the door opening. Fig. 13
19. Snap loose the dash end panel. Fig. 14
20. Snap loose the driver’s side kick panel. Fig. 15
21. Remove the lower portion of the rear seat by pulling straight up on the front edge and then pressing
down on the rear edge while pulling toward the front of the car. Fig. 16
22. Pull the carpet and the plastic panel back far enough to allow the harness to be routed around the metal
divider between the trunk and the rear seat on the driver’s side of the vehicle. Fig. 17
23. Route the signal input wire with the white two pin connecter on it along the driver’s side of the vehicle
and up to the driver’s kick panel or radio opening depending on installation. (If vehicle is equipped with
the Factory Premium sound system, route the signal input wire to the left rear package tray
speaker and refer to the connection instructions for Factory Premium sound system)
24. Route the harnesses alongside the factory cables toward the battery and secure with the supplied wire
ties at the points indicated by the arrows in Fig. 18
Fig. 13
Fig. 14
Fig. 15
Fig. 16
Fig. 17
Route Harness behind metal
divider
Fig. 18
Use Wire Ties
Here
5
Subwoofer Input Connection with Optional Amplifier
25. Connect the white two pin connector of the amplifier harness to the corresponding connector of the
subwoofer harness.
Subwoofer Input Connection without Optional Amplifier and without Factory Premium Audio
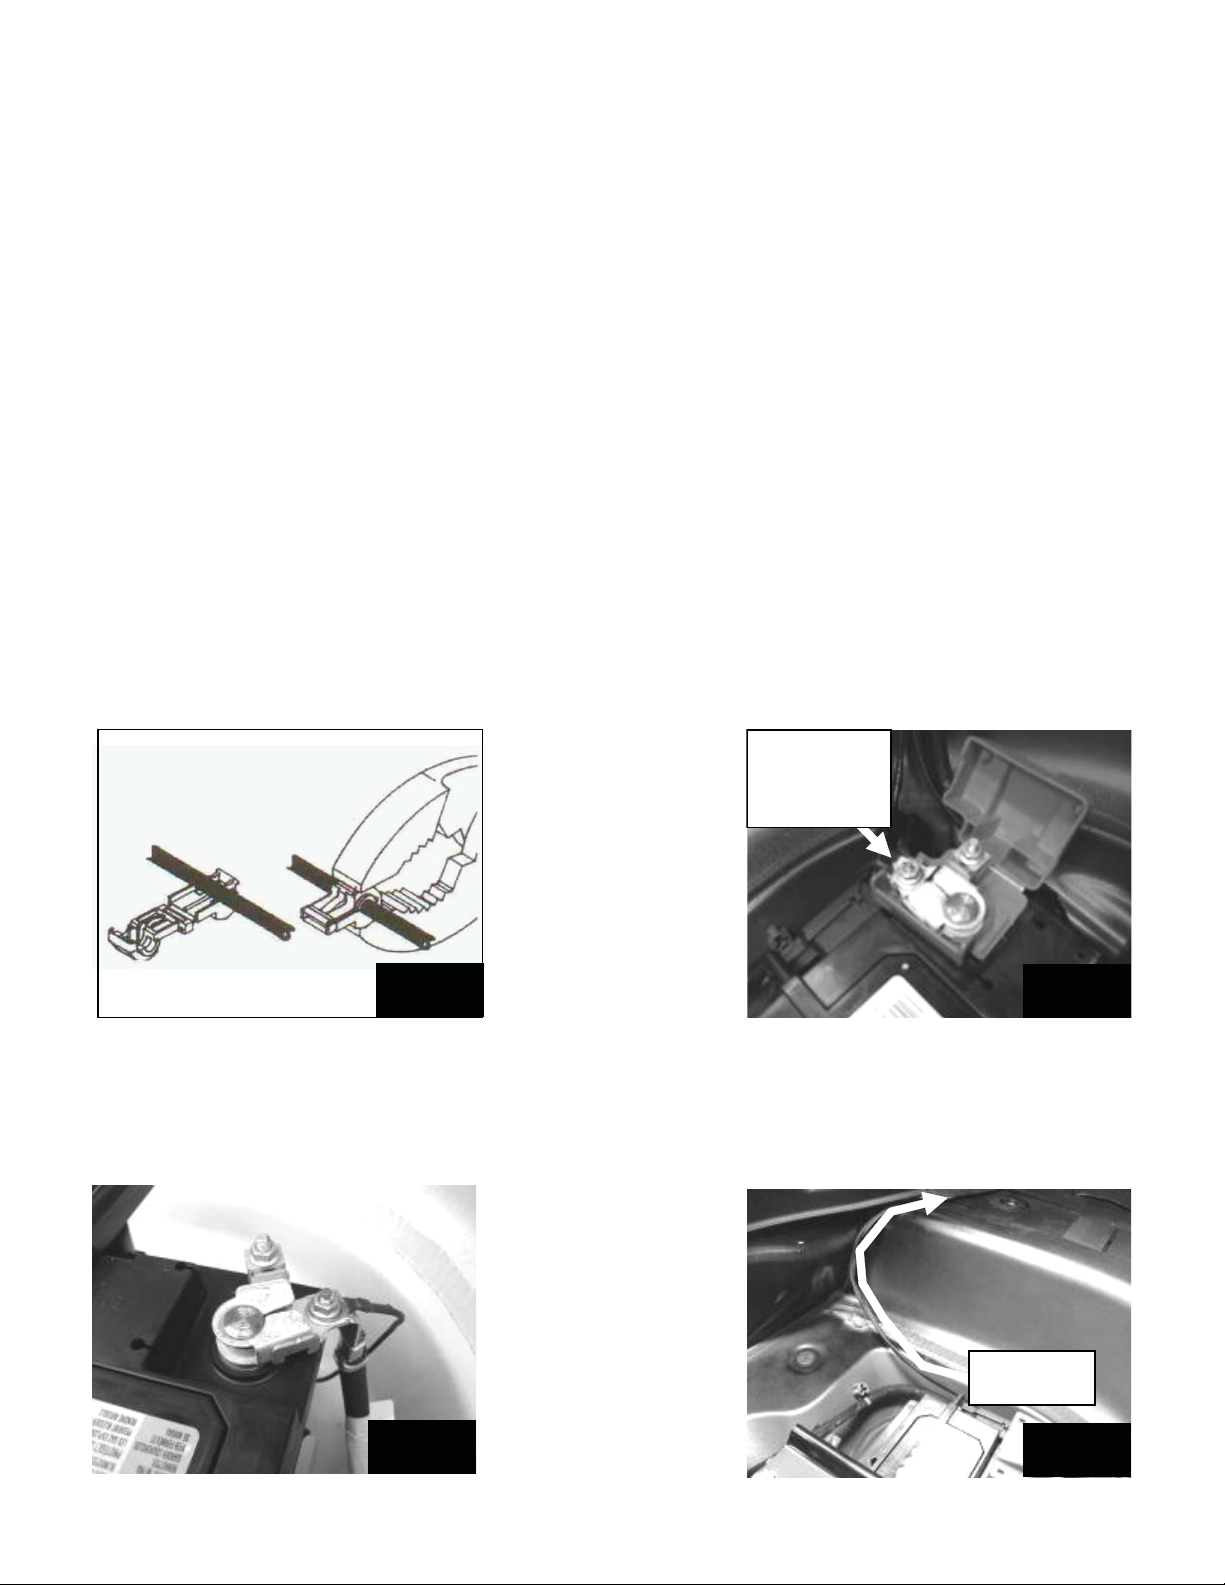
26. Connect the six inch adapter harness to the end of the two pin connecter. Locate position 40 and 32
on the radio connecter and install one of the blue self stripping connecter onto the wire. Lay the wire in the
open channel, fold the connecter body over and squeeze with a pair of pliers until connecter snaps shut.
Fig. 19 Connect the green wire of the adapter harness to the wire in position 40 and the brown wire to the
wire in position 32.
Subwoofer Input Connection with Factory Premium Audio
27. Connect the six inch adapter harness to the end of the two pin connecter. Locate the blue with a white
stripe wire and the green with a black stripe wire connected to the left rear package tray speaker. Lay the
wire in the open channel, fold the connecter body over and squeeze with a pair of pliers until connecter
snaps shut. Fig. 19. Connect the green wire of the adapter harness to the blue/white wire, and the brown
wire of the adapter harness to the green/black wire.
28. Connect the power wire to the positive battery lug. Torque to 9 +/- 1.5 Nm. Fig 20
29. Install the fuse into the fuse holder.
30. Reconnect the negative battery cable and connect the black ground wire to the negative battery lug.
Torque to 9 +/- 1.5 Nm Fig. 21
31. Route the subwoofer connecter toward the rear of the car and up behind the carpeted panel on the
driver’s side of the trunk. Fig. 22
Fig. 19
Fig. 20
Connect
power wire
here
Fig. 21
Fig. 22
Harness
Other Stillwater Designs Subwoofer manuals


