Stirling IA4651 User manual
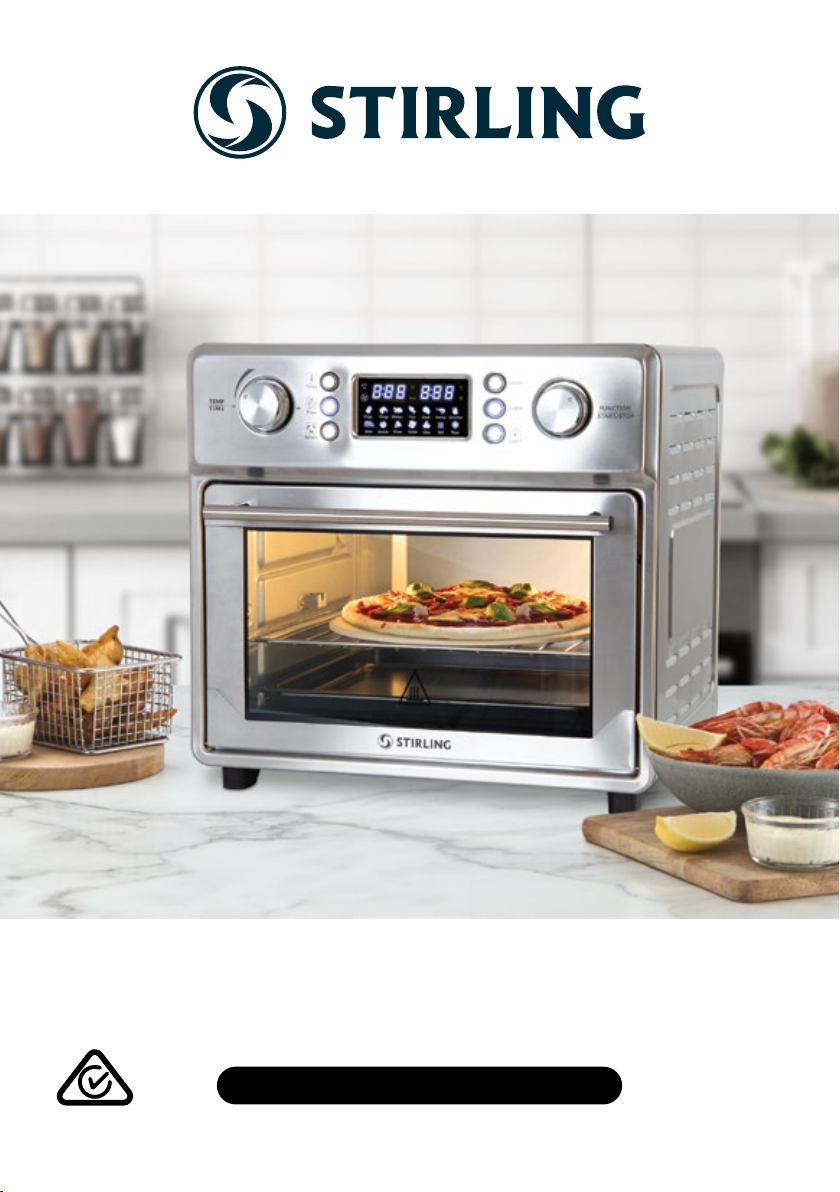
25L AIR FRYER OVEN
Model Number IA4651
INSTRUCTION MANUAL

02
AFTER SALES SUPPORT
1300 777 137
MODEL: IA4651 PRODUCT CODE: 712581 07/2023
Welcome
Congratulations on choosing to buy a Stirling®appliance.
All appliances brought to you by Stirling®are manufactured to the highest
standards of performance and safety and as part of our philosophy of customer
service and satisfaction are backed by our comprehensive 12 month warranty.
We hope you will enjoy using your purchase for many years to come.

03
AFTER SALES SUPPORT
1300 777 137
MODEL: IA4651 PRODUCT CODE: 712581 07/2023
Contents
02 Welcome
04 Warranty Details
05 General Information & Safety Instructions
08 Product Overview
11 Getting Started
12 Instructions
26 Cooking Guide
27 Cleaning and Maintenance
27 Storage
28 Frequently Asked Questions
29 Other Useful Information
30 Repair and Refurbished Goods or Parts Notice
YEAR WARRANTY
1
04
AFTER SALES SUPPORT
1300 777 137
MODEL: IA4651 PRODUCT CODE: 712581 07/2023
25L Air Fryer Oven
Warranty Details
REGISTER YOUR PURCHASE AT www.aldi.com.au/en/about-aldi/product-registration/
TO KEEP UP-TO-DATE WITH IMPORTANT PRODUCT INFORMATION
The product is guaranteed to be free from defects in workmanship and parts for a period of
12 months from the date of purchase. Defects that occur within this warranty period, under
normal use and care, will be repaired, replaced or refunded at our discretion. The benets
conferred by this warranty are in addition to all rights and remedies in respect of the product
that the consumer has under the Competition and Consumer Act 2010 and similar state and
territory laws.
Our goods come with guarantees that cannot be excluded under the Australian Consumer Law.
You are entitled to a replacement or refund for a major failure and for compensation for any
other reasonably foreseeable loss or damage. You are also entitled to have the goods repaired or
replaced if the goods fail to be of acceptable quality and the failure does not amount to a major
failure.

05
AFTER SALES SUPPORT
1300 777 137
MODEL: IA4651 PRODUCT CODE: 712581 07/2023
General Information & Safety Instructions
Read this manual thoroughly before first use, even if you are familiar with this type of product. The
safety precautions enclosed reduce the risk of fire, electric shock and injury when correctly adhered
to. Please keep this instruction manual in a safe place along with your purchase receipt, warranty
certificate and carton for future reference. If applicable, pass these instructions and packaging on
to the next owner of the appliance. Always follow basic safety precautions and accident prevention
measures when using an electrical product.
Electrical Safety and Cord Handling
1. Before connecting the Air Fryer Oven, ensure your outlet voltage and circuit frequency
correspond to the voltage stated on the product rating label.
2. To protect against fire and electric shock, do not immerse the cord or plug in water or other
liquid.
3. Do not use an extension cord unless completely necessary with the Air Fryer Oven.
4. If an extension cord is used, please ensure that it has a rating equal or exceeding the rating of
this product.
5. Do not pull or carry by the cord, use the cord as a handle, close a door on the cord, or pull the
cord around sharp edges or corners. Keep the cord away from heated surfaces.
6. Do not bend or damage the cord.
7. Never force the plug into a power outlet.
8. Always unplug the Air Fryer Oven when not in use. To disconnect from the power outlet, grip
the plug and pull away from the power outlet. Never pull by the cord.
9. The power plug must be removed from the power outlet before cleaning and maintenance or
moving the Air Fryer Oven.
10. Do not move or lift the whole Air Fryer Oven unit while the power cord is still connected to the
power outlet or still on. Always ensure it is switched o and has cooled down before moving.
11. Do not use the Air Fryer Oven if the plug, cord or the product itself is damaged. Please contact
the After Sales Support Line on 1300 777 137 for further advice.
12. Unless your home is already fitted with a residual current device (safety switch), we
recommend installing an RCD with a rated residual operating current not exceeding 30mA to
provide additional safety protection when using electrical appliances. See your electrician for
professional advice.

06
AFTER SALES SUPPORT
1300 777 137
MODEL: IA4651 PRODUCT CODE: 712581 07/2023
General Information & Safety Instructions (cont.)
13. The Air Fryer Oven is intended for indoor household use only. Do not use it for commercial
purposes.
14. Do not use the Air Fryer Oven for anything other than its intended use.
15. The Air Fryer Oven is not a toy. Supervise children to ensure they do not play with this product.
16. The Air Fryer Oven is not intended for use by persons (including children) with reduced
physical, sensory, or mental capabilities, or lack of experience and knowledge, unless they have
been given supervision or instruction concerning use of the product by a person responsible
for their safety.
17. Do not leave the Air Fryer Oven unattended when plugged in. Always switch o and unplug
when you are not using the Air Fryer Oven.
18. Do not operate or place any part of the Air Fryer Oven on or near any hot surfaces (such as a
gas or electric burner, or a heated oven).
19. Do not cover the Air Fryer Oven whilst in use. If covered, there may be a risk of fire.
20. This unit has no user-serviceable parts contained within. Do not attempt to repair, disassemble
or modify the Air Fryer Oven.
21. Improper installation may result in the risk of fire, electric shock, or injury to person.
22. The manufacturer is not responsible for any eventual damage caused by improper or faulty use.
23. The use of attachments not sold or recommended by the manufacturer may cause fire, electric
shock or injury.
24. The Air Fryer Oven is not intended to be operated by means of an external timer or any type of
separate remote control unit.
25. Do not touch hot surfaces. The temperature of the outer body can get very hot while the Air
Fryer Oven is in operation. Allow the unit to cool down before inserting or removing parts.
26. Always use oven mitts when removing or inserting the Air Fryer Oven accessories. Allow for
metal parts to cool down completely before cleaning.
27. When operating the Air Fryer Oven, keep at least 10cm of free space on all sides of the
appliance to allow for adequate air circulation.
28. Do not operate the Air Fryer Oven with wet hands.

07
AFTER SALES SUPPORT
1300 777 137
MODEL: IA4651 PRODUCT CODE: 712581 07/2023
General Information & Safety Instructions (cont.)
29. Do not place the Air Fryer Oven on or near combustible materials such as curtains or tablecloths.
30. Always operate on a dry level surface. Operating on sinks or uneven surfaces must be avoided.
31. Do not clean with metal scouring pads. Pieces may break o the pad and touch the electrical
parts, creating a risk of electric shock.
32. Allow the Air Fryer Oven, including the accessories, to cool down for approximately 30
minutes after use before cleaning.
33. Use extreme caution when removing the Air Fryer Oven accessories, or disposing of hot
grease or other hot liquids.
34. Oversized foods or metal utensils must not be inserted into Air Fryer Oven as they may create
risk of fire or electrical shock.
35. When using, cleaning or moving the appliance, avoid slamming or knocking the glass door as
the glass may break.
36. If the surface of the glass door is cracked, switch o the appliance immediately to avoid the
possibility of electric shock.
37. This appliance is intended for indoor private domestic use only, and is not intended for
commercial, industrial or trade use.
WARNING: The temperature of the outer body can get very hot during and after use of the Air Fryer
Oven. Allow the unit to cool down completely before cleaning or packing the unit away for storage.
WARNING: The pizza stone, air fryer basket, bake tray, rotisserie set, wire rack and crumb tray
will be very hot after use. Please use oven mitts or other heat resistant utensils to handle these
accessories. Allow them to cool down before cleaning or packing away for storage.
WARNING: If winding the power cord, avoid tight bends as this could damage the cord.
CAUTION: Do not touch hot surfaces. The temperature of the outer body can get very
hot while the Air Fryer Oven is in operation. Allow the unit to cool down before cleaning
or packing the unit away for storage.
Read this instruction manual carefully
before using the Air Fryer Oven and keep
it in a safe place for future reference.

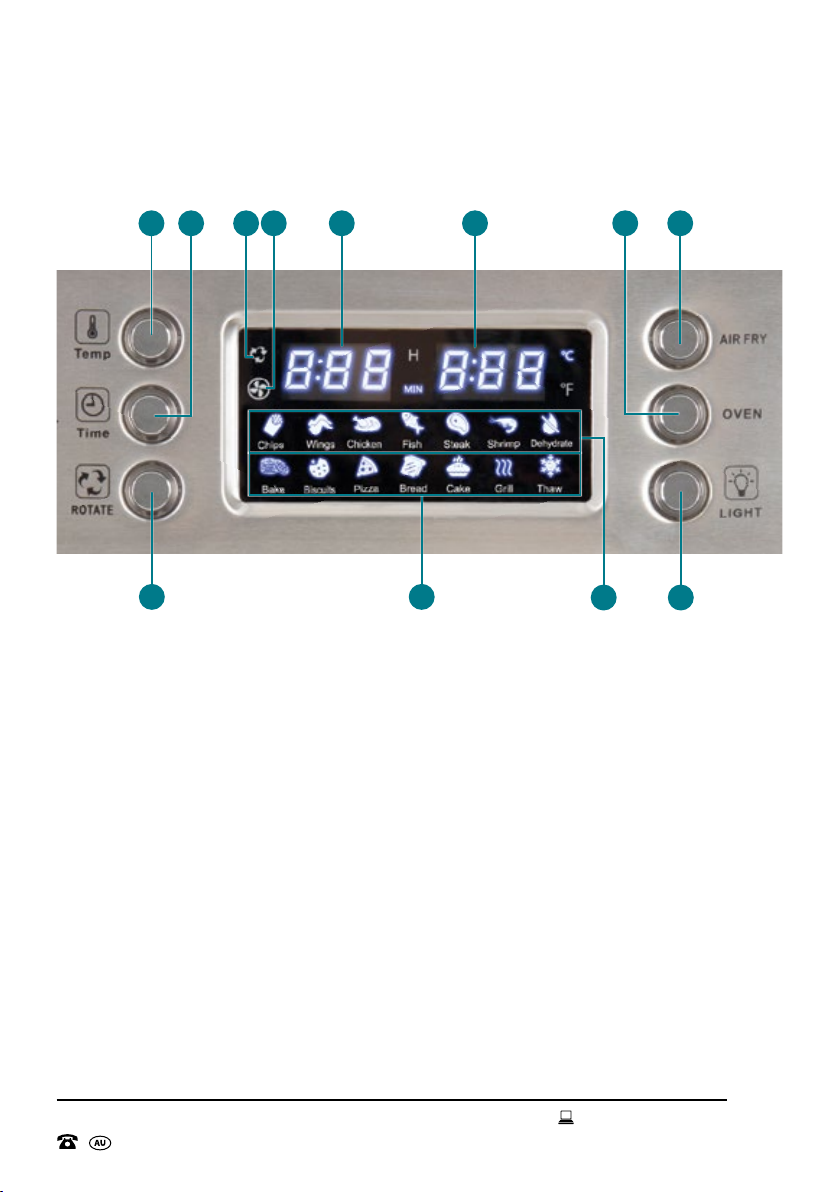
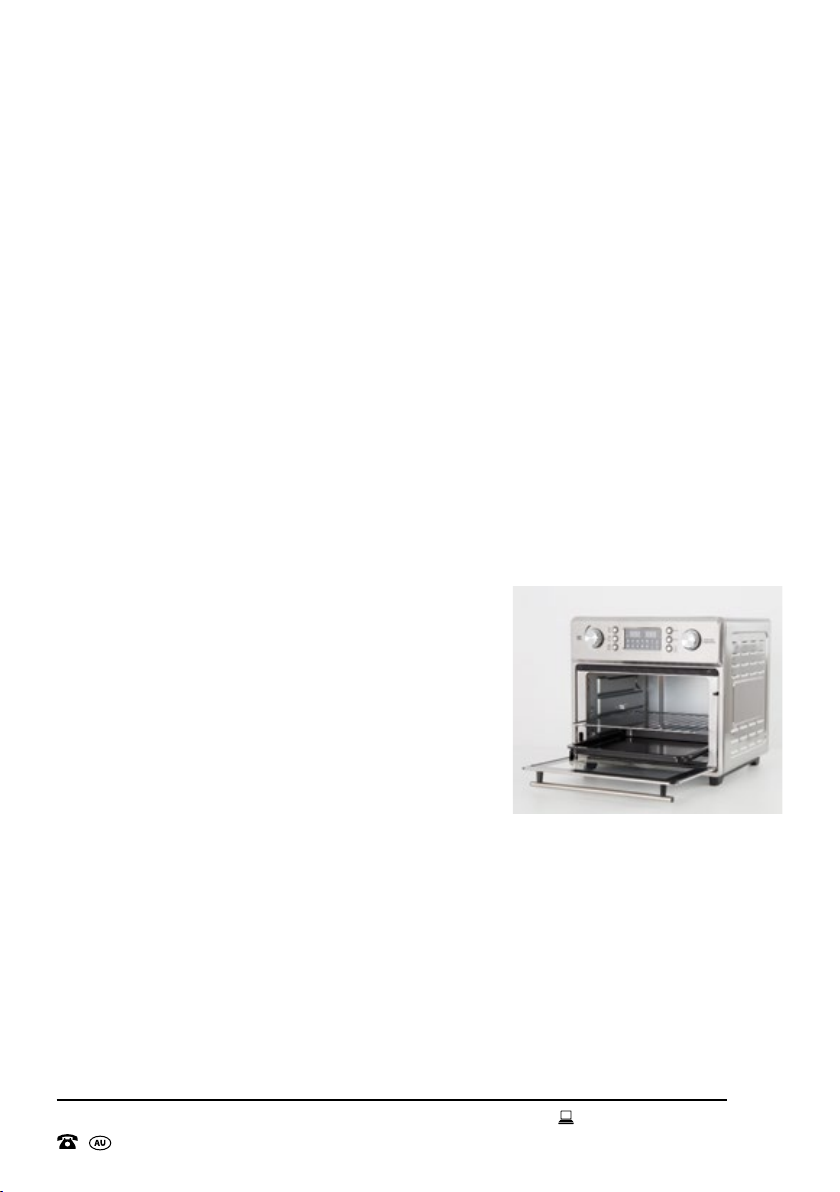
1. Temperature/Time Control Dial
2. Function Buttons
3. Digital LED Display Panel
4. FUNCTION (Preset) Dial and
START/STOP Button
5. Interior LIGHT Button
6. Door Handle
7. Rotisserie Drive Socket
8. Adjustable Rack Height Position
9. Lower Heating Elements
10. Feet
11. Glass Door (Large Viewing Window)
12. Upper Heating Elements and Coil
13. Back Vents
Included (not pictured): Instruction Manual, Quick Start Guide, Recipe Booklet, Warranty
Certificate, Power Cord.
Product Overview
08
AFTER SALES SUPPORT
1300 777 137
MODEL: IA4651 PRODUCT CODE: 712581 07/2023
3
11
13
12
7
4
5
8
9
10
6
1
2 2
Product Overview (cont.)
09
AFTER SALES SUPPORT
1300 777 137
MODEL: IA4651 PRODUCT CODE: 712581 07/2023
1. Temperature Function Button with Indicator Light
2. Time Function Button with Indicator Light
3. ROTATE Icon
4. FAN Icon
5. Time LED display
6. Temperature LED display
7. OVEN Presets Function Button with Indicator Light
8. AIR FRY Presets Function Button with Indicator Light
9. Interior LIGHT Button with Indicator Light
10. AIR FRY Presets
11. OVEN Presets
12. ROTATE Function Button with Indicator Light
2 81 75
10 9
12 11
643
10
AFTER SALES SUPPORT
1300 777 137
MODEL: IA4651 PRODUCT CODE: 712581 07/2023
Product Overview (cont.)
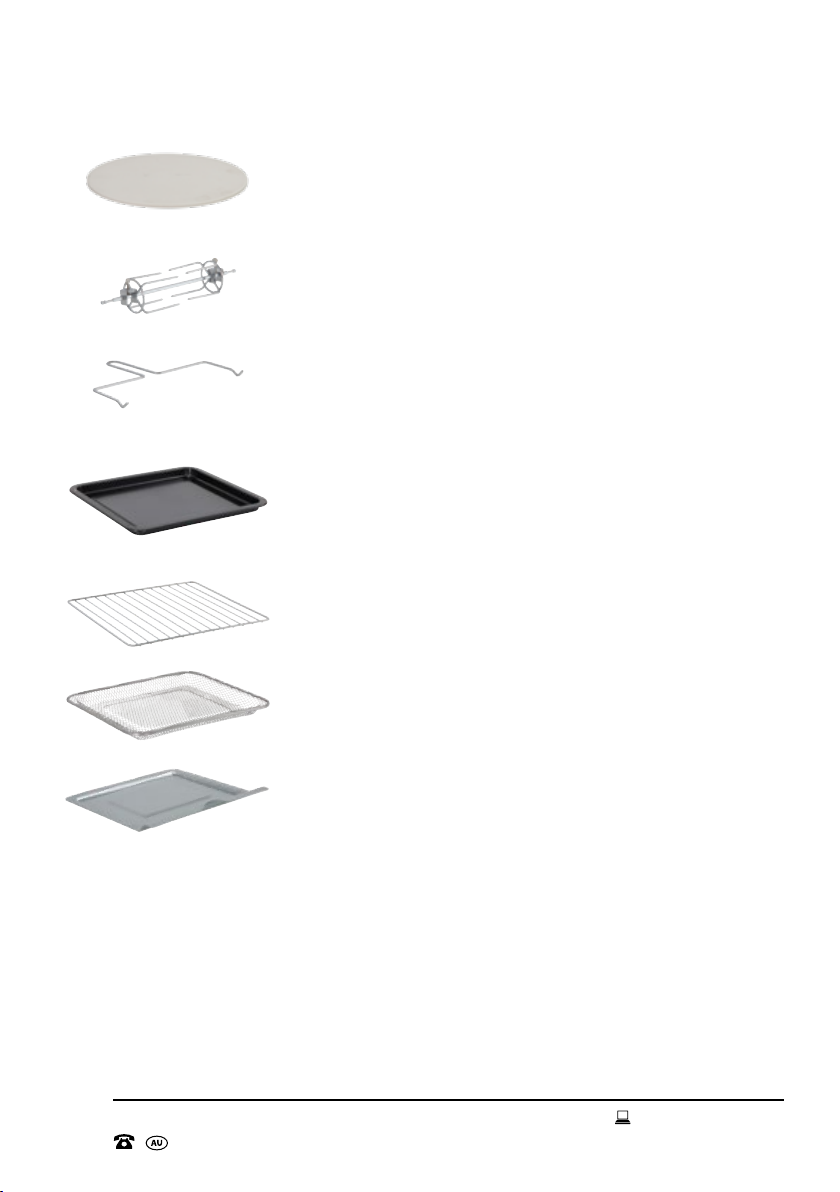
10” Pizza Stone
Use when cooking fresh or frozen pizzas. The pizza stone
should always be placed on the wire rack before inserting into
the middle shelf position.
8 Prong Rotisserie Set
Use when cooking a whole chicken or other meats using the
rotisserie function.
Rotisserie Handle
Use to safely remove the rotisserie set from the Air Fryer
Oven.
Bake Tray
Use when frying, baking or roasting and can also be used
as a drip tray. The baking tray can be placed in three shelf
positions.
Wire Rack
Use when baking, grilling, and toasting. The wire rack can be
placed in the top and middle shelf positions.
Air Fryer Basket
Use when air frying. The air fryer basket can be placed in the
middle and bottom shelf positions.
Crumb Tray
Use at the bottom of the oven to catch any stray food.

11
AFTER SALES SUPPORT
1300 777 137
MODEL: IA4651 PRODUCT CODE: 712581 07/2023
Getting Started
Before First Time Use
Prior to using your Air Fryer Oven, please read all safety and operating instructions thoroughly.
Please ensure you follow the steps below before using this appliance. We recommend you keep the
original packaging for storing your Air Fryer Oven when not in use.
1. Unpack the product and keep all packaging materials until you have made sure your new Air
Fryer Oven is undamaged and in good working order. Plastic wrapping can be a suocation
hazard for babies and children so ensure all packaging materials are out of their reach.
2. Remove the twist-tie which is securing the electrical cord. Uncoil the cord to straighten it to
remove any kinks. Do not use if these parts are damaged. In case of damage, phone the After
Sales Support Line on 1300 777 137.
3. Place the Air Fryer Oven on a flat, stable, heat resistant surface, and remove the accessories
from all packaging. Wash the crumb tray, bake tray, air fryer basket, wire rack, rotisserie handle
and rotisserie set in warm soapy water. Dry thoroughly before use.
4. Plug the Air Fryer Oven into a power outlet and switch on. The Air Fryer Oven will default to
standby mode.
5. Press the AIR FRY button to unlock the LED display panel. The AIR FRY button indicator light
will flash, and the Air Fryer Oven will automatically default to the first preset setting (the icon
will flash indicating it is selected).
6. Press the Time button. The indicator light will flash, and the default time will flash
intermittently on the LED display panel. Turn the TEMP/TIME dial anticlockwise to decrease
the time to 10 minutes.
7. Press the START/STOP button to start the cooking process and the AIR FRY Button will cease
flashing and remain illuminated. This will eliminate any odours within the Air Fryer Oven and
burn o any excess lubricants which were used in the manufacturing process.
8. Once the timer has elapsed the Air Fryer Oven will beep and return to standby mode.
9. Switch o and unplug the Air Fryer Oven from the power outlet and allow it to cool down.
Once cool, use a soft damp cloth to wipe the inside of the appliance. Do not use abrasive
cleaners or scouring pads.
NOTE: You may notice a slight odour being emitted from the Air Fryer Oven during the initial use.
This is normal and will cease with continued use.
NOTE: The 8 prong rotisserie set is very sharp and is embedded in the foam packaging for your
safety. Please make sure you carefully remove the 8 prong rotisserie set from the foam before you
dispose of the packaging.

12
AFTER SALES SUPPORT
1300 777 137
MODEL: IA4651 PRODUCT CODE: 712581 07/2023
Standby Mode
Place the Air Fryer Oven on a dry, level, and heat resistant surface. Plug the power cord into a power
outlet and switch on. Once on, a beep will sound, and the digital LED display panel will light up. The
Air Fryer Oven will default to standby mode after a couple of seconds.
Power On
To unlock the LED display panel for product operation, press either the AIR FRY or OVEN button
(depending on which preset function you wish to use). Refer to the tables on pages 13-16 for the
AIR FRY and OVEN presets. To start cooking at the default (first) preset, simply press the START/
STOP button. Once you have finished using the Air Fryer Oven, press the START/STOP button to
return the Air Fryer Oven back to standby mode. Then switch o and unplug the Air Fryer Oven
from the power outlet and allow it to cool down.
NOTE: The Air Fryer Oven will default to standby mode when plugged in and switched on at the
power outlet. The appliance should always be returned to standby mode before turning it o at the
power outlet.
Preset Functions
For extra convenience, the Air Fryer Oven features 14 auto presets (7 AIR FRY presets and 7
OVEN presets) to make using the Air Fryer Oven easy!
To select the auto preset functions, first press the AIR FRY or OVEN button (depending on which
preset function you wish to use) to unlock the LED display panel. Refer to the tables on pages
13-16 for the AIR FRY and OVEN presets. The indicator light of the button pressed will flash,
indicating it has been selected and the preset icons will illuminate on the LED display panel. The Air
Fryer Oven will default to the first preset and the icon will flash on the LED display panel. Turn the
FUNCTION dial clockwise to scroll through the presets from left to right in the same order as listed
in the tables on pages 13-16. Once a preset is selected, the preset icon will flash, and the LED
display panel will display the default temperature and time settings. The default temperature and
time for each preset are listed in the tables on pages 13-16. You can also adjust the temperature
and timer setting for the presets at any point. Refer to page 16 for instructions on how to adjust the
temperature and timer.
NOTE: The rotate (rotisserie) function is automatically enabled for the Chicken preset. If you
are not using the rotisserie, simply press the ROTATE button to deactivate the rotate (rotisserie)
function.
NOTE: It is recommended to only use the ROTATE function when you are cooking using the
rotisserie set (included). You can use the rotisserie set to cook a variety of meats including chicken,
beef, lamb, pork etc. For convenience and best results, it is recommended to ask your local butcher
how to prepare the meat on the rotisserie set.
Instructions
13
AFTER SALES SUPPORT
1300 777 137
MODEL: IA4651 PRODUCT CODE: 712581 07/2023
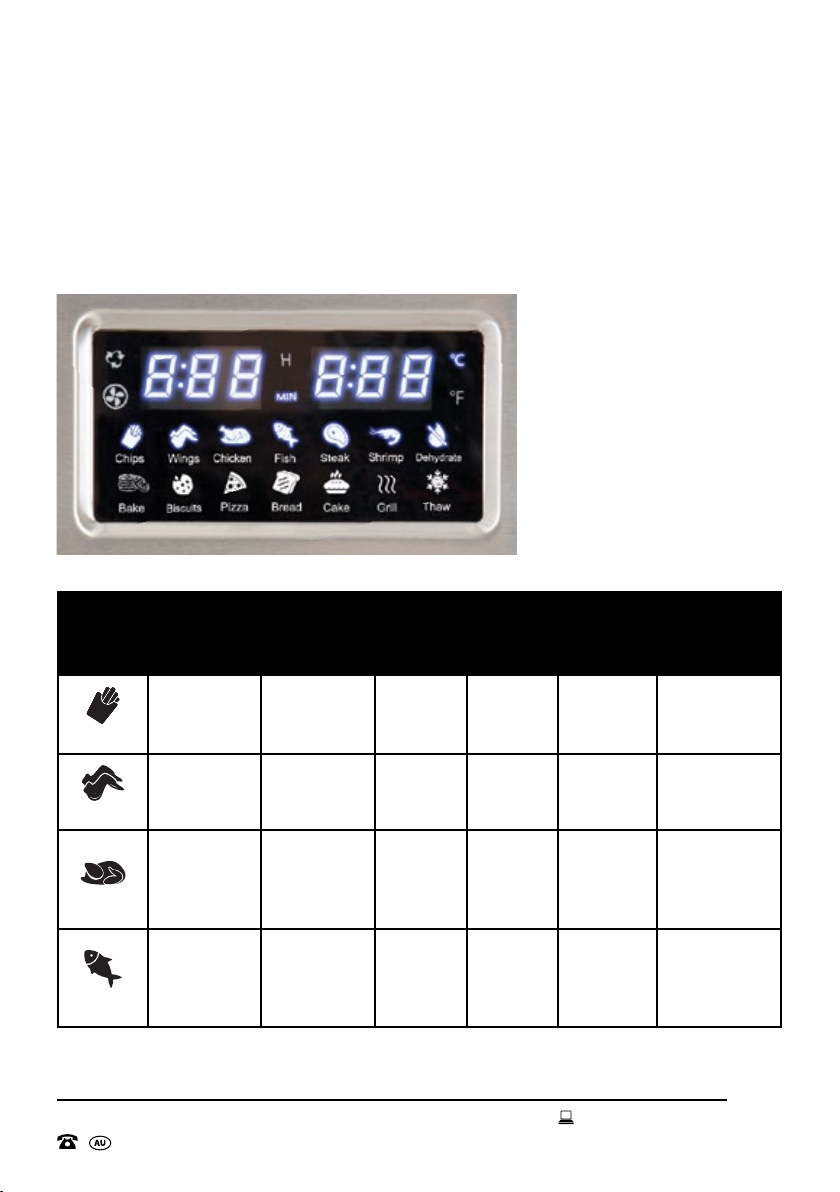
AIR FRY Presets
To use the AIR FRY presets, press the AIR FRY button to unlock the LED display panel. The icons
for the AIR FRY presets will illuminate on the LED display and the Air Fryer Oven will default to the
first preset.
The default settings for each preset are listed in the table below.
Preset Temp
Range (°C)
Time Range
(min-max)
Fan
Assisted
Heating
Modes
Default
Temp (°C)
& Time
Remark
Chips
60-200°C 1 min-
1 hr 30 mins Yes
Upper
Elements
& Coil
200°C
22 mins
Automatically
stops after
22 minutes.
Wings
60-200°C 1 min-
1 hr 30 mins Yes
Upper
Elements
& Coil
200°C
15 mins
Automatically
stops after
15 minutes.
Chicken 60-200°C 1 min-
1 hr 30 mins Yes
Upper
Elements
& Coil
180°C
25 mins
Automatically
stops after
25 minutes.
Fish
60-200°C 1 min-
1 hr 30 mins Yes
Upper
Elements
& Coil
180°C
15 mins
Automatically
stops after
15 minutes.
Instructions (cont.)
14
AFTER SALES SUPPORT
1300 777 137
MODEL: IA4651 PRODUCT CODE: 712581 07/2023
Instructions (cont.)
Preset Temp
Range (°C)
Time Range
(min-max)
Fan
Assisted
Heating
Modes
Default
Temp (°C)
& Time
Remark
Steak
60-200°C 1 min-
1 hr 30 mins Yes
Upper
Elements
& Coil
200°C
9 mins
Automatically
stops after
9 minutes.
Shrimp 60-200°C 1 min-
1 hr 30 mins Yes
Upper
Elements
& Coil
180°C
8 mins
Automatically
stops after
8 minutes.
Dehydrate
60-80°C 1 hr- 9 hrs
59 mins Yes Coil 80°C
9 hours
Automatically
stops after
9 hours.
NOTE: When using the Dehydrate preset, the timer can be adjusted in 30 minute increments
from 1 hour up to 9 hours and 59 minutes.
NOTE: The AIR FRY function presets all have the fan function (convection). When an AIR FRY
preset is selected and the START/STOP button is pressed, the fan icon will illuminate on the
LED display panel. This cannot be manually adjusted. If you do not wish to use the Air Fryer Oven
with convection, please select one the of the OVEN function presets (except the Grill and
Thaw presets which are both fan assisted).
NOTE: The rotate (rotisserie) function is automatically enabled for the Chicken preset. If you
are not using the rotisserie, simply press the ROTATE button to deactivate the rotate (rotisserie)
function.
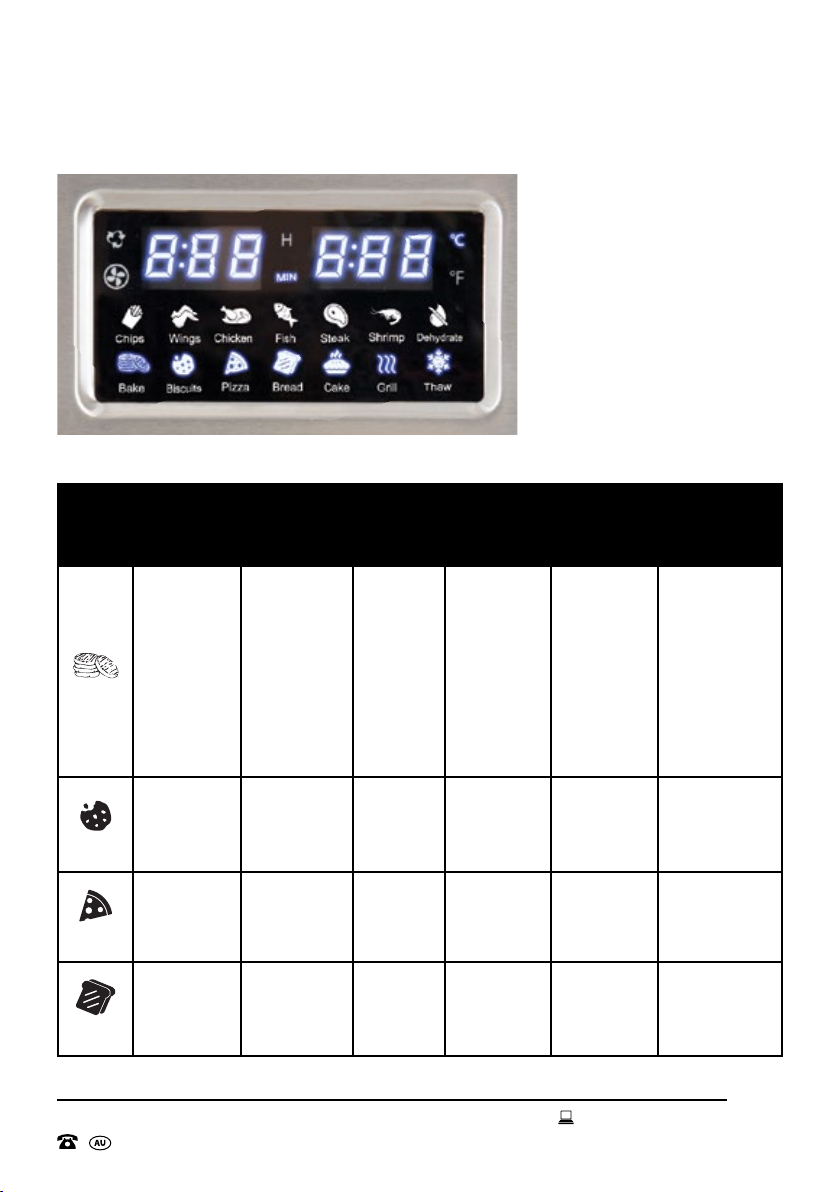
OVEN Presets
To use the OVEN presets, press the OVEN button to unlock the LED display panel. The icons for
the OVEN presets will illuminate on the LED display panel and the Air Fryer Oven will default to the
first preset.
15
AFTER SALES SUPPORT
1300 777 137
MODEL: IA4651 PRODUCT CODE: 712581 07/2023
Instructions (cont.)
The default settings for each preset are listed on the table below.
Preset Temp
Range (°C)
Time Range
(min-max)
Fan
Assisted
Heating
Modes
Default
Temp (°C)
& Time
Remark
Bake 60-200°C
1 min-
1 hr 30 mins No
Upper
& Lower
Elements
(heating up).
Lower
Elements
(once the
temperature
is reached).
170°C
30 mins
Automatically
stops after
30 minutes.
Biscuits 60-200°C 1 min-
1 hr 30 mins No
Upper
& Lower
Elements
170°C
30 mins
Automatically
stops after
30 minutes.
Pizza
60-200°C 1 min-
1 hr 30 mins No
Upper
& Lower
Elements
190°C
16 mins
Automatically
stops after
16 minutes.
Bread
60-200°C 1 min-
1 hr 30 mins No
Upper
& Lower
Elements
200°C
8 mins
Automatically
stops after
8 minutes.
16
AFTER SALES SUPPORT
1300 777 137
MODEL: IA4651 PRODUCT CODE: 712581 07/2023
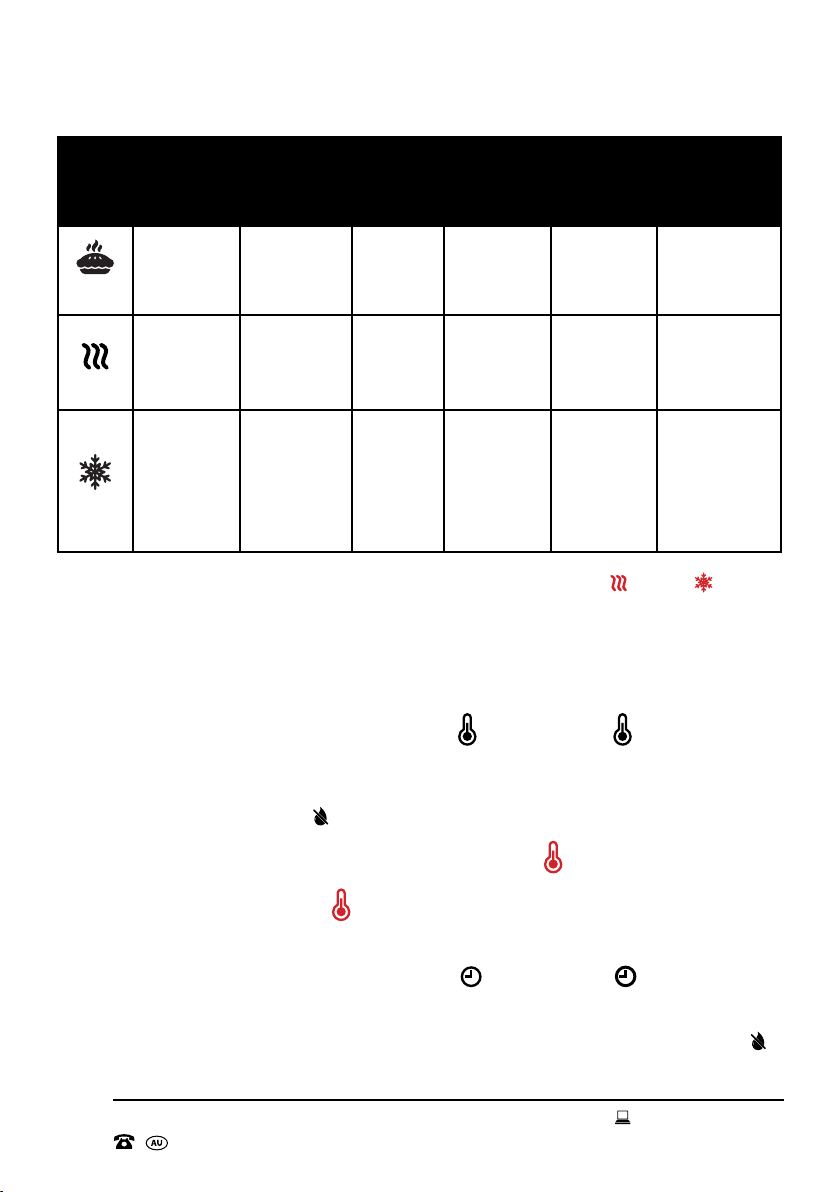
Instructions (cont.)
Preset Temp
Range (°C)
Time Range
(min-max)
Fan
Assisted
Heating
Modes
Default
Temp (°C)
& Time
Remark
Cake
60-200°C 1 min-
1 hr 30 mins No
Upper
& Lower
Elements
170°C
27 mins
Automatically
stops after
27 minutes.
Grill 60-200°C 1 min-
1 hr 30 mins Yes
Upper
Elements &
Coil
200°C
20 mins
Automatically
stops after
20 minutes.
Thaw
60-200°C 1 min-
1 hr 30 mins Yes
Upper
Elements &
Coil
80°C
10 mins
Select this
function to
defrost food.
Automatically
stops after
10 minutes.
NOTE: The OVEN function presets do not have the fan function (except the Grill and Thaw
presets which are both fan assisted). This cannot be manually adjusted. If you wish to use the Air
Fryer Oven with convection (fan), please select one of the AIR FRY function presets.
Oven Timer and Temperature Control Dial
Temperature Setting
To adjust the temperature of a preset setting, press the Temp button. The Temp button
indicator light will illuminate, and the temperature will flash intermittently on the LED display panel.
Turn the TEMP/TIME dial clockwise ( + ) or anticlockwise ( - ) to adjust the temperature setting
up or down. The temperature can be adjusted in 5°C increments from a minimum of 60°C to a
maximum of 200°C (except for the Dehydrate preset, which has a maximum of 80°C).
NOTE: If the temperature is not adjusted within a few seconds, the Temp button will cease to
illuminate, and the temperature will cease flashing on the LED display panel and remain illuminated.
In this case, you will need to press the Temp button once again to change the temperature.
Timer Setting
To adjust the cooking time of a preset setting, press the Time button. The Time button
indicator light will illuminate, and the temperature will flash intermittently on the LED display panel.
Turn the TEMP/TIME dial clockwise ( + ) or anticlockwise ( - ) to adjust the timer settings. The timer
can be adjusted in 1 minute increments to a maximum of 1 hour and 30 minutes (except for the
Dehydrate preset, which has a minimum of 1 hour and a maximum of 9 hours 59 minutes).

17
AFTER SALES SUPPORT
1300 777 137
MODEL: IA4651 PRODUCT CODE: 712581 07/2023
Instructions (cont.)
NOTE: If the timer is not adjusted within a few seconds, the Time button will cease to illuminate,
and the time will cease flashing on the LED display panel and remain illuminated. In this case, you
will need to press the Time button once again to change the timer.
Manual Cooking
The Air Fryer Oven can be used manually as either a convection oven (with fan) or as a traditional
oven (without fan).
Manual Cooking with Convection
If you wish to cook manually using convection (with fan), first press the AIR FRY button to unlock the
LED display panel. The AIR FRY button will flash indicating it has been selected and the Air Fryer Oven
will default to the first preset for AIR FRY. Dierent presets use dierent heating elements. Refer to the
table on pages 13-14 for which heating elements operate for which AIR FRY preset. It is recommended
to select the preset that uses the heating elements you require for the type of food you are cooking.
Then adjust the time and temperature you require according to the instructions on page 16.
NOTE: All the AIR FRY presets use the upper heating elements and coil except for the Dehydrate
preset which only uses the upper heating coil.
Manual Cooking without Convection
If you wish to cook manually using the OVEN function (without fan), first press the OVEN button
to unlock the LED display panel. The OVEN button indicator light will flash indicating it has been
selected and the Air Fryer Oven will default to the first preset for OVEN. Dierent presets use
dierent heating elements. Refer to the table on pages 15-16 for which heating elements operate
for which OVEN preset. It is recommended to select the preset that uses the heating elements
you require for the type of food you are cooking. Then adjust the time and temperature you require
according to the instructions on page 16.
NOTE: The OVEN function presets; Grill and Thaw are both fan assisted. Do not select these
presets if you wish to cook using the Air Fryer Oven without convection (without fan).
NOTE: When using the Air Fryer Oven manually it is recommended to refer to the Heating Modes
on the tables on pages 13-16 for which presets utilise which elements. The type of food you
are cooking will determine whether you need only the upper elements and coil, or only the lower
elements, or both the upper and lower heating elements.
NOTE: When using the Air Fryer Oven manually, if you require the fan to be enabled, select the AIR
FRY function, and presets. Once you press the START/STOP button to commence cooking, the
fan icon will illuminate on the LED display panel indicating that the fan has been activated. If you do
not require the fan, it is recommended to select the OVEN function and presets (except the Grill
and Thaw presets which are both fan assisted).

18
AFTER SALES SUPPORT
1300 777 137
MODEL: IA4651 PRODUCT CODE: 712581 07/2023
NOTE: Don’t forget, the top row of presets on your LED display panel can only be accessed with
the AIR FRY function and the bottom row of presets can only be accessed with the OVEN function.
Interior Light
For your convenience, the Air Fryer Oven comes with a interior light to assist with the cooking
process. You can check your food at any time by pressing the LIGHT button on the control panel
to turn the light on. Press the button again to turn the light o.
NOTE: The interior light will only come on if you have first selected either the AIR FRY function or
the OVEN function and then pressed the LIGHT button. The interior light will also illuminate
when the Air Fryer Oven door has been opened fully, for your convenience.
Using the Bake Tray
This Air Fryer Oven comes with a bake tray you can use
when baking, roasting and cooking vegetables and can also
be used as a drip tray.
1. Brush a small amount of oil onto the bake tray. This will
help to prevent the food from sticking. Place the food
directly onto the tray. Ensure the tray is not overfilled and
the food is spread evenly to assist with even cooking.
2. Insert the bake tray inside the Air Fryer Oven into one
of the three shelf positions (Fig. 1).
3. Gently close the door, plug the Air Fryer Oven into a power outlet and switch on.
4. Press the AIR FRY or OVEN button to unlock the LED display panel. The indicator light of the
button pressed will flash indicating it is selected.
5. Use the FUNCTION dial to scroll through the presets until the desired preset icon flashes on
the LED display panel.
NOTE: Don’t forget, the top row of presets on your LED display panel can only be accessed with
the AIR FRY function and the bottom row of presets can only be accessed with the OVEN function.
6. Press the START/STOP button to commence cooking at the default time and temperature. The
AIR FRY or OVEN button will cease flashing and remain illuminated indicating the Air Fryer Oven
is on and cooking. If you are using the AIR FRY function presets, or the Grill or Thaw presets,
the fan icon will illuminate on the LED display panel indicating that the fan is activated.
NOTE: You may wish to manually adjust the time or temperature for the type of food you are
cooking. Refer to the instructions on page16 for how to adjust the temperature and timer.
Instructions (cont.)
Fig. 1
19
AFTER SALES SUPPORT
1300 777 137
MODEL: IA4651 PRODUCT CODE: 712581 07/2023
Instructions (cont.)
NOTE: Once you have pressed the AIR FRY or OVEN button and selected a preset, if the START/
STOP button is not pressed, after a short period of time, the Air Fryer Oven will return to standby
mode. In this case, you will need to press the AIR FRY or OVEN button once again.
7. Once the timer has elapsed and the Air Fryer Oven beeps, the food is ready to be removed
from the oven.
8. Switch o and unplug the Air Fryer Oven from the power outlet.
9. Using oven mitts, remove the bake tray from the Air Fryer Oven and place on a heat resistant
surface.
CAUTION: The bake tray will be very hot once cooking has finished. Always use oven mitts to
remove the bake tray with food from the Air Fryer Oven, never use your hands. Always use non-
metal tongs to remove the food from the bake tray. Do not use metal utensils to remove the food
from the bake tray as this could damage the non-stick coating.
Using the Wire Rack
This Air Fryer Oven comes with a wire rack you can use when baking, grilling, or toasting.
1. Brush a little oil onto the wire rack. This will help to
prevent the food from sticking.
2. Insert the wire rack in the top or middle position
depending on the shape, size, and portion of the
ingredients being used.
3. We recommend using the bake tray as a drip tray in the
bottom shelf during the cooking process (Fig. 2).
4. Gently close the door, plug the Air Fryer Oven into a
power outlet and switch on.
5. Press the AIR FRY or OVEN button to unlock the LED display panel. The indicator light of the
button pressed will flash.
6. Use the FUNCTION dial to scroll through the presets until the desired preset icon flashes on
the LED display panel.
NOTE: Don’t forget, the top row of presets on your LED display panel can only be accessed with
the AIR FRY function and the bottom row of presets can only be accessed with the OVEN function.
Fig. 2

20
AFTER SALES SUPPORT
1300 777 137
MODEL: IA4651 PRODUCT CODE: 712581 07/2023
7. Press the START/STOP button to commence cooking at the default time and temperature.
The AIR FRY or OVEN button will cease flashing and remain illuminated indicating the Air
Fryer Oven is on and cooking.
NOTE: If you are using the AIR FRY function presets, or the Grill or Thaw presets, the fan
icon will illuminate on the LED display panel indicating that the fan is activated.
NOTE: You may wish to manually adjust the time or temperature for the type of food you are
cooking. Refer to the instructions on page 16 for how to adjust the temperature and timer.
NOTE: Once you have pressed the AIR FRY or OVEN button and selected a preset, if the START/
STOP button is not pressed, after a short period of time, the Air Fryer Oven will return to standby
mode. In this case, you will need to press the AIR FRY or OVEN button once again.
8. Once the timer has elapsed and the Air Fryer Oven beeps, the food is ready to be removed
from the oven.
9. Switch o and unplug the Air Fryer Oven from the power outlet.
10. Using oven mitts, remove the wire rack from the Air Fryer Oven and place on a heat resistant
surface.
CAUTION: The wire rack, bake tray and food will be very hot once cooking has finished. Always use
oven mitts to remove the bake tray and the wire rack from the Air Fryer Oven, never use your hands.
Always use non-metal tongs or utensils to remove the food from the wire rack. Do not use metal
utensils as this could damage the non-stick coating.
Using the Air Fryer Basket
This Air Fryer Oven comes with a mesh air fryer basket you can use to air fry chips, potatoes, chicken,
fish and more! For a crispier result, add a small amount of oil to your food before placing the food in
the air fryer basket. Please ensure you cook your food in the Air Fryer Oven within a few minutes of
adding the oil to the food for best results. Never add oil directly into the air fryer basket.
NOTE: It is recommended to use the AIR FRY function
presets when using the air fryer basket.
1. Place the food to be cooked into the air fryer basket.
Then insert the air fryer basket into the middle position
of the Air Fryer Oven (Fig. 3).
2. Insert the bake tray into the bottom position directly
below the air fryer basket. The bake tray will act as a
drip tray during the cooking process.
Instructions (cont.)
Fig. 3
Other manuals for IA4651
1
Table of contents
Other Stirling Fryer manuals


Popular Fryer manuals by other brands

Pitco
Pitco L20-281 Installation and operation manual

Secura
Secura L-DF401B-T user manual

Henny Penny
Henny Penny KFC Velocity PXE-100 Operator's manual

Magic
Magic A-84 manual

Dosze
Dosze Backyard Pro Safety, Assembly and Use Manual

Far West
Far West PAR-1-20 Installation, operation & maintenance instructions


Lotus
Lotus LIBR.ISTR.F70E POT Installation and operating instructions

Black & Decker
Black & Decker BXAF5500E instructions

Gourmia
Gourmia GTF7950MEX user manual

Frymaster
Frymaster Pro Series Installation and operation manual

Winston Industries
Winston Industries PF46C owner's manual

Falcon
Falcon G402F Installation, servicing and user instructions