Stocker Solarjet 0620 User manual

Alu Spotlight
0620
Manual Use
IT
D
E
ES
GB

- Istruzioni d’uso -
Introduzione
Grazie per aver acquistato una lampada solare della gamma Solarjet !
La lampada solare Spotlight è un articolo innovativo, fabbricato con materiali di alta tecnologia, che consentono il
risparmio energetico. Posizionando in modo appropriato gli spotlights, si possono realizzare eccezionali giochi di
luce! Sono ideali per illuminare sentieri, alberi, terrazze, sculture, ingressi, ecc.
Vi preghiamo di leggere attentamente le istruzioni per ottenere il buon funzionamento della
lampada.
Vantaggi
•Spotlight solare potente con possibilitá di montaggio a muro e terra
•9 super LED
•Riposizionabile
•Attivazione automatica con sensore
•3 batterie ricaricabili
•Lente stabilizzata UV
•3 batterie ricaricabili
•Illuminazione minimo 6 ore
•Ampio raggio di illuminazione fino a 6 metri
•
Resistente alle intemperie
Posizionamento
1) La lampada deve essere collocata in un luogo dove
le è consentito accumulare luce solare, quindi
lontano da alberi o tetti (vedi fig. 1).
2) Assicurarsi che vicino alla lampada non ci siano altre fonti di illuminazione (ad es. un lampione) altrimenti il
sensore non garantisce l’accensione della lampada.
3) La lampada va lasciata in carica per due giorni sotto il sole prima del suo utilizzo.
Istruzioni per il montaggio
Montaggio del pannello
2
1) Togliere la lampada ed ogni accessorio con cura dalla scatola.
2) Unire la vite di giuntura (2) con lo stelo (3);
premere lo stelo direttamente nel terreno.
Non battere sulla luce!.
3) Fissare il pannello (1) nella parte superiore del sostegno accuratamente; premere lo
stelo direttamente nel terreno. Non battere sulla luce!.
4) Posizionarle il sensore sotto il pannello solare su “AUTO”
5) Montaggio a parete o sul tetto con le viti (vedi fig. 3)
3

Montaggio della lampada solare
1)
Togliere la lampada ed ogni accessorio con cura dalla scatola. (1)
4
2) Posizionare la lampada nella direzione desiderata (2)
3) Fissare la lampada con la vite (figura 4)
4) Per il fissaggio a muro usare le viti ( figura 5)
5
Collegamento del cavo
Inserire la spina dello spotlight nella spina del pannello solare.
Funzionamento
1) Per un utilizzo quotidiano, posizionare l’interruttore su “AUTO”, e la lampada si accenderá automaticamente
durante la notte o appena fará buio. Importante é far caricare la lampada per due giorni sotto la luce del sole.
2) Il numero di ore di illuminazione è inoltre determinato dal suo posizionamento, dalle condizioni
meteorologiche e stagionali. In inverno si hanno meno ore di luce rispetto ad altre stagioni, pertanto la durata
d’illuminazione della lampada sará minore.
Sostituzione batterie
Per un risultato ottimale, è consigliabile sostituire le batterie ogni 12 mesi!
1) Capovolgere la lampada. Togliere la vite dal coperchio.
2) Rimuovere le batterie scariche. Assicurarsi che le nuove batterie siano Ni-MH ricaricabili.
3) Posizionare le batterie correttamente.
4) Riassemblare il tutto prima di riaccendere la lampada.
NB: Le batterie esaurite, dovranno essere smaltite negli appositi raccoglitori.
Per maggiori informazioni rivolgersi all’Ente di smaltimento rifiuti locale. Non bruciare.
Mal funzionamento
Se la lampada non dovesse funzionare nonostante il buio e la corretta manutenzione,
verificare che:
1) La lampada non abbia una fonte di luce vicina (ad es. un lampione).
2) La lampada sia sotto la luce del sole durante il giorno.
3) Che l’ interruttore sia posizionato su AUTO.
4) Che le batterie siano inserite correttamente.
Mantenimento
Pulire regolarmente con un panno umido la lampada in modo che il pannello sia sempre pulito.
Non utilizzare alcun tipo di solvente per la pulizia e non esercitare troppa pressione con il panno.

-
Gebrauchsanweisung –
Einleitung
Wir bedanken uns, dass Sie sich entschlossen haben eine Solarlampe bei Solarjet zu beziehen.
Mit punktgenauen Spotlights erzielen Sie in Ihrem Garten ganz besondere Licht-Effekte.
Bestrahlen Sie wirkungsvoll Wege, Bäume, Terrassen, Skulpturen Häuserfronden und vieles mehr.
Vorteile
•Solarscheinwerfer für Boden und Wand
•9 leuchtstarke Hochleistungs- Led´s
•Kristall-Solarpaneel
•Ladestation mit 5m Kabel
•Schaltet bei Dunkelheit automatisch mittels eingebautem Dämmerungsschalter ein
•Aufladbarer Akku – 3 Batterien (600mAh AA Ni-Mh)
•Leuchtdauer bei vollgeladenem Akku bis zu 6 Stunden
•Wetterbeständig
•Schein bis zu 6m
Positionierung
1) Um der Lampe optimale Voraussetzungen bieten
zu können, platzieren Sie die Solarzellenfläche
an einem Ort, wo Sie die maximale
Sonneneinstrahlung sammeln kann (siehe Bild 1)
2) Bitte laden Sie die Batterien zwei Tage vor der Inbetriebnahme auf.
3) In den Wintermonaten nehmen die Solarzellen nicht viel direktes Sonnenlicht auf, deshalb verringern sich die
Leuchtstunden der Solarlampen.
Montageanleitung
Entnehmen Sie die Lampe und jeglichen Gegenstand aus der Verpackung.
Boden
Verbinden Sie die Teile so wie im Bild angezeigt und stecken Sie den Stick
des Paneels und der Lampe direkt in die Erde. Nicht auf den Stiel oder auf die
Lampe klopfen !!

Wand
1) Nehme die Lampe „4“ und positioniere sie an die Wand und fixiere es mit den
Schrauben „3“ auf die gewünschte Position. Das Paneel kann 4m von der Lampe
positioniert werden. Beachten sie dabei, das dass Paneel viel Sonne braucht, deswegen
positionieren Sie es so das die Solarzellen direktes Sonnenlicht bekommen.
2) Mit den Kabel verbinden sie die Lampe mit den Paneel.
Schließen sie den Kabel an die Lampe und am Paneel
unterhalb.
Leistung
1) Für den täglichen Gebrauch, positionieren Sie den Schalter unter der Lampe auf “AUTO”; die Lampe wird
sich bei Dämmerung selbst einschalten. Es ist wichtig vorher die Lampe zwei Tage unter den Sonnenstrahlen
aufladen zu lassen.
2) In den Wintermonaten nehmen die Solarzellen nicht viel direktes Sonnenlicht auf, deshalb verringern sich die
Leuchtstunden der Solarlampe. Beim bewölkten Himmel wird die Batterie nicht für den nächtlichen Betrieb
aufgeladen.
Austausch der Batterie
Um der Lampe optimale Voraussetzungen bieten zu können, sollten die Ni-Mh Batterien alle 12 Monate
gewechselt werden.
1) Öffnen Sie die Verschlusskappe und wechseln Sie die Batterien.
2) Kontrollieren Sie ob die neuen Batterien Ni-Mh Akku Batterien sind.
Wenn die Funktionstüchtigkeit der Batterie erschöpf ist, müssen diese ordnungsgemäß entsorgt
werden. Für weitere Informationen hinsichtlich der Entsorgung setzen Sie sich mit Ihrer örtlichen
Abfallbeseitigungsbehörde in Verbindung. Nicht verbrennen.
Problembehandlung
Sollte Ihre Solarlampe nicht richtig funktionieren, befolgen Sie die folgenden Anweisungen:
1) Vergewissern Sie sich, dass das Solarpaneel der Sonne ausgesetzt ist.
2) Kontrollieren Sie ob die Batterien richtig installiert wurden.
Instandhaltung
Reinigen Sie regelmäßig mit einem feuchten Tuch das Solarpaneel damit es sauber bleibt, benutzen Sie dabei kein
Reinigungsmittel und drücken Sie nicht auf das Paneel.

-MANUAL DE INSTRUCCIONES-
Introducción
Gracias por comprar una unidad de calidad. Utilizada con cuidado y en concordancia con las instrucciones
explicadas a continuación, su SISTEMA DE ILUMINACION SOLAR PARA JARDIN debería proporcionarle
muchos años de uso sin ningún problema. Por favor, lea las instrucciones detenidamente para obtener los mejores
resultados de su compra.
El producto tiene las siguientes características:
•Gran panel solar cristalino de alta calidad.
•Foco con carcasa en aleación de aluminio.
•No se requiere de suministro de energía eléctrica
•Cableado simple
•El diseño a prueba de agua proporciona una larga vida al producto en cualquier tipo de condiciones
ambientales.
•Los sensores automáticos encienden la lámpara al atardecer.
•3x pilas recargables Ni-MH (1000 mA) incluidas
•1x lámpara con 5metros de cable, 9 piezas LED’S súper brillantes
•La lámpara puede ser puesta a la sombra o en cualquier sitio que desee.
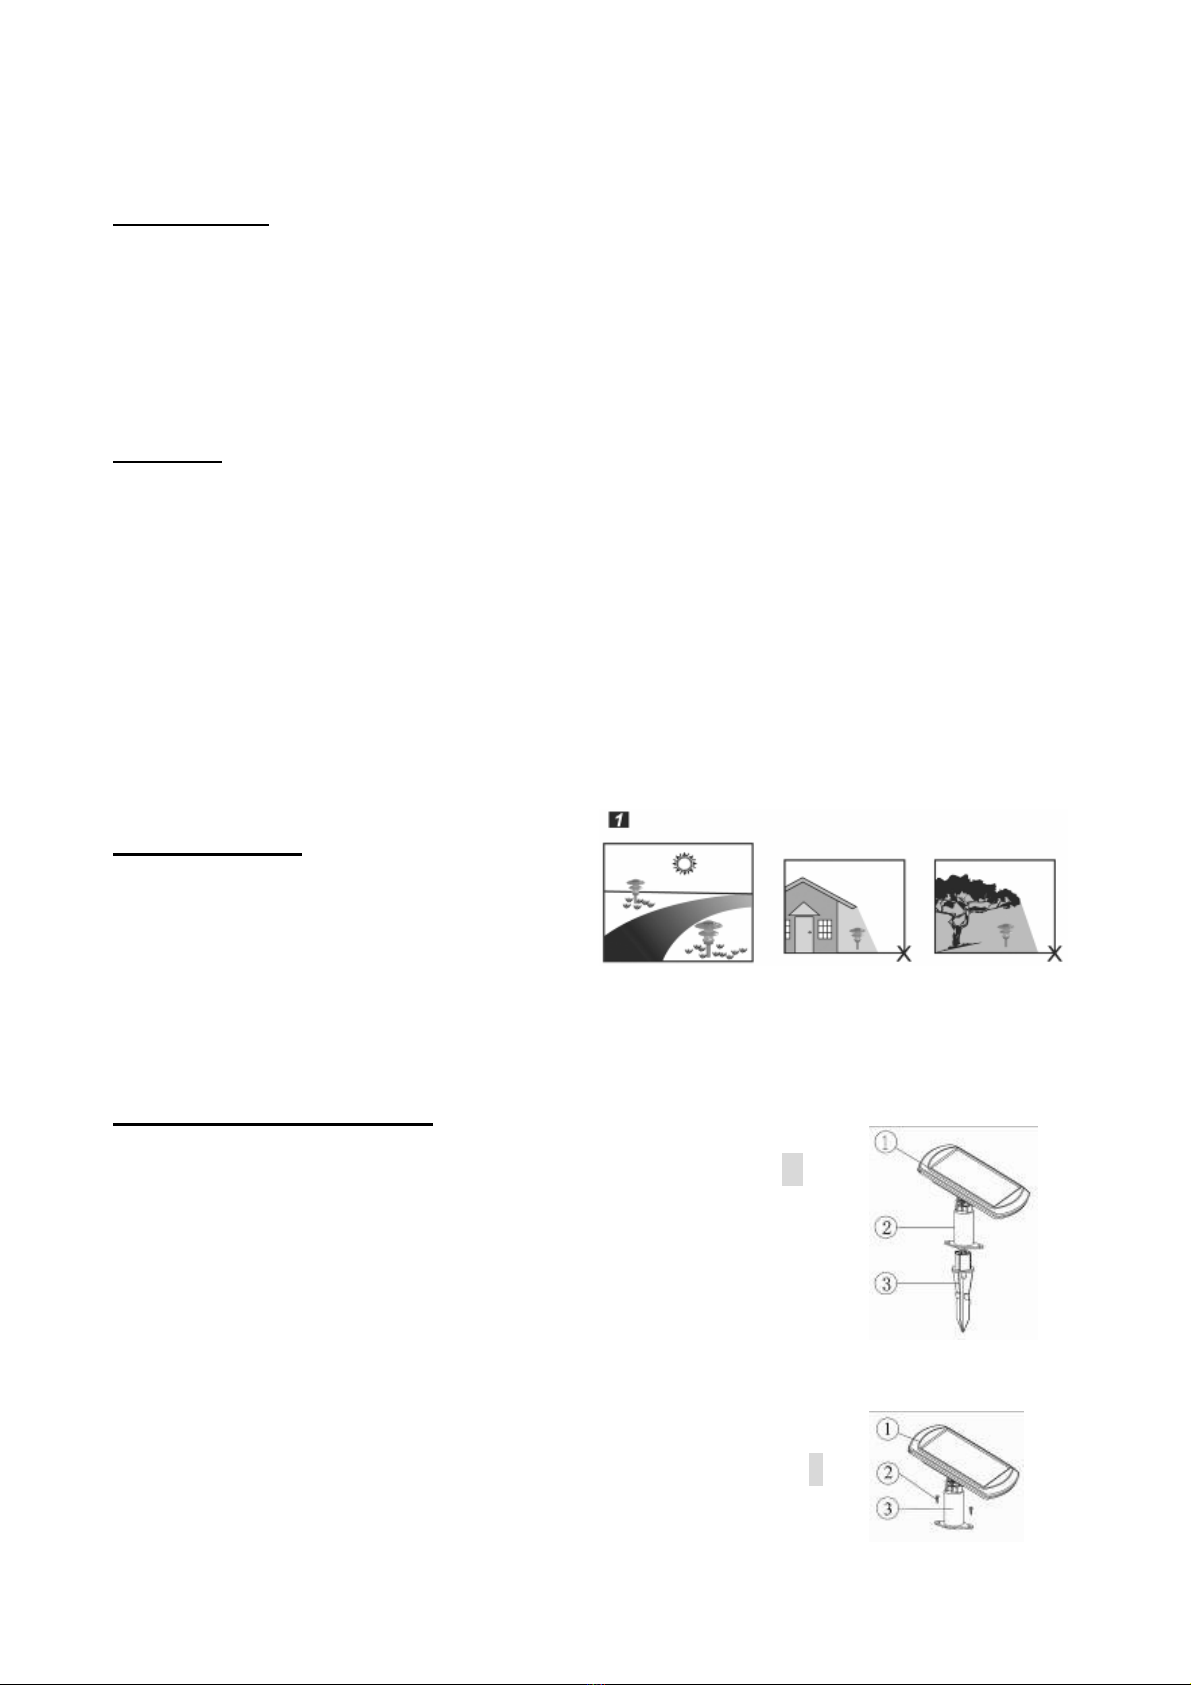
Colocación del controlador solar
1) Para el mejor resultado, por favor colocar el controlador solar en una posición donde pueda tomar luz solar
directamente al panel solar y generalmente sin
estar cubierta ni en la sombra. (Como muestra la
figura 1).
2) Asegurarse de que el foto sensor no vaya a ser
afectado por cualquier otra fuente de luz. De lo
contrario la lámpara no iluminará al atardecer.
3) El CONTROLADOR SOLAR debe dejarse en
carga durante 2 soleados días antes de conseguir
los mejores resultados.
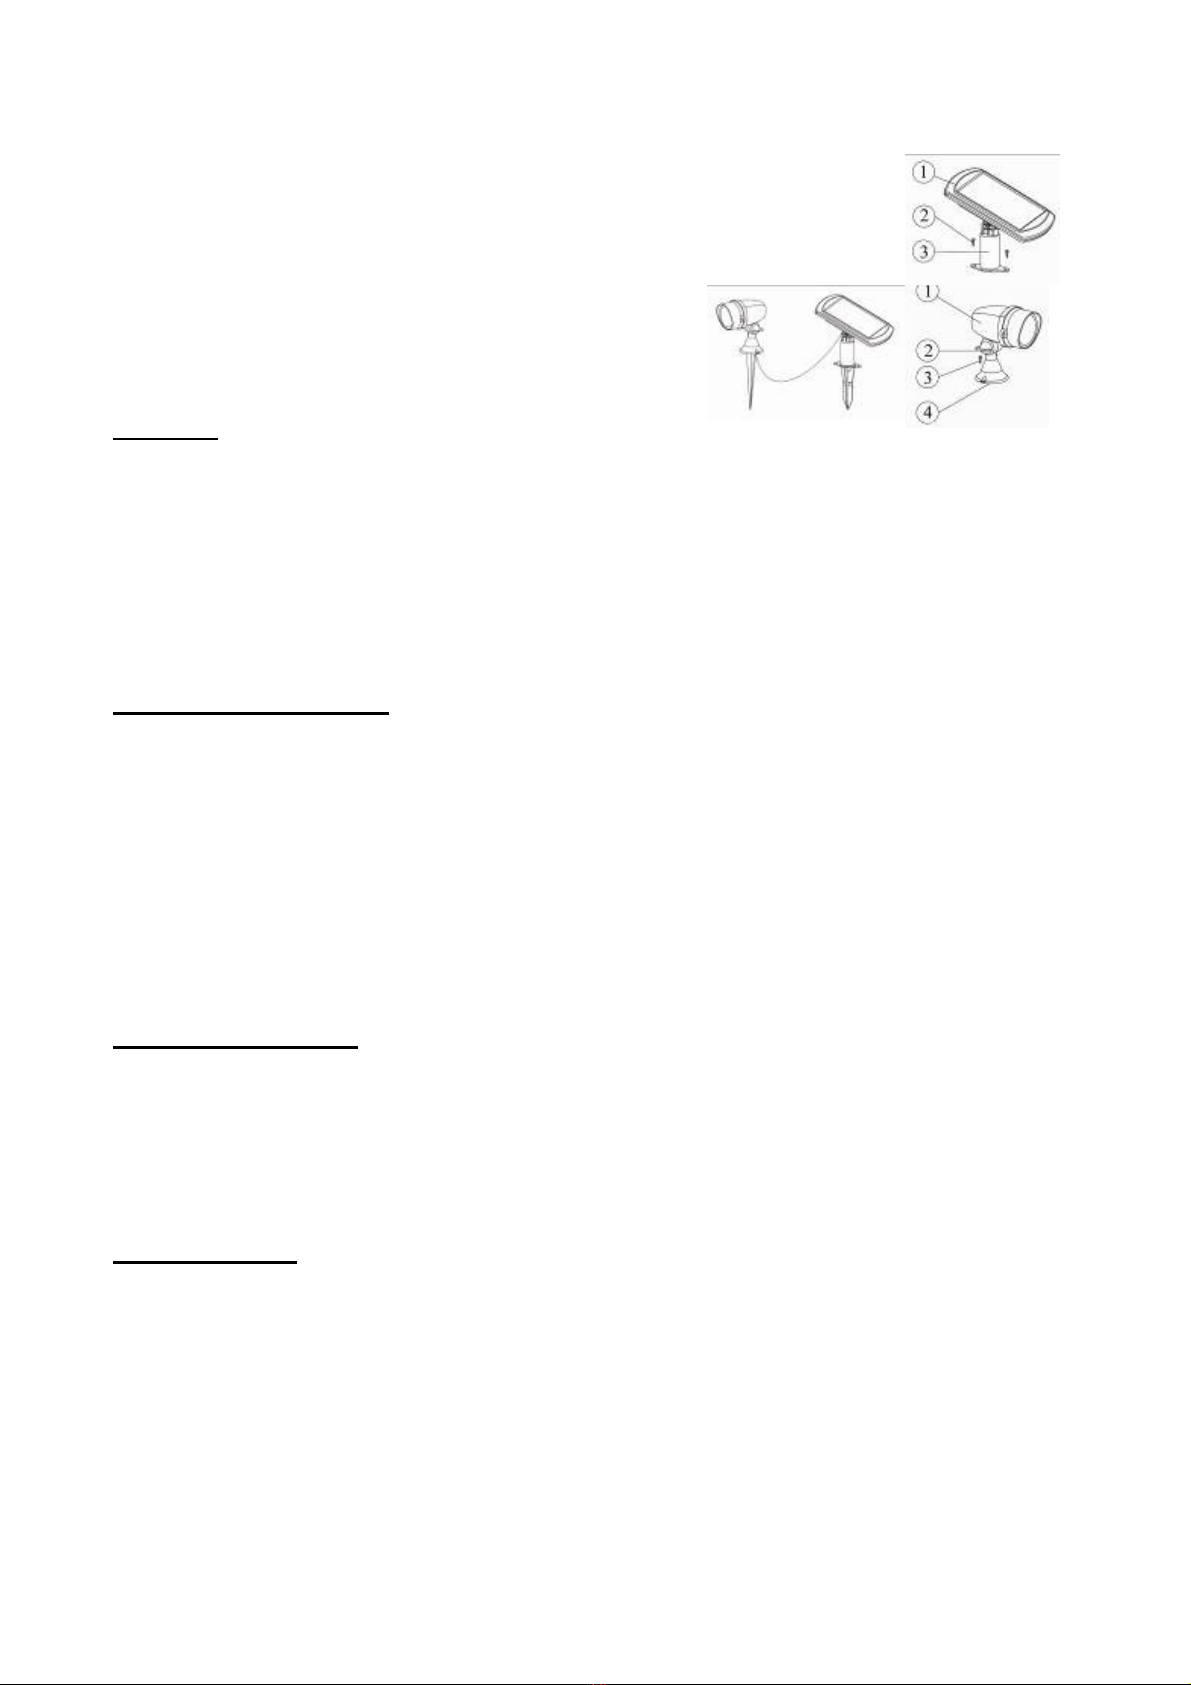
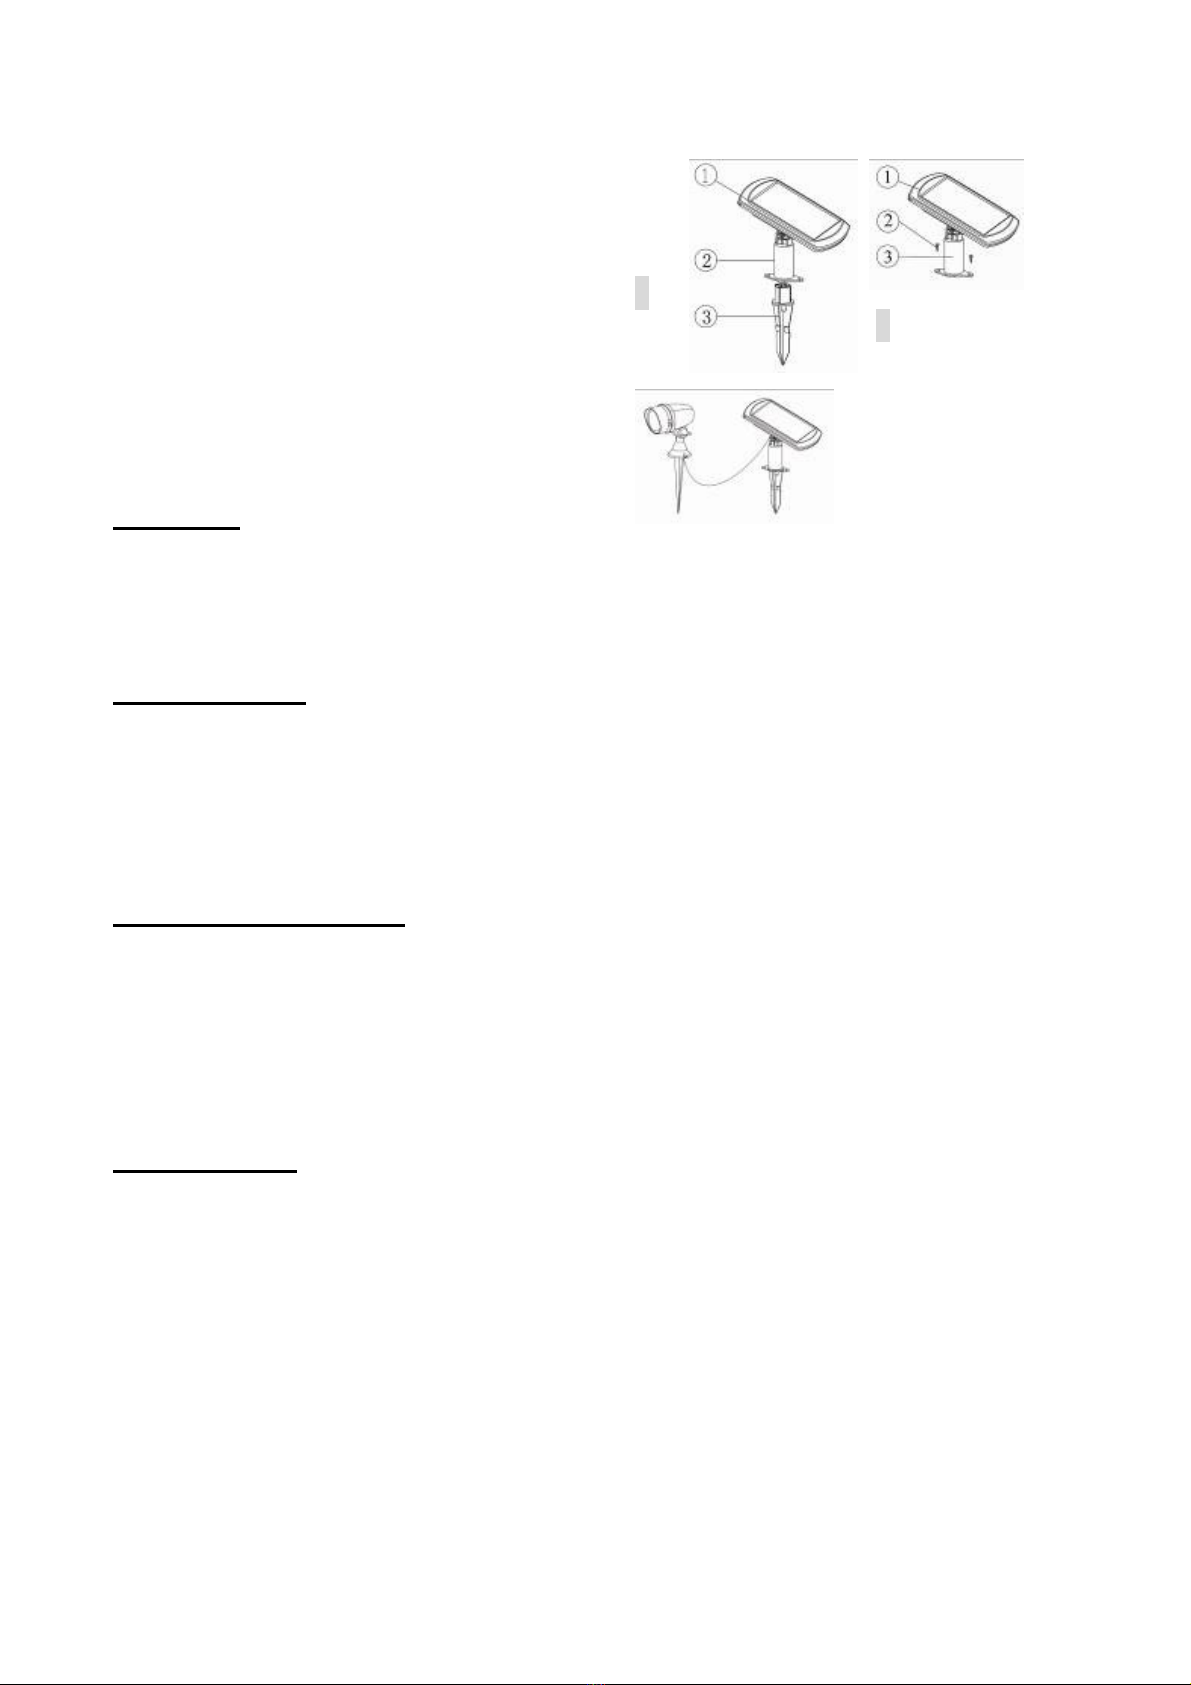
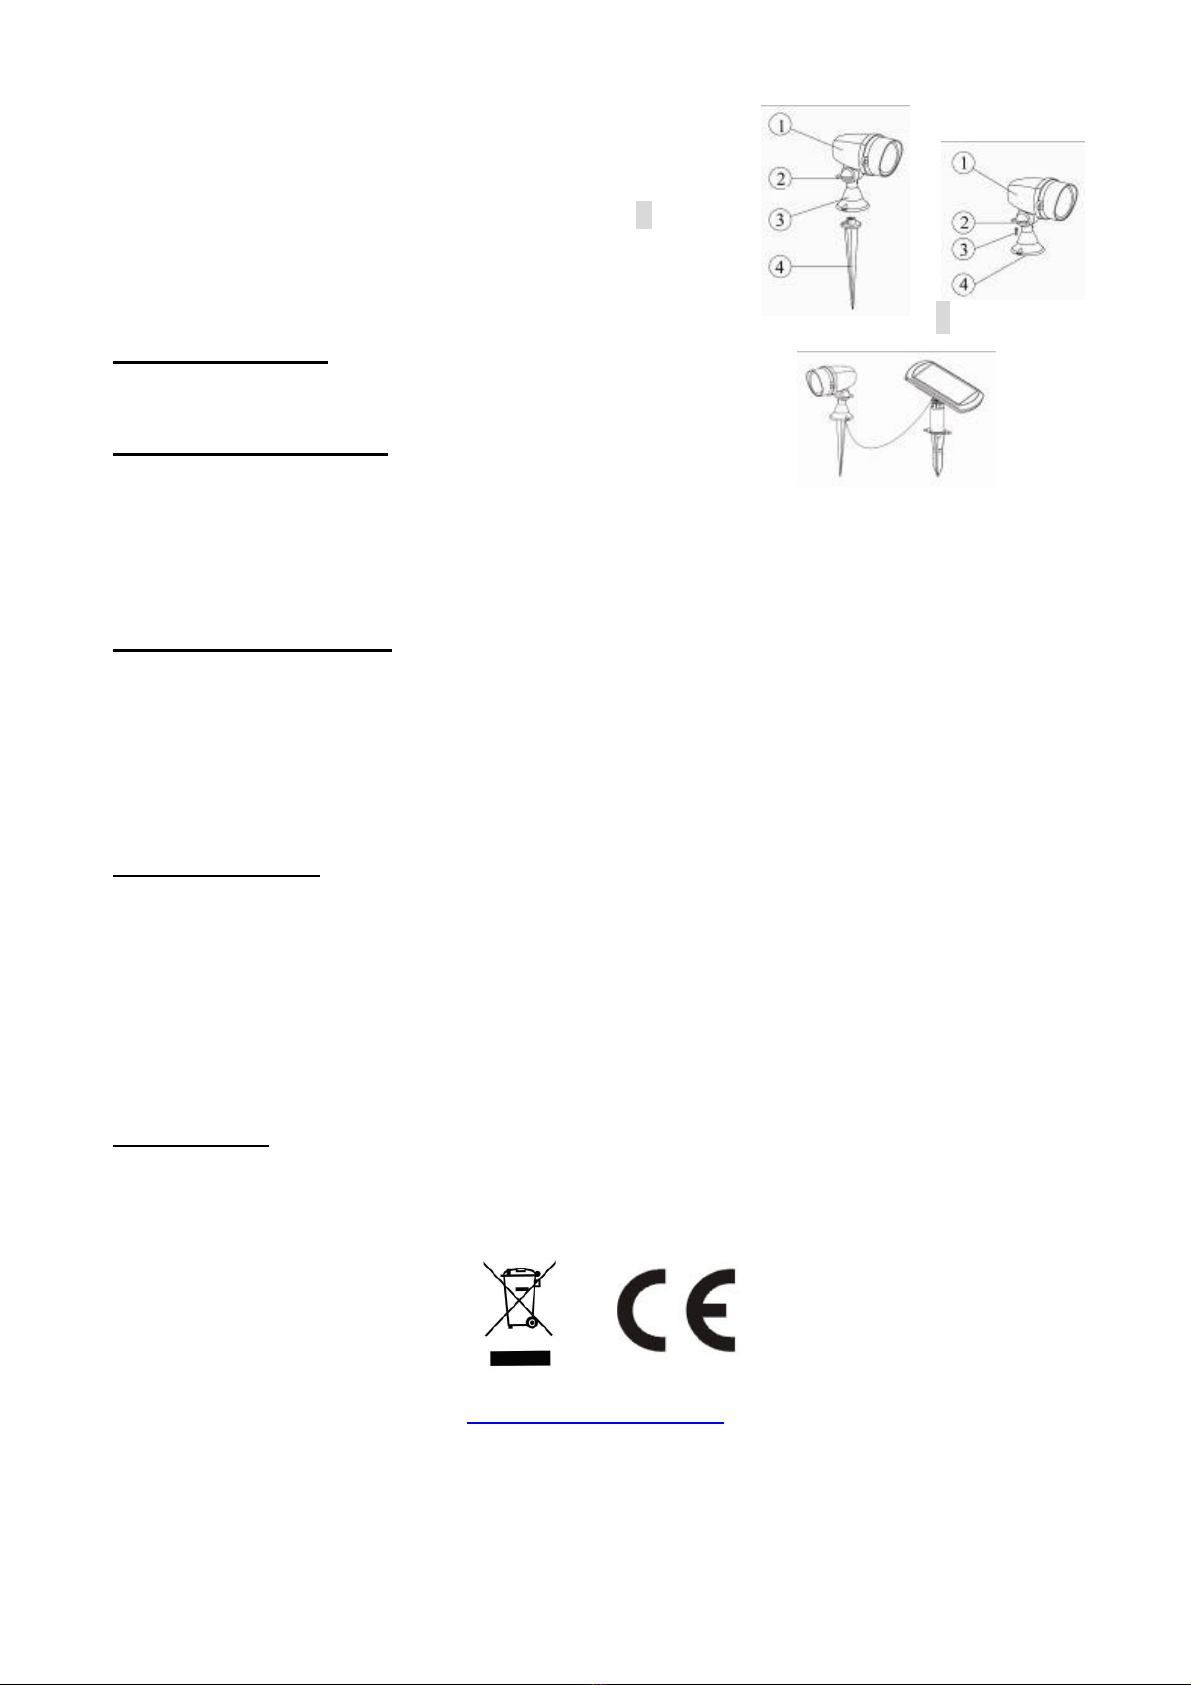
Instrucciones de montaje
Instalación del controlador solar
2
1) Cuidadosamente saque la pieza y todos los accesorios de la caja.
2) Montar los postes (2), y estacas (3); Introducir la estaca directamente en el suelo sin
martillear la lámpara ni la estaca. (Como muestra la figura 2).
3) Encaje cuidadosamente la cabeza del controlador (1) a la parte superior de los postes
montables.
4) Ajustar el interruptor bajo el panel solar a la posición de “AUTO”.
5) Montaje en la pared o tejado mediante tornillos. (Figura 3)
3

Instalación de la lámpara solar
1) Ajustar la lámpara a la dirección preferible
2) Apretar el (2) para fijar la lámpara.
3) Montaje en estaca (figura 4)
4
Montaje en la pared o tejado mediante tornillos (figura 5)
5
Conexión de cables
Introducir el enchufe a la toma del controlador solar.
Operación
1) Para operaciones diarias normales, mueve el interruptor a la posición de “AUTO”, automáticamente se
encenderá durante la noche después de haber estado inicialmente 2 días soleados en carga completa.
2) La función de la lámpara solar variará en cada estación del año. Proporcionará más luz cuando haya tenido un
día entero de sol que en un día nublado.
Cambio de pilas
Para mejores resultados las pilas Ni-MH deberían ser cambiadas cada 12 meses.
1) Abrir el compartimento de las pilas del controlador.
2) Quitar las pilas viejas. Asegúrese de que las nuevas pilas son recargables.
3) Instalar las nuevas pilas en el compartimento, asegurándose de que estén bien colocadas, y volver a tapar el
compartimento.
Problemas de encendido
Si su sistema de iluminación solar para jardín no se enciende al atardecer a pesar de haber observado todas las
instrucciones, por favor intente seguir los siguientes pasos:
1) Asegúrese de que el controlador solar no está siendo afectada por ninguna otra fuente de luz.
2) Asegúrese de que el controlador solar no está bajo la sombra durante el día.
3) Asegúrese de que el interruptor está en la posición de “AUTO”
4) Compruebe que las pilas están colocadas correctamente.
Mantenimiento
Limpie el módulo solar regularmente con un paño húmedo para garantizar un óptimo funcionamiento del panel
solar. No utilice ningún tipo de limpiador y tenga cuidado de no presionar mucho el módulo mientras lo limpia.

-
Instructions Manual –
Introduction
Thank you for purchasing a quality unit. Used carefully and in accordance with the instructions set out below,
your SOLAR GARDEN LIGHT SYSTEM should give you many years of trouble free use. Please read the
instructions carefully to obtain the best results from your purchase.
Your unit features:
•Solar powered by Big size high quality crystalline solar panel
•New Zinc Alloy housing spotlight
•No Mains Power
•Simple wiring
•Water proof design provides longer life in all weather conditions
•Automatic sensor turns the light on at dusk
•3 X Solar Rechargeable Ni-MH batteries (1000mA) included
•1 X light with 5 meters wires, 9 pcs brighter super bright LED
•The light can be put under cover and shade-anywhere as your want.
Location of the SOLAR CONTROLLER
1) For the best result, please locate the solar
controller in a position where it can get direct
sunlight on the solar panel, and generally free
from cover and shade. (As shown in figure 1).
2) Make sure that the photo sensor is not going to
be affected by any other light source. Otherwise the light will not illuminate at dusk.
3) The SOLAR CONTROLLER must be left to charge for 2 sunny days before best results are achieved.
Assembly Instructions
Solar controller installation
2
1) Carefully remove the UNIT and all the fittings out of the box.
2) Assemble the mounting poles (2), and stakes (3); Push the stake directly into the
ground (DO NOT hammer the light or the stakes) (as shown in figure 2).
3) Slot the controller head (1) on the upper part of the mounting poles carefully.
4) Adjust the switch under the solar panel to “AUTO” position.
5) Wall or roof mounted by screws (figure 3)
3

Solar light Instructions
1)
Adjust the suitable direction for lamp (1) 4
2) Tighten the (2) to fix the lamp
3) Spike mounted (figure 4)
4) Wall or roof mounted by screws (figure 4)
5
Wires Connection
Insert plug of spotlight to the sockets on the solar controller.
Operation Instructions
1) For daily / normal operation, turn the switch to the “AUTO” position, it
will automatically turn on during the night time after the initial full 2 sunny days charge.
2) The performance of the SOLAR GARDEN LIGHT SYSTEM will vary with the time of year. It will release
more light when it has had a full day in the sun rather than a day in overcast weather.
Replacing the Batteries
For best results Ni-MH batteries should be replaced every 12 months.
1) Open the batteries chamber cover on the controller.
2) Remove the old batteries. Make sure the new batteries are Ni-MH rechargeable batteries.
3) Install the new batteries in to the battery compartment, ensuring the correct polarity is observed. Recover the
battery chamber.
Trouble Shooting
If your SOLAR GARDEN LIGHT SYSTEM does not come on at dusk despite observance of all the
instructions, please try the following steps:
1) Make sure that the SOLARCONTROLLER is not being affected by any other light source.
2) Ensure the SOLAR CONTROLLER does not stand in the shade during the day.
3) Make sure the switch is in the auto position.
4) Check that the batteries are installed correctly.
Maintenance
Clean the solar module regularly with a damp towel to guarantee optimum performance of the solar panel. Do not
use any type of solvent for cleaning and be careful not to put too much pressure on the module while cleaning.
www.solarjet.it
Table of contents
Languages: