Storage Options Kid Cam User manual


2
CAUTION
RISK OF ELECTRIC SHOCK
DO NOT OPEN
TO REDUCE THE RISK OF ELECTRIC SHOCK,
DO NOT REMOVE THE COVER.
NO USER SERVICABLE PARTS INSIDE.
REFER SERVICING TO QUALIFIED PERSONNEL.
The lightning flash with arrowhead symbol, within an equilateral
triangle, is intended to alert the user to the presence of non-
insulated “dangerous voltage” within the product’s enclosure that
may be of sufficient magnitude to constitute a risk of electric shock.
The exclamation point within an equilateral triangle is intended to
alert the user to the presence of important operating and
maintenance (servicing) instructions in the literature accompanying
the appliance.
WARNING:
TO PREVENT FIRE OR SHOCK HAZARD, DO NOT
EXPOSE THIS UNIT TO RAIN OR MOISTURE
CAUTION:
TO PREVENT ELECTRIC SHOCK, ENSURE THE PLUG
IS FULLY INSERTED INTO A MAINS SOCKET

3
WARRANTY AND TECHNICAL SUPPORT
Support:
www.storageoptions.com/support/
Warranty:
www.storageoptions.com/warranty/
TABLE OF CONTENTS
OVERVIEW
4
PACKAGE CONTENTS
4
FEATURES
5
3.1 –Camera
3.2 –Monitor
5
6
DEVICE ASSEMBLY
7
4.1 –Camera
4.2 –Monitor
7
7
POWERING ON
8
5.1 –Camera
5.2 –Monitor
8
8
PAIRING THE UNITS
8
CHARGING BATTERIES
9
SWITCHING DISPLAY MODES
9
ON-SCREEN INDICATORS
10
9.1 –Signal Condition
9.2 –Speaker Level
9.3 –Display Mode Indicator
9.4 –Camera Indicator
9.5 –Battery Meter
10
10
10
10
10
ATTACHING TO A FLAT SURFACE
11
DESKTOP USE
11
PRODUCT SPECIFICATION
12

4
OVERVIEW
kidCam offers a simple and versatile method of seeing and hearing your children across the home and garden. Two
compact wireless cameras transmit a clear, full colour picture (and sound) to a portable wireless screen from which
the footage of both cameras can be viewed. Both cameras incorporate night vision, so they can be used in the dark
to keep an eye on sleeping babies and children.
A car adapter kit is also available separately to allow use within a vehicle whilst driving. No more looking over your
shoulder to see what the kids are up to whilst driving!
100% digital car baby monitor kit
Interference-free wireless transmission
4.3” colour LCD screen
Infra-red night vision
High sensitivity microphone
PACKAGE CONTENTS
Check the contents of your Kid Cam package against this checklist. If anything is missing or damaged, please do not
use the system, and inform your supplier as soon as possible.
4.3” wireless LCD baby monitor
2 x wireless camera
Stand for monitor
2x stands for cameras
2x suction cup mounting bracket for camera
3x mains adapters
Instruction manual
5
FEATURES
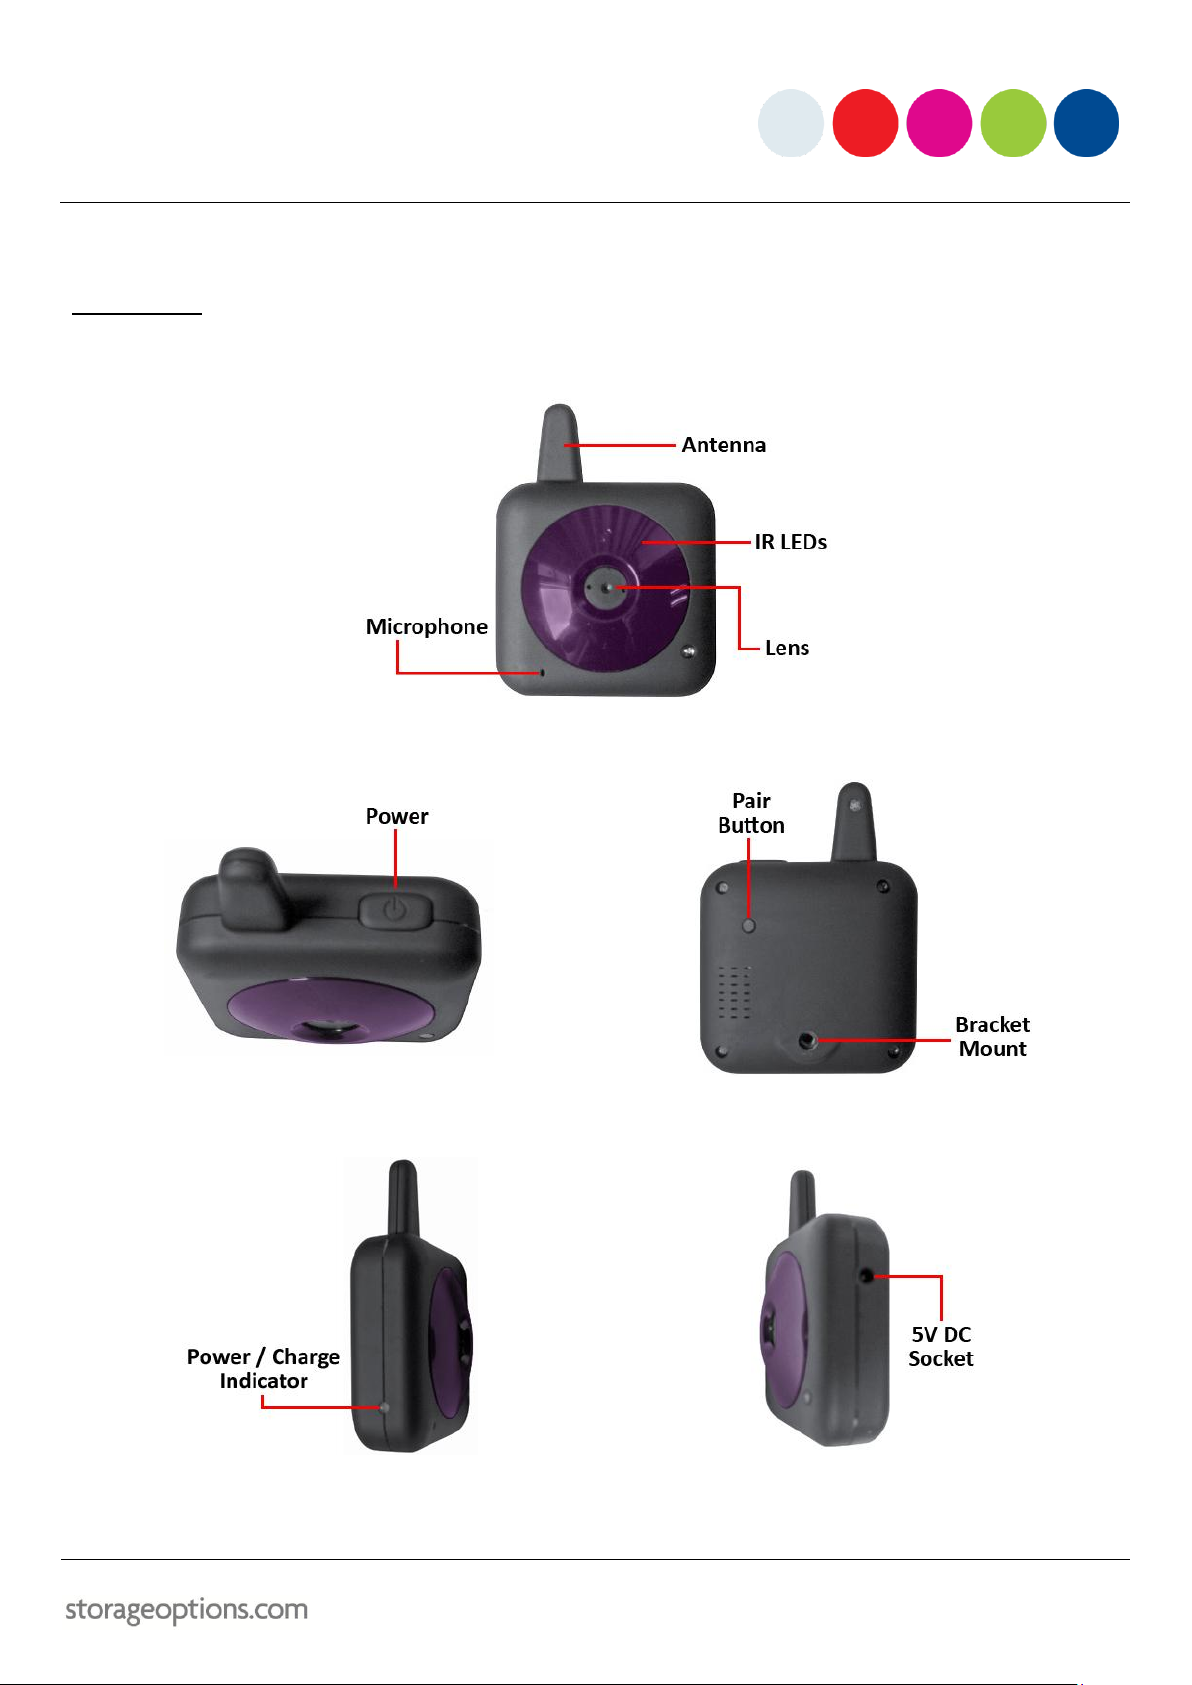
3.1 –CAMERA
The camera has various features you should be familiar with for correct operation.
The POWER button is located on top of the camera, next to the aerial, and the PAIR button is located on the back:
The power socket and charge indicator are on opposite sides of the camera:

6
3.2 –MONITOR
The monitor has various features you should be familiar with for correct operation.
The POWER button is located on top of the monitor, and the speaker is on the back:
NOTE
Once the monitor is powered on, the POWER button can be used to switch between camera feeds. For
more information, see section “Switching Display Modes” (page 9).
The speaker allows the user to hear audio detected by the camera’s built-in microphone. You can adjust the speaker
volume by pressing the + / –buttons.

7
DEVICE ASSEMBLY
4.1 –CAMERA
To assemble the camera and mount:
1. Locate the fixing hole on the back of the camera. The smaller mounting bracket (black and silver design) is
designed for the camera.
2. Screw the camera onto the bracket, then tighten the rubber seal to it (middle image below).
3. To alter the camera angle, loosen the bolt and position the camera as required, then re-tighten the bolt.
4.2 –MONITOR
To assemble the monitor and mount:
1. Locate the two mount holes on the bottom of the monitor and align with the two pegs on the bracket.
2. Slot the monitor onto the pegs, then clip the locking lever into place to secure the monitor in the bracket.
3. To alter the monitor angle, simply move it to the required position.

8
POWERING ON
5.1 –CAMERA
To turn the camera on:
Press and hold the power key for 5 seconds.
The indicator LED will turn green.
To turn the camera off:
Press and hold the power key for 5 seconds.
The indicator LED will switch off.
5.2 –MONITOR
To turn the monitor on:
Press and hold the power key for 3 seconds.
The indicator LED will turn green.
To turn the monitor off:
Press and hold the power key for 3 seconds.
The indicator LED will switch off.
PAIRING THE UNITS
The cameras are paired to the monitor in the factory, but if for some reason they become unpaired (e.g. prolonged
period of no signal), you may need to re-pair the units.
To pair the camera and monitor:
1. Turn the monitor on, and select the video channel you wish to pair (i.e. 1 or 2). For more information, see
section “Switching Display Modes” (page 9).
2. Use a pin or similar pointed object to press the PAIR button. The power indicator LED will flash to show the
monitor is in pairing mode.
3. Press the PAIR key on the camera. When successful, the monitor’s LED will stop flashing and the video feed
will appear on screen.
4. Follow the same procedure to pair the second camera, but this time select the other video channel first.

9
CHARGING BATTERIES
1. Connect a mains adapter to each of the cameras via the 5V DC sockets.
2. Connect a mains adapter to the monitor via the 5V DC sockets.
3. Connect each adapter to a mains socket.
While recharging, the LED indicator will be red.
When fully recharged, the LED indicator will turn green.
SWITCHING DISPLAY MODES
1. Switch both cameras and the monitor on. You will be presented with an image from camera 1.
2. Press the POWER button to cycle through the 3 different display modes:
Camera 1
The camera number is displayed in the top left corner of the screen. In
the top right, just next to the battery indicator, there will be an icon which
indicates the current view mode.
Press POWER to switch to the next mode.
Camera 2
The camera number is displayed in the top left corner of the screen. In
the top right, just next to the battery indicator, there will be an icon which
indicates the current view mode.
Press POWER to switch to the next mode.
Both Cameras
The cameras are presented in a split-screen mode, with camera 1 on the
left and camera 2 on the right. In the top right of the screen, the icon will
change to indicate dual view mode.
Press POWER to cycle the display mode to Camera 1.

10
ON-SCREEN INDICATORS
The monitor unit features several on-screen indicators for device status. Refer to the following descriptions for
more information.
9.1 –SIGNAL CONDITION
INDICATOR
DESCRIPTION
Good signal
Weak signal
No signal
9.2 –SPEAKER LEVEL
INDICATOR
DESCRIPTION
Maximum volume
50% volume
Mute
9.3 –DISPLAY MODE INDICATOR
INDICATOR
DESCRIPTION
1 or 2: Single camera display
Split-screen display
9.4 –CAMERA INDICATOR
INDICATOR
DESCRIPTION
Displaying feed from camera 1
Displaying feed from camera 2
9.5 –BATTERY METER
INDICATOR
DESCRIPTION
Battery is full
Battery is half empty
Battery needs recharging
11
ATTACHING TO A FLAT SURFACE
The monitor and cameras can be attached to a completely smooth surface such as a window, mirror, or worktop.
To mount on a flat surface:
Place the suction cup on the surface and push the locking lever down
to secure it in place.
You can rotate the bracket through 360oto help in finding a suitable
position.
Slide the monitor onto the mount point.
The monitor can be tilted forward or backward to the required
position.
CAUTION
If the surface is not completely smooth, the vacuum may not hold the monitor or cameras properly.
Test to ensure the vacuum has created a solid grip before attaching the device to the bracket.
To remove from a flat surface:
Flip the locking lever into the unlocked position to release the grip.
There may still be a vacuum between the bracket and window. If this
occurs, gently pull the rubber tab until the seal is broken.
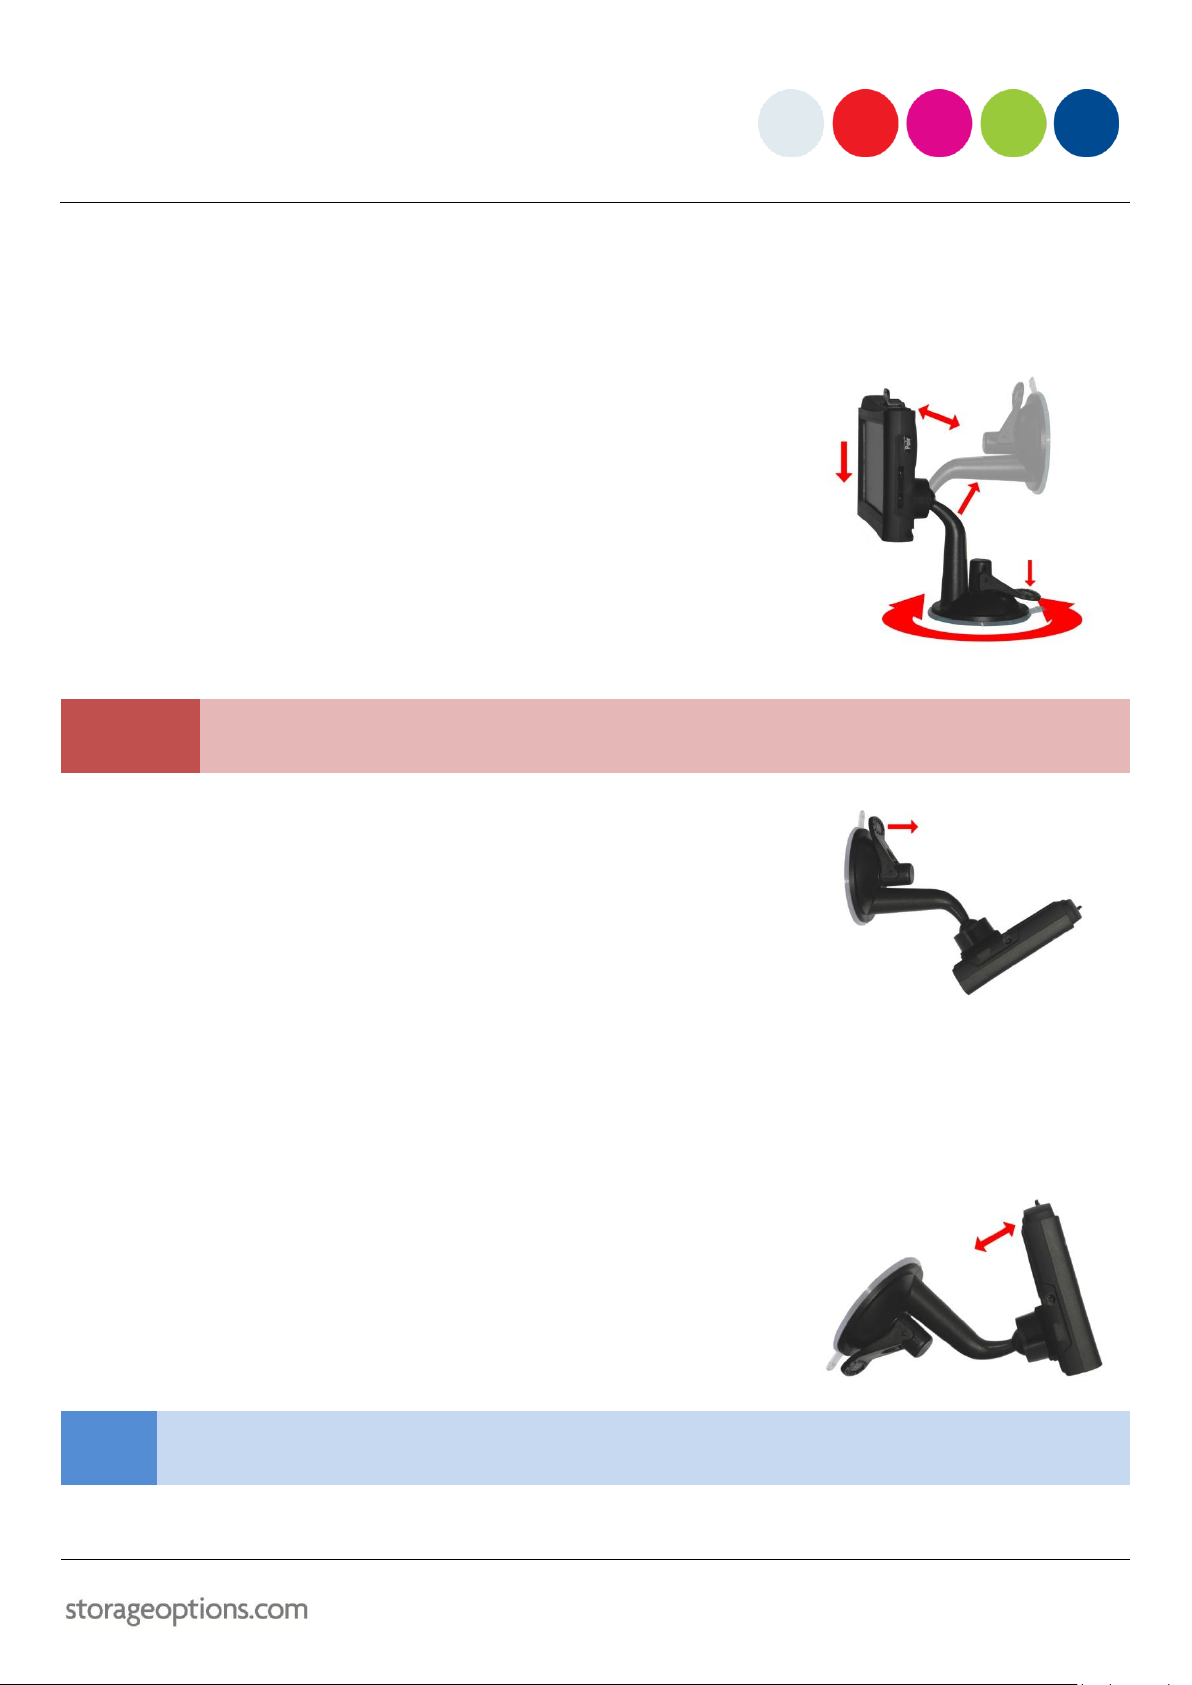
DESKTOP USE
The monitor can be placed on a desktop surface, without having to use the suction cup.
To position on a flat desktop surface:
Adjust the mounting arm into the position shown in the picture (right).
The monitor can be tilted forward or backward in this position.
NOTE
Use the bracket in this position if you are unsure whether another surface is suitable for use with the
suction cup.

12
PRODUCT SPECIFICATION
Kid Cam Kit
Transmission Frequency:
2400MHz –2480MHz
Transmission Power:
17dBM
Operating Frequency:
2450MHz
Unobstructed Effective Range:
100m (approx.)
Modulation Mode:
FHSS
Operating Temperature:
0oC –60oC
Storage Temperature:
25oC
Operating Humidity:
20% –80% RH
Receiving Sensitivity:
-85dBM
Battery Life:
4 hours (approx.)
Power Consumption:
150mA + 15mA
Power Supply:
DC 5V
Display Type:
4.3” TFT LCD

13
NOTES

14
NOTES

15
OTHER PRODUCTS IN THE STORAGE OPTIONS RANGE

16
This manual suits for next models
1
Table of contents
Other Storage Options Baby Monitor manuals


