Procare Apnea Monitor User manual
Page 1 of 12
Apnea Monitor Instructions
4215 Credit Union Dr.
Anchorage, AK 99503
907-274-0770
915 30th Avenue
Fairbanks, AK 99701
907-458-8912
35563 Kenai Spur Hwy
Soldotna, AK 99669
907-260-4433
901 N Leatherleaf Lp.
Wasilla, AK 99654
907-357-7882

Page 2 of 12
Apnea Monitor General Information
Your physician has prescribed an apnea monitor for your child. The apnea monitor should be used only as your
physician prescribes. If your physician prescribes different settings (Heart Rate or Caffeine Level) or discontinues
your apnea monitor, it is your responsibility to notify Procare Home Medical at 1-877-274-0770. A written
physician order must be obtained by Procare Home Medical for any changes regarding your apnea monitor. The
apnea monitor can be dangerous if misused.
What is the Purpose of the Apnea Monitor
An apnea Monitor is designed to monitor and record your baby’s breathing and heart activity. The monitor alerts
you if either of these activities exceeds the limit prescribed by your physician. Patient alarm limits are prescribed
by your physician and set by the Procare Home Medical before the Apnea monitor is delivered. During
monitoring, when the baby's breathing effort and heart activity are not within these set boundaries, an indicator
light comes on and an alarm sounds.
Generally, the monitor is used till the baby has gone two (2) full months without a “true alarm. Downloads are
required to confirm the type of event.
General Precautions
Read the Apnea Monitor instructions provided. If you have a question concerning the operation,
maintenance or safety of the apnea monitor, please call Procare Home Medical at 1-877-274-0770.
Use this product only for its intended purpose. Do not stop using the equipment until directed by your
physician.
Baby should be monitored every time they are in a vehicle, bus, train or airplane. Most events occur
during sleep.
Baby should not sleep with parents and/or siblings. The monitor may detect the body movements of the
parents and/or sibling and not alarm correctly.
The apnea monitor may not be able to detect all episodes of inadequate breathing. If a baby has apnea
due to choking (obstructive apnea) or seizures, the monitor could mistake movement caused by choking
for breathing.
The apnea monitor is a monitoring device only. It does not prevent the loss of breathing or heart activity,
nor will it restore breathing or heart activity. It will not prevent death.
Anyone using the apnea monitor should be trained in CPR.
Keep the apnea monitor at least three (3) feet away from oxygen and flammable gases to prevent a fire.
Do not place the apnea monitor in the crib.
Do not allow the patient cable, lead wires or power cords to become tangled, coiled, crossed, or wrapped
around the baby’s neck, arms or legs. This could result in strangulation.
Never use the apnea monitor when bathing you baby.
Be aware that signal interference can occur from external sources.
oKeep the apnea monitor at least three (3) feet away from electronic devices i.e. TV, electric
blankets, microwave or cellular/cordless phones.
oAvoid fabrics and rugs that may cause static electricity. Touching a grounded path (wall or crib)
will prevent static build up.
oAvoid transmitter signals i.e. TV, radio police fire and ambulance stations. The monitor may pick
up the signal as a breath or heart signals.
oIf monitoring two or more infants in the same area, keep the monitor, patient, patient cables and
lead wires at least three (3) feet apart.
Use only supplies designed for your apnea monitor.
Keep power cord away from heated surfaces.
If you live in an area that has frequent power outages, it is recommended that you have a backup
generator on hand.
Never operate equipment if:
1. It has a damaged cord.
Page 3 of 12
2. It is not properly working.
3. It has been dropped or damaged.
4. It has been dropped into water.
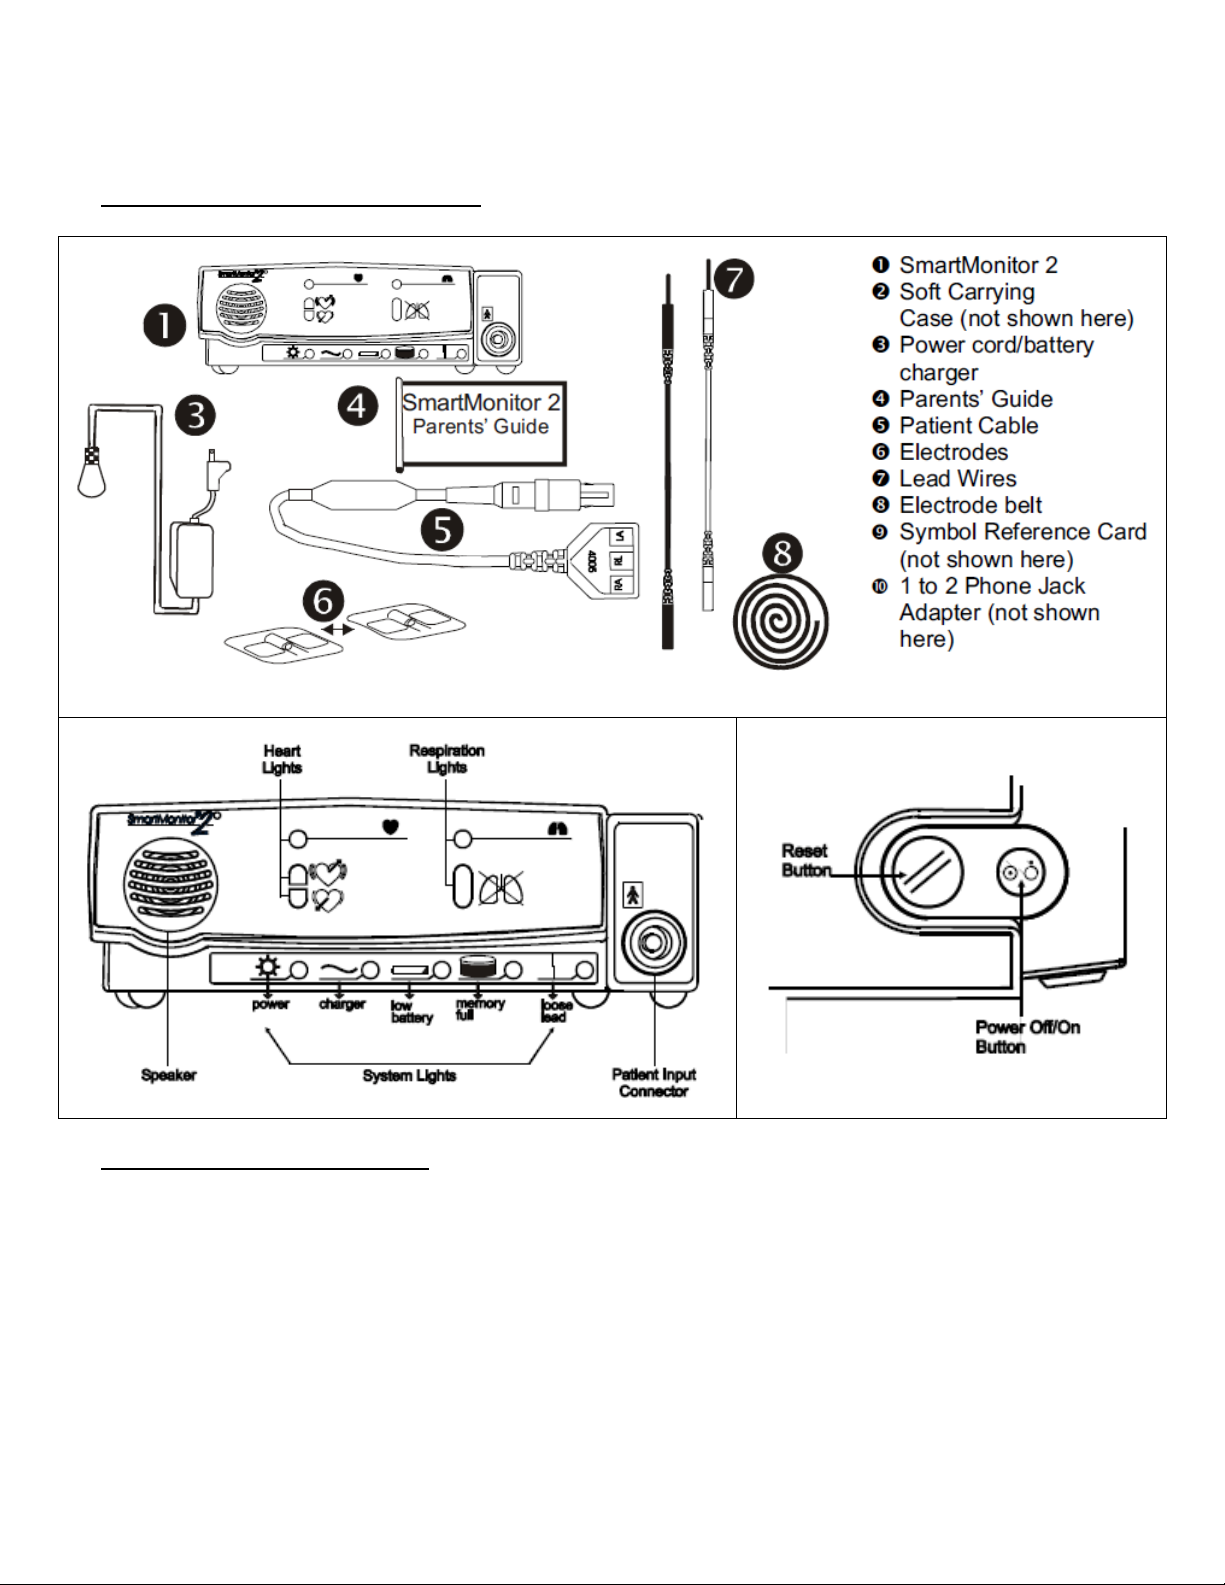
Important Parts of the Apnea Monitor
Placement of the Apnea Monitor
1. Set the apnea monitor on a clean flat surface.
Ensure the speaker is not blocked.
To avoid interference, keep the apnea monitor at least three (3) feet away from electronic devices i.e.
TV, electric blankets, microwave or cellular/cordless phones.
Make sure the monitor is close enough to connect to the baby comfortably.
2. Testing the Alarm
Turn the monitor on (without the baby attached) to sound the alarm. Make sure you can hear the
alarm in different areas of your home.

Page 4 of 12
Apnea Monitor Operation
Step 1: Connect the Patient Cable to the Apnea Monitor.
Insert the round end of the patient cable into the
patient connector on the front of the apnea monitor.
Line up the notch on the connector and push until you
feel the connector snap into place.
Note: to remove the patient cable, grasp at the base
and gently pull back. Do not pull the cable.
Step 2: Connect the Lead Wires to the Patient Cable.
The larger end of the patient cable has three openings,
marked LA (black), RL (green), and RA (white).
Take the white lead wire and insert it into the opening
marked RA.
Take the black lead wire and insert it into the opening
marked LA.
Firmly push each lead wire in until the socket snaps into
place.
Note: to remove a lead wire, grasp and pull at the strain
relief area located near the connecting tip. Do not grasp
the wire.
Step 3: Connect the Lead Wires to the Electrodes.
Insert the black LA lead wire into one electrode.
Insert the white RA lead wire into the other electrode.
Make sure the metal tips of the lead wires are fully
inserted into the electrodes.
Step 4: Attach the Electrodes to the Infant Belt.
Place the electrode belt on a flat surface.
Lay the baby on the belt so the belt is aligned with the
baby’s nipples.
Place the electrodes, Velcro-side down, on either side
of the belt as follows:
Place the electrode with the white lead wire on the
baby’s right side.
Place the electrode with the black lead wire on the
baby’s left side.
Place the electrodes far enough apart so that when the
belt is wrapped around the baby, the electrode will be
located along the mid-line of the side just below or
lined up with the nipples.
Be sure the lead wires and patient cable are leading
down and away from the baby's face and neck
Note: if the skin is unusually dry add a few drops of
moisture (water) to the baby’s skin prior to electrode
placement.

Page 5 of 12
Step 5: Wrap the Electrode Belt around the Baby.
Wrap the belt around the baby’s chest and fasten it
with the white velcro tab.
The belt should be snug enough so that you can only
insert two of your fingers (with your hand lying flat
against baby) between the belt and the baby.
Note: With newborns and very small babies, you may
need to shorten the belt by cutting off a part of it. Be
sure to leave enough room to fasten the belt securely.
Disposable Self Adhesive Electrodes
Follow the steps below if you are using disposable electrodes.
Attach lead wire to the Self Adhesive Electrodes if not pre-attached.
Ensure the infant’s skin is clean and dry.
Place the electrode with the white lead wire on the baby’s right side, along the mid-line of the side, two
finger widths below or lined up with nipples.
Place the electrode with the black lead wire on the baby’s left side, along the mid-line of the side, two
finger widths below or lined up with nipples.
An electrode belt is not needed when using disposable electrodes.
Note: Do not use oils, lotion, or powder on the area of skin that the electrodes will be placed.
Step 6: Connect the Power Cord/Battery Charger.
Insert the round connector of the power cord/battery
charger into the socket on the back panel of the apnea
monitor.
Push until the connector is fully inserted into place.
Then plug the power cord/battery charger into a power
outlet. The green charger light on the monitor will now
come on.
Note: When the apnea monitor is not operating on
battery power it should be plugged into an AC outlet.
The battery cannot be overcharged. The green charger
light stays on as long as the charger is connected.
Step 7: Turning the Apnea Monitor On
Push the POWER button.
The apnea monitor performs a system check. The lights on the front of the apnea monitor and the alarm
come on briefly. Within 10 seconds, the green respiration, and heart lights begin to blink. If the lights do
not blink, check that you have attached the electrode belt properly to the baby and that lead wires are
pushed in, and that cables are connected.
Once the baby is properly connected to the apnea monitor and the power is on:
oThe green (battery) charger light is on.
oThe green power light is on.
oThe green respiration light and the green heart light are blinking.
oAll other lights should be off.
Turning the Apnea Monitor Off
The apnea monitor has a built-in safety feature called a sibling alarm. If the monitor is not turned off in a specific
sequence, the green power light will remain on and the alarm will sound continuously. This safety feature makes
sure the power is not accidentally turned off. To turn the apnea monitor off:
Press and hold the blue RESET button.
Press and release the gray POWER button.
Wait 2 seconds, and then release the blue RESET button.
Page 6 of 12
When the apnea monitor is turned off without pushing the RESET button first, the green power light will remain
on and the Sibling Alarm will sound. To silence the Sibling Alarm:
Press and hold the blue RESET button.
Press and release the gray POWER button.
Wait 2 seconds, and then release the RESET button.
To resume monitoring, press the gray POWER button.
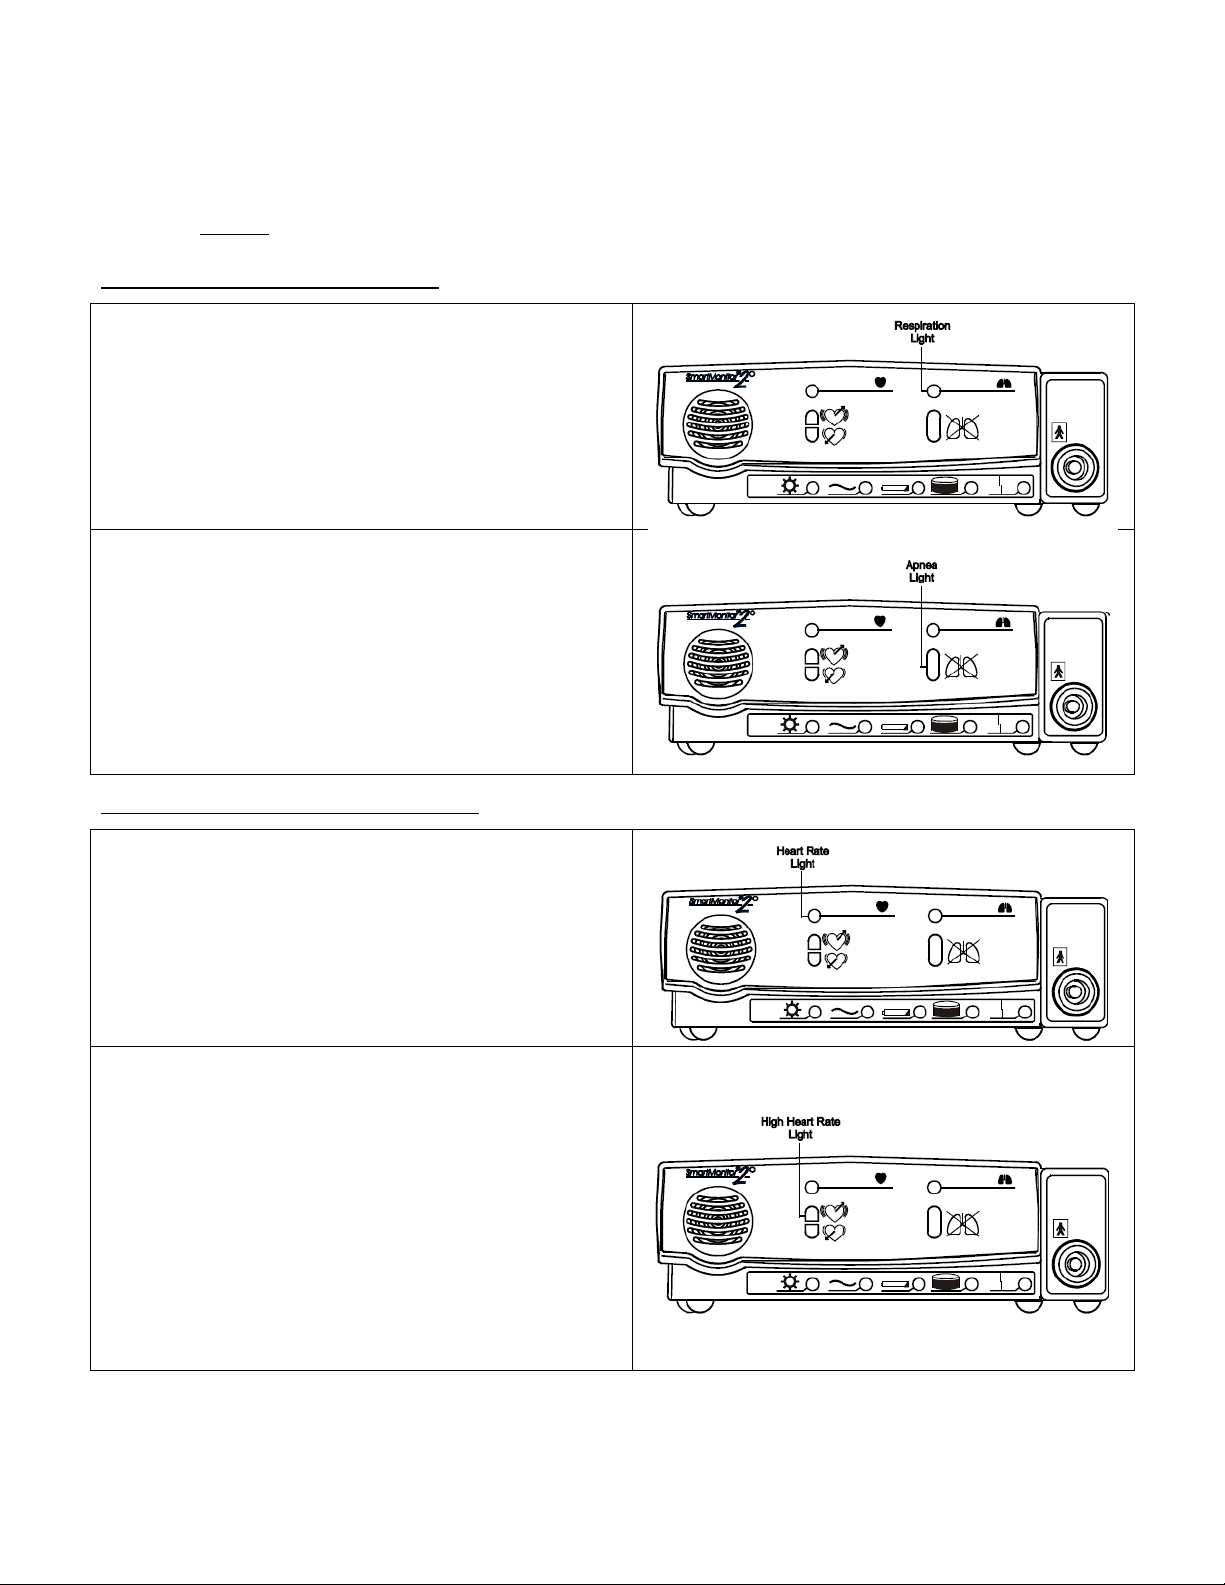
Monitoring Your Baby’s Breathing
Respiration Light
The green respiration light will blink in rhythm
with each breath that the apnea monitor detects.
The light should blink only once for each breath,
although it may flash more times when the baby
is moving.
Apnea Light
When the apnea monitor detects a pause in
breathing longer than the limit set by the
physician the following will occur.
The red apnea light will come on and the alarm
will beep once every second. When the apnea
monitor detects breathing again, the beeping
alarm stops. The red light will stay on until you
press the RESET button.
Monitoring Your Baby’s Heart Activity
Heart Rate Light
The green light marked with a heart blinks with
each heartbeat the apnea monitor detects.
High Heart Rate Light
When apnea monitor determines that the baby’s
heart rate is higher than the limit set by the
physician. The monitor will alert you by the
following:
oThe red light marked high heart rate will
come on and the alarm beeps twice each
second.
oThe beeping alarm stops when the condition
no longer exists.
oThe red light stays on until you press the blue
RESET button.

Page 7 of 12
Low Heart Rate Light
When the apnea monitor determines that the
baby’s heart rate is lower than the limit set by the
physician the following will happen:
oThe red light marked low heart rate will come
on.
oThe alarm beeps once every second.
oThe beeping alarm stops when the condition
no longer exists.
oThe red light stays on until you press the blue
RESET button.
Alarms
Patient Alarms
oApnea - Baby has stopped breathing for longer than the prescribed limit.
oLow Heart - Heart Rate is lower than the prescribed limit.
oHigh Heart - Heart Rate is higher than the prescribed limit.
System Alarms
oLoose Lead –An electrode, cable, or lead wire connection is loose at one of the plu in ports or the
electrodes are not making good contact with the patient’s skin.
oLow Battery –Battery power is low and needs to be charged.
oMemory Full (or Memory Almost Full) –Memory is full and needs to be downloaded.
oAccidental Power Off
oInternal System Error
Note: The blue RESET button resets the alarm lights on the apnea monitor. It will also silence the memory
full and low battery alarms. The RESET button will not silence patient or loose lead alarms
If an Alarm Sounds
If an alarm sounds while you are monitoring your baby, check your baby first. Check the baby’s skin color and
breathing. Then follow the instructions below.
Light
Alarms
Check Baby’s
Condition
Respond Like This
Red Apnea
and/or Low
Heart
Intermittent
(1 beep/sec.)
Skin color is pale or
blue. Baby is not
breathing or is
choking.
Respond as instructed by the physician or in your CPR
class.
An example of your response could be as follows:
Gently pat the baby. The baby may start
breathing and correct the cause of the alarm
on his/her own.
If the baby does not start breathing start
physical stimulation immediately.
If the baby starts breathing and corrects the
cause of the alarm, note it on your log sheet.
Press the RESET button to reset any alarm
lights.
Red Apnea
and/or Low
(Heart)
Intermittent
(1 beep/sec.)
Baby is breathing and
is responsive.
Color is good.
Wait for a few seconds. Watch to see if the
baby’s breathing and color remain normal.
If alarm continues, refer to electrode
placement in the operation section.
Check the monitor to see which light is on.
Note it on your log sheet.
Red High
(Heart)
Intermittent
(2 beeps/sec.)
Baby is crying.
If the baby has frequent high heart rate
alarms not associated with crying please

Page 8 of 12
notify the physician.
Red Loose
Lead
Continuous
Baby is breathing and
is responsive.
Color is good.
Check the connections between the
electrodes lead wires, patient cable, and the
monitor.
If something has come loose, reconnect it
and press the RESET button. The alarm
should stop.
If alarm continues to sound perform a
Functional Self-Test.
Red Loose
Lead
Continuous
Baby is breathing and
is responsive.
Color is good.
If the monitor passed the Functional Self-Test, turn
off the monitor. Then, check the following items:
The electrodes –They should be clean and
there should be no cracks on the surface.
The baby’s skin –Make sure that where the
electrodes are placed is clean and free from
oil, lotions, perspiration.
The electrode belt –Make sure it is snug and
is keeping the electrodes in place.
Note: The RESET button will not silence patient or loose lead alarms.
If This Light
Is On
And This Condition Exists
It Means...
Power
Continuous green light, no
alarm.
Normal Operation. The green power indicator light will come on
and stay on for as long as the monitor is on.
Charger
Continuous green light, no
alarm.
Normal Operation. The green charger light will come on and stay
on while the battery charger is plugged into an active outlet and
connected to the apnea monitor.
Low Battery
Flashing yellow light,
continuous alarm.
Continuous yellow light,
continuous alarm.
This is a warning that the battery voltage is very low and should
be recharged soon. Press the RESET button to temporarily
silence the alarm. The alarm will resound in two (2) minutes if
the monitor has not been plugged in. The yellow light will
continue to flash.
This is a warning that the battery is too low for the apnea
monitor to operate properly. The apnea monitor must be
recharged. Turn the monitor off. Then, recharge the battery.
Note: If you do not recharge the battery, the system will
automatically shut down.
Memory Full
Flashing yellow light,
continuous alarm
When the apnea monitor’s Memory Almost full parameter is
reached, the Memory Full light will flash. The alarm will sound
continuously. The alarm will sound only if programed to do so at
the 50% full or at 80% full. Press the RESET button to silence the
alarm. The light will blink every second.
Memory full is a warning condition. You can continue
monitoring. The caregiver should contact Procare Home Medical
to schedule a download. This will resolve the alarm.
Memory Full
Continuous yellow light,
continuous alarm
Apnea monitor memory is 100% full. Press the RESET button to
silence the alarm. The alarm will sound if programed to do so.
The light will stay on continuously. The caregiver should contact
Procare Home Medical to schedule a download. This will resolve
the alarm.

Page 9 of 12
Loose Lead
Continuous yellow light and
continuous alarm
The yellow loose lead light and the alarm may sound
continuously when there is a problem with any of the following:
Lead wires
Electrodes
Electrode Belt
Patient Cable, or
Connections between the baby’s skin and the electrodes,
the lead wires, the patient cable, and the apnea monitor.
Loose Lead
Continuous yellow light and
no alarm
If you correct the problem, the alarm will stop. However, the
yellow light remains on until you press the RESET button.
Power
Continuous green light,
continuous alarm, with no
other lights lit.
Check the display for error messages. If no error messages are
displayed, the apnea monitor was turned off improperly causing
a sibling alarm. To resolve:
Press and hold the blue RESET button.
Press and release the gray POWER button.
Wait two (2) seconds then release the RESET button.
All
All lights are blinking and the
alarm will come on for 3
seconds and then off for 1
second.
Check the display for error messages. If there is an error
message, enter it on your log sheet.
Turn the monitor off and then back on. If the monitor functions
normally continue to use the monitor.
Cleaning
Apnea Monitor
Wipe the apnea monitor with a damp cloth if necessary.
Electrodes
Do not clean the disposable electrodes.
Clean the carbon electrodes with a mild soap and water.
Rinse well. Note: Soap film can affect signal strength.
Ensure the electrodes are completely dry before using.
Functional Self-Test & Maintenance
The apnea monitor functional self-test verifies that all the features of the unit are functioning properly. A
functional self-test should be performed at least once a week or according to the instructions given by the health
care professional. A test should also be performed:
After a lead wire is changed.
After the patient cable is changed.
To perform the functional self-test.
Insert the patient cable into the socket located on the front of the monitor.
Connect the lead wires to the patient cable. Insert the white lead wire into the opening labeled RA.
Insert the black lead wire into the opening labeled LA.
Connect the lead wires to the functional self-test socket on the side panel of the apnea monitor.
Insert the white lead wire into the RA opening and then the black lead wire into the LA opening.
Turn on the monitor. You will hear a short beep and the lights on the front come on briefly then go off.
After all the alarm lights go out, the green power and charger lights remain on and the green heart and
respiration lights are blinking.
The heart and respiration lights continue to blink for approximately 30 seconds.
When the green lights stop blinking, the red low heart light will come on within approximately 7 seconds
and the alarm beeps once every second.

Page 10 of 12
Next, the red apnea light comes on (the amount of time before the red apnea light comes on is
determined by the Apnea Delay parameter selected at the time the monitor was set-up) and the low
(heart) light remains on. (There should be no green heart or respiration light flashes during this time).
Remove the lead wires from the functional self-test socket.
The loose lead light will come on, and the alarm changes from beeping to continuous. This lets you know
the apnea monitor, patient cable, and lead wires are working properly.
Turn the monitor off.
Press and hold the blue RESET button.
Press and release the gray POWER button.
Wait 2 seconds, and then release the RESET button.
Battery
The battery will charge anytime the apnea monitor is plugged in.
Battery requires six (6) hours to fully charge.
A fully charged battery will supply approximately 15 hours of backup power.
Follow-Up & Memory Download
We provide follow-up services 72 hours after set-up and every month thereafter until the apnea monitor is
discontinued by the physician. The apnea monitor should be downloaded monthly and or when the memory is
full. Please contact Procare Home Medical to schedule for the apnea monitor to be downloaded.
Out of Service Area Downloads
If you live outside of our primary service area, we will need to perform downloads by shipping you a
replacement unit. To accomplish this we use Alaska Air Lines Goldstreak and ERA offices. Below is a summary
of the replacement process.
1. Call Procare when the memory is full or as you physician has requested.
2. A Goldstreak or ERA office will call you when the package arrives.
3. Take the new monitor out of the box and place it on you baby. The apnea monitor will be preset.
4. Place the old monitor in the new monitor box
5. Give the pre-written slip to the office agent.
Use the slip provided.
Ensure your baby’s name is listed as the shipper.
Ensure your name is on the invoice the agent gives back to you.
6. Please ensure that the apnea monitor is returned within three (3) days. Failure to return the apnea
monitor will result in the equipment being charged to you.
24-Hour Emergency Service
If the unit fails and you cannot correct the problem or if you have questions concerning the operation,
maintenance or safety of your machine, you may call our office at 1-877-274-0770, ask for the Procare
person on call, the on-call person will return your call as soon as possible.
Procare Home Medical has trained representatives able to assist you with questions or trouble-shooting
your equipment. The goal is to restore your apnea monitor as quickly as possible.
Note: If you have started CPR and/or need emergency services call 911.

Page 11 of 12
Name D.O.B.
Date
Time
Apnea
Heart
Slow
Simulation
Required
(Y/N)
Color Change
(Y/N)
Feeding
Related
(Y/N)
Comments

Page 12 of 12
713 Northway Dr. : Anchorage, AK 99508 : Phone: 907-274-0770 : Fax: 907-274-0773
To Whom It May Concern,
This infant has been prescribed an apnea monitor by his/her physician. This equipment
monitors the infant for two potential life threatening events: apnea, a respiratory
disorder and bradycardia. These events, either occurring together or separately, could
endanger the health of this infant if not detected.
Due to the computer and memory components of this monitor, we ask that the
equipment not be exposed to an x-ray machine or magnetic wand. Exposure to such
equipment could erase this patient’s necessary data and parameters that the physician
has prescribed. We also ask that the monitor be kept with the infant and caregiver
while in the passenger section of the airplane.
This equipment DOES NOT emit or receive any type of signal that would interfere with
aircraft instrumentation. It only records the heartbeat and respiration of the infant and
must be kept on at ALL TIME’s.
If not monitored, this infant could be fatally or seriously harmed.
We have many children that fly successfully with an apnea monitor all over Alaska.
Please feel free to contact our clinical team with any questions or concerns you might
have.
Thank you for your support and consideration.
Sincerely,
Procare Home Medical


