Store It Cold CoolBot PRO Instructions for use

WWW.STOREITCOLD.COM
SUPPORT@STOREITCOLD.COM
1
2019 © Store It Cold, LLC. Rev 2019-04A All Rights Reserved.
COOLER CONSTRUCTION GUIDE
DIY 8’ X 8’ WALK-IN COOLER

WWW.STOREITCOLD.COM
SUPPORT@STOREITCOLD.COM
2
2019 © Store It Cold, LLC. Rev 2019-04A All Rights Reserved.
DISCLAIMER
Store It Cold, LLC. is here to help and assist the DIYer. All information/advice is free to use. The
information/advice is for general guidance only and whilst every effort is made to ensure that it is
correct, it should not be relied upon as accurate. The information/advice contained within this
document is intended for persons of no less than 18 years of age. Use of the information/advice
contained within this document is at your own risk. It is the sole responsibility of any person(s) using the
information/advice contained within this document that their level of competence is appropriate for the
task they want to complete. All users of information/advice contained within this document should have
all work checked/tested by a professional qualified trades person where applicable.
You should be aware of current Local Regulations on buildings, gas, water and electrical works (i.e.
Part P), if you have any doubts, we would advise you to research further information or contact the
appropriate professional body.
LIABILITY
Store It Cold, LLC. and individuals associated with the document through ownership and contribution
will not accept any liability for any loss, damage, injury or negligence direct or indirect from use of the
information/advice contained within this document. Any dispute arising from use of this document or
disclaimer will be decided by the US courts under the relevant US law.
COPYRIGHT
The contents of these and other pages (graphics, text and arrangement) are owned unless otherwise
noted by Store It Cold, LLC and no part of this document may be reproduced without written permission
of the owners at Store It Cold, LLC. Information may be stored on computer for personal use only, not
for presentation or publication.

WWW.STOREITCOLD.COM
SUPPORT@STOREITCOLD.COM
3
2019 © Store It Cold, LLC. Rev 2019-04A All Rights Reserved.
TABLE OF CONTENTS
BEFORE YOU START.......................................................................................................................................4
MATERIALS LIST ............................................................................................................................................6
TOOLS YOU WILL NEED.................................................................................................................................7
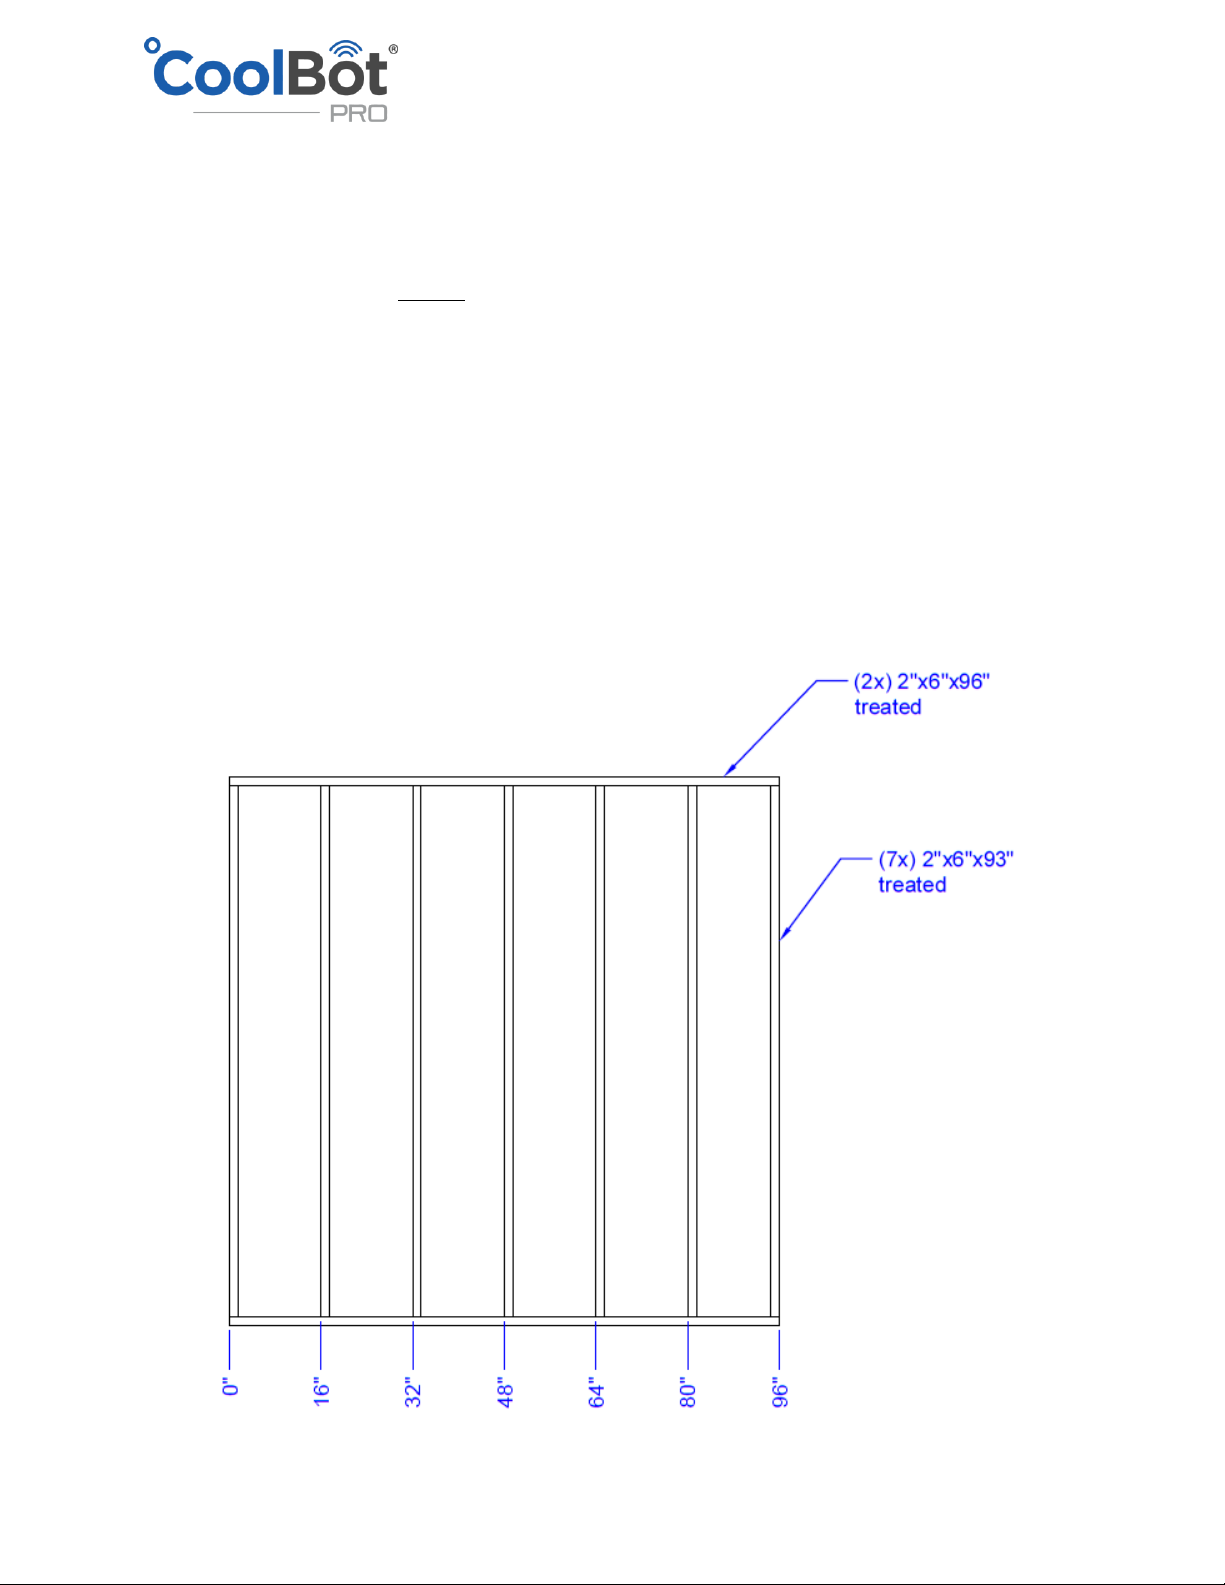
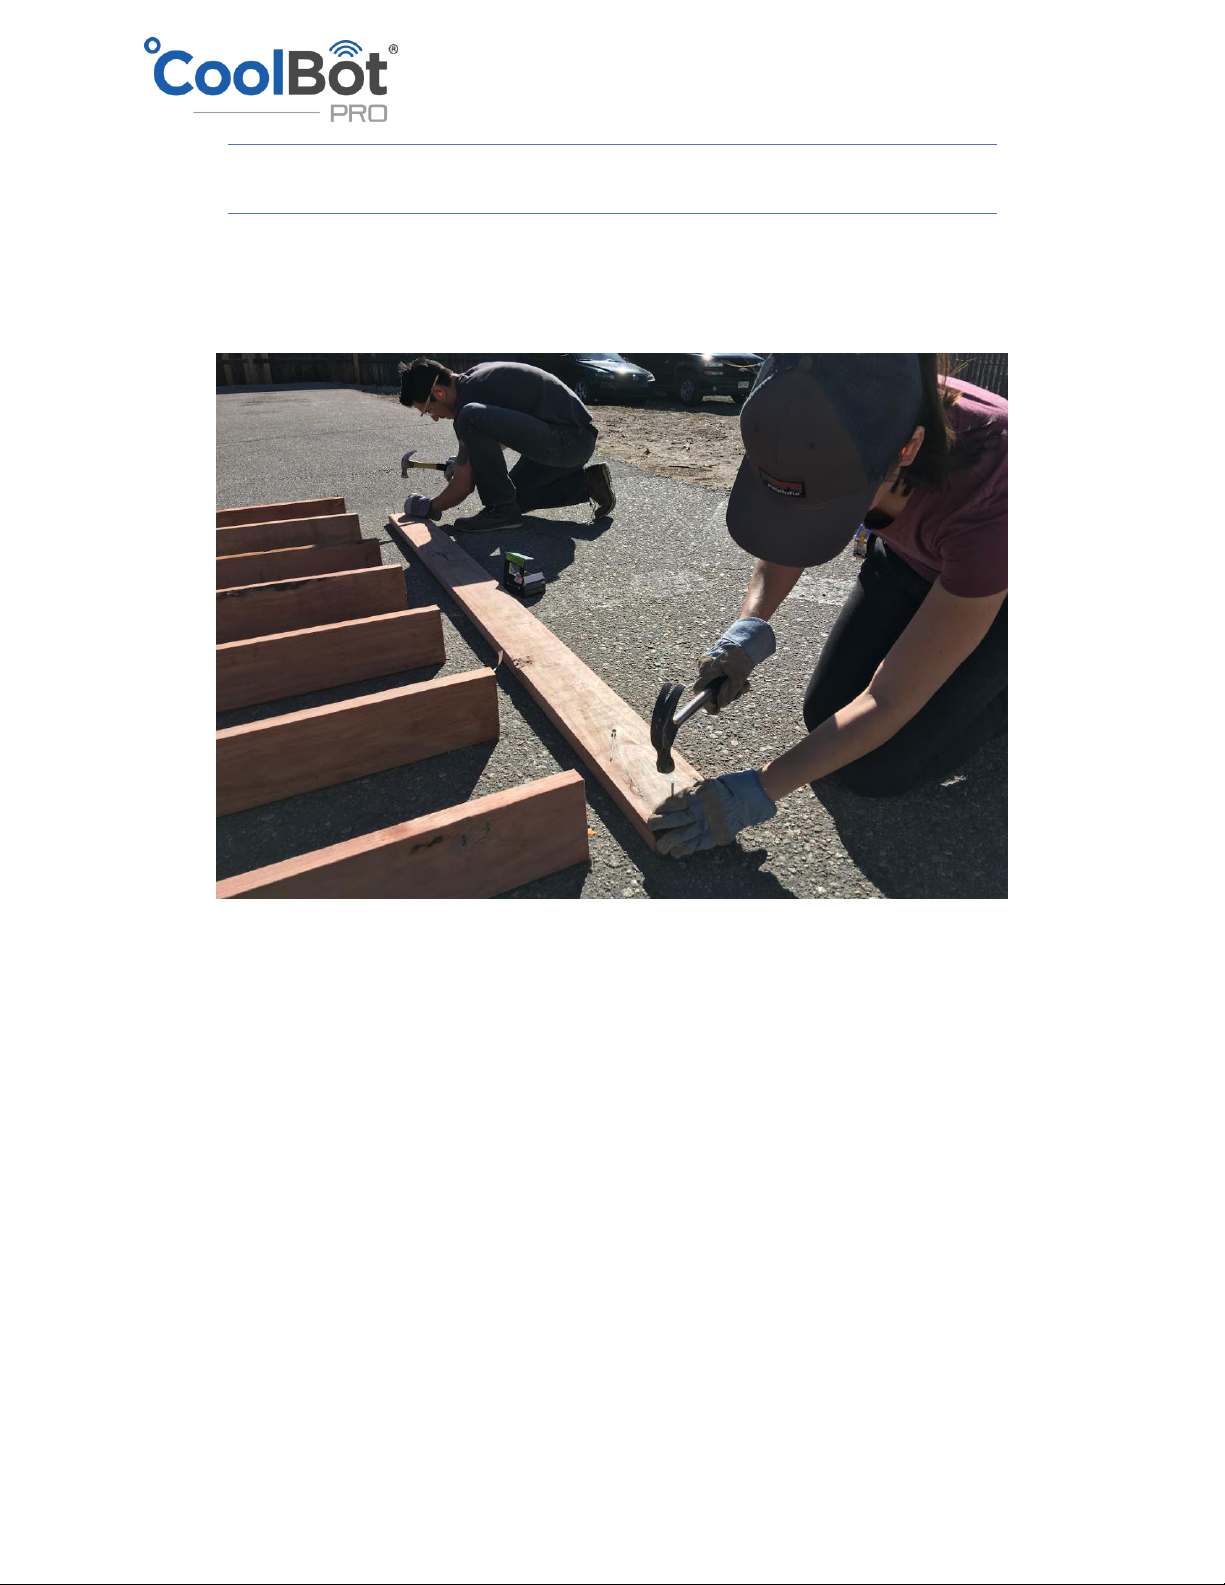
BUILDING THE FLOOR-BASE..........................................................................................................................8
BUILDING THE BACK WALL..........................................................................................................................13
BUILDING THE FRONT WALL.......................................................................................................................17
BUILDING THE RIGHT AND LEFT WALLS......................................................................................................19
CONNECTING THE WALLS TO THE FLOOR...................................................................................................20
BUILDING THE CEILING ...............................................................................................................................26
EXTERIOR SHEATHING.................................................................................................................................29
BUILDING THE ROOF ASSEMBLY.................................................................................................................32
INSTALLING THE ROOF................................................................................................................................35
INSTALLING THE DOOR ...............................................................................................................................37
ELECTRICAL PRE-WIRING WORK .................................................................................................................38
INSULATING YOUR ROOM ..........................................................................................................................39
INTERIOR FINISHING ...................................................................................................................................54
ELECTRICAL..................................................................................................................................................57
OPTIONAL: MOTION DETECTOR LIGHT.......................................................................................................58
OPTIONAL: CEILING RACK - SLIDING GAMBREL SYSTEM INSTALLATION....................................................60
AIR CONDITIONER INSTALLATION...............................................................................................................62
COOLBOT INSTALLATION ............................................................................................................................65
SHED EXTERIOR FINISHES............................................................................................................................70

WWW.STOREITCOLD.COM
SUPPORT@STOREITCOLD.COM
4
2019 © Store It Cold, LLC. Rev 2019-04A All Rights Reserved.
BEFORE YOU START
Read this guide entirely and familiarize yourself with the project before you make a trip to the
hardware store. Plan your project wisely and make a list of all your materials and tools. Depending on
your needs or particular situation, you may want to modify or skip certain parts of this guide.
Please ensure that a flat level and structurally sound surface is available to place your cooler.
“TURN KEY”COOLBOT WALK-IN COOLERS
If a DIY cooler project is not your cup of tea, you lack the construction experience necessary for a project
like this, or just simply lack the time to complete a DIY cooler, we got you covered! CoolBot offers turn-
key commercial grade pre-fab coolers in many standard sizes which include the new CoolBot Pro and the
A/C. For more information please visit us at:
https://www.storeitcold.com/coolbot-walk-in-cooler/
ECO-COOLER
Your fastest and most economical DIY solution is an “Inside” or covered (out-of-the-rain) cooler room. If
you are building your cooler inside AND your cooler will be set to cool above 36°F, a concrete pad (or
similar flat level surface) is all you need for a floor. Additionally, you won’t need a roof and/or exterior
finishing siding panels (just OSB will do). Skip the Floor Foundation and Roof Assembly Sections, and
their corresponding materials from the Materials List.
FLOOR RECOMENDATION
If you are building you cooler “Outside”OR on an elevated surface such as a deck, a second floor, above
a crawling space, OR if your cooler needs to be at or below 36°F, you SHOULD build an insulated Floor-
Base. A non-insulated wood building floor will not suffice.

WWW.STOREITCOLD.COM
SUPPORT@STOREITCOLD.COM
5
2019 © Store It Cold, LLC. Rev 2019-04A All Rights Reserved.
INSULATED CONCRETE SLAB
If you are pouring a concrete slab to place your cooler and want to insulate your slab for added
efficiency, here is a diagram of how you should do this.
OUTDOOR COOLER
Outside coolers (Shed-Style) will require an insulated Floor-Base, a roof and exterior siding panels. This
guide has instructions for a gabled roof but you are welcome to build any other type of roof for your
shed.
SAFETY TIP
At all times wear appropriate personal protective equipment to ensure a safe and enjoyable
construction experience.
THRIFTY TIP
Repurpose lumber from a shed or building that is being tore down or purchase reclaimed lumber from a
local resale lumber supplier.

WWW.STOREITCOLD.COM
SUPPORT@STOREITCOLD.COM
6
2019 © Store It Cold, LLC. Rev 2019-04A All Rights Reserved.
MATERIALS LIST
FOUNDATION- FLOOR BASE
QTY
SIZE
4" X 4" GROUND CONTACT TREATED LUMBER
3
96"
2" X 6" GROUND CONTACT TREATED LUMBER
9
96"
3/4" GROUND CONTACT TREATED PLYWOOD
4
4' x 8'
BACK WALL (A/C WALL)
QTY
SIZE
2" X 4" TREATED
1
96"
2" X 4" WHITE WOOD
4
96"
2" X 4" WHITE WOOD
5
92-5/8"
7/16" OSB (ECO-COOLER)
2
4' x 8'
SMARTSIDE STRAND PANEL SIDING (OUTDOOR COOLER)
3
4' x 8'
FRONT WALL (DOOR WALL)
QTY
SIZE
2" X 4" TREATED
1
96"
2" X 4" WHITE WOOD
3
96"
2" X 4" WHITE WOOD
6
92-5/8"
7/16" OSB (ECO-COOLER)
2
4' x 8'
SMARTSIDE STRAND PANEL SIDING (OUTDOOR COOLER)
3
4' x 8'
RIGHT WALL
QTY
SIZE
2" X 4" TREATED
1
96"
2" X 4" WHITE WOOD
2
96"
2" X 4" WHITE WOOD
7
92-5/8"
7/16" OSB (ECO-COOLER)
2
4' x 8'
SMARTSIDE STRAND PANEL SIDING (OUTDOOR COOLER)
2
4' x 8'
LEFT WALL
QTY
SIZE
2" X 4" TREATED
1
96"
2" X 4" WHITE WOOD
2
96"
2" X 4" WHITE WOOD
7
92-5/8"
7/16" OSB (ECO-COOLER)
2
4' x 8'
SMARTSIDE STRAND PANEL SIDING (OUTDOOR COOLER)
2
4' x 8'
CEILING
QTY
SIZE
2" X 6" WHITE WOOD (FOR “HANGING JOISTS”–OPTIONAL)
4
96"
1/2" PLYWOOD SCRAPS (FOR “HANGING JOISTS”–OPTIONAL)
4
5.5" x 5.5"
4 X 4 JOIST HANGERS (FOR “HANGING JOISTS”–OPTIONAL)
4
-
2" X 4" WHITE WOOD
1
96"
7/16" OSB (INDOOR ECO-COOLER ONLY)
2
4' x 8'
ROOF (OUTDOOR SHED STYLE COOLER)
QTY
SIZE
2" X 4" WHITE WOOD (RAFTERS)
8
120"
2" X 6" WHITE WOOD (RIDGE BOARD)
1
96"
2" X 4" WHITE WOOD (GABLE STUDS)
1
96"
#30 FELT ROOF DECK PROTECTION
1
216 sqft
LAMINATE SHINGLES (32.8 SQFT PER BUNDLE)
4
-
7/16" OSB
5
4' x 8'
18-GAUGE GALVANIZED STEEL ANGLE TIE
4
-

WWW.STOREITCOLD.COM
SUPPORT@STOREITCOLD.COM
7
2019 © Store It Cold, LLC. Rev 2019-04A All Rights Reserved.
INSULATION
QTY
SIZE
RMAX THERMASHEATH POLYISOCYANURATE RIGID R-13.1
22
4' x 8' x 2"
PLASTIC ROUND CAP ROOFING NAILS 1 LB. (117-PACK)
2
#11 x 3 in.
HEAVY DUTY LIQUID NAILS
15
Tube
FOIL HVAC TAPE
2
2.5" x 60 yd.
GREAT STUFF
5
Can
DOOR AND TRIM
QTY
SIZE
PREHUNG EXTERIOR INSULATED DOOR (OUTWARD SWING)
1
36" x 80"
1" X 2" TRIM BOARD PRIMED FINGER JOINT (EXTERIOR CORNERS)
4
96"
1" X 4" TRIM BOARD PRIMED FINGER JOINT (DOOR TRIM, A/C)
7
96"
1" X 6" TRIM BOARD PRIMED FINGER JOINT (SOFFIT)
2
96"
HARDWARE
QTY
SIZE
16-PENNY GALVANIZED STEEL BOX NAILS (1 LB./BOX) –FOR FLOOR BASE
2
#10 x 3-1/2"
6-PENNY HOT GALVANIZED STEEL BOX NAILS (1 LB./BOX) –FOR FLOOR BASE
1
#12-1/2 x 2"
Z-MAX GALVANIZED 18-GAUGE HURRICANE TIE (FOR SKIDS - OPTIONAL)
12
-
POLYMER COATED EXTERIOR SCREW (73/PK)
1
#10 x 3"
PREMIUM EXTERIOR WOOD SCREW (5LB/PK)
1
#10 x 6"
16-PENNY VINYL-COATED STEEL SINKER NAILS (1 LB.-64/BOX)
2
#9 x 3-1/4"
ALUMINUM LOUVERED SOFFIT VENT (SHED STYLE ONLY)
2
16" x 18"
DOOR SHIM PACK
1
-
Z-MAX GALVANIZED DOUBLE SHEAR FACE MOUNT JOIST HANGER (FOR
“JOISTS” – OPTIONAL)
4
4" x 4"
16-PENNY GALVANIZED FRAMING NAILS (1 LB.-71/BOX)
1
1lb box
16-PENNY VINYL-COATED STEEL SINKER NAILS (1 LB.-64/BOX)
2
1lb box
8-PENNY VINYL-COATED STEEL SINKER NAILS (1 LB.-153/BOX)
1
1lb box
12-PENNY HOT GALAVANIZED JOIST HANGER NAILS PACK (FOR “JOISTS” -
OPTIONAL)
1
#9 x 1-1/2"
ELECTRO GALAVANIZED STEEL ROOFING NAILS (5LB PACK)
1
#11 x 1-1/2"
T50 TYPE CROWN GALVANIZED STEEL STAPLES (1,250 PACK)
1
3/8 " Leg x
3/8” Crown
TOOLS YOU WILL NEED
Safety glasses
Ear plugs
Gloves
Pencil
Tape measure
Claw hammer
Drill
4’ level
Hand Saw
Paint roller
Caulk gun
Pliers
Chalk line
Trowel
Sawzall
Snap-off blade
knife
Circular saw or
table saw
Combination or
framing square
Phillips
screwdrivers
Jigsaw

WWW.STOREITCOLD.COM
SUPPORT@STOREITCOLD.COM
8
2019 © Store It Cold, LLC. Rev 2019-04A All Rights Reserved.
BUILDING THE FLOOR-BASE
See Floor Recommendation on Page 4.
Tips for preparing and planning your cooler foundation:
•If the cooler is to sit outside, mark the area with stakes and dig the area (3-4 inches) to remove
all vegetation. Fill the area with 3 to 4 inches of gravel and spread the gravel with a rake.
•Using a straight flat board (like a 2x4), spread the gravel evenly and with a level on top of the
2x4 ensure that the surface is level. Repeat as necessary all around the bed pushing the gravel
with the board and checking for a level surface all around so that it will be ready to receive the
Floor-Base of the Cooler.
•We attached our Floor-Base (diagram below) on three 4x4 skids because we wanted to be able
to move the shed with a forklift to another location after the build. You don’t have to use the
4x4 skids shown on the pictures of this guide.
•If you have a concrete pad outside, ensure the surface is level. You can place the base directly
on top without using the 4 x 4 skids shown on the pictures of this guide.
FLOOR BANDS
FLOOR JOISTS

WWW.STOREITCOLD.COM
SUPPORT@STOREITCOLD.COM
9
2019 © Store It Cold, LLC. Rev 2019-04A All Rights Reserved.
Treated Ground Contact lumber is used for the Floor-Base of the cooler as it will be directly on the floor.
White wood is not treated and used for all other boards in construction of the cooler.
•For the FLOOR BANDS we are using two 8 ft 2 x 6s.
•For the FLOOR JOISTS cut seven treated 2x6s to a length of 93 inches.
•Mark all seven 2 x 6s (FLOOR JOISTS) locations on the FLOOR BANDS with a pencil and straight
edge to identify the edge of the mating 2 x 6s (FLOOR JOISTS) - see diagram above on p8.
•Mark an "X" on the side of the line that will be covered by the mating 2 x 6.
•On a flat surface with a backstop that will not move layout all seven 2 x 6s (FLOOR JOISTS).
All nails used with treated lumber must be galvanized to prevent corrosion of the nails. Galvanized
nails have a rough dull silvery appearance.

WWW.STOREITCOLD.COM
SUPPORT@STOREITCOLD.COM
10
2019 © Store It Cold, LLC. Rev 2019-04A All Rights Reserved.
PRO TIP
Starting nails in a board is much easier if the board is lying flat on a rigid surface than if you are trying
to hold it in position. Start the nails and pound them until they just break through the backside of the
band board.
•Nail the treated FLOOR BANDS to the seven 93” FLOOR JOISTS using two 16 penny galvanized
nails into each joist.
•After you nail all FLOOR JOISTS to the first FLOOR BAND, rotate the entire frame 180˚ and place
the first FLOOR BAND against the backstop.
•Nail the second FLOOR BAND to the FLOOR JOISTS using two nails into each joist.
4”x4” SKIDS
We attached our base to three 4x4 skids because we wanted to be able to move the shed with a forklift
to another location after the build. You don’t have to use the 4x4 skids shown on the pictures of this
guide. The skids where set perpendicular to the FLOOR JOISTS. We used 12 Z-MAX Galvanized 18-Gauge
Hurricane Ties to connect the FLOOR JOISTS to the skids.
Now that the floor frame is complete, it is time to place the first layer of plywood to create a complete
flat surface for your Floor-Base.

WWW.STOREITCOLD.COM
SUPPORT@STOREITCOLD.COM
11
2019 © Store It Cold, LLC. Rev 2019-04A All Rights Reserved.
•Place two 3/4”pressure treated plywood panels on top of the BASE with the seam in between
them perpendicular to the direction of your FLOOR JOISTS

WWW.STOREITCOLD.COM
SUPPORT@STOREITCOLD.COM
12
2019 © Store It Cold, LLC. Rev 2019-04A All Rights Reserved.
•Nail the treated plywood panels to the FLOOR BANDS using 6-penny galvanized nails every 16
inches.
•Using a chalk line, mark the location of your FLOOR JOISTS on the boards and nail the boards to
the FLOOR JOISTS using 6-penny galvanized nails every 16 inches along the joist direction.
Your Floor-Base is now ready. The walls of the cooler will be anchored to this base.
This is also a good time to ensure that the base is completely level before continuing with the room
build.
EFIICIENCY PRO TIP
Want to make your cooler more efficient? Flip the base and insulate the bottom of the base in between
the FLOOR JOISTS. Rigid foam panels properly cut (sealing all seams with expandable foam) or using
Spray Foam insulation are both great alternatives. This will increase the R-Value of the floor to make
your cooler more efficient. NOTE: We will be insulating the floor on the inside with rigid foam panels
after the walls are installed. (DO NOT USE FIBERGLASS!!)

WWW.STOREITCOLD.COM
SUPPORT@STOREITCOLD.COM
13
2019 © Store It Cold, LLC. Rev 2019-04A All Rights Reserved.
BUILDING THE BACK WALL
This wall is opposite to the door and is where the A/C unit will be installed in.
Take extra care to ensure that the air conditioner cutout dimensions are correct for the air conditioner
you have selected. Leave a 1/4" gap all around the air conditioner - make the cutout 1/2" taller and
1/2" wider than your air conditioner. We used a 15K LG A/C for this room.
Treated lumber is used for the BOTTOM PLATE since the BOTTOM PLATE may be mounted to the
concrete (indoor coolers with no floor) and on occasion get wet. White wood is not treated and used for
all other boards in construction of the cooler.
•Measure twice cut once!
•For the BOTTOM PLATE cut an 8' long treated 2 x 4 to 89" long.
•Mark the location of each wall stud on the 2 x 4.
•Do the same for the TOP PLATE by cutting an 8’ long white wood 2 x 4 to 89" long.
•Mark all 2 x 4s with a pencil and straight edge to identify the edge of the mating 2 x 4s.
•Mark an "X" on the side of the line that will be covered by the mating 2 x 4.

WWW.STOREITCOLD.COM
SUPPORT@STOREITCOLD.COM
14
2019 © Store It Cold, LLC. Rev 2019-04A All Rights Reserved.
•On a flat surface with a backstop that will not move layout four 92-5/8" long 2 x 4s.
•Also, cut to length and layout the 2 x 4s for the air conditioner opening.

WWW.STOREITCOLD.COM
SUPPORT@STOREITCOLD.COM
15
2019 © Store It Cold, LLC. Rev 2019-04A All Rights Reserved.
All nails used with treated lumber must be galvanized to prevent corrosion of the nails. Galvanized
nails have a rough dull silvery appearance.
PRO TIP
Starting nails in a board is much easier if the board is lying flat on a rigid surface than if you are trying
to hold it in position. Start the nails and pound them until they just break through the backside of the
board.
•Nail the treated BOTTOM PLATE to the four 92-5/8" and one 61" STUDS using two 16 penny
galvanized nails into each stud.
•Use two 16 penny vinyl-coated sinker nails per joint for the remaining nailing of the back wall
frame.

WWW.STOREITCOLD.COM
SUPPORT@STOREITCOLD.COM
16
2019 © Store It Cold, LLC. Rev 2019-04A All Rights Reserved.
•Nail together the four boards that make up the AIR CONDITIONER FRAME and then nail the
frame to the adjacent STUDS.
•Rotate the entire back wall frame 180˚ and place the BOTTOM PLATE against the backstop.
•Nail the TOP PLATE to the STUDS using two nails into each STUD.
•Align the TOP DOUBLE PLATE centered on the TOP PLATE which will leave 3-1/2" overhang on
each side. A 2x4 lying flat on the ground is a good reference for the required overhang
•Nail the TOP DOUBLE PLATE to the TOP PLATE with nails approximately every 12" staggered side
to side.
The back wall is now complete.

WWW.STOREITCOLD.COM
SUPPORT@STOREITCOLD.COM
17
2019 © Store It Cold, LLC. Rev 2019-04A All Rights Reserved.
BUILDING THE FRONT WALL
The second wall frame on the process is the front wall frame. This wall has the doorway.
•Find your Door Manufacturer’s Installation Guide for the dimensions of the “Rough Opening”
required for your door. These dimensions are W* and H*
•If you don’t have the door’s installation guide or if you are installing a used door, a good rule of
thumb, is to make the Rough Opening (W* x H*), 1/2” taller than the height of the door frame
and 3/4” wider than the width of the door frame you are installing. This will ensure you have
space to shim and plumb your door frame properly.
•Door opening should be centered in your wall frame.
•SHORT STUD*
▪If you built a Floor-Base for your cooler following this guide, then you won’t be cutting the
BOTTOM PLATE of the wall frame in between the doorway. The floor of the cooler will be
raised because of the insulation so we are leaving the 2x4 to lift the door frame and to avoid
having a larger than necessary step when walking into the cooler.
▪If you build an inside cooler over concrete that will not have an insulated Floor-Base (Eco-
cooler) then you will be cutting the BOTTOM PLATE in between the doorway, this will drop
the door frame and give you an additional 1.5” (hence you are cutting the STUD* at H*- 1.5
inches).
•Measure twice cut once!
•Cut and layout the 2 x 4s for the front wall in a similar manner to the back wall

WWW.STOREITCOLD.COM
SUPPORT@STOREITCOLD.COM
18
2019 © Store It Cold, LLC. Rev 2019-04A All Rights Reserved.
•Nail together the two pairs of doubles STUDS for the doorway using 16 penny vinyl-coated
sinker nails staggered every 12". Nailing from the shorter STUD* through the taller 92-5/8” stud
will ensure that the protruding nail tips do not face into the doorway.
•Nail the treated BOTTOM PLATE to the six STUDS using two 16 penny galvanized nails in each
STUD.
•Rotate the entire front wall frame 180˚ and place the BOTTOM PLATE against the backstop.
•Use two 16 penny vinyl-coated sinker nails per joint for the remaining nailing of the front wall
frame.
•Nail the TOP PLATE to the studs.
•To build your HEADER cut a piece of ½”OSB to the same size as the 2x4 headers and sandwich it
in between the 2x4s to fill the space in between - nail them together from both sides.
•Nail the DOORWAY HEADER (2 x 4s on edge) to the adjacent STUDS with the faces of the
DOORWAY HEADERS flush with the outside of the STUDS. Nail the CRIPPLE STUDS above the
doorway header in place.
•Align the TOP DOUBLE PLATE centered on the TOP PLATE which will leave 3-1/2" overhang on
each side. A 2x4 lying flat on the ground is a good reference for the required overhang
•Nail the TOP DOUBLE PLATE to the TOP PLATE with nails approximately every 12" staggered side
to side.
The front wall is now complete.

WWW.STOREITCOLD.COM
SUPPORT@STOREITCOLD.COM
19
2019 © Store It Cold, LLC. Rev 2019-04A All Rights Reserved.
BUILDING THE RIGHT AND LEFT WALLS
Repeat the process for the left and right walls in a similar manner to that done for the back and front
walls.

WWW.STOREITCOLD.COM
SUPPORT@STOREITCOLD.COM
20
2019 © Store It Cold, LLC. Rev 2019-04A All Rights Reserved.
CONNECTING THE WALLS TO THE FLOOR
FOR COOLERS WITH A FLOOR-BASE BUILT FOLLOWING THE INSTRUCTIONS FROM THIS GUIDE
Go Straight to page 24.
FOR COOLERS WITHOUT A FLOOR-BASE AND BUILT DIRECTLY OVER A LEVEL CONCRETE PAD (ECO-
COOLER)
The next step is to layout a "perfect" 96" by 96" square on the floor you will be placing your cooler.
•Mark and "X" where you would like the front left corner of the cooler.
•Mark another "X" 96" away for the front right corner.
Other manuals for CoolBot PRO
4
Table of contents