Strom HANDYWASH SEHW3KM1 User manual

SEHW3KM1, SEHW3KA1
Installation Manual
Issue 1 2017
SEHW3KA1 Model Shown
STROM-
LIMITED
www.stromltd.com
HANDYWASH

INTRODUCTION
Thank you for purchasing your Strom Limited instaneous water heater, we are very proud of our products
and we are sure that you will be happy with the years of service you get from your model. This product has
been designed to operate at mains pressure and deliver instant hot water.
SPECIFICATION
MODEL SEHW3KM1 SEHW3KA1
Body Material High Strength ABS Plastic
Spout Material High Quality Stainless Steel
Voltage 220-240v
Rated Frequency 50-60Hz
Power 3.0kW
Rated Current 13A
Recommended Cable Size 1.5mm2
Thermal Cut-Out 65oC
Dry Heating Protection 70oC
Hot Water Flow 0.5L - 2L Per Minute (Dependent On Required Temp)
IP Rating IPX4
Working Pressure 0.2 - 6 Bar
Sensing Distance N/A 50mm
IMPORTANT NOTICE
• For your satisfaction and safety, read all instructions before installing or using this instant hot water
heater.
• This particular unit is not intended for commercial use.
• This appliance should be connected to mains water feed.
• This water heater may not be suitable for unsupervised use by children, the elderly, or persons of
deminished responsability due to the risk of scalding should the flow of water not be controlled
properly.

• Your Strom Limited water heater MUST be installed and maintained regularly by a qualified
professional in accordance with current electrical and plumbing regulations.
• If the chloride content exceeds 200ppm a filtration system should be fitted, failure to do so may
invalidate your warrenty.
• This device has been designed for internal use only, if the system may be exposed to frost please
drain down the system completely, and DO NOT attempt to use the device if you suspect it is frozen.
• Always ensure that the flow temperature is not excessive before use. If the water is too hot please
increase the flow rate and wait for the temperature to reduce.
• As part of the product maintenance regularly clean the filter washer provided, failure to do so may
reduce your flow rate over time.
• The HandyWash is not designed for modification in any way, please do not fit anything to the unit
unless otherwise recommended.
• When comissioning the water valve should be adjusted to increase or decrease the water flow to
the unit, this in turn will control the temperature of water from the outlet, slower increases the
temperature, faster decreases the temperature.
• Each unit is tested at our factory before its departure, a little residual water is normal, and the product
should be flushed through before use.
• Never try to operate this device if your water supply is blocked or turned off, doing so could cause
premature failure of your device.
• Any damage to the wiring or integrity of your device should be assessed by a qualified electrician, and
the device should not be used until the unit or wiring has been repaired.
• The minimum water supply available at the point of install is 0.2 Bar.
• If at any time the water heater begins to overheat or produce water too hot for use and increasing
the flow doesn’t cure the problem please isolate the electrical supply and consult your installer or our
technical team immediately.
BEFORE INSTALLATION
This installation must only be performed by a qualified electrician and installed to all relevent national
and local electrical and plumbing regulations. Failure to do this could render the install both illegal and
dangerous. Before installation please ensure the following:
1. Your Strom Limited appliance is intact, and the fittings are supplied & complete.
2. Please make sure the mains power supply, water pressure, earthing condition, and cabling reach the
standards required for installation as required by all relevent regulations & laws.
3. The appliance must be properly earthed in accordance with all current regulations and laws.
4. If the unit is not to be used for a prolonged period of time please drain down and isolate the electrical
supply of the product.
5. Position the unit upright with all plumbing connections at the bottom of the unit.
6. During the installation please test water flow is achieved at the tap before connecting the power
supply. If the heater is activated without water supply the unit may be damaged.
7. Check incoming mains water pressure, if greater than 6 bar please reduce the pressure with a
pressure reducing set available from your merchant. Failure to do so may damage your device &
render your device warranty void.

PRODUCT STRUCTURE
Water Inlet
Water Spray Arm
Electrical Terminal Block
Water Valve Block
Micro Switch
Heating Element
Thermal Cut-Out
Water Inlet
Water Spray Arm
Electrical Terminal Block
PCB Cover
Micro Switch
Heating Element
Thermal Cut-Out
Electromagnetic Valve
SEHW3KM1
SEHW3KA1
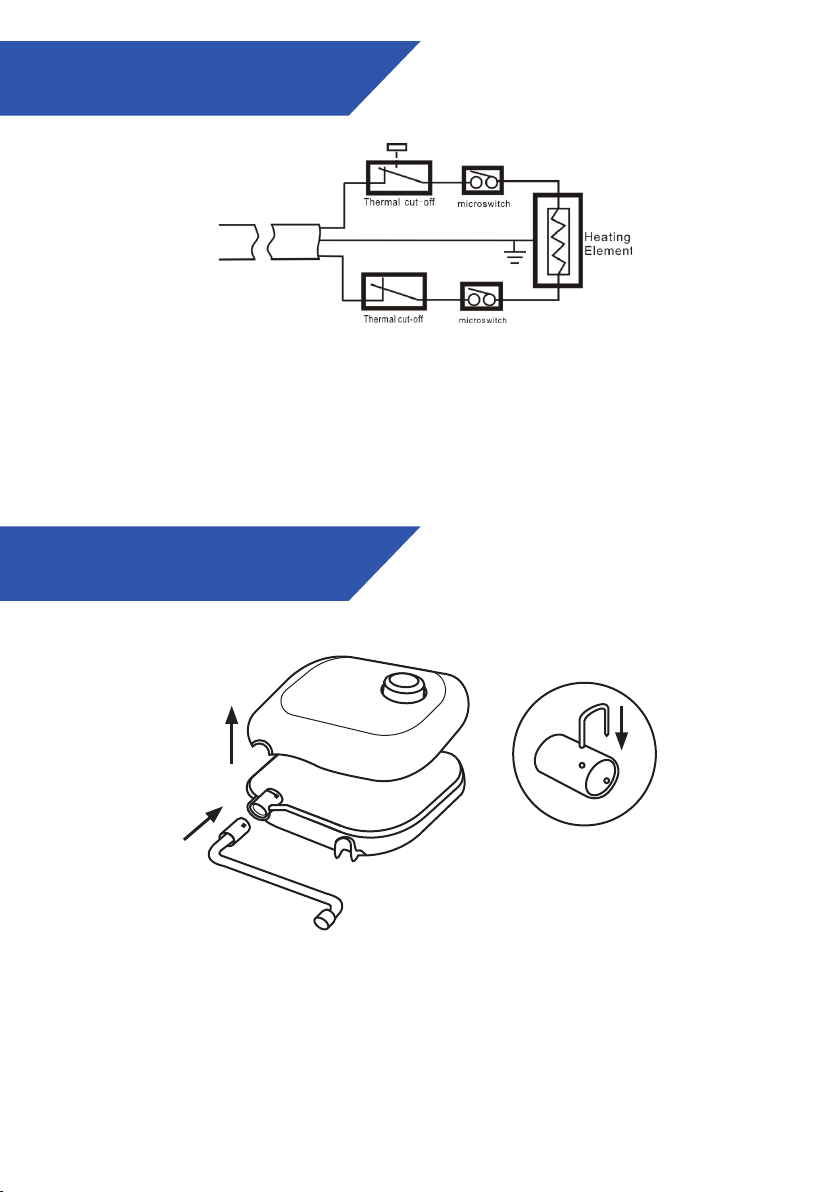
WIRING SCHEMATIC
INSTALLATION
• This diagram is provided for your reference of the internal wiring of your Strom Limited water heating
product.
• No attempt should be made to change the internals of your water heater, doing so may be dangerous
and will invalidate your warranty.
• Your product MUST always be wired by a qualified electrician in accordance with all the relevent
regulations and laws in place at the time of installation.
ACTION 1
ACTION 2
ACTION 3
1. To connect the Sprayer Spout, start by ensuring the temperature control dial is set in the off position.
Remove the two screws at the base of the unit and then remove the front cover of the unit (ACTION 1).
Push the end of the water outlet sprayer firmly into the outlet out of the heating element and ensure
it is all the way in (ACTION 2). Push the plastic sleeve as high up as it can go then insert the circlip
into the two holes of the plastic sleeve (ACTION 3). Ensure the water outlet sprayer is firmly installed.

2. Using the template provided work out where best to secure this unit on to the wall ensuring that it is
level. Mark up the drill holes through the holes in the template then drill through and place wall plugs
into the holes. Offering your unit up to the wall and screw into the corresponding holes on the unit to
the holes on the wall and ensure the unit is secure on the wall.
3. We suggest fitting an isolation valve or ball valve before the tap to facilitate removal of the unit
and servicing. Connect your cold mains supply to the internal ½” thread’s making sure that the flow
reducing washer provided is fitted the correct way around between the nut and threads.
4. Make the correct electrical connections to the unit, but do not turn the power back on at this stage. A
minimum heat resistance cable size of 1.5mm² should be used. The product can be connected in two
different ways:
• Via a fused and switched connection unit taken as a spur from a 13amp ring main.
• As a separate circuit taken directly from a spareway in a consumer unit.
In each case a double pole isolating switch having a contact separation of at least 3mm in each pole,
and a minimum rating of 13amp must be incorporated in the wiring of the appliance.
5. Before replacing the front cover of the unit make sure that there are no leaks from the cold inlet
connection. Place the front cover back on to the unit whilst still ensuring the temperature control dial
is still in the off position. Finally replace the screws at the base of the unit.
REMEMBER: Before turning off the water supply to the unit you must isolate its electric supply, operating
the tap while there is no water can cause premature failure and invalidate your warranty. DO NOT turn on
your electric supply at this time.
COMISSIONING
1. Flush the unit completely for 20 seconds, to do this turn the control dial to the fully open cold position,
in the case of the automatic model please restore power to the unit only when the control dial is in
the fully cold position.
2. Once flushed for 20 seconds please move the control dial to the off position and in the case of the
manual model please also restore power.
3. To set the flowrate and temperature of the unit please set the control dial to the midway position on
the hot side.
4. Whilst in this position please restrict water flow to the unit using the isolating valve fitted before
the unit. Restricting the flow will increase the output temperature, whilst increasing the flow will
decrease the temperature.
5. Once the required temperature is achieved please set control dials on manual models to the off
position, and set automatic models to the correct temperature ready for use.
6. Your HandyWash is now ready for use.

GENERAL USE
SEHW3KM1
SEHW3KA1
• Turning the temperature dial towards cold will give you cold water, the further towards cold you turn
the temperature dial the faster the cold water will come out of the tap.
• Turning the temperature dial towards hot will give you hot water, the further towards hot you turn the
temperature dial the faster hot water will come out of the tap however, the higher the flow rate the
cooler the water will be. By pushing the control only slightly towards hot the flow rate will be very low
but the water temperature will be very hot. REMEMBER: This product, if used incorrectly can scald, if
the water is too hot increase the flow rate by turning the temperature dial further forwards, if it is too
cool reduce the flow rate by throttling the temperature dial backwards.
• Leaving the temperature dial in the central OFF position turns the flow rate and the heater off.
REMEMBER: If you are to leave this product unattended for long periods of inactivity please isolate
the electric supply, and drain the product down. After a draindown please follow the comissioning
procedure again.
• Turning the temperature dial towards cold will give you cold water, the further towards cold you turn
the temperature dial the faster the cold water will come out of the tap.
• Turning the temperature dial towards hot will give you hot water, the further towards hot you turn the
temperature dial the faster hot water will come out of the tap however, the higher the flow rate the
cooler the water will be. By pushing the control only slightly towards hot the flow rate will be very low
but the water temperature will be very hot. REMEMBER: This product, if used incorrectly can scald, if
the water is too hot increase the flow rate by turning the temperature dial further forwards, if it is too
cool reduce the flow rate by throttling the temperature dial backwards.
• To activate the flow of water from the unit simply pass your hand infront of the control dial, your hand
should pass within 5cm of the device in order to activate the flow.
• Leaving the temperature dial in the central OFF position turns the flow rate and the heater off.
REMEMBER: If you are to leave this product unattended for long periods of inactivity please isolate
the electric supply, and drain the product down. After a draindown please follow the comissioning
procedure again.
MAINTENANCE
Always turn off the power supply before servicing your unit
To ensure a long lasting and efficient product we recommend the following maintenance regime:
• Periodically remove scale and dirt that may build up at the aerator of the faucet or in the sprinkler.
• The filter washer supplied and fitted should be cleaned to reduce any debris build up and ensure good
consistent flow rates.

TROUBLESHOOTING
SYSTEM ISSUE LIKELY CAUSE POSSIBLE SOLUTION
No Hot Water Is Supplied When
The Tap Is Turned On.
Inlet flow rate is less than
0.4L/Min Increase the inlet flow rate
There is no power supply Please call an electrician to
inspect your installation
Outlet Temperature Is Too Hot Flow rate is too low Increase the flow rate at the
unit
Outlet Temperature Is Too Cold Flow rate is too high Reduce the flow rate at the tap
Flow Rate At The Tap Is Low Filter washer clogged Please clean the filter washer
Water Flow At The Tap Is
Uneven Or Spraying
Sprinkler at the tap is blocked
or impeeded
Remove limescale from
sprinkler and clean.
Your Strom Limited water heater is guaranteed for a period of 12 months from the date of purchase. The
unit is only guaranteed if the water heater has been installed and maintained in accordance with these
instructions. Full guarantee information can be found at: www.stromltd.com/guarantee
The guarantee specifically excludes:
• Corrosion by incorrect maintenance of the water heater, or incorrect installation.
• Limscale build up.
• Consequential losses, including labour charges and damages to fittings.
• Any water heater that has not been maintained and installed in accordance with this manual.
• Products not installed by a qualified electrician in accordance with this manual.
GUARANTEE
For technical support regarding your water heating product please
ensure that you have:
• GOT YOUR PRODUCT SERIAL NUMBER.
• HAVE SET THE CORRECT FLOW RATE FOR YOUR UNIT.
• HAVE YOUR ELECTRICAL INSTALLATION CERTIFICATE TO HAND.
TECHNICAL SUPPORT
CALL US ON:
MON-FRI, 8:30am - 4:30pm
0333 344 24 27

NOTES

NOTES

NOTES

www.stromltd.com
STROM-
LIMITED
www.stromltd.com
This manual suits for next models
1
Popular Heating System manuals by other brands

Heatpol
Heatpol Home Plus Economy installation manual

Viessmann
Viessmann VITODENS operating instructions

Immergas
Immergas 3.033210 Instruction and warning book

Saunum
Saunum H-1/6 Instructions for use and installation

EarthLinked
EarthLinked R-407C installation manual

Envirovent
Envirovent heatSava installation guide


PAW
PAW HeatBloC K32-DN 25 Installation and operation instructions

Vortice
Vortice VORT-NRG Series Instruction booklet

Sabiana
Sabiana Carisma Whisper CFF Instructions for installation, use and maintenance

Valsir
Valsir ARIA EVO H/V Series manual

Broan
Broan ERV120S user guide

Bryant
Bryant 582A Series user manual