Studio 54 Alexander 5T User manual
ALEXANDER 5T - 10T - 15T
Ed.12/2011 1
Made in Italy

ALEXANDER 5T - 10T - 15T
Ed.12/2011 2
Via Gian Lorenzo Bernini 147, Z.I. Paviola 3
35010 S. Giorgio in Bosco (Pd) Italy
TEL. 049 9450466 FAX. 049 9451044

ALEXANDER 5T - 10T - 15T
Ed.12/2011 3
1. General Information
We recommend you to read carefully the owner’s instructions, remembering that it
is an integral part of this equipment, and it must be kept with care.
In case of loss or damaging of the present manual, don’t hesitate to request
another copy of it, specifying the model and the date of purchase of the product.
The blast chiller/freezer has been designed and built exclusively to blast
chilling/freezing of temperature for food.
THE PRODUCING COMPANY DECLINES ANY RESPONSIBILITY FOR
DAMAGES RESULTING FROM
•ILLEGITIMATE USE
•USING OF NOT ORIGINAL SPARE PARTS
•NON-AUTHORIZED MODIFICATIONS ON THE PRODUCT
•FAILURE TO COMPLY WITH THIS MANUAL INSTRUCTIONS
ELEMENTARY SAFETY MEASURES
•Unplug before making any kind of intervention on the electrical parts: the
contact can cause the death.
•Don’t use the appliance with damp or wet hands or feet.
•Unplug before cleaning the appliance.
•Don’t insert any screwdriver, kitchen utensil, etc. among the moving
components or the protections.
2. Preliminary checks
At the receiving of the product, please verify immediately the packaging integrity
checking if there is any transport damaging.
Open the packaging and make sure that there are all the accessories.
If there have been transport damages, inform immediately the driver; within three
days such reservations must be confirmed by recorded delivery letter addressed
to the forwarder sending a copy of it directly to the producing company or its
reseller.
Every claim must be notified within 8 days from the receiving of the goods.

ALEXANDER 5T - 10T - 15T
Ed.12/2011 4
3. Warranty terms
The product is covered by a 12 months warranty starting from the date of the
purchase, except for the electrical components. The spare parts will be eventually
supplied under warranty ex works San Giorgio in Bosco (PD).
Before the delivery of spare parts under warranty, there must be the returning of
the damaged goods.
The warranty certificate must be filled and sent to the producer within 8 days from
the installation.
4. Installation
The main characteristics, as dimensions, absorption, etc., are specified on the
European Community silver label.
The appliance must use an electric socket equipped with an automatic cut-out,
respecting the safety regulations. Make also sure that voltage and power line are
suitable to the motor absorption.
4.1 POSITIONING
The installer must verify the presence of fire prevention regulations, and place the
appliance in full obedience of the industrial injuries legislation and the current
regulations.
The appliance works with an air condenser, so it is necessary to pay attention to
the placing of it, keeping free the side of the incoming of the cooling air.
Besides, it is also necessary to keep it at least at 20 cm from wall or other
appliances nearby the air exit, so as to obtain the best performances.
To refrain from placing the appliance in closed or poorly aired spaces, from
exposing it directly to sun-beams, and from the heat sources.
4.2 AMBIENT
Generally, the refrigerators with air condensing units work with a maximum
ambient temperature of 32°C. The declared performances are not guaranteed
where there are higher temperatures.
The producing company guarantees an IP43 degree of protection (in accordance
with CEI 70-1 EN 60529 and IEC529 laws). The installer will estimate if different
ambient conditions require other kind of protection degrees.

ALEXANDER 5T - 10T - 15T
Ed.12/2011 5
NOTE
Correct installation:
- Verify the electrical connections
- Verify the absorption at working appliance
- Switch on the fridge and let it to reach the desired temperature before putting
inside the food
If the appliance has been transported in a non-appropriate way (i.g. non-vertical
position or laying on the back), wait at least 4 hour before switching it on.
The end user must be informed on the right use of the appliance.
4.3 CORRECT DISPOSAL
Subject: Legislative Decree n. 151 dtd 25/07/2005 (ROHS – RAEE)
Correct disposal of this product (waste electrical and electronic equipment)
(Applicable in the European Union and other European countries with separate
collection systems)
IT08020000000717
This marking shown on the product or its literature, indicates that it should not be
disposed with other household wastes at the end of its working life.
To prevent possible harm to the environment or human health from uncontrolled
waste disposal, please separate this from other types of wastes and recycle it
responsibly to promote the sustainable reuse of material resources.
Household users should contact either the retailer where they purchased this
product, or their local government office, for details of where and how they can
take this item for details of where and how they can take this item for
environmentally safe recycling.
Business users should contact their supplier and check the terms and conditions
of the purchase contract. This product should not be mixed with other commercial
wastes for disposal.
Some economic sanctions to the defaulting user are provided for wrong wasting of
the products with RAEE mark.

ALEXANDER 5T - 10T - 15T
Ed.12/2011 6
5. OWNER’S INTERFACE
THE WORKING AND THE SETTING OF THE DIGITAL CONTROL DEVICE ARE
EXPLAINED IN THE ENCLOSED INSTRUCTION MANUAL FOR THE DIGITAL
CONTROL DEVICE EVCO EVC80S10P7XXX01
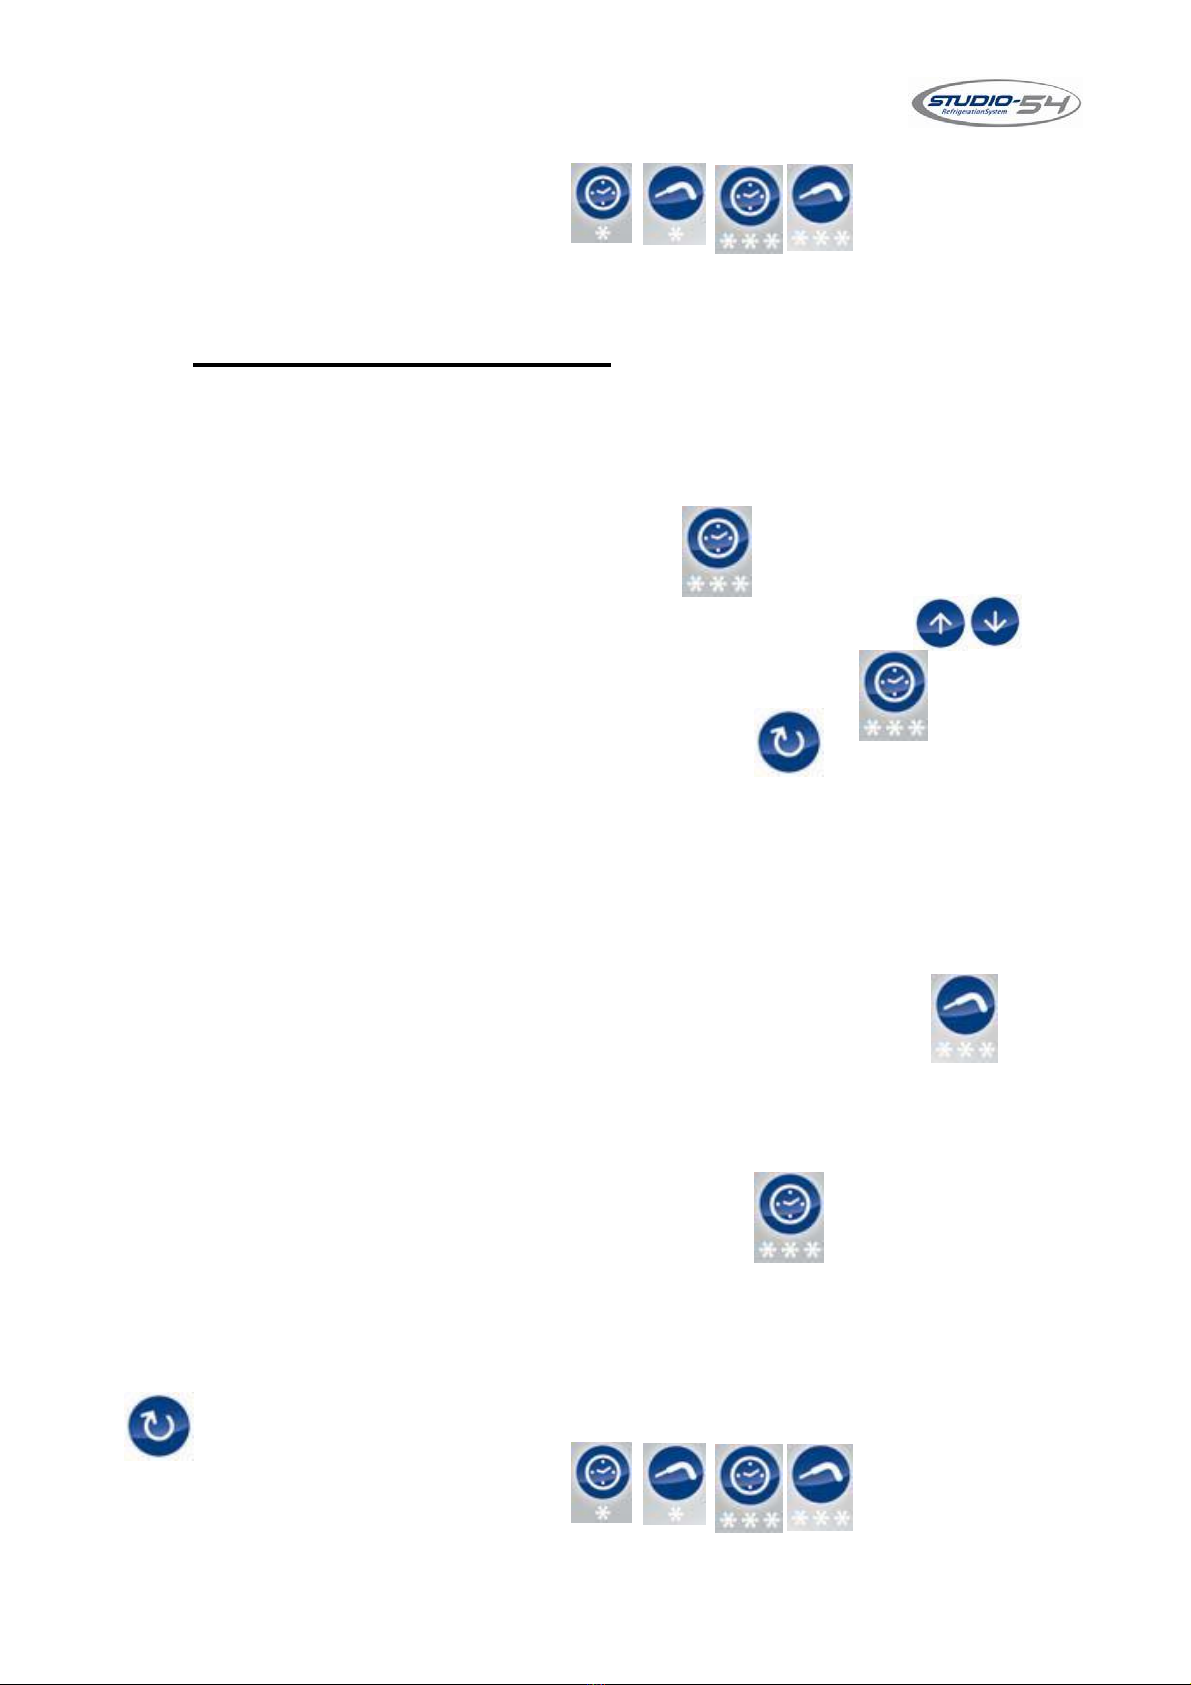
6. KEYS
SYMBOL NAME
START Key
TIME BLAST CHILLING Key
TEMPERATURE BLAST
CHILLING Key
TIME BLAST FREEZING Key
TEMPERATURE BLAST
FREEZING Key
DEFROSTING Key
INCREASE Key
DECREASE Key

ALEXANDER 5T - 10T - 15T
Ed.12/2011 7
6.1 Icons
7. INSTRUCTION FOR THE STARTING OF THE BLAST
CHILLING AND SHOCK FREEZING CYCLES
Here follow the setting instructions for the starting of the most common functions
of the appliance.
N.B. FOR A BETTER WORKING OF THE APPLIANCE, REMEMBER TO
MAKE AN AUTOMATIC DEFROSTING AFTER 2/3 CONSECUTIVE BLAST
CHILLING/FREEZING CYCLES.
SUCH OPERATION CAN BE MADE KEEPING THE DOOR OPEN AND
PRESSING THE DEFROSTING KEY . THAT SUCCESSION OF
CONTROLS MAKES THE APPLIANCE GO INTO THE AUTOMATIC
DEFROSTING FUNCTION.
ATTENTION: We recommend you to insert the food probe 2 – 3 cm max
inside the product.
SYMBOL NAME
BLAST CHILLING icon
It flashes during the blast chilling cycle, it is switched on
during the successive preservation.
SHOCK FREEZING icon
It flashes during the shock freezing cycle, it is switched on
during the successive preservation.
PRESERVATION icon
It is switched on or it flashes during a preservation cycle.
TEMPERATURE icon
It is switched on during a temperature cycle.
TIME icon
It is switched on during a time cycle.
OFF icon
It is switched on when the digital control device is in off, it is
off with all the other functions.
FAHRENHEIT icon
It is switched on in red or green, depending by the colour of
the display, if it is displayed a temperature, and if the unit of
measurement is the Fahrenheit degree.
CELSIUS icon
It is switched on in red or green, depending by the colour of
the display, if it is displayed a temperature, and if the unit of
measurement is the Celsius degree.
ALEXANDER 5T - 10T - 15T
Ed.12/2011 8
7.1 SOFT TEMPERATURE BLAST CHILLING
Procedure to use the SOFT temperature blast chilling function:
1. Insert the probe in the food
2. Press the TEMPERATURE BLAST CHILLING key until when it
appears the word SOFT. After 3 seconds the displays shows the set point of
temperature of the cell during the blast chilling function (-5°C) in red light.
Such value can be changed pressing the increase and decrease
keys, and must be confirmed with the TEMPERATURE BLAST CHILLING
key .
3. Start the working cycle pressing the START key
4. The blast chilling cycle ends when the probe temperature goes to +3°C.
5. Now it automatically starts the preservation phase.
During the temperature blast-chilling phase it is always possible to visualize the
probe temperature pressing the TEMPERATURE BLAST CHILLING key
In that way, on the display will appear for 5 seconds the probe temperature in
green light.
Moreover, it is always possible to visualize the passed time from the beginning of
the cycle pressing the TIME BLAST CHILLING key .
In that way, on the display it will appear for 5 seconds the passed time from the
beginning of the cycle in green light.
When it is time to remove the food from the blast chiller/freezer press the START
key .
Pressing for 3 seconds one of the keys the digital control
device goes in standby and the machine is ready for a new cycle.

ALEXANDER 5T - 10T - 15T
Ed.12/2011 9
7.2 HARD TEMPERATURE BLAST CHILLING
Procedure to use the HARD temperature blast chilling function:
1. Insert the probe in the food
2. Press the TEMPERATURE BLAST CHILLING key until when it
appears the word HARD. After 3 seconds the displays shows the set point
of temperature of the cell during the blast chilling function (-5°C) in red light.
Such value can be changed pressing the increase and decrease
keys, and must be confirmed with the TEMPERATURE BLAST CHILLING
key .
3. Start the working cycle pressing the START key
4. The blast chilling cycle ends when the probe temperature goes to +3°C.
5. Now it automatically starts the preservation phase.
During the temperature blast-chilling phase it is always possible to visualize the
probe temperature pressing the TEMPERATURE BLAST CHILLING key
In that way, on the display will appear for 5 seconds the probe temperature in
green light.
Moreover, it is always possible to visualize the passed time from the beginning of
the cycle pressing the TIME BLAST CHILLING key .
In that way, on the display it will appear for 5 seconds the passed time from the
beginning of the cycle in green light.
When it is time to remove the food from the blast chiller/freezer press the START
key .
Pressing for 3 seconds one of the keys the digital control
device goes in standby and the machine is ready for a new cycle.

ALEXANDER 5T - 10T - 15T
Ed.12/2011 10
7.3 SOFT TIME BLAST CHILLING
Procedure to use the SOFT time blast chilling function:
1. Insert the probe in the food
2. Press the TIME BLAST CHILLING key until when it appears the word
SOFT. After 3 seconds the displays shows the set point of temperature of
the cell during the blast chilling function (-5°C) in red light.
Such value can be changed pressing the increase and decrease
keys, and must be confirmed with the TIME BLAST CHILLING key .
3. Set the desired working time with the increase and decrease
keys and confirm with the TIME BLAST CHILLING key .
4. Start the working cycle pressing the START key
5. The blast chilling cycle ends when the set time as during of chilling phase
has passed.
6. Now it automatically starts the preservation phase.
During the time blast-chilling phase it is always possible to visualize the probe
temperature pressing the TEMPERATURE BLAST CHILLING key
In that way, on the display will appear for 5 seconds the probe temperature in
green light.
Moreover, it is always possible to visualize the passed time from the beginning of
the cycle pressing the TIME BLAST CHILLING key .
In that way, on the display it will appear for 5 seconds the passed time from the
beginning of the cycle in green light.
When it is time to remove the food from the blast chiller/freezer press the START
key .
ALEXANDER 5T - 10T - 15T
Ed.12/2011 11
Pressing for 3 seconds one of the keys the digital control
device goes in standby and the machine is ready for a new cycle.
7.4 HARD TIME BLAST CHILLING
Procedure to use the HARD time blast chilling function:
1. Insert the probe in the food
2. Press the TIME BLAST CHILLING key until when it appears the word
SOFT. After 3 seconds the displays shows the set point of temperature of
the cell during the blast chilling function (-5°C) in red light.
Such value can be changed pressing the increase and decrease
keys, and must be confirmed with the TIME BLAST CHILLING key .
3. Set the desired working time with the increase and decrease
keys and confirm with the TIME BLAST CHILLING key .
4. Start the working cycle pressing the START key
5. The blast chilling cycle ends when the set time as during of chilling phase
has passed.
6. Now it automatically starts the preservation phase.
During the time blast-chilling phase it is always possible to visualize the probe
temperature pressing the TEMPERATURE BLAST CHILLING key
In that way, on the display will appear for 5 seconds the probe temperature in
green light.
Moreover, it is always possible to visualize the passed time from the beginning of
the cycle pressing the TIME BLAST CHILLING key .
ALEXANDER 5T - 10T - 15T
Ed.12/2011 12
In that way, on the display it will appear for 5 seconds the passed time from the
beginning of the cycle in green light.
When it is time to remove the food from the blast chiller/freezer press the START
key .
Pressing for 3 seconds one of the keys the digital control
device goes in standby and the machine is ready for a new cycle.
7.5 TEMPERATURE SHOCK FREEZING
Procedure to use the temperature shock freezing function:
1. Insert the probe in the food
2. Press the TEMPERATURE SHOCK FREEZING key
3. Start the working cycle pressing the START key
4. The blast chilling cycle ends when the probe temperature goes to -18°C.
5. It automatically starts the preservation phase.
During the temperature blast freezing phase it is always possible to visualize the
probe temperature pressing the TEMPERATURE SHOCK FREEZING key .
In that way, the probe temperature will appear in green light for 5 seconds on the
display.
Moreover, it is always possible to visualize the passed time from the beginning of
the cycle pressing the TIME SHOCK FREEZING key .
In that way, on the display will appear in green lighting for 5 seconds the passed
time from the beginning of the cycle.
When it is time to remove the food from the blast chiller/freezer press the START
key .
ALEXANDER 5T - 10T - 15T
Ed.12/2011 13
Pressing for 3 seconds one of the keys the digital control
device goes in standby and the machine is ready for a new cycle.
7.6 TIME SHOCK FREEZING
Procedure to use the time shock freezing function:
1. Insert the probe in the food
2. Press the TIME SHOCK FREEZING key
3. Set the desired working time with the increase and decrease
keys and confirm with the TIME SHOCK FREEZING key .
4. Start the working cycle pressing the START key
5. The shock freezing cycle ends when the set time as during of chilling phase
has passed.
6. Now it automatically starts the preservation phase.
During the time blast-chilling phase it is always possible to visualize the probe
temperature pressing the TEMPERATURE SHOCK FREEZING key
In that way, on the display will appear for 5 seconds the probe temperature in
green light.
Moreover, it is always possible to visualize the passed time from the beginning of
the cycle pressing the TIME SHOCK FREEZING key .
In that way, on the display it will appear for 5 seconds the passed time from the
beginning of the cycle in green light.
When it is time to remove the food from the blast chiller/freezer press the START
key .
Pressing for 3 seconds one of the keys the digital control
device goes in standby and the machine is ready for a new cycle.

ALEXANDER 5T - 10T - 15T
Ed.12/2011 14
8. USE ADVICES
N.B. ATTENTION: THE BLAST CHILLER/FREEZER MUST NOT BE USED
AS A NORMAL REFRIGERATING APPLIANCE.
N.B. DO NOT INSERT FOOD WITH HIGHER TEMPERATURE THAN 70°C:
THE ELECTRICAL CONTROL DEVICE WILL INDICATE AN ERROR.
It is advisable, to have the best performances from the appliance, to chill the
chamber making a whole working cycle (chilling or freezing) at least until the
achieving of the preservation temperature, before putting inside the product.
Moreover, to avoid damages to the appliance:
•Do not leave the hot product inside the appliance without starting a cycle.
•Start immediately the suitable working cycle only just after having put inside
the product to treat.
•Avoid covering the inside holders (also with isolating films): the best
performances and times are with the maximum quantity of exposed surface.
•Do not overload the appliance:
5T chilling 16 kg – freezing 12 kg;
10T chilling 38 kg – freezing 25 kg;
15T chilling 60 kg – freezing 45 kg;
•In order to allow a better air circulation, leave a sufficient space between the
inserted holders.
•Place the inserted holder on the supplied grates and not directly on the
bottom part.
N.B. REMEMBER PERIODICALLY TO CHECK THE DEFROSTING WATER
PAN PUT ON THE BOTTOM OF THE APPLIANCE, AND TO EMPTY IT.
8.1 FEAURES OF THE PRODUCT TO TREAT
Considering that the referring timings of the cycles start from +70°C
(chilling cycle from +70°C to +3°C; freezing cycle from +70°C to -18°C :
•Do not leave the food for long time in ambient temperature: the higher is the
humidity lost from the product, the lower will be the preserved softness.
•Insert the product at a higher temperature than +70°C.

ALEXANDER 5T - 10T - 15T
Ed.12/2011 15
N.B. PULL OUT THE PROBE FROM THE TREATED FOOD TAKING IT UP
BY THE RIGID PART OF IT AND NOT PULLING IT BY THE CABLE. THE
WRONG ACTION CAN CAUSE ITS BREAKING, AND ITS SUBSTITUTION
WILL NOT BE DONE UNDER WARRANTY.
9. ROUTINE MAINTENANCE
In order to make ad adequate maintenance of the appliance, the user, the
maintenance man or the non-specialized staff must firstly keep in mind the
elementary safety rules quoted on paragraph n. 1 GENERAL INFORMATION.
Then, it is also compulsory to not remove the safety devices and the protections
during the routine maintenance.
OTHERWISE, THE PRODUCING COMPANY DECLINES ANY
RESPONSIBILITY FOR DAMAGES OR ACCIDENTS RESULTING FROM THE
FAILURE TO COMPLY WITH THE ABOVE-STATED OBLIGATION.
Considered the previous rules, the cleaning of the cooled storage must be done
daily, in order to guarantee the best quality and the perfect sanitariness of the
treated products. Use water and non-abrasive cleansing agents. Wash and rinse
using a cloth or a sponge.
N.B. NO SHARP OR ABRASIVE INSTRUMENTS, NO SOLVENTS OR
DILUENTS
For a better air circulation, keep clean also the condensing unit (part 10) removing
from its wings dust etc. To reach the condensing unit, you must pull out the plug
from the electrical socket, and unscrew the front panel (part 14) paying attention
on not putting in excessive traction the electrical connections. Use a vacuum
cleaner in order of not having a dispersion of dust. Do not scrape with sharp or
abrasive instruments.
At the end, reassemble the front panel closing the fixing screws.
The defrosting water goes inside a tank in the bottom of the blast chiller/freezer.
In case of extraordinary maintenance to the refrigerating system, it is possible to
remove the back panel, and also the lateral panel if necessary. Such operations
can be made exclusively by refrigerator or authorised technicians, and only after
having pull out the plug from the electrical socket.

ALEXANDER 5T - 10T - 15T
Ed.12/2011 16
10. ALARMS LIST
Here following we explain you the most frequent alarms of this appliance.
For any further information, we suggest you to read the enclosed owner’s
instructions of the digital control device EVC80S10P7XXX01
CODE PROBLEM SOLUTION
Er 1 Failure chamber probe Check connections an functioning of the
chamber probe
Er 2 Failure product probe Check connections an functioning of the
product probe
Er 3 Failure evaporator
probe (only if enabled)
Check connections an functioning of the
evaporator probe
Er 4 Failure condenser
probe (only if enabled)
Check connections an functioning of the
condenser probe
AL 1 Open door alarm Close the door
AL 2 High pressure alarm Remove the alarm cause, turn off and
switch on the appliance
AL 3
High temperature
condensing alarm (only
if enabled)
Wait the condenser drop in temperature
AL 4 Not inserted pin Check the pin insertion
ALEXANDER 5T - 10T - 15T
Ed.12/2011 17
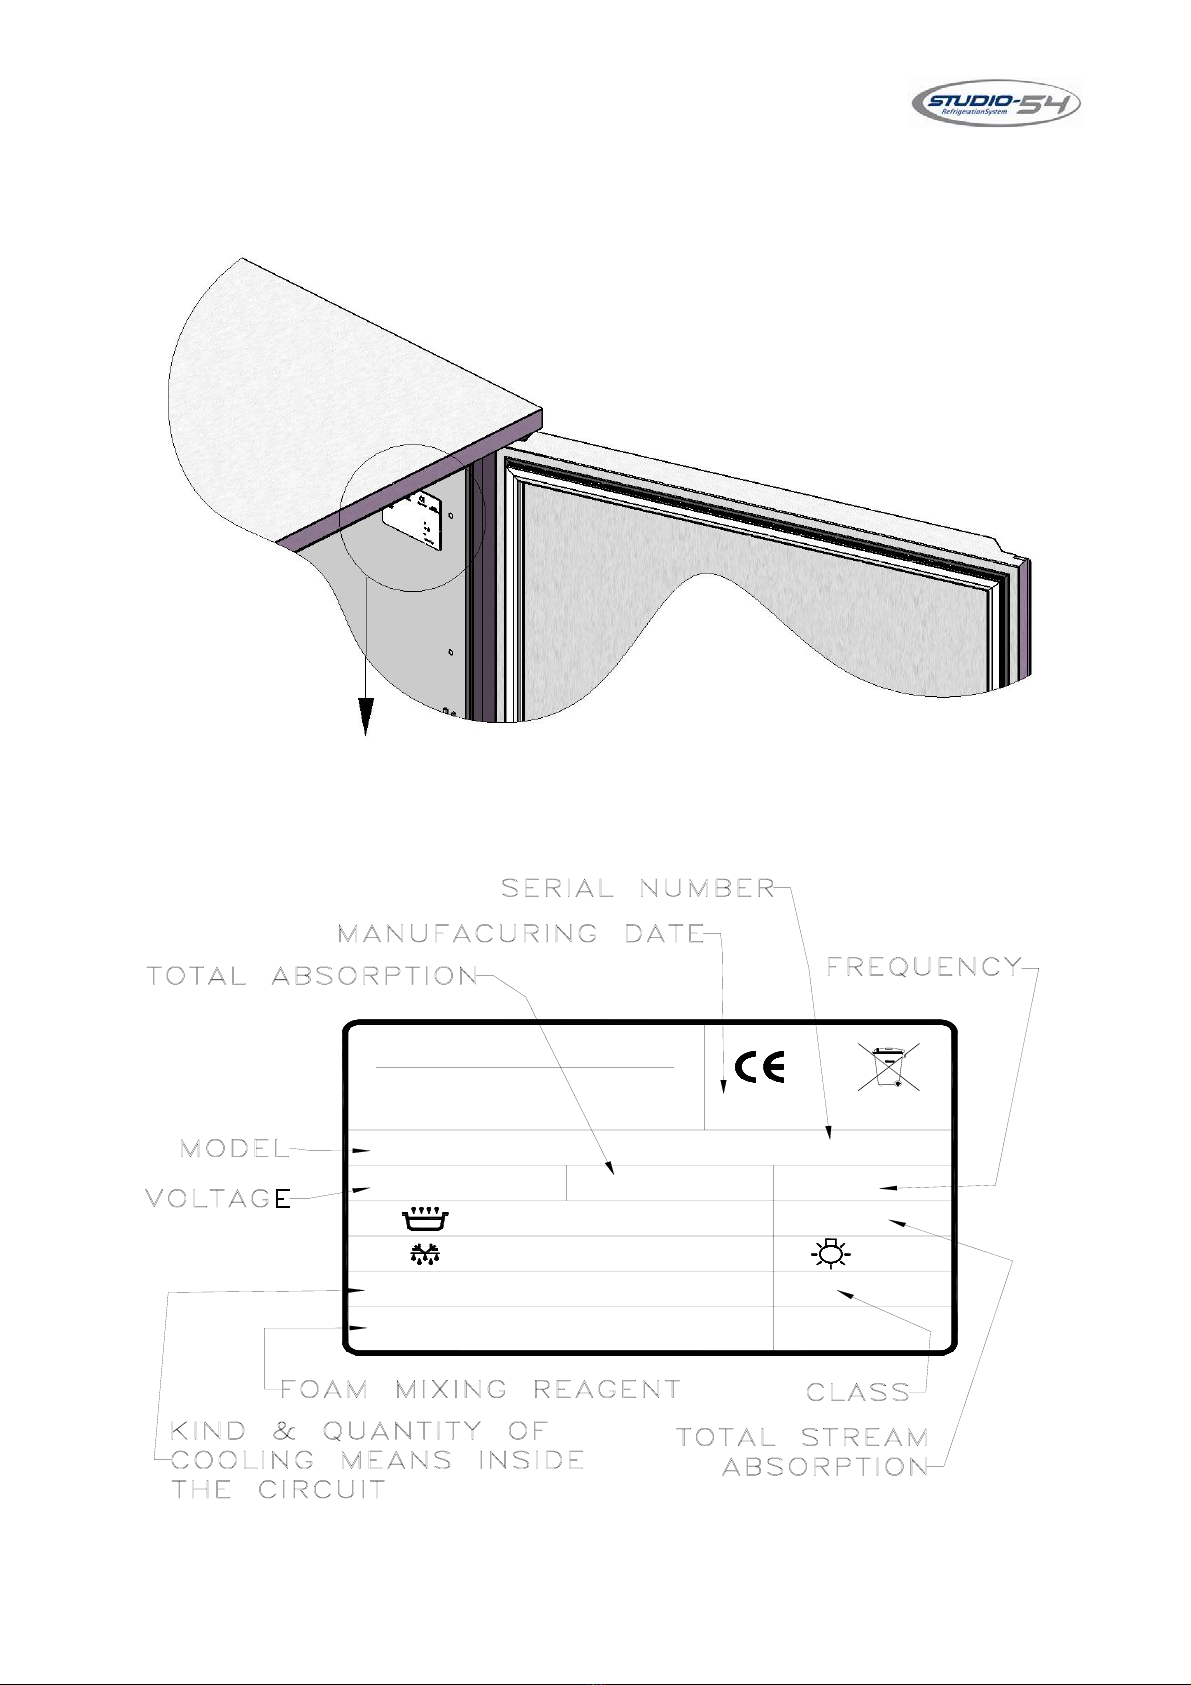
CE PLATE
STUDIO 54 S.r.l
Via Gian Lorenzo Bernini 147
35010 S.Giorgio in Bosco (PD) Italy
Tel. 049-9450466 Fax 049-9451044
01/01/2000 IT08020000000717
MOD. ALEXANDER 10 T
V 400/3N
made in Italy
W /
Nr. 00000001
W 2140 H z 50
A 3,08
Cl. 4
Gas (1) R404A
Gas (2) HSC365/227
Kg (1) 1,900
W /
W /
ALEXANDER 5T - 10T - 15T
Ed.12/2011 18
ALEXANDER 5T
ALEXANDER 5T - 10T - 15T
Ed.12/2011 19
11. ALEXANDER 5T EXPLODED VIEW
ALEXANDER 5T - 10T - 15T
Ed.12/2011 20
12. SPARE PARTS ALEXANDER 5T LIST
Articolo
num.
NUMERO
PARTE Descrizione Quantità
1 63600370 INSULATED BODY 1
2 63600363 INSULATED DOOR 1
3 64691084 MAGNETIC GASKET 1
4 62500260 SUPERIOR DOOR HINGE 1
5 64700132 BEARING IN PVC 1
6 62500130 INFERIOR DOOR HINGE 1
7 64700128 LOWER TWISTING HINGR 1
8.1 64740150 RELAY 1
8.2 64740178 TEMPERATURE CONTROL DEVICE 1
8.3 64740033 TERMINAL BOX 5 1
9.1 64850320 COMPRESSOR T2180GK 1
9.2 64840105 CONDENSER 1
9.3 64840112 CONDENSER FAN MOTOR 1
9.4 64850323 TANK 1,6 Lt. 1
10 62454024 BACK COVER STEEL 1
11.A 63600245 WORKING TOP 1
11.B 63600253 WORKING TOP WITH SPLASHBACK 1
13 64700112 TRAY HOLDER FRAME 2
14 64700066 FEET H=70 4
15 64700091 GRATE 530x325 1
15 64700092 GRATE 600x400 1
16 64740160 PIN PROBE 1
17 64860166 EVAPORATOR 1
18 64740105 DEFROSTING WATER TANK 1
19 62454054 ELECTRICAL SWITCH PANEL 1
20 62454038 SUPPORT STEEL EVAPORATOR FAN 1
21 64740096 DOOR MICRO-SWITCH 1
22 64740098 DOOR MICRO-SWITCH 1
23 64840101 EVAPORATOR FAN 1
24 62454066 BOTTOM 1
25 64700213 DISCHARGE Ø20x75 1
26 64700159 DISCHARGE Ø20 1
27 64740165 PTC PROBE 2
28 64904053 INSERT M4 L=13mm 8
This manual suits for next models
2
Table of contents
Popular Freezer manuals by other brands


Electrolux
Electrolux ENS6TE19S user manual

Arctiko
Arctiko ULUF P390 Original operating instructions

BOMANN
BOMANN KB 9486 CB instruction manual

K2 Scientific
K2 Scientific K23ULT manual

Linea 2000
Linea 2000 DOMO DO920DV Instruction booklet

Beko
Beko COOL74FDS Installation, operation & food storage instructions


