Studio Italia Design LASER AP7 User manual

Italiano
Garanzie
La Studio Italia Design garantisce i suoi prodotti essere privi da difetti di materiale e di lavorazione per la durata di un anno dalla consegna. Durante tale periodo la Studio Italia Design riparerà o sostituirà, a sua
discrezione, i prodotti che hanno dato prova di difetto.Questa garanzia non è applicata a danni risultanti dall’incidente , alterazione, manomissione, abuso e negligenza.
Questa garanzia non è applicata alle lampadine, che non sono prodotti fatti dalla Studio Italia Design e fornite dalla Studio Italia Design solo come una comodità.
Le operazioni indicate devono essere eseguite da personale qualificato.
Conservare le istruzioni per una manutenzione futura.
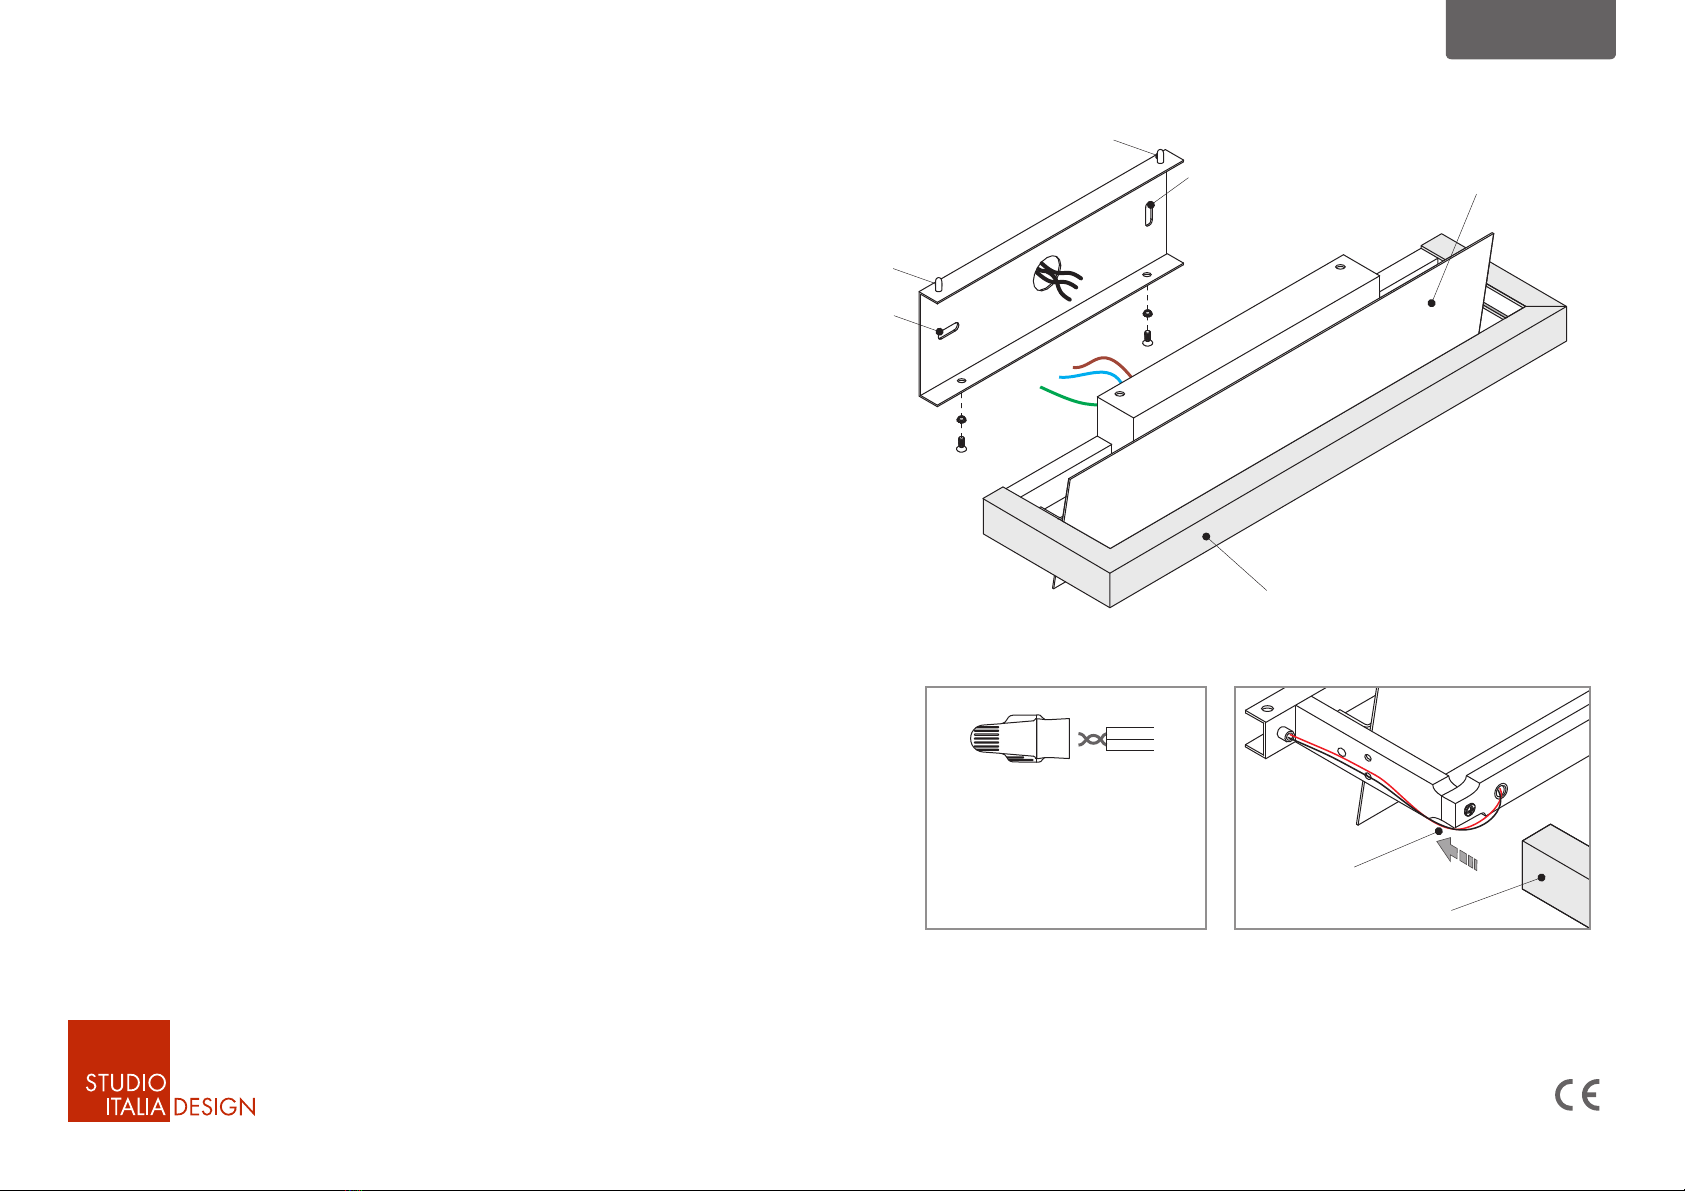
ISTRUZIONI DI MONTAGGIO
Disinserire la tensione prima di operare sull’apparecchio.
LED 2800K - 12W 220-240V 50/60 Hz
1) Impugnare la lampada dai lati. Fare attenzione a non toccare i LED
(Fig.1)
2) Svitare le due viti [E] nella parte inferiore dell'apparecchio.
3) Rimuovere la staffa a muro [A] dalla struttura [C] sganciandola dai
perni [F].
4) Fissare la staffa alla parete attraverso i fori asolati [G].
5) Eseguire il collegamento elettrico ai morsetti [B]
6) Riposizionare la struttura [C] sulla staffa [A] inserendo i perni [F],
quindi fissarla con le viti e le rondelle [E].
7) In caso di rimozione accidentale della cover [D] riposizionarla sulla
struttura [C] facendola scorrere sulle due braccia laterali;
Si noti che la posizione del riflettore [H] può essere regolata per
dirigere la luce verso l'alto o verso il basso.
fare
attenzione che i cavi elettrici [L] non si danneggino durante questa
operazione (vedi Fig.2)
LASER AP7 28.09.12_00
Fig.2
G
A
C
D
H
D
L
B
E
E
F
F
G
Fig.1

MOUNTING INSTRUCTIONS
Before installing turn off the power to the electrical box.
English
Studio Italia Design warrants its to be free from defects in materials and workmanship for a period of one year date of delivery. During this warranty period Studio Italia Design will repair or replace, at its option, product
that are proven to be defective. This warranty does not apply to damages resulting from accidental, alteration, tampering, misuse, negligence or abuse.
This warranty does not apply to light bulbs, which are not products manufactured by Studio Italia Design and supplied by Studio Italia Design only as an accomodation.
Warranty
To be installed by a qualified licensed electrician only
Keep these instructions for future reference.
1) Handle the fixture by its sides. Pay attention not to touch the LEDs (Fig.1)
2) Undo the two screws [E] at the bottom of the fixture.
3) Remove the wall bracket [A] from the structure [C] sliding the pins [F] out.
4) Secure the bracket to the wall through the slots [G] using appropriate
fasteners.
5) Make the electric connection to the terminals [B] (see detail in Fig.3)
6) Place the structure [C] back on the bracket [A] sliding the pins [F] in and
secure it with the screws and washers [E].
7) In case of inadvertently removing the cover [D] push it back on the structure
[C] sliding it over the two sides; pay attention not to damage the underneath
wires [L] in the process (see Fig.2)
Please note that the position of the reflector [H] can be adjusted to direct the
light upwards or downwards as preferred.
LED 2800K - 12W 220-240V 50/60 Hz
LASER AP7 28.09.12_00
Fig.2
G
A
C
D
H
D
L
B
E
E
F
F
G
Fig.1
USA
Studio Italia Design warrants its to be free from defects in materials and workmanship for a period of one year date of delivery. During this warranty period Studio Italia Design will repair or replace, at its option, product
that are proven to be defective. This warranty does not apply to damages resulting from accidental, alteration, tampering, misuse, negligence or abuse.
This warranty does not apply to light bulbs, which are not products manufactured by Studio Italia Design and supplied by Studio Italia Design only as an accomodation.
Warranty
To be installed by a qualified licensed electrician only
Keep these instructions for future reference.
WARNING: Transformer NOT INCLUDED.
Make sure to install a transformer with an output that exceeds the sum of
the wattages of all the fixtures it has to feed.
1) Handle the fixture by its sides. Pay attention not to touch the LEDs (Fig.1)
2) Undo the two screws [E] at the bottom of the fixture.
3) Remove the wall bracket [A] from the structure [C] sliding the pins [F] out.
4) Secure the bracket to the wall through the slots [G] using appropriate
fasteners.
5) Install the transformer and make the electric connection to the terminals [B]
(see detail in Fig.3)
6) Place the structure [C] back on the bracket [A] sliding the pins [F] in and
secure it with the screws and washers [E].
7) In case of inadvertently removing the cover [D] push it back on the structure
[C] sliding it over the two sides; pay attention not to damage the underneath
wires [L] in the process (see Fig.2)
Please note that the position of the reflector [H] can be adjusted to direct the
light upwards or downwards as preferred.
LED 2800K - 12W 12V - for USA
Strip wire insulation. Firmly grasp wires,
making sure insulation ends are even
and tightly bundled. (Wires may be
twisted or untwisted.) Lead stranded
wires slightly. Slip the connector over
wire tips. Turn connector onto wires in
clockwise direction until secure.
for USA
Fig.3
MOUNTING INSTRUCTIONS
Before installing turn off the power to the electrical box.
B
LASER AP7 28.09.12_00
Fig.2
G
A
C
D
H
D
L
B
E
E
F
F
G
Fig.1
Popular Lighting Equipment manuals by other brands

Platinum
Platinum PT-CFLS8621 quick start guide

Robus
Robus RVR1840-01 instruction manual

JB Systems
JB Systems ACCU MINI-PAR 12TC MK2 Operation manual

Tronix
Tronix 571-079 quick start guide

Denali
Denali D3 quick start guide

TIME LED
TIME LED Guardian 5W Emergency Bulkhead Installation and operating instructions

SIGNIFY
SIGNIFY GARDCO GL18 installation instructions

Blizzard Lighting
Blizzard Lighting Puck Pro Zoom EXA user guide

GAME OF BRICKS
GAME OF BRICKS Great Pyramid of Giza 21058 instruction manual

Chauvet
Chauvet LED Pinspot 2 user manual

LIGMAN
LIGMAN Harrier 2 installation manual

ACME
ACME Uploader II user manual


